Display Contacts on Sales Orders
Control how Order Management displays contacts on sales orders.
Set Default Value for Contact on Order Header
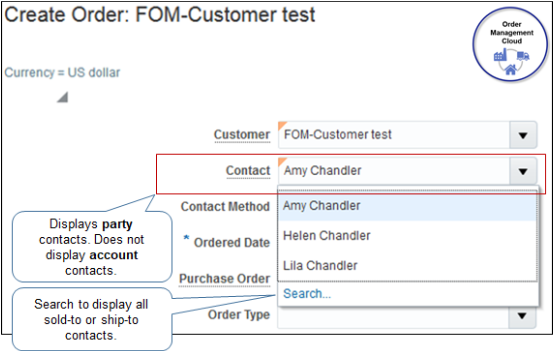
The Order Entry Specialist can select a contact from the sold-to customer or the ship-to site in attribute Contact on the order header, by default.
-
If the Order Entry Specialist clicks Search, then the Contact attribute displays all contacts that reference a sold-to or ship-to contact.
-
Note that Contact on the order header displays party contacts. It doesn't display account contacts.
-
If you set the primary contact on the account site, then Order Management populates the Contact attribute on the order header to this primary when the user sets the Customer attribute on the order header.
- For details about how to set the default value for the ship-to contact, see Display Ship-to Addresses On Sales Orders.
Remove Duplicate Contacts
You might see the same contact more than one time in the list of values that displays when you click the down arrow in the Contact attribute on the order header in the Order Management work area. To remove the duplicate, set the end date for the duplicate contact at the party level. Don't delete it at the site level because this list of values doesn't get its values from the site.
Assume you create a sales order for Computer Service and Rentals, and you see the Diane Cho contact two times in the Contact list of values.
-
Go to the Organizations work area.
The Organizations work area is part of the Customer Data Management offering. For details about the license and user you need, see Display Party Details on Sales Orders. If you don't have the license, then skip this part of the procedure and use REST API to set the end date for the contact.
For details and examples, go to REST API for Oracle Supply Chain Management Cloud, expand Order Management, then click Sales Orders for Order Hub.
-
On the Organizations page, search for the value.
Attribute
Value
Name
Computer Service and Rentals
-
In the search results, in the Name column, click Computer Service and Rentals.
-
On the Edit Organization page, click Relationships.
-
In the Relationships area, click View > Columns, then add a check mark to To Date.
-
Look for Diane Cho in the Related Name column. There are probably two rows that have Diane Cho. Set the To Date in one of the rows to yesterday's date, then click Save and Close.
-
Collect data for the Organizations entity.
For details, see Collect Planning Data for Order Management.
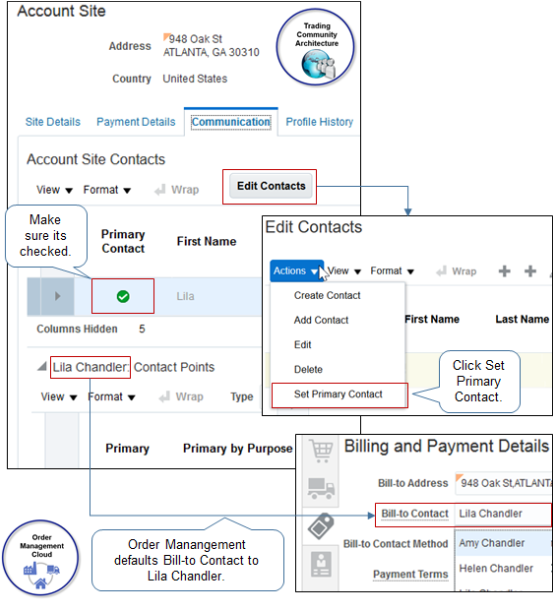
Set Primary Contact on Account Site
-
On the Manage Customers page, search for the party you must modify.
-
In the Sites area, click the Site Number for an account site.
-
On the Edit Site page, click Communication.
-
In the Account Site Contacts area, click Edit Contacts.
-
On the Edit Contacts page, click Actions > Set Primary Contact.
-
Click Save and Close.
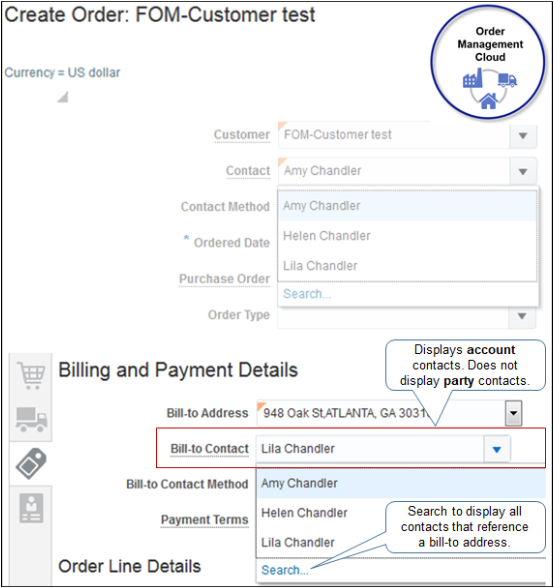
Set Default Value for Contact in Billing and Payment Details
If you specify the primary account during set up, then Order Management populates the Contact attribute in the Billing and Payment Details area to the primary contact for this account when you set Customer on the order header.
If you click Search, then the drop down for Contact displays each contact that references a bill-to address.
Note that Contact in the Billing and Payment Details area displays account contacts. It doesn't display party contacts.