Use Descriptive Flexfields to Integrate Order Management with Other Oracle Applications
Use a descriptive flexfield to integrate Order Management with Oracle Receivables, Shipping, Receiving, or Procurement.
This example describes how to integrate Order Management with Oracle Receivables. Integration with Shipping, Receiving, or Procurement is similar.
In this example, you use a descriptive flexfield named Invoice Lines to integrate Order Management with Oracle Receivables.
Summary of the Setup
-
Get values that identify the descriptive flexfield.
-
Modify the service mapping.
This topic uses example values. You might need different values, depending on your business requirements.
Get Values That Identify the Descriptive Flexfield
-
Enable the Invoice option in the Enable Custom Payloads for Downstream Integration feature.
For details, see Get Started with Integrating Order Management with Other Oracle Applications.
Use a spreadsheet editor, such as Microsoft Excel, to create a spreadsheet that contains columns and values.
Attribute
Source
Value
Namespace
targetNamespace attribute from the XSD file.
-
XsitypecomplexType attribute from the XSD file.
-
Context Code
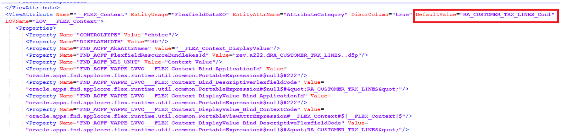
DefaultValue property of the FLEX_Context view attribute from the XML file.
-
SegmentnameName of the view attribute from the XML file.
-
The Source column describes the source you will use to get the value you will enter in the Value column. Leave the Value column empty for now. You will add values to it during this procedure.
-
Go to the Setup and Maintenance work area, then go to the task.
-
Offering: Financials
-
Functional Area: Receivables
-
Task: Manage Receivables Descriptive Flexfields
The task name is different for other Oracle Applications. For example, if you're integrating with Purchasing, then go to the Manage Purchasing Descriptive Flexfields task instead.
-
-
On the Manage Receivables Descriptive Flexfields page, search for the value.
Attribute
Value
Name
Invoice Lines
-
In the search results, click the row that contains the value.
Attribute
Value
Name
Invoice Lines
-
Download the archive and open it for editing.
-
Click Actions > Download Flexfield Archive.
-
In the Confirmation dialog, wait for the archive to finish, click Download, then save the file to your local computer.
The name of this file will include the value of the Flexfield Code attribute. For this example, the file name is 222_RA_CUSTOMER_TRX_LINES.zip.
-
Use Windows Explorer to navigate to 222_RA_CUSTOMER_TRX_LINES.zip.
-
Expand
C:\Users\user_name\Downloads\222_RA_CUSTOMER_TRX_LINES.zip\oracle\apps\flex\financials\receivables\transactions\autoInvoices\TransactionLineDff\view. -
Use an editor, such as Notepad++ or an XML editor, to open one of the files.
If the Flexfield That You Define in Receivables
Then You Should Open
Includes a context.
RACUSTOMERTRXLINESCon1.xsd
This folder contains several XSD files. You open the XSD file that contains the context code you use for this example, which is RA_CUSTOMER_TRX_LINES_Con1.
Doesn't include a context and you set it up it globally.
TransactionLineFLEX.xsd
Note the values of targetNamespace and complexType.
If you don't set up a context, then the DefaultValue attribute is empty, and _FLEX_Context is empty in the Sources tab of the service mapping.
If you set up the context for only one attribute in the flexfield, then you can use DefaultValue of this attribute when you specify _FLEX_Context in the VO.xml file.
-
-
Copy values to your spreadsheet, then close the editor. Make sure you include the single quotation marks ( ' ) in each value.
Attribute
Value
targetNamespace
'http://xmlns.oracle.com/apps/financials/receivables/transactions/shared/model/flex/TransactionLineDff/'
complexType
If you.
-
Set up a context, then use 'RACUSTOMERTRXLINESCon1'
-
Didn't set up a context, then use 'TransactionLineFLEX'
For example, the RACUSTOMERTRXLINESCon1.xsd file contains the attributes on lines 2 and 4.

-
-
In Windows Explorer, expand View, then use an XML editor to open the file that includes the public view object with the context you need.
For this example, open TransactionLineFLEXRA_5FCUSTOMER_5FTRX_5FLINES_5FCon1VO.xml.
-
Copy the DefaultValue property of the FLEX_Context view attribute to your spreadsheet.
In this example, the default value is RA_CUSTOMER_TRX_LINES_Con1.
-
Identify the name of the view attribute you must map, then copy it to your spreadsheet.
In this example, search the XML file for a view attribute that contains RACUSTOMERTRXLINESSSeq1.

-
Manage the context.
-
On the Edit Descriptive Flexfield page, click Manage Contexts.
-
On the Manage Contexts page, search for the value.
Attribute
Value
Context Code
'RA_CUSTOMER_TRX_LINES_Con1'
-
In the search results, click Actions > Edit.
-
On the Edit Context page, copy the value to your spreadsheet.
Attribute
Value
API Name
RACUSTOMERTRXLINESCon1
-
Cancel pages until you're back on the Setup and Maintenance page.
-
-
Verify that your spreadsheet contains the values.
Attribute
Source
Value
Namespace
The targetNamespace attribute from the XSD file.
'http://xmlns.oracle.com/apps/financials/receivables/transactions/shared/model/flex/TransactionLineDff/'
XsitypeThe complexType attribute from the XSD file.
'RACUSTOMERTRXLINESCon1'
Context Code
The DefaultValue property of the FLEX_Context view attribute from the XML file.
'RA_CUSTOMER_TRX_LINES_Con1'
SegmentnameThe name of the View attribute from the XML file.
RACUSTOMERTRXLINESSSeg1
You must enclose each string value with single quotation marks.
Modify the Service Mapping
You will modify a service mapping that implements the service data object.
Here's the service data object.
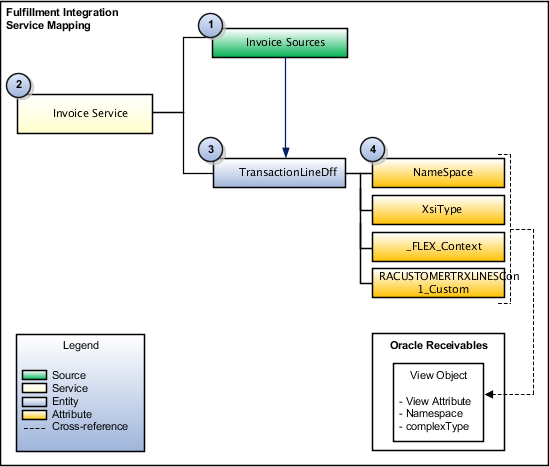
This SDO (service data object) includes objects.
-
Source. Provides a structure so Order Management can model data in the input SDO (service data object).
In this example, you will do these steps.
-
Modify the InvoiceSources source on the predefined FulfillmentIntegration service mapping. You will map this source to the TransactionLineDff entity. This entity comes predefined with attributes NameSpace, XsiType, and _FLEX_Context.
-
Add the RACUSTOMERTRXLINESCon1_Custom attribute. The FulfillmentIntegration context comes predefined with the descriptive flexfields and global descriptive flexfields that Order Management supports.
-
-
Service. Requests the service mapping and receives the output SDO. In this example, the InvoiceService service references the entities and attributes that the integration algorithm uses to get the value of the descriptive flexfield.
-
Entity. The entity that the service mapping requires to structure the output SDO. In this example, you modify the TransactionLineDff entity so it references the descriptive flexfield.
-
Attributes. The attributes that the service mapping requires to structure the output SDO. You will set up these attributes so they reference objects and properties in Oracle Receivables.
For details about the service data object, see How Service Mappings, Pricing Algorithms, and Matrixes Work Together.
Modify the service mapping.
-
Make sure you have the privileges that you need to administer Order Management.
Use these privileges so you can access the integration algorithm and service mappings that you use in the Pricing Administration work area to set up the integration.
-
Create a sand box. For details, see Create a Sandbox So You Can Edit Service Mappings.
-
Go to the Pricing Administration work area.
-
Click Tasks, then, under Order Management Configuration, click Manage Service Mappings.
-
On the Manage Service Mappings page, in the Name column, click FulfillmentIntegration.
-
On the Edit Service Mappings page, on the Entities tab, click the row that contains the value.
Attribute
Value
Entity
TransactionLineDff
-
Click Sources.
-
In the InvoiceSources Details area, on the Entity Mappings tab, click the row that contains the value.
Attribute
Value
Entity
TransactionLineDff
Include only the attributes that you want. For example, the integration uses the POLineNumber attribute to populate the ATTRIBUTE_CATEGORY column of the RA_INTERFACE_LINE_ALL table. If you don't want any values in ATTRIBUTE_CATEGORY, then make sure the Entity Mappings tab doesn't contain the POLineNumber attribute.
-
On the Attribute Mappings tab, add expressions, then click Save.
Attribute
Expression
NameSpace
"http://xmlns.oracle.com/apps/financials/receivables/publicFlex/TransactionLineDff/"
XsiType
"RACUSTOMERTRXLINESCon1"
RACUSTOMERTRXLINESCon1_Custom
Leave empty.
Copy values from your spreadsheet into the expression. You must use one set of double quotation marks ( " ) to enclose each string that you define in the expression.
-
Click Services, then click the row that contains the value.
Attribute
Value
Entity
TransactionLineDff
-
In the TransactionLineDff Entities area, add a row for each entity.
-
_FLEX_Context
-
XsiType
-
NameSpace
-
RACUSTOMERTRXLINESCon1_Custom
Note
-
Make sure the Read attribute and the Write attribute each contain a check mark in each row.
-
You must add a value in the Alias attribute in each row, and the alias must begins with an upper case character, such as A. Don't begin the alias with a lower case character, such as a.
-
-
Click Save and Close.