Add Branches to Orchestration Processes
Create a branching condition that determines whether to run a branch on an orchestration process.
An orchestration process branch is a path in an orchestration process that the process runs when the flow meets a condition.
Assume you sell commercial computer systems, and you need a business rule.
-
If the sales order is valued at $50,000.00 or more, then make sure a representative calls the customer before sending the invoice for the order.
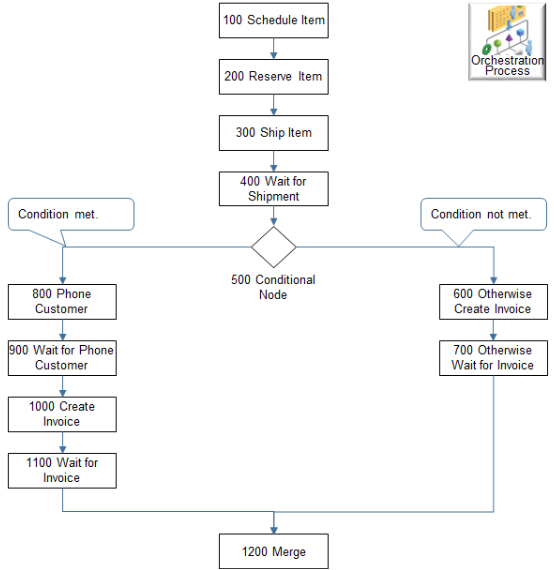
Here's the flow that you will create for this example.
Note
-
Each step in the flow includes the step number, task name, task type, and service name.
-
The Conditional Node indicates that an orchestration process is about to branch. The first step of the branch contains the condition.
-
If the flow.
-
Meets the condition. The orchestration process runs the steps on the branch that notifies the representative.
-
Doesn't meet the condition. The orchestration process runs the steps on the branch that don't notify the representative.
-
-
Order Management adds an empty default branch when it runs the orchestration process. If the orchestration process includes only one branch, then it isn't necessary to set an Otherwise condition.
This example uses a rule that processes only one fulfillment line. You use an advanced rule to write a rule for an orchestration process that processes more than one fulfillment line. For details, see Overview of Using Business Rules With Order Management.
Summary of the Set Up
-
Route the notification to the representative.
-
Create the orchestration process.
-
Add the orchestration process steps.
-
Create the If statement.
-
Create the Then statement.
-
Test your set up.
This topic uses example values. You might need different values, depending on your business requirements.
Route the Notification to the Representative
This example sends a notification to a representative to call the customer if the invoice is valued at $50,000.00 or more. You create the routing that enables the notification. This setup is specific to this example. Other branching usages might not require this setup, or they might require some other setup.
-
Create the routing rules that enable the send. For details, see Manage Routing Rules.
-
Create the connector that you referenced in the routing rules in step 1.
-
Use the Manage Web Service Details page to create the connector.
Create the Orchestration Process
Use these values in the header of the orchestration process when you create the process.
|
Attribute |
Value |
|---|---|
|
Process Name |
CallCustomerWhenLargeInvoice |
|
Process Display Name |
Call the Customer |
|
Process Class |
Ship Order Class |
|
Set |
Common Set |
For details, see Guidelines for Setting Up Orchestration Processes.
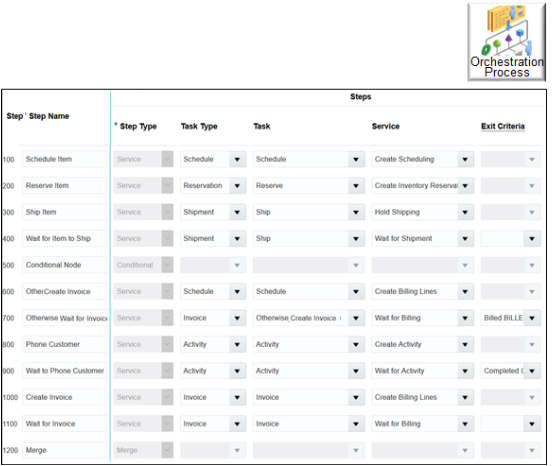
Add the Orchestration Process Steps
You will add these steps.
-
Add a step.
Attribute
Value
Step Name
Schedule Item
Step Type
Service
Task
Schedule
Service
Create Scheduling
-
Add another step.
Tip: To maintain the correct sequence when you add each step, click the step you most recently added, then click Add Row.Attribute
Value
Step Name
Reserve Item
Step Type
Service
Task
Reserve
Service
Create Inventory Reservation
-
Add another step.
Attribute
Value
Step Name
Ship Item
Step Type
Service
Task
Ship
Service
Create Shipping
-
Add another step.
Attribute
Value
Step Name
Wait for Item to Ship
Step Type
Service
Task
Ship
Service
Wait for Shipment
Exit Criteria
Shipped
Fulfillment Completion Step
Contains a check mark.
-
Add another step.
Attribute
Value
Step Name
Conditional Node
Step Type
Conditional
-
Add another step.
Attribute
Value
Step Name
Phone Customer
Step Type
Service
Task
Activity
Service
Create Activity
Evaluation Sequence
1
-
Add another step.
Attribute
Value
Step Name
Wait for Phone Customer
Step Type
Service
Task
Activity
Service
Wait for Activity
Exit Criteria
Completed
-
Add another step.
Attribute
Value
Step Name
Create Invoice
Step Type
Service
Task
Invoice
Service
Create Billing Lines
-
Add another step.
Attribute
Value
Step Name
Wait for Invoice
Step Type
Service
Task
Invoice
Service
Wait for Billing
Exit Criteria
Billed
-
In the Step Definition list, click the Conditional Node step, then add another step. This step creates the Otherwise branch.
Attribute
Value
Step Name
Otherwise Create Invoice
Task Type
Invoice
Task
Otherwise Create Invoice
Each task name that you use with a task type must be unique. You used the Invoice task with the Invoice task type earlier in this procedure, so you must create a new task name.
To do this, In the Task attribute, click the Search down arrow, then click Create. In the Create Task Name dialog, enter values.
-
Code: 1
-
Name: Otherwise_Create_Invoice
-
Display Name: Otherwise Create Invoice
-
Task Type: Invoice
Click Save and Close.
Service
Create Billing Lines
Evaluation Sequence
2
Otherwise
Contains a check mark.
Planning Default Branch
Contains a check mark.
-
-
In the Step Definition list, click the Otherwise Step, Create Invoice step, then add another step. This step creates the Wait for Invoice Step on the Otherwise branch.
Attribute
Value
Step Name
Otherwise Wait for Invoice
Step Type
Service
Task
Otherwise Create Invoice
Service
Wait for Billing
Exit Criteria
Billed
-
In the Step Definition list, click the Wait for Invoice step, then add another step. This step merges the branch back to the main flow.
Attribute
Value
Step Name
Merge
Step Type
Merge
Create the If Statement
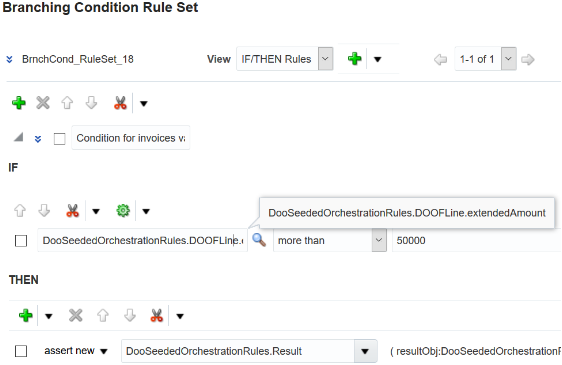
Start by creating the If statement.
-
If the extendedAmount attribute on the fulfillment line is more than 50000
Do it.
-
In the Step Definition list, in the Phone Customer step, in the Branching Condition column, click Click for Rule.
-
In the Branching Condition Rules dialog, click Add Rule, then click Expand.
-
Delete the value
Rule 1, and then enterCondition for invoices valued at more than 50000 dollars. -
Click Left Value.
-
In the Condition Browser dialog, expand DooSeededOrchestrationRules > DOOFLine, click extendedAmount, then click OK.
where
Code
Description
DooSeededOrchestrationRulesA dictionary that includes predefined rule sets, facts, functions, variables, bucket sets, links, and functions that you can use to orchestrate fulfillment.
DOOMeans distributed order orchestration, which is an earlier name for order orchestration.
FLineFulfillment line.
extendedAmountA fulfillment line attribute that stores the total value of the sales order.
-
Click Is, and then click More Than.
-
Click Right Value.
-
In the Condition Browser dialog, enter
50000, then click OK. Don't include commas in your value.
Create the Then Statement
You will create the Then statement.
-
( resultObj:DooSeededOrchestrationRules.Boolean.TRUE
)
where
|
Code |
Description |
|---|---|
|
|
A variable in the DooSeededOrchestrationRules dictionary. You use it to store the result of the business rule. |
|
|
Sets the value of resultObj to TRUE. |
Do it.
-
In the Then area, click Add Action > Assert New.
-
Click Select a Target, then click DooSeededOrchestrationRules.Result.
-
Click Edit Properties.
-
In the Properties dialog, in the ResultObj row, click Value.
-
In the Condition Browser dialog, expand DooSeededOrchestrationRules > Boolean, click True, then click OK.
-
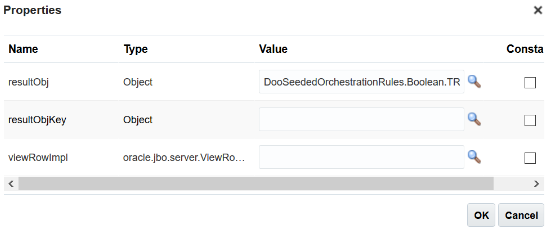
Make sure the Properties dialog contains these values.
Name
Type
Value
resultObj
Object
DooSeededOrchestrationRules.Boolean.TRUE
resultObjKey
Object
Leave this cell empty.
viewRowImpl
oracle.jbo.server.viewRowImpl
Leave this cell empty.
For example:
-
Click OK.
-
In the Branching Condition Rules dialog, click Save.
-
On the Edit Orchestration Process Definition page, click Save.
Test Your Set Up
-
Verify that you correctly defined the orchestration process steps and flow.
-
In the header of the Edit Orchestration Process Definition page, click Actions, then click Generate Process Diagram.
-
Make sure the diagram includes the same steps and logic that the diagram at the beginning of this topic displays.
-
-
Test the nonbranching flow.
-
In the Order Management work area, create a sales order that's valued at less than $50,000.00.
-
Verify that Order Management ships the item without requesting that you call the customer.
-
-
Test the branching flow.
-
Create a sales order that's valued at more than $50,000.00.
-
Verify that Order Management doesn't ship the item until the activity that the Wait for Phone Customer step references reaches a Completed state.
-