Use Holds to Stop Orchestration Processes
Set up a hold code so you can place a hold on a sales order.
The hold stops the service that the orchestration process references.
You can set up a hold code only for a hold that starts in Order Management. You can't use it for a hold that starts in some other application.
Summary of the Set Up
-
Create a hold code.
-
Specify job roles that manage holds.
-
Create a release reason.
-
Test your set up.
Assume you're an order administrator for Vision Corporation, and your sales engineers have informed you that a problem might exist with an item. You must create a hold code that your users can use to temporarily hold all sales orders that reference the item while your sales engineers investigate the problem.
This topic uses example values. You might need different values, depending on your business requirements.
This topic uses predefined job roles. You must create your own job roles, depending on your security requirements. For details, see Privileges That You Need to Implement Order Management.
Create a Hold Code
-
Go to the Setup and Maintenance work area, then go to the task:
-
Offering: Order Management
-
Functional Area: Orders
-
Task: Manage Hold Codes
-
-
On the Manage Hold Definitions page, click Actions > Add Row, then set the values.
Attribute
Value
Code
hold_item_issue
You must not enter a comma (,) or an apostrophe (‘).
Name
Hold to Investigate Item
Description
This hold allows us to investigate a problem that happened with the item.
Hold All Services
Contains a check mark.
This value specifies to apply a hold on all services. Fulfillment tasks determine whether Order Management attaches a hold code to the fulfillment line, or to the sales order for one or more fulfillment tasks that the orchestration process references.
Set
COMMON
You can use the Set value to specify the business unit set that Order Management uses with a hold code. You can assign a hold code to a single business unit, or you can assign more than one hold code to sets of business units. These sets can share hold codes.
-
Optional. Specify each service where Order Management must apply the hold.
For example, do these steps to apply the hold only for the Shipment service.
-
Make sure the Hold All Services option doesn't contain a check mark.
-
In the Hold to Investigate Item: Services area, click Actions > Select and Add.
-
In the Select and Add: Services dialog, leave all attributes empty, then click Search.
-
Click a row that displays Shipment in the Task Type column.
-
For this example, you must apply the hold to all services, so click Cancel, then add a check mark to option Hold All Services.
-
-
Click Save.
Specify Job Roles That Manage Holds
As an option, you can specify who can apply or release a hold according to the job role that the user uses when signing into Order Management.
Order Management might place a sales order on hold for a variety of reasons. Your business requirements might demand that a person who possesses the correct knowledge or authority to release a hold. Controlling holds according to job role helps you improve security by limiting functionality according to role. It also helps you decrease order processing time and reduce downstream problems that might be related to a hold that nobody releases.
For example, allow role x to apply and release hold 1, and to apply hold 2 but not release hold 2.
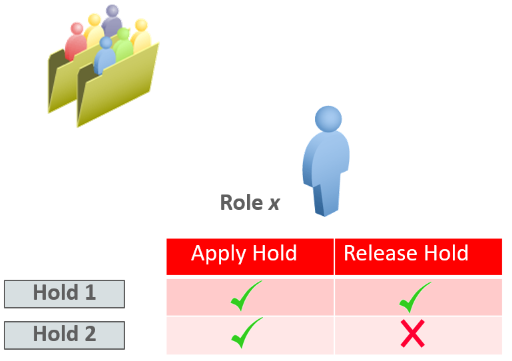
Assume you must allow the Order Manager job role to apply and release a hold, and allow the Order Entry Specialist job role to apply a hold but not release it.
Try it.
-
In the Details area, click Applicable Roles, then, in the Apply Hold area and in the Release Hold area, make sure the Selected Roles option is black.
-
Click Actions > Select and Add.
-
In the Search dialog, search for Order Manager, then click Apply > OK.
-
Click Actions > Select and Add.
-
In the Search dialog, search for Order Entry Specialist, then click Apply > OK.
-
In the Details area, set options for the roles.
Role
Apply Hold
Release Hold
Order Manager
Contains a check mark.
Contains a check mark.
Order Entry Specialist
Contains a check mark.
Doesn't contain a check mark.
-
Click Save and Close.
This topic uses predefined job roles. You must create your own job roles, depending on your security requirements.
For details about how to set up privileges, see Security Reference for Order Management.
Create Your Own Job Role
Assume users in the Vision Services department of Vision Corporation receive service calls from customers who are inquiring about the status of a sales order, such as what item the customer ordered, and expected delivery date. The user must view the sales order, but not edit it. Assume you already created a user named order_entry_specialist_vision_services to meet this requirement.
For details, see Privileges That You Need to Implement Order Management.
Create your own job role.
-
Examine privileges in the predefined job roles.
-
For this example, examine the Privileges section in the Job Role: Order Entry Specialist chapter, then notice the View Orders privilege.
-
Make sure you have the privileges that you need to administer IT security and users.
-
Create the job role.
-
Go to the Setup and Maintenance work area, then go to the task:
-
Offering: Order Management
-
Functional Area: Users and Security
-
Task: Manage Job Roles
-
-
On the Roles page, click Create Role, set the values, then click Next.
Attribute
Value
Role Name
View Orders
Role Code
view_orders
Role Category
SCM Job Roles
-
Click Add Function Security Policy.
-
In the Add Function Security Policy dialog, search for View Orders, click Add Privilege to Role, confirm the addition, then click Cancel.
-
On the Create Role View Orders: Function Security Policies page, click Next several times until you reach the Users page.
-
On the Create Role View Orders: Users page, search for, then add the order_entry_specialist_vision_services user.
The values you can search for depend on the users you created in your environment.
-
Click Next > Save and Close.
-
-
Get LDAP (Lightweight Directory Access Protocol) changes.
-
Go to the Scheduled Processes work area.
-
Run the Retrieve Latest LDAP Changes scheduled process.
-
In the Confirmation dialog, note the process number, such as 75603.
-
On the Scheduled Processes page, click Actions > Refresh. Continue to refresh until the status of your scheduled process is Succeeded.
-
-
Synchronize users and roles.
-
Go to the Setup and Maintenance work area.
-
Click Tasks > Search, search for, then open Run User and Roles Synchronization.
For details about this task, see Implementing Common Features for Oracle SCM.
-
On the page that displays, click Submit.
-
-
Use the Manage Hold Definitions page to add your new job role to the hold code.
Create a Release Reason
Create a reason that your user can choose to indicate why they released the hold.

Try it.
-
In the Setup and Maintenance work area, go to the task.
-
Offering: Order Management
-
Functional Area: Orders
-
Task: Manage Order Lookups
-
-
On the Manage Order Lookups page, enter the value, then click Search.
Attribute
Value
Lookup Type
DOO_HLD_RELEASE_REASON
-
In the DOO_HLD_RELEASE_REASON: Lookup Codes area, click Actions > New then set the values.
Attribute
Value
Lookup Code
doo_hldrel_item_ok
Display Sequence
1
Start Date
The current date.
End Date
One week from today.
Meaning
Fixed Problem with Item
Description
Fixed the problem with the item.
-
Click Save and Close.
Test Your Set Up
-
Make sure you have the privileges that you need to manage sales orders.
-
Go to the Order Management work area.
On the Overview page, click Actions > Manage Orders.
-
On the Manage Orders page, enter the value, then click Search.
Attribute
Value
Status
Equals Processing
-
In the search results, in the Order column, click a link.
-
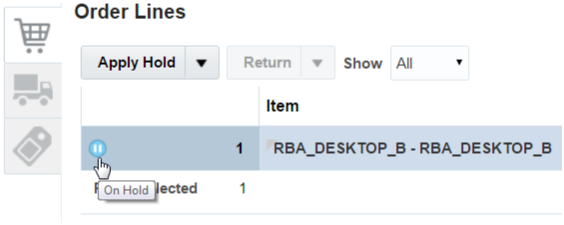
On the Order page, in the Order Lines area, click Apply Hold.
-
In the Apply Hold dialog, set the value, then click Save and Close.
Attribute
Value
Hold Name
Hold to Investigate Item
This is the name of the hold that you created earlier in this topic.
-
In the Order Lines area, to verify that Order Management placed a hold on the order line, make sure it displays the On Hold icon.
-
Click the arrow next to Apply Hold, then click Release Hold.
-
In the Release Hold dialog, set values, then click Save and Close. You defined these values earlier in this topic.
Attribute
Value
Hold Name
Hold to Investigate Item
Release Reason
Fixed the Item Problem
-
Sign out of Order Management, then sign back in with the Order Entry Specialist role.
-
Repeat the steps described above, but verify that Order Management doesn't display Release Hold when you click the arrow next to Apply Hold.