Use Integration Cloud Service with Order Management
Use Oracle Integration Cloud Service to integrate Order Management.
Summary of the Set Up
-
Manage trigger points for business events.
-
Send status updates for fulfillment lines.
-
Create a connection.
-
Monitor business events.
-
Track business events.
-
Test your set up.
Learn more about how to do this set up. For details, see Developing Integration Flows with Integration Cloud Service.
This topic includes example values. You might need different values, depending on your business requirements.
This topic uses predefined job roles. You must create your own job roles, depending on your security requirements. For details, see Privileges That You Need to Implement Order Management.
Manage Trigger Points for Business Events
-
Go to the Setup and Maintenance work area, then go to the task:
-
Offering: Order Management
-
Functional Area: Orders
-
Task: Manage Business Event Trigger Points
-
-
Set up the trigger points so Order Management uses a business event and sends a notification to each subscriber for each trigger point that you need.
For example, send a notification to each subscriber when Order Management changes the status on the sales order header to Closed.
-
On the Manage Business Event Trigger Points page, click the Order Header Status Update row, then make sure the Active option in this row contains a check mark.
-
In the Details area, in the Closed row, add a check mark to the Raise Event option.
-
Click Save.
-
Send Status Updates for Fulfillment Lines
Send an update to each subscriber when the status changes on a fulfillment line.
-
On the Manage Business Event Trigger Points page, click the Fulfillment Line Status Update row, then make sure the Active option in this row contains a check mark.
-
Click Save and Close.
-
Go to the task.
-
Offering: Order Management
-
Functional Area: Orders
-
Task: Manage Orchestration Process Definitions
-
-
On the Manage Orchestration Process Definitions page, search for the orchestration process that your deployment uses.
For example, search for OrderFulfillmentGenericProcess.
Each orchestration process controls the status value for each fulfillment line, so you must modify the orchestration process that controls the status value. In this example, you modify the orchestration process that controls the shipping status value.
-
In the search results, click the row that contains OrderFulfillmentGenericProcess, then click Actions > Edit.
-
In the Process Details area, click Status Conditions > Fulfillment Line Status Values > Edit Status Rule Set.
-
On the Edit Status Rule Set page, add a check mark to the Notify External System option for each Status Value where your deployment must send a notification.
For example, to send a notification when Order Management changes the fulfillment line status to Shipped, add a check mark to the Notify External System option in the Shipped row.
-
Repeat step 7 for other status values, as necessary.
Order Management will send a notification when each fulfillment line that this orchestration process processes reaches the status you specify in steps 7 and 8.
-
Repeat steps 4 through 8 for each orchestration process in your deployment that updates status values, as necessary.
Create a Connection
Create a connection between Integration Cloud Service and Order Management. For details about how to use Integration Cloud Service, including the URL that you use when you sign in, see Developing Integration Flows with Oracle Integration Cloud Service.
-
Create a service request so the Cloud Operations team can register the CSF-KEY (Credential Store Framework). You need the key to sign into Integration Cloud Service.
Request a separate key for each order administrator who uses Integration Cloud Service. For details, see Get CSF Keys So You Can Sign Into Integration Cloud Service.
-
Get the privileges that are in the SOA Infra Operations Duty role. SOA means Service Oriented Architecture. The Order Administrator job role comes predefined with this duty role.
-
If you get privileges from a different role, such as Order Manager, then use the Security Console to get access to the SOA Infra Operations Duty role.
-
If your connection publishes the Sales Order Notification event to Integration Cloud Service, then you must specify the login credentials of an Oracle Cloud Application user so you can access the Event Catalog URL. You must assign the privileges that are in the SOA Operator Role to this user.
-
Use privileges from the Order Manager job role so this same user can call the web services that Order Management uses. The integration must use the same login credentials to call web services at run time that you use when you set up the integration at design time. These are Oracle Cloud Application user credentials.
If you use this connection to publish a business event to Integration Cloud Service, and to call Order Management web services, then the Oracle Cloud Application user must have the privileges that are in the Order Manager job role and the SOA Infra Operations Duty role.
For details, see Privileges That You Need to Implement Order Management.
-
-
Create the connection.
-
Sign into Integration Cloud Service.
-
On the Welcome page, click Create Connections.
-
On the Connections page, click New Connections.
-
In the Create Connection Select Adapter dialog, under Oracle ERP Cloud, click Select .
-
In the Create New Connection dialog, set the values, then click Create.
Attribute
Value
Name
Enter any text that describes the connection. For example,
Connection_for_Order_Status_Update.Identifier
Enter any text that describe the connection. For example,
CONNECTION_FOR_ORDER_STATUS_UPDATE.Role
Select
Trigger and Invoke.Description
Enter any text that describe the connection. For example,
Connection for the order status update. -
On the page that displays, click Configure Connectivity.
-
In the Connection Properties dialog, set the values, then click OK.
Attribute
Value
ERP Services Catalog WSDL URL
Enter the URL that locates the WSDL. Use this format.
https://server:port/fndAppCoreServices/ServiceCatalogService?wsdlFor example:
https://my_server.com:9999/fndAppCoreServices/ServiceCatalogService?wsdlERP Events Catalog URL (optional)
Enter the URL that locates the events catalog. Use this format.
https://server:port/soa-infraFor example:
https://my_server.com:7818/soa-infraThese URLs allow Integration Cloud Service to connect to Oracle ERP so Integration Cloud Service can get details about the services and events that are available in Oracle ERP Cloud. Contact your system administrator to determine the URLs you must use.
-
-
Configure security.
-
Click Configure Security.
-
In the Credentials dialog, enter the user name and password you use to access Order Management as an administrator, then click OK.
-
At the top of the page, click Test, then wait for the indicator that displays immediately to the right of Test to change to a green color, and to display 100%.
-
Click Save > Close.
-
Create an Integration
Here's the integration you create.
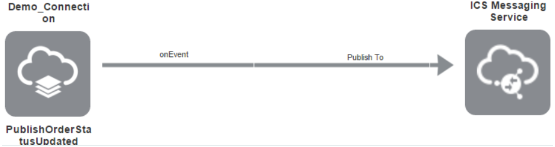
Create an integration that monitors business events.
-
On the Connections page, click Integrations.
-
On the Integrations page, click Create.
-
In the Create Integration Select dialog, under Publish to ICS, click Select.
This procedure provides only part of an example integration. In an actual integration, its more likely you will select Map My Data. To create a full, end-to-end integration, see the Integration Cloud Service documentation.
-
In the Create New Integration dialog, set the values, then click Create.
Attribute
Value
What do you want to call your integration?
Describe the connection. For example, enter
Connection_for_Order_Status_Update.Identifier
Describe the connection. For example, enter
CONNECTION_FOR_ORDER_STATUS_UPDATE.Version
Accept the value that displays.
What does your integration do?
Describe the connection. For example, enter
Integration that uses a business event to monitor updates to the order status.Which package does your integration belong to?
Leave empty.
-
On the page that displays, you will identify the source of the connection that provides the details. For this example, in the search window, enter
Connection_for_Order_Status_Update, which is the integration that you created earlier, then click ENTER.The test you did earlier for the connection you created must finish successfully. If it doesn't, then the search won't return the connection.
-
Drag and drop Connection_for_Order_Status_Update from the search results onto the Drag and Drop a Trigger area.
-
In the Configure Oracle ERP Cloud Endpoint dialog, specify the events and scenarios for the ERP Cloud connection. Set the values, then click Next.
Attribute
Value
What do you want to call your endpoint?
Describe the endpoint. For example, enter
PublishOrderStatusUpdated.What does this endpoint do?
Describe the connection. For example, enter
Publish the OrderStatusUpdated event. -
Select the With Business Events option.
Integration Cloud Service uses the URLs you set up earlier to get the event catalog, and then display it in the Business Event for Subscription list. This list helps you select from the events that are available in Oracle ERP Cloud.
-
In the Business Event for Subscription list, enter
Order, then click Sales Order Notification > Next. -
On the Configure the Response to Send to the Oracle ERP Cloud Application page, note that Integration Cloud Service only listens for events in this integration, then sends them to subscribers without replying to Order Management. So, click None > Next.
-
On the Summary page, click Done.
Track Business Events
Track business events so you can test and monitor your integration. Track at least one business event so you can monitor your deployment during normal operations.
-
On the page that displays, click Tracking.
Use Tracking to test your set up. You can view the business events that your integration uses in Integration Cloud Service's monitoring system.
-
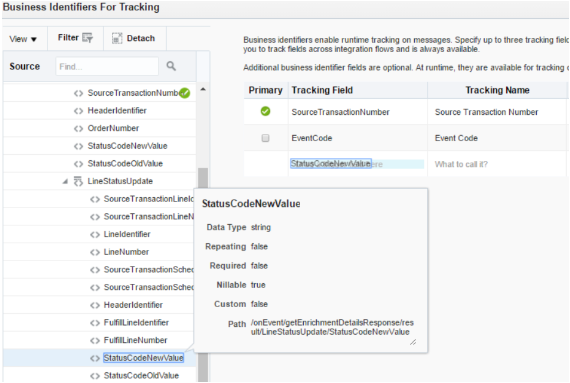
For this example, on the Business Identifiers for Tracking page, in the Source tree, under the result branch, click Load More.
Here are the business identifiers you will track.
-
Drag and drop SourceTransactionNumber from the hierarchy tree to the first row of the Tracking Field column.
-
Drag and drop Event from the hierarchy tree to the second row of the Tracking Field column.
-
In the result branch, expand LineStatusUpdate, then click Load More.
-
Drag and drop StatusCodeNewValue from the hierarchy tree to the third row of the Tracking Field column.
-
Click Done.
-
On the page that displays, click Save > Exit Integration.
-
On the Integrations page, in the Connection_for_Order_Status_Update row, click Pending Activation.
-
In the Confirmation dialog, add a check mark to the Enable Tracingoption, then click Yes.
Test Your Set Up
-
Sign into Order Management, create a sales order, add one order line, use the Shipment Details tab to set the Requested Date to a time that happens in the future, then click Submit.
-
In the Confirmation dialog, make a note of the order number that displays, such as 492634, then click OK.
The shipment step of the orchestration process runs, sets the Status to scheduled, then displays the status on the fulfillment line in the Order Lines tab. This shipment step uses the business event that you specified earlier. You must have already set up this orchestration process and finished other setup in Order Management.
-
Navigate back to Integration Cloud Service, then click Monitoring.
-
On the Integrations Dashboard, click Tracking, then click anywhere in the Messages area.
-
In the search window, enter the order number you noted earlier, such as
492634, then click ENTER. -
In the search results, notice that Order Management used more than one event for the sales order. Click the event at the top of the list, which is the most recent event.
-
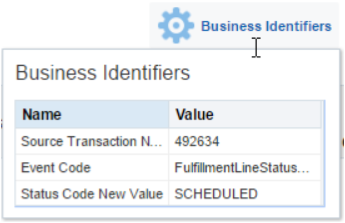
On the page that displays, click Business Identifiers, then verify that the tracking details you set up for tracking earlier displays.
Here are the details you set up in this example.
-
SourceTransactionNumber. Identifies the order number.
-
Event. Identifies the business event that gets triggered, which is FulfillmentLineStatusUpdate.
-
StatusCodeNewValue. Identifies the new status value of the fulfillment line, which is Scheduled.
For example:
-
Other Setups
Get details about other ways you can use Integration Cloud Service with Order Management.