Create Discounts That Accumulate or Cascade
Apply one or more discounts that accumulate on a single price list.
You can also apply one or more discounts that cascade. For example, on the running net price.
You apply discounts through a simple rule or through a pricing matrix according to different types of adjustments.
-
Discount Amount
-
Discount Percent
-
Markup Amount
-
Markup Percent
-
Price Override
Here are some important concepts.
-
Cascading discount. A calculation that subtracts the discount that each discount rule applies on an item. Here's what cascading discount does.
-
Subtracts discounts in alphabetic, ascending sequence according to rule name.
-
Uses Running Net Price as the basis when it applies each adjustment.
-
Reduces the value of Running Net Price each time it applies the discount for each rule.
-
Doesn't keep the basis constant for each rule. Instead, the discount cascades from rule to rule.
-
-
Cumulative discount. A calculation that subtracts the discount that each discount rule applies on an item. Here's what cumulative discount does.
-
Subtracts discounts in alphabetic, ascending sequence according to rule name.
-
Accumulates the total discount amount while it applies each rule.
-
Uses List Price as the basis when it applies each adjustment.
-
Doesn't modify the value of List Price when it applies each discount.
-
Keeps the basis constant for each rule. The discount remains the same from rule to rule.
-
-
Running net price. An object that can go up or down in value while Pricing applies discounts and does other calculations on the price of an item.
You can't create a discount that accumulates or cascades on a configured item.
Summary of the Set Up
-
Create price element and pricing basis.
-
Modify pricing algorithms.
-
Modify pricing algorithms for discounts.
-
Create discount rules.
-
Test your set up.
1. Create Price Element and Pricing Basis
Create the price element and pricing basis that you will use for the running net price.
-
Go to the Setup and Maintenance work area, then go to the task:
-
Offering: Order Management
-
Functional Area: Pricing
-
Task: Manage Price Elements
-
-
On the Manage Price Elements page, click Actions > Add Row, set values, then click Save and Close.
Attribute
Value
Element Code
ELEMENT_FOR_NET_PRICE
Element Name
Running Net Price
Type
Price
Active
Contains a check mark.
-
On the Search page, search for, then open Manage Pricing Bases.
-
On the Manage Pricing Bases page, click Actions > Create, set the values, then click Save and Close > Done > Done.
Attribute
Value
Name
Running Net Price
Usage
Adjustment Basis
Price Element
Running Net Price
Description
Pricing basis for cumulative and cascading discounts on running net price.
Active
Contains a check mark.
Create Service Mapping Attributes
You modify the Sales service mapping differently, depending on whether you use a simple discount or discount according to attribute.
-
Go to the Pricing Administration work area, then click Tasks > Manage Service Mappings.
-
On the Manage Service Mappings page, click Sales.
-
On the Edit Service Mapping page, click Services > Query by Example, enter the value, then press the Enter key on your keyboard.
Attribute
Value
Service
PriceRequestInternal
Modify Service Mapping for Simple Discount
Here are the modifications that you make in the Sales service mapping.
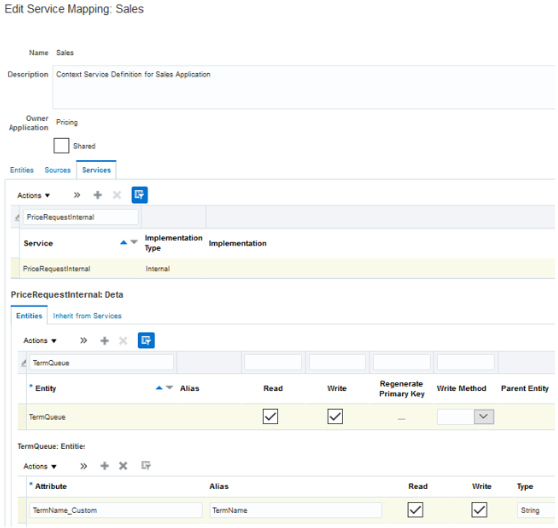
You add the TermName_Custom attribute to the TermQueue entity of the PriceRequestInternal service.
If you need to add your discount on a tier adjustment, then use the TierLineQueue entity instead of the TermQueue entity. If you need to apply a discount according to an attribute, see Add Your Own Attributes to Items in Pricing.
-
In the Details area, in the Entities tab, click the row that includes the value.
Attribute
Value
Entity
TermQueue
-
In the Details area, click Actions > Add Row, then set the values.
Attribute
Value
Entity
TermQueue
Read
Contains a check mark.
Write
Contains a check mark.
-
In the Entities area, click View > Columns > Show All, click Actions > Add Row, set the values, then click Save.
Attribute
Value
Attribute
TermName_Custom
Alias
TermName
Read
Contains a check mark.
Write
Contains a check mark.
Type
String
Modify Service Mapping for Discount According to Attribute
Here are the modifications that you make in the Sales service mapping.
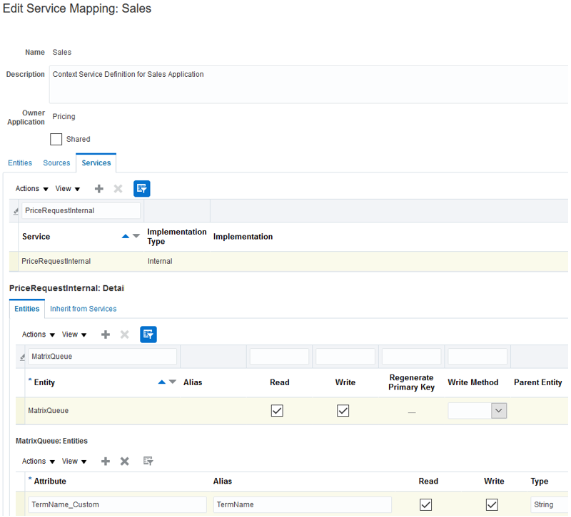
You add the TermName_Custom attribute to the MatrixQueue entity of the PriceRequestInternal service.
-
In the Details area, in the Entities tab, click the row that includes the value.
Attribute
Value
Entity
MatrixQueue
-
In the Details area, click Actions > Add Row, then set the values.
Attribute
Value
Entity
MatrixQueue
Read
Contains a check mark.
Write
Contains a check mark.
-
In the Entities area, View > Columns > Show All, click Actions > Add Row, set the values, then click Save.
Attribute
Value
Attribute
TermName_Custom
Alias
TermName
Read
Contains a check mark.
Write
Contains a check mark.
Type
String
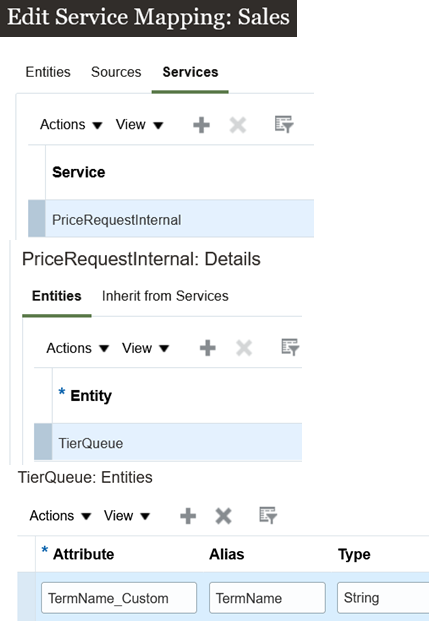
Modify Service Mapping for Tier Adjustments
You will add the TierQueue entity.
Try it.
- Click Tasks > Manage Service Mappings.
- On the Manage Service Mappings page, in the Name column, click Sales.
- On the Edit Service Mapping page, click Services.
- Click Query By Example, then query for PriceRequestInternal.
- In the PriceRequestInternal Details area, on the Entities tab, click Query By Example, then query for TierQueue.
- In the TierQueue Entities area, click View > Columns, then make sure Type contains a check mark.
- Click Actions > Add Row, then set the values.
Attribute
Value
Name TermName_Custom Alias TermName Type String - Click Save and Close.
2. Modify Pricing Algorithms
You modify pricing algorithms that calculate the discounts.
Modify the Pricing Algorithm That Applies Discounts
Here's the algorithm that you modify.

Modify the pricing algorithm that applies discounts.
-
Click Tasks > Manage Algorithms.
-
On the Manage Algorithms page, click Query by Example, enter the value, then press the Enter key on your keyboard.
Attribute
Value
Name
Apply Discounts
-
Click Action > Create Version.
-
In the Name column, click the link for the version you just created.
-
On the Edit Algorithm page, expand the steps until you locate the Write Pricing Terms step.
-
Click the row that includes Write Pricing Terms in the Name column.
-
In the Step Details area, in the First Row Actions area, locate this code:
//if (TermQuery.Name!=null) ts.Name = TermQuery.Name -
Remove the forward slashes ( // ) from the code.
For example:
if (TermQuery.Name!=null) ts.Name = TermQuery.NameThis step instructs the algorithm to examine the TermQuery attribute that you set up in the service mapping earlier in this topic.
-
Click Save and Close > Actions > Publish.
Modify the Pricing Algorithm That Applies Pricing Terms
Modify the pricing algorithm that applies pricing terms so it can process the running net price.
-
Click Tasks > Manage Algorithms.
-
On the Manage Algorithms page, click Query by Example, enter the value, then press the Enter key on your keyboard.
Attribute
Value
Name
Apply Pricing Terms
-
Click Actions > Create Version.
-
In the Name column, click the link for the version that you just created.
-
Click Variables > Actions > Add Row, set the values, then click Save.
Attribute
Value
Name
RunningNetPriceElem
Data Type
String
Input/Output
None
Default Expression
'ELEMENT_FOR_NET_PRICE'
This value identifies the pricing element you created earlier in this topic.
You must include the single quotation marks (' ).
-
Click Algorithm.
-
In the Steps area, click the row that includes Find Applicable Charges in the Name column.
-
Add the step that creates the running net price.
-
Click Add Step > Composite Step, then click If.
Here's the step that you add.
-
In the Step Details area, set the values, then click Save.
Attribute
Value
Name
Create the Running Net Price
Condition
'DISCOUNT_LINE' == TermTypeYou must include the single quotation marks (' ).
-
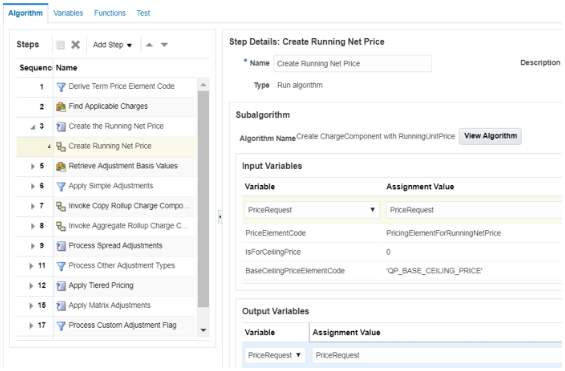
In the Steps area, click the row that includes Examine Create Running Net Price in the Name column.
-
Click Add Step > Subalgorithm.
You can add a condition only on the step. So, you create the step, then add the subalgorithm that specifies the pricing algorithm to run and the variable to send to this algorithm.
-
In the Step Details area, set the values.
Attribute
Value
Name
Create the Running Net Price
Description
This step creates a charge component for a running net price.
Algorithm Name
Create ChargeComponent with RunningUnitPrice
-
In the Input Variables area, set values.
Variable
Assignment Value
PriceRequest
PriceRequest
PriceElementCode
RunningNetPriceElem
IsForCeilingPrice
BaseCeilingPriceElementCode
Don't use these variables. They are for Oracle internal use only.
RoundingAdjustmentElementCode
'QP_ROUNDING_ADJUSTMENT'
PerformRounding
false
IsForMargin
false
PriceElementUsageCode
Leave empty
ChargeAppliesToCode
'PRICE'
RoundingAdjustmentElementUsageCode
'PRICE_ADJUSTMENT'
-
In the Output Variables area, set the value.
Variable
Assignment Value
PriceRequest
PriceRequest
-
-
Add the step that deletes the running net price.
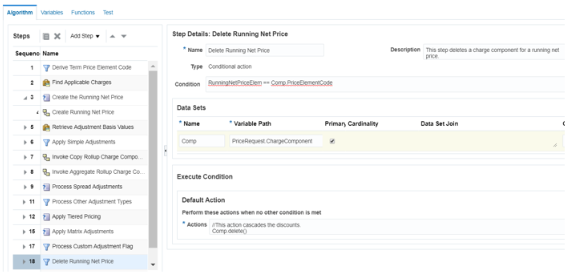
Add the step.
-
Click the step that has Process Custom Adjustment Flag in the Name column.
-
Click Add Step > Conditional Action, then set the values.
Attribute
Value
Name
Delete Running Net Price
Description
This step deletes a charge component for a running net price.
Condition
RunningNetPriceElem == Comp.PriceElementCode -
In the Data Sets area, click Add Row, then set the value.
Name
Variable Path
Primary
Comp
PriceRequest.ChargeComponent
Contains a check mark.
-
In the Execute Condition area, click Add Condition > Default Action, then set the value.
Attribute
Value
Action
//This action cascades the discounts. Comp.delete() -
Click Save.
-
-
Make sure the algorithm applies your rules in the sequence that you expect. Do this step when your discount list has more than one rule.
-
Click the step that has Process Other Adjustment Types in the Name column.
-
In the Conditional Actions area, in the Then Perform These Actions column, click the pencil.
-
In the Edit Actions dialog, notice the code.
finer('\tSetting up queue for applying discount matrix '+TermSetup.AttributePricingMatrixId) mq = MatrixQ.insert([ParentEntityCode:'CHARGE', ParentEntityId:TermQ.ChargeId]) mq.DynamicMatrixId = TermSetup.AttributePricingMatrixId mq.ApplyToRollupFlag = ('Y' == TermSetup.ApplyToRollupFlag) mq.FromCurrencyCode = TermSetup.PricingCurrencyCode -
Locate the line that has
mq.FromCurrencyCode = TermSetup.PricingCurrencyCode. Its the last line of code. -
Add a new line after the code that you just located, then add
mq.TermName=TermSetup.Nameto the new line.Here's your revised code.
finer('\tSetting up queue for applying discount matrix '+TermSetup.AttributePricingMatrixId) mq = MatrixQ.insert([ParentEntityCode:'CHARGE', ParentEntityId:TermQ.ChargeId]) mq.DynamicMatrixId = TermSetup.AttributePricingMatrixId mq.ApplyToRollupFlag = ('Y' == TermSetup.ApplyToRollupFlag) mq.FromCurrencyCode = TermSetup.PricingCurrencyCode mq.TermName=TermSetup.Name -
Click OK > Save.
-
3A. Modify Pricing Algorithms for Simple Discounts
Do this section only if you're applying a simple discount.
-
Add a function.
-
Click Functions.
Here's the function that you will add.
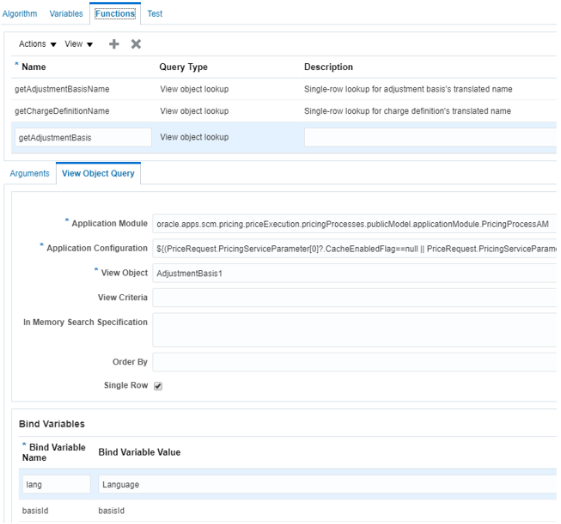
You add a view object that the pricing algorithm can use in a function that gets the adjustment basis.
-
Click Actions > Add Row, then set the value.
Name
Query Type
getAdjustmentBasis
View Object Lookup
-
In the Arguments area, add the arguments.
Name
Comments
BasisId
Value that identifies the adjustment basis.
Language
Abbreviation that identifies the language.
-
Click View Object Query > Add Row, then set the values.
Attribute
Value
Application Module
oracle.apps.scm.pricing.priceExecution.pricingProcesses.publicModel.applicationModule.PricingProcessAMApplication Configuration
${(PriceRequest.PricingServiceParameter[0]?.CacheEnabledFlag==null
                                          ||
                                          PriceRequest.PricingServiceParameter[0].CacheEnabledFlag)
                                          ? 'PricingProcessAMShared' :
                                          'PricingProcessAMLocal'}
View Object
AdjustmentBasis1
Single Row
Contains a check mark.
-
In the Bind Variables area, add the bind variables, then click Save.
Bind Variable Name
Bind Variable Value
basisId
BasisId
lang
Language
-
-
Modify the step that gets values for the adjustment basis.
-
Click Algorithm.
-
In the Steps area, click the step that includes Retrieve Basis Values in the Name column.
-
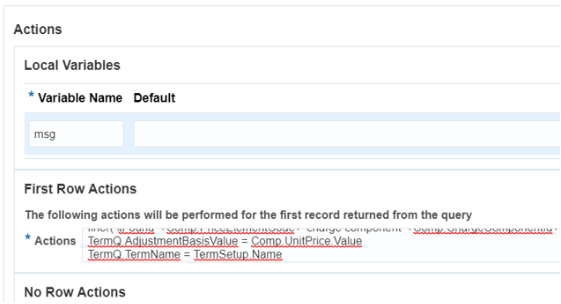
In the Step Details area, in the Default Action area, scroll all the way to the end, and then locate this code:
else { finer('\tFound '+component .PriceElementCode+' charge component '+component .ChargeComponentId+' with unit price '+component .UnitPrice.Value) TermQ.AdjustmentBasisValue = component .UnitPrice.Value } -
Add this line immediately before the closing curly bracket:
//We're adding this line for cascading discounts:
TermQ.TermName = TermSetup.Name
For example:
else {
  finer('\tFound '+component .PriceElementCode+' charge component '+component .ChargeComponentId+' with unit price '+component .UnitPrice.Value)
  TermQ.AdjustmentBasisValue = component .UnitPrice.Value
  //We're adding this line for cascading discounts:
  TermQ.TermName = TermSetup.Name
 }
You add it here:
-
Click Save.
-
-
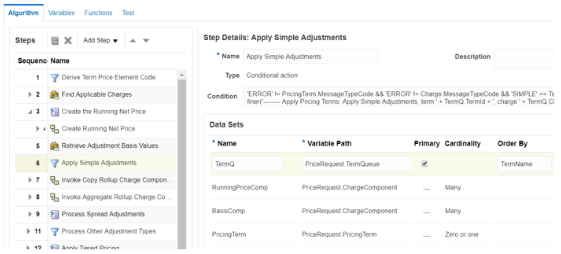
Modify the step that applies the simple adjustment.
-
In the Steps area, click the step that includes Apply Simple Adjustments in the Name column.
-
In the Data Sets area, add the data sets.
Name
Variable Path
Cardinality
RunningPriceComp
PriceRequest.ChargeComponent
Many
This value specifies to use many charge components for the running price to one term in the term queue.
BasisComp
PriceRequest.ChargeComponent
Many
This value specifies to use many pricing bases for the charge components to one term in the term queue.
-
In the Data Sets area, in the row that includes TermQ in the Name column, set the value.
Attribute
Value
Order By
TermName
-
In the Execute Condition area, in the Local Variables area, add the local variables.
Variable Name
Default
BasisElementCode
Leave empty.
RunningPrice
Leave empty.
-
In the Default Action area, locate this code.
AdjustmentValue = AdjustmentValue * (-1) } } else -
Here's the code that cascades the discount according to the adjustment basis. Add it immediately after the code that you just located.
// cascade your discount modifications according to the adjustment basis { BasisElementCode = getBasis(TermSetup.AdjustmentBasisId)?.PriceElementCode if (BasisElementCode != null) { TermQ.AdjustmentBasisValue = BasisComp.locate([ChargeId: TermQ.ChargeId, PriceElementCode: BasisElementCode])?.UnitPrice?.Value } - Locate this
code.
finer(' Unit price adjustment = '+AdjustmentValue) - Add a closing curly bracket on a new line immediately before the code you just
located:
} -
Here's the entire modified code. The modification is in bold font:
def runningUnitPriceCurAdj = Charge.RunningUnitPrice
def termInDifferentCurrency = (TermSetup.PricingCurrencyCode != null && TermSetup.PricingCurrencyCode != Line.AppliedCurrencyCode && !TermSetup.AdjustmentTypeCode.contains('PERCENT'))
if (termInDifferentCurrency) {
    convRateRow = locateConversionRate(ConvRate, Header, Line, Charge, PricingTermRule, TermSetup, Message, Line.AppliedCurrencyCode, TermSetup.PricingCurrencyCode)
    if (convRateRow) {
        runningUnitPriceCurAdj *= convRateRow.ConversionRate
    }
}
if ('ROOT' == Line.ItemType && 'Y' == TermSetup.ApplyToRollupFlag) {
    finer('    Adjustment type = '+TermSetup.AdjustmentTypeCode)
    finer('    Unit price = '+Charge.RunningUnitPrice)
    finer('    Adjustment amount = '+TermSetup.AdjustmentAmount)
    finer('    Basis value = '+TermQ.AdjustmentBasisValue?:0)
    AdjustmentValue = pricingUtil.computeUnitAdjustment(TermSetup.AdjustmentTypeCode, runningUnitPriceCurAdj, TermSetup.AdjustmentAmount, TermQ.AdjustmentBasisValue?:0)
    if (termInDifferentCurrency) {
        convRateRow = locateConversionRate(ConvRate, Header, Line, Charge, PricingTermRule, TermSetup, Message, TermSetup.PricingCurrencyCode, Line.AppliedCurrencyCode)
        if (convRateRow) {
            AdjustmentValue *= convRateRow.ConversionRate
        }
    }
    if ('ERROR' != PricingTermRule.MessageTypeCode && AdjustmentValue!=null) {
        spread = Spread.insert([ParentChargeId: Charge.ChargeId])
        spread.UnitAdjustment = AdjustmentValue
        //spread.createDataObject('ExtendedAdjustmentAmount')
        //spread.ExtendedAdjustmentAmount.Value = AdjustmentValue
        //spread.ExtendedAdjustmentAmount.CurrencyCode = Charge.CurrencyCode
        spread.PriceElementCode = TermElementCode
        spread.PriceElementUsageCode = priceElementUsageCode
        spread.SourceId = TermSetup.TermId
        spread.SourceTypeCode = 'PRICING_TERM'
        spread.SpreadId = ++spreadId
        // Code Changes for Bug#20265319
        spread.ExplanationMessageName = TermExplanationMsg
    }
} else {
    finer('    Adjustment type = '+TermSetup.AdjustmentTypeCode)
    finer('    Unit price = '+Charge.RunningUnitPrice)
    finer('    Adjustment amount = '+TermSetup.AdjustmentAmount)
    finer('    Basis value = '+TermQ.AdjustmentBasisValue?:0)
    if ( TermSetup.AdjustmentTypeCode in ['ORA_QP_ACCRUAL_AMOUNT','ORA_QP_ACCRUAL_DIFFERENCE','ORA_QP_ACCRUAL_PERCENT'] )
     {
      AdjustmentValue = pricingUtil.computeAccrualAdjustment(TermSetup.AdjustmentTypeCode, TermSetup.AccrualTypeCode, runningUnitPriceCurAdj, TermSetup.AdjustmentAmount,TermQ.AdjustmentBasisValue?:0)
      TermElementCode = 'QP_ACCRUAL'
      priceElementUsageCode = null
      //For Un-Reference Return lines, reverse the polarity of adjustment value
      if ( Line.UnreferencedReturnLineFlag ) {
       AdjustmentValue = AdjustmentValue * (-1)
      }
     }
    else {
       BasisElementCode = getBasis(TermSetup.AdjustmentBasisId)?.PriceElementCode
       if (BasisElementCode != null) {
       TermQ.AdjustmentBasisValue = BasisComp.locate([ChargeId: TermQ.ChargeId, PriceElementCode: BasisElementCode])?.UnitPrice?.Value
       }
       AdjustmentValue = pricingUtil.computeUnitAdjustment(TermSetup.AdjustmentTypeCode, runningUnitPriceCurAdj, TermSetup.AdjustmentAmount, TermQ.AdjustmentBasisValue?:0)
   }
    finer('    Unit price adjustment = '+AdjustmentValue)
    Comp = ChargeComponent.insert([ChargeComponentId:++ServiceParam.ChargeComponentIdCntr])
    Comp.ChargeId = TermQ.ChargeId
    Comp.createDataObject('UnitPrice')
    Comp.UnitPrice.Value = AdjustmentValue
    Comp.UnitPrice.CurrencyCode = Charge.CurrencyCode
    Comp.CurrencyCode = Charge.CurrencyCode

    if (termInDifferentCurrency) {
        convRateRow = locateConversionRate(ConvRate, Header, Line, Charge, PricingTermRule, TermSetup, Message, TermSetup.PricingCurrencyCode, Line.AppliedCurrencyCode)
        if (convRateRow) {
            Comp.UnitPrice.Value *= convRateRow.ConversionRate
        }
    }

    if ( Charge.PricedQuantity!=null ) {
        Comp.createDataObject('ExtendedAmount')
        Comp.ExtendedAmount.Value = Comp.UnitPrice.Value*Charge.PricedQuantity.Value
        Comp.ExtendedAmount.CurrencyCode = Comp.UnitPrice.CurrencyCode
        if (Line.ItemType in ['STANDARD', 'COMPONENT', 'ROOT'] && null != Line.ServiceDuration?.Value && null != Line.ServiceDurationPeriodCode ) {
            Comp.createDataObject('CoverageExtendedAmount')
            if ('ONE_TIME' == Charge.PriceTypeCode) {
                Comp.CoverageExtendedAmount.Value =  Comp.ExtendedAmount.Value
            }
            else if ('RECURRING' == Charge.PriceTypeCode) {
                if (Charge.PricePeriodicityCode != Line.ServiceDurationPeriodCode) {
                    // Partial Price Period with Conversion Rate from OKC tables
                    Comp.CoverageExtendedAmount.Value =  Comp.ExtendedAmount?.Value * Charge.PartialPeriodDurationConversionRate?:0
                }
                else {
                    //no partial Period pricing based on ServiceDuration
                    Comp.CoverageExtendedAmount.Value =  Comp.ExtendedAmount.Value * Line.ServiceDuration?.Value
                }
            }
            Comp.CoverageExtendedAmount.CurrencyCode = Comp.ExtendedAmount.CurrencyCode
        }
    }
    assert Charge.CompSeqCntr != null
    Comp.SequenceNumber = (Long) Charge.CompSeqCntr++
    Comp.PriceElementCode = TermElementCode
    Comp.PriceElementUsageCode = priceElementUsageCode
    Comp.ExplanationMessageName = TermExplanationMsg
    Comp.PriceValidFrom = Line.PricingDate
    Comp.PriceValidUntil = TermSetup.EndDate
    Comp.SourceId = TermQ.TermId
    Comp.SourceTypeCode = 'PRICING_TERM'
    finest('\tCreated ' + Comp.PriceElementCode + ' charge component ' + Comp.ChargeComponentId + ' with unit adjustment ' + Comp.UnitPrice.Value + ' ' + Comp.UnitPrice.CurrencyCode)
    // Adjust running unit price
     Charge.RunningUnitPrice += Comp.UnitPrice.Value
    if (Line.MessageTypeCode != 'ERROR' && Comp.PriceElementCode == 'QP_ACCRUAL')
       ChannelProgram.ApplicationStatusCode =  'ORA_APPLIED'
    finest('\tAdjusted running unit price by ' + Comp.UnitPrice.Value)
    pricingUtil.computeHeaderCurrencyAmounts(Comp, Charge, Line, Header, ConvRate, Messages)
}
-
Make these replacements.
|
Variable in Code |
Attribute from SQL Query You Can Use to Replace the Variable |
|---|---|
|
customer_id |
CustomerId |
|
selling_business_unit_id |
SellingBusinessUnitId |
|
selling_legal_entity_id |
SellingLegalEntityId |
|
inventory_item_id |
InventoryItemId |
|
inventory_organization_id |
InventoryOrganizationId |
|
unit_code |
LineQuantityUOMCode |
|
line_quantity_uom_code |
LineQuantityUOMCode |
5. Test Your Set Up
-
Sign into Order Management and create a sales order.
-
Set the Customer to a value, such as PennyPack Systems.
-
Click Actions > View Pricing Segment and Strategy, then verify that the Segment is the default segment, and that the Strategy is correct for PennyPack Systems.
-
In the Order Lines area, search for item AS54888, wait for the results, tab out of the search attribute, then verify that Order Management gets the price from the price list for PennyPack Systems.
-
Add the AS54888 item to an order line, click Amount on the order line, then verify that Pricing correctly calculates the Net Price and applied the discounts.