Connect Order Management to Your Fulfillment System
Set up a connector that allows Order Management to communicate with your fulfillment system.
This topic assumes these conditions are true.
-
You use Oracle JDeveloper (Java Developer) to create the connector. You can use any similar development tool.
-
You create a fulfillment connector that uses the Fulfillment task. You can use a similar approach for other tasks.
-
You use a web service to communicate between Order Management and the connector. The connector can use some other technology that you select to communicate with your fulfillment system.
-
You use basic security. Your implementation team must incorporate any other security that you need.
-
The fulfillment system doesn't understand the Order Management message, so the connector must transform the message.
-
The connector and the fulfillment system use security certificates that a certificate authority (CA) publishes.
-
You have the privileges that you need to deploy the connector on the fulfillment system, or you licensed Oracle SOA (Service Oriented Architecture) Cloud Service so you can access Oracle JDeveloper on the cloud and integrate with other cloud applications and systems.
-
Services in the fulfillment system all use the same user credentials.
Summary of the Set Up
-
Prepare to make connection.
-
Create connector.
-
Add branches for operations.
-
Set up delayed response.
-
Secure your connector and deploy your project.
-
Communicate extensible flexfields to fulfillment system.
-
Deploy connector.
This topic uses example values. You might need different values, depending on your business requirements.
Prepare to Make Connection
-
Get the administrative privileges you need to access the web server where you plan to deploy the connector.
-
Get source system details from Oracle Trading Community Architecture. You will use them to link connectors in the web service details to your fulfillment system.
-
Install the Java runtime environment on the computer you will use to create the connector.
For details, see Java Downloads for All Operating Systems at https://www.java.com/en/download/manual.jsp.
-
Open a web browser, then install Java SE Development Kit.
For details, see Java SE Development Kit 9 Downloads.
-
Install Oracle SOA Suite.
-
Go to the Oracle SOA Suite 12.2.1.3.0 QuickStart Download page on Oracle Technology Network.
-
Download, then unzip these files.
-
SOA Suite 12.2.1.3 Part 1 of 2
-
SOA Suite 12.2.1.3 Part 2 of 2
Download them to the bin folder where you installed Java SE Development Kit, such as
C:\Program
Files\Java\jdk-9.0.4\bin
. -
-
Right-click Windows Start menu, then click
Command Prompt (Admin). -
In the DOS command line, navigate to the bin folder where you downloaded the SOA Suite files (Service Oriented Architecture), enter
java.exe -jar
                           fmw_12.2.1.3.0_soa_quickstart.jar
, then press Enter on your keyboard. -
Follow the prompts in the installer until you finish the installation.
-
-
Open a web browser, then verify your browser can open the URLs you plan to use for your WSDLs. For details about these WSDLs, see the next section in this topic.
Create Connector
-
Open Oracle JDeveloper.
For details about how to use Oracle JDeveloper, see Oracle JDeveloper Tutorials.
-
In the Select Role dialog, select Studio Developer, then click OK.
-
Click Application > New.
-
In the New Gallery dialog, in tree Categories, expand General, then click Applications.
-
In the Items area, click SOA Application > OK.
-
In the Name Your Application dialog, set the values, then click Next.
Attribute
Value
Application Name
Enter any value.
Directory
C:\JDeveloper\mywork\ConnectorServiceYou can accept the default value or select some other folder. For example:
-
C:\JDeveloper\mywork\ConnectorService
Application Package Prefix
oracle.apps
-
-
In the Name Your Project dialog, set the values, then click Next.
Attribute
Value
Project Name
ConnectorServiceComposite
You can set any value.
Directory
C:\JDeveloper\mywork\ConnectorService\ConnectorServiceComposite -
In the Configure SOA Settings dialog, set the values, then click Finish.
Attribute
Value
Composite Name
ConnectorServiceComposite
Composite Template
Empty Composite
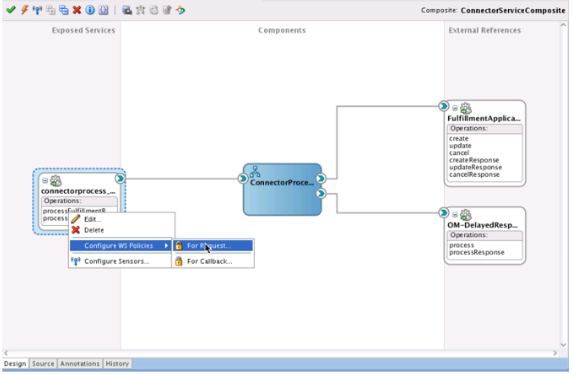
Oracle JDeveloper creates an empty composite.
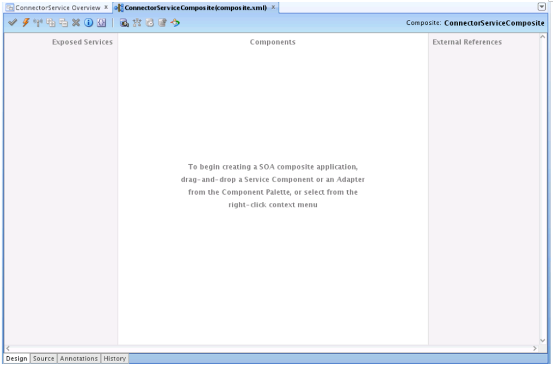
This composite includes the Exposed Services, Components, and External References panes. You will use these panes during this procedure.
-
Click File > Save.
-
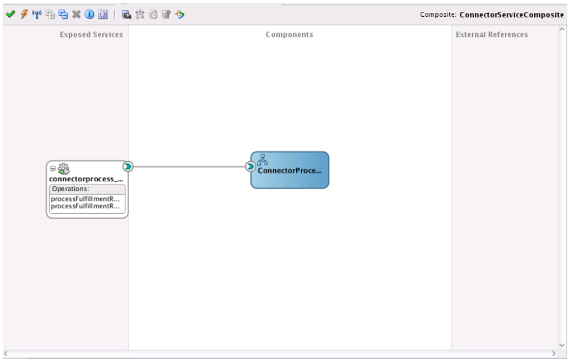
Specify the service that will communicate data from your fulfillment system to Order Management.
-
Drag and drop BPEL Process from the Component Palette onto the Components pane.
-
In the Create BPEL Process dialog, set the values, then click OK. Make sure you set each value in the same sequence that this table displays them.
Attribute
Value
BPEL Specification
BPEL 2.0 Specification
Name
ConnectorProcess
Namespace
http://xmlns.oracle.com/ConnectorService/ConnectorServiceComposite/ConnectorProcessDirectory
C:\JDeveloper\mywork\ConnectorService\ConnectorServiceComposite\SOA\BPELTemplate Type
Web Service
Template
Base on a WSDL
Service Name
connectorprocess_client
Expose as a SOAP Service
Contains a check mark.
WSDL URL
Specify this WSDL.
https://host:port/soa-infra/services/default/DooTaskExternalInterfaceVirtualPartnersComposite/fulfillmentrequest_client_ep?WSDLThe FulfillOrderService uses this WSDL.
where
-
host. Identifies the computer that hosts your Oracle Applications. -
port. Identifies the port that Oracle Applications uses to communicate data. Port is optional.
For example, enter this value.
https://server:port/soa-infra/services/default/DooTaskExternalInterfaceVirtualPartnersComposite/fulfillmentrequest_client_ep?WSDLYou must identify the host and port. For details, see Identify Hosts and Ports for Order Management.
This URL locates the WSDL that FulfillOrderService uses. This service communicates data from your fulfillment system to Order Management. It uses these operations and inputs.
-
The processFulfillmentRequest operation uses the FulfillmentRequestRequestMessage input value.
-
The processFulfillmentRequestResponseoperation operation uses the FulfillmentRequestResponseMessage input value.
If you can't access or use this service for some reason, then see the Use Alternative WSDL Files section in this topic, immediately after this procedure.
-
Next to WSDL URL, click
Find Existing WSDLs. -
In the WSDL Selector dialog, set Location to
home/user/projects/FulfillmentRequestWSDL.where
-
useris your user name.
-
-
In the window below the location you just set, click
FulfillmentRequest.wsdl
> OK
. -
In the Localized Files dialog, add a check mark to Maintain Original Directory Structure for Imported Files, then click OK.
Port Type
FulfilmentRequest
Callback Port Type
FulfilmentRequestCallback
Oracle JDeveloper creates the BPEL process.
-
-
-
Create the web service that you use to send the request to your fulfillment system.
-
In the External References pane, right-click, then click Insert > Direct.
-
In the Create Direct Binding dialog, set the values, then click OK.
Attribute
Value
Name
FulfillmentApplication
Type
Reference
WSDL URL
FulfillmentApplication/fulfillmentapplication/process_client_ep?WSDLPort Type
execute_ptt
Callback Port Type
callback_ptt
Copy WSDL
Doesn't contain a check mark.
Transaction Participant
WSDLDriven
-
-
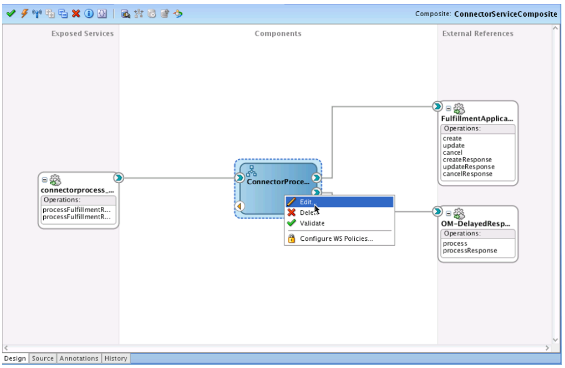
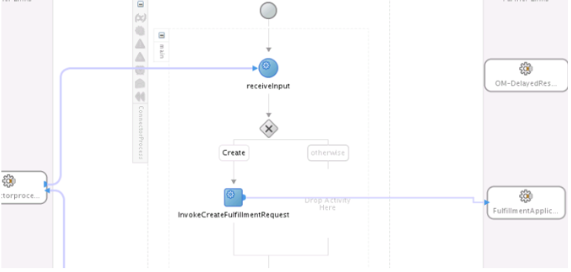
Connect the connector to the FulfillmentApplication web service.
Drag and drop a connection from the Component Palette to create a connection between the ConnectorProcess node in the Components pane and the FulfillmentApplication node in the External References pane.
-
Create the web service you use to send the delayed response back to Order Management.
-
In the External References pane, right-click, then click Insert > Web Service.
-
In the Create Web Service dialog, set the values, then click OK.
Attribute
Value
Name
OM-DelayedResponse
Type
Reference
WSDL URL
Enter this value.
https://host:port/soa-infra/services/default/DooTaskFulfillOrderResponseInterfaceComposite/fulfillmentresponse?WSDLwhere
-
host. Identifies the computer that hosts your Oracle Applications. -
port. Identifies the port that your Oracle Applications use to communicate data.
This URL locates the WSDL that FulfillmentResponseService uses. This service communicates status updates from your fulfillment system to Order Management. It uses these operations and inputs.
-
The process operation uses the FulfillmentResponseRequestMessage input value.
-
The processResponse operation uses the FulfillmentResponseResponseMessage input value.
Port Type
FulfillmentResponse
Callback Port Type
FulfillmentResponseCallback
Copy WSDL
Doesn't contain a check mark.
Transaction Participant
WSDLDriven
-
-
-
Connect the connector to the OM-DelayedResponse web service. Drag and drop a connection from the Component Palette to create a connection between the ConnectorProcess node in the Components pane and the OM-DelayedResponse node in the External References pane.
-
In the Components pane, right-click the ConnectorProcess node, click Edit.
-
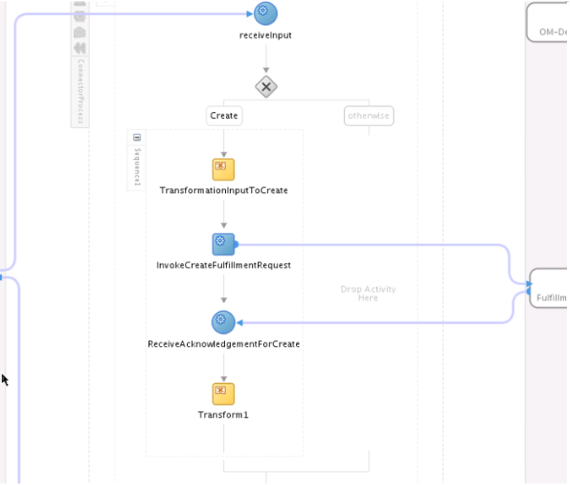
Set up the condition that specifies when to do the Create operation for the service in the fulfillment system.
-
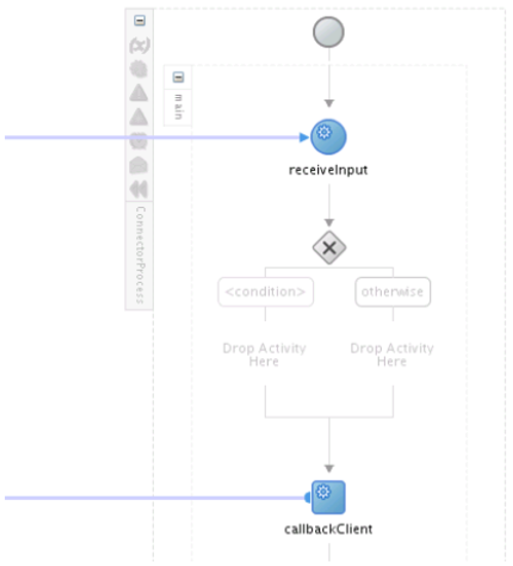
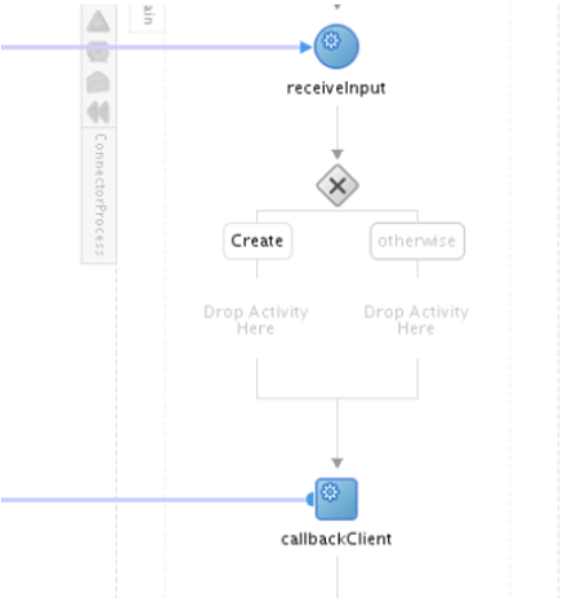
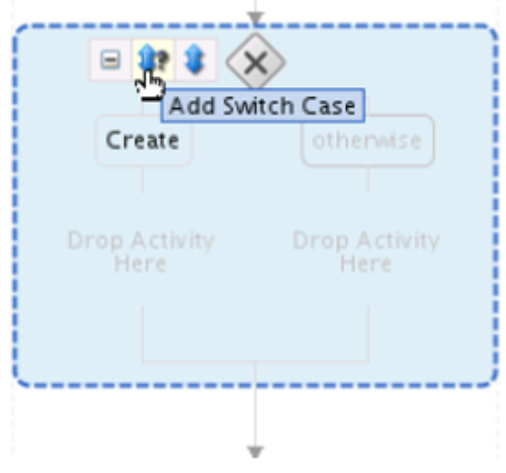
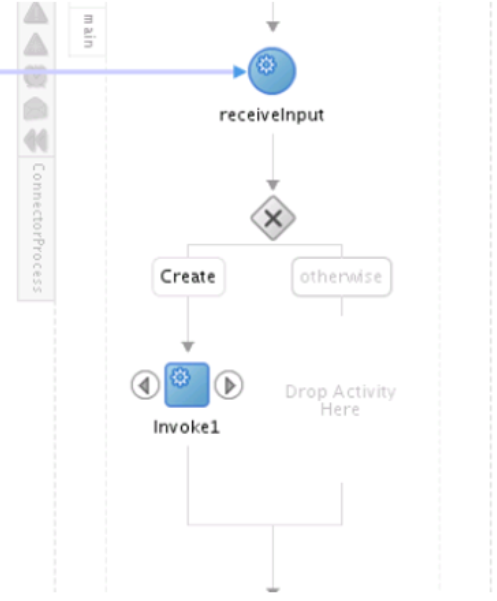
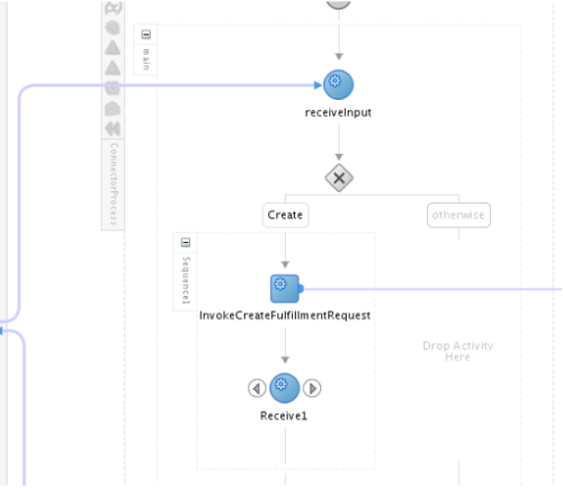
Drag and drop a Switch activity from Component Palette to immediately after the receiveInput activity.
-
Immediately below the switch activity that you just added, click Condition, then set the values.
Attribute
Value
Label
Create
Description
CreateFulfillmentReqeuest
You will create a condition.
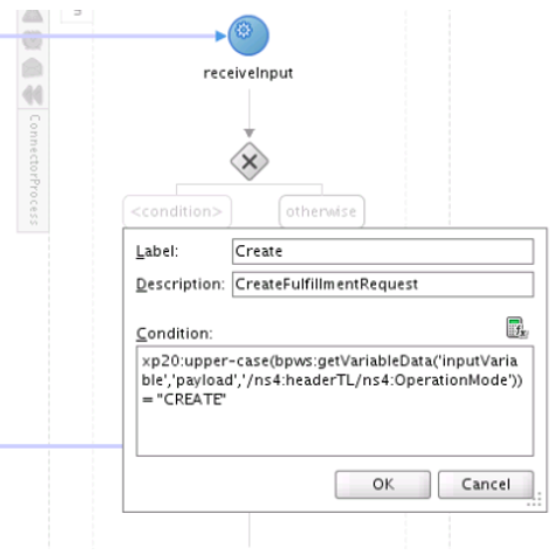
-
Click Expression Builder.
-
In the Expression Builder dialog, in the BPEL Variables window, click
ns4:OperationMode
string
. -
In windowFunctions, select String Functions, then click upper-case.
-
Verify that the Expression window contains this value.
xp20:upper-case(bpws:getVariableData('inputVariable','payload','/ns4:headerTL/ns4:OperationMode')) = "CREATE"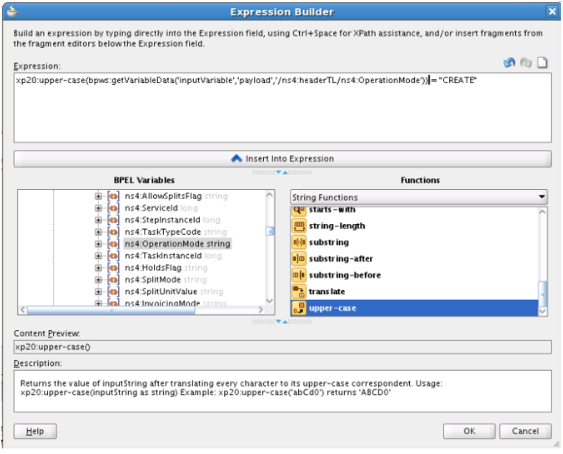
-
Click OK.
-
In the Condition dialog, click OK.
The Create step now displays in bold font.
-
Use Alternative WSDL Files
You typically use the FulfillOrderService service and FulfillmentResponseService service to communicate with your fulfillment system. If you can't access or use these services for some reason, then do a different set up, depending on whether you use extensible flexfields in your implementation.
|
Extensible Flexfields |
Description |
|---|---|
|
You use extensible flexfields. |
Go to Technical Reference for Order Management (Doc ID 2051639.1), download the Payloads and Files attachment, download the FulfillmentRequest.zip file, then use the WSDL and XSD in the zip. |
|
You don't use extensible flexfields. |
Do these steps.
|
Set the WSDL When Your Implementation Uses Business Events
If you set up Order Management to use a business event, then do these steps.
-
Use this value when you create the FulfillmentApplication connector.
Attribute
Value
WSDL URL
http://host:port/soa-
infra/services/default/DooTaskExternalInterfaceVirtualPartnersComposite/businesseventsconnetor_client_ep?WSDL
The connector uses the pushPayload operation and the
bodyinput value of FulfillOrderService. -
Make sure the web service operation can do these steps.
-
Accept the user name and password that you enter on the Manage External Interface Web Service Details page. You use this page later during this integration setup after you finish setting up the connector.
-
Receive a payload that uses the signature in the business_events_connnector_payload.xsd file. Get a copy of this file from the technical reference that you downloaded earlier in this topic.
-
-
Use the Associated Connectors tab to specify the connector that references the WSDL that you set up in step 1.
You can access this tab when you use the Manage Business Events Trigger Points page to set up the business event.
Learn about business events and the Associated Connectors tab. For details, see Send Notifications from Order Management to Other Systems.
You typically use FulfillOrderService to handle business events. If you can't access or use this service for some reason, then use a different set up.
|
Extensible Flexfields |
Description |
|---|---|
|
You don't use extensible flexfields. |
Download the business_events_wsdl.zip from the technical reference that you downloaded earlier in this procedure, then use the WSDL and XSD in that zip file. |
|
You use extensible flexfields. |
|
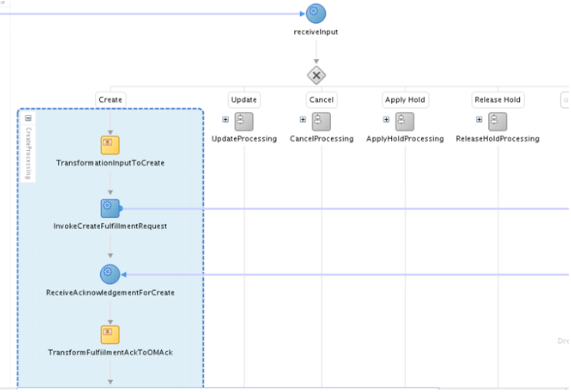
Add Branches for Operations
You will add one branch for each operation that you need for the fulfillment service. For example, this example uses these fulfillment tasks.
-
Create
-
Update
-
Apply Hold
-
Release Hold
-
Cancel
So you add five switch case branches, one for each task.
You will add these branches.
Learn about these tasks and other tasks that you can use. For details, see Create Your Own Task Type.
Add branches for operations.
-
Click:
-
Add an activity that calls the branch.
-
Drag and drop from Component Palette onto branch Create.
-
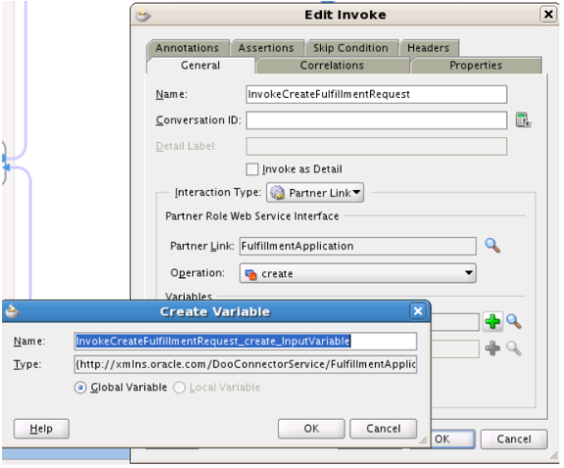
Right-click Invoke1, then, in the
Edit
Invoke
dialog, set the value.Attribute
Value
Name
InvokeCreateFulfillmentRequest
-
Click Partner Link.
-
In the Partner Link Selector dialog, click FulfillmentApplication > OK.
-
In the
Edit
Invoke
dialog, set the value.Attribute
Value
Operation
create
-
In the
Edit
Invoke
dialog, in the Variables section, next to theInputwindow, click Add. -
In the Create Variable dialog, set the value, then click OK.
Attribute
Value
Name
InvokeCreateFulfillmentRequest_create_InputVariable
For example:
-
In the
Edit
Invoke
dialog, click OK.The editor adds the InvokeCreateFulfillmentRequest node to the flow.
-
-
Add an activity that receives a reply from the fulfillment system.
-
Drag a receive activity from Component Palette, then drop it immediately downstream of the InvokeCreateFulfillmentRequest node.
-
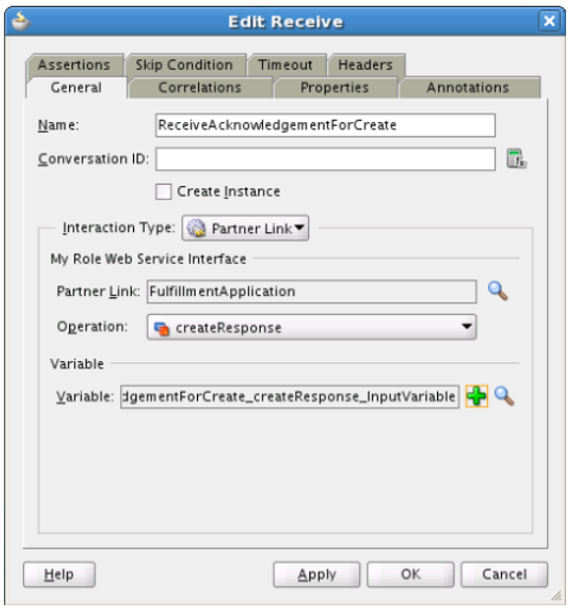
Right-click the Receive1 node that you just added.
-
In the Edit Receive dialog, set values, then click OK.
Attribute
Value
Name
ReceiveAcknowledgementForCreate
Conversation Id
Leave empty.
Create Instance
Leave empty.
Interact Type
Partner Link.
Partner Link
FulfillmentApplication
Operation
createResponse
Variable
ReceiveAcknowledgementForCreate_createResponse_InputVariable
For example:
-
-
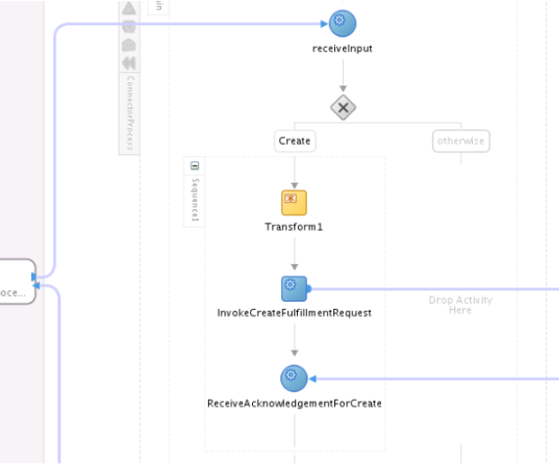
Add an activity that transforms the input value into a message that your fulfillment system can understand.
-
Drag a transform activity from Component Palette, then drop it immediately upstream of the InvokeCreateFulfillmentRequest node.
-
Right-click the Transform1 activity that you just added.
-
In the Edit Transform dialog, on the General tab, set the value, then click Transformation.
Attribute
Value
Name
TransformationInputToCreate
-
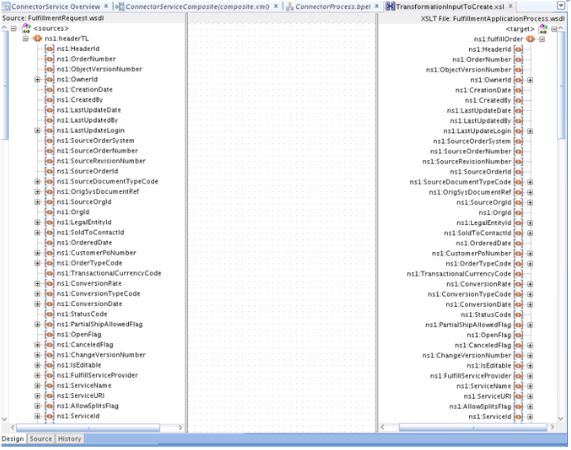
On the Transformation tab, in the Source area, click Add, then set the values.
Attribute
Value
Variable
inputVariable
Part
payload
-
Set the values.
Attribute
Value
Target Variable
InvokeCreateFulfillmentRequest_create_InputVariable
Target Part
payload
Mapper File
xsl/TransformationInputToCreate
-
In the Mapper File area, click Add.
-
In the page that displays, connect each attribute that you must send from Order Management to your fulfillment system.
-
In the Edit Transform dialog, click Apply > OK.
-
-
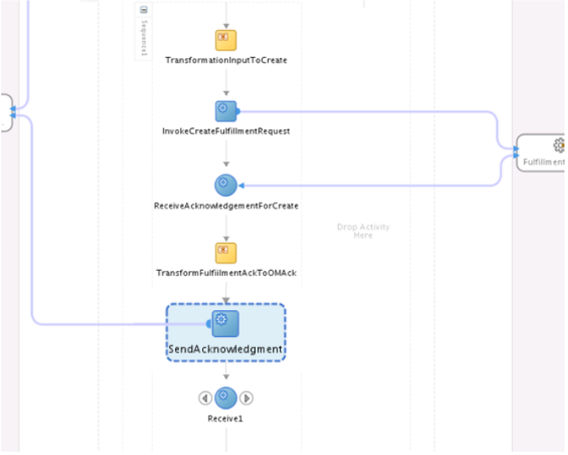
Add an activity that transforms the reply that your fulfillment system sends into a message that Order Management can understand.
-
Drag a transform activity from Component Palette, then drop it immediately downstream of the ReceiveAcknowledgementForCreate node.
-
Right-click the Transform1 activity that you just added.
-
In the Edit Transform dialog, on the General tab, set the value, then click Transformation.
Attribute
Value
Name
TransformFulfillmentAckToOMAck
-
On the Transformation tab, in the Source area, click Add, then set the values.
Attribute
Value
Variable
ReceiveAcknowledgementForCreate_createResponse_InputVariable
Part
payload
-
Set the values.
Attribute
Value
Target Variable
outputVariable
Target Part
payload
Mapper File
xsl/TransformFulfillmentAckToOMAck
-
In the Mapper File area, click Add.
-
In the page that displays, connect each attribute that you must send from the fulfillment system to Order Management.
-
In the Edit Transform dialog, click Apply > OK.
-
-
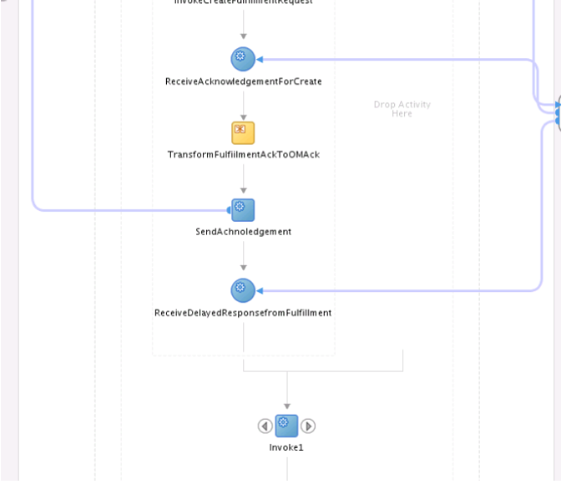
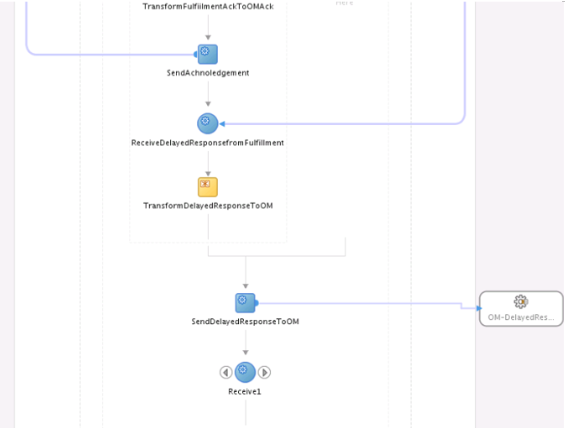
Specify how to send the acknowledgment to Order Management.
-
On the ConnectorProcess process that you created earlier, drag an activity from the Component Palette, then drop it immediately downstream of the TransformFulfillmentAckToOMAck activity.
-
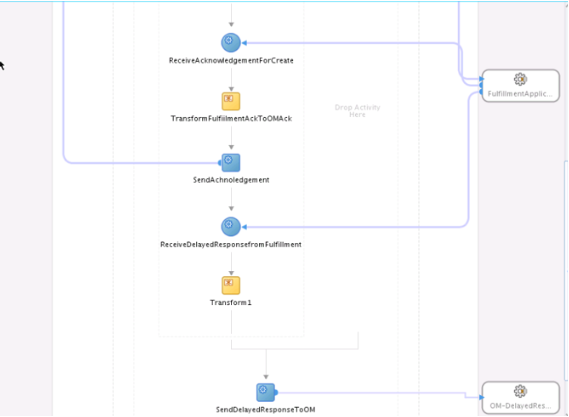
Drag a Receive activity from Component Palette, then drop it immediately downstream of the SendAcknowledgement activity that you just added.
This activity receives the delayed response from the fulfillment system.
-
Right-click Receive1.
-
In the Edit Receive dialog, on the General tab, set the values, then click Apply > OK.
Attribute
Value
Name
ReceiveDelayedResponseFromFulfillment
Conversation Id
Leave empty
Create Instance
Leave empty
Interaction Type
Partner Link
Partner Link
FulfillmentApplication
Operation
CreateResponse
Variable
ReceiveDelayedResponseFromFulfillment_CreateResponse_InputVariable
-
-
Repeat steps 1 through 6 for the Update operation.
For each operation, modify the values slightly to reflect the operation. For example, add the Update operation to the Update branch, and use ReceiveAcknowledgementForUpdate instead of ReceiveAcknowledgementForCreate.
-
Repeat steps 1 through 6 for the Apply Hold operation.
-
Repeat steps 1 through 6 for the Release Hold operation.
-
Repeat steps 1 through 6 for the Cancel operation.
Set Up Delayed Response
You will set up the flow that sends a delayed response from your fulfillment system to Order Management. You use the same payload for each operation so you can use a single flow for all operations.
Set up the delayed response.
-
Drag an activity from Component Palette, then drop it immediately downstream of the switch node.
-
Right-click Invoke1.
-
In the
Edit Invokedialog, on the General tab, set the values, then click Apply > OK.Attribute
Value
Name
SendDelayedResponseToOM
Conversation Id
Leave empty
Invoke as DetailLeave empty
Interaction Type
Partner Link
Partner Link
OM-DelayedResponse
Operation
process
Variable
SendDelayedResponseToOM_process_InputVariable
-
Transform the delayed response message that your fulfillment system sends to a message that Order Management can understand.
-
Drag the Transform activity from Component Palette, then, in the create branch, drop it immediately downstream of the ReceiveDelayedResponseFromFulfillment activity.
-
Right-click the Transform1 activity that you just added.
-
In the Edit Transform dialog, on the General tab, set the value, then click Transformation.
Attribute
Value
Name
TransformDelayedResponseToOM
-
On the Transformation tab, in the Source area, click Add, then set the values.
Attribute
Value
Variable
ReceiveDelayedResponseFromFulfillment_createResponse_InputVariable
Part
payload
-
Set the values.
Attribute
Value
Target Variable
SendDelayedResponseToOM_process_InputVariable
Target Part
payload
Mapper File
xsl/TransformationDelayedResponseToOM
-
In the Mapper File area, click Add.
-
On the page that displays, connect each attribute that you must send as part of the delayed response from your fulfillment system to Order Management.
-
In the Edit Transform dialog, click Apply > OK.
-
-
Add an activity that receives a reply from Order Management.
-
Drag a receive activity from Component Palette, then drop it immediately downstream of the SendDelayedResponseToOM activity.
-
Right-click the Receive1 node that you just added.
-
In the Edit Receive dialog, set values, then click Apply > OK.
Attribute
Value
Name
ReceiveResponseFromOM
Conversation Id
Leave empty.
Create Instance
Leave empty.
Interaction Type
Partner Link.
Partner Link
OM-DelayedResponse
Operation
processResponse
Variable
ReceiveResponseFromOM_processResponse_InputVariable
-
-
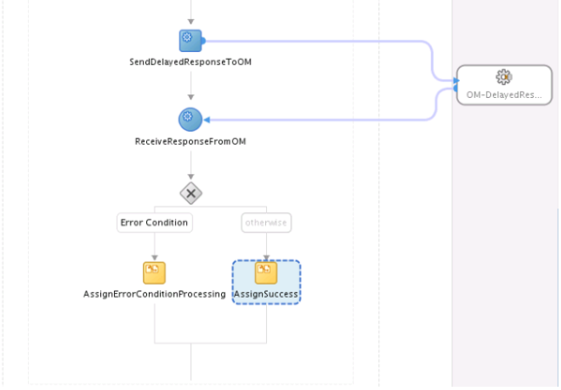
Set up a condition that specifies how to handle errors that Order Management might send.
-
Drag and drop the Switch activity from Component Palette to immediately downstream of the ReceiveResponseFromOM activity.
-
Immediately below the switch activity that you just added, click Condition, set the values, then click OK.
Attribute
Value
Label
ErrorCondition
Description
Handle errors when processing a delayed response
Condition
xp20:upper-case(bpws:getVariableData('ReceiveResponseFromOM_processResponse_InputVariable','payload','/ns3:FulfillmentResponse/ns3:Status') !="SUCCESS"
-
-
Add nodes.
-
AssignErrorConditionProcess. Specify actions to take in the Error Condition branch when an error happens.
-
AssignSucess. Specify actions to take in the Otherwise branch when an error doesn't happen.
-
Including Charges in Delayed Response
If the delayed response from the web service that calls Order Management includes a charge, then Order Management deletes all previous charges and replaces them with the values that the response sends. Therefore, you must make sure the response includes all charges that Order Management sent in the outgoing request.
For example, if Order Management sends the ORA_SHIPPING_FREIGHT value and the QP_NET_PRICE value for the ChargeTypeCode charge, then the response must include ORA_SHIPPING_FREIGHT and QP_NET_PRICE for ChargeTypeCode.
Secure Connector and Deploy Project
Oracle Applications use policies to secure your connector.
|
Policy |
Description |
|---|---|
|
oracle/wss11_saml_or_username_token_with_message_protection_service_policy |
Encrypts and decrypts incoming and outgoing messages. |
|
oracle/wss_username_token_over_ssl_client_policy |
Uses SSL (Secure Sockets Layer) to secure communication. |
Use Oracle JDeveloper or Oracle Enterprise Manager to secure your connector. This example uses Oracle JDeveloper. For details about Oracle Enterprise Manager, see https://www.oracle.com/technetwork/oem/enterprise-manager/overview/index.html.
Secure your connector and deploy your project.
-
Specify the security policy for the Request service. In the Exposed Services pane, right-click the end point of ConnectorProcess, then click Configure WS Policies > For Request.
-
In the Configure SOA WS Policies dialog, in the Security area, click Add.
-
In the Select Server Security Policies dialog, select the value.
oracle/ws11_saml_or_username_token_with_message_protection_service_policy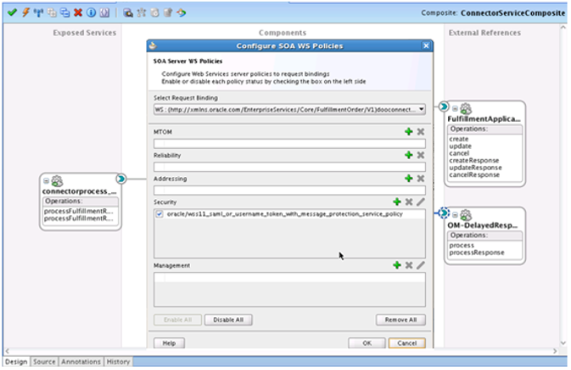
-
Click OK.
-
Specify the security policy for the callback service. In the Exposed Services pane, right-click the end point of ConnectorProcess, then click Configure WS Policies > For Callback.
-
In the Configure SOA WS Policies dialog, in the Security area, click Add.
-
In the Select Server Security Policies dialog, select the value.
oracle/wss_username_token_over_ssl_client_policy -
Click OK.
-
In the Security area, click the row that you just added, then click Edit.
-
Set the values.
Attribute
Value
Override Value
FUSION_SCM_SOA_APPID-KEY
Note
-
This value specifies the key for Credential Store Framework (CSF).
-
You must create this key in the application where you deploy the connector.
-
This key must use the same user name and password that you use to sign into Order Management.
-
-
Edit and assign the security policy for the connector that handles the delayed response.
Repeat the above steps. Use the same security policies and specify the same Credential Store Framework key.
-
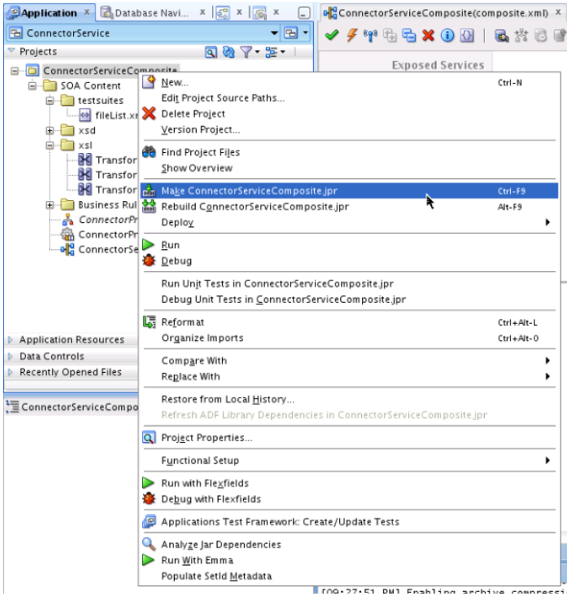
Create and deploy your project.
-
Create an object, then add it to the identity store on the server that will call the web service. For details, see Integrate Order Management with Source Systems.
-
Get the user credentials that the service provider needs when they call their web service. You can typically get these details from the service provider.
-
Send a request to your IT administrator to add the user credentials that you identified in step 4. Request to add them to the server that will call the web service. Use the CSF-KEY (Credential Store Framework) reference.
Communicate Extensible Flexfields to Your Fulfillment System
The payload includes extensible flexfields that you have set up, by default. If you have set up extensible flexfields, then you must set up the WSDL so it can communicate them to your fulfillment system.
Communicate extensible flexfields to your fulfillment system.
-
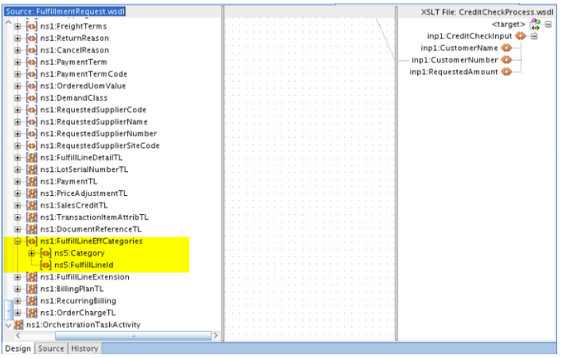
In the transformation activity, navigate to the appropriate EffCategories node, such as FulfillLineEffCategories.
-
Expand the node.
Notice that only two attributes are available in the node.
-
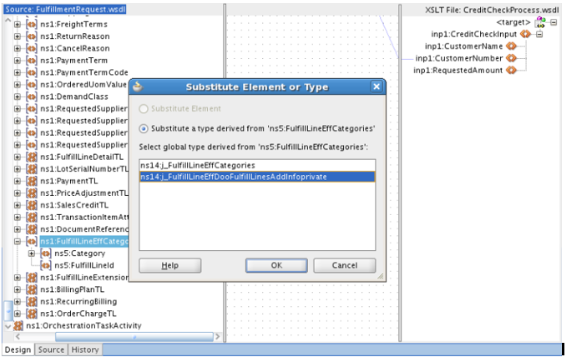
In the
Source:
FulfillmentRequest.wsdl
pane, in the navigation tree, right-clickns1:FulfillLineEFFCategories, then click Substitute Element or Type. -
In the Substitute Element or Type dialog, click j_FulfillLineEFFDooFulfillLineAddInfoPrivate > OK.
-
Expand
ns1:FulfillLineEFFCategories.The navigation tree displays the hierarchy that includes the contexts and extensible flexfields that you can map to the target XSD.

-
Make sure each attribute that you must map exists.
For example:
<xsl:if test="/ns1:headerTL/ns1:FulfillLineTLVO1/ns1:FulfillLineEffCategories/ns10:FulfillLineEffBPackShipInstructionprivateVO/ns21:shipDate"> <ns21:shipDate> <xsl:if test="/ns1:headerTL/ns1:FulfillLineTLVO1/ns1:FulfillLineEffCategories/ns10:FulfillLineEffBPackShipInstructionprivateVO/ns21:shipDate/@xsi:nil"> <xsl:attribute name="xsi:nil"> <xsl:value-of select="/ns1:headerTL/ns1:FulfillLineTLVO1/ns1:FulfillLineEffCategories/ns10:FulfillLineEffBPackShipInstructionprivateVO/ns21:shipDate/@xsi:nil"/> </xsl:attribute> </xsl:if> <xsl:value-of select="/ns1:headerTL/ns1:FulfillLineTLVO1/ns1:FulfillLineEffCategories/ns10:FulfillLineEffBPackShipInstructionprivateVO/ns21:shipDate"/> </ns21:shipDate> </xsl:if> -
Map each attribute.
Map Document References
Order Management uses a typical entity to describe the relationship that exists between a transaction in a system that resides outside of Order Management and a fulfillment line. Here are some document types that you can use to map the data elements between this entity and your fulfillment system.
|
Attribute |
Description |
Example |
|---|---|---|
|
DocRefType |
Abbreviation that identifies the type of business document. Here are the these types that you can use.
|
DROPSHIP_PO_REFERENCE |
|
DocId |
Value that uniquely identifies the document. Order Management creates this value. |
Purchase Order Identifier in the purchasing system |
|
DocUserKey |
Business document number that an end-user can understand and recognize. |
Purchase Order Number |
|
DocAltUserKey |
Details that accompany DocUserKey, such as a document revision number. |
Change Sequence Number |
|
DocLineId |
Value that uniquely identifies the document line. Order Management creates this value. |
Purchase Order Line Identifier in the purchasing system |
|
DocLineUserKey |
Line number that an end-user can understand and recognize. |
Purchase Order Line Number |
|
DocSublineId |
Value that uniquely identifies the document subline. Order Management creates this value. |
Purchase Order Schedule Identifier in the purchasing system |
|
DocSubLineUserKey |
Number for the subline that an end-user can understand and recognize. |
Purchase Order Schedule Number |