Create Your Configuration Model
Use the Product Information Management work area to create your configuration model.
Here's an example model you will create.

Summary of the Set Up
-
Create classes and configure options.
-
Add options to your option classes.
-
Create the model.
-
Add classes to your model.
-
Associate your model with an inventory organization.
-
Verify your set up.
Create Classes and Configure Options
You start at the bottom of the hierarchy. You create classes and configure options, then add them to the model.
-
Go to the Product Information Management work area.
-
On the Product Information Management page, click Tasks > Create Item.
-
In the Create Item dialog, set values, then click OK.
Attribute
Value
Organization
V1
V1 is an abbreviation for Vision Operations.
Create New
Selected
Number of Items
9
This is a nifty feature you can use to add more than one item to the same class.
Item Class
My Laptop
This is the class you created earlier.
Template
Finished Goods
As an alternative, use the ATO Item template for configure options and the ATO Option Class template for option classes. If you use them, verify each value that the template sets.
-
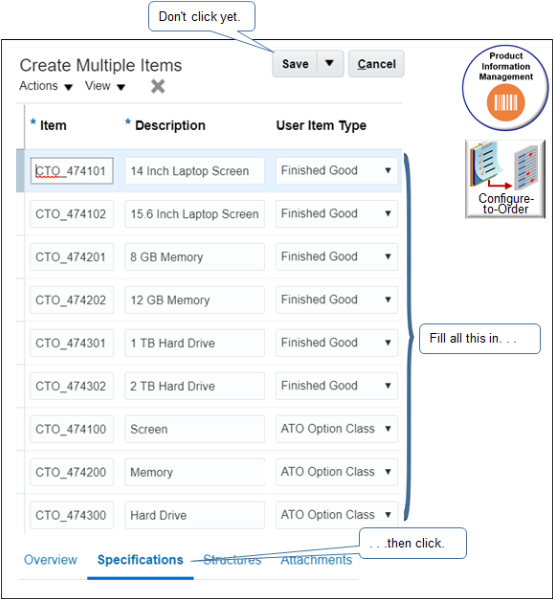
On the Create Multiple Items page, don't click Save. Instead, set the values.
Item
Description
User Item Type
CTO_474101
14 Inch Laptop Screen
Finished Good
CTO_474102
15.6 Inch Laptop Screen
Finished Good
CTO_474201
8 GB Memory
Finished Good
CTO_474202
12 GB Memory
Finished Good
CTO_474301
1 TB Hard Drive
Finished Good
CTO_474302
2 TB Hard Drive
Finished Good
CTO_474100
Screen
ATO Option Class
CTO_474200
Memory
ATO Option Class
CTO_474300
Hard Drive
ATO Option Class
Leave other attributes at their default values.
Attribute
Value
Item Status
Active
Lifecycle Phase
Design
Pack Type
Leave empty.
Here's what your set up should look like.
-
Set the values for the first item in the list.
-
Click the row that contains CTO_474101 in the Name column, click Specifications > Sales and Order Management, then set the value.
Attribute
Value
Order Management Indivisible
Yes
Specify whether your user can use a decimal quantity for the item. If Yes, then your user can use only a whole number for the quantity, such as 1, 2, or 3, and can't use a decimal, such as 1.4.
In this example, each item is indivisible. For example, you can't order a fraction of a screen, memory, or hard drive.
-
Click Associations, click Actions > Select and Add, search for an inventory organization, click Apply, then click Done.
Attribute
Value
Organization
M1
You must specify an inventory organization. If you don't, you can't create a work definition for your item.
Organization Name
Seattle Manufacturing
In this example, assume you already set up Seattle Manufacturing as an inventory organization.
-
-
Repeat step 5 for each row.
-
Set the values for the option classes.
You use the option class to group options but you don't actually ship the class. You do ship the option. So, you set some values differently for the option class than you do for the option.
-
Set the values for the screen. Click the row that contains CTO_474100 in the Name column, click Specifications, click Manufacturing under Item Organization, then set the values.
Attribute
Value
Structure Item Type
Option Class
Pick Components
No
Assemble to Order
Yes
Build in WIP
No
Supply Type
Phantom
The class is a phantom. You don't pick, assemble, or build it. You do pick, assemble, and build the option.
-
Click Sales and Order Management, then set the value.
Attribute
Value
Shippable
No
You don't ship the class. You ship the option.
-
Repeat this step for the memory option class, CTO_474200.
-
Repeat this step for the hard drive option class, CTO_474300.
-
-
Accept all other default values, then click Save > Save and Close.
Add Options to Your Option Classes
-
Search for and open the screen class for editing.
-
Click Tasks > Manage Items.
-
Search for the screen class.
Attribute
Value
Name
CTO_474100
-
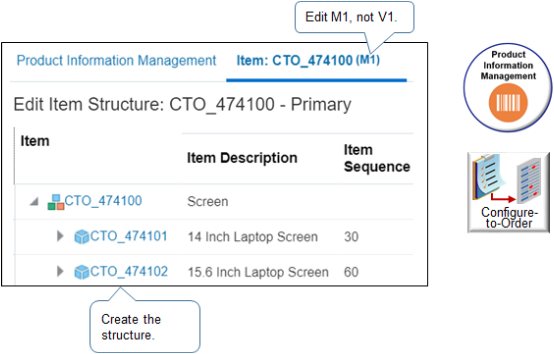
In the search results, click the M1 version.
Note:Product Information Management creates a new version of each item when you associate the item with an inventory organization, then appends the name of the organization, such as M1, to the name of the item. The search results display the V1 and M1 versions in separate rows, but doesn't display V1 or M1. It displays only the name. Make sure you click the M1 version. Its usually the second row.
-
-
Add the structure.
-
On the Edit Item page, click Structures, then click Actions > Create from Common.
Don't use Actions > Create. If you do, you will be creating a separate structure. Instead, click Create from Common to use the structure you created for the V1 version.
-
In the Create New Item Structure from Common dialog, set the values, then click OK.
Attribute
Value
Organization Name
Vision Operations
Item
CTO_474100
Structure Name
Primary
Common Structure Levels
First Level
-
In the Item Structures list, in the Name column, click Primary.
-
On the Edit Item Structure page, click View, then add a check mark to Component Order Management.
-
-
Add an option.
-
On the Edit Item Structure page, click Actions > Select and Add.
-
In the Select and Add dialog, search for the item.
Attribute
Value
Item
CTO_474101
-
In the search results, click the row, then click Edit and Add.
-
In the Edit Multiple Components dialog, set the values, then click OK.
Attribute
Value
Optional
Set to No for the option classes.
Set to Yes for the configure options.
Note
-
An option class can be required or optional. For example, a laptop computer can't function without a screen, so the screen class isn't optional.
-
If you set Optional to No for the option class, and if you set Optional to Yes for at least one option in the class, then the Order Management work area will display the class on the Configure page at runtime. This allows your user to choose the option.
-
If you set a configure option to No, then Order Management won't display it at runtime, your user can't set the option, and the purchase order and shipping documents won't include it. If its a manufactured item, then the work order will still include it because its part of the item structure.
Minimum Quantity
1
Specify the minimum quantity the user can set for this option. A laptop computer must have one and only one screen, so set the minimum quantity to 1 and the maximum quantity to 1.
Maximum Quantity
1
Instantiability
Don't modify for this example.
Specify whether to create a separate flow for each instance of the item on the order line. If the quantity of the component is greater than one, and if Instantiability is Yes, then use a separate instance for each assemble-to-order flow.
For example, assume you add an order line for the CTO_474000 with a quantity of 12, and Instantiability is.
-
Enabled. Create 12 separate flows and set the quantity on each flow to 1. Enable Instantiability when each item requires a slight variation that the flow must fulfill. For example, the item is a personal computer that includes two hard drives, and you must serialize each drive. For another example, the item is a cell phone and you must provision a unique telephone number for each phone.
-
Not enabled. Create one flow and set the quantity on the flow to 12.
-
-
-
Repeat step 3 for the CTO_474102 option.
-
Click Done, then click Save > Save and Close.
-
Repeat these steps but create the memory hierarchy.
CTO_474200 CTO_474201 CTO_474202 -
Repeat these steps but create the hard drive hierarchy.
CTO_474300
   CTO_474301
   CTO_474302
Create the Model
Create the CTO_474000 model so it works in an assemble-to-order flow.
-
On the Product Information Management page, click Tasks > Create Item.
-
In the Create Item dialog, set values, then click OK.
Attribute
Value
Organization
V1
Create New
Selected
Number of Items
1
Item Class
My Laptop
Template
ATO Model
Move ATO Model from the available list to the selected list.
Make sure the selected list contains only ATO Model.
-
On the Create Item page, set the values, then click Save.
Attribute
Value
Name
CTO_474000
Description
Build My Laptop
Item Status
Active
Lifecycle Phase
Design
User Item
ATO Model
Pack Type
Leave empty
-
Click Specifications, then set the values. Use these values for an assemble-to-order flow.
Attribute
Value
Structure Item Type
Model
Autocreated Configuration
No
Pick Components
No
Assemble to Order
Yes
Build in WIP
Yes
Set it to Yes for an assemble-to-order item that you will make.
If you were setting up a pick-to-order flow, you would use different values.
Attribute
Value
Pick Components
Yes
Assemble to Order
No
Build in WIP
No
-
Click Sales and Order Management, then set the values.
Attribute
Value
Customer Ordered
Customer Orders Enabled
Order Management Transaction Enabled
Yes
If you set these attributes to No, the flow will fail in Order Management.
Back-to-Back Enabled
Yes
This attribute allows Supply Orchestration to procure the item in a back-to-back flow, such as buy or make.
-
Set to Yes for an assemble-to-order item.
-
Set to No for pick-to-order. You can enable the configure options for back-to-back in a pick-to-order flow, but not the model.
Shippable
Yes
Note
-
Set to Yes for an assemble-to-order model. Order Management views the model as the item. The configured item is an attribute on the model. So you must make the model is shippable.
-
Set to No for a pick-to-order model. Each item in the pick-to-order model is shippable, but the pick-to-order model only represents the collection of items to ship. It isn't shippable.
Ship Model Complete
No
Note
-
Set to No for assemble-to-order because an assemble-to-order model is a single item.
-
Set to Yes for pick-to-order because Order Management only supports shipping all pick-to-order items together from the same warehouse.
Invoiced
Yes
If you set this attribute to No, then the flow won't send any details to Accounts Receivable.
-
-
Click Planning, then set the values.
Attribute
Value
Planning Method attribute in the MPS MRP Planning area
MPS Planning
If you set it to MPS Planning or MRP Planning, then the model, option classes, options, and components display in Planning Central.
For details, see Item MRP and MPS Planning Specifications.
Forecast Control
Consume Then Explode
Use this value if you intend to forecast the model. For details, see Forecast an Assemble-to-Order Item.
-
Click Purchasing, set the values, then click Save.
Attribute
Value
Purchasable
Yes
Set to Yes for the model, each option class, and each option.
List Price
100
Purchasing uses this value as the default purchase price in the purchase order. It applies only when you create a blanket purchase agreement with your supplier. It has nothing to do with set ups you make in the Pricing Administration work area.
Set a value for the model and each option, but not the option classes.
For details, see Create Purchase Orders for Configured Items.
-
Add a structure.
-
Click Structures, then click Actions > Create.
-
In the Create New Structure dialog, set the value, then click OK.
Attribute
Value
Name
Primary
-
Click Save.
-
Add Classes to Your Model
-
Add the CTO_474100 class.
-
On the Edit Item page, on the Structures tab, in the Item Structures list, in the Name column, click Primary.
-
On the Edit Item Structure page, click Actions > Select and Add.
-
In the Select and Add dialog, search for the value.
Attribute
Value
Item
CTO_474100
-
Click the row that contains CTO_474100 in the search results, then click OK.
-
On the Edit Item Structure page, click the row that contains CTO_474000 in the Item column.
-
-
Repeat step 2 to add the memory class, CTO_474200.
-
Repeat step 2 to add the hard drive class, CTO_474300.
-
Click Done, then click Save.
-
Add a picture of your model.
-
On the Edit Item page, in the large empty area under the page name, under the text No items to display, next to the text None, click the plus sign.
-
In the Attachments dialog, click Browse to locate a file that contains an image of your model, click OK, then click Save.
-
Associate Your Model with an Inventory Organization
-
Add the association.
-
On the Edit Item page, click Associations.
-
Click Actions > Select and Add.
-
In the Select and Add dialog, search for an inventory organization, then click Apply > Done.
Attribute
Value
Organization
M1
Organization Name
Seattle Manufacturing
Make sure the organization you choose as an inventory organization. If it isn't, then it won't display when you create the work definition. For details, see Inventory Organizations.
-
Click Save > Save and Close.
-
-
Create the structure in the M1 version from the structure you created in the V1 version.
-
On the Manage Items page, open the CTO_474000 (M1) version of your model for editing.
Its typically the second row in the results.
-
On the Edit Item: CTO_474000y (M1) page, click Structures, then click Actions > Create from Common.
You add the structure from the V1 version you created earlier. In this example, the V1 version is the master organization. This way, you use a single structure for all classes and options in the configured item, which helps manage and maintain the item. For example, if you update the structure in V1, then Product Information Management updates the structures that reference V1.
Don't use Actions > Create. If you do, you will be creating a separate structure for the M1 version.
Learn about master organizations. For details, see Item Organizations.
-
In the Create New Item Structure from Common dialog, set the values, then click OK.
Attribute
Value
Organization Name
Vision Operations
Item
CTO_474000
Structure Name
Primary
Common Structure Levels
All Levels
-
In the Information dialog, click OK.
-
Click Save > Save and Close.
-
Verify Your Set Up
-
Sign into Order Management and create a sales order.
Attribute
Value
Customer
Computer Service and Rentals
-
On the catalog line, enter the value.
Attribute
Value
Item
CTO_474000
-
Wait for the search results to display, then verify that the catalog line displays the Configure and Add button.
Configure and Add displays only for a configured item.
-
Click Configure and Add, then verify the Configure page.
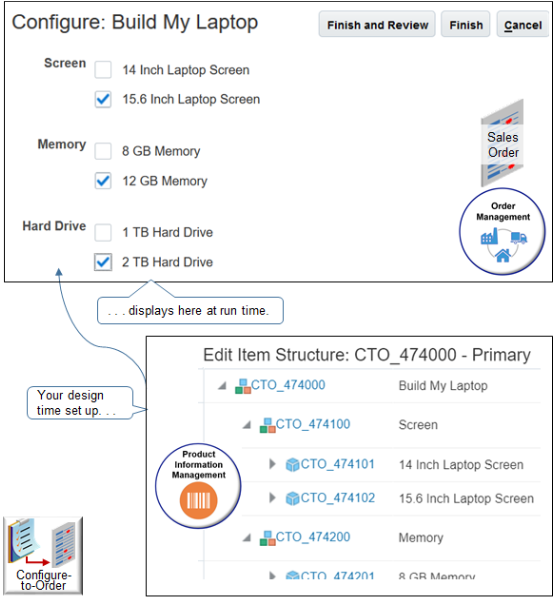
Note
-
Verify that the hierarchy on the Configure page reflects the hierarchy you set up in Product Information Management.
-
Verify that you can choose one, and only one configure option in each class.
-
Notice there's no pricing. You set it up in a different topic. For details, see Set Up Pricing for Your Configuration Model.