Use Extensible Flexfields to Integrate Order Management with Oracle Applications
Use an extensible flexfield to integrate Order Management with Oracle Pricing, Oracle Receivables, Oracle Shipping, Oracle Receiving, or Oracle Purchasing.
You can use an extensible flexfield when you need to integrate custom data with some other Oracle Application. You set up a service mapping that's similar to that service mapping that you set up for Oracle Pricing. You use an extensible flexfield to store values that the service mapping needs:
Note
-
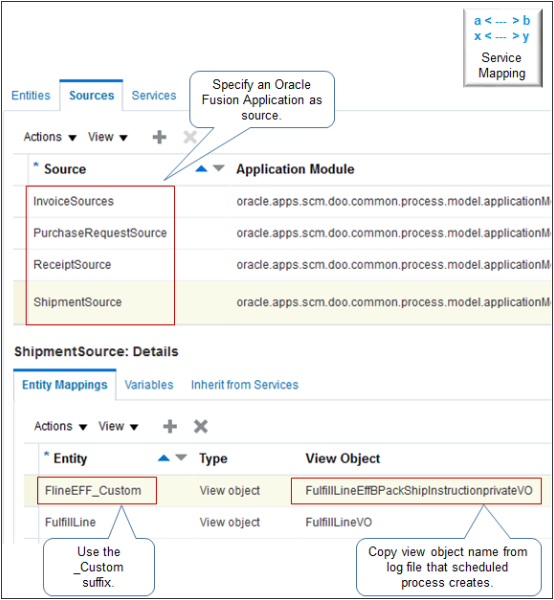
Copy the view object's name from the log file. The service mapping uses the view object to get data from your extensible flexfield. Use the log file that the Publish Extensible Flexfield Attributes scheduled process creates.
-
Use the _Custom suffix when you specify each new entity.
-
Use an integration algorithm to implement complex logic. For example, assume you must concatenate an item with the coverage that covers the item, add quantity, then store the results in a descriptive flexfield for Oracle Receivables. You can use an integration algorithm to implement this requirement.
Use Case
Assume you must make sure the primary salesperson is the same on the order header in Order Management and on the line in Oracle Receivables.
Assume you implemented a context and segment for the header extensible flexfield.
-
HeaderContext as the context
-
H1AttributeNumas the segment
You will you add an extensible flexfield on the order header in the service mapping, store the Id of the primary salesperson in the extensible flexfield, then map it to the Id of the primary salesperson on the Accounts Receivable line.
Summary of the Setup
-
Get values that identify the extensible flexfield.
-
Modify the service mapping.
-
Create an integration algorithm.
This topic uses example values. You might need different values, depending on your business requirements.
Get Values That Identify the Extensible Flexfield
-
Use a spreadsheet editor, such as Microsoft Excel, to create a spreadsheet that contains columns and values.
Attribute
Source
Value
ViewObject
XML file.
HeaderEffBHeaderContext1privateVOViewAttribute
XML file.
_H1AttributeNum1 -
Go to the Setup and Maintenance work area, then go to the task:
-
Offering: Order Management
-
Functional Area: Orders
-
Task: Manage Order Extensible Flexfields
-
-
On the Manage Order Extensible Flexfields page, search for the value.
Attribute
Value
Module
Process Order
-
In the search results, click the row that contains the value.
Attribute
Value
Name
Header Information
-
Click Actions > Download Flexfield Archive
-
In the Confirmation dialog, wait for the archive to finish, click Download, then save the file to your local computer.
The name of this file will include the value that the Flexfield Code attribute contains. For this example, you're interested in an attribute that resides on the order header, so the file name you need is 10008_DOO_HEADERS_ADD_INFO.zip.
-
Use Windows Explorer to navigate to 10008_DOO_HEADERS_ADD_INFO.zip.
-
Expand
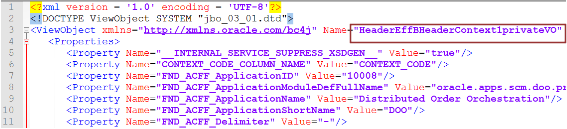
10008_DOO_HEADERS_ADD_INFO.zip
> Oracle Apps > SCM > DOO > processOrder > Flex > headerContextsB
> View
, then use an editor, such as Notepad++ or an XML editor, to open HeaderEffBHeaderContext1privateVO.xml.This view lists the XML files that are available for each context.
You will examine the HeaderContext1 extensible flexfield context.
-
Copy the value to your spreadsheet.
Attribute
Value
Name of ViewObject
HeaderEffBHeaderContext1privateVOFor example, the HeaderEffBHeaderContext1privateVO.xml file contains view object name.
-
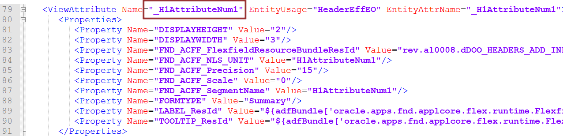
Copy the name of the attribute you will use to store the Id of the primary salesperson to your spreadsheet.
Look for the ViewAttribute that matches the segment you're using to store the value you need. For this example, here's the value you copy.
Attribute
Value
Name of ViewAttribute
_H1AttributeNum1For example, the HeaderEffBHeaderContext1privateVO.xml file contains the view attribute name.
-
Verify that your spreadsheet contains values.
Attribute
Source
Value
ViewObject
XML file.
HeaderEffBHeaderContext1privateVOViewAttribute
XML file.
_H1AttributeNum1
Modify the Service Mapping
You will modify the predefined FulfillmentIntegration service mapping.
Here's the modification.

Try it.
-
Make sure you have the privileges that you need to administer Order Management.
Use these privileges to access the integration algorithm and service mappings you use in the Pricing Administration work area to set up the integration.
-
Go to the Pricing Administration work area.
Click Tasks, then, under Order Management Configuration, click Manage Service Mappings.
-
On the Manage Service Mappings page, in the Name column, click FulfillmentIntegration.
-
On the Edit Service Mappings page, on the Entities tab, click Actions > Add Row, then set the values.
Attribute
Value
Entity
HeaderSalesPersonEFF_Custom
Description
Context for an extensible flexfield on the order header. It contains details about the salesperson.
-
In the Details area, add attributes, then click Save.
Attribute
Type
HeaderId_Custom
Long
SalesPersonId_Custom
Long
If you use a descriptive flexfield as part of this solution, then you must specify the same Type that you specify for the attribute in the extensible flexfield. For example, if you use SalesPersonId of type Long in the descriptive flexfield, then you must also specify SalesPersonId as Long on the extensible flexfield. In a different scenario, if you use an attribute named packingInstructions of type String on your descriptive flexfield, then you must also set packingInstructions to String on your extensible flexfield. If you don't use the same data type, then your service mapping might not fail when compiling but will fail in your runtime environment. The runtime failure might be difficult to troubleshoot because you might not encounter any errors but your set up might not work as you expected.
-
Set up the sources.
-
Click Sources.
-
In the InvoiceSources Details area, on the Entity Mappings tab, click View > Columns, then add a check mark to each value.
-
Joined Entity
-
Joined Entity Attribute
-
Use Existing View Object
-
-
Click Actions > Add Row, set the values, then click Save.
Attribute
Value
Entity
HeaderSalesPersonEFF_Custom
Type
View Object
View Object
HeaderEffBHeaderContext1privateVOQuery Type
Join
Query Attribute
HeaderId
Use Existing View Object
Contains a check mark.
Joined Entity
Header
It might be necessary to click Save to get the list of values to populate.
Joined Entity Attribute
HeaderId
-
On the Attribute Mappings tab, add attributes, then click Save.
Attribute
View Object Attribute
HeaderId_Custom
HeaderId
SalesPersonId_Custom
_H1AttributeNum1Copy the value from your spreadsheet.
The attribute View Object Attribute is required for each mapping you create in this topic.
-
On the Entity Mappings tab, click the row that contains the value.
Attribute
View Object Attribute
Entity
ARInterfaceLine
-
In the ARInterfaceLine Details area, click Actions > Add Row, set the value, then click Save.
Attribute
Value
Attribute
ResourceSalesrepId
-
-
Set up the services.
-
Click Services.
-
In the InvoiceService Details area, click Actions > Add Row, then set the value.
Attribute
Value
Entity
HeaderSalesPersonEFF_Custom
-
In the HeaderSalesPersonEFF_Custom - Entities area, add attributes.
Attribute
Alias
HeaderId_Custom
Optional
SalesPersonId_Custom
Optional.
The alias is optional. You can add a value or leave it empty. If you add an alias, make sure it begins with an upper case character, such as My Alias. Don't begin the alias with a lower case character, such as my alias.
-
In the InvoiceService Details area, click the row that contains the value.
Attribute
Value
Entity
Header
-
In the Header Entities area, add an attribute.
Attribute
Alias
HeaderId
Leave empty.
-
In the InvoiceService Details area, click the row that contains the value.
Attribute
Value
Entity
ARInterfaceLine
-
In the ARInterfaceLine Entities area, add the attribute, then click Save and Close.
Attribute
Alias
ResourceSalesrepId
Leave empty.
-
Create an Integration Algorithm
-
Click Tasks, then, under Order Management Configuration, click Manage Algorithms.
-
On the Manage Algorithms page, click Actions > Create.
-
On the Create Algorithm page, set the value, then click Save.
Attribute
Value
Name
Accounts Receivable Mapping Custom
-
Click Variables > Actions > Add Row, set the values, then click Save.
Attribute
Value
Name
ARIntegration
Data Type
Data Object
Input and Output
Input and Output
Internal Service Schema
FulfillmentIntegration.InvoiceService
-
Click Algorithm > Add Step > Conditional Action, set the values, then click Save.
Attribute
Value
Name
Map Salesperson Id
Description
Map the primary salesperson from the extensible flexfield that resides on the order header.
-
In the Data Sets area, add the data sets, then click Save.
Name
Variable Path
Cardinality
Data Set Join
ARLine
ARIntegration.ARInterfaceLine
Leave empty
Not applicable
FLine
ARIntegration.FulfillLine
Zero or one
[FulfillLineId: {ARLine.FulfillLineId}]HdrEFF
ARIntegration.HeaderSalesPersonEFF_Custom
Zero or one
[HeaderId_Custom: {FLine. HeaderId}]where
Code
Description
ARIntegration.ARInterfaceLine
Specifies to use entity ARInterfaceLine of the service mapping to get order details, then store them in ARIntegration, which is the variable you added to this integration algorithm earlier in this topic.
This integration uses ARIntegration to temporarily store the data that this integration algorithm will communicate through the service mapping. The Data Set Join is empty in primary data set ARLine because the secondary data set populates ARLine.
ARIntegration.FulfillLine
Filters the results in ARIntegration according to the fulfillment line.
The join
[FulfillLineId: {ARLine.FulfillLineId}]uses the FulfillLineId attribute of the FulfillLine entity from the service mapping to filter the primary ARLine data set so it contains only the fulfillment line that FulfillLineId references.ARIntegration.HeaderSalesPersonEFF_Custom
Filters the results in ARIntegration according to order header.
The join
[HeaderId_Custom: {FLine. HeaderId}]uses the HeaderId attribute of the HeaderSalesPersonEFF_Custom entity to filter theFLinedata set so it contains only order headers.Note
-
In the Variable Path, make sure you use the exact entity names from the service mapping, such as ARInterfaceLine, FulfillLine, and HeaderSalesPersonEFF_Custom.
-
To make ARLine the primary, enable the Primary option.
-
Each group of data sets includes one primary data set and one or more secondary data sets.
-
Cardinality specifies that there is zero or one records in the secondary data set to one or many records in the primary data set. It determines whether the join is an inner join or outer join.
-
Data Set Join defines the constraint that this step uses to filter records that the secondary data set saves in the primary.
-
FLine represents a row from entity FulffillLine that matches the join condition. The name is case-sensitive. Make sure you use FLine, not fline.
-
HdrEFF represents a row from entity HeaderSalesPersonEFF_Custom that matches the join condition.
-
ARInterfaceLine and FufillLine come predefined.
-
You create HeaderSalesPersonEFF_Custom in the service mapping.
-
ARInterfaceLine comes predefined with attribute ResourceSalesRepId. Your set up will populate ResourceSalesRepId with the value from attribute SalesPerson_Custom in entity HeaderSalesPersonEFF_Custom that you define. You define HeaderSalesPersonEFF_Custom in the join conditions for the data set so it uniquely identifies the row that your set up uses to do the mapping.
-
-
In the Execute Condition area, click Add Condition > Default Action, add the value, then click Save and Close.
Attribute
Value
Action
ARLine.ResourceSalesrepId=HdrEFF.SalesPerson_Customwhere
-
ARLine.ResourceSalesrepId. Specifies to store the result in the ResourceSalesrepId attribute of the ARInterfaceLine entity on the service mapping.
-
-
Test your algorithm. For details, see Set Up an Integration Algorithm.
-
On the Manage Algorithms page, click Actions > Publish.
-
Verify that the Status displays Published, then click Done.
-
Navigate to the Edit Service Mapping page.
-
Click Services, set the values, then click Save and Close.
Attribute
Value
Service
InvoiceService
Implementation Type
Algorithm
Implementation
Accounts Receivable Mapping Custom
where
-
Accounts Receivable Mapping Custom is the name of the integration algorithm you created.
-
What If I Can't Find an Attribute I Can Use
You can't add an attribute to the data model, but you can reference an attribute that you aren't using. Most applications come predefined with a set of attributes you can use for your own, specific purpose, such as string attributes Attribute1 through Attribute20 with drop ship, or string attributes SrcAttribute1 through SrcAttribute20 in shipping. Get a list of the attributes. For details, see Entities and Attributes That You Can Use When You Integrate Order Management with Other Oracle Applications.