Guidelines for Setting Up Configuration Models
Follow guidelines to help your setup go smoothly.
Use a Proven Setup Sequence
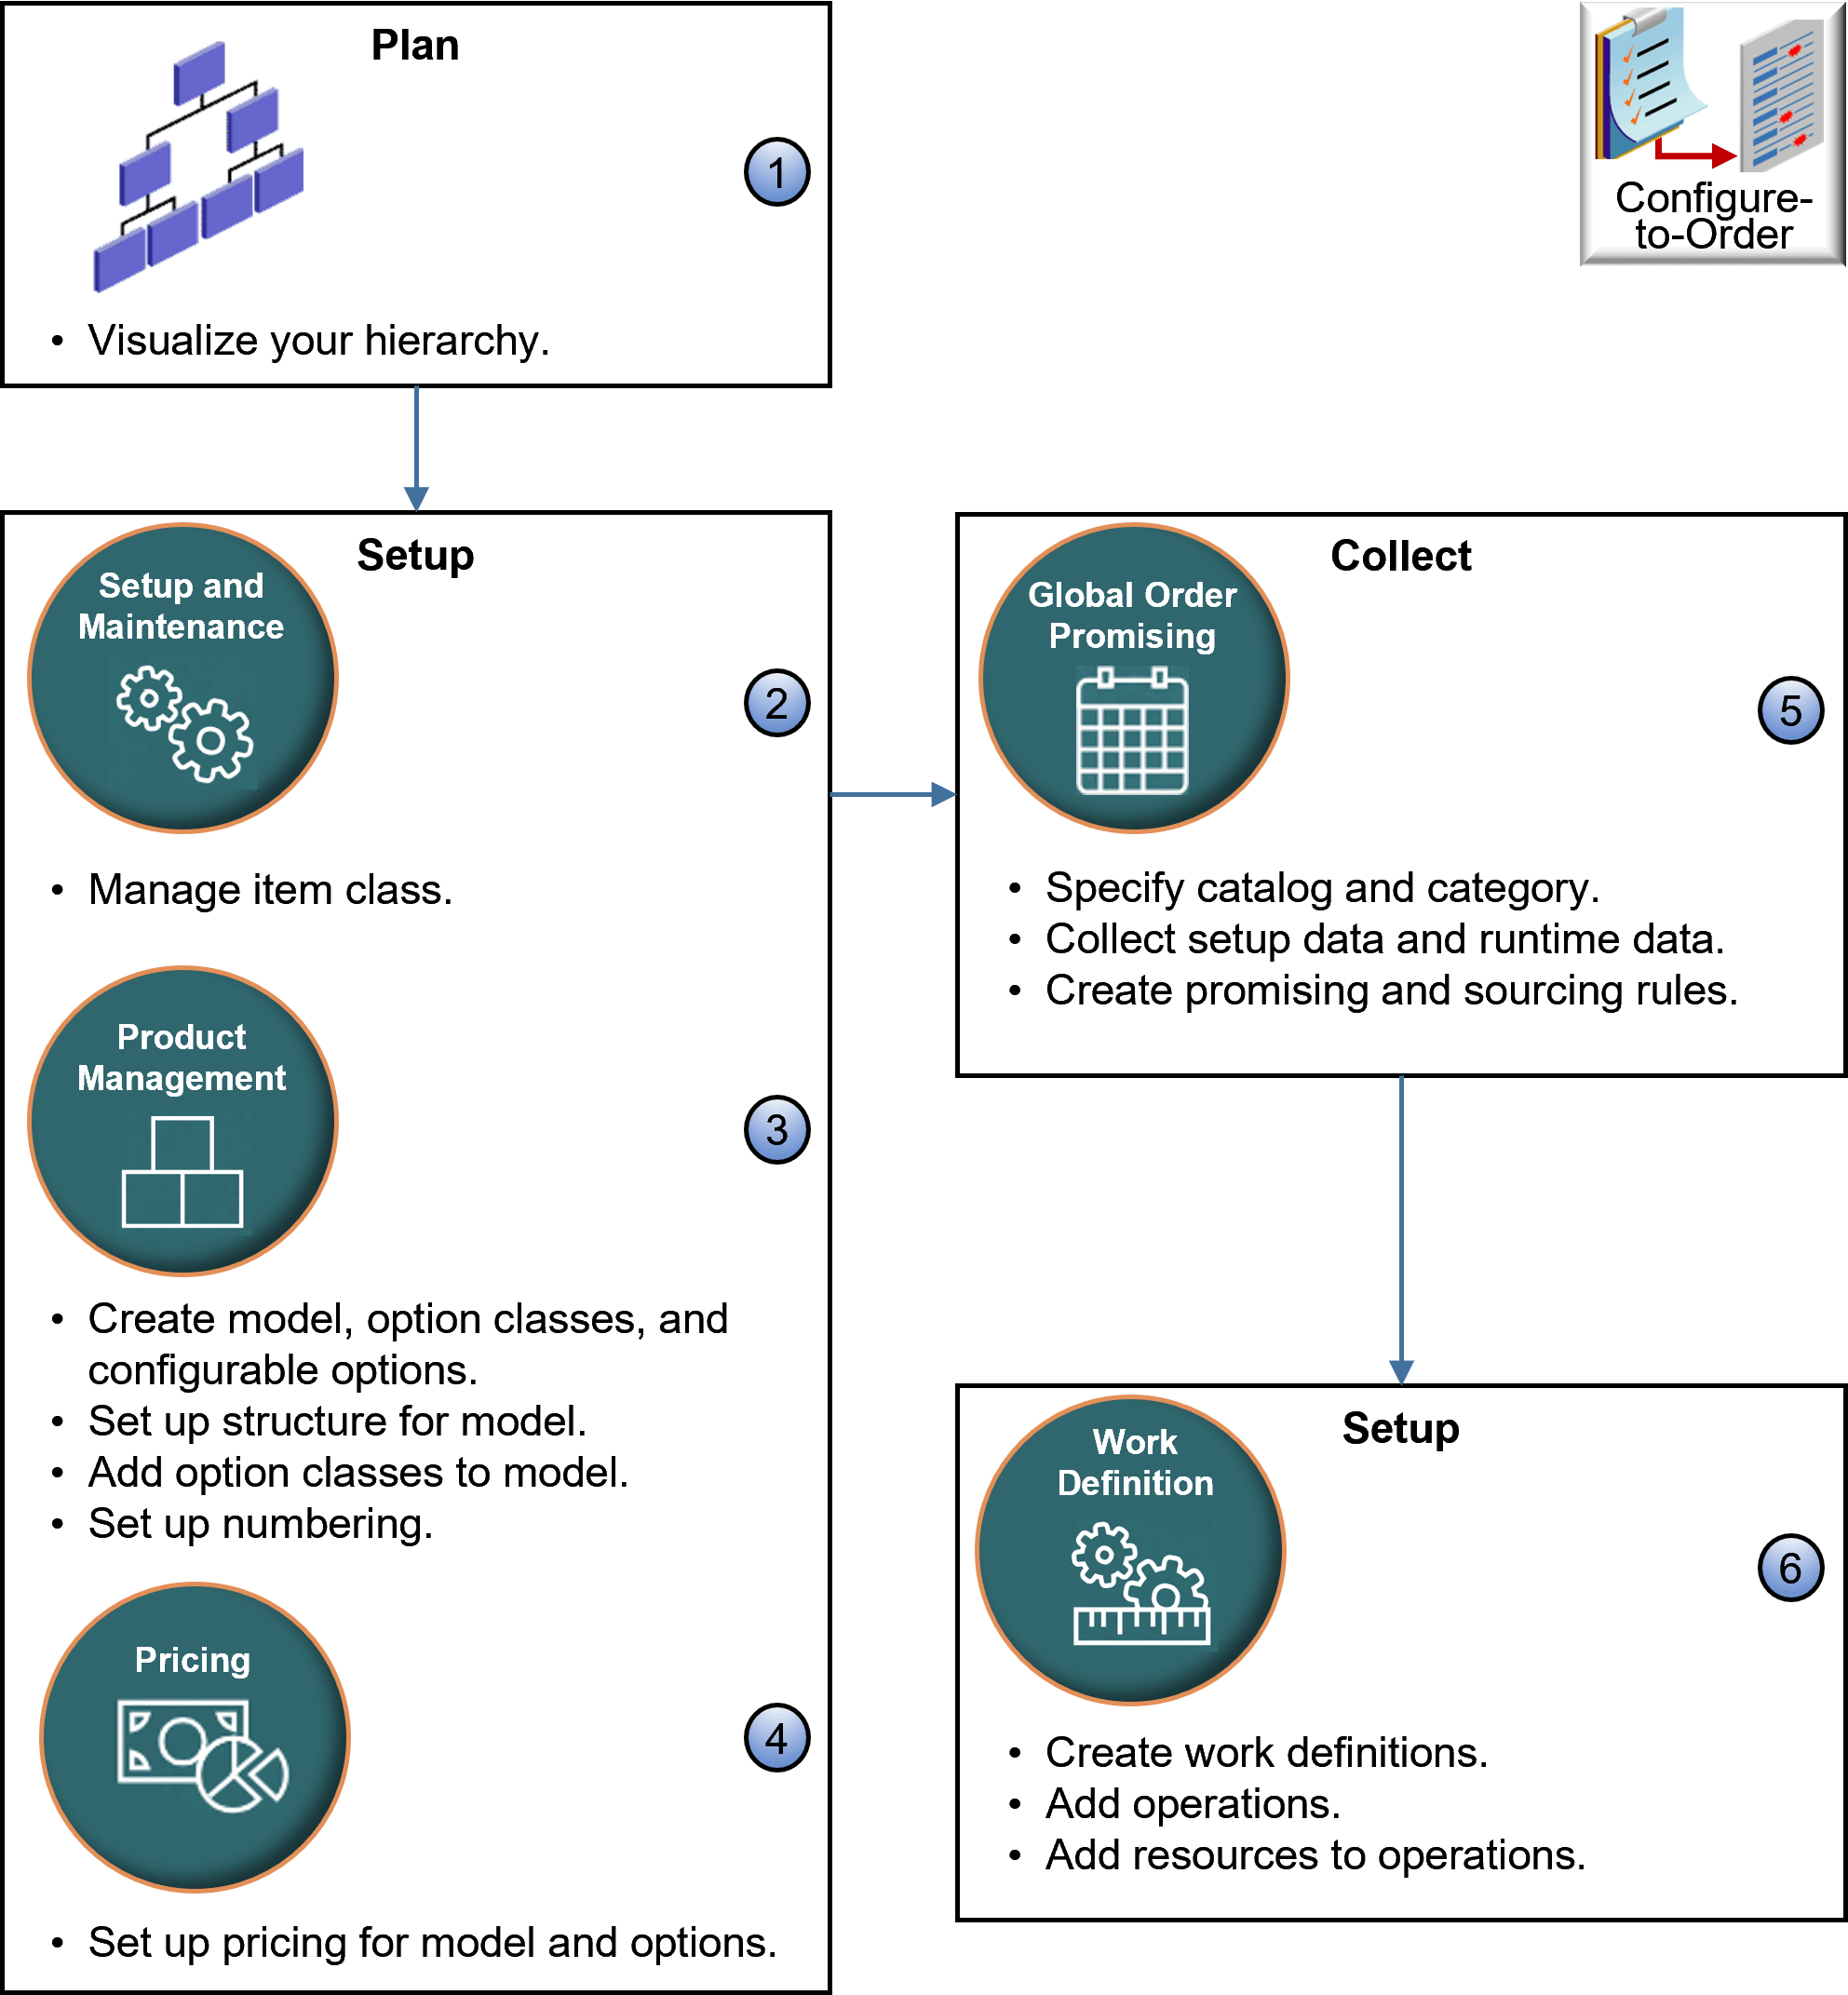
You use various work areas to set up your configuration model. Here's an example sequence for the make flow.
Note
-
Use a graphics program or pen and paper to visualize your hierarchy.
-
Use the Setup and Maintenance work area to manage the item class.
-
Use the Product Management work area:
-
Create the model, option classes, and configurable options.
-
Set up a structure for your model.
-
Add option classes to your model.
-
Set up numbering. See Set Up Numbers for Configuration Models.
-
-
Use the Pricing Administration work area to set up pricing for your model and configurable options.
-
Use the Global Order Promising work area:
-
Specify catalog and category.
-
Collect setup data and runtime data.
-
Create promising and sourcing rules.
-
-
Use the Work Definition work area:
-
Create work definitions.
-
Add operations.
-
Add resources to operations.
-
Organize Your Hierarchy
Your hierarchy can include parents and children, but there are limits about what you can include in assemble-to-order (ATO) items, pick-to-order (PTO) items, and kits. Here's what's allowed:
| Hierarchy | Allowed? |
|---|---|
| ATO child in an ATO parent | Yes |
| ATO child in a PTO parent | Yes |
| PTO child in a PTO parent | Yes |
| PTO child in an ATO parent | No |
| ATO child or PTO child in a kit parent | No |
| Kit child in an ATO parent | No |
| Kit child in an PTO parent | Yes |
| Kit child in an Kit parent | Yes |
Assume you sell these items in various configurations:
- Kitchen Appliances
- Stove
- Stove Burners
- Espresso Station
- Milk Steamer
- Coffee Grinder
- Air Fryer
Here are some example hierarchies.
ATO Stove
  ATO Stove Burners
PTO Espresso Station
ATO Milk Steamer
PTO Espresso Station
  PTO Coffee Grinder
| Allowed | Not Allowed |
|---|---|
|
You can’t have a PTO child in an ATO parent, so you can’t have PTO Espresso Station as a child of ATO Kitchen Appliances. If you need to include the Espresso Station as a child of Kitchen Appliances, then change Kitchen Appliances from ATO to PTO. |
More
-
You can include a configurable option in your hierarchy that isn't part of an option class.
-
You can set up a hybrid configuration model. For example, add a child assemble-to-order model to a parent pick-to-order model or assemble-to-order model.
-
Reuse your option classes. For example, create an option class for hard drives, then reuse it for different laptop computer models.
Set Up Your Item
Go to Home > Product Management, create an item, click Attributes, then set your values:| Section | Description |
|---|---|
| Manufacturing |
|
| Sales and Order Management |
|
-
Set the Optional attribute to Yes for each component of an assemble-to-order or pick-to-order item when you create the item in Product Management. Setting it to Yes means the user can set a value for it, or not set any value.
For example, if you set Optional to Yes for the Hard Drive component, and if the user doesn't choose an option for the hard drive, such as 1TB or 2TB, then configure-to-order uses the default value that you set for the hard drive.
-
If you use a transaction attribute, then, to create a new configured item at run time, set the scope to Configuration Matching in the item class for your transaction attribute. You must set the scope for each transaction attribute that's unique in your assemble-to-order model. If you don't do this, then Order Management will save the value, but Supply Chain Orchestration won't save it or send it to manufacturing.
Set Up Global Order Promising
Here are some setups that you can do:
-
Promise an assemble-to-order item, pick-to-order item, or a hybrid that includes an assemble-to-order item inside a pick-to-order item.
-
Consider lead times for the model, option class, and option when determining the lead time for the configured item. You can do supply chain availability but not lead-time promising when you use an available-to-promise rule in a business-to-business flow. You can set some values, but don't mix rule types.
-
Exclude sourcing on each option and option class.
-
Create a supply recommendation at runtime for each configured item in a back-to-back flow.
-
Promise each configured item in a drop ship flow.
-
Make sure Supply Planning is available for each component. Planning plans each component, including child models.
Note
-
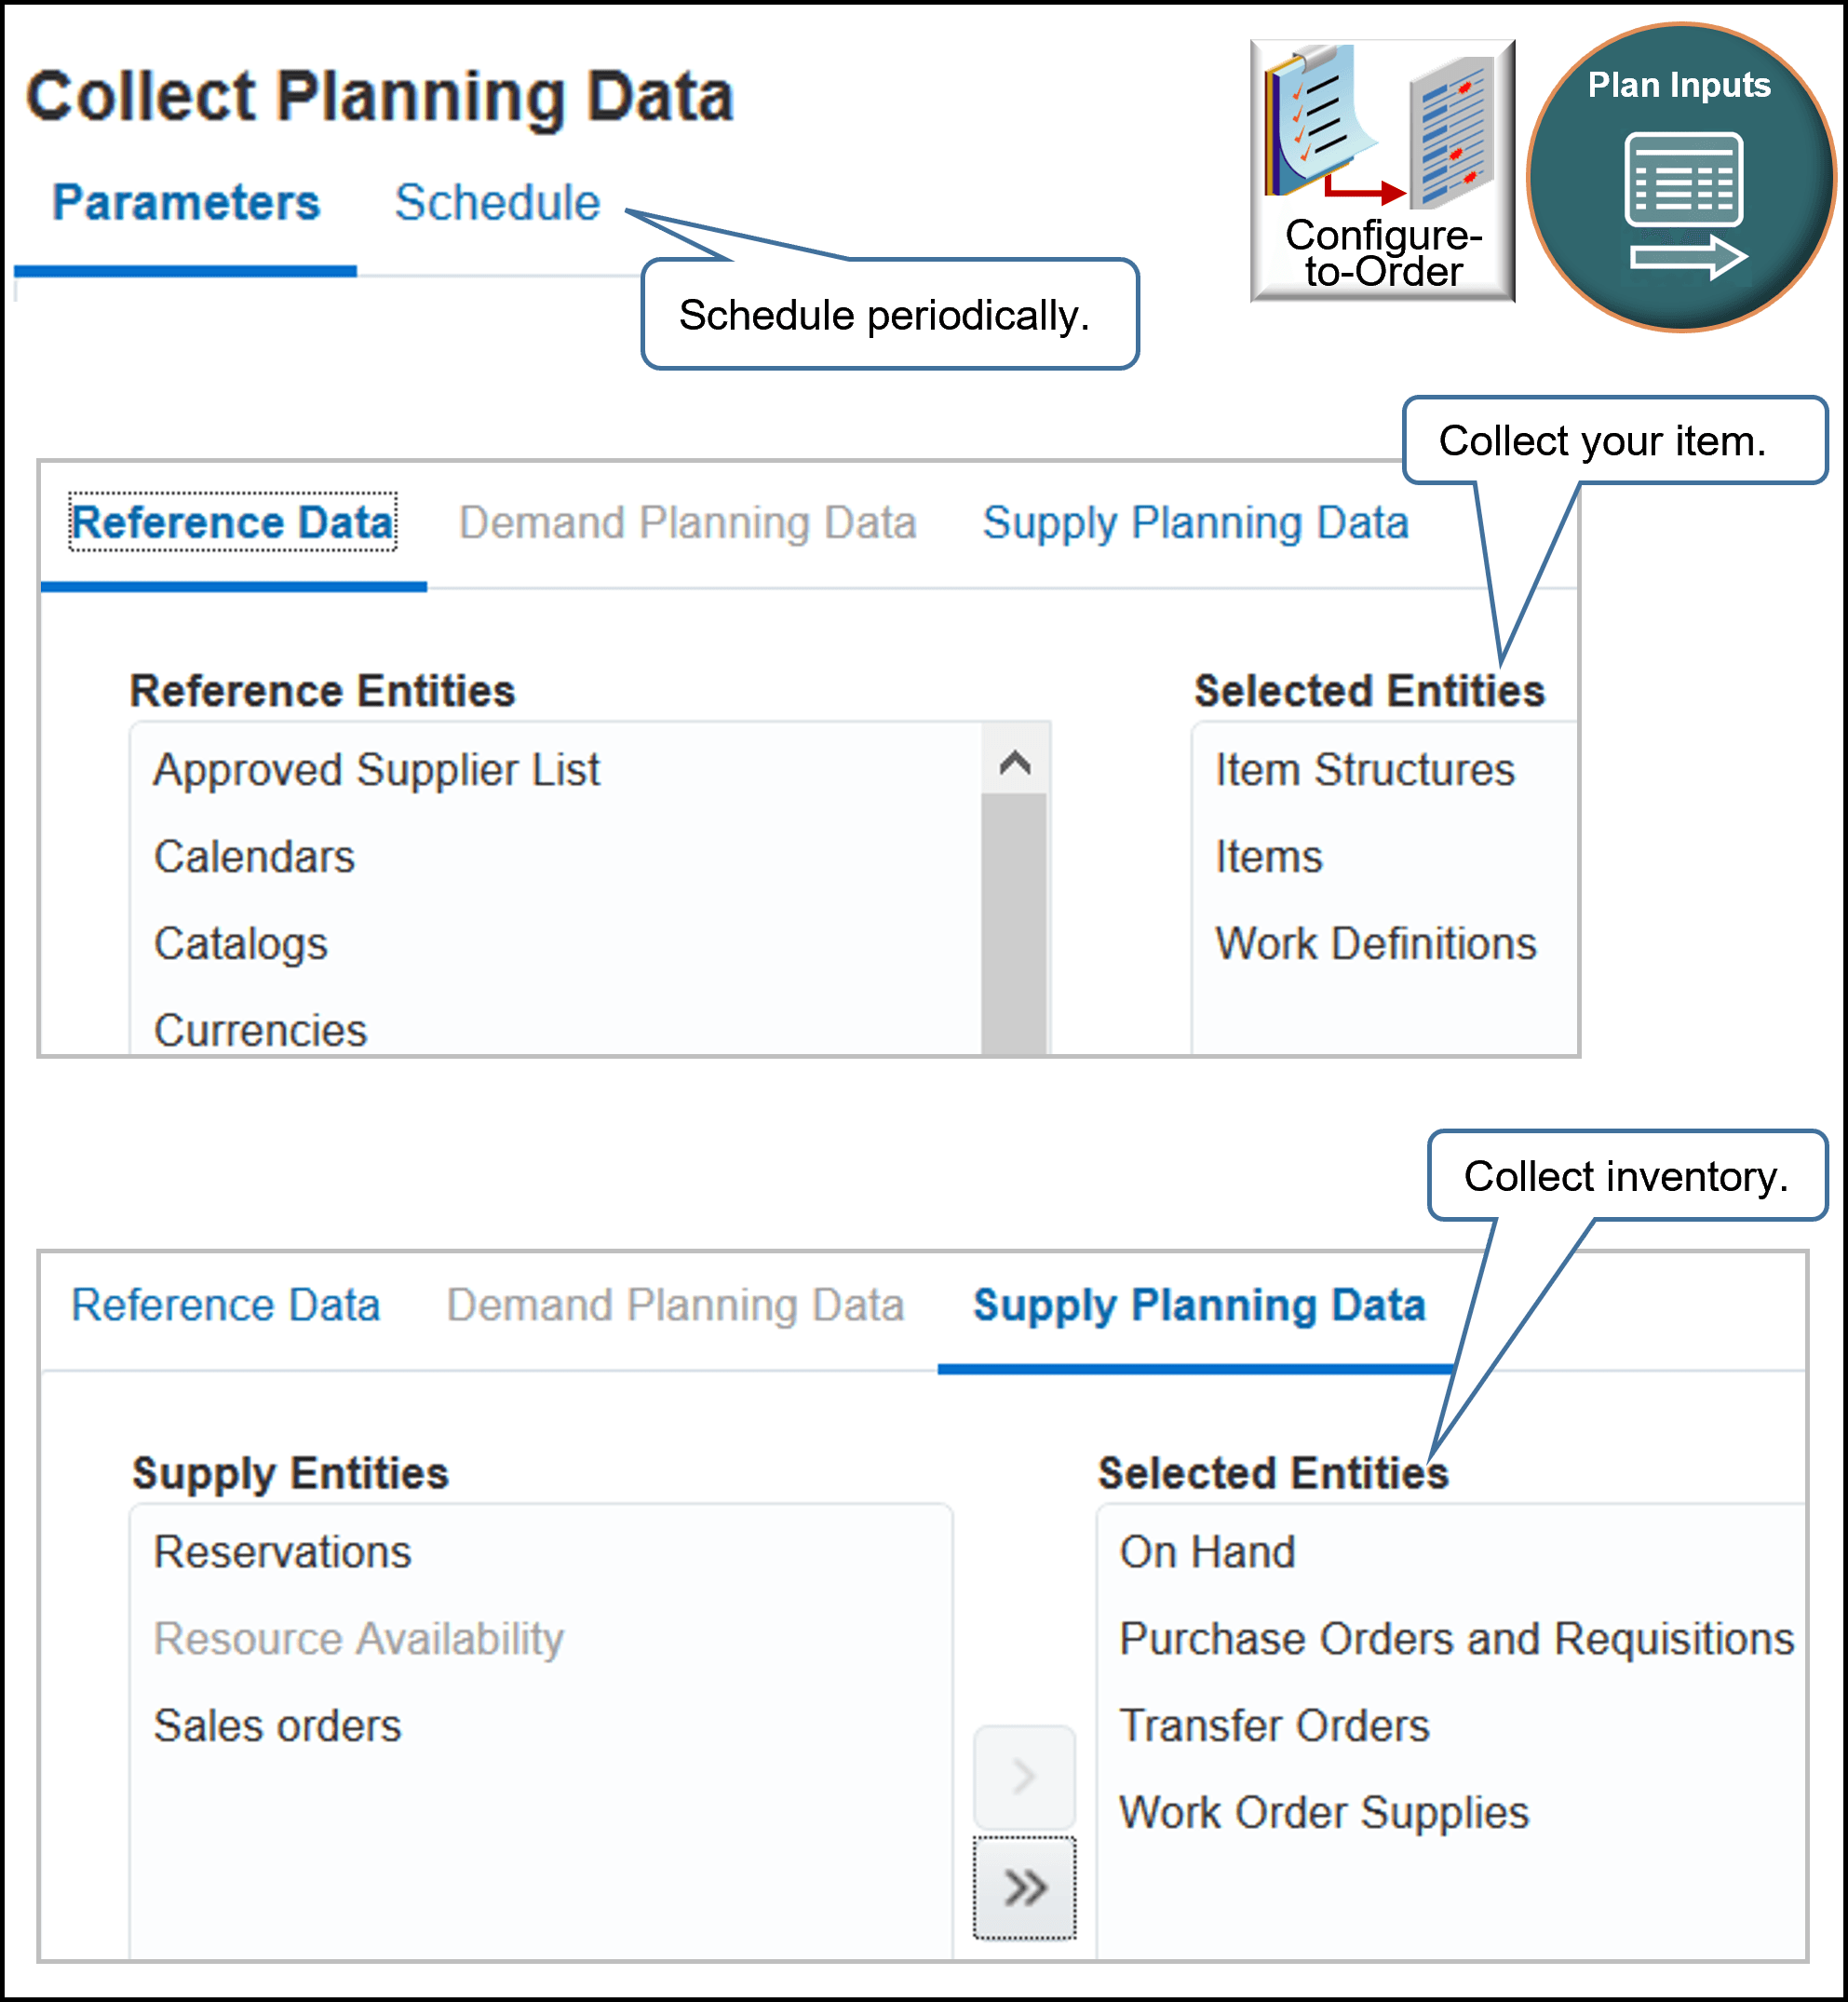
Go to the Plan Inputs work area, then click Tasks > Collect Planning Data.
-
Collect your configured item on a schedule, such as at the end of each day, so the flow can include them in the on-hand quantity. For example, the return orders you receive throughout the day might increase on-hand quantity.
-
Collect items, item structures, and work definitions for your new model. Promising won't provide a make recommendation if you don't collect the work definition.
-
Collect on-hand inventory for each configurable option. If even one component isn't in stock, then Promising won't display availability for your model.
-
You must collect each new configured item.
-
Refresh the repository after you collect.
Avoid the Not Available message at runtime:
-
Create an available-to-promise (ATP) rule to get a recommendation from Promising during the back-to-back flow.
-
Explicitly reference the model and each component in your available-to-promise rule. If you don't explicitly reference them, then include them in a category.
Consider Resource Capacity
Consider resource capacity and availability for each configured item that you manufacture:
|
If |
Then |
|---|---|
|
You must specify the operation assignment for the item at the first level component of the model. You do this when you set up the work definition for your assemble-to-order model. The flow ignores assignments you set at lower levels. |
Note
-
You can use an available-to-promise rule to promise according to fixed and variable lead times for an attribute on the option.
-
Oracle Manufacturing supports assignments at any level in the model.
Use the Configurator Models Work Area
Use the Configurator Models work area to extend your configuration model. For example:
-
Set default choices or values.
-
Automatically select a configurable option according to another choice your user makes when configuring the item.
-
Prevent your user from selecting options that result in a configured item that won't work.
-
Control the number of instances your flow creates for a model at runtime.
-
Calculate and set the values for numeric configurable options.
If you use the Configurator Models work area, then follow these guidelines:
-
If you must display a transaction attribute at runtime, then import your model into the Configurator Models work area.
-
If you revise a model, option class, optional item, or update the item class in the Product Management work area, then you must refresh their definitions in the Configurator Models work area, add the modifications to an unreleased workspace, test the model, and then release the workspace to production.
For details, see Create and Maintain Configurator Models.
Import Sales Orders
If you use the Configurator Models work area, and if you import a sales order that has a configured item at run time through:
-
File-base data import. Use the same template you use when you import a sales order that includes only one order line.
-
Web service. Use the same web service you use when you import a sales order that includes only one order line. Make sure your import includes child lines for the configurable options and that it establishes a relationship between the child and parent configured item.
-
REST APIOrder Management doesn't cascade values from the parent to its children when you import a configured item through REST API, so you must include your values on each child. For example, include the contract start date and the contract end data on each child.
If you must cascade values, consider using an order management extension. See the Cascade Values Between Order Lines in Configuration Models section in Extend Order Lines.
I Use My Own Application to Set Up the Configuration Model
Assume you use your own application to set up a configuration model and to create the bill of materials that Oracle Applications use to build the model, and you use that list to import the order lines that contain your configured item and its components. If at some later point you import a revision for the model, then you must make sure the sequence that you use in the revision is identical to the sequence you used in the original import.
Assume you import a configuration model for a desktop computer, it has 3 components, and you import this sequence and hierarchy.
  Desktop Computer
    4K Monitor
    HD Monitor
You also have a rule that says depending on the value of the Desktop Computer, if user doesn't select 4K Monitor, then add the HD Monitor to the configured item.
Some time later, you import a revision for Desktop Computer. If your revision doesn't import Desktop Computer, 4K Monitor, and HD Monitor in the same sequence that you used in the original import, then the configuration might fail. For example, if your revision imports 4K Monitor before it imports Desktop Computer, then the rule might fail because the rule logic depends on the value of Desktop Computer before it can proceed to make the decision about HD Monitor.
I Use Oracle Configurator to Set Up the Configuration Model
If your application integrates with Oracle Configurator and you used it to set up the configuration model, then don't import the entire list of components from the model when your send your revision. Instead, import only the configuration header and revision number, and the import will communicate with Oracle Configurator to recreate the component list.
Add Coverages and Subscriptions at Each Level
As an option, you can add a coverage or subscription at each level of a configured item instead of only at the root parent level regardless of how you price it.
This feature is particularly useful when you need a unique coverage or coverage duration for different components in the item's hierarchy. You can now select a single component in the Order Management workarea and apply a subscription or coverage without cascading from the root parent. You can add, end, renew, or amend a coverage or subscription through REST API or the workarea.
Realize these benefits:
- Provide more specific coverages and subscriptions so you can improve operational efficiency and customer satisfaction.
- Increase revenue. You can sell an individual subscription or coverage for a specific component, such as extending a warranty for a critical part.
- Allocate resources more efficiently. Order Management can automatically cascade coverage according to your specific requirements, and this can reduce your manual workload.
1. Quantum-Thermic Flux Coils ($48,000 each)
  1.1 Neutrino-Harmonized Induction Rings ($12,000). Aligns molecular spin for gentle baking at the quantum level.
  1.2. Zero-Point Energy Stabilizers ($9,800). Prevents collapse of local spacetime during flash roasting.
  1.3. Swiss-Calibrated Entropy Dampers ($6,600). Ensures consistent thermodynamic flow, even in a state of existential crisis.

2. Cryo-Resistant Carbon-Neutron Alloy Shell ($32,000)
  2.1. Meteorite-Forged Core Plates ($10,200). Only sourced from asteroids with ironic names.
  2.2. Anti-Magnetic Titanium Filament Mesh ($7,300). Resists solar flares and conspiracy theories.
  2.3. VantaBlack-Infused Thermal Paint ($5,500). So dark it absorbs hope (and radiant heat).

3. AI-Infused Heat Distribution Matrix ($28,500)
  3.1. Sentient Thermodynamic Balancer ($11,200). It doesn’t just heat, it feels you watching it.
  3.2. Deep Neural Toasting Core ($9,999). Trained on 80 million hours of footage from The Great British Bake Off.
  3.3. Predictive Burn Modeling Algorithm ($6,400). Calculates when your experiment will char before you forget it.

4. Diamond-Edge Infrared Sight Glass ($21,000)
  4.1. Monocrystalline Sapphire Pressure Dome ($7,800). Pressure-rated for use on Jupiter’s surface.
  4.2. Anti-Glare Cosmic Ray Filter Layer ($6,100). Keeps out solar interference and judgmental glares.
  4.3. Micro-etched Grid of Elemental Purity ($4,700). Each pixel custom-ground by an artisan.

5. Nuclear-Grade Gasket Seals ($18,250)
  5.1. Kevlar-Aramid Reinforced Memory Rings ($6,800). Seals in air, heat, and government secrets.
  5.2. Bio-Adaptive Compression Gel Core ($5,100). Adjusts viscosity depending on planetary alignment.
  5.3. Triple-Lock Neutron Baffles ($3,500). Blocks unwanted subatomic escape events.

6. Voice-Activated Temporal Bake Core ($15,000)
  6.1. Chrono-Intuitive Delay Buffer ($4,900). Bake your soufflé yesterday—finally, time travel for pastry.
  6.2. Linguistic Synapse Processor ($4,100). Understands 342 dialects of “crispy.”
  6.3. Wormhole Preheat Accelerator ($3,300). Preheats your consciousness and the oven in under 1 second.

7. Platinum Nano-Filtration Exhaust ($12,400)
  7.1. HEPA-9B Particle Condensers ($4,200). Traps fumes, allergens, and bad vibes.
  7.2. Aromatic Signature Modulator ($3,600). Makes burnt cheese smell like lavender.
  7.3. Auto-Cleansing Ion Discharge Frame ($2,700). Charges itself monthly off ambient guilt.

8. NASA-Spec Control Interface Panel ($9,750)
  8.1. Haptic Feedback Loop Arrays ($3,800). Tactile response mimics warm fondue.
  8.2. Multi-Spectral OLED Heat Gauge ($3,300). Color-coded in hues only visible to owls.
  8.3. Dual Encryption Bake Authorization Keypad ($2,000). Two-factor authentication for pie.
You can add a coverage at any level. For example, apply a:
- 5 year warranty for the 1. Quantum-Thermic Flux Coil
- 2 year warranty for the 3.1 Sentient Thermodynamic Balancer
- 1 year warranty for the 4.2 Anti-Glare Cosmic Ray Filter Layer
- Integrate Order Management with Subscription Management to Process Subscriptions
- Integrate Order Management with Subscription Management to Process Coverages
- If you add a coverage or subscription to a component that isn't at the hierarchy's lowest level, then make sure none of the lower components have a coverage or subscription. For example, if you add a coverage for the Quantum-Thermic Flux Coils, then make sure the induction rings, energy stabilizers, and entropy dampers don't have a coverage.
- Order Management displays each item that you price before you import it on a separate order line. If Order Management cascades this price, then it will display the price only on the top component. You can click More to view details.
- You can’t add a component directly to an included item. Instead, cascade it from the parent.
Troubleshoot
You set up a configuration model in two phases:
-
Create the model, options, classes, and hierarchy in Product Management.
-
Send details about the model to your downstream systems.
Go to the Supply Orchestration work area, then use the Manage Configured Item Exceptions page to examine most errors that happen in this step. Correct the error and resubmit, or ignore it:
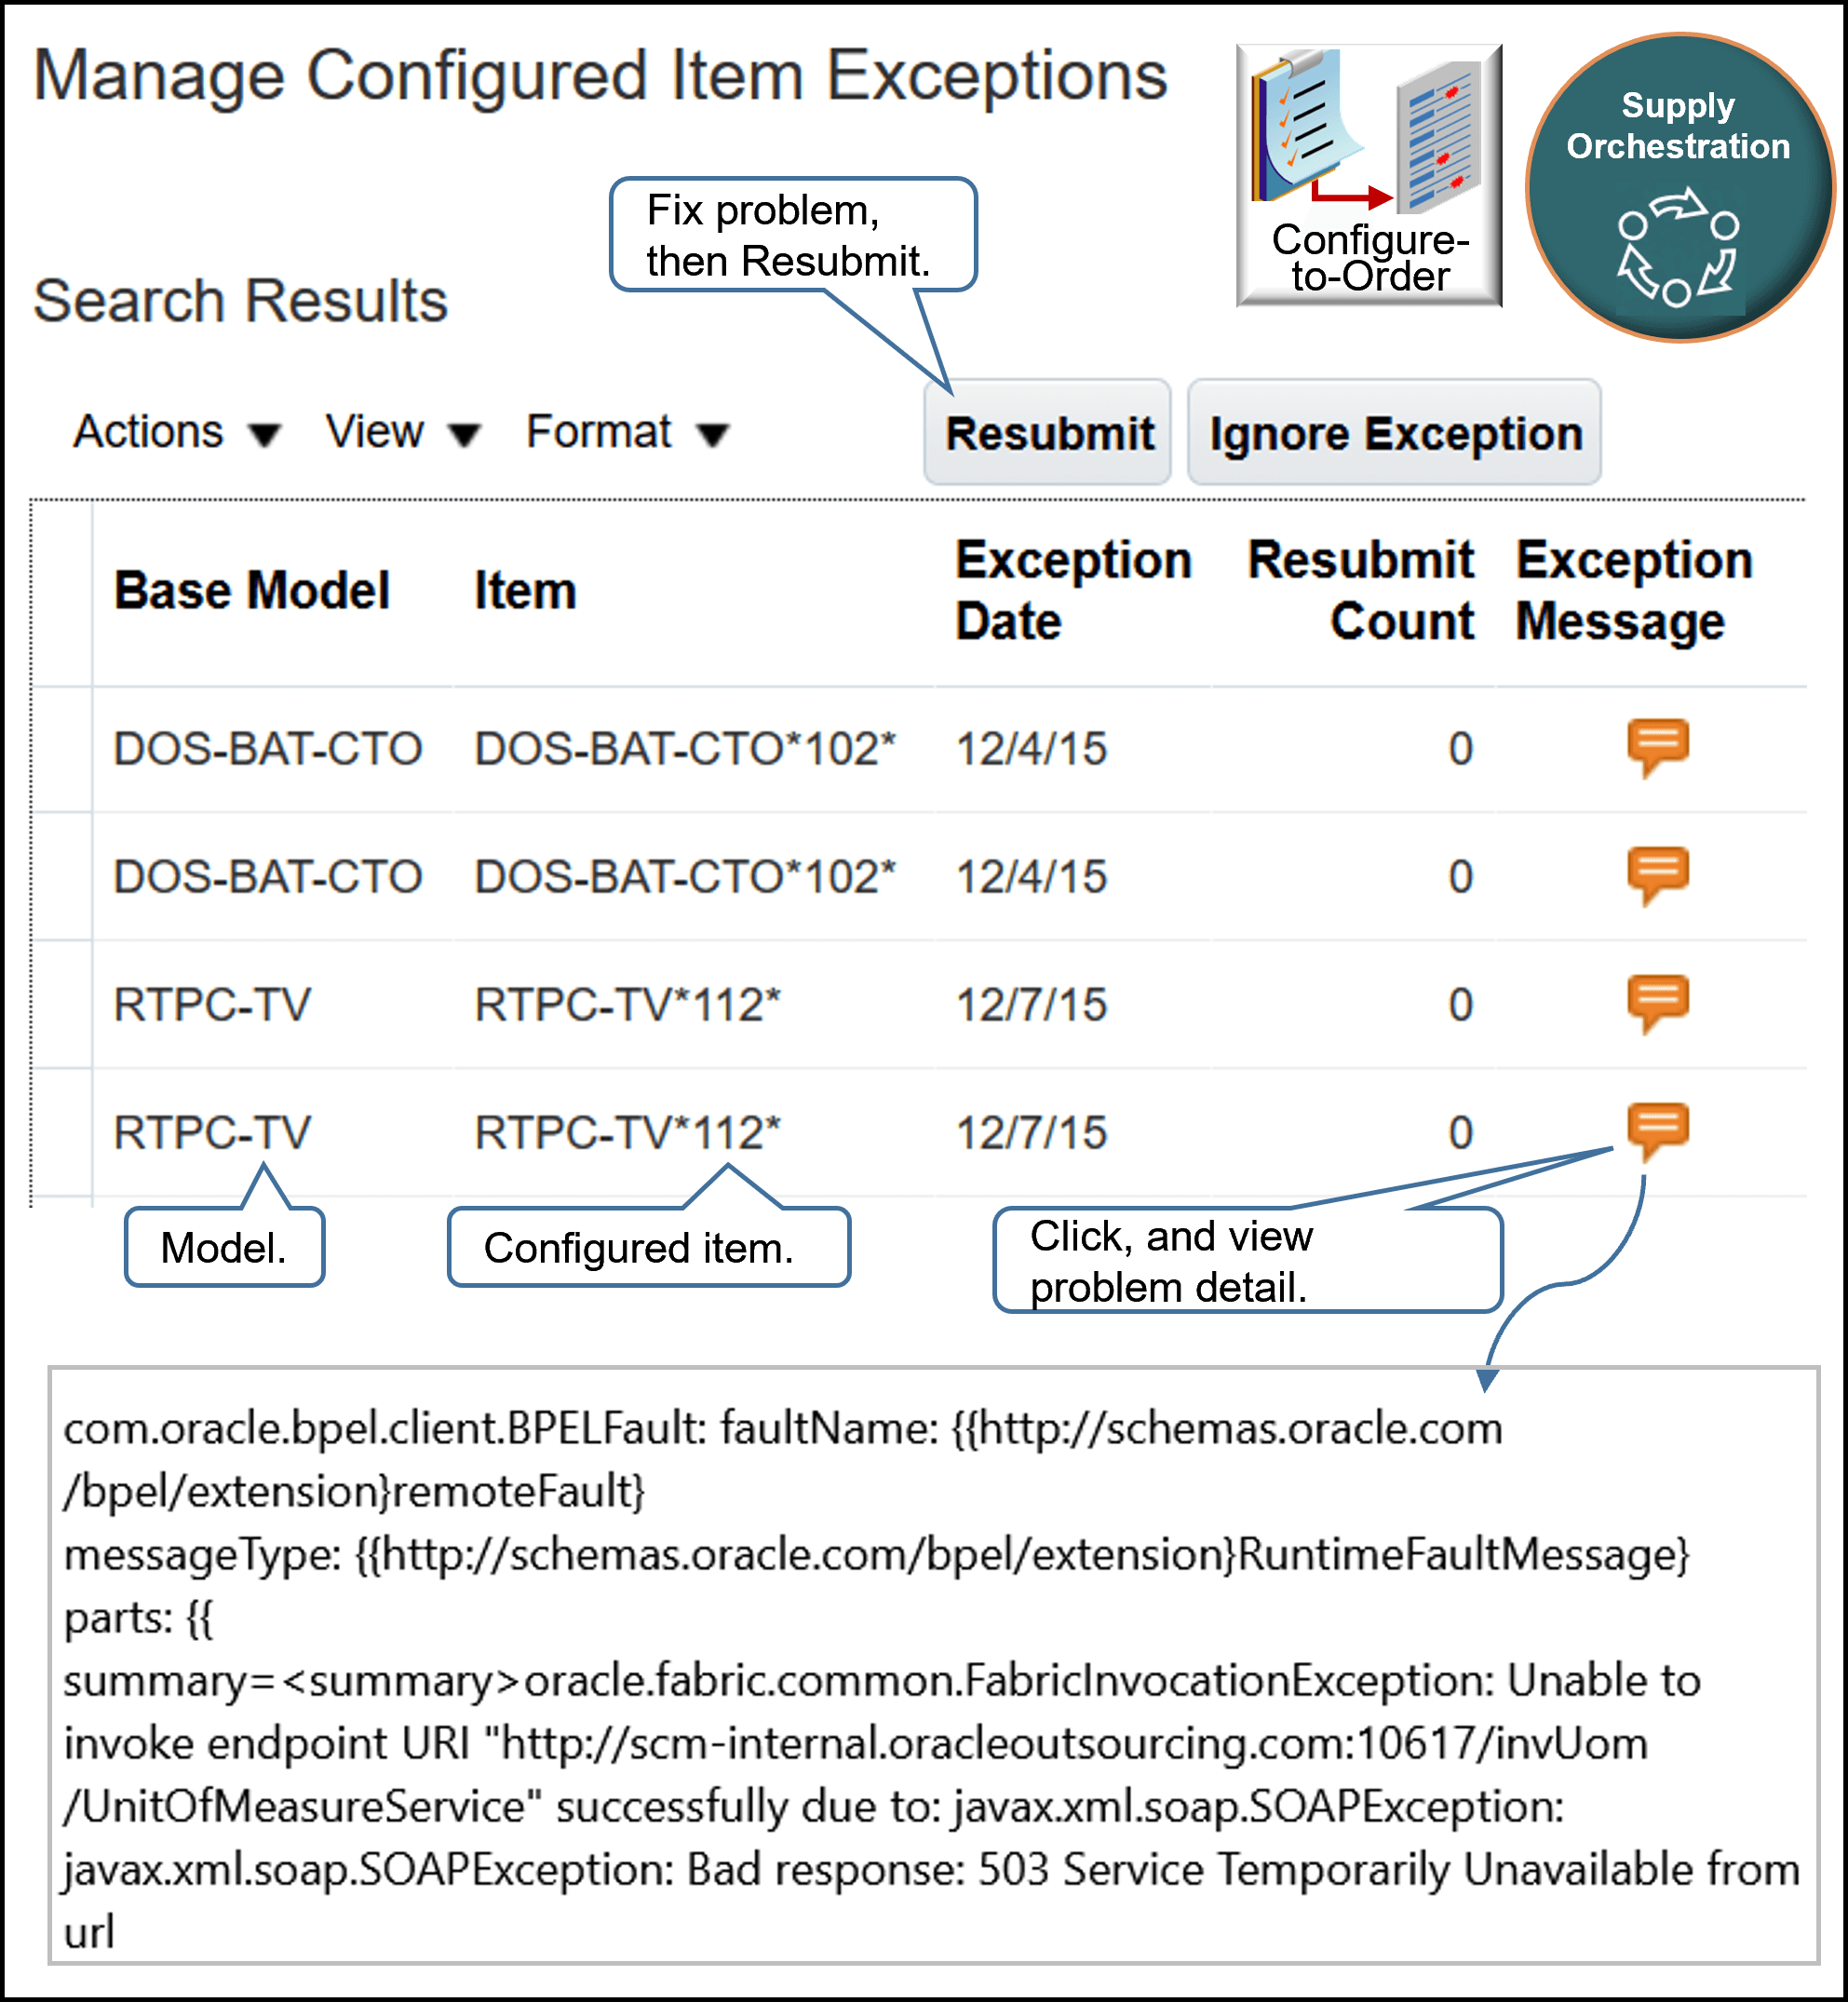
For details, see Troubleshoot Problems with Configure-to-Order.
More
Use two browser applications during set up. Opening a second browser application allows you to toggle between work areas without having to close a work area and then open another work area. For example, you can keep the Product Management work area open in browser x, open the Work Definition work area in browser y, then toggle between x and y as necessary if you find you need to modify your set up in Product Management.