2Oracle Taleo Mobile Overview
Oracle Taleo Mobile Overview
Oracle Taleo Mobile Overview
Oracle Taleo Mobile provides hiring managers with a simplified approach to managing multiple hiring activities. Some of the activities available to hiring managers using Mobile include reviewing candidate details, their job applications and evaluation results, progressing candidates in the selection workflow, reviewing open requisitions, approving requisitions and offers, comparing and evaluating active candidates, completing evaluations, etc.
Mobile is driven by user permissions and data populated in the Oracle Taleo Recruiting product. Mobile, for both tablets and smartphones, runs on cloud-based Oracle Taleo Enterprise Applications. A users ability to view information and perform actions is driven by user permissions configured for them in the that Taleo Enterprise application.
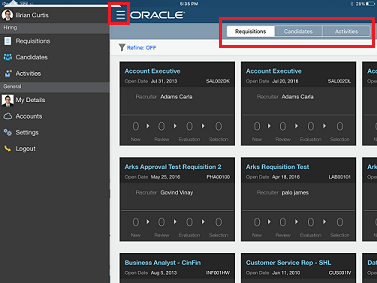
Mobile is accessed by tapping the Navigator icon and is comprised of three tabs:
-
Requisitions: list of open requisitions that you own.
-
Candidates: list of active candidates who applied on requisitions that you own.
-
Activities: list of requisitions and offers that you need to approve and evaluations that need your attention.
To enhance the user experience the Mobile app is optimized so that is renders properly using the appropriate amount of real estate no matter the device you're using whether in portrait or landscape mode.
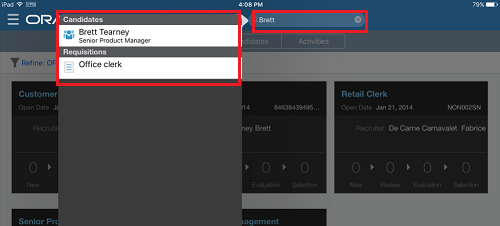
If you have a specific requisition, candidate, etc., that you're interested in viewing, you can enter a term into the search field and the application will pull all of the relevant search results. It is a global search, which means all items containing your keyword will display. For example, you can see in the screenshot below that by entering, "Brett" you can see that the search results show that he is a candidate and is also associated to a requisition.
Features
-
View and approve requisitions and candidates for interviewing.
-
Complete interview evaluations for candidates as they are interviewed; these can be for requisitions that you do or do not own.
-
View candidate prescreening questions and competency evaluation ratings.
-
Review interview evaluation results and progress selected candidates in the next step of the hiring process.
-
Take actions on candidates.
-
Review and approve pending hiring offers.
-
Compare up to three candidates at one time.
-
Search across requisitions, candidates and activities.
Requisitions Tab
The Requisitions tab allows hiring managers to view open requisitions that they own.
When the Requisitions tab is tapped, the requisitions are displayed as cards that provide requisition summary information.
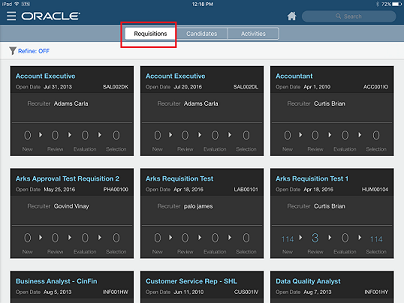
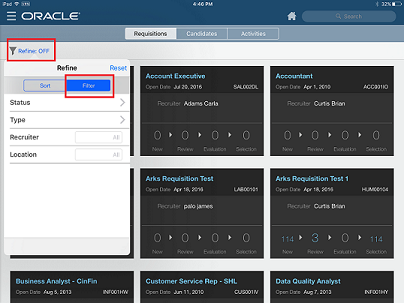
You can browse through the cards and narrow your search by refining the results using filters and sorting.
Filters
Requisitions can be narrowed by four delivered filter values:
-
Status
-
Type
-
Recruiter
-
Location
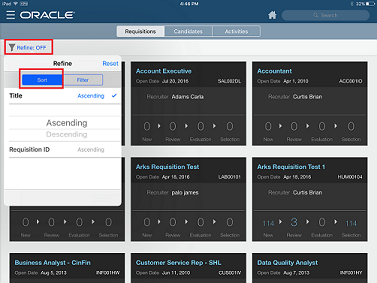
Sort
Requisitions can be sorted in either ascending or descending order by the following criteria:
-
Title
-
Requisition ID
For each requisition card, the following basic information is displayed:
-
Requisition Title
-
Requisition ID
-
Posting Date
-
Recruiter
-
Collaborators (if any)
-
Number of active candidates at various steps in the workflow - you can click on any one of these workflow steps to only view candidates who have reached that specific step.

From the requisition cards list, you can click on the requisition title on any card to view the list of active candidates who applied on the requisition (an active candidate is a candidate who applied on a requisition that has not been rejected). These candidates are displayed as candidate cards and more requisition and candidate details can be found by drilling into these cards.
Working with Candidates Associated to a Requisition
Hiring managers can view the active candidates who applied on a specific requisition by tapping on the requisition title of the requisition cards. This will bring up a list of candidate cards.
Candidate cards are ordered based on the furthest workflow progression and can be scrolled through.
You can browse through the requisition candidate cards and refine your search by using filters and sorting.
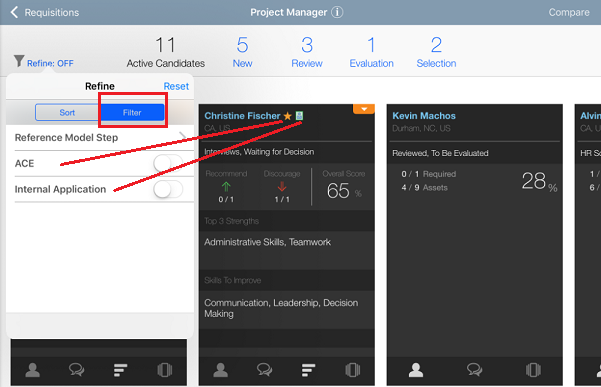
Filters
Requisition candidate cards can be narrowed by three delivered filter values:
-
Reference Model Step
-
ACE (toggle on/off) - an ACE candidate is indicated with a star icon.
-
Internal Application (toggle on/off) - an internal candidate is indicated with a person icon.
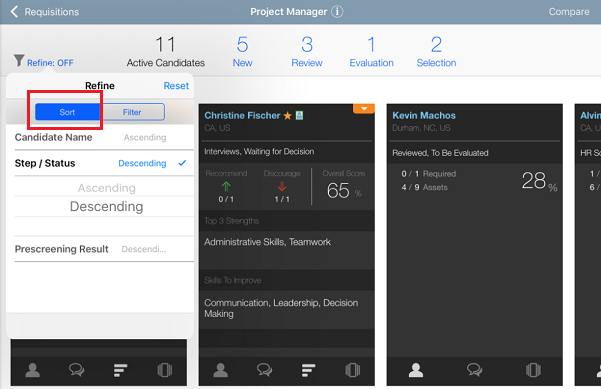
Sort
Requisition candidate cards can be sorted in either ascending or descending order by the following criteria:
-
Candidate Name
-
Step/Status
-
Prescreening Result
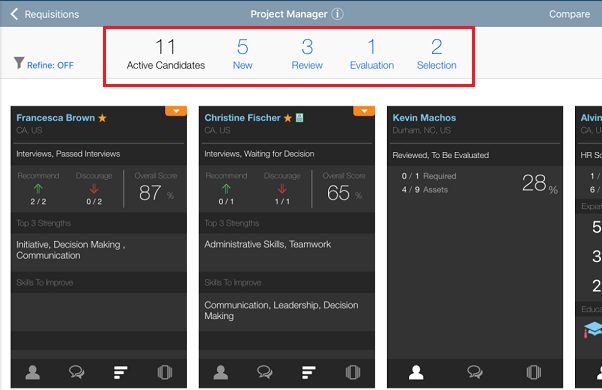
You can also filter the requisition candidate cards by clicking on the candidate workflow statuses displayed at the top of the page. Available statuses are:
-
Active Candidates
-
New
-
Review
-
Evaluation: Candidates who had an evaluation sent to interviewers that is still open (not expired).
-
Selection
These statuses, or categories, are discussed in detail later in this document.
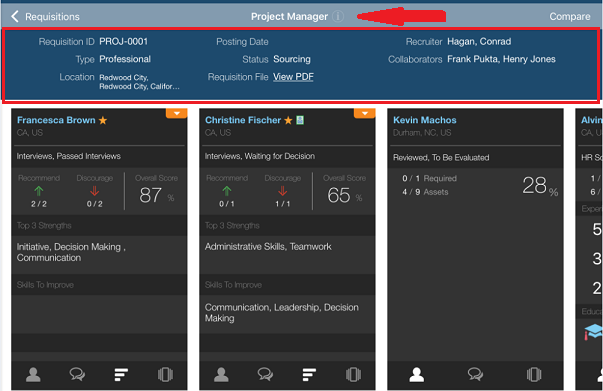
To get more information about the requisition, you can click the Information icon located next to the requisition title. A pop-up window displays summary information such as Requisition ID, Requisition Type, Recruiter and Collaborators. A link is also available to view the requisition file in PDF format which allows you to view the entire requisition file.
If the hiring manager has enough information to decide on a candidate action they do have the ability to move the candidate forward or reject them from this view. However, if they'd like more information before deciding on an action they can drill into the candidate card details.

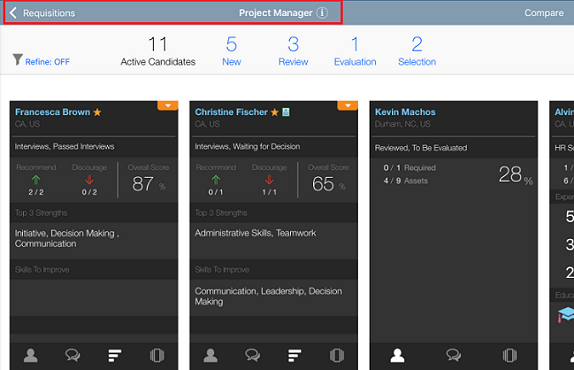
Compare
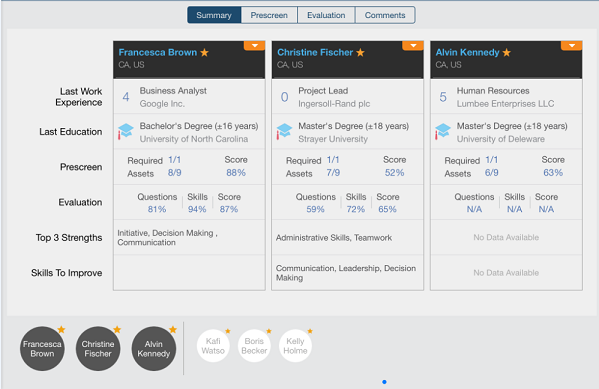
Mobile allows hiring managers to compare up to three candidates at one time side-by-side. To do, this click Compare.
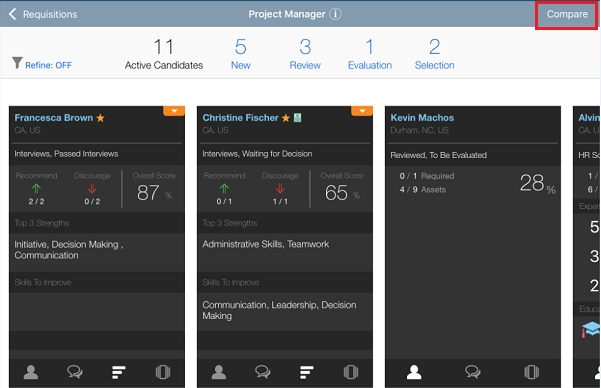
By default, clicking Compare displays and compares the first three candidates (first three candidate cards) and their summary information, prescreen information, evaluation information and any comments are compared. You can easily change the candidates in the comparison by dragging and dropping different candidates into the comparison view.
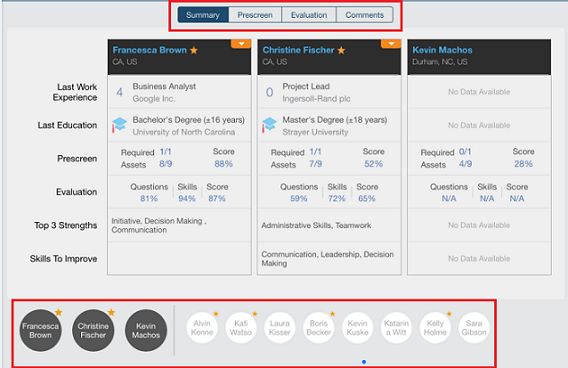
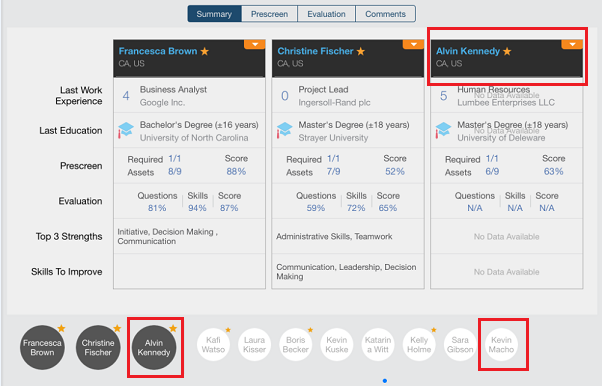
The dark circles on the left indicate which candidates are in the current comparison. The lighter circles on the right display the other candidates on this particular requisition that are available to be brought into the comparison. For example, you can choose to compare Alvin instead of Kevin. To do this, you tap and hold the circle with Alvin's name within it; the screen will flash signaling that you're in edit mode and able to move candidates in and out of the comparison. Now, simply drag and drop Alvin into the comparison. To replace Kevin with Alvin, you drop the circle onto Kevin's candidate card. To replace Christine with Alvin, you drop Alvin's circle onto Christine's candidate card, and so on.
You can refine the list of candidates that are available for comparison by first filtering or sorting the candidate cards prior to selecting Compare. For example, you may only want to see and compare ACE candidates or internal candidates, or both. If you set a filter prior to your comparison, the comparison will only displays those candidates that meet your particular filter criteria.
In the following screenshot, you can see that the ACE filter is enabled.
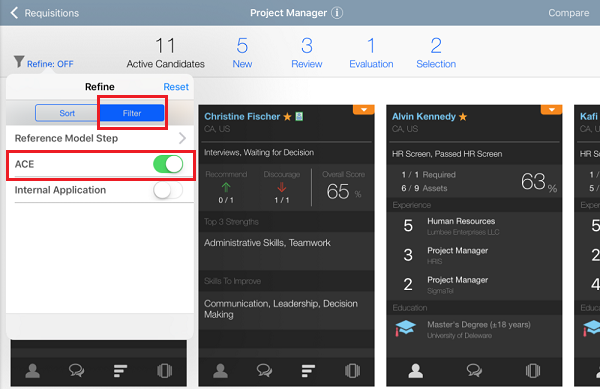
With the ACE filter applied, selecting Compare results in only those candidates that are identified as ACE (indicated by the star icon) being displayed and available for comparison.
Requisition Candidate Card Details and Actions
Hiring managers can get more detailed information on active candidates who applied on a requisition by drilling into the individual candidate cards.
The candidate card is organized into three sections:
-
Top: the top section displays the candidate name, the candidate location, and the candidate step and status regarding the requisition. When clicking the name of the candidate, you are brought to the candidate file which contains the entire candidate submission that contains all of the information available for that candidate.
-
Middle: the middle section displays prescreening information (required and asset criteria considered for the job as well as weight percentage), most recent work experience, and highest education attained. If you need to complete an evaluation for a particular candidate, an Evaluate Now link is also displayed here. Tapping on this link will bring you to the Evaluation Feedback tab in the candidate file which opens the evaluation for you to complete and submit.
-
Bottom: the bottom section provides icons to display relevant information about the candidate.

When selecting the icons at the bottom of the card, you can access the following information:
| Icon | Description |
|---|---|
 |
When clicking the Person icon, you are presented with prescreening information, work experience, and education of the candidate. |
 |
When clicking the Comments icon, you are presented with comments that were entered on the candidate regarding his/her submission and can enter comments here as well. |
 |
When clicking the Bar Chart icon, you are presented with evaluation results. The number of evaluators who recommended and discouraged the hiring of the candidate as well as the average score across all evaluations are indicated. The top three skills as well as skills requiring improvements are displayed. |
 |
When clicking the Calendar icon, you are presented with the interview schedule information, that is date, time, conference room information, and a link to the evaluation form. This icon will not display if no interviews are scheduled. |
 |
When clicking the Multi-Resume icon, you are presented with the PDF resume of the candidate as well as the resumes of the other candidates who applied on the requisition. You can move candidates forward or reject them from this view. You can also view and add comments about candidates here. |
When viewing the candidate card, you can tap the Actions button to either move the candidate forward or reject the candidate.
-
Move Forward: Moves the candidate to the completion status of the step, or to the initial status of the following step. If configured in Taleo Recruiting, you may be able to select the reason for moving the candidate forward.
-
Reject: Puts the candidate in a rejected status and the candidate will no longer appear as an active candidate. If configured in Taleo Recruiting, you may be able to select the reason for rejecting the candidate and enter a comment. For example, you may want to add a comment to remind yourself to send a rejection letter to the candidate.Note: If your organization uses more than one rejection status in a Candidate Selection Workflow (CSW), this is not currently supported in Mobile. Mobile will use the first configured rejection status in the CSW step.
As previously stated, you can also access the Move Forward and Reject actions and view and add comments for a candidate from the multi-resume mode. Tap the Multi-Resume icon on the candidate card and you can view several candidate resumes in PDF format and quickly swipe through them to analyze and compare candidates.
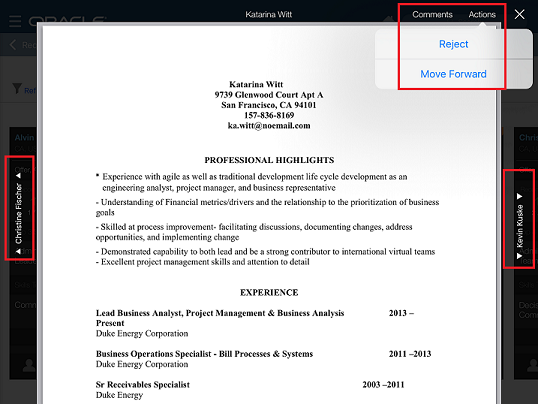
Multi-Resume mode is not available with Android at this time.
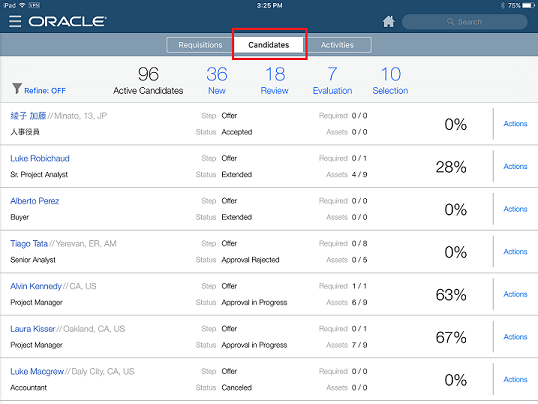
Candidates Tab
The Candidates tab allows hiring managers to view a list of candidates who applied on requisitions owned by them.
When on the Candidates list, you can browse through the list and refine your search by using a global keyword search, filters, and sorting. The filters and sort values available are the same here as what's available in the Requisitions tab when viewing the requisition candidate cards.
Search
The global search engine will search against the candidate name and the candidate ID. A list of candidates will be displayed based on the keyword used to search.
Filters
Requisition candidate cards can be narrowed by three delivered filter values:
-
Reference Model Step
-
ACE (toggle on/off)
-
Internal Application (toggle on/off)
Sort
Requisition candidate cards can be sorted in either ascending or descending order by the following criteria:
-
Candidate Name
-
Step/Status
-
Prescreening Result
You can also filter the requisition candidate cards by clicking on the candidate workflow statuses displayed at the top of the page. Available statuses are:
-
Active Candidates
-
New
-
Review
-
Evaluation: Candidates who had an evaluation sent to interviewers that is still open (not expired).
-
Selection
From the Candidates list, you can tap on the candidate name to view the candidate submission file.
Working with Candidate Submission Details
The candidate submission file allows hiring managers to view candidate submission details and take action on these candidates.
From the Candidates list, you can tap on the candidate name to access the candidate submission file. The following information is available:
-
Submission: Presents metrics, talent timeline, attachments, external profiles, other submissions.
-
Resume: Displays the candidate resume.
-
Submission File: Displays the submission file.
-
Requisition File: Displays the requisition file.
-
Prescreen: Displays the overall rating (required and asset criteria considered for the job as well as the overall score) and any prescreen information. You can tap on the Questions link to see how the candidate answered prescreening questions. You can also tap the Skills link to see the skills of the candidate regarding the requisition.
-
Evaluations: Displays summary information across all the evaluations that have been completed for the candidate. Interviewers ratings on each evaluation is displayed, as well as if they recommended or did not recommend the candidate.
-
Comments: Displays comments regarding the candidate submission.
-
Evaluation Feedback.

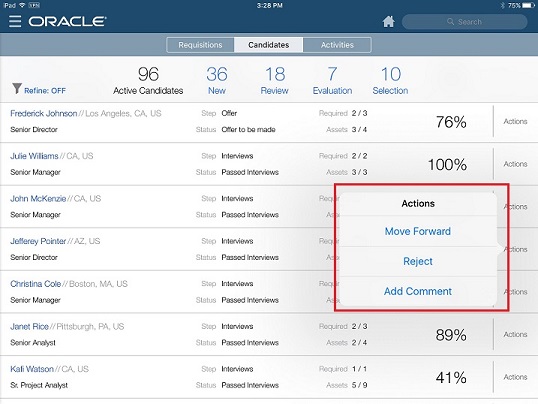
When viewing the candidate submission, you can tap the Actions button to perform one of the following actions on the candidate:
-
Move Forward: Moves the candidate to the completion status of the step, or to the initial status of the following step. If configured in Taleo Recruiting, you may be able to select the reason for moving the candidate.
-
Reject: Puts the candidate in a rejected status and the candidate will no longer appear as an active candidate. If configured in Taleo Recruiting, you may be able to select the reason for rejecting the candidate and enter a comment.Note: If your organization uses more than one rejection status in a Candidate Selection Workflow (CSW), this is not currently supported in Mobile. Mobile will use the first configured rejection status in the CSW step.
-
Add Comment: Allows you to enter a comment in the candidate file.
Taking Actions on Candidates
Hiring managers may take certain actions on candidates who have applied to requisitions that they own.
When looking at candidate submissions, you need to make decisions on how you want to move forward with some candidates that have submitted their information on a requisition. Whether you are in the requisition candidate cards, the candidate list, the candidate submission file or the multi-resume review mode you can click the actions arrow to perform one of the following actions on the candidate:
-
Move Forward: Moves the candidate to the completion status of the step, or to the initial status of the following step. If configured in Taleo Recruiting, you may be able to select the reason for moving the candidate.
-
Reject: Puts the candidate in a rejected status and the candidate will no longer appear as an active candidate. If configured in Taleo Recruiting, you may be able to select the reason for rejecting the candidate and enter a comment.Note: If your organization uses more than one rejection status in a Candidate Selection Workflow (CSW), this is not currently supported in Mobile. Mobile will use the first configured rejection status in the CSW step.
-
Add Comment: Allows you to enter a comment in the candidate file.
Moving a Candidate Forward
The candidate will be placed in the next status of the step, or the initial status of the next step if the candidate is already in the final status.
Rejecting a Candidate
The candidate is placed in a reject status and will no longer show as an active candidate for this requisition.
Adding a Comment on a Candidate
The comment is associated with the candidate file and can be viewed later by the hiring manager or recruiter.
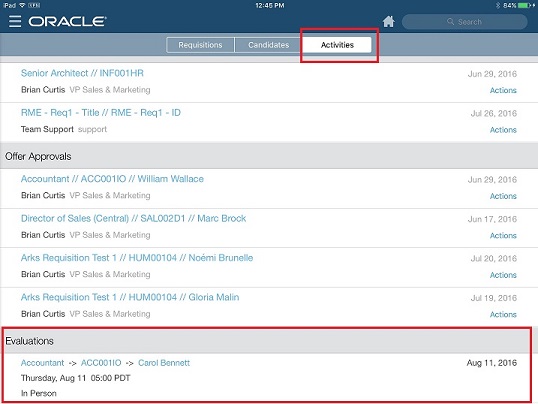
Activities Tab
The Activities tab allows hiring managers to view a list of requisitions and offers that require their approval and any evaluations they must complete before providing their approval.
You tap on the requisition title or offer title to view requisition and offer details before deciding which action to take. The Actions menu displays with the same options on both the detailed view and the Activities list view so you can take action on your offer and requisition approvals from either view.
It may be the case that a hiring manager is asked to participate in an interview and evaluation of a candidate on a requisition that they do not own. All evaluations that need attention from the hiring manager are listed under Evaluations in the Activities tab whether the evaluation is associated to a requisition that they own or not. Tapping on the requisition title under Evaluations brings you to the Evaluations Feedback tab within the candidate details. From here, you can complete the evaluation questionnaire.
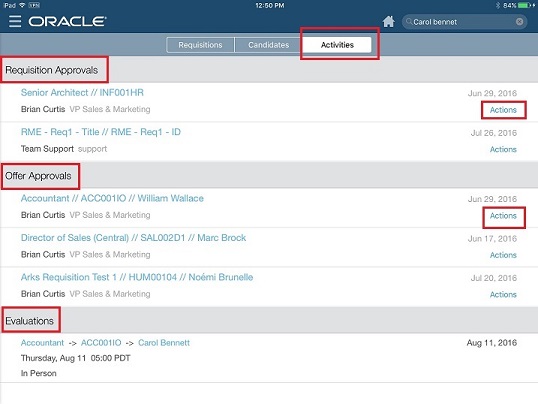
Requisition Approvals
The requisition approval activity is a task assigned to hiring managers. Hiring managers are responsible for approving requisitions that have been created by one of their direct reports or a recruiter.
A requisition approval is required before a job can be posted on career sites or job boards to receive candidate applications. Once a requisition has been created by a recruiter or one of your direct reports in the Taleo Recruiting product, you are assigned the approval of the requisition via the approval workflow.
Before approving the requisition, you can view the details of the requisition by clicking on the requisition title. The detailed requisition view provides access to the following information:
-
Summary: General information about the requisition approval details (requisition ID, recruiter, hiring manager, number of openings, etc.), the requisition approval flow (who has approved the requisition as well as the outstanding approvals), and attachments.
-
Comments: Comments provided by approvers on the requisition.
-
Requisition File: Complete details about the requisition.
When you are ready, you can perform one of these actions on the requisition approval task using the Actions button:
-
Approve: When you approve a requisition, the requisition moves into the next approval step in the workflow and the requisition appears in the next users' approval list.
-
Decline: When you decline a requisition, the requisition moves back to the initiator of the requisition.
-
Pass: When you decide to pass, the approval task is moved to another user in the approval flow.
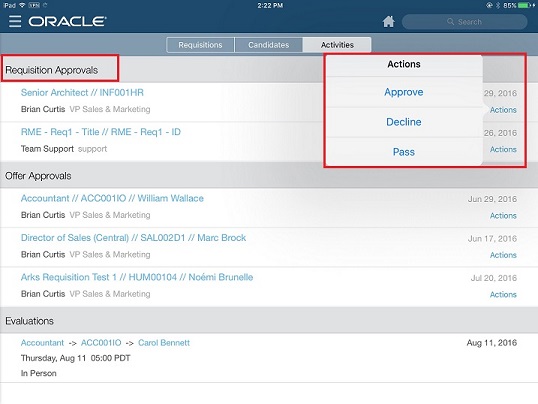
Whether users choose to approve, decline or pass a requisition, they will be prompted to add a comment. The requisition configuration determines whether a comment is mandatory, but it is considered best practice to add a comment so that there is a record of the reasoning behind decisions made.
Approving a Requisition
-
Tap the Activities tab.
-
Tap Actions or tap the requisition title and then Actions.
-
Tap Approve.
-
Enter a comment if desired. (A comment may or may not be required depending on the requisition configuration).
-
Tap OK.
This requisition is no longer displayed in your requisition approval list on the Activities tab. The requisition will move into the next approval step of the workflow and will appear in the requisition approval list of the next approver.
Declining a Requisition
-
Tap the Activities tab.
-
Tap Actions or tap the requisition title and then Actions.
-
Tap Decline.
-
Enter a comment if desired. (A comment may or may not be required depending on the requisition configuration).
-
Tap OK.
This requisition is no longer displayed in your requisition approval list on the Activities tab. The requisition will move back to the initiator of the requisition.
Choosing to Pass a Requisition's Approval
-
Tap the Activities tab.
-
Tap the requisition title.
-
Tap the Actions button.
-
Tap Pass.
-
Enter a comment if desired.
-
Tap OK.
This requisition is no longer displayed in your requisition approval list. The requisition will be routed to the next approver and will appear in their requisition approval list.
Offer Approvals
The offer approval activity is a task assigned to hiring managers. Hiring managers are responsible for approving offers before making a formal offer to a candidate.
When it is decided that an offer will be made to an active candidate and the offer is created, you can access the Activities tab to review and approve the pending offer. An offer approval is required at the end of the candidate selection workflow before you make a formal offer to hire the candidate. It helps in deciding the compensation, budget allocation, and other considerations.
Before approving the offer, you can view the details of the offer approval by clicking on the offer title. The detailed offer view provides access to the following information:
-
Summary: General information about the offer approval details (such as requisition ID, recruiter, hiring manager, salary, vacation, etc.), the offer approval flow (who has approved the offer as well as the outstanding approvals), and attachments.
-
Comments: Comments provided by approvers on the offer.
-
Submission: Complete details about the candidate job application such as talent timeline, attachments, external profiles and other submissions.
-
Submission File: Details about the submission process and status including the candidate's resume, prescreening information and workflow history.
-
Resume: Resume provided by the candidate.
-
Requisition File: Complete details about the requisition.
-
Offer File: Complete details about the offer.
-
Evaluations: Results of the candidate's evaluations.
When you are ready, you can perform one of these actions using the Actions button:
-
Approve: When you approve an offer, the offer moves into the next approval step in the workflow and the offer appears in the next users approval list.
-
Decline: When you decline an offer, the offer moves back to the initiator of the offer.
-
Pass: When you decide to pass an offer, the approval task is moved to another user in the approval flow.
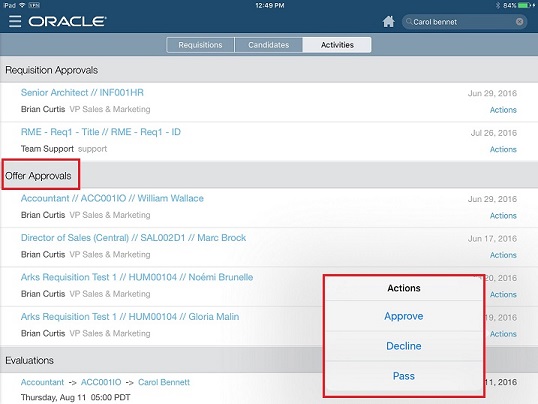
Whether users choose to approve, decline or pass an offer, they will be prompted to add a comment. The offer configuration determines whether a comment is mandatory, but it is considered best practice to add a comment so that there is a record of the reasoning behind decisions made.
Approving an Offer
-
Tap the Activities tab.
-
Tap the offer title.
-
Tap the Actions button.
-
Tap Approve.
-
Enter a comment if desired.
-
Tap OK.
This offer is no longer displayed in your offer approval list. The offer will move into the next approval step of the workflow and will appear in the offer approval list of the next approver.
Declining an Offer
-
Tap the Activities tab.
-
Tap the offer title.
-
Tap the Actions button.
-
Tap Decline.
-
Enter a comment if desired.
-
Tap OK.
This offer is no longer displayed in your offer approval list. The offer will move back to the initiator of the offer.
Choosing to Pass an Offer's Approval
-
Tap the Activities tab.
-
Tap the offer title.
-
Tap the Actions button.
-
Tap Pass.
-
Enter a comment if desired.
-
Tap OK.
This offer is no longer displayed in your offer approval list. The offer will be routed to the next approver and will appear in their offer approval list.
Evaluation Participation Requests
All evaluations that need attention from the hiring manager, for both requisitions that they own and those that they do not, are listed under Evaluations in the Activities tab.
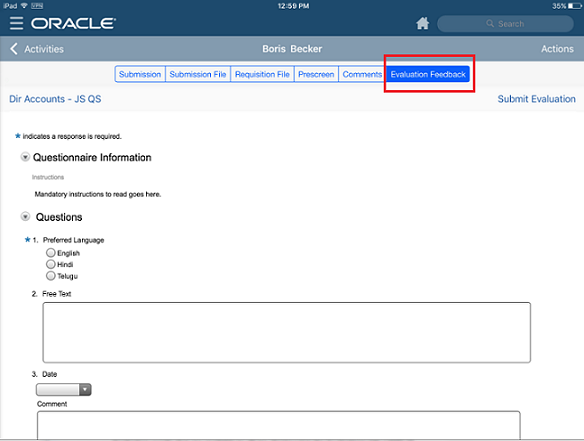
The evaluations are accessed by tapping on the requisition title/candidate name. This brings you to the Evaluation Feedback tab in the candidate file. The evaluation loads and is ready for you to complete and submit. Once the evaluation is completed and submitted, it will be removed from your Evaluations list on the Activities tab. Evaluations can also be accessed from the candidate card in the Requisitions tab and in the candidate file from the Candidates tab. No matter the path, the evaluation is available for completion and submission.
The evaluation questionnaire is divided into four sections:
-
Questionnaire Information: General information about the evaluation questionnaire such as specific instructions to complete the questionnaire.
-
Questions: Questions to ask the candidate during the interview. Depending on the type of questions, different answers may be provided. You can answer a question by:
-
Selecting one radio button, or one value in a drop-down list.
-
Selecting one or several checkboxes, or by selecting one or several values in a drop-down list.
-
Typing text in a field.
-
Entering a date using a calendar.
-
-
Skill Ratings: Skills to evaluate the candidate. A rating scale is provided to later compare candidates against each other.
-
Recommendation: Text box where you can enter details about your recommendation.
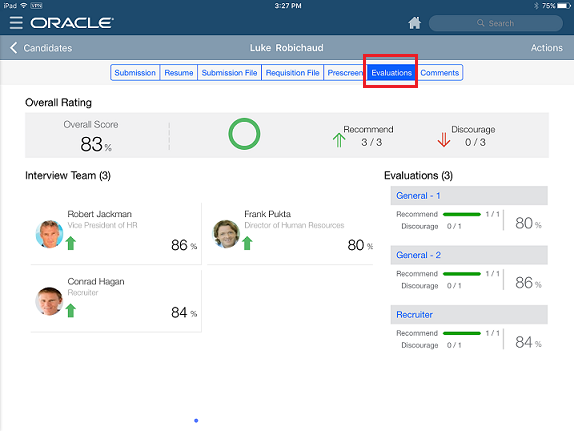
Once evaluators have completed the evaluation of a candidate, the completed questionnaires are available in the candidate job submission, under the Evaluations tab. The Evaluations tab is divided into three sections:
-
In the Overall Rating section, the overall score of the evaluators is displayed as well as the number of evaluators who recommended and discouraged the hiring of the candidate.
-
In the Interview Team section, the evaluators are displayed with the score they provided for the candidate.
-
In the Evaluations section, completed evaluation questionnaires are listed. For each questionnaire, the overall score is displayed as well as the number of evaluators who recommended and discouraged the hiring of the candidate. Clicking the questionnaire title brings you to the Candidate Interview Evaluation form.