3Oracle Taleo Mobile Installation and Configuration
Oracle Taleo Mobile Installation and Configuration
Mobile Installation
The steps to install the Oracle Taleo Mobile application are outlined below. The iOS and Android installation steps and behavior are identical.
Mobile Application Installation
-
User navigates to the Mobile site.
-
User downloads Oracle Tap (Oracle Taleo Mobile) from the Apple App store or the Google Play store.
-
User configures the Mobile application with the Oracle Taleo Enterprise product URL and logs in.
-
User launches the Mobile application.
-
(Optional) Alternative Manual Method for User to Configure the Mobile Application with Product URL and Log In Tile.
Note: This is a manual way to install Mobile which is helpful if troubleshooting is necessary or the automatic method is unavailable.
1. User Navigates to the Mobile Site
1. Using a tablet or smartphone, navigate to the URL available in the message sent by your Administrator (i.e. "https://<YourTaleoZone>.taleo.net/mobile"). If you have Mobile permissions, you will be redirected to the Mobile screen with instructions on how to configure the Mobile application. You will be presented with two links:
-
Download the Mobile application.
-
Configure the Mobile application.
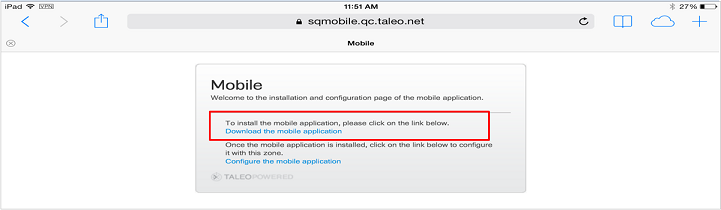
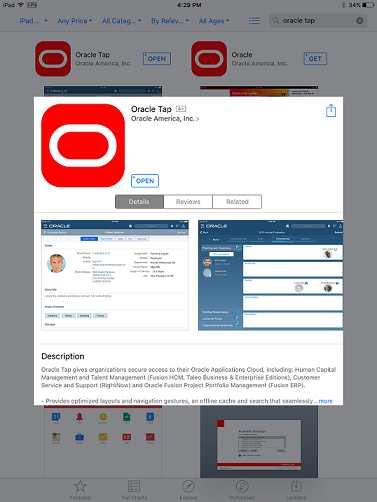
2. Tap the first link, "Download the mobile application", to be redirected to the Apple App store or Google Play store depending on the device. The Oracle Tap screen opens.
2. User Downloads Oracle Tap (Oracle Taleo Mobile) from the Apple App store or Google Play store.
1. Download Oracle Tap.
3. User configures the Mobile application with the Oracle Taleo Enterprise product URL and logs in
The following steps provide an alternative automatic method for the user to configure Oracle Taleo Mobile to connect with their Taleo zone:
1. Once Oracle Taleo Mobile is downloaded and installed on your mobile device, return to the Mobile screen and tap the second link, "Configure the mobile application".
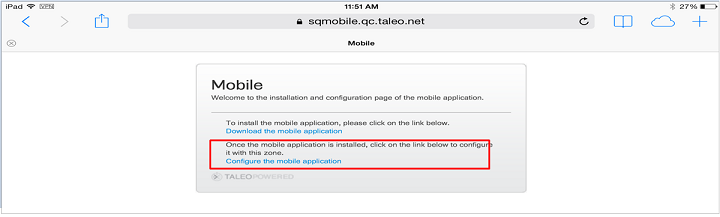
2. The Oracle Taleo Enterprise server URL is injected into the server settings in Oracle Taleo Mobile.

Figure: Oracle Cloud screen with Cloud Configuration confirmation dialog.
3. Tap Confirm at the Cloud Configuration confirmation screen.
4. The system auto configures your Mobile application to point to your company's Oracle Taleo Enterprise zone.
If you have SSO enabled and you use an Akamai URL for login (https://tas-<zone name>.taleo.net), you will not be able to use the Configure the mobile application link in this unique scenario. Please contact Oracle Support and request a custom configuration HTML file to correctly configure your app.
5. The Oracle Tap tile is placed on the mobile device's screen.
4. User launches the Mobile application
1. To access Oracle Taleo Mobile during installation, when prompted tap the Proceed to Login link or the Talent Management tile on the Oracle Cloud screen. During normal usage tap the Talent Management tile.2. The Oracle Cloud Apps login screen opens.
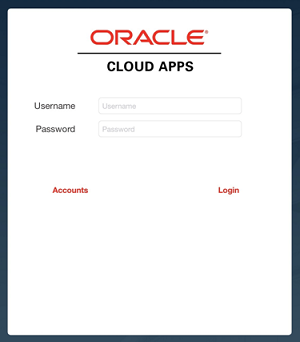
3. Enter your Oracle Taleo Enterprise Username and Password, and tap Login to start using Oracle Taleo Mobile on your mobile device.
5. (Optional) Alternative Manual Method for User to Configure the Mobile Application with Product URL and Log In Tile
The following steps provide a manual method for the user to configure Oracle Taleo Mobile to connect with their Taleo zone:
1. Once you have completed downloading Oracle Taleo Mobile (see above), return to the Oracle Cloud screen on your mobile device.

2. Tap the "Tap to Add Account" tile to start the configuration process.
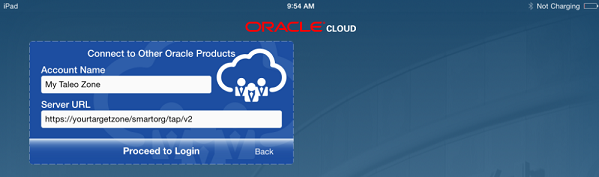
3. Under "Account Name" specify the name you would like to call your account.
4. Under "Server URL" enter "https://yourtargetzone/smartorg/tap/v2" or "https://tas-yourtargetzone/smartorg/tap/v2" if your environment is Akamai-enabled, where "yourtargetzone" is the Taleo zone to which you are connecting.
5. Tap "Proceed to Login" to be taken to the login screen.
Oracle Taleo Enterprise Configuration
For the Mobile application to receive the data from Taleo Recruiting, Oracle Taleo Enterprise must be configured to enable that integration. The steps to configure Oracle Taleo Enterprise are as follows:
-
Administrator activates the Enable Mobile setting.
-
Administrator creates a new user type and enables the Mobile access permission.
-
Administrator Associates users who will be using the Mobile application to the new or existing Mobile user type.
-
Administrator configures the Enable Data Cache setting..
-
Administrator sends out an email to all hiring managers using Mobile
1. Administrator activates the Enable Mobile setting.
The Enable Mobile setting in the Oracle Taleo Enterprise configuration enables the integration of Mobile and Oracle Taleo Enterprise integration. When the setting is off the Oracle Taleo Enterprise product will not send data to Mobile under any circumstance. When the setting is turned on, users that have the Mobile Access permission will have data passed to the mobile application.
| Setting |
Default Value at Upgrade |
Default Value for New Zone |
State (Public, Protected, Private) |
Behavior for Each Value |
Location |
|---|---|---|---|---|---|
| Enable Mobile |
No |
No |
Public |
|
General Configuration Settings |
-
In the Refine by drop-down list, select Category, then Mobile.
-
Click the Enable Mobile setting.
-
Click Edit.
-
Select Yes as the Value.
-
Click Save.
2. Administrator creates a new user type and enables the Mobile access permission.
There may be some users within an organization the Administrator wants to ensure do not have access to mobile. In this case, the Administrator should create (or duplicate) a new User Type for users who they wish to grant mobile permissions. This action is recommended to control the users who have access to mobile.
| Permission |
Default Value at Upgrade |
Default Value for New Zone |
State (Public, Protected, Private) |
Behavior for Each Value |
Location |
|---|---|---|---|---|---|
| Mobile Access |
No |
No |
Public |
|
Configuration > [SmartOrg] Administration > [Users] User Types > User Type - Recruiting > [Functional Domain = Mobile] |
-
Create a User Type Navigation: Configuration > [SmartOrg Settings] > Administration > [Users] > User Types > Create

-
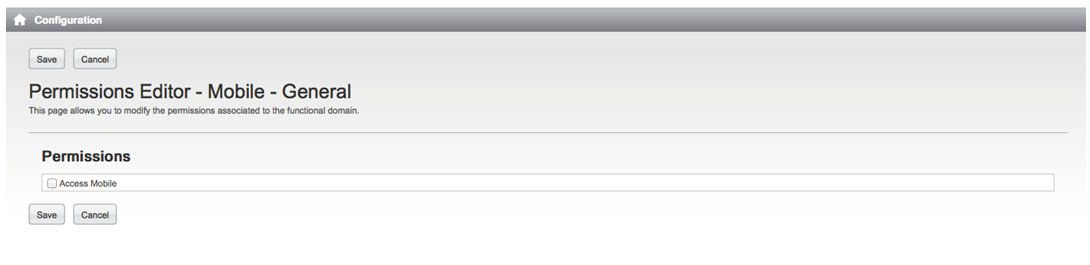
Enable the Access Mobile permission. Once you save your new user type, you're presented with the Functional Domains where you will enable access to Mobile for this user.
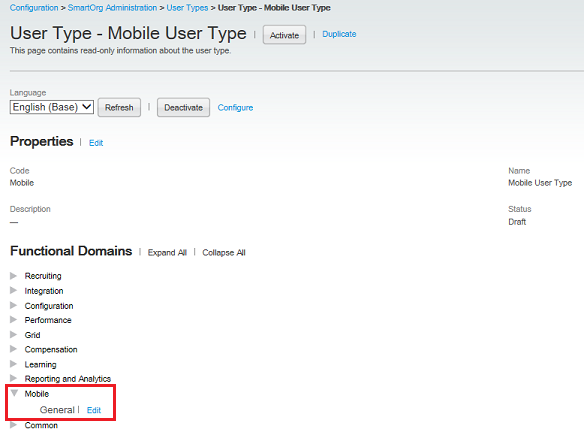
Click Edit next to General. Then, select the Access Mobile checkbox and click Save.
Alternatively, if there is already an existing user type, you can skip Step 1 and go directly to Step 2 and modify the existing permissions and enable the Access Mobile permission for users who are already associated with this user type.
3. Administrator associates users who will be using the Mobile application to the new or existing Mobile user type.
The Administrator associates users who will be using the Mobile application to the new Mobile user type.
Navigation: Configuration > [SmartOrg Settings] > Administration > [Users] > User Accounts
-
In the User Accounts page, search for and select a user for whom Mobile should be enabled.
-
Click Edit next to User Types.
-
Click Add.
-
In the User Type Selector page, select the user type for which Mobile Access was enabled and click Select.
-
From the User Account Editor page, confirm that the User Type for which the Access Mobile permission was enabled is associated with the user and click Save.
4. Administrator configures the Enable Data Cache setting.
The Enable Data Cache setting in the Oracle Taleo Enterprise configuration allows the Administrator to turn on or off data caching for mobile devices. The default value is Yes (On). When the setting is set to No, the mobile application will only present data when it is online. If the User switches applications, lets the screen go to sleep, taps the power button, turns it off, switches to General Settings, answers the phone, sends a text or email (outside of Mobile), or does anything that makes the mobile application not the frontmost visible application on the screen, then all of the data on the disk is instantly purged. When the User switches back to the mobile application again, the application will need to download data from the Oracle Taleo Enterprise application again.
| Setting |
Location |
|---|---|
| Enable Data Cache |
General Configuration Settings |
-
In the Refine by drop-down list, select Category, then Mobile and Refresh.
-
Click the Enable Data Cache setting.
-
Click Edit.
-
Select Yes for the value.
-
Click Save.
5. Administrator sends an email to all hiring managers using Mobile.
The Administrator sends an email to the users who will be using the mobile application, letting them know that they can access the mobile site, and that the URL will be: "your organization's zone name/mobile".Candidate Selection Workflow Configuration
Certain functions within the steps of a workflow that a hiring manager performs in Oracle Taleo Mobile integrate with the Candidate Selection Workflow (CSW) in Oracle Taleo Recruiting. Some configuration in Recruiting Administration is required of the System Administrator to associate these workflow functions with specific steps and statuses in the CSW.
Oracle Taleo Mobile enables hiring managers to perform several managerial tasks associated with talent acquisition from their mobile device:
-
Approve requisitions.
-
Review and progress candidates for interviews.
-
Complete evaluation questionnaires and ratings.
-
Review candidates' interview performance and progress candidates for selection.
-
Review selected candidates and approve offers.
-
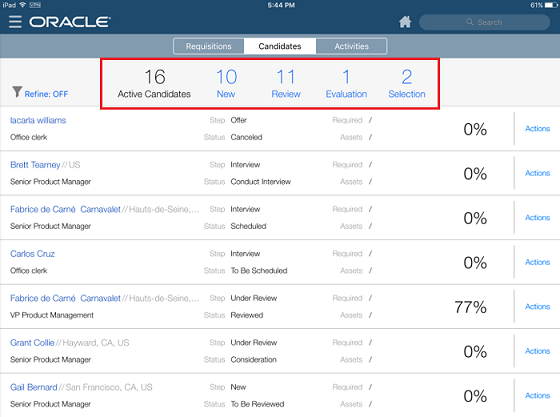
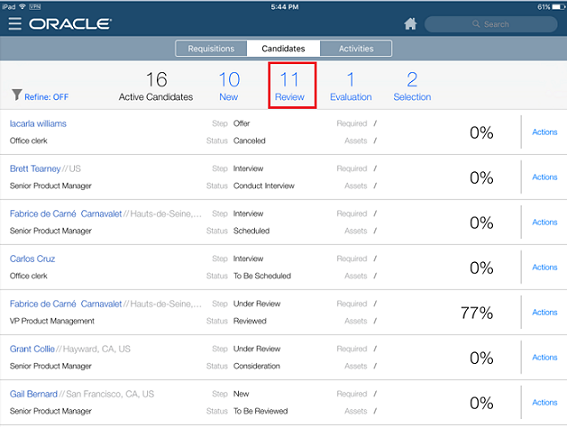
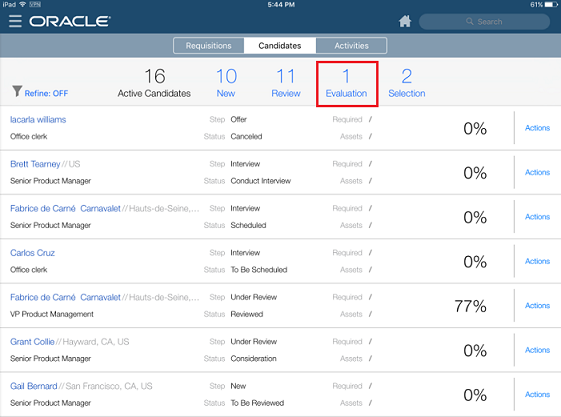
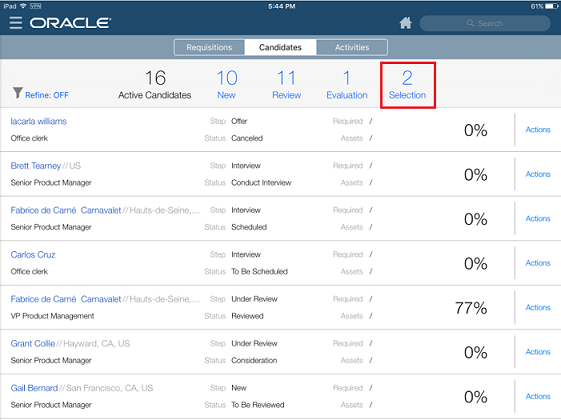
Active Candidates: No CSW configuration is necessary.
-
New: No CSW configuration is necessary; all new candidates visible to managers are automatically assigned to this new status.
-
Review: CSW configuration is necessary and the steps are detailed below.
-
Evaluation: No CSW configuration is necessary, however, Evaluation Management must be enabled in the Recruiting Configuration. For complete steps and details, please refer to the Oracle Taleo Enterprise Recruiting Configuration Guide for Release 15A and later.
-
Selection: CSW configuration is necessary and the steps are detailed below.
Candidate Review Configuration
The CSW must be configured to allow candidates that are in the Candidate Review status to be displayed in the Review category.
An example configuration for the Candidate Review function is as follows:
1. Log into Oracle Taleo Enterprise Configuration.
2. Navigation: Configuration > [Recruiting] > Administration > [Process] > Candidate Selection Workflow
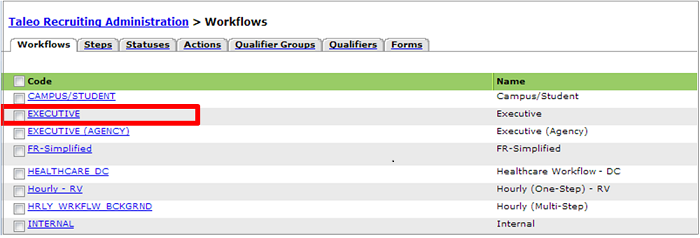
3. Locate and select a specific hiring manager-related CSW you want to integrate with the Candidate Review function (e.g. Executive) in Worklist. The Steps Usage tab opens.
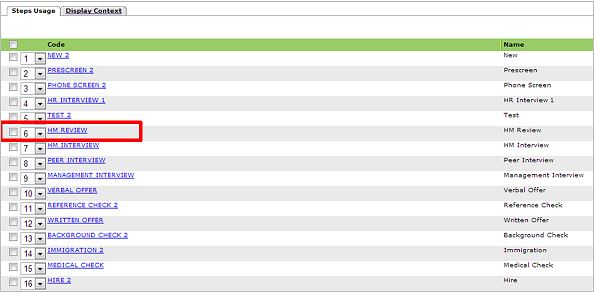
4. Determine the Steps Usage within the workflow you want to associate with the Candidate Review function (e.g. Hiring Manager Review). Note this Steps Usage name, you will need it in the next step. Cancel out of this page and you're brought back to the Workflows page.
5. Switch to the Steps tab.
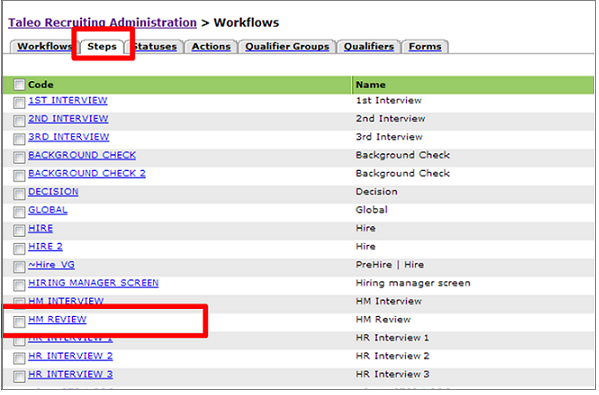
6. Locate and select the Step you want to associate with the Candidate Review function (the step you noted previously, e.g. Hiring Manager Review). The Statuses Usage tab opens.
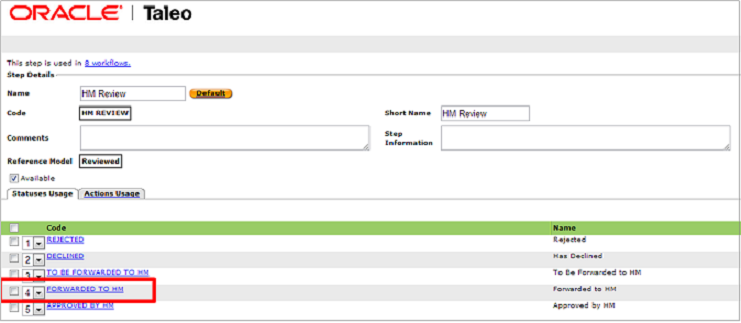
7. Locate and select the Statuses Usage (e.g. Forwarded to HM) you want to associate with the Candidate Review function. The Status Details page opens.
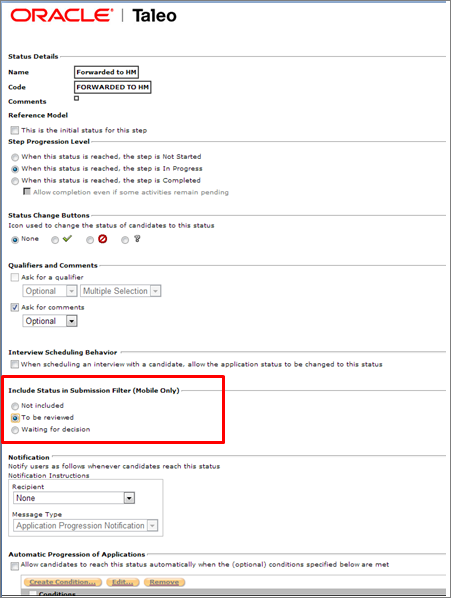
8. In "Include Status in Submission Filter (Mobile Only)", select the To be Reviewed option. This associates the Step and Status with the Candidate Review function.
Candidate Evaluation Configuration
While no configuration to the CSW is necessary, the user must have an interview scheduled with the candidate through Evaluation Management in Oracle Taleo Recruiting for the candidate to display in the Evaluation category/status. This integration must be present for these Recruiting candidates to flow through to Mobile.
The setting to enable Evaluation Management is found in the Recruiting Configuration at: Configuration > [Recruiting] > Administration > [General Configuration] > Settings > Evaluation Questions and Questionnaires Activation.
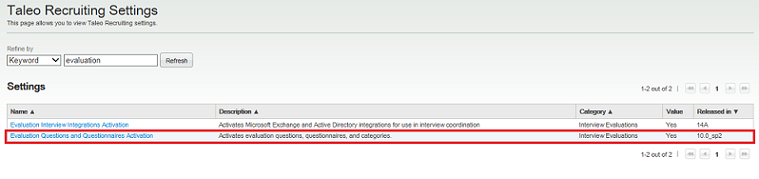
Notice that the default value is No. You must edit this setting and enable it for candidates to display in the Evaluation category of the CSW.
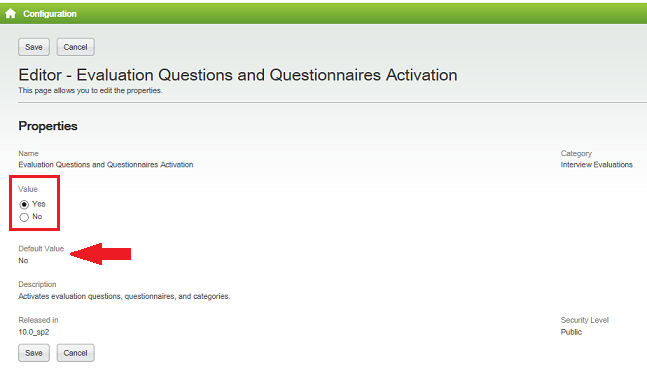
For details and comprehensive steps on enabling Evaluation Management, please refer to the Oracle Taleo Enterprise Recruiting Configuration Guide for Release 15A and beyond.
Candidate Selection Configuration
The CSW must be configured to allow candidates that are in the Candidate Selection status to be displayed in the Selection category.
An example configuration for the Candidate Selection function is as follows:
1. Log into Oracle Taleo Enterprise Configuration
2. Navigation: Configuration > [Recruiting] > Administration > [Process] > Candidate Selection Workflow
3. Locate and select a specific hiring manager-related CSW you want to integrate with the Candidate Selection function (e.g. Executive)in Worklist. The Steps Usage tab opens.
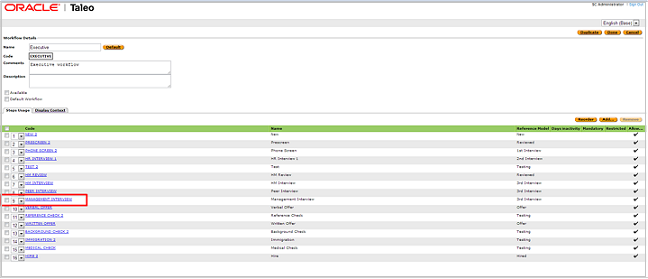
4. Determine the Steps Usage within the workflow you want to associate with the Candidate Selection function (e.g. Management Interview). Note this Steps Usage name, you will need it in the next step. Cancel out of this page and you're brought back to the Workflows page.
5. Switch to the Steps tab.
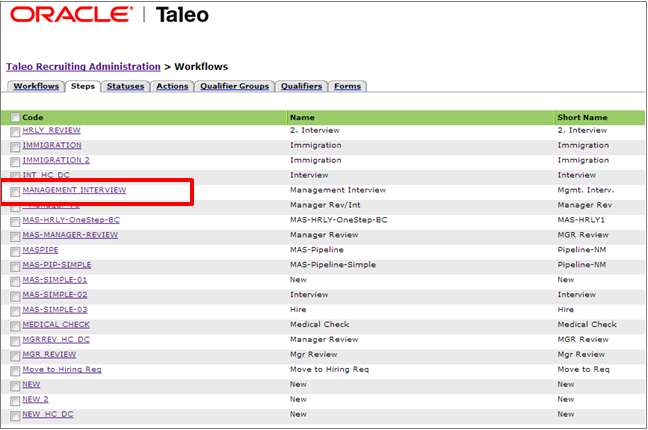
6. Locate and select the Step you want to associate with the Candidate Review function (the step you noted previously, e.g. Management Interview). The Statuses Usage tab opens.
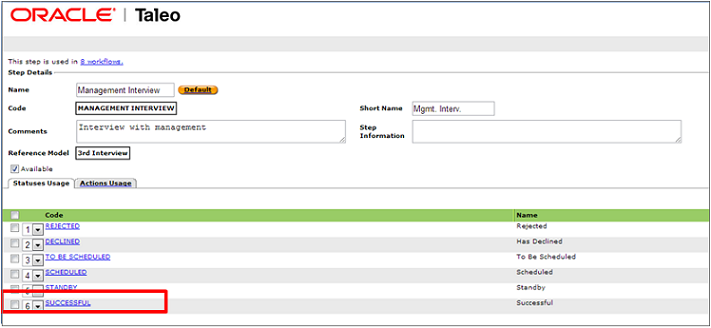 7. Locate and select the Statuses Usage (e.g. Successful) you want to associate with the Candidate Selection function. The Status Details page opens.
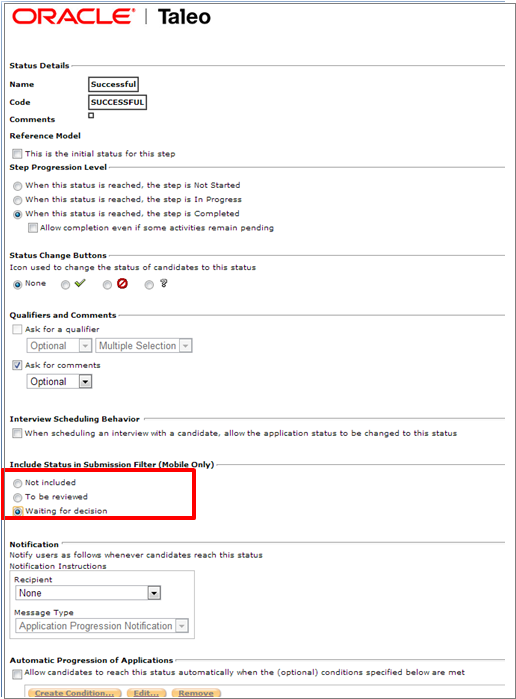 8. In "Include Status in Submission Filter (Mobile Only)", select the Waiting for Decision option. This associates the Step and Status with the Candidate Selection function.
Status Change in One-Click Configuration
Oracle Taleo Enterprise users can access steps and statuses directly in the candidates list without having to select an action in the More Actions list. For this feature, the Next Action column must be added in a candidate list format. The Next Action column contains actions that will give access to the next status or step related to a candidate.
Actions available in the Next Action column are Candidate Selection Workflow (CSW) movements only and:-
Allow users to change the status of a candidate to the next completion status (if the step is not already completed).
-
Allow users to move the candidate to the initial status of the next step if the current step is completed.