2Installation
Installation
Files and Folders
File Name
Distinctive file names facilitate the management of various integration points.
Touchpoints
Import
An import touchpoint corresponds to an available Taleo product service offering as defined in the data dictionary. The services have the same name as the business entity for which they offer specific import operations. For example, in the SmartOrg Data dictionary, the Group service offers create, delete, merge, and update operations. Other services may offer different operations.
Export
An export touchpoint corresponds to the information to be extracted from a particular Taleo product business model.
Actions
The import actions correspond to the specific operations offered by the service. There is only one export action, and that is an export.
File Name Standards
Import
Load file: <touchpoint>_<action>_ld.xml
Configuration file: <touchpoint>_<action>cfg.xml
Data file: <touchpoint>_<action>.csv
Result file: <touchpoint>_<action>_result_<date_time>.csv
Export
Query file: <touchpoint>_<action>_sq.xml
Configuration file: <touchpoint>_<action>_cfg.xml
Result file: <touchpoint>_<action>_result_<date_time>.csv
Examples
Import
Load file: user_merge_ld.xml
Configuration file: user_merge_cfg.xml
Data file: user_merge.csv
Result file: user_merge_result_20080715T084011.csv
Export
Query file: newhire_export_sq.xml
Configuration file: newhire_export_cfg.xml
Result file: newhire_export_result_20080715T090517.csv
Folder Structure
A well organized folder structure facilitates the management, development, testing, and migration from staging to production of the various integration point files.
The image illustrates a well organized folder structure.
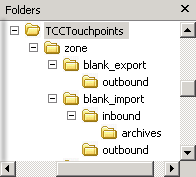
Level 0
This is the root folder for Taleo integrations. It contains the following:
Zones
A folder for each zone that is available such as production, staging, development.
Level 1
This is the Zones folder level. It contains the following:
touchpoint_action
A folder for each import and export integration point.
Level 2
This is the integration point folder level. It contains the following:
For import integration points:
The inbound folder for data files to import.
The outbound folder for result files.
For export integration points:
The outbound folder for result files.
Level 3
This is the import integration inbound folder level. It contains the following:
archives
The archives folder to save imported data files.
Windows
Installing TCC in Windows
One of the following operating systems pre-installed:
Windows Server 2008
Windows Server 2012
Windows Server 2016
Linux
Hardware:
Design and development workstation, ~1GHz, 256 MB RAM
Large volume production workstation, ~1 GHz, 512MB RAM
Software:
Product Integration Pack (PIP) setup program
Taleo Connect Client setup program
Security approval from your information security department to install TCC.
TCC installation packages come bundled with a 32 bit version of Java Runtime Environment.
17.0 - JRE 1.8
TaleoConnectClient.exe always uses the information in the jre folder created during installation, no matter what value is specified in JAVA_HOME. If the jre folder is deleted or renamed, making it impossible to find, the value set in JAVA_HOME is used. If JAVA_HOME is set to a 32 bit version everything works. If JAVA_HOME is set to a 64 bit version the "Can't load IA 32-bit .dll on a AMD 64-bit platform" error is displayed.
TaleoConnectClient.bat will work with 32 or 64 bit versions because there is no UI to display. The presence or absence of the jre folder, or the value set in JAVA_HOME have no impact.
Testing TCC in Windows
Testing TCC in Windows validates the endpoints, the user names and passwords, and communication between TCC and the Taleo products.
-
TCC is installed in Windows.
-
Production and staging zones are up and running.
-
Integrator user name and password for production and staging zones.
On successful completion of the test the TCC graphic user interface opens. On test failure a Ping Error is displayed. To troubleshoot, refer to the TCC Errors list in Appendix B.
Upgrading TCC in Windows
Upgrading to the latest version of TCC allows users to take advantage of the latest fixes, enhancements, and new features. Oracle recommends following the upgrade process described below to ensure smooth transition and minimal impact on existing integration scripts.
An [INSTALL FOLDER] for the new version of TCC, different from the current installation location.
Linux
Installing TCC in Linux
Installing TCC in Linux enables users to run import and export configuration files, in a command line environment.
Operating system:
Linux
Hardware:
Large volume production workstation, ~1 GHz, 512MB RAM
Software:
JRE 1.8.0 or JRE 8.0
TaleoConnectClient-X.Y.Z.tar.gz file
Security approval from your information security department to install TCC.
Copy the TaleoConnectClient-[version].tar.gz file to your Linux environment.
Unzip the file with this instruction, gunzip TaleoConnectClient-[version].tar.gz. The following file is generated, TaleoConnectClient-[version].tar.
Untar the file with this instruction, tar –xf TaleoConnectClient-[version].tar.
The Taleo Connect Client is installed in the tcc-[version] directory.
Testing TCC in Linux
Testing TCC in Linux validates the conformity of the integration workflow between TCC and the Taleo products.
TCC is installed in Linux.
Production and staging zones are up and running.
Linux system has access to zones.
Valid import specification and data file, and associated configuration file.
Valid export specification and associated configuration file.
Invoke import configuration execution.
Invoke export configuration execution.
Verify monitoring files.
Verify result files.
Upgrading TCC in Linux
Upgrading to the latest version of TCC allows users to take advantage of the latest fixes, enhancements, and new features. Oracle recommends following the upgrade process described below to ensure smooth transition and minimal impact on existing integration scripts.
An [INSTALL FOLDER] for the new version of TCC, different from the current installation location.