3Description
Description
Taleo Connect Client Basics
Ping Dialog
The Ping the Taleo product window opens when Taleo Connect Client is started. The ping dialog validates the endpoints, the user names and passwords, and communication between TCC and the Taleo products.
The ping dialog uses the default configuration board endpoint settings. The original default board file is provided by your Integration Customer Support representative. If this file has not been provided, you can manually enter zone information in the Endpoint and the Authentication sections.
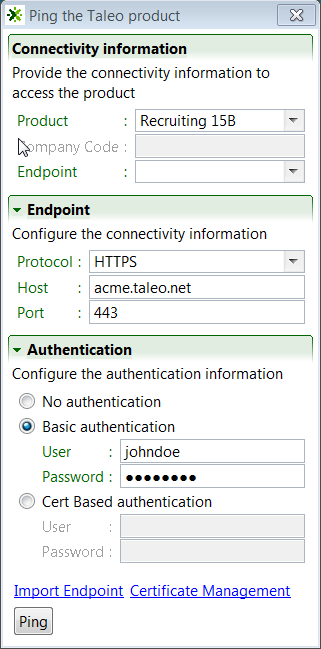
Connectivity Information
The Connectivity Information section provides the connectivity information to access the product.
Product: The product to ping is selected from the pull down menu.
Company Code: The company code is not used.
Endpoint: The Endpoint to use is selected from the pull down menu.
Endpoint
The Endpoint section displays the settings of the selected Endpoint. If no endpoints are configured, the information can be entered manually.
Protocol: The protocol to use is selected from the pull down menu.
Host: Production or staging zone name, for example acme.taleo.net or stgacme.taleo.net.
Port: The port number to access the Taleo product. Port 443 is used by default.
Authentication
The Authentication section provides the authentication context for the requests.
No authentication: No authentication is listed as an option for testing purposes.
Basic authentication: This is the minimum requirement to connect to the Taleo environment.
Cert Based authentication: This is used to sign the requests and responses between Connect Client and Oracle Taleo Enterprise Cloud Service. This is in addition to basic authentication.
For both types of authentication, the user must provide the following information:
User: The user name for integration must be created with an integrator role.
Password: The integration user password.
Import Endpoint
The Import Endpoint link opens a window where the user can locate the original default configuration file supplied by Oracle Support or a legacy environment properties file and retrieve the endpoint settings.
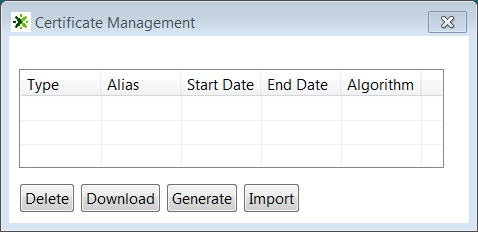
Certificate Management
The Certificate Management link opens a window where the user can generate, import, download, and delete certificates.
Oracle supports the signing of requests and responses between Taleo Connect Client (TCC) and the Oracle Taleo Enterprise Cloud Service zone. To activate communication signing, a certificate must be generated in TCC and imported in the Taleo zone. A certificate must also be generated in the Taleo zone and imported in TCC. Both certificates are needed for the signing feature to work. When requests and responses are sent by both TCC and Taleo, they are signed by the sender. The signature is validated by the receiver before processing the payload.
When generating a Connect Client certificate, you must set the certificate’s validity start date and end date. An alias is also required to identify the certificate. Only one certificate can be valid at a given time. You must create validity periods that do not overlap. Once the certificate is generated, you download it. To complete the certificate setup, the Taleo administrator accesses the TCC Security feature in Taleo and imports the TCC certificate. For instructions on how to import the TCC certificate in Taleo, see the Recruiting User Guide.
Ping
The Ping button starts the process. When the process is successful, TCC starts. If there is a failure, an error message is displayed. Refer to the error messages in Appendix B for additional details.
Eclipse RCP Framework
The Taleo Connect Client integration development environment is based on the Eclipse foundation's Rich Client Platform project (http://www.eclipse.org). It is important to understand the underlying concepts of this framework before going through the features in Taleo Connect Client.
Underlying Concepts
A perspective is a logical grouping of elements that organizes the work for the user in a clear and uncluttered fashion (including views, tool bars, and menu items).
An editor is a user interface that allows a user to create and update a particular part of the integration process. Multiple editor types and instances may be opened in a single perspective.
A view is a read-only auxiliary element that offers information about the active editor. As such, views react to selections within the active editor and to changes to different editor instances.
A preference is a setting that affects the user experience within the application. All preferences have a default value set by Taleo that can be changed by the user and preserved between work sessions.
Design Perspective
The design perspective is where the integration process workflow is built and where you determine how to extract information from or upload information to the Taleo environment. A specific editor is offered for each of these activities.
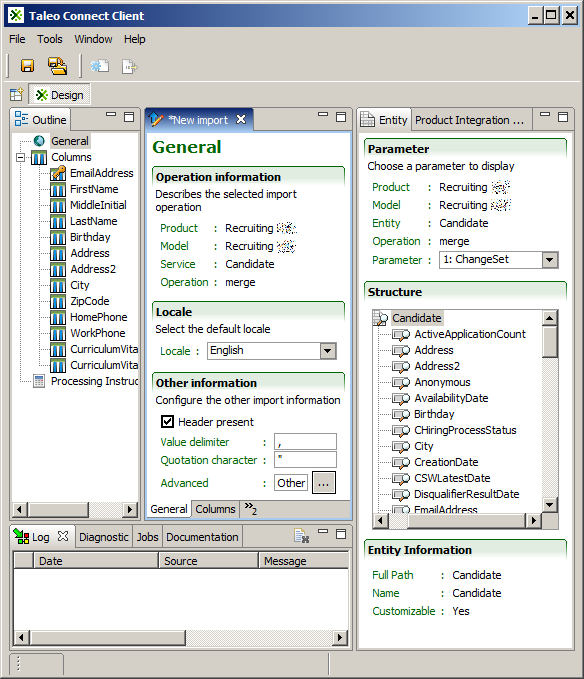
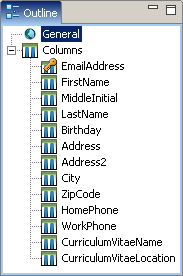
Outline View
The Outline view shows a structured view of the content of the current editor.
Entity View
The Entity View shows the structure of the entity selected within an Export Editor or a service operation parameter selected within an Import Editor.
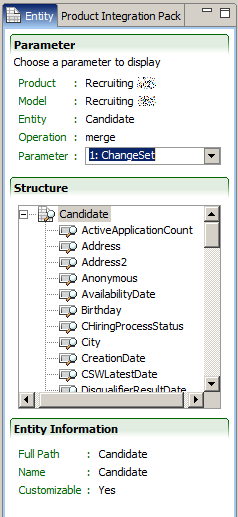
Each service operation offers a specific set of parameters that can be used to define the characteristics of data columns. Refer to the data dictionary for additional details.
The root entity has a set of fields and relations. The information section at the bottom of the view displays the details of the selected element.
Product Integration Pack View
The Product Integration Pack View shows the entire integration offering of a Taleo product with the available standard content.
Model
The Model section offers a selection of the installed product integration packs. Each product has typically a single model, although previous models may be included for backwards compatibility purposes.
The state of the dictionary is indicated for the displayed product model. The Synchronize custom fields button is used to update the data dictionary with user defined fields found in the Taleo product.
Dictionary tab
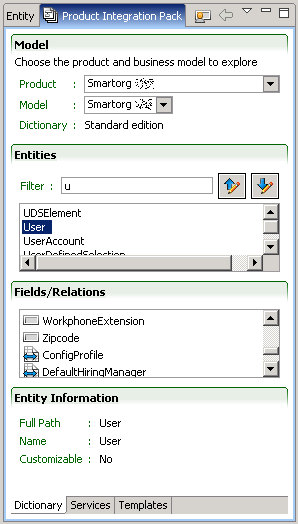
The Dictionary tab describes the entities available in the business model. These entities can be searched with an update-as-you-type filter box or with available for export or import filter buttons.
Each entity has a set of fields and relations. The relationships can be navigated to the related entity by double clicking, and back to the original entity with the Return icon.
Services tab
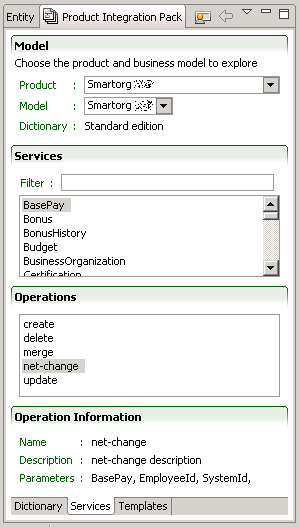
The Services tab lists the services available for this product. The services can be searched with an update-as-you-type filter box. The available operations are specific to each service.
Templates tab
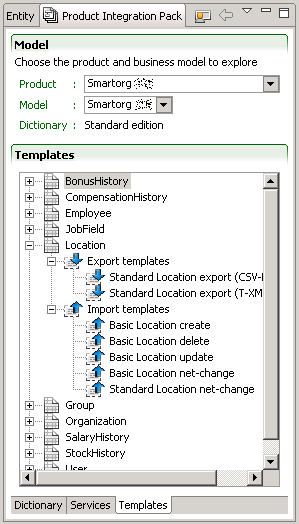
An import template is used to create an import specification for the given entity. The columns provided in the template are typical of integration processes with the Taleo product.
An export template is used to create an export specification for the given entity. The projections (fields) provided in the template are typical of integration processes with the Taleo product.
An export filter is used as a specific filtering element in an export specification. Export filtering elements from the Product Integration Pack are resolved only at runtime in the Prepare Export step; that is, the source export file does not contain the definition of the filtering, but only a reference to the filtering name.
Log View
The Log View lists all error messages produced by the various editors and views.
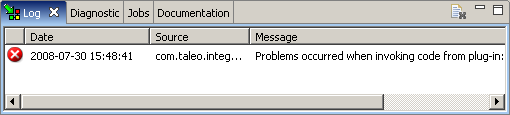
The first column shows the severity of the message with an icon.
The Date column displays the date of the error.
The Source column displays the source of the error.
The Message column displays the error message
Diagnostic View
The Diagnostic View shows the warnings or errors associated to the current Editor.
The first column displays the type of Editor that generated the diagnostic message with an icon.
The second column displays the severity of the message with an icon.
The File column displays the file name of the Editor that generated the message.
The Message column displays the actual description of the diagnostic message.
The Detail column displays additional details.
Jobs View
The Jobs View lists the jobs running in the background.
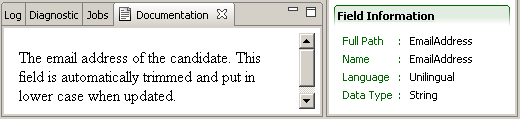
Documentation View
The Documentation view displays field and relation descriptions from the data dictionary, for the element selected in the Entity or Production Integration Pack views.
Default Configuration Board
Board Editor
The board editor enables users to create endpoint and symbol elements and save them in the default.configuration_brd.xml file for later use.
The Default Configuration Board facilitates migration from one environment to another (Staging to Production, Windows to Linux) by centralizing endpoint and symbol information in one file.
The default configuration board file location is [TCC_HOME]\system\default.configuration_brd.xml. This path and file must be copied to the production environment (Windows, Linux) to use centralized symbols and endpoints.
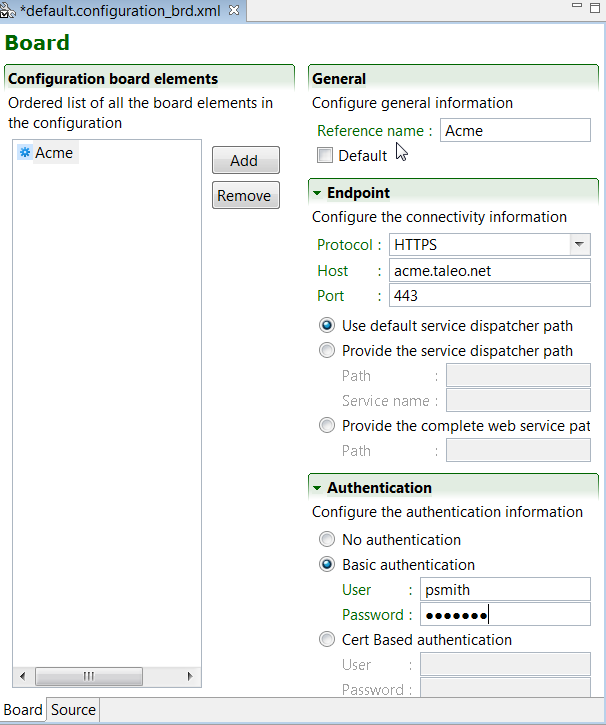
Configuration Board Elements
An ordered list of all the configuration board elements is displayed. The remove button deletes selected board elements. The Add button creates new board elements.
Endpoint Element
General
The reference name is what is displayed in the ordered list and in the pull down menus when endpoint information is required.
The Default check box assigns the selected endpoint to be used by default.
Endpoint
The Endpoint section provides the actual connectivity information for the Taleo environment:
Protocol: Taleo zones use HTTPS
Host: Production or staging zone name, for example acme.taleo.net or stgacme.taleo.net.
Port:Taleo zones use port 443.
The communication path can be set by default, be provided by the full Path directly, or by a combination of the service dispatcher Path and Service Name. The complete web service path can also be provided.
Authentication
The Authentication section provides the authentication context for the requests.
No authentication: No authentication is listed as an option for testing purposes.
Basic Authentication: This is the minimal requirement to connect to the Taleo environment.
Cert Based Authentication: This is used to sign the requests and responses between TCC and Taleo. This is in addition to basic authentication.
For both types of authentication, the user must provide the following information:
User: The user name for integration must be created with an integrator role.
Password: The integration user password.
Symbol Element
Symbols can be used anywhere in a configuration file and their values are resolved when executing the integration job. These are name and value pairs.
For example, Name=OUTPUT_FOLDER and Value=c:\tcc\output. The symbol is resolved to the value set in the default configuration board when it is used in a configuration file.
Note: Windows supports backslash (\) and forward slash (/) as path delimiters. When production and staging zones run under a Linux operating system, it is recommended to use forward slashes in configuration files since this is the only path delimiter supported by those systems. This simplifies moving integration configurations from staging to production environments since no modifications are required to the file paths in the configuration files.
NOW (“DateTimePattern”)
The symbol will be replaced by the current date and time. The date and time is resolved only once for a configuration execution. Therefore if you refer to the NOW( ) symbol in a preprocessing step, it will be that resolved value.
The default date format is: NOW(“yyyyMMdd'T'HHmmss”) = 20080702T10:12:00
You can specify the time format by using any supported date and time pattern: NOW(“EEE, MMM d, yyyy”)=Wed, Jul 2, 2008
For more information on supported date and time patterns, please refer to:
http://docs.oracle.com/javase/1.5.0/docs/api/java/text/SimpleDateFormat.html-
NUMBER_FORMAT ([symbolName])("pattern")
The symbol will be replaced by the formatted number. This token has two parameters which are the number to format and the pattern to apply on the number to format.
The pattern parameter can be composed of the following characters:
0 - Digit
# - Digit, zero shows as absent
. - Decimal separator or monetary decimal
, - Grouping separator
For example, [NUMBER_FORMAT([itk_attribute_count])("0000000000000")] or [NUMBER_FORMAT([itk_attribute_count])("#,##0.00")]
CFGFOLDER
The symbol will be replaced by the configuration file folder location.
The configuration file location is:
c:\tcc\myjob\candidateexport_cfg.xml.The token will be replaced at runtime by:
c:\tcc\myjobUUID
The symbol will be replaced by a universally unique identifier. This is the same token that can be used in the workflow identifier.
HOST
The symbol will be replaced by the host name of the workstation. This is the same token that can be used in the workflow identifier.
RANDOM
The symbol will be replaced by a random integer. This has the same purpose as the UUID but it is smaller (32 bits). There is no warranty to be globally unique.
SYSTEMPROPERTY(“system.property.name”)
The symbol will be replaced by the specified property name.
For example:
[SYSTEMPROPERTY(“java.io.tmpdir”)]/tcc, places temporary files in the tcc folder under the system's default temporary directory.Overriding symbol value
When executing TCC via the command line, you can override any symbol by specifying a system property with the following pattern:
com.taleo.client.symbol.TOKEN_NAMEFor example, to override the [OUTPUT_FOLDER] symbol defined in the default configuration board, specify the following system property when launching TCC:
-Dcom.taleo.client.symbol.OUTPUT_FOLDER=c:\folder\override-
Open bracket symbol delimiter
TCC uses the open bracket [ as a symbol delimiter. To use the open bracket more than once it must be doubled.
Normaly the regex_count function is written like this:
<quer:customFunction name="REGEXP_COUNT">
    <quer:customFunction name="REGEXP_REPLACE">
      <quer:field path="ProfileInformation,Candidate,HomePhone"/>
      <quer:string>[^0-9]+</quer:string>
      <quer:string/>
    </quer:customFunction>
    <quer:string>[[:digit:]]</quer:string>
    <quer:string>1</quer:string>
    <quer:string>i</quer:string>
  </quer:customFunction>
To work properly in TCC, it must be written like this:
<quer:customFunction name="REGEXP_COUNT">
    <quer:customFunction name="REGEXP_REPLACE">
      <quer:field path="ProfileInformation,Candidate,HomePhone"/>
      <quer:string>[^0-9]+</quer:string>
      <quer:string/>
    </quer:customFunction>
    <quer:string>[[[[:digit:]]</quer:string>
    <quer:string>1</quer:string>
    <quer:string>i</quer:string>
  </quer:customFunction>
Creating Endpoints
Taleo Connect Client is running.
Creating Symbols
Taleo Connect Client is running.
Import
Import Editor
The Import Editor creates a specification to upload comma separated value (CSV) files into a Taleo product.
Each service operation supports a list of parameters that can be simple values or dictionary entities. Each column is associated to a particular parameter. For entity type parameters, each column is associated to a field or relation of the entity itself.
General Tab
The general tab presents information that applies to the whole load file.
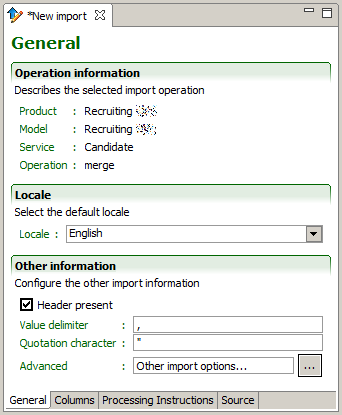
Operation information
The Operation information describes what import service operation of the Taleo product offering is used. This information is set when creating the import specification file and cannot be changed.
Listed are:
Product
Model
Service
Operation
Locale
The Locale determines the language used when uploading multilingual values for columns where the default locale strategy has been selected.
The default language for multilingual fields, such as descriptions, is selected from the pull down list.
Other information
The CSV format determines the characteristics of the request message.
When Header present is checked, it indicates that the source file contains an initial record containing the header of the columns. It is required to prevent using the values of the header line as an actual upload record.
Value delimiter determines the character used to separate values within a particular record. CSV file values can be separated by commas (,), pipes (|), or other characters. Taleo recommends the comma as a value delimiter for CSV files.
Quotation character determines the character used to quote (i.e. surround) a particular value that may contain special characters, such as the value delimiter. Taleo recommends the double quote (") as quotation character.
Fields with embedded double-quote characters must be delimited with double-quote characters, and the embedded double-quote characters must be represented by a pair of double-quote characters. For example, width 50”:
true,“width 50”” etc”,abc is valid
true,“width 50” etc”,abc is invalid
Advanced: Other import options
The integration processor executes specific code in the Taleo environment before the first imported entity and after the last imported entity. The mandatory integration processor is automatically added when selecting the desired import service. For OLF entity imports, the “olf” integration processor is added. For Department delete, the “maintenance” integration processor is added.
Additional import options are used to toggle specific behavior when processing the integration document. These are name and value pairs.
switch.system.maintenance
This option allows you to automatically switch the zone to maintenance mode when importing Organization, Location, or JobField (OLF), or deleting Department.
Possible values:
always: The integration processor will force the zone to switch into maintenance mode.
never: When importing OLF entities or deleting Department entities, the result file displays “To make any changes, the system must be in maintenance mode.”.
non.updatable.fields
Special behavior when trying to update a non-updatable field. This is very useful when calling a merge service where some values are required to create a new entity but cannot be updated.
Possible values:
error: the record update will fail when non-updatable fields are found during the import. This is the default behavior.
error.different: the record update will fail when trying to change the value of a non-updatable field.
warn: will never try to update the field value. A warning will be logged within the integration message saying the value has not been updated.
info.import.limit
This option allows you to retrieve information about your daily import limit and count.
Possible values:
true: the response SOAP document contains the
info.import.daily.limitand theinfo.import.daily.countattributes.false: the limit and count attributes are absent from the response SOAP document.
-
progress.interval
Defines the interval, in number of records processed, used to update the progress of the request in the monitor. For example, setting a value of 100 on a request containing 2000 records, would limit to 20 the number of progress updates sent to TCC.
-
Possible values:
A positive number, the default value is 1.
Columns Tab
A Column defines the conversion rules for a particular value of a record of the source file.
Column
An ordered list of all the columns in the import specification is built by dragging and dropping fields from Entity view Structure section. The Up and Down buttons allows sorting of the fields in the required order. The remove button deletes selected column. The Add button creates new columns:
data column
Field from Entity view Structure section. The different service operations offer specific parameters that can be used as data columns.
locale column
Special column indicating locale, it is used with multilingual fields Record locale type.
identifier column
Adding an Identifier column simplifies troubleshooting the error messages in the results file. It is not processed by the Taleo product.
Use the same value as the key field for the record. It will be returned in the result file with a mention of success, error, or failure.
ignore column
An ignore column is never processed. It is used when the customer system generates a column that has no equivalent in the Taleo product.
There are several import field types:
Search or lookup fields are identified with a magnifying glass icon.
Key fields are identified with an orange key icon (visible after checking Use the value for search or lookup).
Non updatable fields are identified with a red circle icon.
User defined fields (UDFs) are identified with a person icon.
Numerous column options can be set in the following sections. Some options are field specific. To set these options, click on the column to select it.
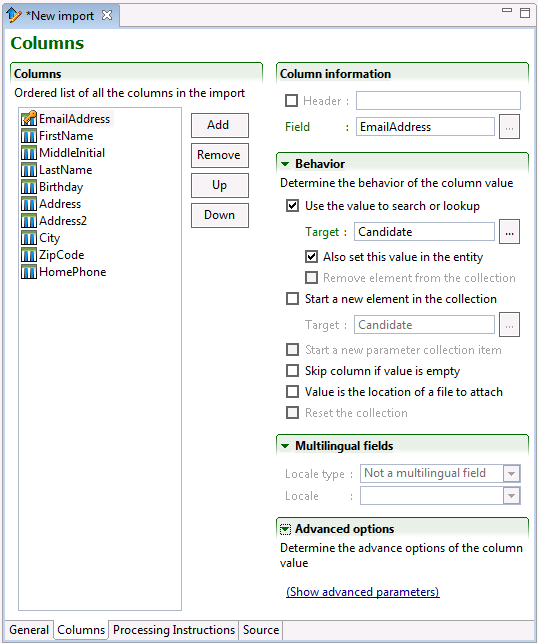
Column information
The header is a label used to identify the column for information purposes only. The value is disregarded during the actual integration process.
The Field entry determines the actual field of the root entity. Values can be dragged here from the Entity Structure view.
Behavior
The Behavior section determines what kind of information the value provides to the import.
Use the value to search or lookup: The column may be used to search within the Taleo product for existing entities. There are two types of searches:
Key column search: The search value affects (targets) the root entity. A key icon marks the column. As such, a key is used to actually search for the entity within the Taleo product. A record may have several keys to refine the search; however, an update can only be executed on one entity at a time. As such, the search keys must turn up either no entities or exactly one; any other result will cause an error.
Lookup column search: The search value does not affect (target) the root entity. A lookup icon marks the column. It is used to create a relation between the entity and another entity within the Taleo product. A typical example of lookups are locations. For example, when creating a requisition for Canada, we need to link the entity to the Canada location, not create a new Canada entity. In particular, a field of the root entity can never be looked up; a relation is required for this particular type of search.
Target: When importing a field that is a relation to another entity, not a standalone field, it will use the value to lookup the Target and bind it to the main entity, rather than update it. For example, if you want to use the Loginname as the search key for your User import, click the browse button and Select User.
Also set this value in the entity: When checked, it means that the import will try to update the field. It will not work for a lookup, but will work for a search. For example, if you try to import candidates and you use the email address as a search key, it will also set the email address if it creates a new candidate.
Start a new element in the collection: Some relationships are collections, because an entity can have multiple occurrences for that relationship. In the Basic Question import template, multiple answer questions mandate the use of more than one answer. To support this, each of the Answer columns (Question, PossibleAnswers, Description field) is marked as starting a new PossibleAnswer element of the PossibleAnswers collection.
Target: For example, to import 2 job-specific applications for the same candidate with at least 1 work experience for each application. Change the Target of the collection for the 1st and 2nd requisition to PreselectionApplication, but leave the Target of the option Use the value to search or lookup as is.
Start a new parameter collection item: The behavior of this option is the same as Start a new element in the collection, but for parameters rather than entities. For example, if you want to import multiple motives in a candidate move (CSW), you must find the motive in the Parameter list box, and then check this option for each motive occurrence. Note that this option is not frequently used.
Skip column if value is empty: The column may be ignored if the value provided in the file is empty. This is the case mainly when an entity field is optional but does not support the empty string as a valid value. In the Basic Question import template, not all questions will have the same amount of answers. However, you cannot import an empty answer in a question. To support both these restrictions, all answer related columns are marked as optional. Although the CSV file must always contain the total number of values in each row, when certain are empty the answers are not created.
Value is the location of a file to attach: The column value may be the location of a file that is to be attached to an entity. In such cases, the content of the file is compressed using the G-ZIP algorithm and then encoded in the base-64 scheme to ensure data integrity when embedding the file in the T-XML document. For example, the CurriculumVitaeLocation column (AttachedFiles,Content field) is configured to contain the location on the local system of a file to attach to the candidate. The file needs no preparation nor compression nor encryption and all Taleo supported formats are accepted (HTML, text, Microsoft Word, etc).
Reset the collection: The default and only possible value for this parameter in TCC is TRUE. To change the default behavior, enter the value FALSE in the corresponding column of the CSV file. The value set in the CSV file will override the default TCC value for that parameter.
When “Reset the collection” is TRUE, the elements of that collection must not check the “Use the value to search or lookup” parameter because those elements are removed and therefore don’t exist.
Please refer to the product data dictionary for the list of resetable relations.
Multilingual Fields
Multilingual fields can be imported in several different configurations.
Default locale: Uses the Default locale set in the General Tab for that column.
Specific locale: Uses the locale set in the Locale pull down menu for that column.
Record locale: Uses the Locale column to identify field locale value. When this option is selected for a column, the presence of a single locale column is mandatory. The value of this column should be a standard locale code such as 'en' or 'fr'.
Advanced options
Advanced options are used to toggle specific behavior when processing the column value. These are name and value pairs.
default.value
A default value can be specified for columns that have no value set in the customer CSV file. Processing is not executed when “Skip column if value empty” is checked.
updatable
Some field values only need to be sent to the target application once, usually during the create operation. Once the column is defined as non-updatable, the field values contained in that column are not sent to the target application in an update operation. This advanced option is Net Change specific.
Possible values:
true: will update the field (default)
false: will not update the field
Processing Instructions Tab
Processing instructions allow customization and extension of import processing on fields and relations.
A processing instruction is a name value pair that can be set on any field or relation available for import in TCC. The attribute name is a predefined string understood by a component in TCC indicating that special processing is required. The instruction is processed locally by TCC, before or after the import depending on the particular instruction.
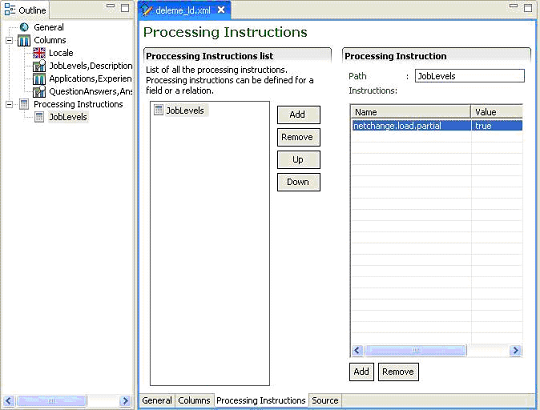
Processing Instructions List
An ordered list of all the fields and relations that require processing instructions is built by dragging and dropping them from the Entity view Structure section. The Up and Down buttons allows sorting the fields and relations in the required order. The remove button deletes selected fields and relations. The Add button creates a blank processing instruction subject.
Processing Instruction
Path
Path of the field or relation for which a processing instruction is specified.
For a blank processing instruction subject, the path to a valid field or relation can be entered manually.
Instructions
The add button enables the user to enter the instruction name value pair. Only predefined instructions are understood by TCC. Setting an invalid or unknown instruction will be ignored and have no effect.
The remove button deletes the selected instruction.
Creating a New Import File
Make sure the Taleo Connect Client application is open.
Click File > New > New Import Wizard >Next.

Saving a New Import File
Make sure a new import specification file is open in import editor.
Click File > Save.
Select directory.
Enter file name or select existing name in directory.
Select file type.
Click Save.
Opening an Existing Import File
Make sure the Taleo Connect Client application is open.
Click File > Open > Import.
Select directory.
Select file in directory.
Click Open.
Building an Import Specification
Verify that the information in the General tab is correct.
Click the Column tab.
Create columns.
Drag and drop the required fields from the entity structure view to the column view.
Set column behavior.
Save file.
Creating a CSV File
A configured and saved import specification is open in the import editor.
Changing Default CSV Editor
Open the Preferences window by clicking Window > Preferences > Client > Design.
In the Sample CSV viewer, click the Open window button. The Select file window opens.
Navigate to the new CSV editor folder.
Select the CSV editor.
Click Open. The path and name of the new default CSV editor are displayed in the Sample CSV viewer dialog box.
Click Apply then OK.
Export
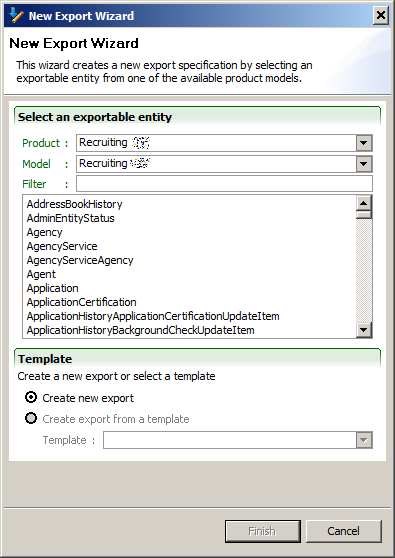
Export Editor
The Export Editor uses a business model from a particular Taleo product version to create a specification for information to be extracted from Taleo products.
Each export is based on a root entity from which all fields and relations are defined. From that entity, fields and relations may be selected (projected) for extraction from the Taleo product.
General Tab
The general tab presents information that applies to the whole export file.
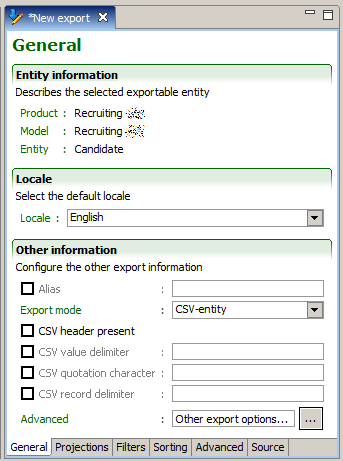
Entity information
The Entity information describes what entity of the Taleo product offering is exported. This information is set when creating the export specification file and cannot be changed.
Listed are:
Product
Model
Entity
Locale
The Locale determines the default language used when extracting multilingual fields for projections where the default locale strategy has been selected.
The default language for multilingual fields, such as descriptions, is selected from the pull down list.
Other information
The Alias is used to identify the query and reuse return results in sub queries.
The Export Mode determines how the extracted information is returned in the response message:
T-XML: Uses a structured XML format (akin to a tree view) to represent the data. This mode is well suited to complex data sets including several relations, for example, exporting new hires with their applications, the associated requisition (job offer) information, the work experiences, the education elements, etc. The two main limitations of the T-XML format is that only fields of the business model are allowed and that due to the structure format, the performance of large exports is usually better in the other modes.
XML: Uses a flat XML format (akin to a tabular list or an Excel spreadsheet) to represent the data. This mode is well suited for large exports of simple data sets with no or only direct relations. For example, exporting all of the users of a Taleo product or all of the currently opened requisitions. The main limitation of the XML mode is that when n-ary relations are involved, one record per combination of relations is exported (i.e. for a candidate with two work experiences and three education elements, a total of 6 records would be exported).
CSV-entity: Based on the T-XML export mode, it handles multiple values and multilingual fields. All data related to the root entity is located on the same line. When a column contains multiple values (multilingual or relations of maximum cardinality "N"), the values are serialized inside a single column. The prevent duplicates, grouping, and joining features are not supported by the CSV-entity export mode.
CSV-report: Uses a flat file format (that can be directly imported as an Excel spreadsheet) to represent the data. This mode exports exactly the same information as the XML mode, hence has the same strengths and weaknesses.
The following information only applies to the CSV modes.
When Header present is checked, it indicates that the projection aliases and field names will be exported as the first record.
Value delimiter determines the character used to separate values within a particular record. By default the export uses the comma (,) character.
Quotation character determines the character used to quote (i.e. surround) a particular value that may contain special characters, such as the value delimiter. By default the export uses the double quote (") character.
The Record delimiter determines the character used to separate records within the file. By default the export uses the new line character and thus places each record on a separate line.
Advanced: Other export options
The Advanced export options should only be used by Taleo certified specialists to tune the performance of certain large extractions.
Additional export options are used to toggle specific behavior when processing the integration document. These are name and value pairs.
info.export.limit
This option allows you to retrieve information about your daily export limit and count.
Possible values:
true: the response SOAP document contains the
info.export.daily.limitand theinfo.export.daily.countattributes.false: the limit and count attributes are absent from the response SOAP document.
-
progress.interval
Defines the interval, in number of records processed, used to update the progress of the request in the monitor. For example, setting a value of 100 on a request containing 2000 records, would limit to 20 the number of progress updates sent to TCC.
-
Possible values:
A positive number, the default value is 1.
Projections Tab
A Projection defines which fields of the entity will be returned.
The use of projections differs greatly depending on the mode of the export specification:
When T-XML or CSV-entity mode is used, the only possible projections are field projections. The sequence of the projections is irrelevant as they only serve to identify which elements of the business model will be selected for extraction after the entities have been determined using the filtering elements.
When a flat mode such as XML or CSV-report is used, projections may include transformations. In this mode, the sequence of projections is critical as they each represent a column in the resulting document.
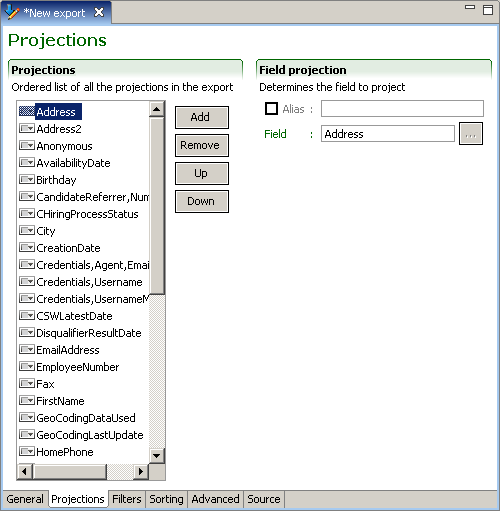
Projections
An ordered list of all the projections in the export specification is built by dragging and dropping fields from Entity view Structure section. The Up and Down buttons allows sorting of the projections in the required order. The remove button deletes selected projections. The Add button creates new projections:
field projection
A field projection is the most common projection and directly represents an element of the business model. The alias of a field projection is optional. When an alias is not present, the path itself will be used. The field is defined by a path that navigates the business model starting from the root entity set for the export specification.
For multilingual field projections, the extracted locale values can be selected in the Locale. Filtering window that is opened with the Field open window button.
formatted date projection
A formatted date projection allows modification of the field date format. The alias of a formatted date projection is mandatory. The date field is defined by a path that navigates the business model starting from the root entity set for the export specification. The date format defines the presentation of the date elements.
function projection
Available functions are: Add, Add days, Add weeks, Add months, Add years, Average, Cast as date, Cast as number, Cast as timestamp, Concatenate, Count, Decode, Divide, Greatest, Least, Maximum, Minimum, Multiply, Power, Replace, Replace null, Replace null or not, Round, Substring, Subtract, Subtract date, Sum, To char, To end of day, To start of day, To lower-case, To upper-case, Trim, Truncate
The alias of a function projection is mandatory. The plus and minus buttons add and delete parameters. The up and down symbols moves the selected parameter. Available function parameter data types are: String, Boolean, Integer, Long, Float, Double, Date, Date/Time, and Field. Parameter values must conform to the selected data type.
multilingual field projection
Allows the language code of related entity fields to be exported in CSV-report format. The alias of a multilingual field projection is optional. When an alias is not present, the path itself will be used. The value exported can be the language code (2), or locale code (en).
complex projection
Insert the SQ-XML code into the complex projection pane.
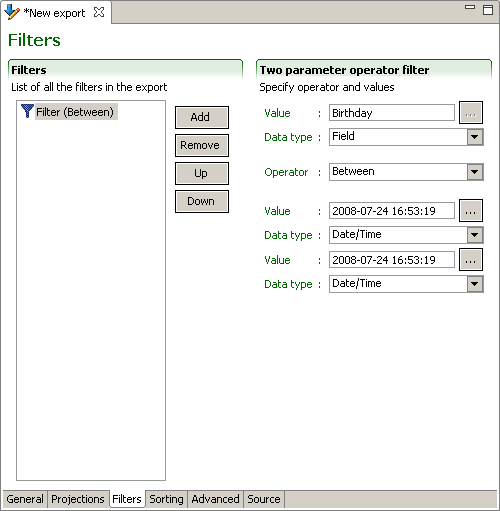
Filters Tab
Filters determine which entities are extracted from the Taleo product.
Filters
The use of filters is the same for all export modes. The sequence of filtering elements is unimportant since they are combined by a logical AND to select entities. The Up and Down buttons allows sorting of the filters if so desired. The remove button deletes selected filters. The Add button creates new filters:
simple filter
Field filtering selects entities based on the value of the field. The field can be compared in a number of ways to a specific value that should be of the same type as the field itself.
Available operators are: Between, Equals, Equals (allow null), Does not equal, Greater than, Greater than or equal, Is null, Is not null, Is true, Is false, Less than, Less than or equal, Contains (case sensitive), Contains (case insensitive), Matches (case sensitive), Matches (case insensitive), and Last Run Date.
Last Run Date filters the records that were added or modified since the last export.
complex filter
Insert the SQ-XML code into the complex filter pane.
filter from a template
The template pull down menu displays the available templates for the selected entity.
One/No parameter operator filter
The one parameter operator filter requires the argument to be specified. The no parameter operator filter argument is embedded in the operator.
The available parameter data types are: String, Boolean, Integer, Long, Float, Double, Date, Date/Time, and Field.
Sorting Tab
Sorting defines the order in which the selected entities will be returned from the Taleo product.

Sorting
The use of sorting is the same for all export modes. The sequence of the sorting elements is important as the first sorting will be applied first and the subsequent sorting only for matching entities. The Up and Down buttons allows placement of the sorting elements in the required order. The remove button deletes selected projections. The Add button creates new sorting elements:
field sorting
Field sorting is the most common sorting and orders entities based on the value of the field. The only option is to select the Order of the sort, which can either be Ascending or Descending.
complex sorting
Insert the SQ-XML code into the complex sorting pane.
field based projection sorting
When exporting in T-XML or CSV-entity, field based projection sorting allows specifying the sorting order of sub-entities. The only option is to select the Order of the sort, which can either be Ascending or Descending.
complex projection sorting
Insert the SQ-XML code into the complex projection sorting pane.
Advanced Tab
The advanced tab enables users to insert SQ-XML code of advanced elements to the export specification.
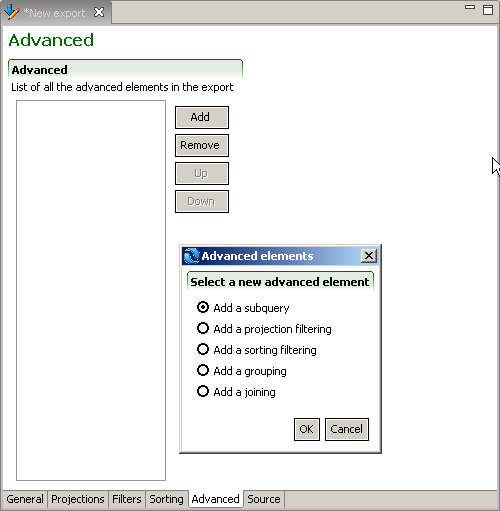
Advanced
The remove button deletes selected elements. The Add button creates new elements:
subquery
projection filtering
sorting filtering
grouping
joining
Creating a New Export File
Make sure the Taleo Connect Client application is open.
Click File > New > New Export Wizard > Next.
Saving a New Export File
Make sure a new export specification file is open in export editor.
Click File > Save.
Select directory.
Enter file name or select existing name in directory.
Select file type.
Click Save.
Opening an Existing Export File
Make sure the Taleo Connect Client application is open.
Click File > Open > Export.
Select directory.
Select file in directory.
Click Open.
Building an Export Specification
Verify that the information in the General tab is correct.
Click the Projections tab.
Create projections.
Drag and drop the required fields from the entity structure view to the projections list.
Click Add to insert other types of projections.
Click the Filters tab.
Drag and drop the fields to use as simple filters from the entity structure view to the filters list.
Set values, data types, and operator.
Click Add to create other types of filters.
Click Sorting.
Drag and drop the fields to sort from the entity structure view to the filters list.
Set sorting order.
Click Add to create other types of sorters.
Click Advanced.
Click Add to create advanced queries.
Save file.
Configuration
Configuration Editor
The Configuration Editor creates the integration process workflow that sends the request file to the Taleo product and retrieves the response file.
The overall behavior of the integration process workflow
The type of monitoring associated to a workflow execution
The alerts triggered by the workflow execution
How to handle and transform the source file eventually sent as a the request message to the Taleo environment
The connectivity information required to contact the Taleo environment
How to handle and transform the response message received from the Taleo environment
General Tab
The general tab presents information that applies to the whole configuration file.
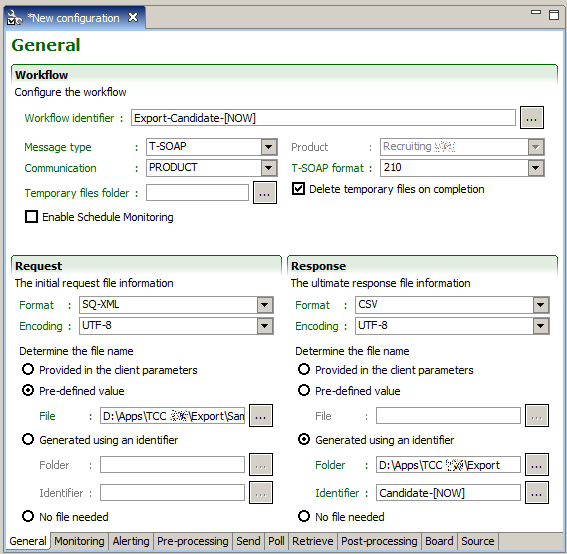
Workflow
The Workflow identifier should be sufficiently unique to unambiguously define each particular execution instance of the workflow.
The Message type determines the format of the request and response messages exchanged with the Taleo environment. This does not place any restrictions on the original request or ultimate response messages, except for possibly requiring transformations within the workflow.
The Product selected at file creation.
The Communication type defines where the integration instructions are sent within the Taleo environment.
PRODUCT: The messages are exchanged directly with the Taleo product. This requires a T-SOAP or RS-XML message type.
MIDDLEWARE: The messages are exchanged with the Taleo middleware. There are no requirements on the message type.
MIXED: This communication type is deprecated and should not be used. It is present only to support legacy processes.
The T-SOAP format defines the structure of T-SOAP messages. The current version is 2.1.0, version 2.0.0 is available only to support legacy processes.
The temporary files folder defines where the files created during workflow execution are stored. By default, the temporary files are deleted upon workflow completion.
Enable Schedule Monitoring determines the conservation of configuration execution records. The execution records can be viewed in the scheduling monitoring report available from the TCC menu bar Report.
Request/Response
File information for the initial request and ultimate answer.
The Format describes the structure of the message.
T-SOAP: main message format used by the current Taleo Connect platform, it contains information wrapped in an industry standard SOAP envelope with certain Taleo specific information.
RS-XML: proprietary Taleo legacy message format similar in nature but not in structure to the T-SOAP format.
SQ-XML: proprietary Taleo XML format that expresses export specifications.
XML: any file in the industry standard XML format.
CSV: flat file format containing records with character delimited values.
TEXT: any file in a plain text format.
OTHER: any other file format.
The Encoding states the way the file is encoded. The Taleo environment only supports UTF-8 encoding. Conversion is available in the Pre- and post-processing steps.
The File name can be determined in three ways:
The file can be provided in the client parameters when invoking a workflow execution at the command line. This option is currently not supported when executing a workflow within the user interface in the runtime perspective.
The file can be a pre-defined value in which case the file is simply the location on disk of the initial request file.
The file can be generated using an identifier in which case the folder defines where on disk to resolve the file name.
Monitoring Tab
Taleo Connect Client enables end users to track the progress and inspect the final status of workflow executions by using the monitoring feature. The feature is based on the workflow result information that is updated at each step of the workflow execution. This information can be saved to disk in its original XML format, in a text or HTML formatted version, or in a custom format using an XSL transformation.
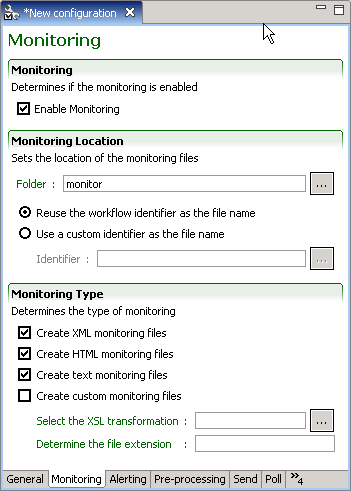
Monitoring
The Enable Monitoring check box determines if monitoring is active or not. It is highly recommended to always have at least one type of monitoring active as this is the principal source of information about workflow executions.
Monitoring Location
Folder identifies the folder where all monitoring files are stored. This value can be modified from its default value; however, when using the HTML monitoring type, the web subfolder is required for the images and style sheets.
A specific monitoring file is generated for each workflow execution and updated after each step. The Reuse the workflow identifier as the file name setting will use the workflow identifier as defined in for the monitoring file name. The Use a custom identifier setting allows you to specify the monitoring file name instead of using reusing the workflow identifier as the file name. In addition, the monitoring file name can use either a static or a unique identifier:
Use a static identifier. A static or constant identifier for the monitoring file name gives you easy access to the result of a given integration process over time. Each workflow execution would overwrite the previous one, but a simple shortcut could be added to an Internet browser to quickly access the current result.
By default, the monitoring file name is static.
Use a unique identifier. A unique identifier creates a different monitoring file name for each workflow execution. This ensures that the monitoring information is always available and easily retrievable for a particular execution.
A unique identifier can be used either when the file name reuses the workflow identifier or when the file name uses a custom identifier.
There are two ways to add a unique identifier to a monitoring file name:
Append a token (UUID, time stamp) to the file name.
Add a system property named "com.taleo.integration.client.uniquemonitoringid=true" to the command line or set "-Dcom.taleo.integration.client.uniquemonitoringid=true" in the ini file.
Monitoring Type
The Monitoring Type section determines what information is stored and how it is presented.
The XML monitoring file contains all the information produced by the workflow execution. It is not easily readable and is more suited for automated system treatment.
The HTML monitoring file offers a styled view of the main monitoring information that is easy to read and interpret.
The TEXT monitoring file contains the minimal subset of monitoring information and is mostly used in a production environment where an HTML file cannot be accessed.
The Custom monitoring file allows a personalized view of the monitoring information. The custom file is generated by applying an XSL transformation to the XML monitoring file. The file extension determines what is appended to the file location set in the previous location to create the actual file on disk.
Alerting Tab
The Alerting feature of Taleo Connect Client (TCC) enables the user to receive e-mail notification of workflow completion or failure.
The TCC Monitoring feature is very helpful to get detailed information about the workflow execution of an integration process during its execution. However, when processes are scheduled to run at times where it is not practical for a user to monitor the execution, an e-mail report can help the user stay informed on the status of the integration processes. The end user can choose to receive e-mails as text or in a custom format using an XSL transformation.
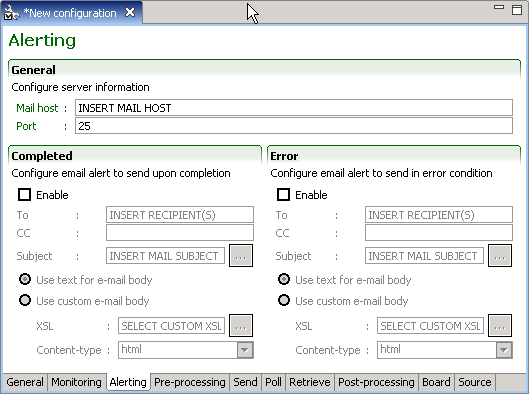
General
The mail host SMTP server address is determined by specifying the host alias or the IP address and the server port.
Completed/Error
The Completed and Error sections determine if and how an e-mail alert is sent when the workflow is completed or completes with an error, respectively.
To specifies a list of comma-separated e-mail addresses of recipients that will receive the alert e-mail.
CC specifies a list of comma-separated e-mail addresses of recipients that will receive a copy of the alert e-mail.
Subject determines the subject line of the alert e-mail.
The alert e-mail can be provided in two formats:
Text format is a plain text version of the monitoring information.
Custom format is built by applying an XSL transformation to the XML monitoring file. The Content-type or the resulting content can also be specified to facilitate e-mail reception processing.
Pre-processing Tab
The Pre-processing steps define all handling and transformations to the source file, as well as any other task that needs to be done, prior to sending the request message to the Taleo environment.
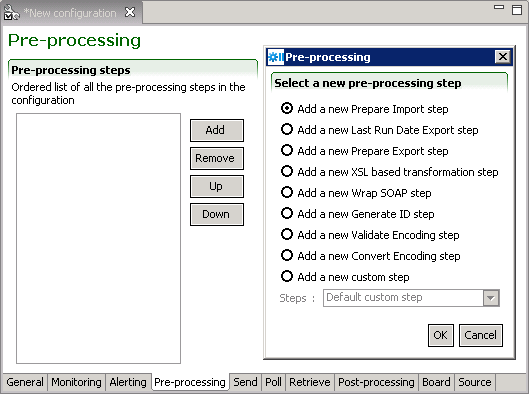
Pre-processing steps
The Add button creates new steps. The remove button deletes selected step. The Up and Down buttons allows sorting of the steps in the required order.
Prepare Import
The Prepare Import step converts an initial request message in CSV format to a standard Taleo T-XML import document. The conversion rules are set in the import specification file.
Last Run Date Export
The Prepare Last Run Date (LRD) step gets the current date and time, and on successful completion of the workflow updates the LRD file. By default, Use date from the zone is selected. Use date from current computer is for extracting from Professional 7.0.4 or earlier.
Prepare Export
The Prepare Export step adjusts and embeds an initial request message in SQ-XML format to a Taleo standard T-XML export document. The request details and specific configurations are set in the export specification file.
XSL based transformation
The Transform with XSL step is used to convert an XML file to a valid data file compliant with the defined import specification. It determines XSL file path and name, output format, and encoding.
The pre-processing step processes the whole document at once. XSL technology is not designed to support large transformations, the whole file must be loaded in memory prior to conversion. Make sure you have enough available memory to use the XSL transformation preprocessing step with large import files.
Wrap Soap
The Wrap SOAP step wraps a T-XML document within a T-SOAP envelope to create a message that can be sent to the Taleo environment. This is a mandatory step when using the Prepare Import or Prepare Export steps.
Generate ID
The Generate ID step determines how to construct the unique message identifier for the T-SOAP message sent to the Taleo environment. If the workflow identifier is unique, then it can be reused; if not, a new identifier can be specified. It is required to use a unicity token within the identifier to ensure uniqueness of the resulting message identifier.
Validate Encoding
The Validate Encoding step ensures the file is correctly encoded.
Convert Encoding
The Convert encoding step changes the encoding of the request message.
Expected encoding: Current type
Target encoding: Desired type
A Byte order mark (BOM) byte can be generated if required.
Custom Steps
Default Custom step
Allows implementors to basically execute any logic they want. Java class is the fully qualified name of a class that extends com.taleo.integration.client.step.BaseCustomStep. The custom step can access any number of parameters provided in the configuration file in the form of name/value pairs.
CSV Mapping
The CSV Mapping step processes the input CSV file columns and maps the values to a new value based on an external mapping file.
Standard Parameters
Value delimiter: CSV input file column delimiter character.
Quotation character: CSV input file quotation character.
Mapping columns: List of column numbers that represent the first column of each block of columns that are used as a key in the mapping process. Each block number must be separated by a semi-colon (;). The first column in the CSV file is always 1. For example, the key length is 2, the first block of 2 columns starts at column number 4, and the next block starts at column 12, the value in this field must be "4;12" (without the double quotes).
Mapping file: Mapping process definition file. It must contain 1 more column than the number of columns used for the key. The last column in this file contains the value that will be used as a replacement value for the specified column(s). The file must be encoded in UTF-8, must have a CSV header, must use a comma (,) for value delimiter and a double quote (") for the quotation character.
Case sensitive keys: Indicates if the mapping process must be case sensitive for the key(s) comparison.
Advanced parameters
DefaultValue: Default value to use when a key is not found in the mapping file. Provides value to prevent mapping process generating an error by default.
DuplicateKeys: Duplicate keys in the mapping file generate an error by default. Setting the value to "ignore" will use the last defined duplicate key value as replacement in the original CSV file. Possible Values: error, ignore.
Net Change Computation
Compares the customer CSV request file with the Net Change database to determine the changes (create, update, delete, etc...) required to synchronize the target application.
Net Change Setup
Creates the Net Change reference database for the selected service (entity). First, it clears the existing entity Net Change tables. Then it extracts data from the target application, based on the Import File specification, to fill the entity Net Change reference table.
FTP Get
Retrieves a file from an FTP server.
Standard Parameters
Host: Name or IP address of the FTP server.
Port: Port number on which the FTP server listens for requests (for example, 4566), The default is 21.
User: The valid user that will be used for the logon on the remote FTP server.
Password: The valid password for the FTP user specified in username that will be used for the logon on the server.
Transfer type: Ftp supports both ASCII and binary image file transfer types. The default is binary. You should use ASCII when transferring text files. In ASCII mode, character conversions to and from the network standard character set are performed. For example, end-of-line characters are converted as necessary, based on the target operating system.
Remote path: Working directory of the FTP server (for example, /tmp/pub). If the directory does not exist, the server throws an exception.
File name: Name of the remote file.
Move file: The request file will be moved into a specific folder determined by Move Folder parameter.
Move folder: The move request file destination folder name. If not specified the request file will not be moved.
Number of retries: Represents the number of retries that will be done if the operation fails. Zero by default.
Time between retries: Represents the number of seconds to wait between the retry attempts. Zero by default.
Retry factor: This factor is used as a multiplier on the "Time between retries" between each attempt. It multiplies the last time waited by this amount. i.e. If "Time between retries" is 10 seconds and the retry factor is 2, the first wait time will be 10sec, the second will be 20sec, the third will be 40sec and so on, until the maximum number of retries has been reached.
Advanced parameters
Account: Optional. The user name for an account on the FTP server (for example, FADA). Specify account if your FTP host requires account information. The account is defined in the FTP protocol to further identify the user that is identified by the username and password input variables.
Transfer mode: Ftp supports both of the following file transfer modes: passive or active. The default is passive.
Data port: Optional. Listener port number of the data transfer channel. If you do not specify dataport, the FTP Client will throw an exception. This value is used only when the transfer type value is active. In active mode, the FTP client opens a dynamic port, sends the FTP server the dynamic port number on which it is listening over the control stream and waits for a connection from the FTP server. When the FTP server initiates the data connection to the FTP client it binds the source port to port 20 on the FTP server.
Client host: Optional. The client host that listen on a port determined by above DataPort. The host name can either be a machine name, such as "www.taleo.com", or a textual representation of its IP address. If a literal IP address is supplied, only the validity of the address format is checked.
Timeout: Optional. Sets the timeout in milliseconds to use when reading from the data connection. This timeout will be set immediately after opening the data connection.
Create remote path if missing: Create the working directory on the FTP server (for example, /tmp/pub/a/b).
FTP Put
Sends a file to an FTP server.
Standard Parameters
Host: Name or IP address of the FTP server.
Port: Port number on which the FTP server listens for requests (for example, 4566), The default is 21.
User: The valid user that will be used for the logon on the remote FTP server.
Password: The valid password for the FTP user specified in username that will be used for the logon on the server.
Transfer type: Ftp supports both ASCII and binary image file transfer types. The default is binary. You should use ASCII when transferring text files. In ASCII mode, character conversions to and from the network standard character set are performed. For example, end-of-line characters are converted as necessary, based on the target operating system.
Remote path: Working directory of the FTP server (for example, /tmp/pub). If the directory does not exist, the server throws an exception.
File name: Name of the remote file.
Number of retries: Represents the number of retries that will be done if the operation fails. Zero by default.
Time between retries: Represents the number of seconds to wait between the retry attempts. Zero by default.
Retry factor: This factor is used as a multiplier on the "Time between retries" between each attempt. It multiplies the last time waited by this amount. i.e. If "Time between retries" is 10 seconds and the retry factor is 2, the first wait time will be 10sec, the second will be 20sec, the third will be 40sec and so on, until the maximum number of retries has been reached.
Advanced parameters
Account: Optional. The user name for an account on the FTP server (for example, FADA). Specify account if your FTP host requires account information. The account is defined in the FTP protocol to further identify the user that is identified by the username and password input variables.
Transfer mode: Ftp supports both of the following file transfer modes: passive or active. The default is passive.
Data port: Optional. Listener port number of the data transfer channel. If you do not specify dataport, the FTP Client will throw an exception. This value is used only when the transfer type value is active. In active mode, the FTP client opens a dynamic port, sends the FTP server the dynamic port number on which it is listening over the control stream and waits for a connection from the FTP server. When the FTP server initiates the data connection to the FTP client it binds the source port to port 20 on the FTP server.
Client host: Optional. The client host that listen on a port determined by above DataPort. The host name can either be a machine name, such as "www.taleo.com", or a textual representation of its IP address. If a literal IP address is supplied, only the validity of the address format is checked.
Timeout: Optional. Sets the timeout in milliseconds to use when reading from the data connection. This timeout will be set immediately after opening the data connection.
Create remote path if missing: Create the working directory on the FTP server (for example, /tmp/pub/a/b).
FTP Delete
Removes a file from An FTP server.
Standard Parameters
Host: Name or IP address of the FTP server.
Port: Port number on which the FTP server listens for requests (for example, 4566), The default is 21.
User: The valid user that will be used for the logon on the remote FTP server.
Password: The valid password for the FTP user specified in username that will be used for the logon on the server.
Remote path: Working directory of the FTP server (for example, /tmp/pub). If the directory does not exist, the server throws an exception.
File name: Name of the remote file.
Number of retries: Represents the number of retries that will be done if the operation fails. Zero by default.
Time between retries: Represents the number of seconds to wait between the retry attempts. Zero by default.
Retry factor: This factor is used as a multiplier on the "Time between retries" between each attempt. It multiplies the last time waited by this amount. i.e. If "Time between retries" is 10 seconds and the retry factor is 2, the first wait time will be 10sec, the second will be 20sec, the third will be 40sec and so on, until the maximum number of retries has been reached.
Advanced parameters
Account: Optional. The user name for an account on the FTP server (for example, FADA). Specify account if your FTP host requires account information. The account is defined in the FTP protocol to further identify the user that is identified by the username and password input variables.
Transfer mode: Ftp supports both of the following file transfer modes: passive or active. The default is passive.
Data port: Optional. Listener port number of the data transfer channel. If you do not specify dataport, the FTP Client will throw an exception. This value is used only when the transfer type value is active. In active mode, the FTP client opens a dynamic port, sends the FTP server the dynamic port number on which it is listening over the control stream and waits for a connection from the FTP server. When the FTP server initiates the data connection to the FTP client it binds the source port to port 20 on the FTP server.
Client host: Optional. The client host that listen on a port determined by above DataPort. The host name can either be a machine name, such as "www.taleo.com", or a textual representation of its IP address. If a literal IP address is supplied, only the validity of the address format is checked.
Timeout: Optional. Sets the timeout in milliseconds to use when reading from the data connection. This timeout will be set immediately after opening the data connection.
HTTP
Posts data to an HTTP/HTTPS URL.
Standard Parameters
Endpoint:) Represents the endpoint to use for the post operation. This endpoint must use the HTTP or HTTPS protocol.
Number of retries: Represents the number of retries that will be done if the operation fails. Zero by default.
Time between retries: Represents the number of seconds to wait between the retry attempts. Zero by default.
Retry factor: This factor is used as a multiplier on the "Time between retries" between each attempt. It multiplies the last time waited by this amount. i.e. If "Time between retries" is 10 seconds and the retry factor is 2, the first wait time will be 10sec, the second will be 20sec, the third will be 40sec and so on, until the maximum number of retries has been reached.
Advanced parameters
Custom HTTP headers are supported through the use of advanced parameters. A parameter having the prefix Header: followed by the name of the header as the name of the parameter can be defined. For example, to define the Content-type the parameter name will be Header:Content-type.
SMTP
Sends import/export result file by email.
Standard Parameters
Host:The address of the host SMTP server.
Port: The port of the host SMTP server. 25 by default.
From: The address of the sender. Taleo Connect Client by default.
To: The address(es) of the receiver(s).
Cc: The address(es) of the receiver(s).
Subject: The subject of the email.
MessageTemplate: The template string that contains the email message body. The template supports the following velocity standard tools: DateTool and MathTool. See the Apache velocity website for details. It also supports the following Taleo custom velocity tools: StringTool and FileTool. The StringTool variables are: $string.rightPad("123", 10), $string.rightPad("123", 10, "_"), $string.leftPad("123", 10) and $string.leftPad("123", 10, "0"). The FileTool variables are: $file.content(), $file.lineCount() and $file.size().
Number of retries: Represents the number of retries that will be done if the operation fails. Zero by default.
Time between retries: Represents the number of seconds to wait between the retry attempts. Zero by default.
Retry factor: This factor is used as a multiplier on the "Time between retries" between each attempt. It multiplies the last time waited by this amount. i.e. If "Time between retries" is 10 seconds and the retry factor is 2, the first wait time will be 10sec, the second will be 20sec, the third will be 40sec and so on, until the maximum number of retries has been reached.
SendAttachment: Send the step input file as attachment. True by default.
Attachment Maximum File Size: The maximum file size is now defaulted to 100MB (104857600 bytes). This can be modified by setting a different value, in bytes, for the attachment.max.file.size advanced parameter. For example, attachment.max.file.size=104857600
ZipAttachment: Compress the attached file.
Attachment file name: Enter name for attached file. The file name MUST NOT have leading or trailing spaces. The file name MUST NOT contain the \ / : * ? < > | characters. If left empty, the default file name will be used.
Send Notification: Sends notification email on selected condition. Condition is determined by processing status provided by previous step. Select "Always" to disregard previous step processing status and send notification on all step executions. Select "On warning or error" to send a notification only if the previous step processing status is "warning" or "error". Select "On error" to send a notification only if the previous step processing status is "error". The possible values are: Always, On warning or error, On error.
This applies only to Net Change steps, in all other cases the notification email is sent no matter what choice is selected.
Send Tab
The Send processing step defines the connectivity information required to contact the Taleo environment.
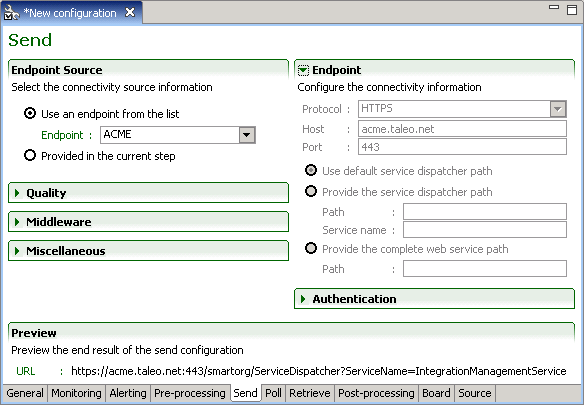
Endpoint Source
Endpoint information can originate from the default configuration board file, the configuration file board tab, or from the current step.
Endpoint
The Endpoint section provides the actual connectivity information for the Taleo environment:
Protocol: HTTP or HTTPS
Host: Alias or IP address
Port: Number
The communication path can be provided by the full Path directly or by a combination of the service dispatcher Path and Service Name. The complete web service path can also be provided.
Authentication
The Authentication section provides the authentication context for the requests.
No authentication: No authentication is listed as an option for testing purposes.
Basic Authentication: This is the minimal requirement to connect to the Taleo environment.
Cert Based Authentication: This is used to sign the requests and responses between TCC and Taleo. This is in addition to basic authentication.
For both types of authentication, the user must provide the following information:
User: The user name for integration must be created with an integrator role.
Password: The integration user password.
Quality
The Quality section determines how communication failures are handled within the workflow execution.
Retry determines what action is taken when a particular processing operation fails. This option is optional for the send step.
Interval determines the number of seconds between each try.
Acknowledgement Attempts is a deprecated option only kept for backwards compatibility reasons and should not be used.
Completion attempts is the number of times the request file will be sent to the zone before halting the workflow and generating an error message.
Ignore errors determines if retries are attempted even if an error has occurred. This option is mandatory when using retries in the send step as the only two possible outcomes are success or error.
Socket time-out determines how much time a particular processing operation will wait for a response. This is a highly technical setting and only needs to be modified in particular cases where connectivity issues occur with the Taleo environment.
Middleware
The Middleware section provides extra information required when communicating with the Taleo middleware. These settings are only enabled if the communication type is set to MIDDLEWARE.
Sender ID, Receiver ID and Event ID specify information required for the routing of the request message within the middleware.
Miscellaneous
The Miscellaneous section sets some very technical send step information.
Chunked limit affects how large request messages are sent using the HTTP protocol.
Validate request is a legacy option only offered in RS-XML workflows where the request message was pre-validated.
Preview
Preview the send configuration connectivity information defined in the endpoint section.
Poll Tab
The Poll processing step defines the connectivity information required to contact the Taleo environment.
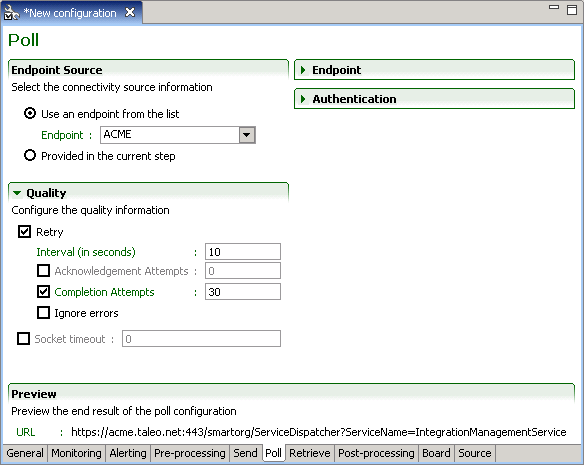
Endpoint Source
Endpoint information can originate from the default configuration board file, the configuration file board tab, or from the current step.
Endpoint
The Endpoint section provides the actual connectivity information for the Taleo environment:
Protocol: HTTP or HTTPS
Host: Alias or IP address
Port: Number
The communication path can be provided by the full Path directly or by a combination of the service dispatcher Path and Service Name. The complete web service path can also be provided.
Authentication
The Authentication section provides the authentication context for the requests.
No authentication: No authentication is listed as an option for testing purposes.
Basic Authentication: This is the minimal requirement to connect to the Taleo environment.
Cert Based Authentication: This is used to sign the requests and responses between TCC and Taleo. This is in addition to basic authentication.
For both types of authentication, the user must provide the following information:
User: The user name for integration must be created with an integrator role.
Password: The integration user password.
Quality
The Quality section determines how communication failures are handled within the workflow execution.
Retry determines what action is taken when a particular processing operation fails. This option is mandatory for the poll step. An integration process will very rarely complete on the first polling attempt.
Interval determines the number of seconds between each try.
Acknowledgement Attempts is a deprecated option only kept for backwards compatibility reasons and should not be used.
Completion attempts is the number of times the zone will be polled for the result file before halting the workflow and generating an error message. The completion attempt counter automatically resets when the zone processed record count changes.
Ignore errors determines if retries are attempted even if an error has occurred. This setting only applies to polling errors and not document errors.
The workflow will stop when the following document states are encountered: Interrupted, Suspended, or Error.
Socket time-out determines how much time a particular processing operation will wait for a response. This is a highly technical setting and only needs to be modified in particular cases where connectivity issues occur with the Taleo environment.
Preview
Preview the poll configuration connectivity information defined in the endpoint section.
Retrieve Tab
The Retrieve processing step defines the connectivity information required to contact the Taleo environment.
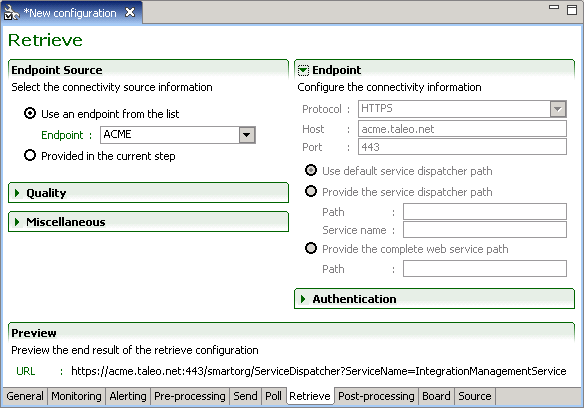
Endpoint Source
Endpoint information can originate from the default configuration board file, the configuration file board tab, or from the current step.
Endpoint
The Endpoint section provides the actual connectivity information for the Taleo environment:
Protocol: HTTP or HTTPS
Host: Alias or IP address
Port: Number
The communication path can be provided by the full Path directly or by a combination of the service dispatcher Path and Service Name. The complete web service path can also be provided.
Authentication
The Authentication section provides the authentication context for the requests.
No authentication: No authentication is listed as an option for testing purposes.
Basic Authentication: This is the minimal requirement to connect to the Taleo environment.
Cert Based Authentication: This is used to sign the requests and responses between TCC and Taleo. This is in addition to basic authentication.
For both types of authentication, the user must provide the following information:
User: The user name for integration must be created with an integrator role.
Password: The integration user password.
Quality
The Quality section determines how communication failures are handled within the workflow execution.
Retry determines what action is taken when a particular processing operation fails. This option is optional for retrieve step.
Interval determines the number of seconds between each try.
Acknowledgement Attempts is a deprecated option only kept for backwards compatibility reasons and should not be used.
Completion attempts is the number of times to try and retrieve the result file from the zone before halting the workflow and generating an error message.
Ignore errors determines if retries are attempted even if an error has occurred. This option is mandatory when using retries in the retrieve step as the only two possible outcomes are success or error.
Socket time-out determines how much time a particular processing operation will wait for a response. This is a highly technical setting and only needs to be modified in particular cases where connectivity issues occur with the Taleo environment.
Middleware
The Middleware section of the retrieve step provides extra information required when communicating with the Taleo middleware. These settings are only enabled if the communication type is set to MIDDLEWARE.
Sender ID, Receiver ID and Event ID specify information required for the routing of the request message within the middleware.
Miscellaneous
The Miscellaneous section sets some very technical send step information.
Chunked limit affects how large request messages are sent using the HTTP protocol.
Validate request is a legacy option only offered in RS-XML workflows where the request message was pre-validated.
Preview
Preview the retrieve configuration connectivity information defined in the endpoint section.
Post-processing Tab
The Post-processing steps define how to handle and transform the source file eventually sent as the response message from the Taleo environment.
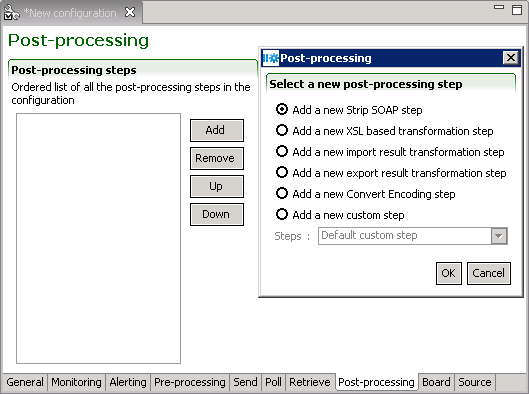
Post-processing steps
The Up and Down buttons allows sorting of the steps in the required order. The remove button deletes selected step. The Add button creates new steps:
Strip SOAP
Determines how the SOAP envelope will be removed from the response message:
Document: leaves an XML message with the content and the attributes of the document.
Content: leaves an XML message with the business content of the document.
CSV: leaves a CSV message with the business content of the document, applies to CSV mode export responses only.
The Fail on export error stops processing if the response message contains an error.
XSL based transformation
Applies an XSL transformation to a response message. This step works at the record level. The template file must contain a placeholder ([RECORD_OUTPUT]) that will contain the transformed data.
XSL file: Specifies the path and file name to use.
Template file: Specifies the path and file name to use.
Export mode: File format before transformation T-XML or XML
Output format: File format after transformation, OTHER, TEXT, CSV, XML, SQ-XML, T-XML, T-SOAP, RS-XML
Import Result Transformation
Converts the import results to a CSV file using the following specifications.
File: Specifies the path and file name to use.
Output properties: When selected, inserts operation properties at begining of result file.
Advanced Parameters are available to add data columns to the CSV result file.
EXTRA_COLUMN_NAME_x: The parameter value sets the column header name.
EXTRA_COLUMN_XPATH_x: The parameter value sets the Xpath for the data inserted into the column. The Xpath for a particular set of data can be found in the T-XML response file returned by the operation. Since the response document contains a namespace, the "local name" must be specified. For example, if the Xpath in the T-XML file is //Candidate/Number, the parameter value is expressed as //*[local-name()="Candidate"]/*[local-name()="Number"].
Note: Make sure to replace the x at the end of the pairs of parameter names with the same number to ensure they remain matched. For example, EXTRA_COLUMN_NAME_1 and EXTRA_COLUMN_XPATH_1, EXTRA_COLUMN_NAME_2 and EXTRA_COLUMN_XPATH_2, etc...
Export Result Transformation
Converts the exports results to a CSV file using the export specifications
Convert Encoding
Changes the encoding of the response message if necessary.
Expected encoding: Current type
Target encoding: Desired type
A Byte order mark (BOM) byte can be generated if required.
Custom Steps
Default Custom step
Allows implementors to basically execute any logic they want. Java class is the fully qualified name of a class that extends com.taleo.integration.client.step.BaseCustomStep. The custom step can access any number of parameters provided in the configuration file in the form of name/value pairs.
CSV Mapping
The CSV Mapping step processes the input CSV file columns and maps the values to a new value based on an external mapping file.
Standard Parameters
Value delimiter: CSV input file column delimiter character.
Quotation character: CSV input file quotation character.
Mapping columns: List of column numbers that represent the first column of each block of columns that are used as a key in the mapping process. Each block number must be separated by a semi-colon (;). The first column in the CSV file is always 1. For example, the key length is 2, the first block of 2 columns starts at column number 4, and the next block starts at column 12, the value in this field must be "4;12" (without the double quotes).
Mapping file: Mapping process definition file. It must contain 1 more column than the number of columns used for the key. The last column in this file contains the value that will be used as a replacement value for the specified column(s). The file must be encoded in UTF-8, must have a CSV header, must use a comma (,) for value delimiter and a double quote (") for the quotation character.
Case sensitive keys: Indicates if the mapping process must be case sensitive for the key(s) comparison.
Advanced parameters
DefaultValue: Default value to use when a key is not found in the mapping file. Provides value to prevent mapping process generating an error by default.
DuplicateKeys: Duplicate keys in the mapping file generate an error by default. Setting the value to "ignore" will use the last defined duplicate key value as replacement in the original CSV file. Possible Values: error, ignore.
Net Change Result Processor
Generates a simple XML report that indicates how many entities have been processed during the operation.
Net Change Result Transformation
Processes the file generated by the "Net Change Result Processor" to transform it into a standard TCC CSV file. This step is optional for Initial Load processing.
FTP Put
Sends a file to an FTP server.
Standard Parameters
Host: Name or IP address of the FTP server.
Port: Port number on which the FTP server listens for requests (for example, 4566), The default is 21.
User: The valid user that will be used for the logon on the remote FTP server.
Password: The valid password for the FTP user specified in username that will be used for the logon on the server.
Transfer type: Ftp supports both ASCII and binary image file transfer types. The default is binary. You should use ASCII when transferring text files. In ASCII mode, character conversions to and from the network standard character set are performed. For example, end-of-line characters are converted as necessary, based on the target operating system.
Remote path: Working directory of the FTP server (for example, /tmp/pub). If the directory does not exist, the server throws an exception.
File name: Name of the remote file.
Number of retries: Represents the number of retries that will be done if the operation fails. Zero by default.
Time between retries: Represents the number of seconds to wait between the retry attempts. Zero by default.
Retry factor: This factor is used as a multiplier on the "Time between retries" between each attempt. It multiplies the last time waited by this amount. i.e. If "Time between retries" is 10 seconds and the retry factor is 2, the first wait time will be 10sec, the second will be 20sec, the third will be 40sec and so on, until the maximum number of retries has been reached.
Advanced parameters
Account: Optional. The user name for an account on the FTP server (for example, FADA). Specify account if your FTP host requires account information. The account is defined in the FTP protocol to further identify the user that is identified by the username and password input variables.
Transfer mode: Ftp supports both of the following file transfer modes: passive or active. The default is passive.
Data port: Optional. Listener port number of the data transfer channel. If you do not specify dataport, the FTP Client will throw an exception. This value is used only when the transfer type value is active. In active mode, the FTP client opens a dynamic port, sends the FTP server the dynamic port number on which it is listening over the control stream and waits for a connection from the FTP server. When the FTP server initiates the data connection to the FTP client it binds the source port to port 20 on the FTP server.
Client host: Optional. The client host that listen on a port determined by above DataPort. The host name can either be a machine name, such as "www.taleo.com", or a textual representation of its IP address. If a literal IP address is supplied, only the validity of the address format is checked.
Timeout: Optional. Sets the timeout in milliseconds to use when reading from the data connection. This timeout will be set immediately after opening the data connection.
Create remote path if missing: Create the working directory on the FTP server (for example, /tmp/pub/a/b).
FTP Delete
Removes a file from An FTP server.
Standard Parameters
Host: Name or IP address of the FTP server.
Port: Port number on which the FTP server listens for requests (for example, 4566), The default is 21.
User: The valid user that will be used for the logon on the remote FTP server.
Password: The valid password for the FTP user specified in username that will be used for the logon on the server.
Remote path: Working directory of the FTP server (for example, /tmp/pub). If the directory does not exist, the server throws an exception.
File name: Name of the remote file.
Number of retries: Represents the number of retries that will be done if the operation fails. Zero by default.
Time between retries: Represents the number of seconds to wait between the retry attempts. Zero by default.
Retry factor: This factor is used as a multiplier on the "Time between retries" between each attempt. It multiplies the last time waited by this amount. i.e. If "Time between retries" is 10 seconds and the retry factor is 2, the first wait time will be 10sec, the second will be 20sec, the third will be 40sec and so on, until the maximum number of retries has been reached.
Advanced parameters
Account: Optional. The user name for an account on the FTP server (for example, FADA). Specify account if your FTP host requires account information. The account is defined in the FTP protocol to further identify the user that is identified by the username and password input variables.
Transfer mode: Ftp supports both of the following file transfer modes: passive or active. The default is passive.
Data port: Optional. Listener port number of the data transfer channel. If you do not specify dataport, the FTP Client will throw an exception. This value is used only when the transfer type value is active. In active mode, the FTP client opens a dynamic port, sends the FTP server the dynamic port number on which it is listening over the control stream and waits for a connection from the FTP server. When the FTP server initiates the data connection to the FTP client it binds the source port to port 20 on the FTP server.
Client host: Optional. The client host that listen on a port determined by above DataPort. The host name can either be a machine name, such as "www.taleo.com", or a textual representation of its IP address. If a literal IP address is supplied, only the validity of the address format is checked.
Timeout: Optional. Sets the timeout in milliseconds to use when reading from the data connection. This timeout will be set immediately after opening the data connection.
HTTP
Posts data to an HTTP/HTTPS URL.
Standard Parameters
Endpoint:) Represents the endpoint to use for the post operation. This endpoint must use the HTTP or HTTPS protocol.
Number of retries: Represents the number of retries that will be done if the operation fails. Zero by default.
Time between retries: Represents the number of seconds to wait between the retry attempts. Zero by default.
Retry factor: This factor is used as a multiplier on the "Time between retries" between each attempt. It multiplies the last time waited by this amount. i.e. If "Time between retries" is 10 seconds and the retry factor is 2, the first wait time will be 10sec, the second will be 20sec, the third will be 40sec and so on, until the maximum number of retries has been reached.
Advanced parameters
Custom HTTP headers are supported through the use of advanced parameters. A parameter having the prefix Header: followed by the name of the header as the name of the parameter can be defined. For example, to define the Content-type the parameter name will be Header:Content-type.
SMTP
Sends import/export result file by email.
Standard Parameters
Host:The address of the host SMTP server.
Port: The port of the host SMTP server. 25 by default.
From: The address of the sender. Taleo Connect Client by default.
To: The address(es) of the receiver(s).
Cc: The address(es) of the receiver(s).
Subject: The subject of the email.
MessageTemplate: The template string that contains the email message body. The template supports the following velocity standard tools: DateTool and MathTool. See the Apache velocity website for details. It also supports the following Taleo custom velocity tools: StringTool and FileTool. The StringTool variables are: $string.rightPad("123", 10), $string.rightPad("123", 10, "_"), $string.leftPad("123", 10) and $string.leftPad("123", 10, "0"). The FileTool variables are: $file.content(), $file.lineCount() and $file.size().
Number of retries: Represents the number of retries that will be done if the operation fails. Zero by default.
Time between retries: Represents the number of seconds to wait between the retry attempts. Zero by default.
Retry factor: This factor is used as a multiplier on the "Time between retries" between each attempt. It multiplies the last time waited by this amount. i.e. If "Time between retries" is 10 seconds and the retry factor is 2, the first wait time will be 10sec, the second will be 20sec, the third will be 40sec and so on, until the maximum number of retries has been reached.
SendAttachment: Send the step input file as attachment. True by default.
Attachment Maximum File Size: The maximum file size is now defaulted to 100MB (104857600 bytes). This can be modified by setting a different value, in bytes, for the attachment.max.file.size advanced parameter. For example, attachment.max.file.size=104857600
ZipAttachment: Compress the attached file.
Attachment file name: Enter name for attached file. The file name MUST NOT have leading or trailing spaces. The file name MUST NOT contain the \ / : * ? < > | characters. If left empty, the default file name will be used.
Send Notification: Sends notification email on selected condition. Condition is determined by processing status provided by previous step. Select "Always" to disregard previous step processing status and send notification on all step executions. Select "On warning or error" to send a notification only if the previous step processing status is "warning" or "error". Select "On error" to send a notification only if the previous step processing status is "error". The possible values are: Always, On warning or error, On error.
This applies only to Net Change steps, in all other cases the notification email is sent no matter what choice is selected.
Report Filtering
Filters record results by criteria.
reportFiltering: Select from drop down list. All (no filter), On error or warning, On error only.
Board Tab
The Board Tab allows the user to to create endpoint and symbol elements specific to the current configuration file.
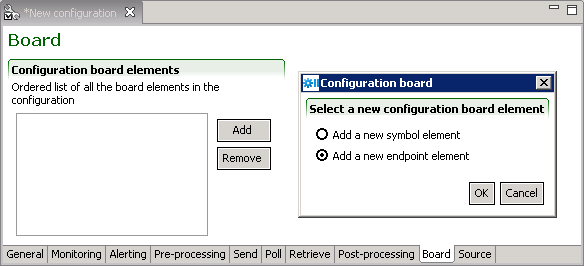
With specific endpoints and symbols the user can override the settings of the default configuration board.
For additional information on endpoints and symbol elements refer to the Default Configuration Board section.
Creating a New Configuration File
Make sure the Taleo Connect Client application is open.
Saving a New Configuration File
Make sure a new configuration specification file is open in configuration editor.
Click File > Save.
Select directory.
Enter file name or select existing name in directory.
Select file type.
Click Save.
Opening an Existing Configuration File
Make sure the Taleo Connect Client application is open.
Click File > Open > Configuration.
Select directory.
Select file in directory.
Click Open.
Executing a Configuration
Make sure a configuration file is open and active.
Click Execute the configuration icon.
Runtime
Runtime Perspective
The Runtime perspective displays the workflow execution details in graphical and tabular formats.
Workflow Identifier
The workflow identifier for the current execution displays above the Workflow Execution Details icons.
Workflow Execution Details
A graphical overview of the step progress groups all processing steps in a single aggregated icon.
Basic Information
The basic monitoring information can be seen in the left hand column and consists of the overall state of the workflow execution and the individual step statuses.
If the workflow execution is completed, then all steps will also be completed.
If the workflow execution is in progress, then a subset of all steps will be completed.
If the workflow execution is in error, then a particular step may also be in error. However, certain error scenarios occur at the initialization or finalization of the workflow execution, hence either no steps or all steps will have been completed.
General Information
Workflow type, start, finish, and duration of the execution (when applicable).
-
The original location of the request message file and the target location of the response message file.
Step Details
The step details tabular view shows the start, finish, duration (when applicable), and the request and response message information when applicable.
Monitoring a Workflow
A workflow configuration file is available for execution.
Click Window > Open Perspective > Runtime. The Runtime Perspective opens.
Click File > Open Configuration.
Select directory.
Select file.
Click Open. The configuration file opens.
Click the Execute the configuration icon.
Maximise the Runtime Perspective.
The workflow execution details are displayed.
Console
Console Perspective
The Console perspective displays a real-time view of all integration processes handled by a Taleo product.
The console perspective uses a single editor, the message list viewer, that lists all the messages in a Taleo product matching a particular criteria. This perspective distinguishes between the message and the document contained in the message.This perspective offers multiple views that analyze each message from different angles.
Message List Viewer
The Message List Viewer is an editor that primarily shows a list of messages from the target Taleo Connect Server. Technically, it is an editor, since the profile of the target Taleo Connect Server can be edited and saved here.
The information available in the message list is:
Identifier: A universally unique external identifier for the message.
Type: Determines if the message is a request or a response.
State: The current position of the message in the Taleo Connect Server processing workflow.
Creation Date: Indicates the date and time the message was received or created by the Taleo Connect Server.
The three actions available in the Message List viewer are:
Refresh the current list of messages.
Filter the list of messages according to a set of criteria.
Edit the profile of the target Taleo Connect Server.
Filters
The Filters define which messages will be part of the displayed list. The available filters are:
Key: Filters the messages based on whether the key matches the exact value provided. Since the message key is a unique value within a Taleo Connect Server instance, specifying a value here guarantees that a single message will be displayed.
Identifier: Filters the messages based on the whether the identifier contains the value provided. For example, using the value 'Candidate' would match 'CandiateImport-2006-03-12' and 'Extract-Candidates-2005-12-12'.
Conversation: Filters the messages based on whether the conversation contains the value provided. This is the same behavior as the Identifier filter.
Target: Filters the messages based on whether they are requests or responses. The Request option is an alias for the Application target. The Response option includes the Middleware, External, and Queue targets.
State: Filters the messages based on their state in the Taleo Connect Server workflow. The Incomplete option matches all states except In Progress.
Date: Filters the messages based on their creation date in the Taleo Connect Server. Selecting a specific date shows all messages from 00:00:00 to 23:59:59, local time of the computer running the Taleo Connect Console. Selecting a range of dates shows all message from 00:00:00 of the 'from' date to 23:59:59 of the 'to' date, local time of the computer running the Taleo Connect Console.
Profile
A Profile defines the connectivity information required to access the Taleo Connect Server embedded in a target Taleo product. The general information of a profile is:
Description: Information with no functional significance. May be used by customers to distinguish or identify profiles.
Version: The version of the target Taleo Connect Server. This value determines the communication protocol and the available features.
The connectivity information of a profile is:
Protocol: The type of HTTP communication used: plain HTTP or secure HTTPS.
Host: The host alias or the IP address of the target Taleo product.
Port: The port number of the target Taleo product.
Dispatcher: The location of the target Taleo product web service dispatcher entry point. For the Taleo Professional product this is /servlets/ServiceDispatcher?ServiceName=. For other Taleo products, the value is /product name/ServiceDispatcher?ServiceName=.
Username: The username required to authenticate web service requests to the Taleo Connect Server.
Password: The password required to authenticate web service requests to the Taleo Connect Server.
Message Details
The Message Details View shows the top level information of the integration message
Key: An internal identifier used by the Taleo Connect Server embedded in a target Taleo product. The message key's only external use is to uniquely associate request and response message instances. The key values are only unique within a particular Taleo product.
Identifier: A universally unique external identifier for the message. It is used by external systems to link messages within larger business processes.
Conversation: An identifier that loosely links several messages together in a business process. This is not a transaction identifier in the usual sense of the word (including two-phase commit and integrity concerns). A conversation is only used for monitoring purposes. In particular, a response generated by a Taleo Connect Server will always have the same conversation identifier as the request message (if none was provided, then the conversation identifier of the response will be the message identifier of the request).
Target: Determines the processing target in the Taleo Connect Server.
Application indicates that this message contains a request and is to be processed by the Taleo product.
Middleware or External indicates that this message contains a response and is to be pushed to another application.
Queue also indicates that the message contains a response, but that the message should remain within the Taleo product and will be polled by an external party.
State: Either a Request or a Response. An integration message is a generic transmission from a source to a target application. The concept of request and response is only linked to the business document contained within the message.
Service: The unique identifier of the processing strategy of the Taleo Connect Server. This value only apply to messages with an Application target, i.e. request messages.
The full raw message content is available using the show full message action.
Message Actions
Under certain specific circumstances, it is possible to interact with messages from the console.
Suspend halts the processing of a message. This action is only applicable to request messages that are in the In Progress state. A signal will be sent to the Taleo product and the message will be marked as Suspending; the actual suspension is dependent on the type of processing and may not be immediate.
Resume resumes the processing of a message. This action is only applicable to messages that are in the Suspended or Interrupted states. The result of this action is to mark the message as Ready so the Taleo Connect Server will process it through the normal message queue. In the case of a request message, the processing will start after the last complete record. In the particular case of an export request, as there is only one record, the entire export is restarted. For response messages, the resume action resends the response to the middleware system when required.
Message Errors
When a technical process error occurs, the details of the problem are available in the second section of the view. It is important to note that only internal processing errors are visible in this view and specifically only when messages are either in the Interrupted or In Error states. Any business errors that occur during the processing of a particular record are stored in the response document and do not affect the overall processing of the message.
Source: Either the Server or the Client. An integration message is a generic transmission from a source to a target application. The concept of request and response is only linked to the business document contained within the message.
Code: An external unique identifier for the type of problem that occurred.
Reason: A contextualized message giving more information about the problem that occurred.
Detail: Further technical information about the problem. Specifically, if the problem was caused by an unmanaged Java language exception, this detail would be the stack trace of the exception.
Document Detail
The Document Detail View shows the top level information of the integration document.
Action: Defines how the target application is to process the records. The three possible values are Export, Import, or Business Service. In the two first actions, the records are handled by the generic integration services provided by the Taleo Connect Client. The last action signifies that the records are delegated to product specific business services for individual processing.
Progress: Shows how many records have currently been processed. In most cases, this value is identical for both the request and response message. For exports, the request document has a single record and the progress is only significant for the response document where the total indicates the number of entities that will be exported.
Each record processed during the integration is assigned a status: success or error. The total section first shows the overall number of records in the document then the amount of successful records and the amount of records in error.
Document Content
The document content view can display the content of the document or save it to file.
Creating a Console Profile
Saving a Console Profile
Make sure a new console profile is open in the message viewer.
Click File > Save.
Select directory.
Enter file name or select existing name in directory.
Select file type.
Click Save.
Command Line
Script Execution
Taleo Connect Client workflow execution in a production environment is run by a command line script. The command line script can be scheduled to run automaticaly.
There are three possible command line scripts to launch TCC execution. They are the same for all operating systems. The only difference being that Windows uses .bat files and Linux uses .sh files. The following files can be specified in a command line script:
The TCC batch file that is included in the installation package.
TaleoConnectClient.bat
An import or export configuration file.
<touchpoint>_<action>cfg.xml
An import or export request file.
<touchpoint>_<action>_ld.xml
<touchpoint>_<action>_sq.xml
An import or export result file.
<touchpoint>_<action>_result_<date_time>.csv
<touchpoint>_<action>_result.xml
<touchpoint>_<action>_<date_time>.txt
filename.other
The three possible command line scripts will have the following layout. The path is the absolute or relative location of the specified file.
“path\TaleoConnectClient.bat” “path\configuration file” “path\request file” “path\result file”
The first script is the typical use for Taleo Connect Client where both the request and response message files are specified explicitly. The workflow configuration usually contains only communication information that applies to a variety of different messages.
“path\TaleoConnectClient.bat” “path\configuration file” “path\request file”
The second script is typical of a scheduled integration process where the request message varies and the response message file is generated based on the timestamp.
“path\TaleoConnectClient.bat” “path\configuration file”
The third script is typical of a specialized workflow with extensive pre and/or post-processing that only applies to a single integration process. In this situation, the request and response files are often known and can thus be specified in the configuration itself.
Scheduling Tasks
Scheduling tasks automates the Taleo Connect Client ongoing import and export processes. Scheduled imports and exports are programmed and maintained by users, on scheduler software running in the environment (Windows, Linux).
Linux use Cron to schedule tasks. Refer to your system documentation to implement scheduling under Linux.
Scheduling in Windows
Integration scripts that have been tested and are ready to scheduled.
Execution from Java
Execution of a Taleo Connect Client workflow from within another Java application is possible. The host application must match the environment constraints defined in the TaleoConnectClient.bat script and invoke the com.taleo.integration.client.Client.execute() method.
For Taleo Connect Client to execute correctly, the proper execution environment must be available. The following execution script is the minimal required configuration for a typical Windows installation:
SET IC_HOME="C:\Program Files\Taleo Connect Client";
SET CLASSPATH="%IC_HOME%\lib\taleo-integrationclient.jar";"%IC_HOME%\log";
java.exe
-Dcom.taleo.integration.client.install.dir="%IC_HOME%"
-Djava.endorsed.dirs="%IC_HOME%\lib\endorsed"
-Djavax.xml.parsers.SAXParserFactory=org.apache.xerces.jaxp.SAXParserFactoryImpl
-Dorg.apache.commons.logging.Log=org.apache.commons.logging.impl.Log4JLogger
-classpath %CLASSPATH% com.acme.integration.ACMEIntegrationProcess
The IC_HOME variable defines the installation directory of the Taleo Connect Client. This information is required because several libraries and resources are delivered with the installation bundle.
The classpath of the application is fairly simple because the taleo-integrationclient.jar contains the full classpath embedded in its manifest. This works fine with most JRE implementations. If any classpath problems occurs, you may also explicitly define the classpath by including all Java libraries (*.jar) in the lib and lib/endorsed folders. Of course, the classpath must also contain the required references to the host Java application.
In the Java invocation command itself, we first set the Taleo Connect Client installation directory explicitly. This is required mainly to locate the feature pack files. The next instruction ensures that the proper version of the Xerces XML parser is used. The final system property directs the Apache Jakarta Commons Logging project to use the Apache Log4J system. This is the reason why the log folder is part of the classpath, as the log4j.properties configuration file is located there. The invoked class com.acme.integration.ACMEIntegrationProcess is used here only as an example and should be replaced by the actual entry point of your Java application hosting the Taleo Connect Client.
The correct entry point to execute the Taleo Connect Client is: com.taleo.integra-tion.client.Client.execute(). The JavaDoc provided for this method in the docs/api folder of the product describes the behavior and parameter values.