5Using TCC

Using TCC

    Hierarchical Entities

      Hierarchical Entities

      Hierarchical entities are organized in a tree structure. They are composed of parents and children. The root entity has no parent and is the ancestor of all the other entities.

      Types

      There are two types of hierarchical entities. The rigid type such as Organization, Location and JobField in SmartOrg and the flexible type such as Department in Professional.

      Rigid hierarchical entities require special attention in import operations. To create a rigid type entity you must specify its Parent. To delete a rigid type entity you must first delete all its children or move them to a new Parent.

      Flexible type entities pretty much behave as regular entities in import operations. They can be created individually without a parent or structured in a hierarchy. To delete a flexible type entity its dependencies, if any, must be reassigned to another entity.

      Model

      We will use the Organization entity to illustrate various import operations on hierarchical entities. We will create an Organization, update its multilingual fields, reorganize it, and delete parts of it.

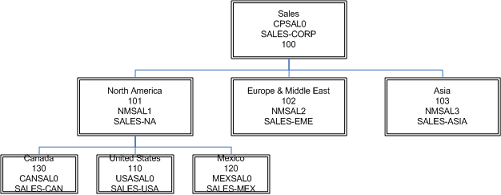
      Here is the top of the organization:


      Image showing the top of an organization.

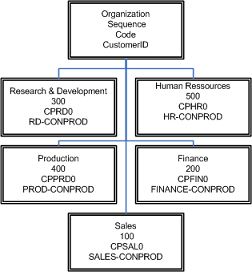
      To keep the model manageable we have only expanded the sales division. Here is the sales division:


      Image showing the Sales division.

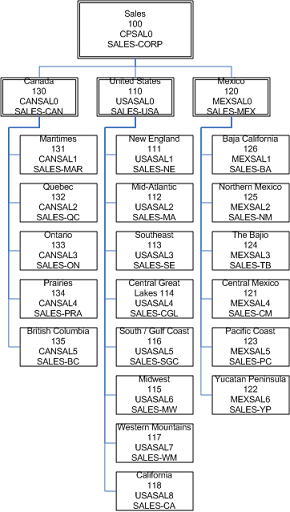
      Once the Organization has been created and updated, the sales division will be restructured. Here is the restructured sales division:


      Image showing the restructured sales division.

      Fields

      We will use the following fields and relations from the Organization entity to perform our operations:

      • Code: Unique identifier that provides a meaningful key. Unilingual string.

      • CustomerID: Customer identifier used to reference the organization in an external system for integration purposes. Unilingual string.

      • Name: Name of the organization instance. Multilingual string.

      • Parent, Organisation.Code: Unique identifier that provides a meaningful key. Unilingual string.

      • Industry.Number: Associated industry number that is pre-loaded in the Taleo application. Integer.

      • Sequence: Specified sorting order that overrides the default sorting order when viewing the entity in the Taleo application. Integer.

        Finding Root Code

        To find the root code, we will extract it from the entity. The root code value will be the parent code of the first record of the hierarchical entity we will create.

        Taleo Connect Client is running and ready for use.

        Taleo application is available for integration.

        1. Click File, New to open the New Export Wizard.

        2. In Product pull down menu, Select SmartOrg [Version].

          1. In Filter, enter letter o.

          2. Click Organization.

          3. Select Create new export.

          4. Click Finish. A New Export editor opens.

        3. In General tab, select CSV header present. We will use default values for the CSV attributes.

        4. Select Projections tab.

        5. Drag and Drop Code, Name, and Level from Entity view to Projections list.

        6. Select Filters tab.

          1. Drag Level from Entity view to Filters list and select it.

          2. In the bottom Data type drop down menu select Integer.

          3. In value, Enter 0. Level 0 is the root level.

        7. Save as OrgRoot-export_sq.xml in organization-export folder. Level 0 is the root level.

        8. Click File, New to open the New Configuration Wizard.

        9. Select Based on an export specification.

          1. Click the Browse icon.

          2. Navigate to organization-export folder.

          3. Select OrgRoot-export_sq.xml.

          4. Click on Open.

          5. Click on Next.

          6. Select Endpoint.

          7. Click on Finish. A New Configuration editor opens.

        10. In General tab, under Request, select Pre-defined value.

          1. Click the Browse icon. A Select file window opens.

          2. Navigate to organization-export folder.

          3. Select OrgRoot-export_sq.xml.

          4. Click Open. The file path and name are displayed in the dialog box.

        11. In General tab, under Response, select Generated using an identifier.

          1. Click the Browse icon.

          2. Navigate to organization-export folder.

          3. Click OK. The file path is displayed in the dialog box.

          4. Click the Browse icon.

          5. In the Template dialog box enter [FILE]-[NOW].

          6. Click OK. [FILE]-[NOW] is displayed in the dialog box.

        12. Save as OrgRoot-Extract_cfg.xml in organization-export folder.

        13. Click the Execute the configuration icon. and wait for the workflow to complete the extraction.

        14. Open organization-export folder.

        15. Open CSV result file OrgRoot-export_sq-yyyyMMddTHHmmss.csv in a csv editor or notepad

        The root code, organization name, and level are displayed below the header.

        Code,Name,Level 
        ROOT-ORGANIZATION,[en]=New Millenium,0

          Creating an Organization

          Taleo Connect Client is running and ready for use.

          Taleo application is available for integration.

          1. From TCC open New Import Wizard File>New>New Import Wizard.

            The New Import Wizard opens.

          2. In Product, Select SmartOrg [Version] from pull down menu.

            1. Click on Organization.

            2. Select Use the following import template.

            3. In Template pull down menu, select Basic Organization create.

            4. Click on Finish.

            A New Import editor opens.

          3. Verify that the information in the General tab is correct.

            1. Header present is selected.

            2. Value delimiter is comma.

            3. Quotation character is double quotes.

          4. In Advanced: Other import options click the Browse icon.

            1. Integration Processor is selected.

            2. olf is specified in dialog box.

            3. In Additional import options, switch.system.maintenance parameter is set to always.

            4. Click OK.

          5. Click on Columns tab.

          6. Select each column and verify Column information and Behavior.

          7. Save as organization-create_ld.xml in organization-create folder.

          8. Click Generate a sample csv file.

            The sample csv file opens in the default editor.

          9. Enter the following data in the csv file.

            The first line is the file header. The second line is the first line of data. ROOT-CODE is the root code extracted previously from the Taleo product.

            Code,CustomerID,Name,ParentCode,IndustryNumber,DisplaySequence 
            CPCORP0,CORP-CONPROD,Corporate Headquarters,ROOT-CODE,12,1 
            CPRD0,RD-CONPROD,Research & Development,CPCORP0,12,300 
            CPHR0,HR-CONPROD,Human Ressources,CPCORP0,12,500 
            CPPRD0,PROD-CONPROD,Production,CPCORP0,12,400 
            CPFIN0,FINANCE-CONPROD,Finance,CPCORP0,12,200 
            CPSAL0,SALES-CONPROD,Sales,CPCORP0,12,100 
            CANSAL0,SALES-CAN,Canada,CPSAL0,12,130 
            USASAL0,SALES-USA,United States of America,CPSAL0,12,110 
            MEXSAL0,SALES-MEX,Mexico,CPSAL0,12,120 
            CANSAL1,SALES-MAR,Maritimes,CANSAL0,12,131 
            CANSAL2,SALES-QC,Quebec,CANSAL0,12,132 
            CANSAL3,SALES-ON,Ontario,CANSAL0,12,133 
            CANSAL4,SALES-PRA,Prairies,CANSAL0,12,134 
            CANSAL5,SALES-BC,British Columbia,CANSAL0,12,135 
            USASAL1,SALES-NE,New England,USASAL0,12,111 
            USASAL2,SALES-MA,Mid-Atlantic,USASAL0,12,112 
            USASAL3,SALES-SE,Southeast,USASAL0,12,113 
            USASAL4,SALES-CGL,Central Great Lakes,USASAL0,12,114 
            USASAL5,SALES-SGC,South / Gulf Coast,USASAL0,12,116 
            USASAL6,SALES-MW,Midwest,USASAL0,12,115 
            USASAL7,SALES-WM,Western Mountains,USASAL0,12,117 
            USASAL8,SALES-CA,California,USASAL0,12,118 
            MEXSAL1,SALES-BA,Baja California,MEXSAL0,12,126 
            MEXSAL2,SALES-NM,Northern Mexico,MEXSAL0,12,125 
            MEXSAL3,SALES-TB,The Bajio,MEXSAL0,12,124 
            MEXSAL4,SALES-CM,Central Mexico,MEXSAL0,12,121 
            MEXSAL5,SALES-PC,Pacific Coast,MEXSAL0,12,123 
            MEXSAL6,SALES-YP,Yucatan Peninsula,MEXSAL0,12,122
          10. Save file as organization-create.csv in organization-create folder.

          11. From TCC open New Configuration WizardFile>New>New Configuration Wizard.

            The New Configuration Wizard opens.

          12. Select Based on an import specification.

            1. Click the Browse icon.

              A Select folder window opens.

            2. Navigate to organization-create folder.

            3. Select organization-create_ld.xml.

            4. Click on Open.

            5. Click on Next.

            6. Select Endpoint.

            7. Click on Finish.

            A New Configuration editor opens.

          13. In General tab, under Request, select Pre-defined value

            1. Click the Browse icon.

              A Select file window opens.

            2. Navigate to organization-create folder.

            3. Select organization-create.csv.

            4. Click on Open.

            The file path and name are displayed in the dialog box

          14. In General tab, under Response, select Generated using an identifier

            1. Click the Browse icon.

              A Select folder window opens.

            2. Navigate to organization-create folder.

            3. Click on OK.

              The file path is displayed in the dialog box

            4. Click the Browse icon.

              A Choose Identifier window opens.

            5. In the Template dialog box enter [FILE]-[NOW]

            6. Click OK.

              [FILE]-[NOW] is displayed in the dialog box

          15. Save as organization-create_cfg.xml in organization-create folder.

          16. Click the Execute the configuration icon and wait for the workflow to complete the import.

          17. Open organization-create folder.

          18. Open CSV result file organization-create-yyyyMMddTHHmmss.csv in a csv editor or notepad

            The following results are displayed.

            "Index","Identifier","Status","TransactionType","Result","Message" 
            "1","","success","organization.create",,"" 
            "2","","success","organization.create",,"" 
            "3","","success","organization.create",,"" 
            ... 
            "26","","success","organization.create",,"" 
            "27","","success","organization.create",,"" 
            "28","","success","organization.create",,""

            Updating an Organization

            Updating organisation multilingual fields with the specific locale method.

            Taleo Connect Client is running and ready for use.

            Taleo application is available for integration.

            Taleo application has more than one active language.

            1. From TCC open New Import Wizard File>New>New Import Wizard.

              The New Import Wizard opens.

            2. In Product, Select SmartOrg [Version] from pull down menu.

              1. Click on Organization.

              2. Select Use the following import template.

              3. In Template pull down menu, select Basic Organization update.

              4. Click on Finish.

              A New Import editor opens.

            3. Verify that the information in the General tab is correct.

              1. Header present is selected.

              2. Value delimiter is comma.

              3. Quotation character is double quotes.

            4. In Advanced: Other import options click the Browser button.

              1. Integration Processor is selected.

              2. olf is specified in dialog box.

              3. In Additional import options, switch.system.maintenance parameter is set to always.

              4. Click OK.

            5. Click on Columns tab.

            6. Select Organisation: name.

              1. In Column information select Header and enter Name (en) in dialog box.

              2. In Behavior select Skip column if value is empty.

              3. Expand Multilingual fields.

              4. In locale type select Specific locale from pull down menu.

              5. In locale select english from pull down menu.

            7. Drag and drop Name from Entity view.

              1. Select Organisation: name.

              2. Click Up button to move it above DisplaySequence and below Name (en).

              1. In Column information select Header and enter Nom (fr) in dialog box.

              2. In Behavior select Skip column if value is empty.

              3. In Multilingual fields, Locale type select Specific locale from pull down menu.

              4. In Multilingual fields, Locale select french from pull down menu.

            8. Drag and drop Name from Entity view.

              1. Select Organisation: name.

              2. Click Up button to move it above DisplaySequence and below Nom (fr).

              3. In Column information select Header and enter Nombre (es) in dialog box.

              4. In Behavior select Skip column if value is empty.

              5. In Multilingual fields, Locale type select Specific locale from pull down menu.

              6. In Multilingual fields, Locale select spanish from pull down menu.

            9. Save as organization-update_ld.xml in organization-update folder.

            10. Click Generate a sample csv file.

              The sample csv file opens in the default editor.

            11. Enter the following data in the csv file.

              The first line is the file header. The second line is the first line of data.

              Code,CustomerID,Name (en),Nom (fr),Nombre (es),DisplaySequence 
              CPCORP0,CORP-CONPROD,Corporate Headquarters,Siège social,Domicilio social,1 
              CPRD0,RD-CONPROD,Research & Development,Recherche et développement,Investigatiión y desarrollo,300 
              CPHR0,HR-CONPROD,Human Ressources,Ressources humaines,Recursos humanas,500 
              CPPRD0,PROD-CONPROD,Production,Production,Producción,400 
              CPFIN0,FINANCE-CONPROD,Finance,Finance,Finanzas,200 
              CPSAL0,SALES-CONPROD,Sales,Ventes,Ventas,100 
              CANSAL0,SALES-CAN,Canada,Canada,Canada,130 
              USASAL0,SALES-USA,United States of America,États Unis d'Amérique,Estados Unidos de América,110 
              MEXSAL0,SALES-MEX,Mexico,Mexique,Mexico,120 
              CANSAL1,SALES-MAR,Maritimes,Maritimes,Marítimos,131 
              CANSAL2,SALES-QC,Quebec,Québec,Quebec,132 
              CANSAL3,SALES-ON,Ontario,Ontario,Ontario,133 
              CANSAL4,SALES-PRA,Prairies,Prairies,Praderas,134 
              CANSAL5,SALES-BC,British Columbia,Colombie Britannique,Colombia Británica,135 
              USASAL1,SALES-NE,New England,Nouvelle Angleterre,Nueva Inglaterra,111 
              USASAL2,SALES-MA,Mid-Atlantic,Atlantique centre,Atlántico central,112 
              USASAL3,SALES-SE,Southeast,Sud-est,Sudeste,113 
              USASAL4,SALES-CGL,Central Great Lakes,Grands lacs central,Gran lagos central,114 
              USASAL5,SALES-SGC,South / Gulf Coast,Sud / Côte du golfe,Sur / Costa del golfo,116 
              USASAL6,SALES-MW,Midwest,Midwest,Midwest,115 
              USASAL7,SALES-WM,Western Mountains,Montagnes de l'ouest,Montañas del oeste,117 
              USASAL8,SALES-CA,California,Californie,California,118 
              MEXSAL1,SALES-BA,Baja California,Baja California,Baja California,125 
              MEXSAL2,SALES-NM,Northern Mexico,Mexique du Nord,Mexico del norte,125 
              MEXSAL3,SALES-TB,The Bajio,Le Bajio,El Bajío,124 
              MEXSAL4,SALES-CM,Central Mexico,Mexique central,Mexico central,121 
              MEXSAL5,SALES-PC,Pacific Coast,Côte du Pacifique,Costa del Pacífico,123 
              MEXSAL6,SALES-YP,Yucatan Peninsula,Péninsule du Yucatan,Península del Yucatan,122
            12. Save file as organization-update.csv in organization-update folder.

            13. From TCC open New Configuration WizardFile>New>New Configuration Wizard.

              The New Configuration Wizard opens.

            14. Select Based on an import specification.

              1. Click the Browse icon.

                A Select folder window opens.

              2. Navigate to organization-update folder.

              3. Select organization-update_ld.xml.

              4. Click on Open.

              5. Click on Next.

              6. Select Endpoint.

              7. Click on Finish.

              A New Configuration editor opens.

            15. In General tab, under Request, select Pre-defined value

              1. Click the Browse icon.

                A Select file window opens.

              2. Navigate to organization-update folder.

              3. Select organization-update.csv.

              4. Click on Open.

              The file path and name are displayed in the dialog box.

            16. In General tab, under Response, select Generated using an identifier.

              1. Click the Browse icon.

                A Select folder window opens.

              2. Navigate to organization-update folder.

              3. Click on OK.

                The file path is displayed in the dialog box.

              4. Click the Browse icon.

                A Choose Identifier window opens.

              5. In the Template dialog box enter [FILE]-[NOW].

              6. Click OK.

                [FILE]-[NOW] is displayed in the dialog box.

            17. Save as organization-update_cfg.xml in organization-export folder.

            18. Click the Execute the configuration icon and wait for the workflow to complete the import.

            19. Open organization-update folder.

            20. Open CSV result file organization-update-yyyyMMddTHHmmss.csv in a csv editor or notepad.

              The following results are displayed.

              "Index","Identifier","Status","TransactionType","Result","Message" 
              "1","","success","organization.update",,"" 
              "2","","success","organization.update",,"" 
              "3","","success","organization.update",,"" 
              ... 
              "26","","success","organization.update",,"" 
              "27","","success","organization.update",,"" 
              "28","","success","organization.update",,""

              Modifying an Organization

              Taleo Connect Client is running and ready for use.

              Taleo application is available for integration.

              1. From TCC open organization-create_ld.xml in organization-create folder.

              2. Click Generate a sample csv file.

                The sample csv file opens in the default editor.

              3. Enter the following data in the csv file.

                The first line is the file header. The second line is the first line of data.

                Code,CustomerID,Name,ParentCode,IndustryNumber,DisplaySequence 
                NMSAL1,SALES-NA,North America,CPSAL0,12,101 
                NMSAL2,SALES-EME,Europe & Middle East,CPSAL0,12,102 
                NMSAL3,SALES-ASIA,Asia,CPSAL0,12,103
              4. Save file as reorganization-create.csv in organization-create folder.

              5. From TCC open organization-create_cfg.xml in organization-create folder.

              6. In General tab, under Workflow modify Workflow identifier to Reorganization-create-[NOW].

              7. In General tab, under Request, select Pre-defined value

                1. Click the Browse icon.

                  A Select file window opens.

                2. Navigate to organization-create folder.

                3. Select reorganization-create.csv.

                4. Click on Open.

                The file path and name are displayed in the dialog box

              8. Save as reorganization-create_cfg.xml in organization-export folder.

              9. Click the Execute the configuration icon and wait for the workflow to complete the import.

              10. Open organization-create folder.

              11. Open CSV result file reorganization-create-yyyyMMddTHHmmss.csv in a csv editor or notepad.

                The following results are displayed.

                "Index","Identifier","Status","TransactionType","Result","Message" 
                "1","","success","organization.create",,"" 
                "2","","success","organization.create",,"" 
                "3","","success","organization.create",,""

                Moving an Organization

                Taleo Connect Client is running and ready for use.

                Taleo application is available for integration.

                1. From TCC open New Import Wizard File>New>New Import Wizard.

                  The New Import Wizard opens.

                2. In Product, Select SmartOrg [Version] from pull down menu.

                  1. Click on Organization.

                  2. Select Use the following import template.

                  3. In Template pull down menu, select Basic Organization move.

                  4. Click on Finish.

                  A New Import editor opens.

                3. Verify that the information in the General tab is correct.

                  1. Header present is selected.

                  2. Value delimiter is comma.

                  3. Quotation character is double quotes.

                4. In Advanced: Other import options click the Browse icon.

                  1. Integration Processor is selected.

                  2. olf is specified in dialog box.

                  3. In Additional import options, switch.system.maintenance parameter is set to always.

                  4. Click OK.

                5. Click on Columns tab.

                6. Select each column and verify Column information and Behavior.

                  The move operation requires two parameters, the organization to move and the new parent organization. The parameters are selected from the Parameter pull down menu in the Entity view.

                7. Save as organization-move_ld.xml in organization-move folder.

                8. Click Generate a sample csv file.

                  The sample csv file opens in the default editor.

                9. Enter the following data in the csv file.

                  The first line is the file header. The second line is the first line of data.

                  "OrganizationCode","NewParentCode" 
                  CANSAL0,NMSAL1 
                  USASAL0,NMSAL1 
                  MEXSAL0,NMSAL1
                10. Save file as organization-move.csv in organization-move folder.

                11. From TCC open New Configuration WizardFile>New>New Configuration Wizard.

                  The New Configuration Wizard opens.

                12. Select Based on an import specification.

                  1. Click the Browse icon.

                    A Select folder window opens.

                  2. Navigate to organization-move folder.

                  3. Select organization-move_ld.xml.

                  4. Click on Open.

                  5. Click on Next.

                  6. Select Endpoint.

                  7. Click on Finish.

                  A New Configuration editor opens.

                13. In General tab, under Request, select Pre-defined value

                  1. Click the Browse icon.

                    A Select file window opens.

                  2. Navigate to organization-move folder.

                  3. Select organization-move.csv.

                  4. Click on Open.

                  The file path and name are displayed in the dialog box

                14. In General tab, under Response, select Generated using an identifier

                  1. Click the Browse icon.

                    A Select folder window opens.

                  2. Navigate to organization-move folder.

                  3. Click on OK.

                    The file path is displayed in the dialog box

                  4. Click the Browse icon.

                    A Choose Identifier window opens.

                  5. In the Template dialog box enter [FILE]-[NOW]

                  6. Click OK.

                    [FILE]-[NOW] is displayed in the dialog box

                15. Save as organization-move_cfg.xml in organization-move folder.

                16. Click the Execute the configuration icon and wait for the workflow to complete the import.

                17. Open organization-move folder.

                18. Open CSV result file organization-move-yyyyMMddTHHmmss.csv in a csv editor or notepad

                  The following results are displayed.

                  "Index","Identifier","Status","TransactionType","Result","Message" 
                  "1","","success","organization.move",,"" 
                  "2","","success","organization.move",,"" 
                  "3","","success","organization.move",,""

                  Deleting an Organization

                  Taleo Connect Client is running and ready for use.

                  Taleo application is available for integration.

                  1. From TCC open New Import Wizard File>New>New Import Wizard.

                    The New Import Wizard opens.

                  2. In Product, Select SmartOrg [Version] from pull down menu.

                    1. Click on Organization.

                    2. Select Use the following import template.

                    3. In Template pull down menu, select Basic Organization delete.

                    4. Click on Finish.

                    A New Import editor opens.

                  3. Verify that the information in the General tab is correct.

                    1. Header present is selected.

                    2. Value delimiter is comma.

                    3. Quotation character is double quotes.

                  4. In Advanced: Other import options click the Browse icon.

                    1. Integration Processor is selected.

                    2. olf is specified in dialog box.

                    3. In Additional import options, switch.system.maintenance parameter is set to always.

                    4. Click OK.

                  5. Click on Columns tab.

                  6. Select each column and verify Column information and Behavior.

                    The delete operation offers two parameters, the Organization to delete and the Reassignorganization for the orphans. If the entity to delete has children, they can be reassigned to a new parent. The parameters are selected from the Parameter pull down menu in the Entity view.

                  7. Select ReassignOrganisation and click Remove.

                  8. Save as organization-delet_ld.xml in organization-delete folder.

                  9. Click Generate a sample csv file.

                    The sample csv file opens in the default editor.

                  10. Enter the following data in the csv file.

                    The first line is the file header. The second line is the first line of data.

                    OrganisationCode 
                    MEXSAL1 
                    MEXSAL2 
                    MEXSAL3 
                    MEXSAL4 
                    MEXSAL5 
                    MEXSAL6 
                    MEXSAL0

                    Note that the parent is the last entry. All the children will be deleted before the parent.

                  11. Save file as organization-delete.csv in organization-delete folder.

                  12. From TCC open New Configuration WizardFile>New>New Configuration Wizard.

                    The New Configuration Wizard opens.

                  13. Select Based on an import specification.

                    1. Click the Browse icon.

                      A Select folder window opens.

                    2. Navigate to organization-delete folder.

                    3. Select organization-delete_ld.xml.

                    4. Click on Open.

                    5. Click on Next.

                    6. Select Endpoint.

                    7. Click on Finish.

                    A New Configuration editor opens.

                  14. In General tab, under Request, select Pre-defined value

                    1. Click the Browse icon.

                      A Select file window opens.

                    2. Navigate to organization-delete folder.

                    3. Select organization-delete.csv.

                    4. Click on Open.

                    The file path and name are displayed in the dialog box

                  15. In General tab, under Response, select Generated using an identifier

                    1. Click the Browse icon.

                      A Select folder window opens.

                    2. Navigate to organization-delete folder.

                    3. Click on OK.

                      The file path is displayed in the dialog box

                    4. Click the Browse icon.

                      A Choose Identifier window opens.

                    5. In the Template dialog box enter [FILE]-[NOW]

                    6. Click OK.

                      [FILE]-[NOW] is displayed in the dialog box

                  16. Save as organization-delete_cfg.xml in organization-move folder.

                  17. Click the Execute the configuration icon and wait for the workflow to complete the import.

                  18. Open organization-delete folder.

                  19. Open CSV result file organization-delete-yyyyMMddTHHmmss.csv in a csv editor or notepad

                    The following results are displayed.

                    "Index","Identifier","Status","TransactionType","Result","Message" 
                    "1","","success","organization.delete",,"" 
                    "2","","success","organization.delete",,"" 
                    "3","","success","organization.delete",,"" 
                    "4","","success","organization.delete",,"" 
                    "5","","success","organization.delete",,"" 
                    "6","","success","organization.delete",,"" 
                    "7","","success","organization.delete",,""

                    Filters

                      Last Run Date

                      The Last Run Date (LRD) is used in export specifications to filter records based on the value of a date field. This feature facilitates the extraction of records created or modified since the last execution of the workflow.

                      The LRD is set after the extract is completed and only if there were no errors during the process. The Last Run Date that is saved will be the one captured at the beginning of the process.

                      Files

                      The date and time of a successful export workflow is stored as a *.lrd file in the ...\Taleo Connect Client\lastrundates folder. The LRD file name is based on the configuration file that creates and updates it. For example: Candidate_export_cfg.xml creates or updates Candidate_export.lrd.

                      Because the LRD value is associated to a specific configuration file, each export specification that uses LRD filtering must be paired with its own configuration file. For example: Candidate_export_sq.xml is matched exclusively to Candidate_export_cfg.xml. Using multiple LRD export specifications with a single configuration file will cause saved LRD conflicts.

                      Delay

                      By default, LRD filtering uses the current zone time minus 5 minutes to set the LRD filter value. The default LRD minute adjustment can be modified with the following system property: com.taleo.integration.client.lrd.filtering.minute.adjustment.zone=[minute value]

                        Setting Last Run Date

                        Setting Last Run Date will create the *.lrd file with an LRD value for first time use.

                        The corresponding export specification file that uses the LRD filter exists.

                        1. Create a new configuration based on the corresponding export specification.

                        2. Save the configuration file.

                        3. Click on the Pre-processing tab.

                        4. Click on Prepare Last Run Date.

                        5. Select time and date source.

                          • TEE 7.0.5 and higher : Use date from the zone (default).

                          • TEE 7.0.4 and lower : Use date from current computer.

                        6. Click on the Change link.

                          1. Select date and time.

                          2. Click OK.

                          Last Run Date value : displays selected date and time.

                          Strip Non Numeric Characters

                          Non numeric characters can be removed quickly from a projection with the REGEXP_REPLACE function.

                          Phone numbers are commonly entered in multiple formats:

                          • (123)456-7890

                          • (123) 456-7890

                          • 123-456-7890

                          • 123 456-7890

                          This projection removes non numeric characters to output the results in the same format (1234567890) with the REGEXP_REPLACE function.

                          <quer:projection alias="HomePhone"> 
                                      <quer:customFunction name="REGEXP_REPLACE"> 
                                                  <quer:field path="Candidate,HomePhone"/> 
                                                  <quer:string>\D</quer:string> 
                                                  <quer:string/> 
                                      </quer:customFunction> 
                          </quer:projection>

                          Regular expressions are a powerful tool that can also be used for other data transformations.

                            Filtering vs ProjectionFiltering

                            <filterings> and <projectionsFilterings> have different semantics. This is to disambiguate where the filter should be applied: the driving table or a joined table.

                            For example, we want to create a query for the following model: Requisition -> CieLocation. This is an N relation where there are many CieLocation for one Requisition.

                            We create a query for Requisition and add a projection for CieLocation. If we have a <filtering> on CieLocation, it filters out Requisition that doesn’t satisfy the filter. If we have a <projectionfiltering> on CieLocation, it filters out CieLocation that doesn’t satisfy the filter.

                            In other words, <filtering> is a filter on an inner join and <projectionfiltering> is a filter on an outer join.

                              Miscellaneous

                                Removing Element From Collection

                                Taleo Connect Client can remove a specific element from a collection. When updating a record, the user can remove a specific element from a collection before adding new ones.

                                Taleo Connect Client is running and ready for use.

                                Taleo application is available for integration.

                                • This operation is only available for removable relations. Please refer to the data dictionary entity relation summary table for documentation about removable relations.

                                1. From TCC open New Import Wizard File>New>New Import Wizard.

                                  The New Import Wizard opens.

                                2. In Product, Select SmartOrg [Version] from pull down menu.

                                  1. Click on User.

                                  2. Select Create a new import specification.

                                  3. In Operation pull down menu, update.

                                  4. Click on Finish.

                                  A New Import editor opens.

                                3. Verify that the information in the General tab is correct.

                                  1. Header present is selected.

                                  2. Value delimiter is comma.

                                  3. Quotation character is double quotes.

                                4. Click on Columns tab.

                                5. Select the user search key.

                                  1. Drag User.CorrespondenceEmail from entity structure to Column list.

                                  2. In Behavior section, select Use the value for search or lookup.

                                6. Add a column to remove a Group from the user account.

                                  1. Drag UserAccount,Groups,Description from entity structure to Column list.

                                  2. Select UserAccount,Groups,Description in the column list.

                                  1. In Behavior section, select Use the value for search or lookup.

                                  2. In Behavior section, select Remove element from the collection.

                                  To remove multiple items from the collection, repeat step as many times as required. In Behavior section, select "Start a new element in the collection" for the second and following items.

                                  Exporting Language Codes

                                  Language codes can be exported in CSV-report format. The user can identify the language code associated to multilingual fields, allowing the exported string to be matched to the locale.

                                  Taleo Connect Client is running and ready for use.

                                  Taleo application is available for integration.

                                  1. From TCC open New Export Wizard File>New>New Export Wizard.

                                    The New Export Wizard opens.

                                  2. In Product pull down menu, Select SmartOrg [Version].

                                    1. In Filter, enter letter o.

                                    2. Click on Organization.

                                    3. Select Create new export.

                                    4. Click on Finish.

                                    A New Export editor opens.

                                  3. In General tab, Other information, Export mode, select CSV-report from pull down menu. header present.

                                  4. In General tab, Other information, select CSV header present.

                                    We will use default values for the CSV attributes.

                                  5. Select Projections tab.

                                  6. Drag and Drop Name from Entity view to Projections list.

                                    1. Select Name in projection list.

                                    2. Select Alias and enter ParentName in dialog box.

                                    3. Click Field open window button.

                                    4. Select Show the value only in the default locale.

                                    5. Click OK

                                  7. Drag and Drop Code from Entity view to Projections list.

                                    1. Select Code in projection list.

                                    2. Select Alias and enter ParentCode in dialog box.

                                  8. Drag and Drop Children,Name from Entity view to Projections list.

                                    Expand Children and BaseComposite to expose Name.

                                    1. Select Children,Name in projection list.

                                    2. Select Alias and enter ChildName in dialog box.

                                    3. Click Field open window button.

                                    4. Select Show values in all locales.

                                    5. Click OK.

                                  9. Click Add.

                                    1. Select Add a multilingual field projection.

                                    2. Click OK.

                                    3. Select multilingual field projection.

                                    4. Select Alias and enter ChildLocale in dialog box.

                                    5. Select Locale from Field pull down menu.

                                    6. Drag and drop the Children relation into the Relation dialog box.

                                  10. Select Filters tab.

                                    1. Drag Code from Entity view to Filters list and select it.

                                      By default first Value is set to Code, Data type is set to Field, and Operator is set to Equals.

                                    2. Set second Value to CPCORP0.

                                    3. Select String from pull down menu for second Data type.

                                  11. Save as OrgLocale-export_sq.xml in organization-export folder.

                                    Folder structure is described in Installation section.

                                  12. From TCC open New Configuration Wizard File>New>New Configuration Wizard.

                                    The New Configuration Wizard opens.

                                  13. Select Based on an export specification.

                                    1. Click the Browser button.

                                      A Select folder window opens.

                                    2. Navigate to organization-export folder.

                                    3. Select OrgLocale-export_sq.xml.

                                    4. Click on Open.

                                    5. Click on Next.

                                    6. Select Endpoint.

                                    7. Click on Finish.

                                    A New Configuration editor opens.

                                  14. In General tab, under Request, select Pre-defined value

                                    1. Click the Browser button.

                                      A Select file window opens.

                                    2. Navigate to organization-export folder.

                                    3. Select OrgLocale-export_sq.xml.

                                    4. Click on Open.

                                    The file path and name are displayed in the dialog box

                                  15. In General tab, under Response, select Generated using an identifier

                                    1. Click the Browser button.

                                      A Select folder window opens.

                                    2. Navigate to organization-export folder.

                                    3. Click on OK.

                                      The file path is displayed in the dialog box

                                    4. Click the Browser button.

                                      A Choose Identifier window opens.

                                    5. In the Template dialog box enter OrgLocale-[NOW]

                                    6. Click OK.

                                      OrgLocale-[NOW] is displayed in the dialog box

                                  16. Save as OrgLocale-Extract_cfg.xml in organization-export folder.

                                  17. Click the Execute the configuration icon and wait for the workflow to complete the extraction.

                                  18. Open organization-export folder.

                                  19. Open CSV result file OrgLocale-yyyyMMddTHHmmss.csv in a csv editor or notepad

                                  ParentName,Parentcode,ChildName,ChildLocale 
                                  Corporate Headquarters,CPCORP0,Research & Development,en 
                                  Corporate Headquarters,CPCORP0,Investigatiión y desarrollo,es 
                                  Corporate Headquarters,CPCORP0,Recherche et développement,fr 
                                  Corporate Headquarters,CPCORP0,Human Ressources,en 
                                  Corporate Headquarters,CPCORP0,Recursos humanas,es 
                                  Corporate Headquarters,CPCORP0,Ressources humaines,fr 
                                  Corporate Headquarters,CPCORP0,Production,en 
                                  Corporate Headquarters,CPCORP0,Producción,es 
                                  Corporate Headquarters,CPCORP0,Production,fr 
                                  Corporate Headquarters,CPCORP0,Finance,en 
                                  Corporate Headquarters,CPCORP0,Finanzas,es 
                                  Corporate Headquarters,CPCORP0,Finance,fr 
                                  Corporate Headquarters,CPCORP0,Sales,en 
                                  Corporate Headquarters,CPCORP0,Ventas,es 
                                  Corporate Headquarters,CPCORP0,Ventes,fr

                                    CSV Multilingual Field Support

                                    The Language Token

                                    A specialized token that contains an instruction to apply on the column definition is added to a multilingual CSV column header. It is used to support the addition of new languages by adding multilingual field columns to an existing CSV file without having to modify the corresponding load file.

                                    To use the CSV multilingual field support in TCC-TCB:

                                    • The properties section of the CSV file MUST contain the "csv.multilingual=true" property. The property name is case sensitive and MUST be lowercase.

                                    • The CSV header MUST be present. It means that the load file MUST have "Header present" checked, and that the first row of the CSV input file data is the header.

                                    • All the CSV file header names MUST match the column path or the column alias (header) specified in the load file.

                                    To add new multilingual field columns, at least one column of this multilingual field MUST already exist in the load file. The new column header added to the CSV file MUST be placed after all the existing column headers defined in the load file for that field. It is not mandatory to put the new header right after the last existing header, it could be placed at the end of the row.

                                    To specify a locale, the token [locale=xx] MUST be used at the end of the header name (where xx is a specified locale for example "fr"). The "locale" token is case sensitive and MUST be lowercase.

                                    Example

                                    Original CSV file:

                                    Identifier,"UserLoginname","Title","ManagerLoginname"
                                    abc123,abc123,architect,manager123

                                    CSV file with additional multilingual fields:

                                    #BEGINPROPERTIES
                                    csv.multilingual=true
                                    ....
                                    #ENDPROPERTIES
                                    Identifier,"UserLoginname","Title","Title [locale=fr]",
                                    "Title [locale=es]","ManagerLoginname"
                                    abc123,abc123,architect,architecte,arquitecto,manager123

                                    Note:The locale information is optional for the initial multilingual field columns defined in the load file.

                                    • When the locale is NOT specified in the CSV file, the locale information is retrieved from the load file.

                                    • When the locale is specified in the CSV file and the "csv.multilingual=true" property is set, it always overrides the locale information from the load file.

                                    CSV file using specific locale:

                                    #BEGINPROPERTIES
                                    csv.multilingual=true
                                    ....
                                    #ENDPROPERTIES
                                    Identifier,"UserLoginname","Title [locale=fr]","ManagerLoginname"
                                    abc123,abc123,architecte,manager123
                                    Internal Load File

                                    When TCC loads a set of additional multilingual columns, it creates an internal load file that matches the structure of the CSV file. The attribute values for the new columns are copied from the first multilingual column defined in the load file. The locale token value sets the locale attribute value for each new column.

                                    Original Load File

                                    <load:column parameter="1" type="DATA" path="CorrespondenceEmail" ignoreEmpty="true" localeType="NONE"/>
                                    <load:column parameter="1" type="DATA" path="Title" ignoreEmpty="true" localeType="DEFAULT"/>
                                    <load:column parameter="1" path="Department,CostCenter" searchType="NONE" localeType="DEFAULT" type="DATA"/>
                                    

                                    New CSV File

                                    #BEGINPROPERTIES
                                    csv.multilingual=true
                                    #ENDPROPERTIES
                                    CorrespondenceEmail,Title,"Title [locale=fr]",
                                    "Department,CostCenter","Department,CostCenter [locale=fr]"
                                    abc123@xyz.com,plumber,plombier,plumbing,plomberie

                                    Internal Load File

                                    <load:column parameter="1" type="DATA" path="CorrespondenceEmail" ignoreEmpty="true" localeType="NONE"/>
                                    <load:column parameter="1" type="DATA" path="Title" ignoreEmpty="true" localeType="DEFAULT"/>
                                    <load:column parameter="1" type="DATA" path=" Title" ignoreEmpty="true" localeType="SPECIFIC" localeValue="fr"/>
                                    <load:column parameter="1" path="Department,CostCenter" searchType="NONE" localeType="DEFAULT" type="DATA"/>
                                    <load:column parameter="1" path="Department,CostCenter" searchType="NONE" localeType="SPECIFIC" localeValue="fr" type="DATA"/>
                                    

                                    Note that only the locale attributes are different for the new columns, all the others are the same.

                                      UDF with Standard Name Export

                                      How to export a UDF that has the same name as a standard field using TCC without any XML modification.

                                      When a UDF and a standard field share the same name, the standard field is exported. If the UDF is a selection, you get an error message when trying to export the description of the code.

                                      The workaround for this problem is adding "CustomField:" in the field name.

                                      For example, "Candidate,Prefix" is a standard field. To extract the UDF, you must use "Candidate,CustomField:Prefix".

                                      The same is true for a selection UDF, "Candidate,CustomField:Prefix,Description".

                                        Integration with RSOFFER module

                                        When a candidate selection workflow includes the RSOFFER, there are various integration restrictions/limitations using TCC.

                                        The following tasks can be done using TCC:

                                        • TCC can export draft offers and import them back using Offer number as key. Example would be to update Salary, Pay Basis and Pay Frequency Basis.

                                        • After few manual steps, TCC can export the "approval pending" data and import them back as "offer approved" based on the approval list thats pre-defined.

                                        The following tasks cannot be done using TCC:

                                        • Cannot create a new offer record.

                                        • Cannot use CSW MOVE operation to move from a step and status to another with in RSOFFER module.

                                        • Cannot request for offer approval using TCC. It has to be a manual process.

                                          Temporary File Compression

                                          The compression feature for temporary files is now activated by default. The compressed temporary files now have a "zip"extension instead of a "tmp" extension.

                                          This feature:

                                          • Reduces the risk of reaching the 4 gigabyte maximum file size limitation due to the 32 bit JDK.

                                          • Increases communication speed between each work-flow step.

                                          • Saves disc space.

                                          You can deactivate  the compression mode by adding the following parameter in your TaleoConnectClient.ini file available under your TCC installation path.

                                          -Dcom.taleo.integration.compress.tempfile=false(or FALSE)