9General Configuration
General Configuration
Career Section URL
When a Career Section is created, a URL is automatically generated for the Career Section. When candidates access the Career Section of an organization, they are taken to the URL created for the Career Section.
System administrators can choose the page that is displayed when candidates access the Career Section; the default page is the Basic Search page.
System administrators can provide:
an alternate job list URL, i.e. when candidates are in a Career Section, the alternate job list URL provides a point of return to the Job List when candidates click Exit, Return to Job, email URL, or Forgot Password.
an alternate candidate profile URL i.e. when candidates click on one of the profile URLs, the alternate profile URL provides an alternate profile link. This redirects candidates to any other URL of the standard profiler flow.
System administrators can create additional Career Section URLs that can later be added to different areas of the Career Section or to email correspondence. For example, rather than have candidates start from the job search page, they could be directed to the portal and log in to the My Submissions page. A specific Career Section URL could be created for this purpose. When a URL is created for a Career Section, only part of the URL is displayed in the URL column of the Career Section URL list, this portion must be added to the domain name of the organization to obtain a complete URL.
System administrators can embed a source ID, a media ID, or an event ID to the URL; therefore when candidates apply for a job, the right source, or media or event is automatically selected.
URL and Source ID: Put the “src=” parameter plus a source ID in the URL. For example: https://abc.taleo.net/careersection/5/jobdetail.ftl?lang=en&job=51380&src=JB-10088. By doing that, the right source is automatically selected when a candidate applies for a job. This feature is available for any valid sources. For a list of sources, consult the Sources feature in the Recruiting Administration module.
URL and Media ID: Put the “src=” parameter plus a media ID in the URL. This parameter can only be used for eQuest.
URL and Event ID: Put the “src=” parameter plus an event ID in the URL. For example: http://v750dev.qa.rsft.net/careersection/2/jobapply.ftl?job=7397&src=EV-001. By doing that, the right event is automatically selected when a candidate applies for a job. It provides you the ability to track which events, banners or online campaigns are attracting the most candidates to your organization career section. Note that event IDs must be valid and active and they must have been activated in the Sources feature of the Recruiting Administration module. Event IDs are case sensitive. For example, ev-001 and EV-001 are two distinct Event IDs.
Parameters can be manually added to a URL to direct candidates to a specific Career Section or to filter what is displayed on the page. For example:
to have candidates land on a French page, add &art_servlet_language=fr
to have the Career Section visible for internal candidates only, add &csNo=1
to display only urgent jobs in the job list page, add &u=1
URL considerations for standard career sections using only Advanced search and linked to a mobile career section
Career Section administrators create career section URLs for a variety of reasons (Configuration > Career Section Administration > Career Section URLs).The special situation involves standard career sections for which:
the Advanced search page is enabled and
the Basic and Faceted search pages are disabled and
a mobile career section is linked to the standard career section.
In such a situation, it is important to configure any URL for the Advanced search in the standard career section such that the URL ends with "jobsearch.ftl". E.g. http://customerzone/careersection/careersectioncode/jobsearch.ftl. This might seem odd given that "jobsearch.ftl" points to the Basic search or Faceted search (both disabled on the standard career section) but this configuration works well in practice. Because the Basic search and Faceted search are disabled, visitors to the standard career section are redirected automatically to the URL ending with "moresearch.ftl" and the Advanced search page. Because of "jobsearch.ftl" (pointing to Basic search or Faceted search) in the standard career section URL and because the Faceted search page is enabled for mobile career sections, mobile device users are automatically redirected to the mobile career section and the Faceted search page.
When system administrators use the Preview functionality of the Career Section, the system automatically creates a candidate in the Career Section with the login information of the system administrator. The system administrator is then logged in to the Career Section directly using this candidate's account. All changes made in the preview page are also made in the actual Career Section. The data the system administrator creates in the Career Section is saved under this candidate's name. This data can later be accessed in the Recruiting Center and deleted.
Creating an Additional URL for a Career Section
The Access the Career Section administration section user type permission grants users access to this feature.
Career Section does not need to be deactivated.
The URL is available to be used in the selected Career Section.
Adding a URL in a Career Section
The Access the Career Section administration section user type permission grants users access to this feature.
Career section must have Inactive or Draft status.
The new URL is now available to be used in the Career Section.
Deleting a URL in a Career Section
The Access the Career Section administration section user type permission grants users access to this feature.
Click the name of a Career Section.
Click Show next to Career Section URL.
Click Delete.
The URL is no longer available to be used in a Career Section.
Adding a URL to a Career Section Field
The Access the Career Section administration section user type permission grants users access to this feature.
The HTML editor must be supported for the field.
Create an additional URL for a Career Section.
Copy the partial URL displayed in the URL column of the Career Section URL list.
Preview the Career Section.
Paste the partial URL copied at step 2 after the desired zone URL.
Example
Partial URL: /cp1/profile.ftl?lang=en
Career Section URL: http://v750sp1.qa.rsft.net/careersection2/jobsearch.ftl?lang=en
Complete URL to use: http://v750sp1.qa.rsft.net/careersection2/cp1/profile.ftl?lang=en
You need the resource identification number of the field. You can look at the list of IDs in the appendix or you can display the resource identifiers associated to the field.
Access the career portal page when the field is located.
Locate the ID you wish to modify. You can refine the list by resource number.
Click on the resource.
Click Edit next to Properties.
In the Override field, click the link icon.
Paste the URL in the URL field
Click OK.
Adding a Source, Event or Media to the Job Application Flow
The system administrator must know the ID of the source, the event, or the media. The ID must be valid and active.
Event IDs are case sensitive.
Media ID can only be used for eQuest.
The URL must be created for the career section.
Add
&src=to the URL.Add the ID of the event, the media or the source after src=.
The right source, media, or event is automatically selected when a candidate applies for a job. If a customer has a source id and an event id that are the same and are both active, the source id will be selected over the event id.
Personalized Job List Matching Criteria
The Personalized Job List - Matching Criteria feature enables system administrators to set the criteria that determine when a match is to be made between a job and a candidate. Only jobs that meet all specified criteria are displayed in the Career Section Jobs Matching My Profile page.
To efficiently match jobs to qualified candidates, system administrators can select matching criteria that improves the quality of their results. Matching is done by comparing answers provided by candidates to criteria specified in the requisition by the recruiter or the hiring manager. Because the matching criteria are global settings, they apply to all Career Sections in your organization.
| Matching Criteria |
|---|
| Structure |
| A match exists between the "Job" specified in the requisition and the candidate's "Preferred Jobs" |
| A match exists between the "Locations" specified in the requisition and the candidate's "Preferred Locations" |
| A match exists between the "Organization" specified in the requisition and the candidate's "Preferred Organizations" |
| A match exists between the "Locations" specified in the requisition and the candidate's "Place of Residence" |
| Competencies |
| A match exists between the competencies specified in the requisition and the competencies of the candidate (based on competencies marked as required) |
| A match exists between the competencies specified in the requisition and the competencies of the candidate (based on competencies marked as required AND competencies marked as asset) |
| Questions |
| A match exists between the questions specified in the requisition and the candidate answers (Based on answers marked as required) |
| A match exists between the questions specified in the requisition and the candidate answers (Based on answers marked as required AND answers marked as asset) |
| Basic Profile |
| Job Level |
| Job Type |
| Schedule |
| Shift |
| Employee Status |
| Education Level |
| Travel |
| Minimum Annual Salary |
Basic Profile, Competencies and Questions criteria are considered as wildcards. If these criteria are not selected as Required in the requisition, or if a candidate does not enter answers for these criteria, the answers are still considered. The candidate is matched if he/she matches all the other required criteria.
-
Required: the criterion is mandatory. The candidate must meet this specific criterion to be considered. Candidates who meet all the Required criteria are automatically matched to the selected requisition and appear in the Matching Candidate List in the Recruiting Center.
-
Desired: the criterion is not mandatory and is considered as an asset. If a candidate does not match a Desired criterion, he/she is not rejected. Candidates who meet all the Required criteria and who also meet some Desired criteria appear at the top of the Matching Candidate List in the Recruiting Center. Desired criteria are considered as a plus.
-
Not Required: the criterion is not considered.
Taleo recommends to not make competencies and questions required because candidates might not answer these questions and therefore the candidates are excluded.
Selecting Criteria to Match a Candidate to a Job
The Access the Career Section administration section user type permission grants users access to this feature.
Click Edit.
Make selections.
Click Save.
The matching criteria are applied to all Career Sections in your organization.
Requisition Status
On the My Submissions page, the display of the job status can be configured to display whether submissions are still being accepted.
On the My Referrals page, the display of the job status can be configured to display whether candidates are still being accepted.
| Requisition Status | Default Label displayed in the Career section |
|---|---|
| Active | Accepting Job Submissions |
| Inactive | No Longer Accepting Job Submissions |
The requisition status can indicate the status of the requisition in the Recruiting Center.
| Requisition Status | Default Label displayed in the Career section |
|---|---|
| Canceled | Closed |
| On Hold | On Hold |
| Filled | Filled |
| Open | Accepting Job Submissions |
The labels of requisition statuses displayed in the My Submission page and My referrals page can be customized. Default labels are supplied for all requisition types and types of user (agent, internal or external candidates, referrer or all types of users). System administrators can create a specific label for a specific combination of user and type of requisition. When a requisition status is customized for a specific usage, the customized status is applied to all Career Sections and to all staffing types. If no user-defined requisition status is created then the default value is displayed. Only one status can be configured for a given combination of requisition type and user.
Creating a User-defined Requisition Status
The Access the Career Section administration section user type permission grants users access to this feature.
The requisition status display type must be set to Requisition Status.
-
Click the name of a requisition status.
-
Click Create.
-
Enter a code and a name.
-
Click Save.
When the combination of a requisition type and user in a Career Section matches the combination of the user-defined requisition status, the requisition status created for the user-defined requisition status is used instead of the default value.
Activating a User-defined Requisition Status
The Access the Career Section administration section user type permission grants users access to this feature.
Click the name of a requisition status.
Click the name of a user-defined requisition status.
Click Activate.
When the combination of a requisition type and type of user being used in the Career Section matches the combination of the user-defined requisition status, the label created for the user-defined requisition status is used instead of the default value.
Deactivating a User-defined Requisition Status
The Access the Career Section administration section user type permission grants users access to this feature.
Click the name of a requisition status.
Click the name of a user-defined requisition status.
Click Deactivate.
The label of the requisition status created for the user-defined requisition status is no longer used when the combination of a requisition type and user matches the combination of the user-defined requisition status. The default value for the requisition status is used.
Deleting a User-defined Requisition Status
The Access the Career Section administration section user type permission grants users access to this feature.
Click the name of a requisition status.
Click the name of a user-defined requisition status.
Click Delete next to the name of a user-defined requisition status.
Confirm the deletion.
The label specified for the combination of requisition type and user is no longer used, the default value is used.
Defining a Usage for a Requisition Status
The Access the Career Section administration section user type permission grants users access to this feature.
Click the name of a requisition status.
Click the name of a user-defined requisition status.
Click Create next to Statuses usage.
Click Create.
Select a requisition type and a user type.
Click Save.
When the combination of a requisition type and user in a Career Section matches the combination of the user-defined requisition status, the requisition status created for the user-defined requisition status is used instead of the default value.
Deleting a Usage for a Requisition Status
The Access the Career Section administration section user type permission grants users access to this feature.
Click the name of a requisition status.
Click the name of a user-defined requisition status.
Click Delete next to a status.
Confirm the deletion.
The combination of a requisition type and user is no longer matched to the combination of the user-defined requisition status, the default value is used.
Changing the Label of a User-defined Requisition Status
The Access the Career Section administration section user type permission grants users access to this feature.
Click the name of a requisition status.
Click the name of a requisition status.
Click Edit next to Properties.
Change the text in the Name field.
Click Save.
The new name of the user-defined requisition status is displayed in the My Submissions and the My Referrals pages.
Selecting the Requisition Status Display Type
The Access the Career Section administration section user type permission grants users access to this feature.
Click Edit.
Select the Display Type.
Click Save.
The requisition status is displayed in the selected format for all Career Sections and all staffing types.
Selecting a Usage for a Requisition Status
The Access the Career Section administration section user type permission grants users access to this feature.
Click the name of a requisition status.
Click the name of a user-defined requisition status.
Click Create next to Statuses usage.
Click Create.
Make selections.
Click Save.
When the combination of a requisition type and user matches the combination of the user-defined requisition status, the requisition status created for the user-defined requisition status is used instead of the default value.
Job Submission Status
Job Submission Status is a feature that allows candidates to be informed of where they are in the hiring process because they can view the status associated to their job applications.
The Job Submission Statuses feature allows system administrators to display the status of job submissions in the My Submissions page and the My Referrals page of a Career Section. The Job Submission Statuses feature is part of the Candidate Communication Agent module. The Candidate Communication Agent options must be activated for each Career Section otherwise the job submission statuses are not displayed in the My Submissions or the My Referrals pages.
System administrator can choose the display type of the job submission status:
If the Default Configuration is selected, the Taleo Default values are used in the Career Section to display the job submission status.
If the Customized Configuration is selected, the custom values are displayed when the usage context of the status matches the context of the candidate selection workflow.
-
Draft indicates that a candidate has not completed his/her job application.
-
Complete indicates that a candidate has completed his/her job application.
-
Withdraw indicates that a candidate has withdrawn his/her job application.
Labels are created for a specific step of a candidate selection workflow. When creating a job submission status, system administrators can choose to use the default value of a job submission status or a customized version for a specific step of a candidate selection workflow. System administrators can customize the job submission status for all the possible steps that can be added to a candidate selection workflow in the Recruiting Center. System administrators can add a more detailed description that the candidate can view on the customized job submission status.
For example, for the 1st interview step, the system administrator has customized the label of the job submission status when all types of candidates are applying on a professional type of requisition. When a candidate applying on a Professional type of requisition reaches the 1st Interview step, the customized job submission status label is displayed in the My Submissions or My Referrals pages of the candidate in the Career Section. In Recruiting, recruiters and managers can view the candidate status in the candidate file header. This allows recruiters to know what the candidate is being told about the position via the Career Section.
Configuration
| Setting | |||
|---|---|---|---|
| Name | Possible Values | Default Value | Location |
| Enable Customization of Job Submission Statuses |
|
No | Configuration > [Career Section] Administration > Career Section Settings |
Creating a User-defined Job Submission Status for a Step
The Access the Career Section administration section user type permission grants users access to this feature.
The Enable Customization of Job Submission Statuses setting allows the activation of this feature.
Display type must be Custom Configuration.
Click the name of a status.
Click Create.
Complete the fields.
Click Save.
The text in the Name field is the customized job submission status and the Description field displays the additional information the candidate can view on the job submission status.
Selecting a usage for the new status.
Deleting a User-defined Job Submission Status from a Step
The Access the Career Section administration section user type permission grants users access to this feature.
The Enable Customization of Job Submission Statuses setting allows the activation of this feature.
Display type must be Custom Configuration.
User-defined Job Submission Status must be Inactive.
Select a Workflow Statuses Usage
Click Delete next to the name of a User-defined Job submission Status.
The default status is used if no user-defined Job submission Status is defined.
Selecting the Display Type of the Job Submission Status
The Access the Career Section administration section user type permission grants users access to this feature.
The Enable Customization of Job Submission Statuses setting allows the activation of this feature.
Click Edit.
Select the display type.
Click Save.
If Default Configuration was selected, the Taleo Default values are used in the Career Section to display the job submission status.
If Customized Configuration was selected, the custom values are displayed when the usage context of the status matches the context of the candidate selection workflow.
Defining a Usage for a Job Submission Status
The Access the Career Section administration section user type permission grants users access to this feature.
The Enable Customization of Job Submission Statuses setting allows the activation of this feature.
Job submission status display type must be Custom Configuration.
User-defined Job Submission Status must be created.
The usage is activated, and the new label is displayed when a step is used in the specified context.
Activating a User-defined Job Submission Status for a Step
The Access the Career Section administration section user type permission grants users access to this feature.
The Enable Customization of Job Submission Statuses setting allows the activation of this feature.
Click the name of a Workflow Statuses Usage status.
Click the name of a User-defined Job submission Status.
Click Activate.
The user-defined Job submission Status is available for use.
Deactivating a User-defined Job Submission Status for a Step
The Access the Career Section administration section user type permission grants users access to this feature.
The Enable Customization of Job Submission Statuses setting allows the activation of this feature.
Click the name of a Workflow Statuses Usage status.
Click the name of a User-defined Job submission Status.
Click Deactivate.
The user defined status is longer be available for use.
Activating the Candidate Communication Agent
The Access the Career Section administration section user type permission grants users access to this feature.
The Enable Customization of Job Submission Statuses setting allows the activation of this feature.
Career Section must be inactive.
Click Edit next to Properties.
Select Yes from the Display user-defined job submission statuses in the My Submissions page and in the My Referrals page drop down menu.
Click Save.
User-defined job submission statuses are displayed in the My Submissions and the My Referrals pages of the Career Section.
Deactivating the Candidate Communication Agent
The Access the Career Section administration section user type permission grants users access to this feature.
The Enable Customization of Job Submission Statuses setting allows the activation of this feature.
Career Section must be inactive.
Click Edit next to Properties.
Select No from the Display user-defined job submission statuses in the My Submissions page and in the My Referrals page drop down menu,
Click Save.
User-defined job submission statuses are no longer displayed in the My Submissions and the My Referrals page of the Career Section.
Changing the Description of a Job Submission Status
The Access the Career Section administration section user type permission grants users access to this feature.
The Enable Customization of Job Submission Statuses setting allows the activation of this feature.
Job submission status display type must be Custom Configuration.
Click the name of a Status.
Click the name of a user-defined Job Submission Statuses.
Click Edit.
Change the text in the Description field.
Click Save.
The new description is displayed next time a step is used in the specified context.
Changing the Label of a Job Submission Status
The Access the Career Section administration section user type permission grants users access to this feature.
The Enable Customization of Job Submission Statuses setting allows the activation of this feature.
Job submission status display type must be Custom Configuration.
Click the name of a Status.
Click the name of a user-defined Job Submission Statuses.
Click Edit.
Change the text of the Name field.
Click Save.
The new label is displayed next time a step is used in the specified context.
Deleting a Usage for a Job Submission Status
The Access the Career Section administration section user type permission grants users access to this feature.
The Enable Customization of Job Submission Statuses setting allows the activation of this feature.
Job submission status must be inactive or Draft.
Click the name of a Workflow Statuses Usage.
Click the name of a user-defined Job Submission Status.
Click Delete next to a usage.
Click Yes to confirm Deletion.
The default value is used if no status is set for a specific usage.
Exporting Job Submission Statuses Through Integration
Customers can get the appropriate customer-defined job submission statuses for candidate submissions, exported through integration.
In the Taleo Career Section product, it is possible to configure job submission statuses to describe the current progression state of a candidate submission. These job submission statuses are displayed to external candidates, internal candidates, referrers or agents.
An entity hierarchy is available in the Recruiting integration offering: "ApplicationStatusesByContext". The entities in this hierarchy are available for export through TCC, TCB and Web services.
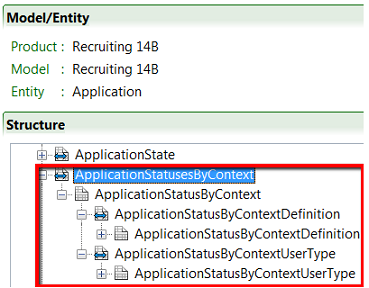
Below is a description of these entities.
ApplicationStatusesByContext
Collection of items (ApplicationStatusByContext).
Child entity of the Application entity.
ApplicationStatusbyContext
Represents a job submission status for one type of user (external candidates, internal candidates, referrers, agents).
Describes a status defined by the customer or one of the default statuses provided by Taleo (depending on if a customized status for this context has been configured).
Parent entity for ApplicationStatusByContextDefinition and ApplicationStatusByContextUserType.
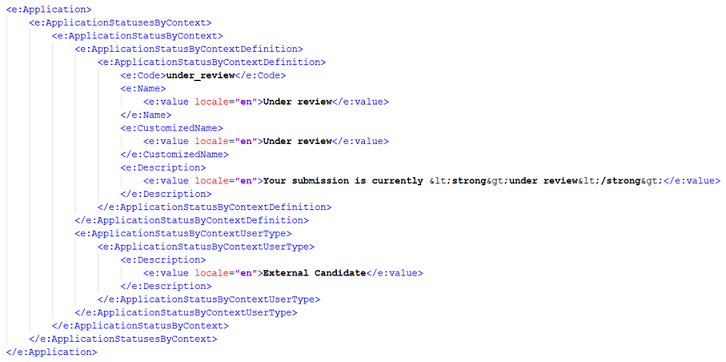
ApplicationStatusByContextDefinition
Contains the name and description of a specific status.
Contains the following fields:
Name: Name of the returned status. This name does not take into consideration customer-specific customizations that may have been done on the name of the Taleo default statuses (customizations done through support requests).
CustomizedName: Same as "Name" but takes into consideration customer-specific customizations that may have been done on the name of the Taleo default statuses (customizations done through support requests). If no customizations have been made on the Taleo default statuses, it contains the same value as the "Name" field.
Description: Description of the returned status (description provided by the administrator). The text from this field is in rich text format and can include links, images, bold text, etc.
ApplicationStatusByContextUserType
Identifies the type of user (external candidates, internal candidates, referrers, agents) for which a status is targeted.
-
Contains the following fields:
Description: Description of the type of user to which this status applies. Possible values: External Candidate, Internal Candidate, Referrer, Agent.
Number: Number representing the type of user to which this status applies. Possible values: 1 (External Candidate), 2 (Internal Candidate), 3 (Referrer), 4 (Agent).
Below is a sample output.
Important Information
When exporting field values from the ApplicationStatusByContextDefinition entity, if different locale (language) filterings are applied to the fields from this entity, the output may not contain the locales that were requested. To avoid this situation, make sure to set the same locale filtering on all multilingual fields from the ApplicationStatusByContextDefinition entity.
The order in which the four possible statuses (ApplicationStatusbyContext ) are returned in the export output will not always be the same if running the same export query multiple times. For example, when using the export output, do not rely on the external candidate status to be returned first. Always validate the user type for which a status applies to.
It is recommended to always use the CustomizedName field value of the ApplicationStatusByContextDefinition entity instead of the Name field value. If no customer-specific customizations have been done on the names of the Taleo default statuses, both fields will have the same value. If customizations have been made, only CustomizedName will take those customizations into consideration. The only reason to use the Name field would be if you want the standard Taleo default statuses, ignoring customizations made to the text for those default statuses.
Matched Candidate Display
The Matched Candidate Display feature allows system administrators to specify if jobs manually matched to candidates in the Recruiting Center are displayed in the candidate's Career Section My Submissions page.
System administrators can choose to display jobs manually matched to candidates in the My submissions page based on the type of candidate:
Internal candidates
External candidate
Candidate referred
Candidates matched by an agent
Matched jobs can be displayed for one, several or all types of candidates.
-
Never (default value)
-
Always
-
Yes, when candidate reaches one of the selected steps.
A candidate does not absolutely have to reach the selected step in order for the matched jobs to be displayed. If the recruiter/manager advances a candidate past the step selected for the Matched Candidate Display feature, the job is displayed to the candidate.
Selecting if Matched Jobs are Displayed
The Access the Career Section administration section user type permission grants users access to this feature.
Select a type of user.
Click Edit next to Properties
Select a display type.
Click Save.
Hiding Matched Jobs in the My Submissions Page
The Access the Career Section administration section user type permission grants users access to this feature.
Click the name of a type of user.
Click Edit.
Select Never from the Display type drop down list.
Click Save.
When a candidate is manually matched to a requisition, the job no longer appears in the My submissions page of the candidate and remove the ones that were previously displayed.
Selecting a Step Triggering the Display of a Matched Job
The Access the Career Section administration section user type permission grants users access to this feature.
Display Type must be Yes, when candidate reaches one of the selected steps.
Click the name of a type of user.
Click Add.
Select a Step.
Click Select.
When the candidate reaches the step of the candidate selection work flow, matched jobs are displayed in My submissions page of the candidate.
Removing a Step Triggering the Display of Matched Jobs
The Access the Career Section administration section user type permission grants users access to this feature.
Display Type must be Yes, when candidate reaches one of the selected steps.
Click the name of a type of user.
Click Delete.
Select Yes to confirm the deletion.
Click Select.
When the candidate reaches the step of the candidate selection work flow, matched jobs are no longer displayed in My submissions page of the candidate.
Agent Confirmation Request
The system can be configured to send a request to the agent to confirm a candidate’s availability.
This feature is normally used for contingent hiring. When deciding to contract with a specific contingent worker, the system can be configured to send a request to the agent owning the candidate record of the contingent worker to confirm the candidate’s availability. The agent receives an email and is brought back to the portal. This feedback loop in the contingent process is configured by the system administrator via the Agent Confirmation Request feature.
An agent confirmation request can be created for all available candidate selection application flows used in a career section or the system administrator can chose to create an agent confirmation request for only one or several specific candidate selection application flows. The agent confirmation request can be added to any status of a step of a candidate selection application flow. The system administrator can also decide the status the candidate automatically reaches based on the answer sent by the agent. Yes the candidate is available, or no the candidate is unavailable. The email sent to the agents requesting a confirmation, contains the text included in the Agent Confirmation Question (multilingual).
If an agent confirmation request is created, a translation must be provided for all available languages.
Configuration
| User Type Permission Name | Location |
|---|---|
| Access Correspondence Manager configuration | Configuration > [SmartOrg] Administration > User Types > Recruiting > Administration |
Creating an Agent Confirmation Request
The Access the Career Section administration section user type permission grants users access to this feature.
Click Create.
Complete the form.
Click Save.
When an agent owned candidate reaches the specified status of the step for the selected candidate selection work flow, an email is sent to the agent requesting the confirmation of the availability of the candidate.
Deleting an Agent Confirmation Request
The Access the Career Section administration section user type permission grants users access to this feature.
Click Delete next to a Confirmation Request.
Confirm the deletion.
When a agent owned candidate reaches the specified status of the step for the selected candidate selection work flow, an email is no longer sent to the agent requesting the confirmation of the availability of the candidate.
Editing the Properties of an Agent Confirmation Request
The Access the Career Section administration section user type permission grants users access to this feature.
Click the code of an Agent Confirmation Request.
Click Edit.
Make changes.
Click Save.
When an agent owned candidate reaches the specified status of the step for the selected candidate selection workflow, an email is sent to the agent requesting the confirmation of the availability of the candidate.
Secure Message Delivery with the Message Center
Customers who wish to have increased control over the information sent to Career Section users via email may choose to enable the Secure Message Delivery feature. When enabled, all messages are delivered to a secure Message Center accessible from any of the customer's Career Sections. Message recipients are directed to the Message Center to retrieve their messages.
The Secure Message Delivery feature is enabled in the Recruiting Administration. See the Recruiting Configuration Guide for configuration options.
The Secure Message Delivery feature applies only to messages sent to Career Section users, that is candidates, agents, and referrers. It does not impact Recruiting Center users or messages sent with other Taleo products.
If a message is sent via email (whether it is an automated message or the sender selected to send it via email), rather than receiving the actual message via email the message recipient receives a notification of message delivery containing a deeplink. To receive a notification of message delivery, message recipients must have a valid email address on file and the notification template message must be active.
To access the Message Center, the message recipient clicks on the deeplink in the message and must then authenticate himself by entering his user name and password. If the user does not yet have an account, he must create one prior to being able to access his messages. Alternatively, the Message Center can be directly accessed via any active Career Section by clicking the My Messages tab.
Once in the Message Center, the message recipient can read his messages, delete them, and download the files attached to the messages in order to view them. Before accessing an attachment, the recipient must accept a download agreement. Messages are displayed in a print friendly format should Career Section users wish to print a message using the browser's print functionality.
When viewing a specific message, the recipient can navigate from one message to the next without returning to the list view by using the Previous or Next links. The message may also be deleted. Clicking Back returns the user to the message list.
For Career Section users who do not have an email address, the message sender can still send them messages and these users can access their messages from within the Message Center. For example, a candidate exists in the system and did not supply an email address. A recruiter will still be able to send an email message to the candidate using the Recruiting Center correspondence wizard.
The Message Center
The Message Center has the same look and feel as the Career Section; it adopts the theme and branding of the Career Section. Messages inside the Message Center retain the formatting attributes of the message template.
The Message Center language matches the language from where the Message Center was originally accessed. If the user is coming from a Career Section, the Message Center is presented in the same language as the Career Section. If coming from the deeplink contained in the notification, the Message Center is presented in the same language as the notification sent to the user. Messages inside the Message Center are in the language used to transmit the message.
Help text is displayed in the right-hand side of the Message Center. Default universal help text, which can be edited via TexTool, is provided by Taleo. If desired, the text can be customized by a Career Section administrator using the Career Portal Page user-defined labels feature. This text change only affects the Message Center on that particular Career Section.
The Message Center stores messages sent within the past 6 months to a maximum of 100 messages. If more than 100 messages have been delivered, only the most recent 100 messages are accessible.
Messages that do not have a subject cannot be opened from the Message Center.Keyword Search
Candidates can use the search functionality to find jobs via the Basic Search and the Advanced Search pages of a Career Section.
When using the search function to perform a basic search on the Basic Search page or an advanced search on the Advanced Search page, candidates can enter partial words composed of the first two or more characters or 1 character + 1 special character (eg. C+) in the Keywords field. Using partial words in the Keywords field, candidates can create search strategies that usually retrieve more jobs than similar searches that include only complete words. Candidates can enter multiple partial and complete words in the Keywords field. This offers candidates more possibilities in creating search strategies.
The accepted special characters are # + - @ . ! % /
Reserved words such as AND and OR will be removed from the search terms.
Words encased in quotes will be considered one search term by the system.
The search engine treats each search term in the Keywords field as if it ends with a wildcard, whether the term is a complete word or not.
Job Title
Job Description
Primary Location
Qualifications
Help Panel
The Help panel displays helpful information to the candidate.
-
pixel size of the help panel
-
the text appearing in the help panel
-
font of the text in the help panel.
The size of the help panel, and whether it is displayed or not, is set for the entire Career Section. Text and formatting can be set for each page of the career portal and for the application flow, independently. It is important to note that the Career Section automatically adjusts to fit the amount of given space. However, the content, text and fonts do not automatically adjust. If there is no default help text in the help panel, the width of the page is not constrained to what is not taken up by the help panel resource. However, when text is added in the help panel, including a single blank space, the page uses the help panel resource area.
The text of the help panel that is, the Help Title, the Help Subtitle and the Help Text, can be formatted by the system administrator via the Theme feature.
If the help panel is removed (that is, entering 0 pixels), the following links available in the help panel have to be placed in another location: Access my profile, Submit a friend’s profile, Refer a Friend.
Hiding the Help Panel
The Access the Career Section administration section user type permission grants users access to this feature.
User must know the theme associated to the Career Section.
The theme must be inactive.
Click the name of a theme.
Click Edit.
In the Width in pixel reserved for the Online Help in Theme field, enter 0.
Click Save.
The help panel is no longer displayed.
Activating the theme.
Changing the Width of the Help Panel
The Access the Career Section administration section user type permission grants users access to this feature.
User must know the theme associated to the Career Section.
The theme must be inactive.
Click the name of a theme.
Click Edit.
In the Width in pixel reserved for the Online Help in Theme field, enter a value. It is a best practice to keep the help panel between 100 and 200px.
Click Save.
The help panel is displayed in the specified width in every area of the Career Section. If the width is set to 0px the help panel is not shown.
Activate the theme.
Changing the Help Panel Text in a Career Portal Page
The Access the Career Section administration section user type permission grants users access to this feature.
Click Show next to Career Portal Page.
Click the name of a career portal page.
Click Edit User-defined Labels.
Select HelpPanelResources from the Refine by list.
Click the element to change.
Click Edit.
Add text to the override box.
Click Save.
The new text appears in the help panel.
Activate the theme.
Changing the Help Panel Text in an Application Flow
The Access the Career Section administration section user type permission grants users access to this feature.
Click the name of an application flow.
Click Edit User-defined Labels.
Select HelpPanelResources from the Refine by list.
Click the element to change.
Click Edit.
Add text to the override box.
Click Save.
The new text appears in the help panel in the selected application flow.
Formatting the Help Panel Text
The Access the Career Section administration section user type permission grants users access to this feature.
Click a Theme.
Click Text Configuration.
Click the name of a Help style class.
Click a Style name.
Click Edit next to Properties.
Change the value.
Click Save.
The new format is applied in the Help panel.
Single Sign-On
Single Sign-On
Single Sign-On (SSO) enables users to log into Oracle Talent Acquisition Cloud (OTAC) applications using their corporate credentials.
In an SSO environment, users are authenticated by an Identity Provider (e.g. OIF, ADFS) that is maintained by their corporate IT department. Both employees and candidates who have access to internal career sections can use SSO to access Oracle Talent Acquisition Cloud (OTAC) products. SSO cannot be used for external career sections.
Customers who want to use SSO can implement it themselves through the SSO configuration interface. Customers perform easy configuration steps to enable and support one or more identity providers. The feature supports two flows to authenticate users:
Users are authenticated through their company portal, then they access OTAC products through the portal (Identity Provider initiated flow).
Users access the OTAC product URL directly and are redirected to their identity provider for authentication (Service Provider initiated flow).
Customers can configure the authentication request flows, and exit and error URLs for seamless integration with their environment.
SSO setup requires:
An Identity Provider with SAML 2.0 support.
A user/candidate synchronization feed between the Identity Provider and OTAC. This can be developed using Taleo Connect Client (TCC).
A corporate portal (optional).
Oracle Talent Acquisition Cloud (OTAC)
SAML 2.0 based SSO
SSO Identity Provider (IdP) setup
Taleo Connect Client (TCC)
Single Sign-On Basic Concepts
Identity Provider (IdP) and Service Provider
Single Sign-On (SSO) in Oracle Talent Acquisition Cloud (OTAC) is accomplished through the use of SAML (version 2.0). SAML provides a mechanism to exchange authentication and authorization data between two trusting entities.
In a generic SAML context, the entities are:
The Asserting party (or SAML authority)
The Relying party (or SAML requester)
In an SSO context, the Asserting party is the Identity Provider (IdP) and the Relying party is the Service Provider (SP). The Identity Provider is the customer's SAML federation server (OIF, ADFS etc.) and the Service Provider is the Oracle Talent Acquisition Cloud (OTAC) application.
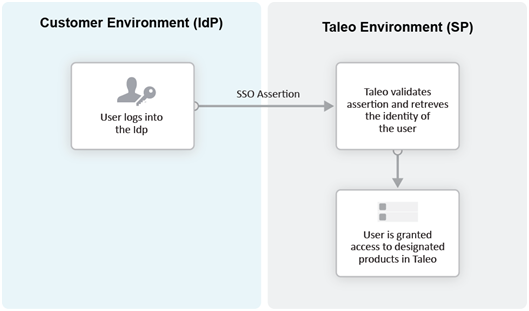
A trust relationship is established between the Identity Provider and the Service Provider. The Service Provider trusts the information received from the Identity Provider. The information sent is called the SAML assertion. It contains the identity of the user that has been authenticated by the IdP. Upon receiving the assertion, Oracle grants the appropriate level of access to resources, based on the identity of the user.
Metadata File
SSO is set up by exchanging metadata files between the Identity Provider (IdP) and the Service Provider (SP).
The SAML 2.0 metadata file format is supported. This metadata file contains information about each SSO entity (URLs, protocols supported, certificates etc.). The IdP's metadata file can be imported into the SSO user interface. If any changes are made to the IdP, the metadata file must be re-imported.
Also, metadata files can be generated for the Taleo Service Providers (SmartOrg and Career Section). These files must be imported into the IdP. A separate metadata file will be generated for each SP-IdP combination. For example, if the customer has 2 IdPs, then up to 4 metadata files will be generated (2 for SmartOrg and 2 for Career section).
For an example of an Identity Provider metadata file, see Identity Provider Metadata Example.
For an example of a SmartOrg metadata file, see SmartOrg Metadata Example.
For an example of a career section Service Provider metadata file, see Career Section Metadata Example.
Single Sign-On Flows
There are two types of Single Sign-On flows: Identity Provider (IdP)-initiated and Service Provider (SP)-initiated.
Identity Provider (IdP)-initiated Flow
In the IdP-initiated flow, the user logs in first to the IdP. The person then requests access to the Service Provider (SmartOrg or career section) – often through an SSO Portal. The Identity Provider will initiate an SSO connection to the Oracle Talent Acquisition Cloud (OTAC) product and provide an assertion. The assertion contains the identity, attributes and entitlements of the requesting user. Oracle will grant access to the user based on the assertion information.
The image represents an Identity Provider (IdP)-initiated flow.
The IdP-initiated flow is the most commonly used configuration.
When SSO is configured, the IdP-initiated flow is activated by default.
Multiple IdPs are supported for IdP-initiated flows. Each IdP can redirect users to the Service Provider (SmartOrg and career section). The Service Provider accepts request from each IdP as long as the IdP is properly defined.
Service Provider (SP)-initiated Flow
In the Service Provider-initiated flow, the user accesses the Oracle Talent Acquisition Cloud (OTAC) product (SP) directly. For example, this can be done by typing the URL of the zone in the browser. The Service Provider then redirects the user to the Identity Provider. After authenticating the user, the IdP generates and sends an assertion back to the SP. The assertion contains the identity, attributes and entitlements of the requesting user. Oracle grants access to the user based on the assertion information.
The Challenge URL setting, depicted in the following illustration, is used to set up a Service Provider-initiated flow.

The customer can choose to optionally activate SP-initiated flow as well.
For SP-initiated flow from SmartOrg, only one IdP can be configured. All SP-initiated requests from SmartOrg are redirected to this IdP.
For SP-initiated flow from career sections, by default all requests are redirected to a single default IdP. However, individual career sections can be set up to redirect requests to a different IdP.
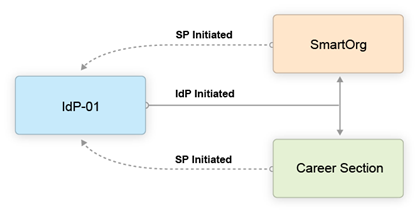
The following illustration depicts a single Identity Provider, SmartOrg and single career section:
-
Users can access both SmartOrg and the career section from the Idp (IdP-initiated flows).
-
When users access SmartOrg directly, they are redirected to the IdP for authentication (SP-initiated flows).
-
When users access the career section directly, they are redirected to the IdP for authentication (SP-initiated flows).
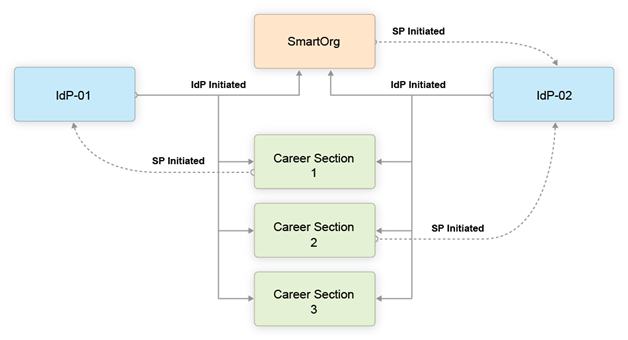
The following illustration depicts an SSO setup with two Identity Providers, SmartOrg and three career sections:
-
Users can access both SmartOrg and each career section from the Idp-01 (IdP-initiated flows).
-
Users can access both SmartOrg and each career section from the Idp-02 (IdP-initiated flows).
-
When users access SmartOrg directly, they are redirected to the IdP-02 for authentication (SP-initiated flows).
-
When users access career section 1 directly, they are redirected to the IdP-01 for authentication (SP-initiated flows).
-
When users access career section 2 directly, they are redirected to the IdP-02 for authentication (SP-initiated flows).
-
When users access career section 3 directly, they are not redirected to any IdPs. Instead, they are prompted for their credentials.
Challenge, Error and Exit URLs
Challenge, Error and Exit URLs can be defined to configure the destination to which the user will be redirected under various conditions.
One set of URLs can be configured for each SP (SmartOrg and career section). In addition, individual career sections can have their own values for these URLs. These values will override the defaults for the career section SP.
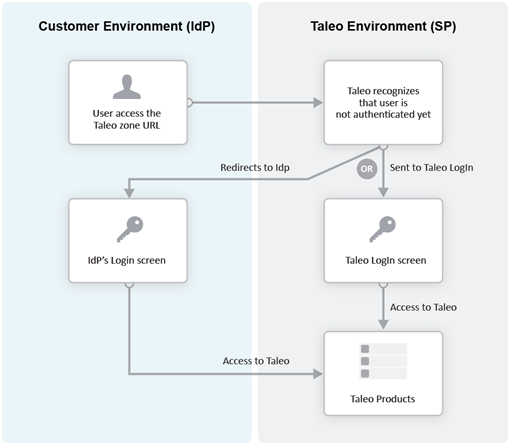
Challenge URL
The Challenge URL setting defines the page where the user will be directed to present his credentials. There are two options:
Default login page: Standard OTAC page. No redirection to the IdP.
SP Initiated Servlet redirect: The user is redirected to the IdP's login page. This option must be selected to enable SP initiated flows from SmartOrg and career section to the chosen IdP.
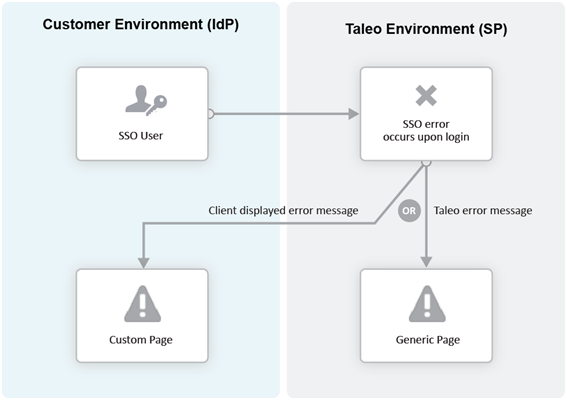
Error URL
The Error URL setting defines the page where the user will be directed when an SSO error occurs. It can be the default Oracle Talent Acquisition Cloud (OTAC) error page or a custom page defined by the customer. Typical errors that would generate an SSO error are:
Locked user account
Invalid Assertion (generic SSO response issue)
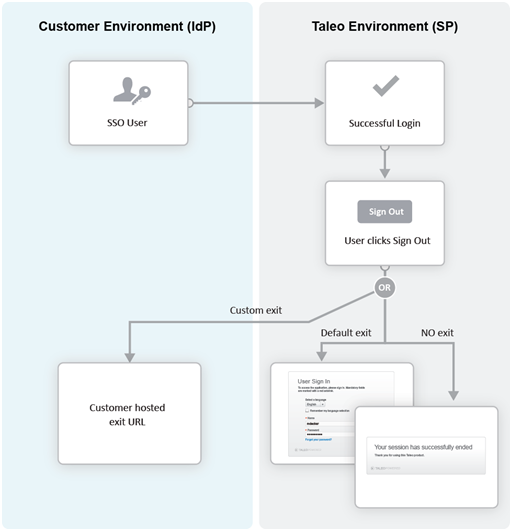
Exit URL
This Exit URL setting defines where the Service Provider sends the user upon exiting the application. Three options are available:
Default exit page – Display the login screen
Custom URL – Display a custom page defined by the customer
No exit page – Display the exit screen
Certificate and Validation
A trust relationship is established between the IdP and the SP when both exchange their respective certificates.
All communications (SAML Request and Response) will be signed by the issuing party. The receiving party will use the certificate to validate the received communication.
IdP Certificates
The IdP's certificate is usually available in its metadata file. The certificate will be automatically imported when the metadata file is imported. After import, this certificate can be viewed and managed in the SSO interface. Certificates can also be manually imported. The certificate can be associated to one or both Service Providers (SmartOrg and career section). Each certificate will have a validity period defined by a start data and an end date.
Multiple certificates can be imported for an IdP. At least one has to be valid for SSO connections to be established.
SP Certificates
The SP certificates are available through SP's metadata file. A separate certificate is generated for each SP-IdP combination.
Validation
Upon receiving an assertion, each Service Provider performs the following validity checks.
Signature – Validate that the assertion has been signed by the IdP.
Timeout – Validate that the age of assertion has not exceeded a specified timeout period. The age is calculated as the time difference between the moment the assertion was received (by the SP) and the moment the assertion was issued (by the IdP). A timeout period of up to 30,000 milliseconds can be configured.
User Synchronization
The customer must configure synchronization of users between the Identity Provider(s) and Oracle Talent Acquisition Cloud (OTAC).
The IdP will identify the user (subject) in the assertion. This user identifier must also be stored in the system. Upon receiving the assertion, Oracle extracts the user identifier from the assertion and then searches for the user in the system. Upon finding a match, the appropriate privileges are granted to this user.
Taleo Connect Client (TCC) can be used to import the user identifier into Oracle Talent Acquisition Cloud (OTAC). A TCC import file can be created and scheduled for automatic import into OTAC. Both user and candidate information must be updated. The following fields must be updated with the SSO user identifier:
Employee/Username (for SmartOrg Service Provider)
Candidate/Credentials/SSOID (for career section Service Provider)
For information about TCC, please refer to the Taleo Connect Client documentation.
Users can also be created manually:
SmartOrg users: Create the users manually through the SmartOrg interface.
Internal career sections: Use the career section SSO Configuration Wizard. See Career Section SSO Configuration Wizard.
Identity Provider Bindings
Identity provider bindings specify the IdP URLs that can be used to perform various SAML transactions.
These URLs will be used by the Taleo Service Providers. It is expected that some bindings will be identical. The metadata file provides values for these bindings automatically, however, you can edit the values as needed.
Identity Provider Trusted Certificates
Trusted certificates are needed to confirm the identity of Identity Providers. Each assertion received will be validated against these certificates.
IdP certificates included in the metadata file are imported and displayed automatically. Certificates can also be imported manually in the Identity Provider Trusted Certificates section. Certificates can be chosen to confirm the identity of Identity Providers for SmartOrg, career sections or both. Afterward, each assertion received is validated against the certificates.
Configuring Single Sign-On
Recommended SSO Implementation
The Manage SSO configuration user type permission is required. (See: Granting Permission to Manage Single Sign-On (SSO)).
It is recommended that you enable and test IdP initiated flows before enabling SP initiated flows. If both IdP and SP initiated flows are enabled at the same time, you run the risk of completely locking out users due to incorrect SSO configuration.
Obtain the metadata file for the corporate Identity Provider from your IT department.
Register the Identity Provider in Oracle Talent Acquisition Cloud (OTAC).
Decide which Service Providers (SmartOrg, career section or both) must be activated for this IdP.
Initially activate just IdP initiated flows.
Set up the exit and error URLs if necessary.
Export the Service Provider metadata files from Oracle Talent Acquisition Cloud (OTAC).
Register the Service Providers in the IdP by importing the metadata files.
Synchronize SmartOrg SSO user identity (either using TCC or manually).
Test IdP initiated access to SmartOrg.
Activate SSO in one or more career sections.
Synchronize career section SSO identity (either using TCC or the career section SSO wizard).
Test IdP initiated access to these career sections.
Activate SP initiated flows for the IdP.
Test SP initiated access to SmartOrg.
Test SP initiated access to career section.
Granting Permission to Manage Single Sign-On
Click the check box next to Manage SSO Configuration.
Click Save.
Users who have the user type will be able to configure SSO.
Configuring an Identity Provider
The Manage SSO configuration user type permission is required.
SmartOrg Service Provider Settings
| Setting | Description |
|---|---|
| Default for SP Initiated Flow |
|
| Challenge URL |
|
| Error URL |
|
| Exit URL |
|
| Execute Global Logout |
|
Career Section Service Provider Settings
| Setting | Description |
|---|---|
| Default for SP Initiated Flow |
|
| Challenge URL |
|
| Error URL |
|
| Exit URL |
|
Exporting SmartOrg Service Provider Metadata Files
To download the metadata file associated with a SmartOrg Service Provider, go to: https://ZoneName/smartorg/sp/metadata.jss?target=EntityID, replacing ZoneName by your Taleo zone name, and replacing EntityID by the Entity ID value imported from the IdP metadata file.
Registering Service Providers (SmartOrg and Career Section) in the IdP
The metadata files exported in previous steps can be imported into your IdP system (OIF, ADFS etc.). You should set up a single Service Provider for SmartOrg and a single, different Service Provider for Career Section.
Deleting an Identity Provider
The Manage SSO configuration user type permission is required.
Ensure that all SSO flows are disabled before deleting an IdP. The IdP to be deleted should not be the default for any Service Provder-initiated flows.
Next to Identity Provider Configuration, click Show.
Click the Delete that corresponds to the Identity Provider you want to delete.
Click Yes.
Adding an IdP Trusted Certificate to an Identity Provider
The Manage SSO configuration user type permission is required.
Deleting an IdP Trusted Certificate from an Identity Provider
The Manage SSO configuration user type permission is required.
Next to Identity Provider Configuration, click Show.
Click the IdP you want to remove a trusted certificate from.
Next to Identity Provider Trusted Certificates, click Edit.
Locate the trusted certificate you want to delete and click the corresponding Delete.
Click Yes.
Click Save.
Configuring Career Sections Individually for Service Provider-Initiated Access
The Manage SSO configuration user type permission is required.
Displaying SSO-protected URLs
The Manage SSO configuration user type permission is required.
Next to SSO Protected URLs, click Show.
Bypassing Single Sign-On
You are logged into Oracle Talent Acquisition Cloud (OTAC) directly, bypassing Single Sign-On.
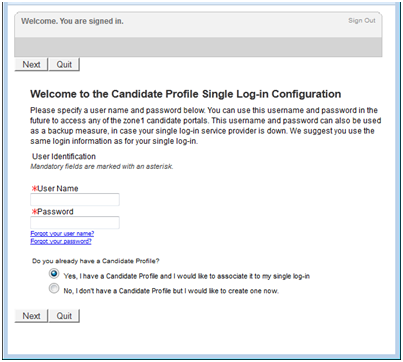
Career Section SSO Configuration Wizard
The Single Sign-On wizard enables internal candidates to link a candidate account to their SSO user identifier.
This method can be used instead of running a Taleo Connect-based integration feed to populate the SSO user identifier in the candidate account.
If the wizard is enabled, the first time that internal candidates log into an internal career section through their Single Sign-On portal, they are prompted to associate their SSO user identifier (profile) with a candidate account. The users can either create a new candidate account or use an existing account. Upon successfully logging in using the candidate account credentials, the SSO user identifier is associated with this candidate account by the Single Sign-On wizard. This operation has to be performed only once. The user will be automatically authenticated in the internal career section for subsequent logins.
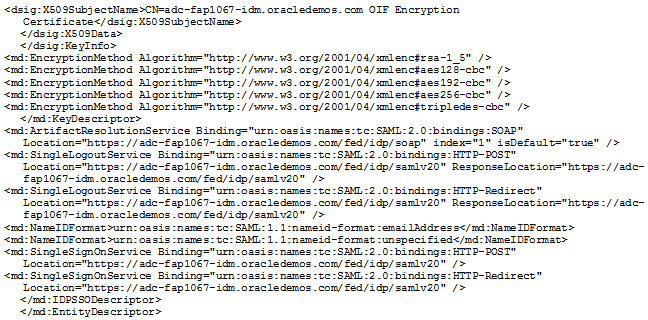
Identity Provider Metadata Example
This is an example of an IdP metadata file.
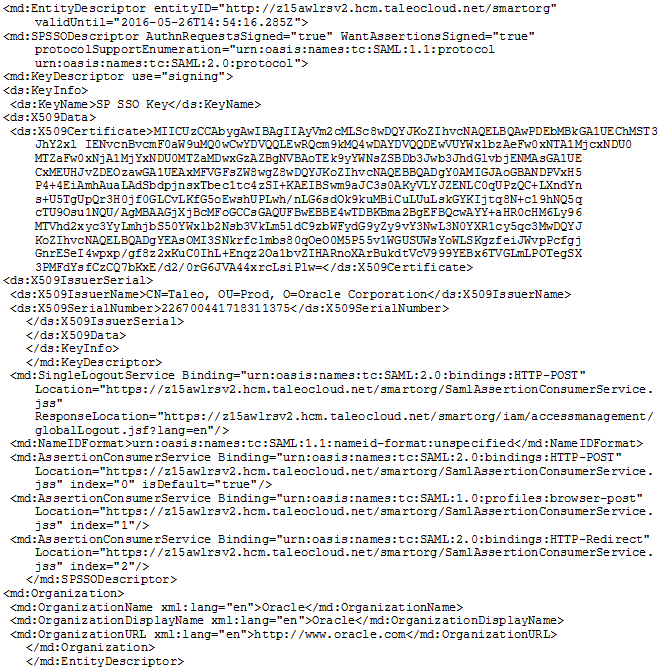
SmartOrg Metadata Example
This is an example of a metadata file for SmartOrg.
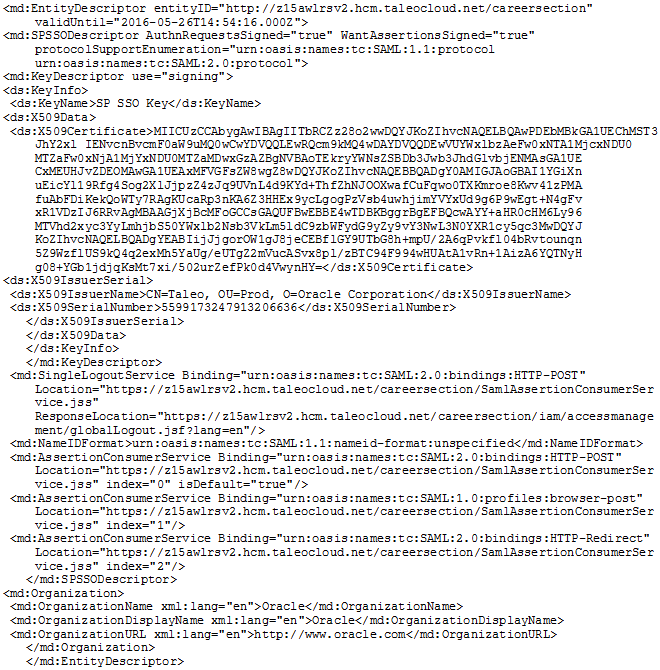
Career Section Metadata Example
This is an example of a metadata file for Career Section.
Configuring Oracle Identity Federation
To register SmartOrg and career sections, begin by logging into Fusion Middleware's Enterprise Manager.
Locate the OIF instance and click it.
Click Oracle Identity Federation.
Click Administration.
Click Federation.
Click Add.
Select the federation you created and click Edit.
Click the Oracle Identity Federation Settings tab.
Click the icon to the left of the Identity Provider/Authority Settings section to display the section.
In the Identity Provider/Authority Settings section:
Set the Default SSO Response Binding to: HTTP POST.
Select the check box next to Response with Assertion – SOAP.
Select the check box next to Response with Assertion – HTTP POST.
Click Apply.