11Social Media
RSS Feature
Real Simple Syndication, or RSS, allows candidates to receive a notification for jobs corresponding to their job search criteria.
When creating a Career Section, system administrators can enable the RSS option allowing candidates visiting their Career Sections to create RSS job feeds. Thereafter, candidates receive a notification (job title and short description) via their RSS feed, of jobs that correspond to the job search criteria they specified in Career Sections. Each RSS feed will display up to 10 jobs to a candidate, plus a link to the Career Section to see all the jobs.
If a job is posted in multiple languages, the language of the RSS feed a person receives corresponds to the language preference specified by that person. When the RSS feature is activated for a Career Section, the candidate can request job feeds based on Job Field and Location. The job feeds include only jobs that conform to a person's permissions at login. For example, the job feed an external user receives does not include internal job postings even if his/her search criteria match the internal job profile.
A private Career Section setting "RSS Feed Activation" allows the activation of this feature. By default this settings is set to OFF; please contact Oracle Support to have this setting activated. RSS is unavailable for Agency portals.
Configuration
To enable the RSS feature the career section must have Inactive status.
| Career Section Property | Location |
|---|---|
| Enable the RSS Feature | Configuration> [Career Section] Administration > Career Sections > [Career Section] Name > [Properties] Edit |
Apply with LinkedIn
To allow job seekers to use their LinkedIn account for both their profile data and authentication, an Apply with LinkedIn button is presented on the Login and Registration pages of the Career Section. This enables job seekers to authenticate into the Career Section using LinkedIn and import their profile in one step; this removes the friction from the steps to register or login with a username and password prior to applying to a job. By using their LinkedIn session, job seekers can create new job submissions without creating a personalized username and password in the Career Section. If the job seeker has an active cookie from LinkedIn on their device, the button displays as Apply with LinkedIn, and allows one-click authentication. In this case, the LinkedIn section displays in the LinkedIn user profile preference language.
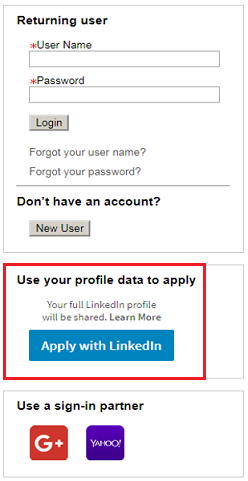
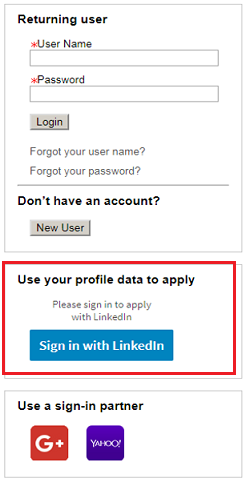
If the job seeker does not have an active LinkedIn cookie, the button displays as, Sign in with LinkedIn. In this case, the LinkedIn section displays in the browser language.
There is a section on the Thank You page supporting this feature that invites users to create a username and password after they complete their job submission. When the user arrives at the Thank You page after completing the application flow, a Create my User Name and Password link displays if they do not have a personalized username and password in place. This LinkedIn feature is solely for creating new job submissions, not viewing or updating new submissions, therefore, users must create a personalized username and password to view or update their submissions, or for signing in to use other Career Section functions.

Those users who do not create a username and password after arriving on the Thank You page will be sent an email inviting them to create the username and password at their convenience. Job seekers that do not reach the Thank You page, but begin a job submission will also receive this email invitation.
The Career Section has scenario handling built in which covers cases such as returning users who may not have created a username and password, and connecting LinkedIn authentication to existing accounts. There are five main scenarios that users will experience are as follows:
- New Candidate - First job submission.
Details: The job seeker does not exist in OTAC and is applying to their first job.
User Experience: Uses the Apply with LinkedIn button, a user record is created and the LinkedIn profile data is imported. They proceed through the application flow and are invited to create a username and password on the Thank You page.
- Returning User - Uses Apply with LinkedIn to apply to a second job.
Details: The job seeker has used the Apply with LinkedIn function in the past to apply to a job, and is now applying to another, different job.
User Experience: Uses the Apply with LinkedIn button, their latest LinkedIn profile data is imported augmenting the existing candidate record in OTAC. They proceed through the application flow. If they created a username and password previously, they are presented with a standard Thank You page. If they did not create a username and password, they are invited to create a username and password on the Thank You page.
- Returning User - First use of LinkedIn; their email address already exists in OTAC.
Details: The job seeker uses the Apply with LinkedIn button for the first time. The Career Section detects that the email on their LinkedIn profile already exists in OTAC on a candidate record.
User Experience: After using the Apply with LinkedIn button, they are presented with a login screen to sign in with their Career Section username and password. This will tether their LinkedIn authentication to their existing Career Section account. Their profile is imported, augmenting their existing account.
They can also bypass this login and account tethering action, and create a new account. If email uniqueness is on the email address will not be imported since this will create a conflict with the other existing candidate record.
- Returning User - Used LinkedIn in the past to apply and attempts to do so again to update an existing job submission. Has a personalized username and password.
Details: Career Section detects that they are a returning user who set up a username and password in a prior session.
User Experience: They are presented with a login screen to use their username and password to sign in.
- Returning User - Used LinkedIn in the past to apply and attempts to do so again to update an existing job submission. Does not have a personalized username and password.
Details: Career Section recognizes that they are a returning user who did not set up a username and password in a prior session when they used Apply with LinkedIn, nor in response to the email they would have been sent which invited them to create a username and password.
User Experience: They are presented with a page with a Send Email button to re-send the email with an invitation to create a username and password.
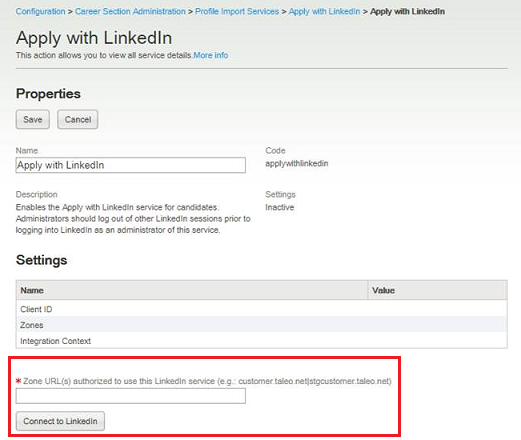
Enabling Apply with LinkedIn
An Administrator must be logged into a LinkedIn Administrator account prior to enabling the Apply with LinkedIn service in OTAC.
The Vertical Layout of the Login page must be enabled to use Apply with LinkedIn.
- Click Configuration.
- Click Administration in the Career Section section.
- Click Profile Import in the Integration section.
- Under Profile Import Services, click the Apply with LinkedIn (applywithlinkedin) link.
- Click Edit.
- At the bottom of the page, enter your zone in the Zone URL(s) authorized to use this LinkedIn Service field and then click Connect to LinkedIn.
LinkedIn returns and populates the Client ID and the Zone URLs in both http and https formats and a LinkedIn widget is presented.
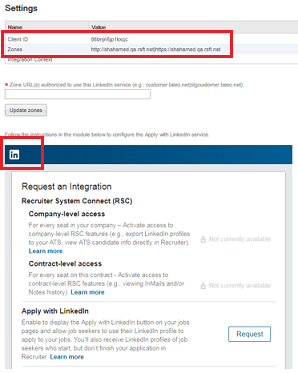
- Click the Request button on the LinkedIn widget.
This populates the last of the needed settings, the Integration Context, in the Profile Import Settings.
- Click Save.
- Click Activate.
Candidate Sign In Using Third-Party Credentials
Candidates can log into their Career Section account (candidate profile) using third-party credentials such as Yahoo and Google.
It is a Taleo best practice to activate this feature, especially in external Career Sections, because it is a great time-saver for candidates.
If the third-party credentials are not linked to a candidate profile in the Taleo customer's Career Sections, the system verifies if the email address from the third-party application is an email address or user name in a candidate profile in the customer's Career Sections.
If no duplicate email address is found, the system creates a candidate profile in the Career Section automatically, using the email address (from the third-party login process) as the user name and generating a password that conforms to the security policies configured for the Career Section. If a security question was enabled for candidate profiles, the candidate is asked to provide this information.
If a duplicate email address is found in a candidate profile, the system displays the login page from which candidates can log into their account in the Career Section. Candidates select one of two options:
If candidates select "Yes, I have a Candidate Profile and I would like to associate it to my single sign-on", the third-party account credentials are linked to the candidate profile in the Career Section. This option enables candidates to later sign into the Career Section directly (provided the candidates selected "Keep me logged in" or similar setting in the third-party product) by simply clicking the third-party icon on the Career Section.
Candidates can choose to create a candidate profile. Thereafter, the third-party account credentials are linked to the new candidate profile in the Career Section and the candidates can sign into the Career Section directly (provided the candidates selected "Keep me logged in" or similar setting in the third-party product) by simply clicking the third-party icon on the Career Section.
If a security question was enabled for candidate profiles, the candidate is asked to provide this information.
When signing into a Taleo customer's Career Section using third-party credentials, candidates must indicate their acceptance or refusal of a legal agreement stating that they are responsible for logging out of the third-party solution after they have finished. Logging out of third-party solutions when finished is particularly important when candidates are using a public computer. If candidates accept the legal agreement, their acknowledgment is recorded in the database. If they decline the agreement, the career section Sign-In page is displayed anew. The text of the legal agreement cannot be configured.
Configuration
| Setting | Location |
|---|---|
| Display the OpenID Option | Configuration > [Career Section] Administration > [Global Security] Internal Career Sections > [Sign In] Edit |
| Display the OpenID Option | Configuration > [Career Section] Administration > [Global Security] External Career Sections > [Sign In] Edit |
| Display the OpenID Option | Configuration > [Career Section] Administration > Career Sections > [Name] > Sign In > Edit |
Separate sets of labels are available for customers who want a single sign-on (SSO) login page for internal users and an SSO login page with third-party login options for external users. Taleo customers should contact their customer executive if they wish to have separate text for each type of candidate.
Table TexTool Labels for External and Internal Career Sections Using SSO
| Default Label | TexTool ID - External SSO | TexTool ID - Internal SSO |
|---|---|---|
| Welcome to the Candidate Profile Single Log-in Configuration |
2418132 | 355212 |
| Our records indicate that your email address is already linked to a candidate profile in our system. Please enter the username and password for the existing account, which will link your two accounts together and allow you to view your existing candidate profile. |
2419711 | 2412630 |
| Candidate Profile Creation |
2416824 | 355086 |
| Please specify a user name and password below. You can use this username and password in the future to access any of the {0} candidate portals. This username and password can also be used as a backup measure, in case your single log-in service provider is down. We suggest you use the same login information as for your SSO connection. | 2416761 | 355083 |
Table TexTool Labels for Third-party Credentials (in Career Sections Using SSO)
| Default Label | TexTool ID |
|---|---|
| Yes, I have a Candidate Profile and I would like to associate it to my single log-in. |
355203 |
| No, I don't have a Candidate Profile, but I would like to create one now. |
355200 |
Enabling Sign In Using Yahoo! Credentials
In the Code column, click http://www.yahoo.com.
Configure the following fields as indicated:
Open ID Version: OpenId 2.0
Service Provider Name: Yahoo
Icon: /iam/images/openid/i_medium_yahoo_logo.gif
Ensure that the Enabled and Trusted check boxes are selected
Display Order: 3
Open ID 2.0 Endpoint: https://me.yahoo.com/
Open ID Connect Redirect URI: https://YourZoneName.taleo.net/careersection/RedirectOpenIdConnectResponseServlet.jss
Click Save.
The Yahoo! sign-in icon will be displayed in all career sections in your zone and candidates who click the icon will be able to sign in to the career sections using their Yahoo! credentials.
Important Changes to the Sign in with Google Service
A change to the Sign in with Google service used by candidates to register and sign in to the Taleo Career Section requires your action to maintain continued service.
Google is replacing their existing Sign in with Google service with Sign in with Google+. Google requires vendors, such as Oracle, to replace the existing Sign in with Google authentication method with the newer Sign in with Google+ authentication method to avoid user disruption.
All customers are impacted by Google's changes. Customers who are currently using the Sign in with Google service must upgrade to Taleo 15A or 14B.3 or higher and undergo configuration steps to enable the Sign in with Google+ service prior to Google’s deprecation of the Sign in with Google service, scheduled for April 20, 2015. If the Sign in with Google+ service is not enabled, candidates using their Google credentials to sign into a customer's career section will lose the ability to access their accounts. Customers who are not currently using the Sign in with Google service but wish to allow candidates to login using Google credentials in the future must also upgrade to Taleo 15A or 14B.3 or higher and undergo the same configuration steps to enable the Sign in with Google+ service.
Instructions on how to configure Google+ feature are provided here: Setting Up Google+ Login if Upgrading to Release 14B.3, 15A or Higher .
Setting Up Google+ Login if Upgrading to Release 14B.3, 15A or Higher
It is recommended that you perform this configuration shortly after the zone is delivered to minimize the time during which candidates will be unable to access the career section using their Google credentials.
1. Access the Google Developers Console (https://console.developers.google.com). You may choose to use or create a company-specific Google account rather than a personal account.
2. Create a project for your zone.
Click Projects, then Create Project.
In the Project Name field, enter the project name that will be listed in the Google account.
In the Project ID field, enter a unique project identifier for the zone you are configuring.
Click Create.
3. Generate Google credentials.
In the left panel navigation, under APIs auth, select Credentials.
In the Auth section, click the Create new Client ID button.
Under Application Type, select Web application.
Click Configure consent screen button.
4. Complete the consent screen.
Click Consent screen.
In the email address field, enter the Google email address associated with the project you created as part of step 2.
In the Product Name field, select the product name to be displayed in the Google consent screen.
In the Homepage URL field, enter the home page of the zone being configured (https://zonename.taleo.net).
Click Save.
5. Create the Client ID.
Under Application Type, select Web application.
In the Authorized Javascript Origins field, enter the full URL of the zone DNS: https://zonename.taleo.net
-
In the Authorized Redirect URIs field, enter the URL below, substituting ‘zonename>’ with your zone. https://zonename.taleo.net/careersection/RedirectOpenIdConnectResponseServlet.jss
Click Create Client ID.
6. Note the results.
-
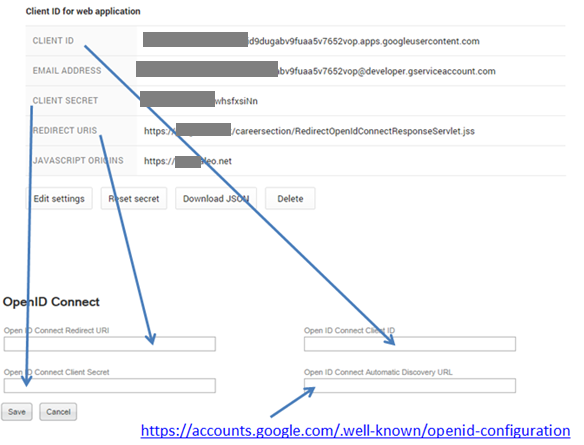
In the Client ID for web application page, take note of the following information:
Client ID
Client Secret
Redirect URLs
7. Configure Google credentials in Taleo.
In Taleo home page, click Configuration.
In the Configuration menu, click Administration under Career Section.
Under Global Security, click OpenID Authentication Configuration.
Click the Google provider link.
In the OpenID Version field, make sure that OpenID Connect Version is selected.
Select the Enabled option.
-
In the Open ID Connect Redirect URL field, enter the redirect URL. https://zonename.domain.com /careersection/RedirectOpenIdConnectResponseServlet.jss
In the Open ID Connect Client ID field, enter the Client ID provided by Google.
In the Open ID Connect Client Secret field, enter the Client Secret provided by Google
In the Open ID Connect Automatic Discovery URL field, enter the URL below. It is the same for all zones. https://accounts.google.com/.well-known/openid-configuration
Once the configuration is done, you should test the connectivity with Google using a testing candidate.
RSS Feed for Twitter
This feature allows Career Section visitors to post jobs to a Twitter account.
Career Section visitors have the ability to post recent jobs to a Twitter account based on various locations and job fields. For example, a visitor could want to post new marketing jobs available on Career Section to a Twitter account called “ABCMarketingJobs”.
TwitterFeed or any third party vendor that can feed RSS to Twitter accounts can be used.
Setting Up an RSS Feed for Twitter
A Twitter account must exist.
A TwitterFeed account (or an account with a 3rd party vendor that can feed RSS to a Twitter account) must exist.
RSS must be enabled on the Career Section.
Access a Career Section.
In a search page, select a location or job field.
Click the RSS icon.
Copy the URL located at the top of the page.
Access TwitterFeed or any third party vendor that can feed RSS to a Twitter account.
Start the Feed creation wizard.
Paste the URL in the RSS Field URL field.
Follow the on-screen instructions.
CS Job Search Tab Redirect to Sourcing
This feature provides Oracle Taleo Career Section (CS) customers, who want to use Sourcing (or another product) as the primary career site, the ability to redirect users from the CS Job Search tab back to Sourcing (or other product).
When a customer uses Sourcing as the Job Search front-end for Taleo Enterprise, and a candidate searches for jobs and finds one they are interested in applying to, the candidate is handed off to CS for the application flow. During the application process, if the candidate decides to search for more jobs and this feature is enabled, when the user clicks the Taleo Enterprise Job Search tab they are navigated back to Sourcing via the configured URL. They can then use Sourcing to search for more jobs.
Candidates using external URLs which point to a CS job search or job list page are also redirected to the configured Sourcing job search.
The settings to enable this feature are located in the Taleo Enterprise Configuration module under the Career Section Administration section. See the table below for the full navigation path and settings names.
Configuration
Configuration properties for this feature are listed in the table below.
| Property Name | Location |
|---|---|
| Alternate Job List URL text box | [TEE Career Section] Configuration > [Career Section] Administration > Career Sections(click career section name) [Properties] Edit |
| Apply Alternate Job List URL to Job Search Tab dropdown list (Yes or No) | [TEE Career Section] Configuration > [Career Section] Administration > Career Sections(click career section name) [Properties] Edit |
One of the CS portal pages for job search needs to be activated, to display the Job Search tab for a navigation link that can be redirected.
Job Description Redirect URL
Candidates coming from job boards or who click the link to a job in email correspondence can be redirected to Taleo Sourcing or other product (instead of a "standard" career section) and can view the job description there.
Career Section administrators can specify an alternate URL that will enable candidates coming from job boards or links in emails to view the job description hosted on Taleo Social Sourcing (or other product).
How does this work? Suppose the following URL is for a job description at an organization's career section is
https: //zone.taleo.net/careersection/cscode/jobdetail.ftl?job=1400123&lang=en&src=linkedin
In the previous URL, "cscode" is the code of the career section, "1400123" is the requisition number and "en" is the language (English) of the job description. Suppose also that the value of the new setting, Job Description redirect URL, is
https: //pm.referrals.selectminds.com/
The Taleo system would replace the "https://zone.taleo.net/careersection/CSCODE/" portion or the original with the value populated in the Job Description redirect URL setting. The two components would be combined to form
https: //pm.referrals.selectminds.com/job=1400123&lang=en&src=linkedin
This new URL enables Taleo Social Sourcing (or other product) to display the job description even though the candidate clicked the URL to the standard career section. Other customer systems using this feature will have to parse the concatenated URLs. If no language is specified (lang=), the system will use the base language of the requisition. If no source tracking is specified (src=), it is omitted in the concatenated URL. If the parameters are not in the correct order, the Taleo system will rearrange them into the correct order. This setting is unilingual because language management is managed by the URL.
Configuration
| User Type Permission Name | Location |
|---|---|
| Job Description redirect URL | Configuration > [Career Section] Administration > Career Sections > (click a career section name) > [Properties] Edit |
Ensure that the "downstream" system is able to parse the concatenated Taleo URLs.
Ensure that the "downstream" system has error handling for cases where the job is no longer posted in the system.
Jobs in Google Search Results
Google Structured Data for Indexing
Jobseekers searching for jobs on Google are able to find jobs in their Google search results. This feature adds markers in the page layout of the Career Section Job Description page which allows Google to index jobs. A block of code is included in the Job Description page which Google Search tools can index according to its formatting rules. This enables jobs posted on Career Sections to be indexed and searchable on Google Search.
Administrators enable this feature through mapping SmartOrg location levels to Google’s levels. The levels in the settings reflect the language and levels used in Google’s level concepts. When the feature is enabled, through location mapping, the system will automatically include those fields which are mapped in the code block.
The five settings represent location level concepts in Google’s data model and reside in the Career Section settings:
-
Google Structured Data Location Mapping Country – Optional for indexing
The location level configured will use the value from the requisition's location for indexing into Google's location structure of "Country". This setting is optional for the Google indexing feature.
-
Google Structured Data Location Mapping Locality – Mandatory for indexing
The location level configured will use the value from the requisition's location for indexing into Google's location structure of "Locality", which is the concept of City. When this setting is configured to "Not Specified", the Google indexing feature will be disabled.
-
Google Structured Data Location Mapping Postal Code – Optional for indexing
The location level configured will use the value from the requisition's location for indexing into Google's location structure of "Postal Code". This setting is optional for the Google indexing feature.
-
Google Structured Data Location Mapping Region – Mandatory for indexing
The location level configured will use the value from the requisition's location for indexing into Google's location structure of "Region", which is the concept of State/Province. When this setting is configured to "Not Specified", the Google indexing feature will be disabled.
-
Google Structured Data Location Mapping Street Address – Optional for indexing
The location level configured will use the value from the requisition's location for indexing into Google's location structure of "Street Address". This setting is optional for the Google indexing feature.
Fields which are optional in the Google Structured Data format are only included in the code block if they are:
-
Configured to be displayed on the Job Description page layout for that Career Section.
-
For locations, when the settings are mapped to SmartOrg locations.
-
This feature only applies to external career sections.
-
For locations, we only show the locations that are mapped in the five SmartOrg location settings.