2User Account Administration

User Account Administration

    User Account Management

      User Account

      A user account is created for each user who has access to Oracle Talent Acquisition Cloud (OTAC) applications on a regular or occasional basis.

      User accounts are defined by system administrators in SmartOrg. (Navigation: Configuration > [SmartOrg] Administration > [Users] User Accounts.) When creating a user account, system administrators define several elements.

      Element Description
      Personal Information

      Basic information such as first name, last name, title, employee ID. The Employee ID field is necessary in order to create the employee record when being fed over from an external system.

      Address information.

      Email information. The Email Address and Current logged-in user password fields are mandatory. If the zone uses Taleo login, the field Current logged-in user password is displayed and you must provide your credentials to modify the user’s password. If the zone is configured to use SSO, the field is not displayed.

      Phone information.

      Department information.

      Employee Information

      Used for Taleo Performance and Dynamic Approval Routing. Once information in this section is provided, both an employee and a candidate file are created for this user and this operation cannot be reverted. Note that only employees can be users of Taleo Performance. Fields to complete are:

      • Employee picture

      • Employee status

      • Employee manager

      • Organization, Location, Job Role

      Any time one of the following events occurs, an entry is added to the Employee History section: updates to employee status; updates to manager, new organization or location; new job role. An entry is recorded whether the change was made directly on the user account page, in Taleo Performance or through SmartOrg integration. The Employee History section is only displayed in Show mode.

      Account Information

      Contains information such as user name, password, external user identifier.

      This is where you can perform actions such as generating a new password, deactivating the user account, locking the user account, transferring and delegating tasks to another user.

      The Current logged-in user password field is mandatory. If the zone uses Taleo login, the field Current logged-in user password is displayed and you must provide your credentials to modify the user’s password. If the zone is configured to use SSO, the field is not displayed.

      User Types

      User types assigned to the user account. Each user account is assigned at least one user type for which a series of permissions are granted.

      User Groups

      User groups to which the user is part of.

      Coverage Areas

      Functional domains to which a user has access. For example, development plans and goal plans in Performance, requisitions and search in Recruiting. Functional domains are tied to Organizations, Locations and Job Fields. The configuration is not mandatory.

      General Preferences

      General preferences are assigned to each user account, for example, frequent collaborators and approvers, preferred content language.

        User Account General Preferences

        General preferences are assigned to each user account.

        A user's general preferences are defined by system administrators in the User Account feature available in SmartOrg. Most general preferences can be modified by users in Recruiting, in the My Setup feature, to fit their personal preferences.

        Certain user account general preferences are tied to a configuration setting. When this is the case, the setting sets a value for an entire zone, the user account general preference sets a value for a specific user, then that specific user can set his/her own personal preference (see table below).

        Note: It is important at deployment to review the defaults for the Default Recruiter and Default Hiring Manager user preferences in My Setup. By default, if there is no Default Recruiter or Default Hiring Manager specified for a user's preference, when the user creates a requisition he/she will be automatically listed as the "Recruiter" on the requisition. If a user has his/her name in the Default Hiring Manager field, this will take precedence and the user will have his/her name appear in the Hiring Manager field rather than the Recruiter field. For proper behavior of managers, it is recommended to specify this information automatically upon integration imports of manager User data.

        User Account General Preference

        (SmartOrg Administration > User Accounts > General Preferences)

        Setting

        (Configuration > Settings)

        User Personal Preference

        (Recruiting Center > Resources > My Setup)

        Comments
        Accessibility Features Accessibility Features Accessibility Features
        Candidate List Content Candidate List Content By default, shows only candidates that are in selection process (if relevant).
        Content Language Content Language Content Language
        Correspondence Language Correspondence Language Correspondence Language
        Country
        Default Configuration Profile Default Distance Unit
        Default Distance Unit Default Distance Unit Default Distance Unit
        Default Hiring Manager Default Hiring Manager See Note above.
        Default Recruiter Default Recruiter See Note above.
        Default Text Size Default Text Size Default Text Size
        Default Theme Default Theme Default Theme
        Default User Group Default Theme
        Display Question Details in Libraries Display Question Details in Libraries
        Enable eShare Email for Response Center Access Enable eShare Email for Response Center Access Enable eShare Email for Response Center Access
        Fax Notification Fax Notification Fax Notification Sends notifications to users by fax, not by email.
        Frequent Collaborators Frequent Collaborators
        Identifier Content Identifier Content
        Integration Profile Type Integration Profile Type
        Last Update Last Update
        Offer Frequent Approvers Frequent Approvers - Offer
        Place of Residence Place of Residence
        Preferred Non-Electronic Media Preferred Non-Electronic Media
        Requisition File Automatic Filling Requisition File Automatic Filling Indicates if the user will use the "automatic filling" option of the requisition file.
        Requisition Frequent Approvers Frequent Approvers - Requisition
        Selected Item Default Color Selected Item Default Color Selected Item Default Color
        Sorting Key Sorting Key
        SSO Preferred Application Language Allows users who log in using Single Sign-On to change their application language.
        Tab displayed when accessing a candidate file from a list Tab displayed when accessing a candidate file from a list
        Tab displayed when accessing a candidate file in navigation Tab displayed when accessing a candidate file in navigation
        Time Zone Time Zone Time Zone
        When managing by candidate When managing by candidate
        When managing by offer When managing by offer
        Workflow Event Notification Workflow Event Notification Workflow Event Notification Keeps the user informed of workflow events by email.
        Zip Code Used in search preferences, with the location (place of residence) and last update.

          User Account Status

          A user account is assigned a status.

          • Active: Only the name and description can be modified.

          • Inactive: Only the status can be modified. The only possibility is to go back to the Active status. Inactive users cannot be selected.

          • Deleted: The user account has been deleted.

          • Locked: The user account has been locked. The user cannot access Oracle Talent Acquisition Cloud (OTAC) products.

          • Expired:

            Employee Information

            Employee information is specific to Performance and to Recruiting for the Dynamic Approval Routing feature.

            Employee information is defined in the User Accounts feature available in SmartOrg.

            Certain fields in the Employee Information section are not mandatory. However, when fields in this section are populated, the Organization and Location fields become mandatory.

            If inserting a picture of the employee, the file limit is 20 KB and the only supported format is .jpg. Note that the uploaded file is cropped from the center to obtain a square (so make sure the picture is correctly centered) and it is then resized to 48 X 48 pixels which results in about 5 KB.

            An employee can have one of the following statuses:

            • New: New employees currently in an onboarding process.

            • Current: Default value.

            • Former Employee

            If no data is entered in the Job Role and Employee Status fields, default values are assigned automatically by the system, which are Employee and New respectively.

            Any time one of the following events occurs, an entry is added to the Employee History section: updates to employee status; updates to manager, new organization or location; new job role. An entry is recorded whether the change was made directly on the user account page, in Taleo Performance or through SmartOrg integration. The Employee History section is only displayed in Show mode.

              User Account - Other Configuration Tasks

                Creating a User Account

                The Manage user accounts user type permission is required.

                In the Employee Information section, certain fields are not mandatory. However, when fields in this section are populated, the Organization and Location fields become mandatory.

                In the Employee Information section, if no data is entered in the Employee Status and Job Role fields, these fields will be populated with their default values, Current and Employee.

                Configuration > [SmartOrg] > Administration > User Accounts

                1. Click Create.

                2. Specify the language in which you want to create the user account.

                3. Complete the fields in each section presented by the User Account Wizard.

                4. Click Next to navigate between sections.

                5. Click Finish.

                The user account appears in the User Accounts list.

                If the Employee Information section is completed, the user's profile is updated and the person is considered an "employee." Employees are used in Taleo Performance and the Dynamic Approval Routing.

                  Editing a User Account

                  The Manage user accounts user type permission is required.

                  Configuration > [SmartOrg] > Administration > User Accounts

                  1. Click a user account.

                  2. Click Edit next to the section you want to modify.

                  3. Make required changes.

                  4. Click Save.

                    Activating a User Account

                    The Manage user accounts user type permission is required.

                    Configuration > [SmartOrg] > Administration > User Accounts

                    1. Click a user account.

                    2. Click Activate in Account Information.

                    3. Click Yes.

                      Deactivating a User Account

                      The Manage user accounts user type permission is required.

                      You need to transfer the user's tasks to another user.

                      This feature may be useful for contract or temporary workers who assist on a assignment but who may leave and later return to an organization. When these workers return, you can reactivate the user account without having to reset their group association (because they are still tied to their user groups).

                      Configuration > [SmartOrg] > Administration > User Accounts

                      1. Click a user account.

                      2. Click Deactivate in Account Information.

                      3. Click Yes.

                        Deleting a User Account From the User Account Page

                        The Manage user accounts - Including HMRS fields user type permission is required..

                        Configuration > [SmartOrg] Administration > User Accounts

                        1. Locate the user in the User Accounts list.

                        2. Click Delete in the Actions column.

                        3. The action(s) you perform next vary depending on whether the user account is associated with an employee.

                          • If the user account is associated with an employee who owns requisitions, templates or folders, or was assigned yet uncompleted actions, or reports to a manager, or has pending tasks or work items, perform the steps in the wizard.

                          • If the user account is associated with someone for whom none of the previous conditions applies, click Yes.

                        Once deleted, the user account status is set to Deleted and the user account is deactivated.

                        To permanently delete employee data related to the employee, including employee metrics and all Taleo Performance data (as might be required in EMEA and other regions), see Employee Information Deletion Task.

                          Deleting the User Account of an Employee Using the Wizard

                          The Manage users - Including HMRS fields user type permission is required.

                          Configuration > [SmartOrg] Administration > User Accounts
                          1. Click the user account you want to disable.

                          2. In the Employee Information section, click Terminate.

                            The wizard is displayed.
                          3. Perform the steps in the wizard.

                          The user account has Deleted status and therefore is no longer displayed on the User Accounts page if Active is selected in the View field. The Employee Status value is changed to Former Employee.

                          To permanently delete employee data related to the employee, including employee metrics and all Taleo Performance data (as might be required in EMEA and other regions), see Employee Information Deletion Task.

                            Deleting the User Account of an Employee Manually

                            The Manage users - Including HMRS fields user type permission is required.

                            Configuration > [SmartOrg] Administration > User Accounts

                            1. Click user account you want to disable.

                            2. Edit the Employee Information section as necessary.

                            3. Set employee status to Former Employee.

                            4. Provide a termination date.

                            5. Remove the manager.

                            6. Transfer direct reports to another manager if applicable.

                            7. Transfer ownership of talent pools and positions to another user.

                            8. Transfer pending tasks to another user.

                            9. Return to the User Accounts page, locate the user account in the list and click the corresponding Delete in the Actions column.

                            10. Click Yes.

                            Once deleted, the user account status is Deleted and the user account is deactivated.

                            To permanently delete employee data related to the employee, including employee metrics and all Taleo Performance data (as might be required in EMEA and other regions), see Employee Information Deletion Task.

                              Assigning a User Type to a User Account

                              The Manage user accounts user type permission is required.

                              Configuration > [SmartOrg] > Administration > User Accounts

                              1. Click a user account.

                              2. Click Edit next to User Types.

                              3. Click Add next to User Types.

                              4. Select one or several user types.

                              5. Click Select.

                              The user types appear in the User Types list.

                                Removing a User Type Assigned to a User Account

                                The Manage user accounts user type permission is required.

                                Configuration > [SmartOrg] > Administration > User Accounts

                                1. Click a user account.

                                2. Click Edit next to User Types.

                                3. Click Remove next to the user type.

                                The user type is no longer displayed.

                                Assigning a user type to the user account.

                                  Associating a Configuration Profile to a User Account

                                  The Manage user accounts user type permission is required.

                                  Each user account is assigned one configuration profile. If no configuration profile is used, the default value of each setting is used.

                                  Changes made to a configuration profile are applied the next time a user linked to this configuration profile logs in.

                                  Configuration > [SmartOrg] > Administration > User Accounts

                                  1. Click a user account.

                                  2. Click Edit next to Account Information.

                                  3. Choose a configuration profile.

                                  4. Click Save.

                                    Assigning a Personal Coverage Area to a User Account

                                    The Manage user accounts permission is required.

                                    Configuration > [SmartOrg] Administration > User Accounts

                                    1. Click a user account.

                                    2. Click Create next to Personal Coverage Areas.

                                    3. Click Add next to Functional Domains.

                                    4. Select the desired functional domains then click Select.

                                    5. Click Save.

                                    6. If desired, specify organizations, locations and/or job fields for the coverage area.

                                      If no Organization-Location-Job Field structure is specified, then the coverage area will apply to all organizations, locations and job fields .

                                      Locking a User Account

                                      Allows a system administrator to lock a user account if, for example, the user was fired.

                                      The Manage user accounts user type permission is required.

                                      Configuration > [SmartOrg] > Administration > User Accounts

                                      1. Click a user account.

                                      2. Click Lock in Account Information.

                                      3. Click Yes.

                                      Deactivating the user account.

                                      Transferring the user's tasks.

                                        Unlocking a User Account

                                        Allows a system administrator to unlock a user account if, for example, a user enters an incorrect password too many times and the system locks the account.

                                        The Manage user accounts user type permission is required.

                                        Configuration > [SmartOrg] > Administration > User Accounts

                                        1. Click a user account.

                                        2. Click Unlock in Account Information.

                                        3. Click Yes.

                                          Generating a Password for a User Account

                                          Allows a system administrator to generate a password for a user if, for example, the user does not have his/her username handy or does not have an e-mail address to receive a temporary access code.

                                          The Manage user accounts user type permission is required.

                                          Configuration > [SmartOrg] > Administration > User Accounts

                                          1. Click a user account.

                                          2. Click Generate Password.

                                          3. Specify if you want to send the password in an e-mail. The user will be forced to change his/her password at next login.

                                          4. Enter your password in the Current logged-in user password field.

                                            If the zone uses Taleo login, the field is displayed and you must provide your credentials to modify the user’s password. If the zone is configured to use SSO, the field is not be displayed.

                                          5. Click Yes.

                                          The newly created password displayed on screen is masked with asterisks to protect the information from potential shoulder surfing attacks. You can momentarily select the "Show password" check box to view the password when it is considered safe to do so.

                                            Task Delegation

                                            Users may have the ability to delegate tasks to another user for a short preset period of time.

                                            Task delegation is useful during the time a user is on vacation or on a sick leave. When selecting a user (new owner) to whom tasks will be delegated, the following rules apply:

                                            • The new owner must have the same user type permissions (constraints not included) as the current owner.

                                            • The new owner must be at least in all the same groups as the current owner.

                                            • If the current owner is an eShare user (not a Taleo application user), the new owner must also be an eShare user.

                                            Note: When a user delegates tasks to an alternate user, if the user is a collaborator on a requisition, the alternate user must also be made collaborator on that requisition in order to perform the same actions as the user. The system does not automatically allow the delegated to interact as a collaborator on behalf of the original user.

                                              Delegating Tasks

                                              The Manage user accounts user type permission is required.

                                              For a user to be valid for delegation, the following rules must be applied:

                                              • The new owner must be different from the current owner.

                                              • It is always possible for a Recruiting Center user to be the new owner.

                                              Configuration [SmartOrg] > Administration > User Accounts

                                              1. Click a user account.

                                              2. Click Delegate in Account Information.

                                              3. Select a user.

                                              4. Select From and To dates.

                                              5. Click Save.

                                                Transferring Tasks

                                                The Manage user accounts user type permission is required.

                                                If the work items transferred belong to an employee, the designated user must also be an employee.

                                                The owner of the work items transferred must have the same user type as the designated user.

                                                Configuration > [SmartOrg] > Administration > User Accounts

                                                1. Click a user account.

                                                2. Click Transfer in Account Information.

                                                3. Select a user.

                                                4. Click Save.

                                                Tasks have been transferred permanently to another use.

                                                Deleting the user account.

                                                  User Type Management

                                                    User Type

                                                    A user type is composed of a set of permissions from multiple functional domains. These permissions provide access to various products and control what a user associated to the user type can do.

                                                    User types are centrally managed in SmartOrg for all products. Default user types are provided with the system. System administrators can also create new user types.

                                                    Users are assigned a user type and one user can be associated to several user types. For example, the Recruiter and Administrator user types for Recruiting, and the Manager user type for Performance.

                                                    Note:
                                                    • It is recommended to leave untouched the default user types.

                                                    • When creating a user type, it is recommended to duplicate an existing user type that has been validated in the zone already to work properly.

                                                    • If possible, use a single user type which combines all necessary permissions.

                                                      User Type Permission

                                                      User type permissions grant users access to specific features and contexts in a product or application.

                                                      Permissions are organized by functional domains (core products):

                                                      • Recruiting

                                                      • Integration

                                                      • Configuration

                                                      • Performance

                                                      • Grid

                                                      • Compensation

                                                      • Learning

                                                      • Reporting and Analytics

                                                      • Mobile

                                                      • Common

                                                      Functional domains are then separated into sub-domains. Depending on the amount of permissions in a sub-domain, permissions may be grouped into sections. When permissions are grouped into sections, system administrators can select the desired section in a drop-down list and quickly see the permissions grouped in that section.

                                                      Example of how permissions are organized in a functional domain
                                                      Functional Domain Recruiting
                                                      Sub-Domain Requisitions
                                                      Section Requisition Types
                                                      Permission Allow access to professional requisitions
                                                      Permission Allow access to hourly requisitions
                                                      Permission Allow access to campus requisitions
                                                      Permission Allow access to contingent requisitions
                                                      Permission Allow access to executive requisitions
                                                      Permission Allow access to pipeline - general requisitions
                                                      Permission Allow access to pipeline - executive requisitions

                                                      Functional domains are displayed in bold when permissions have been granted. Also, the Expand All button allows system administrators to see at a glance all domains, sub-domains and permissions granted to a user type.

                                                      If a system administrator modifies the permissions associated with a user type, the changes affect all users who have been assigned the user type.

                                                      For a list of default user types and their default permissions, refer to the document entitled Default User Types and Permissions.

                                                        Taleo Performance User Permissions

                                                        The security model used in Taleo Performance, represented by user type permissions, enables granular combinations of user access rights to be configured.

                                                        Access to Taleo Performance features are controlled by user type permissions. Permissions are organized by functional domains. For instance, Goal Plans, Performance Reviews and Employee Profiles are specific domains that can have unique user permissions configured for each user type. For each domain, the administrator can configure whether the user type will have read-only access (View) or full edit rights (Manage). With a goal plan a line manager may have View and Manage permissions, while with an employee profile the line manager may only be able to view it.

                                                        View and Manage permissions can be applied to the user’s own data, their direct reports, the employees of those direct reports, employees within the user’s coverage area and individuals the person mentors.

                                                        Attention: Having manage access does not imply view access, it must also be selected.

                                                        Permissions are cumulative and the most expansive access related to those permissions is applied to the actions of a user. For instance a user may be assigned a line-manager user type, which enables them to edit the goals of their direct reports only. In addition, the user may also be associated with a user type that provides view and manage permissions for goal plans associated with the same group as the user, which would then allow the user to edit non-direct report goals.

                                                        As user permissions are not confined to a specific user type or profile, access typically limited to admin users can be given to any user. The configuration setting Access administration tools enables any user to have access to HR Administration Tools from their home page. A typical user with Access administration tools enabled for a functional domain can only see employees they have access to, such as direct reports or those within a group, and do not have access to all employees like an admin user. For instance, a manager could have access to all direct reports from HR Administration Tools > Performance Reviews and be able to perform actions from there instead of having to access them individually from Manager Center > Performance Review.

                                                          Default User Types

                                                          Taleo Performance provides three basic user types that can be used as the foundation for configuring different user types for your implementation.

                                                          Depending on the requirements of your organization and the modules that are used, your may need to create a number of customized user types. Most users typically fall into an employee, manager, or administrator category and the default user types make it easy to create your customized user types accordingly.

                                                          Taleo Performance Default User Types
                                                          Name Code
                                                          HR Administrator PM_HR_ADMINISTRATOR
                                                          Manager PM_MANAGER
                                                          System Administrator PM_SYSTEM_ADMIN
                                                          Employee PM_EMPLOYEE
                                                            HR Administrator

                                                            The HR Admin user type provides access to HR Administration Tools, options for managing workflow processes of items like performance reviews and goal plans, as well as general administrative oversight into your Taleo Performance implementation.

                                                            The ability to use the HR Administration Tools is the most important part of the HR Administrator's permissions. These tools enable the administrator to troubleshoot approvals and restart them or complete them as necessary. This enables the administrator to act as the first line of support and potentially quickly resolves problems for managers and employees.

                                                            It is recommended that there be at least one individual assigned to the HR Administrator - Global role, to ensure that there is never an object (goal plan, succession plan, performance review, career plan) that does not have an HR Administrator responsible for it.

                                                              Manager

                                                              The manager user type gives managers access to work with information on their reports for all functionalities across Taleo Performance.

                                                              Managers can view and edit information for their employees in each of the modules. By default, managers have read and write access to their direct reports and subsequent levels of employees.

                                                                Employee

                                                                The employee user type is for those users in an organization, who do not have line manager or system admin duties and do not require access to HR Administration Tools or the Manager Center.

                                                                By default, an employee has read and write access to their own records and information, but not those of anyone else.

                                                                  Default User Type Permissions

                                                                  This table indicates which permissions the three default user types have, along with encompassing the domains and permissions a Taleo Performance user could reasonably be expected to need.

                                                                  Domain Permission Employee HR Administrator - Global Manager - Global
                                                                  Recruiting > Candidates General > Security level for external candidates (in edit mode) > confidential
                                                                  General > Security level for external candidates (in edit mode) > general Yes Yes Yes
                                                                  General > Security level for external candidates (in edit mode) > restricted
                                                                  General > Security level for external candidates (in view mode) > confidential
                                                                  General > Security level for external candidates (in view mode) > general Yes Yes Yes
                                                                  General > Security level for external candidates (in view mode) > restricted
                                                                  General > Security level for internal candidates (in edit mode) > confidential
                                                                  General > Security level for internal candidates (in edit mode) > general Yes Yes Yes
                                                                  General > Security level for internal candidates (in edit mode) > restricted
                                                                  General > Security level for internal candidates (in view mode) > confidential
                                                                  General > Security level for internal candidates (in view mode) > general Yes Yes Yes
                                                                  General > Security level for internal candidates (in view mode) > restricted
                                                                  Performance > Performance Reviews Access administration tools Yes
                                                                  Manage Yes
                                                                  Manage > If this user is one of the authors Yes Yes
                                                                  Manage > If this user is the direct manager Yes
                                                                  Manage > If this user is a higher level manager Yes
                                                                  Manage > If this user is a matrix manager
                                                                  Manage > If it belongs to the user's coverage area
                                                                  Manage > If this user is a mentor
                                                                  Manage > If it belongs to the user's coverage area or it is associated to a group to which this user belongs
                                                                  View Yes
                                                                  View > If this user is one of the authors Yes Yes
                                                                  View > If this user is the direct manager Yes
                                                                  View > If this user is a higher level manager Yes
                                                                  View > If this user is a matrix manager
                                                                  View > If it belongs to the user's coverage area
                                                                  View > If this user is a mentor
                                                                  View > If it belongs to the user's coverage area or it is associated to a group to which this user belongs
                                                                  Performance > Succession Plans Access administration tools Yes
                                                                  Allow nominations
                                                                  Manage Yes
                                                                  Manage > If this user is the direct manager of the related job position Yes
                                                                  Manage > If this user is a higher level manager of the job position manager Yes
                                                                  Manage > If this user is a higher level manager of the job position manager Yes
                                                                  Manage > If this user is a matrix manager
                                                                  Manage > If it belongs to the user's coverage area
                                                                  Manage > If it belongs to the user's coverage area or it is associated to a group to which this user belongs
                                                                  View Yes
                                                                  View > If this user is the direct manager of the related job position Yes
                                                                  View > If this user is a higher level manager of the job position manager Yes
                                                                  View > If this user is a higher level manager of the job position manager Yes
                                                                  View > If this user is a matrix manager
                                                                  View > If it belongs to the user's coverage area
                                                                  View > If it belongs to the user's coverage area or it is associated to a group to which this user belongs
                                                                  Performance > Goal Plans Access administration tools Yes
                                                                  Manage Yes
                                                                  Manage > If this user is one of the authors Yes Yes
                                                                  Manage > If this user is the direct manager Yes
                                                                  Manage > If this user is a higher level manager Yes
                                                                  Manage > If this user is a matrix manager
                                                                  Manage > If it belongs to the user's coverage area
                                                                  Manage > If this user is a mentor
                                                                  Manage > If it belongs to the user's coverage area or it is associated to a group to which this user belongs
                                                                  View Yes
                                                                  View > If this user is one of the authors Yes Yes
                                                                  View > If this user is the direct manager Yes
                                                                  View > If this user is a higher level manager Yes
                                                                  View > If this user is a matrix manager
                                                                  View > If it belongs to the user's coverage area
                                                                  View > If this user is a mentor
                                                                  View > If it belongs to the user's coverage area or it is associated to a group to which this user belongs
                                                                  Performance > Career Plans
                                                                  Manage Yes
                                                                  Manage > If this user is one of the authors Yes Yes
                                                                  Manage > If this user is the direct manager Yes
                                                                  Manage > If this user is a higher level manager Yes
                                                                  Manage > If this user is a matrix manager
                                                                  Manage > If it belongs to the user's coverage area
                                                                  Manage > If this user is a mentor
                                                                  Manage > If it belongs to the user's coverage area or it is associated to a group to which this user belongs
                                                                  View Yes
                                                                  View > If this user is one of the authors Yes Yes
                                                                  View > If this user is the direct manager Yes
                                                                  View > If this user is a higher level manager Yes
                                                                  View > If this user is a matrix manager
                                                                  View > If it belongs to the user's coverage area
                                                                  View > If this user is a mentor
                                                                  View > If it belongs to the user's coverage area or it is associated to a group to which this user belongs
                                                                  Performance > Development Plans Access administration tools Yes
                                                                  Manage Yes
                                                                  Manage > If this user is the owner Yes Yes
                                                                  Manage > If this user is the direct manager Yes
                                                                  Manage > If this user is the high level manager Yes
                                                                  Manage > If this user is a matrix manager
                                                                  Manage > If it belongs to the user's coverage area
                                                                  Manage > If this user is a mentor
                                                                  Manage > If it belongs to the user's coverage area or it is associated to a group to which this user belongs
                                                                  View Yes
                                                                  View > If this user is the owner Yes Yes
                                                                  View > If this user is the direct manager Yes
                                                                  View > If this user is a higher level manager Yes
                                                                  View > If this user is a matrix manager
                                                                  View > If it belongs to the user's coverage area
                                                                  View > If this user is a mentor
                                                                  View > If it belongs to the user's coverage area or it is associated to a group to which this user belongs
                                                                  Performance > Employee Metrics Manage Yes
                                                                  Manage > If this user is the owner
                                                                  Manage > If this user is the direct manager Yes
                                                                  Manage > If this user is the high level manager Yes
                                                                  Manage > If this user is a matrix manager
                                                                  Manage > If it belongs to the user's coverage area
                                                                  Manage > If this user is a mentor
                                                                  Manage > If it belongs to the user's coverage area or it is associated to a group to which this user belongs
                                                                  View Yes
                                                                  View > If this user is the owner
                                                                  View > If this user is the direct manager Yes
                                                                  View > If this user is a higher level manager Yes
                                                                  View > If this user is a matrix manager
                                                                  View > If it belongs to the user's coverage area
                                                                  View > If this user is a mentor
                                                                  View > If it belongs to the user's coverage area or it is associated to a group to which this user belongs
                                                                  Performance > Team Management Access Yes
                                                                  Access > If this user is the direct manager Yes
                                                                  Access > If this user is a higher level manager Yes
                                                                  Access > If it belongs to the user's coverage area
                                                                  Access > If it belongs to the user's coverage area or it is associated to a group to which this user belongs
                                                                  Access Talent Browser Yes Yes Yes
                                                                  Access administration tools Yes
                                                                  Access centralized search Yes Yes
                                                                  Access Reporting
                                                                  Access Manage Matrix Manager Yes
                                                                  Performance > Administration Access application in maintenance mode
                                                                  Allow system administration
                                                                  Performance > Employee Profile Manage Yes Yes Yes
                                                                  Manage > If this user is the owner Yes Yes
                                                                  Manage > If this user is the direct manager
                                                                  Manage > If this user is the high level manager
                                                                  Manage > If this user is a matrix manager
                                                                  Manage > If this user is a mentor
                                                                  Manage > If it belongs to the user's coverage area
                                                                  Manage > If it belongs to the user's coverage area or it is associated to a group to which this user belongs
                                                                  View Yes Yes Yes
                                                                  View > If this user is the owner Yes Yes
                                                                  View > If this user is the direct manager Yes
                                                                  View > If this user is the high level manager Yes
                                                                  View > If this user is a matrix manager
                                                                  View > If this user is a mentor
                                                                  View > If it belongs to the user's coverage area
                                                                  View > If it belongs to the user's coverage area or it is associated to a group to which this user belongs
                                                                  Performance > Business Goals Manage Yes
                                                                  View Yes
                                                                  Grid > Knowledge Exchange Access Knowledge Exchange Yes
                                                                  Manage Knowledge Exchange Yes
                                                                  Grid > Solution Exchange Access Solution Exchange Yes
                                                                  Manage Solution Exchange Yes
                                                                  Compensation > Compensation Data Manage compensation history
                                                                  View compensation history
                                                                  View compensation history > If this user is the owner
                                                                  View compensation history > If this user is the direct manager
                                                                  View compensation history > If this user is a higher level manager
                                                                  View compensation history > If it belongs to the user's coverage area
                                                                  View compensation history > If it belongs to the user's coverage area or it is associated to a group to which this user belongs
                                                                  myTaleo > Administration Access the administration section
                                                                  myTaleo > Dashboards Access default dashboard
                                                                  Common > Pools Manage Yes Yes
                                                                  Manage > If this user is the pool owner or a pool user
                                                                  Manage > Allow creating and deleting pools
                                                                  View Yes Yes
                                                                  View > If this user is the pool owner or a pool user
                                                                  Learning > Global Learning Access Learn
                                                                  Learning > Learn Access Learn as a default user Yes
                                                                  Access Learn as a supervisor
                                                                  Access Learn as an administrator
                                                                  Access Learn as user 1
                                                                  Access Learn as user 2
                                                                  Access Learn as user 3

                                                                    Configuring User Types

                                                                      Creating a User Type

                                                                      When creating a user type, it is recommended to duplicate an existing user type that has been validated in the zone already to work properly.

                                                                      The Manage user types user type permission is required.

                                                                      Configuration > [SmartOrg] Administration > User Types

                                                                      1. Click Create.

                                                                      2. Enter a code and a name.

                                                                      3. Enter a description to clarify the intent of the user type.

                                                                        The description is displayed in the user type selector and listed under the user account definition page.

                                                                      4. Select Active from the Status list so it can be added to user accounts and groups, otherwise select Inactive.

                                                                      5. Click Save.

                                                                      6. Click the Arrow icon beside the functional domain you want to configure and click Edit to display the user type permissions.

                                                                      7. Select the required view and manage permissions and click Save.

                                                                        Changing a User Type Status

                                                                        The Manage user types user type permission is required.

                                                                        Configuration > [SmartOrg] Administration > User Types
                                                                        1. Click a user type.

                                                                        2. Click Edit next to Properties.

                                                                        3. Select either Active or Inactive from the Status list.

                                                                        4. Click Save.

                                                                        If changed to Active, the user type can now be associated with a user account or group and the status Active appears in the User Types list. If changed to Inactive, the user type cannot be associated to any new user accounts or groups, but will remain valid for those it is already associated with.

                                                                          Deactivating a User Type

                                                                          The Manage user types user type permission is required.

                                                                          The user type must have the Active status.

                                                                          Configuration > [SmartOrg] Administration > User Types
                                                                          1. Click a user type.

                                                                          2. Click Edit next to Properties.

                                                                          3. Select Inactive in the Status field.

                                                                          4. Click Save.

                                                                          The status Draft appears in the User Types list.

                                                                            Duplicating a User Type

                                                                            The Manage user types user type permission is required.

                                                                            Configuration > [SmartOrg] Administration > User Types

                                                                            1. Locate the user type you want to duplicate.

                                                                            2. From the Actions column, click Duplicate for the user type.

                                                                            3. Change the code, name and description as required.

                                                                              When you have more than one language, after entering the name for the initial language, click Refresh and select the next language from the list and click Refresh again. Enter the required value for that language and then choose the next language, click Refresh and repeat the process.
                                                                            4. Click Save.

                                                                            On the user type definition page, your actions are displayed in the History section. On the User Types page, the new user type is displayed and its status is Active.

                                                                              Editing User Type Properties

                                                                              The Manage user types user type permission is required.

                                                                              Configuration > [SmartOrg] Administration > User Types

                                                                              1. Click a user type.

                                                                              2. Click Edit next to Properties.

                                                                              3. Make the required changes to the code, name and description.

                                                                              4. Click Save.

                                                                                Dissociating All Users from a User Type

                                                                                The Manage user types user type permission is required.

                                                                                Configuration > [SmartOrg] Administration > User Accounts

                                                                                1. In the Refine by field, select User Type.

                                                                                2. In the adjacent field, enter a word or part of a word found in the name of the user type you want to delete.

                                                                                3. Click Refresh.

                                                                                4. Click a name displayed in the User Accounts list.

                                                                                5. Click Edit next to User Types.

                                                                                6. Locate the user type you want to remove and click Remove in the Actions list.

                                                                                7. Click Save.

                                                                                8. Repeat steps 4 to 7 for each user who has the user type you want to delete.

                                                                                The user type is no longer displayed in the User Types list.

                                                                                  Granting a User Type Permission

                                                                                  The Manage user types user type permission is required.

                                                                                  Configuration > [SmartOrg] Administration > User Types

                                                                                  1. Click a user type.

                                                                                  2. Click a functional domain.

                                                                                  3. Click Edit next to the sub-domain.

                                                                                  4. Select the permissions you want to grant.

                                                                                  5. Click Save.

                                                                                  All users assigned with this user type now have the selected permissions.

                                                                                    Revoking a User Type Permission

                                                                                    The Manage user types user type permission is required.

                                                                                    Configuration > [SmartOrg] Administration > User Types
                                                                                    1. Select a user type.

                                                                                    2. Click the functional domain (and in some cases the sub-domain) containing the permission.

                                                                                    3. Click Edit next to the section containing the permission you want to revoke.

                                                                                    4. Clear the check box next to the permission you want to revoke.

                                                                                    5. Click Save.

                                                                                    On the user type definition page, your actions are displayed in the History section. The users who have the user type will no longer have the permissions you revoked.

                                                                                      User Group Management

                                                                                        User Group

                                                                                        A user group is a group of people who need to have access to the same information for example, a group of people who works on the same requisitions.

                                                                                        User groups are used in Recruiting, Taleo Performance, and Reporting and Analytics.

                                                                                        The creation of groups typically simplifies the work of an organization because each group has access only to the information that its members need.

                                                                                        One group, called the Main Group, is created by default for all users within an organization. The Main Group's Organization- Location-Job Field structure cannot be modified.

                                                                                        The creation of user groups by system administrators involves:

                                                                                        • Defining a name for the group.

                                                                                        • Selecting users belonging to the group.

                                                                                        • Defining the coverage areas of the group to specify the product areas to which the group has access, that is selecting domains and sub-domains and linking them to organizations, locations and job fields.

                                                                                        For Reporting, group creation also involves:

                                                                                        • Creating a folder in Business Objects.

                                                                                        • Selecting groups that have the reporting domain tied to it to define who gets access to the reports within that folder.

                                                                                        Special rules regarding user groups:

                                                                                        • Users should be removed from the Main Group after being added to a specific group.

                                                                                        • To gain access to elements associated to a particular group, users must belong to that group.

                                                                                        • It is possible to delete a group only if all its members belong to at least one other group.

                                                                                        • It is not possible to delete a group if a user is associated to this group.

                                                                                        • It is not possible to delete a group if elements (such as requisitions) remain associated to the group.

                                                                                        • If a user is removed from a group and the user owns one or more element (such as requisitions) associated with this group, the elements will appear in red in the system (for example, in the requisition list) to indicate that there is a conflict.

                                                                                        System administrators have the ability to assign a default user group to newly created users. The Default User Groups setting, available under the General Configuration settings, can be used to indicate which user group new users will be automatically assigned. The default user group is automatically assigned only when no user group was manually assigned during the user account creation process. When the setting value is left empty, no default user group is assigned when creating new users. See Assigning a Default User Group.

                                                                                          User Group Management

                                                                                          User groups are used in Recruiting, Taleo Performance and Reporting and Analytics.

                                                                                          • Recruiting Center

                                                                                            • It is possible to create a user and to not link the user to a user group. In Recruiting Center, it is recommended that users belong to at least one user group if they are a recruiting user who creates, approves or manages requisitions. If a user is authorized to search, the user will be able to view candidates of all Organization-Location-Job Field structures unless a user group using the recruiting search domain.

                                                                                            • Search and requisition are independent domains that can be individually applied to a user group.

                                                                                            • If users do not belong to a group linked to the Requisition domain, and they are a Recruiting user, the user will only see requisitions they own or collaborate on or without restriction (All) if so authorized. The user will not see information in or by group, even if their user type permission state otherwise – since there are no groups linked to the user to view. In addition, the user will not see information in or by group, even if their user type permission state otherwise – since there are no groups linked to the user to view.

                                                                                          • Taleo Performance

                                                                                            • Users will only see the data of the domain that belongs to their group, provided they have the proper user type permission.

                                                                                            • It is possible to create a user and not link the user to a group for a given domain. For all sub-domains (except for the Employee Succession Search) users will not be able to see information in or by group, even if their user type permission state otherwise – since there are no groups linked to the user to view. If a user is authorized to search (sub-domain Employee Succession Search), the user will be able to view employees of all Organization-Location-Job Field structures.

                                                                                          • Reporting and Analytics

                                                                                            • The reporting administrator creates documents within the reporting and analytics environment. These include Web Intelligence Documents, Analytics, Advanced Analytics, Single Dashboards, Tiered Dashboards, Hyperlinks, Desktop Intelligence Documents and imported files (PDF, XLS, DOC, TXT, etc…)

                                                                                            • Each reporting document is filed into a "folder."

                                                                                            • Each reporting folder can be linked to one or more reporting groups containing the reporting domain.

                                                                                            • Users can belong to one or more groups that have the reporting domain associated, Reporting Administrator ties these groups to reporting folders where reporting and analytic documents are filed.

                                                                                            • Users only have access to the documents included in the folders to which their group(s) are linked. With the exception of reporting administrators, if a user has no groups linked to a reporting domain, he/she will not be able to see any reports.

                                                                                            • When generating a report data presented is still derived by user's access in that application (Recruiting Center or Performance)

                                                                                            Creating a User Group

                                                                                            The Manage groups user type permission is required.

                                                                                            Configuration > [SmartOrg] Administration > User Groups

                                                                                            1. Click Create

                                                                                            2. Complete the New Group page.

                                                                                            3. If your organization activated more than one language, enter values for each of the other languages, being sure to click Refresh after you select a new language and before you enter the values for that language.

                                                                                            4. Click Save.

                                                                                            The system displays the user group. If you display the list of user groups, the new user group appears there.

                                                                                              Adding a User to a User Group

                                                                                              The Manage groups user type permission is required.

                                                                                              You must create a user group before you can add users to it.

                                                                                              Configuration > [SmartOrg] Administration > User Groups

                                                                                              1. Click a user group.

                                                                                              2. Click Add next to Users.

                                                                                              3. Click the check box next to each user you want to add to the user group.

                                                                                              4. Click Select.

                                                                                              The user is displayed in the Users list.

                                                                                                Removing a User from a User Group

                                                                                                The Manage groups user type permission is required.

                                                                                                Configuration > [SmartOrg] Administration > User Groups

                                                                                                1. Click a user group.

                                                                                                2. Click Show next to Users.

                                                                                                3. In the Actions column, click Remove next to the user you want to remove.

                                                                                                The user is no longer displayed in the Users list. The History section is not updated automatically but if you move to a different page and then display the user group definition page anew, the action you performed is displayed in the History section.

                                                                                                If you remove a user from a group and the user owns one or more requisitions associated with this group, the requisitions will appear in red in the Requisitions list to indicate that there is a conflict. To revert the situation, re-enter the owner of the requisitions in the group, reassign each requisition owned by this user to a new user who belongs to the same group, reassign each requisition owned by this user to a group to which the owner used to belong.

                                                                                                  Deleting a User Group

                                                                                                  The Manage groups user type permission is required.

                                                                                                  It is not possible to delete a group if requisitions or templates remain associated to the group.

                                                                                                  Configuration > (SmartOrg) Administration > User Groups
                                                                                                  1. In the User Groups list, locate the user group you want to delete.

                                                                                                  2. Click Delete in the Actions column.

                                                                                                  3. Click Yes.

                                                                                                  The user group is removed from the User Groups list.

                                                                                                    Assigning a Default User Group

                                                                                                    Configuration > [General Configuration] Settings
                                                                                                    1. In the Refine by field, select Name.

                                                                                                    2. Type Default User Group in the field.

                                                                                                    3. Click the setting name.

                                                                                                    4. Click Edit.

                                                                                                    5. Click Add.

                                                                                                    6. Select one or multiple user groups.

                                                                                                    7. Click Select.

                                                                                                    8. Click Done.

                                                                                                    When creating new users, the selected user groups will be assigned if no user group was manually assigned during the user account creation process.

                                                                                                      Coverage Area

                                                                                                      A coverage area is a combination of functional domains, Organizations, Locations and Job Fields that together determine the scope of information available to a specific user group.

                                                                                                      The coverage areas of a group define exactly what kind of information is available to the group's members. A coverage area typically contains domains (and perhaps subdomains), which are core products, and Organizations, Locations and Job Fields. The combination of domains, Organizations, Locations and Job Fields associated with a coverage area determine the scope of information available to the group for that area.

                                                                                                        Adding a Coverage Area to a User Group

                                                                                                        Allows the system administrator to limit the information available to a user group by specifying core products and Organizations, Locations and Job Fields.

                                                                                                        The Manage groups user type permission is required.

                                                                                                        You must create a user group before you can add coverage areas to it.

                                                                                                        Configuration > [SmartOrg] Administration > User Groups

                                                                                                        1. Click a user group.

                                                                                                        2. Click Create next to Coverage Areas.

                                                                                                        3. Click Add next to Functional Domains.

                                                                                                        4. Select the domain/subdomain you want to make available to the user group.

                                                                                                        5. Click Select.

                                                                                                        6. Click Save.

                                                                                                        The domains you selected are displayed in the Functional Domains section of the Coverage Area page.

                                                                                                          Removing a Coverage Area from a User Group

                                                                                                          Allows a system administrator to reduce the kinds of information currently available to the user group.

                                                                                                          The Manage groups user type permission is required.

                                                                                                          Configuration > [SmartOrg] Administration > User Groups

                                                                                                          1. Click a user group.

                                                                                                          2. Click Show next to Coverage Areas.

                                                                                                          3. Click Remove next to the coverage area you want to remove.

                                                                                                          4. Click Yes.

                                                                                                          The coverage area is no longer displayed in the Coverage Areas list. The History section is not updated automatically but if you move to a different page and then display the user group definition page anew, the action you performed is displayed in the History section.

                                                                                                            Adding Organizations, Locations and Job Fields to a Coverage Area

                                                                                                            Allows the system administrator to further define which information will be available to members of the user group according to organizations, locations and job fields.

                                                                                                            The Manage groups user type permission is required.

                                                                                                            You must add functional domains to a coverage area before you can add Organization, Location and Job Field values.

                                                                                                            Configuration > [SmartOrg] Administration > User Groups

                                                                                                            1. On a Coverage Area page, click Add next to the type of item you want to add: Organizations, Locations or Job Fields.

                                                                                                            2. After the system displays the corresponding selector page, click the check box next to each item you want to add to the coverage area.

                                                                                                            3. Click Select.

                                                                                                            4. You can repeat the previous steps if you added Organization elements, for example, and you also want to add Location and Job Field elements.

                                                                                                            The Organization, Location and Job Field elements you added are displayed in the corresponding sections of the Coverage Area page.

                                                                                                              Removing Organizations, Locations and Job Fields from a Coverage Area

                                                                                                              The Manage groups user type permission is required.

                                                                                                              Configuration > [SmartOrg] Administration > User Groups

                                                                                                              1. Click a user group.

                                                                                                              2. Click Show next to Coverage Areas.

                                                                                                              3. Click a coverage area.

                                                                                                              4. On the Coverage Area page, click Remove next to the item you want to remove.

                                                                                                              The Organization, Location or Job Field element you removed is not longer displayed in the corresponding section of the Coverage Area page.

                                                                                                                Reducing the Scope of a Coverage Area

                                                                                                                You can remove functional domains, Organizations, Locations and Job Fields if you want to reduce the scope of a coverage area.

                                                                                                                Configuration > (SmartOrg) Administration > User Groups

                                                                                                                1. Click a user group.

                                                                                                                2. Click Show next to Coverage Areas.

                                                                                                                3. Click the coverage area you want to modify.

                                                                                                                4. You can perform any of the following steps.

                                                                                                                  • To remove a functional domain, Organization, Location or Job Field, click the corresponding Remove in the Actions column.

                                                                                                                  • To remove all Organizations, all Locations or all Job Fields, click Remove All next to the corresponding item.

                                                                                                                The items you removed are no longer displayed the Coverage Areas page. The actions you performed are displayed in the History section of the user group definition page.

                                                                                                                  Configuration Profiles

                                                                                                                    Configuration Profile

                                                                                                                    A configuration profile is a set of settings which control how the application behaves for a specific set of users to better fit the user experience.

                                                                                                                    It is through the configuration profile that different product behaviors can be achieved such as a streamlined manager product experience vs. a more robust recruiter product experience. Users may have the same set of permissions which grant access to specific features, but how a user is presented access to the features is then further controlled by the configuration profile designation.

                                                                                                                    In addition to user types (which define user access to specific features via permissions and product access) and user groups (which further define access to elements and functions based on Organization-Location-Job Field, users are assigned a configuration profile which defines what they will see in the Recruiting Center.

                                                                                                                    Configuration profiles are created in SmartOrg. Once created, a configuration profile is assigned to Recruiting Center users via their user account. Therefore, depending on the user signing into the application, elements displayed to the user will vary depending on the configuration profile associated to the user.

                                                                                                                    Three default configuration profiles are provided:

                                                                                                                    • Recruiter

                                                                                                                    • Hiring Manager

                                                                                                                    • Hourly Manager

                                                                                                                    System administrators can edit the settings for these default configuration profiles and can also create new configuration profiles. Changes made to a configuration profile are applied the next time a user linked to this configuration profile logs in. For a list of configuration profile settings, see Configuration Profile Settings.

                                                                                                                    System administrators have the ability to assign a default configuration profile to newly created users. The Default Configuration Profile setting, available under the General Configuration settings, can be used to indicate which configuration profile new users will be automatically assigned. The default configuration profile is automatically assigned only when no configuration profile was manually assigned during the user account creation process. When the setting value is left empty, no default configuration profile is assigned when creating new users. See Assigning a Default Configuration Profile.

                                                                                                                      Configuration Profile Settings

                                                                                                                      Configuration Profile Setting Description
                                                                                                                      About Link in Auxiliary Menu Display the about link in the auxiliary menu.
                                                                                                                      Advanced Search "Save Query" Button Displays the "Save Query" button in the advanced search page.
                                                                                                                      Advanced Search Links Displays the advanced search links.
                                                                                                                      Advanced Search Toolbar Displays the advanced search toolbar.
                                                                                                                      Auxiliary Navigation Bar Displays the auxiliary navigation bar.
                                                                                                                      Candidate File Creation Indicates the files used to create a candidate.
                                                                                                                      Candidate List Format Candidate list format available for users having this configuration profile.
                                                                                                                      Center Stage - Separator Line Display a line between the Welcome title and the content of the main center stage (this line helps to help distinguish the title from the body portion of the page).
                                                                                                                      Center Stage - Welcome Title Display the Welcome message when users first log in and are presented the Recruiting center stage.
                                                                                                                      Center Stage Configuration Indicates the center stage configuration.
                                                                                                                      Center Stage Footer Text Indicates if the center stage footer is displayed.
                                                                                                                      Communication Channel - Custom Link Contains the link text towards the custom page in the communication channel.
                                                                                                                      Communication Channel - Custom Link Tooltip Contains the tooltip text for the link towards the custom page in the communication channel.
                                                                                                                      Communication Channel - Custom Link URL Indicates the URL of the custom page in the communication channel.
                                                                                                                      Communication Channel - Custom Text Contains the text to be displayed in the custom communication channel.
                                                                                                                      Communication Channel - Custom Title Contains the title to be displayed in the custom communication channel.
                                                                                                                      Communication Channel - HTML Custom URL Indicates the URL of the HTML custom page in the communication channel.
                                                                                                                      Communication Channel Mode Indicates the "Communications" channel mode to be used.
                                                                                                                      Core Navigation Bar Displays the core navigation bar.
                                                                                                                      Customer Support Section Enable the customer support section.
                                                                                                                      Customer Support Text Contains the text to be displayed in the customer support section.
                                                                                                                      Default "Advanced Search" Field Configuration Displays the selection of fields that are available to the user when performing an advanced search.
                                                                                                                      eLearning Section URL Indicates the target URL to the eLearning section.
                                                                                                                      Oracle Support Link in Auxiliary Menu Display the Support link in the auxiliary menu.
                                                                                                                      Recruiting Header Text Displays the Recruiting header text.
                                                                                                                      Release Notes Display the release note information when accessing the application, according to the user's profile.
                                                                                                                      Requisition File Automatic Filling I want to use the "automatic filling" option of the requisition file.
                                                                                                                      Requisition File Creation Indicates the files used to create a requisition.
                                                                                                                      Requisition List Format Requisition list format available for users having this configuration profile.
                                                                                                                      Search Widget Displays the search widget.

                                                                                                                      Default Value for the Show Information Filter

                                                                                                                      Determines the default value of the Show Information filter which controls the requisitions displayed in the Requisitions list and center stage channels.

                                                                                                                      Possible values are: Requisitions I own (default); Requisitions I collaborate on; Requisitions I own or collaborate on; Requisition in my coverage area, I own or collaborate on; All requisitions.
                                                                                                                      Show information for Filter Visibility Indicates whether the context filter control is displayed on the Recruiting requisition list and homepage.
                                                                                                                      Training Section URL Indicates the target URL to the training section (Oracle University). The URL is http://education.oracle.com/pls/web_prod-plq-dad/ ou_product_category.getPage?p_cat_id=356.
                                                                                                                      View or Edit Requisition File File used for viewing or editing a requisition.
                                                                                                                      Welcome Center Content Indicates which customized content and layout will be used in the Welcome Center.

                                                                                                                        Creating a Configuration Profile

                                                                                                                        The Manage configuration profile user type permission is required.

                                                                                                                        Configuration > [SmartOrg] Administration > [Users] Configuration Profiles

                                                                                                                        1. Click Create.

                                                                                                                        2. Provide a code and a name.

                                                                                                                        3. Click Save.

                                                                                                                        4. Click configuration profile settings and set them as desired.

                                                                                                                        5. Click Save.

                                                                                                                          Activating a Configuration Profile

                                                                                                                          A configuration profile must have the Draft or Deactivated status.

                                                                                                                          The Manage configuration profile user type permission is required.

                                                                                                                          Configuration > [SmartOrg] Administration > [Users] Configuration Profiles

                                                                                                                          1. Click a configuration profile.

                                                                                                                          2. Click Activate.

                                                                                                                            Associating a Configuration Profile to a User Account

                                                                                                                            Configuration > [SmartOrg] Administration > [Users] User Accounts

                                                                                                                            1. Click a user account.

                                                                                                                            2. Click Edit next to Account Information.

                                                                                                                            3. Select a configuration profile.

                                                                                                                            4. Click Save.

                                                                                                                              Deactivating a Configuration Profile

                                                                                                                              A configuration profile must be activated.

                                                                                                                              The Manage configuration profile user type permission is required.

                                                                                                                              Configuration > [SmartOrg] Administration > [Users] Configuration Profiles

                                                                                                                              1. Click a configuration profile.

                                                                                                                              2. Click Deactivate.

                                                                                                                                Deleting a Configuration Profile

                                                                                                                                The Manage configuration profile user type permission is required.

                                                                                                                                The configuration profile must have the Draft or Inactive status.

                                                                                                                                Configuration > [SmartOrg] Administration > [Users] Configuration Profiles

                                                                                                                                1. Click Delete next to the configuration profile.

                                                                                                                                2. Click Yes.

                                                                                                                                  Assigning a Default Configuration Profile

                                                                                                                                  Configuration > [General Configuration] Settings
                                                                                                                                  1. In the Refine by field, select Name.

                                                                                                                                  2. Type Default Configuration Profile in the field.

                                                                                                                                  3. Click the setting name.

                                                                                                                                  4. Click Edit.

                                                                                                                                  5. Click Search.

                                                                                                                                  6. Select a configuration profile.

                                                                                                                                  7. Click Select.

                                                                                                                                  8. Click Save.

                                                                                                                                  When creating new users, the selected configuration profile will be assigned if no configuration profile was manually assigned during the user account creation process.

                                                                                                                                    Transferring an Employee's User Account Information

                                                                                                                                    Transferring an employee's user account information in SmartOrg allows you to transfer all the tasks and objects owned by the user/employee and the related employees to a designated user.

                                                                                                                                    Typically, transferring a user having Taleo Performance roles should be preceded by an organization chart and position update.

                                                                                                                                    If the transferred user is also an employee, the designated user must also be an employee.

                                                                                                                                    The transferred user must have the same roles and product accesses as the designated user.

                                                                                                                                    Configuration > [SmartOrg] Administration > [Users] User Accounts
                                                                                                                                    1. In the User Accounts page, select the user for which you want to perform a transfer.

                                                                                                                                    2. In the User Account page of the selected user, click Transfer next to Account Information.

                                                                                                                                    3. In the Transfer pop-up window, specify the name of the designated user of the transfer by selecting the right user in the User Selector window.

                                                                                                                                    4. Click Save.

                                                                                                                                    The following tasks, if existing, will be transferred to the designated user:

                                                                                                                                    • Request to complete a performance review

                                                                                                                                    • Request to approve a performance review

                                                                                                                                    • Request to approve a succession plan

                                                                                                                                    • Request to approve a succession pool

                                                                                                                                    • Request to approve a goal plan

                                                                                                                                      Employee Information Deletion Task

                                                                                                                                        Employee Information Deletion Task

                                                                                                                                        System administrators use the employee information deletion task to permanently delete information related to former employees' employment at the organization (as might be required by law in EMEA and other regions).

                                                                                                                                        The Person Model

                                                                                                                                        The following "objects" are associated with a person:

                                                                                                                                        • User Account – to access the system with granted permissions.

                                                                                                                                        • Candidate Account – to apply for jobs through the career section.

                                                                                                                                        • Profile – to store the common profile. Employee and candidate share the same profile.

                                                                                                                                        • Employee – to store employee-related data.


                                                                                                                                        Image showing that an employee has a profile. When a candidate is hired, a user account and an employee associated with the profile are created.

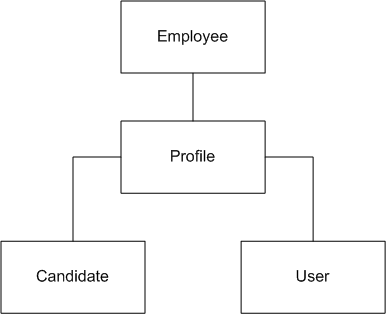
                                                                                                                                        When candidates are hired, a user account and an employee associated with their profile are created:

                                                                                                                                        • As an employee, the profile is maintained through Taleo Performance talent profile.

                                                                                                                                        • As a candidate, the profile is maintained through Recruiting and the career section.

                                                                                                                                        Employee Information Deletion Strategy

                                                                                                                                        Employee information deletion task permanently deletes employee-specific data only. The candidate account and common profile are unaffected. This enables a person to be rehired in the future by the organization. The person can remain in current pools and succession plans. The candidate account can eventually be deleted through a distinct task if Recruiting is available in the system.

                                                                                                                                        Deleted

                                                                                                                                        Not Deleted

                                                                                                                                        Employee Specific Data

                                                                                                                                        • Employee Metrics

                                                                                                                                        • Pictures

                                                                                                                                        • Job History

                                                                                                                                        • Matrix Management

                                                                                                                                        • Remaining Tasks

                                                                                                                                        • Compensation History

                                                                                                                                        • Goal Plans, Goals, Tasks (aligned goals will be unlinked)

                                                                                                                                        • Performance Reviews & Review History

                                                                                                                                        • Career Plans

                                                                                                                                        • Development Plans

                                                                                                                                        • Received Feedbacks

                                                                                                                                        • Sent Feedback Requests

                                                                                                                                        Other Taleo Performance Data

                                                                                                                                        • Business Goals

                                                                                                                                        • Projects

                                                                                                                                        • Sent Feedbacks

                                                                                                                                        • History of actions taken by the employee

                                                                                                                                        Profile and Candidate Data

                                                                                                                                        • General Profile (Education, Experience, Certifications, Preferences, etc)

                                                                                                                                        • Job Submissions

                                                                                                                                        • Offers

                                                                                                                                        Talent Pools & Succession Plans

                                                                                                                                        • Remains as member (now as an external candidate)

                                                                                                                                        User Specific Data

                                                                                                                                        • Remains in the system but inactive

                                                                                                                                        Employee Information Deletion Rules

                                                                                                                                        Employee-related information can be permanently deleted provided all of the following conditions are met:

                                                                                                                                        • The Employee Status of the user account is Former Employee (this is typically achieved by deleting the user account (status: Deleted)).

                                                                                                                                        • The employee must not be the owner manager of positions. A transfer of ownership is required prior to deletion.

                                                                                                                                        • The employee must not be the owner of talent pools. A transfer of ownership is required prior to deletion.

                                                                                                                                        Employee Information Deletion Process

                                                                                                                                        Employee information deletion is a four step process:

                                                                                                                                        1. User account deletion (see Deleting a User Account From the User Account Page, Deleting the User Account of an Employee Using the Wizard and Deleting the User Account of an Employee Manually).

                                                                                                                                        2. Deletion task creation (see Creating a Deletion Task).

                                                                                                                                        3. Preview of employees to be deleted (see Previewing Employees to be Deleted).

                                                                                                                                        4. Execution of the deletion task (manually or, more often, automatically according to the date and frequency chosen by the administrator).

                                                                                                                                        Limitations
                                                                                                                                        • No archiving capabilities at this time.

                                                                                                                                        • A user account cannot be permanently deleted from the system.

                                                                                                                                          • User accounts, once deleted, are no longer displayed but remain in the system.

                                                                                                                                          • The user accounts do not contain employee-related data.

                                                                                                                                        • Products for which the data will not be automatically deleted by the employee information deletion task:

                                                                                                                                          • Learn

                                                                                                                                          • Evaluation Management

                                                                                                                                          • Assessment

                                                                                                                                          • Screening Services

                                                                                                                                          • Analytics

                                                                                                                                          • Any other external products integrated with Oracle Talent Acquisition Cloud (OTAC)

                                                                                                                                          Deleting a User Account From the User Account Page

                                                                                                                                          The Manage user accounts - Including HMRS fields user type permission is required..

                                                                                                                                          Configuration > [SmartOrg] Administration > User Accounts

                                                                                                                                          1. Locate the user in the User Accounts list.

                                                                                                                                          2. Click Delete in the Actions column.

                                                                                                                                          3. The action(s) you perform next vary depending on whether the user account is associated with an employee.

                                                                                                                                            • If the user account is associated with an employee who owns requisitions, templates or folders, or was assigned yet uncompleted actions, or reports to a manager, or has pending tasks or work items, perform the steps in the wizard.

                                                                                                                                            • If the user account is associated with someone for whom none of the previous conditions applies, click Yes.

                                                                                                                                          Once deleted, the user account status is set to Deleted and the user account is deactivated.

                                                                                                                                          To permanently delete employee data related to the employee, including employee metrics and all Taleo Performance data (as might be required in EMEA and other regions), see Employee Information Deletion Task.

                                                                                                                                            Deleting the User Account of an Employee Using the Wizard

                                                                                                                                            The Manage users - Including HMRS fields user type permission is required.

                                                                                                                                            Configuration > [SmartOrg] Administration > User Accounts
                                                                                                                                            1. Click the user account you want to disable.

                                                                                                                                            2. In the Employee Information section, click Terminate.

                                                                                                                                              The wizard is displayed.
                                                                                                                                            3. Perform the steps in the wizard.

                                                                                                                                            The user account has Deleted status and therefore is no longer displayed on the User Accounts page if Active is selected in the View field. The Employee Status value is changed to Former Employee.

                                                                                                                                            To permanently delete employee data related to the employee, including employee metrics and all Taleo Performance data (as might be required in EMEA and other regions), see Employee Information Deletion Task.

                                                                                                                                              Deleting the User Account of an Employee Manually

                                                                                                                                              The Manage users - Including HMRS fields user type permission is required.

                                                                                                                                              Configuration > [SmartOrg] Administration > User Accounts

                                                                                                                                              1. Click user account you want to disable.

                                                                                                                                              2. Edit the Employee Information section as necessary.

                                                                                                                                              3. Set employee status to Former Employee.

                                                                                                                                              4. Provide a termination date.

                                                                                                                                              5. Remove the manager.

                                                                                                                                              6. Transfer direct reports to another manager if applicable.

                                                                                                                                              7. Transfer ownership of talent pools and positions to another user.

                                                                                                                                              8. Transfer pending tasks to another user.

                                                                                                                                              9. Return to the User Accounts page, locate the user account in the list and click the corresponding Delete in the Actions column.

                                                                                                                                              10. Click Yes.

                                                                                                                                              Once deleted, the user account status is Deleted and the user account is deactivated.

                                                                                                                                              To permanently delete employee data related to the employee, including employee metrics and all Taleo Performance data (as might be required in EMEA and other regions), see Employee Information Deletion Task.

                                                                                                                                                Creating a Deletion Task

                                                                                                                                                The Access Deletion Tasks permission is required (User Types > [Functional Domains] Configuration > Data Lifecycle Management).

                                                                                                                                                Configuration > Operations > Deletion Tasks

                                                                                                                                                1. Click Create.

                                                                                                                                                2. Select Employees, click Next.

                                                                                                                                                3. Select Permanently delete, click Next.

                                                                                                                                                4. Click the check box next to each criterion you want to include and click Next.

                                                                                                                                                5. Enter values for the Name, Code, Status, Start Date, Recurrence fields and click Next.

                                                                                                                                                6. Review your selections and click Finish.

                                                                                                                                                The task is displayed in the Tasks list. If you selected a date and frequency for the task, the task will run automatically on the dates that correspond to your selections.

                                                                                                                                                  Previewing Employees to be Deleted

                                                                                                                                                  The Access Deletion Tasks permission is required (User Types > [Functional Domains] Configuration > Data Lifecycle Management).

                                                                                                                                                  Configuration > Operations > Deletion Tasks

                                                                                                                                                  1. In the Task list, click the task you want to examine.

                                                                                                                                                  2. Click Count.

                                                                                                                                                  3. Click the x out of y total items link to view the list of former employees to be deleted.

                                                                                                                                                    Prevent Updating Internal System User

                                                                                                                                                    Customer administrator users cannot fully manage internal system users (such as Support and CS Synchronization).

                                                                                                                                                    Internal system users are protected and cannot be deleted or fully updated. Certain internal system user fields also cannot be updated.

                                                                                                                                                    Customer administrator users cannot access, view, update or delete protected internal system users and certain related fields. This feature is not visible to customers except when error messages are generated as a result of having attempted to update or delete protected internal system users and fields.

                                                                                                                                                      Filter Out Internal Users

                                                                                                                                                      Internal users are filtered out of User Exports. Internal users were filling the user export list where the Customer only needs to see standard users.

                                                                                                                                                      Internal users are dedicated technical users required by the application to work properly.

                                                                                                                                                      Note:

                                                                                                                                                      Only support users can see Internal users in SmartOrg.

                                                                                                                                                        System User Check Box

                                                                                                                                                        The System User check box is only visible to system users when they are managing other users.

                                                                                                                                                        The System User check box is available in SmartOrg Administration, in the Personal Information section of user accounts.