11Approval
Requisition and Offer Approvals
Approvals
Standard Approval versus Dynamic Approval Routing
When requesting an approval, Recruiting Center users must choose from a list the name of the individuals who will be required to do the approval. The list of approvers can be configured or not by the system administrator depending on the type of approval chosen by an organization.
If the standard approval process is used within an organization, the Recruiting Center user will select approvers from a list containing all of the active users of the database. The Recruiting Center user will also be able to create a list of frequent approvers in the My Setup feature.
If the Dynamic Approval Routing (DAR) process is used within an organization, the list of approvers is pre-populated upon selecting the Request Approval action. The list of approvers to be generated is configured by the system administrator within the Dynamic Approval Routing feature. These approvers are displayed based on configured rules and conditions.
The approval path can be carried out in two ways:
Sequential: When the first approver receives an approval request, he/she approves the item (requisition or offer). Once approved, the approval request goes to the next approver, and so on. The item does not move forward until each approver has approved it in the sequence defined.
Parallel: Multiple approvers receive an approval request and they can all approve the item at the same time. Approvers can approve the item without having to wait for the others.
If the standard approval process is used within an organization, the system administrator must activate settings to enable sequential or parallel approval. If Dynamic Approval Routing is used, the approval will be sequential unless there are more than one approver for the same role in which case the approval will be parallel.
All files requiring an approval are in PDF format. When conducting the approval from either the Tasks list or from eShare, the user will receive a PDF print version of the file to review (rather than the actual file being visible in the system). Also, approval files are generated according to the user's permissions to view fields having specific security levels.
Approvers and Frequent Approvers
An approver is a Recruiting Center user who will approve requisitions and/or offers.
A list of approvers can be defined by the system administrator at the department level. A list of personal default approvers, called frequent approvers, can also be defined by the Recruiting Center user in the My Setup feature. When a requisition and/or offer is ready to be approved (by selecting the Request Approval action), the approval path is selected by default as follows:
If frequent approvers were defined under My Setup, these approvers will be automatically selected.
If frequent approvers were not defined under My Setup, the approvers set at the department level by the system administrator will be selected automatically.
When a user selects approvers, the selector only displays users who can be potential approvers. It is possible that no approvers are displayed if none of them are allowed to do the approval. An approver must be an active user and have the user type permission to approve requisitions and/or offers.
Requirements to Approve Requisitions
The minimum requirements for a user to approve requisitions are described below.
The user must be active.
The user belongs to the user group of the requisition. (Note: For Dynamic Approval Routing, this requirement is not enforced; users not belonging to the group can be approvers.)
The user has the following permissions:
| User Type Permission | Location |
|---|---|
| Access Recruiting Center AND/OR Access the Response Center (used primarily by eShare users) |
Configuration > [SmartOrg] Administration > User Types > Recruiting > Other |
| View requisitions | Configuration > [SmartOrg] Administration > User Types > Recruiting > Requisitions The user can view requisitions in any context meaning that as long as the user can view the object in some circumstances, he/she will be able to access the object to be approved, even if that object is not otherwise visible to the user. For example: a manager can view requisitions that he/she owns but the requisitions being routed for approval is not owned by him/her. |
| Allow access to professional requisitions OR Allow access to hourly requisitions OR Allow access to campus requisitions OR Allow access to contingent requisitions OR Allow access to executive requisitions |
Configuration > [SmartOrg] Administration > User Types > Recruiting > Requisitions The requisition type here must match the type of the requisition being approved. |
| Approve requisitions | Configuration > [SmartOrg] Administration > User Types > Recruiting > Requisitions |
Requirements to Approve Offers
The minimum requirements for a user to approve offers are described below.
The user must be active.
The user belongs to the user group of the requisition. (Note: For Dynamic Approval Routing, this requirement is not enforced; users not belonging to the group can be approvers.)
The user has the following permissions:
| User Type Permission | Location |
|---|---|
| Access Recruiting Center AND/OR Access the Response Center (used primarily by eShare users) |
Configuration > [SmartOrg] Administration > User Types > Recruiting > Other |
| View requisitions | Configuration > [SmartOrg] Administration > User Types > Recruiting > Requisitions The user can view requisitions in any context meaning that as long as the user can view the object in some circumstances, he/she will be able to access the object to be approved, even if that object is not otherwise visible to the user. For example: a manager can view requisitions that he/she owns but the requisitions being routed for approval is not owned by him/her. |
| Allow access to professional requisitions OR Allow access to hourly requisitions OR Allow access to campus requisitions OR Allow access to contingent requisitions OR Allow access to executive requisitions |
Configuration > [SmartOrg] Administration > User Types > Recruiting > Requisitions |
| Access requisition-specific candidate lists | Configuration > [SmartOrg] Administration > User Types > Recruiting > Candidates |
| View offers | Configuration > [SmartOrg] Administration > User Types > Recruiting > Offers The user can view offers in any context meaning that as long as the user can view the object in some circumstances, he/she will be able to access the object to be approved, even if that object is not otherwise visible to the user. For example: a manager can view requisitions that he/she owns but the requisition for the offer being routed for approval is not owned by him/her. |
| View internal job submissions (if the candidate is an internal candidate) | Configuration > [SmartOrg] Administration > User Types > Recruiting > Candidates This permission only applies if the candidate receiving the offer is internal and the user needs it also granted at some level, regardless of the context level - like view offers and view requisitions. |
Requirements to Terminate an Approval Path
The requirements for a user to terminate a requisition approval path is described below.
The user has the permission to edit requisitions, AND
The user is the originator of the approval path, OR
The user is the owner of the requisition (that is, manager, manager assistant, recruiter, recruiter assistant).
Automatic Approval Reminders
System administrators can configure an automatic reminder so that e-mails are sent to approvers to remind them to review and approve offers and requisitions.
Two settings are available:
Requisition Approval Automatic Reminder
Offer Approval Automatic Reminder
System administrators configure these settings by defining the number of days after which a reminder e-mail is sent to remind approvers to review and approve offers and requisitions. When an approval task is created and a notification is sent to a user by e-mail, the system automatically sends a reminder to that user if a decision has not yet been taken within the time span defined. The system continues to send the reminder at the defined frequency (number of days) until the approver provides a decision on the approval request. Note that after one year, reminders are no longer sent. As an example, if the setting is set to 1 day, reminders will be sent every day for a period of one year or until the approver provides a decision. If the setting is set to 7 days, a reminder will be sent every week.
This functionality decreases the likelihood of approvers holding up the approval process. It also reduces the approval process duration.
The following message templates are used for both the notifications and automatic approval reminders. Since the same message templates are used, it might be beneficial for system administrators to make adjustments to the content of the four message templates.
Standard Notification for an Offer Approval Request
Standard Notification for an Offer Approval Request (E-Share)
Standard Notification for a Requisition Offer Approval Request
Standard Notification for a Requisition Approval Request (E-Share)
Requisition Approval Path Amendment
From time to time, it may be necessary to change the approvers that were originally selected for a requisition. This is done by using the action called Amend Approval Path.
The Amend Approval Path action allows users to modify an existing requisition approval path. Users, if they have the permissions, can add or remove approvers, reorder them, and even decide for them.
the requisition status is set to "Pending - To be Approved";
the user has one of the following permissions:
| User Type Permission | Location |
|---|---|
| Amend an approval path created by this user | Configuration > [SmartOrg] Administration > [Users] User Types > Recruiting > Requisitions > Approval section |
| Amend an approval path created by another user (user B) | Configuration > [SmartOrg] Administration > [Users] User Types > Recruiting > Requisitions > Approval section |
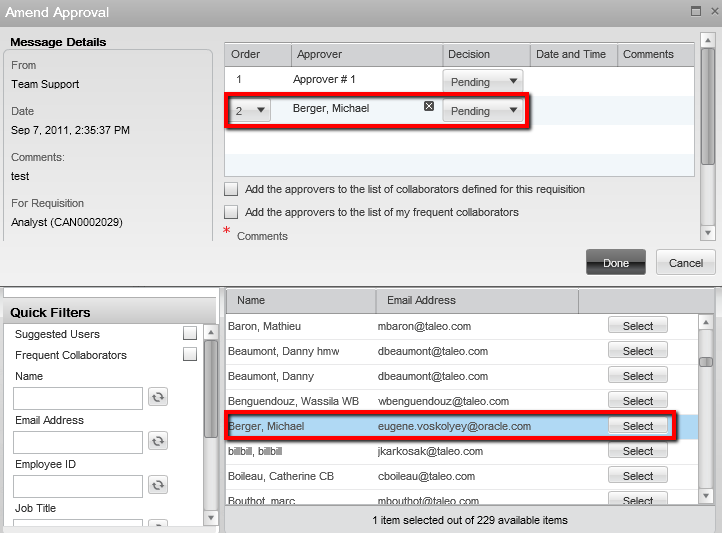
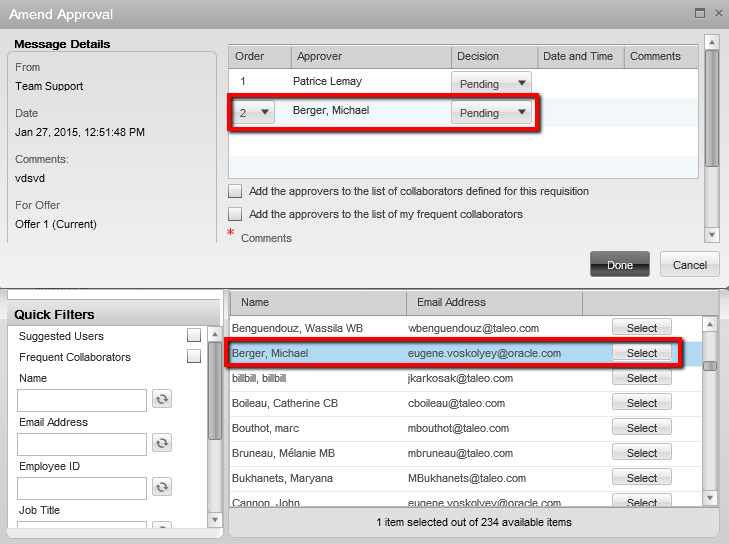
Adding Approvers
It is possible to add approvers to an existing approval path. When clicking the Add Approvers button located at the bottom of the Amend Approval window, a window appears and users can filter and select one or many approvers. The newly added approvers appear at the top section of the window with the other approvers. When approvers are added to the approval path, the event "Approval Request Amended: Approvers Added" is added to the requisition's History tab.
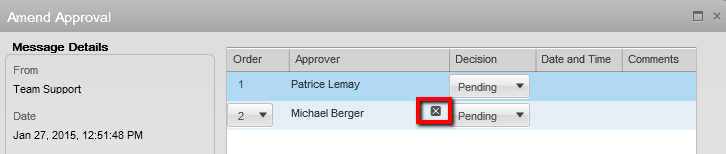
Removing Approvers
It is possible to remove approvers from an existing approval path. When clicking the Remove icon next to the approver's name, the approver is removed from the approval path. When approvers are removed from the approval path, the event "Approval Request Amended: Approvers Removed" is added to the requisition's History tab.
Specific rules apply when removing approvers:
A user can remove approvers from an approval path only if the approvers have not yet received the Approve Requisition task.
A user can remove approvers from an approval path created by himself only if he has the permission "Remove approver, change decision of approver, or change approved requisition recipient when amending an approval path created by this user."
A user can remove approvers from an approval path created by another user only if he has the permission "Remove approver, change decision of approver, or change approved requisition recipient when amending an approval path created by another user."

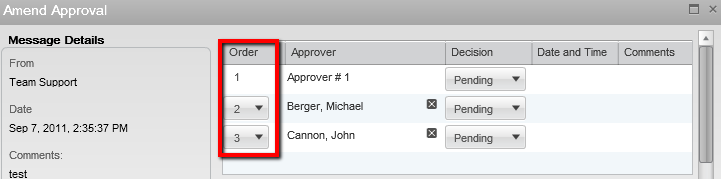
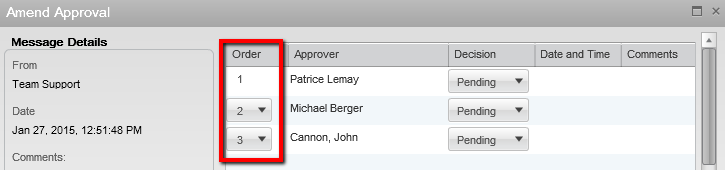
Reordering Approvers
It is possible to reorder approvers in an existing approval path. When approvers are reordered in the approval path, the event "Approval Request Amended: Approvers Reordered" is added to the requisition's History tab.
Specific rules apply when reordering approvers:
A user can change the order of the approvers only if the approvers have not yet received the Approve Requisition task.
A user can change the order of the approvers only if the approvers have not yet render their decision.
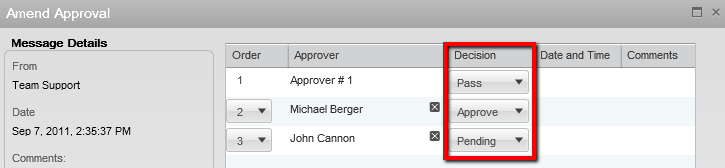
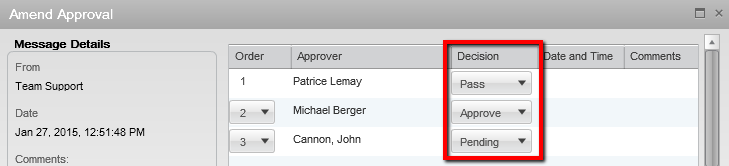
Deciding for Approvers
It is possible to take an approval decision for an approver. When all the approvers have rendered their decision, an event is added for each decision in the requisition's History tab.
Specific rules applies when deciding for approvers:
A user can decide for an approver only if the approver has not yet rendered his decision.
A user can decide for an approver even if the approver has already received the Approve Requisition task.
A user can decide for an approver in an approval path created by himself only if he has the permission "Remove approver, change decision of approver, or change approved requisition recipient when amending an approval path created by this user."
A user can decide for an approver in an approval path created by another user only if he has the permission "Remove approver, change decision of approver, or change approved requisition recipient when amending an approval path created by another user."
A user can set the decision to Pass for an approver only if he has the permission "Choose to pass when this user decides on behalf of another approver". Two exceptions: a) Except if the approval path has been created by himself and the option "But not when amending an approval path created by the user" was selected for that permission. b) Except if the approval path has been created by another user and the option "But not when amending an approval path created by another user" was selected for that permission.
A user cannot set the decision to Pass for the last approver if all other approvers have also set their decision to Pass.
When a decision has been taken for an approver, the decision is displayed in the requisition's Approvals tab: {Current User} on behalf of {Approver Name}.
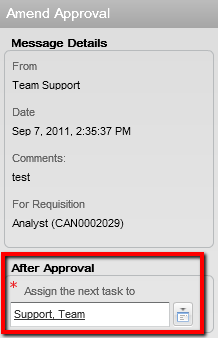
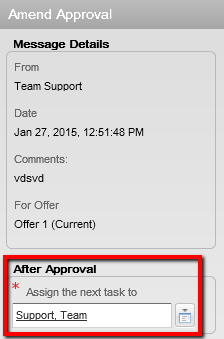
Assigning the Task After the Approval
It is possible to change the person who will perform the next task once the approval has been rendered. This is done using the selector next to the Assign the next task to field.
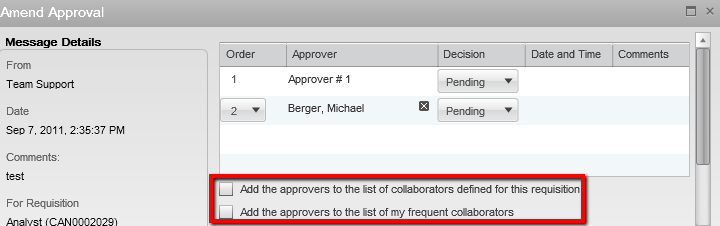
Adding Approvers to the List of Collaborators
When the option "Add the approvers to the list of collaborators defined for this requisition" is selected, the selected approvers will be automatically added to the requisition's collaborators list. This option is visible if:
the Collaborators list has been enabled for the requisition;
the user adding the approvers is the owner of the requisition (Recruiter, Recruiter Assistant, Hiring Manager, Hiring Manager Assistant). If the user is not the owner of the requisition, he must have the permission "Reassign requisitions to owners and collaborators if the user is not an owner".
When the option "Add the approvers to the list of my frequent collaborators" is selected, the selected approvers will automatically be added to the user's frequent collaborators list (available under My Setup > Preferences). It will not add the approvers in the collaborator's list of the requisition. This option is visible only if the Collaborators list has been enabled for the requisition.
Offer Approval Path Amendment
From time to time, it may be necessary to change the approvers that were originally selected for an offer. This is done by using the action called Amend Approval Path.
The Amend Approval Path action allows users to modify an existing offer approval path. Users, if they have the permission, can add or remove approvers, reorder them, and even decide for them.
the offer status is set to "Approval in Progress";
the user has the permission "View and Manage Offers".
the user has the permission "Amend an Approval Path".
Adding Approvers
It is possible to add approvers to an existing approval path. When clicking the Add Approvers button located at the bottom of the Amend Approval window, a window appears and users can filter and select one or many approvers. The newly added approvers appear at the top section of the window with the other approvers.
Removing Approvers
It is possible to remove approvers from an existing approval path. When clicking the Remove icon next to the approver's name, the approver is removed from the approval path.
To remove an approver, the user must have the permission "Edit approvers when requesting approvals".
Specific rules apply when removing approvers:
A user can remove approvers from an approval path only if the approvers have not yet received the Approve Offer task.
A user cannot remove an approver from an approval path if the approver has already render his decision.
Reordering Approvers
It is possible to reorder approvers in an existing approval path.
To reorder approvers, the user must have the permission "Edit approvers when requesting approvals".Specific rules apply when reordering approvers:
A user can change the order of the approvers only if the approvers have not yet received the Approve Offer task.
A user can change the order of the approvers only if the approvers have not yet render their decision.
Deciding for Approvers
It is possible to take an approval decision for an approver.
Specific rules applies when deciding for approvers:
A user can decide for an approver only if the approver has not yet rendered his decision.
A user can decide for an approver even if the approver has already received the Approve Offer task.
A user can decide for an approver if the user has the permission "Decide for other approvers".
A user cannot set the decision to Pass for the last approver if all other approvers have also set their decision to Pass.
Assigning the Task After the Approval
It is possible to change the person who will perform the next task once the approval has been rendered. This is done using the selector next to the Assign the next task to field.
Adding Approvers to the List of Collaborators
When the option "Add the approvers to the list of collaborators defined for this requisition" is selected, the selected approvers will be automatically added to the requisition's collaborators list. This option is visible if:
the Collaborators list has been enabled for the requisition;
the user adding the approvers is the owner of the requisition (Recruiter, Recruiter Assistant, Hiring Manager, Hiring Manager Assistant). If the user is not the owner of the requisition, he must have the permission "Reassign requisitions to owners and collaborators if the user is not an owner".
When the option "Add the approvers to the list of my frequent collaborators" is selected, the selected approvers will automatically be added to the user's frequent collaborators list (available under My Setup > Preferences). It will not add the approvers in the collaborator's list of the requisition. This option is visible only if the Collaborators list has been enabled for the requisition.

Configuring the Access to Items Being Approved
Access to items being approved by users must be configured.
For eShare via email:
The eShare Response Center Product must be activated by Oracle Support.
The Access the Response Center (used primarily by eShare users) permission must be granted in SmartOrg (Configuration > [SmartOrg] Administration > User Types > Recruiting > Other).
The Enable eShare Email for Response Center Access user's preference must be enabled in the Recruiting Center (Recruiting Center > Resources > My Setup > Preferences). Note: The same setting exists under Configuration > [General Configuration ] Settings. By default, it is set to No for all users. If changing the value of this setting, the change will apply to all users that have not manually edited their own user preference.
For Tasks via the Recruiting Center:
The Access Recruiting Center permission must be granted in SmartOrg (Configuration > [SmartOrg] Administration > User Types > Recruiting > Other).
-
Access must be given to the tasks via one or both of the following means:
The Tasks tab available in the core navigation bar. The core navigation bar is enabled via the SmartOrg Configuration Profiles feature.
The Tasks channel available in the main panel. The Tasks channel is configured via the Center Stage feature. The Center Stage is then associated to the user's configuration profile. See Center Stage.
Requisition Approval Rerouting After Changes
Configuration options when activated can force requisitions to automatically be rerouted for approval when certain business scenarios occur.
System administrators can configure certain settings to force requisitions to automatically be rerouted for approval when certain business scenarios occur. System administrators define which scenarios they wish to activate. Each of the settings can be individually set to control if that situation when it occurs will cause the requisition to be re-routed for approval:
| Setting | Description |
|---|---|
| Restart Approval Process After "Cancel" Step | Restart the approval process when reopening a requisition after it has been canceled. |
| Restart Approval Process After "Fill" Step | Restart the approval process when reopening a requisition after it has been filled. |
| Restart Approval Process After "On Hold" Step | Restart the approval process when reopening a requisition after it has been placed on hold. |
| Restart Approval Process After Editing the Number of Positions | Restart the approval process when editing the number of positions for the requisition. |
| Restart Approval Process After Editing the Salary Fields | Restart the approval process when editing the salary fields in the requisition file. |
Immediately upon a Recruiting Center user has performed an action that makes true one of the above activated settings:
The requisition status will return back to Draft.
The requisition will be unposted.
The requisition tasks will be deleted.
Also, if the requisition was posted and the Recruiting Center user modifies the requisition file, the requisition will be re-routed to the Draft status and it will also be unposted.
Setting a Default Approval Path for Requisitions
Setting a default approval path for requisitions allows you to specify, at the department level, which approvers will be selected by default when users are requesting the approval of a requisition. Such default approval path is used when no default approval path is set at the user level and when a department is selected while creating a requisition.
The Enable Department setting must be activated.
A department must be created before defining approvers.
Click on the desired department.
Under the Approver Preferences - Requisitions section, click the Plus icon.
Select one or several approvers from the user list then click Done.
To change the order of the approvers, select a number from the list next to the approver, then click Reorder.
Click Done.
Setting a Default Approval Path for Offers
The Enable Department setting must be activated.
A department must be created.
Click on the desired department.
Under the Approver Preferences - Offers section, click the Plus icon.
Select one or several approvers from the user list.
Click Done.
To change the order of the approvers, select a number from the list next to the approver, then click Reorder.
Click Done.
The default approval path for offers has been created. The approvers selected by default when users are requesting the approval of an offer are selected at the department level.
Approval - Permissions and Settings
The following permissions and settings are used for the approval functionality.
| User Type Permission | Location |
|---|---|
| Forego the approval process | Configuration > [SmartOrg] Administration > [Users] User Types > Recruiting > Offers > Approval |
| Choose to pass when this user is asked to approve an offer | Configuration > [SmartOrg] Administration > [Users] User Types > Recruiting > Offers > Approval |
| Amend an approval path | Configuration > [SmartOrg] Administration > [Users] User Types > Recruiting > Offers > Approval |
| Decide for other approvers | Configuration > [SmartOrg] Administration > [Users] User Types > Recruiting > Offers > Approval |
| Send an approval request reminder for offers | Configuration > [SmartOrg] Administration > [Users] User Types > Recruiting > Offers > Approval |
| Approve requisitions | Configuration > [SmartOrg] Administration > [Users] User Types > Recruiting > Requisitions > Approval |
| Save a requisition as open | Configuration > [SmartOrg] Administration > [Users] User Types > Recruiting > Requisitions > Approval |
| Choose to pass when this user is asked to approve a requisition | Configuration > [SmartOrg] Administration > [Users] User Types > Recruiting > Requisitions > Approval |
| Choose to pass when this user decides on behalf of another approver | Configuration > [SmartOrg] Administration > [Users] User Types > Recruiting > Requisitions > Approval |
| Create an approval path | Configuration > [SmartOrg] Administration > [Users] User Types > Recruiting > Requisitions > Approval |
| Decide for other approvers when creating an approval path | Configuration > [SmartOrg] Administration > [Users] User Types > Recruiting > Requisitions > Approval |
| Amend an approval path created by this user | Configuration > [SmartOrg] Administration > [Users] User Types > Recruiting > Requisitions > Approval |
| Remove approver, change decision of approver, or change approved requisition recipient when amending an approval path created by this user | Configuration > [SmartOrg] Administration > [Users] User Types > Recruiting > Requisitions > Approval |
| Amend an approval path created by another user (user B) | Configuration > [SmartOrg] Administration > [Users] User Types > Recruiting > Requisitions > Approval |
| Remove approver, change decision of approver, or change approved requisition recipient when amending an approval path created by another user | Configuration > [SmartOrg] Administration > [Users] User Types > Recruiting > Requisitions > Approval |
| Send an approval request reminder for requisitions | Configuration > [SmartOrg] Administration > [Users] User Types > Recruiting > Requisitions > Approval |
Data Access Security
When conducting an approval, users will be able to see data they are authorized to view based on their viewing permissions. For example:
If a user is authorized to view fields with the General security level, then these fields will be displayed on the file. Fields having the Restricted or Confidential security level will not appear on the file.
If a user is only authorized to view compensation data on requisitions where he/she is the owner, compensation fields on requisitions outside of their ownership will not be displayed.
If a system administrator has forgotten to give users at least viewing permission to fields with the General security level, general viewing rights will be granted to allow the file to render.
Exception Scenarios
If a user's group changes so that they no longer belong to the authorized approving user group: This will not change the user's ability to execute the approval. The user will still receive the task and will be able to complete the approval review and decision.
If a user's permissions change so that they are no longer authorized to conduct the approval: The user will not be able to complete the approval request. The task will remain assigned to the user but when trying to complete the task, the user will receive a message indicating that the user is not authorized. For the approval process to proceed, the user's permissions will need to be changed, or the approval path will need to be amended.
| Setting | Description | Default Value | Location |
|---|---|---|---|
| Enable Approval Models | Allows collaborative (parallel) approval in addition to sequential approval. It allows forwarding an approval request to another approver if the user has the permission to amend approval paths. | No | Configuration > [Recruiting] Settings |
| Offer Default Approval Model | Defines the approval model that will be used by default when users are creating an offer approval request. | Sequential | Configuration > [Recruiting] Settings |
| Requisition Default Approval Model | Defines the approval model that will be used by default when users are creating a requisition approval request. | Sequential | Configuration > [Recruiting] Settings |
| Offer Approval Workflow Activation | Determines whether or not approvals are used on offers. | Optional | Configuration > [Recruiting] Settings |
| Offer Letter Must be Selected for Approval Request | Allows a request for approval only if an offer letter has been selected. | No | Configuration > [Recruiting] Settings |
| Requisition Approval Automatic Reminder | Remind approver to provide a decision on the requisition approval X days after having sent the last notification. The maximum value is 365 days. Setting the value to 0 does not send any reminder. | Configuration > [Recruiting] Settings | |
| Offer Approval Automatic Reminder | Remind approver to provide a decision on the offer approval X days after having sent the last notification. The maximum value is 365 days. Setting the value to 0 does not send any reminder. | Configuration > [Recruiting] Settings |
Standard Notification of a Requisition Approval Request (eShare): Message sent to approvers for both the initial request and any reminders, provided that the eShare center has been activated.
Standard Notification of a Requisition Approval Request: Message sent to approvers for both the initial request and any reminders, in cases where the eShare center has not been activated. In this message, the Respond hyperlink does not appear by default (to prevent cases where the eShare center is not available). If users are receiving this message for requisition approval requests, it means that you are trying to use the eShare function but it is not implemented. You should call support and ask to have the eShare Center activated.
The above behavior does not exist for offer approval notifications. For offers, there is only one offer approval notification template; it is sent in all cases, regardless of whether or not the eShare center has been activated.
Dynamic Approval Routing
Dynamic Approval Routing
Dynamic Approval Routing is an advanced tool that automatically populates requisition and offer approvers through the use of inclusion and exclusion rules. These rules, based primarily on functional and hierarchical roles, enable customers to enforce processes and simplify the approval process for the initiator.
Dynamic Approval Routing basically works as follows: When a user routes a requisition or an offer for approval, if the Dynamic Approval Routing is relevant for the context of the requisition or the offer, it will predetermine the list and sequence order of approvers. The initial list of approvers may be modified by the user routing the approval request based on his user type permissions. With the path already generated, the user can simply click to request that the approval process be initiated. Approvers will receive approval requests just as they do with the standard approval functionality.
Once the Dynamic Approval Routing module has been activated by Oracle, it becomes available in the Configuration menu. The system administrator is responsible for configuring the Dynamic Approval Routing feature. The configuration involves many steps:-
Defining the "reports to" structure and configuring users involved in the Dynamic Approval Routing process.
-
Defining hierarchical and functional roles.
-
Defining inclusion and exclusion rules.
-
Configuring approval paths and sequences.
Once the Dynamic Approval Routing is configured, it is important to test the workflow with a small sample that can be easily controlled prior to full deployment. This step is recommended to ensure that the desired results are achieved prior to rolling out to the entire employee population.
Checklist prior to testing:
-
Ensure roles are activated and assigned properly to users.
-
Ensure all Dynamic Approval Routing components are active (approval paths, rules, sequences).
-
Ensure inclusion rules are included on the active workflow for every role expected to be included in the approval workflow.
-
Ensure sequences are defined for the desired Organizations-Locations-Job Fields contexts and contain all possible approver roles.
-
Observe the approval path presented to the initiating user and ensure it is as expected.
What happens when the system finds more than one appropriate match:
-
If a workflow has a rule invoking the inclusion of a functional role, the "best" matching user will be assigned a task. Based on the configuration, it is possible that more than one match be equally suitable. In such case, if more than one user included in a functional role matches the given Organization-Location-Job Field context, then all those users are included within the same sequence in the approval path (users will be included in parallel).
-
If a user matches more than one inclusion rule, the system removes any duplicates, and the last appearance of the user in the approval path is kept and all others are removed. For example, a compensation team has an opening and the director of compensation is pulled in for both a functional and hierarchical role. Once all roles are resolved (the same user is included because its hierarchical role is included and its functional role is included), the system removes any duplicates.
Locking Generated Approval Paths
With the introduction of the Dynamic Approval Routing (DAR) feature, a mechanism was required so users would not be able to remove or reorder approval paths generated by the DAR engine.
This feature is available for all but makes practical sense to use in conjunction with the Dynamic Approval Routing feature.
The following permission allows system administrators to control if a user type is authorized to remove or reorder the pre-populated approvers presented during the request approval action.
| User Type Permission | Location |
|---|---|
| Edit approvers when requesting approvals | Configuration > [SmartOrg] Administration > User Types > Recruiting > Other |
When the Dynamic Approval Routing is used to generate the list of approvers, this permission can be used to lock out the user's ability to modify that list of approvers. This permission can also be used if the requisition approval path is always created from scratch (which means the user has no frequent approvers and is not using requisition duplicate function) and the customer wants to enforce that for offer approvers; the same approvers who approved the requisition must also approve the offer.
When a user does not have the above permission:
When using the Request Approval action (for requisitions or offers), the user conducting the approval request cannot remove nor reorder system-generated approvers. These may have been inserted from DAR, requisition duplication, frequent approvers, or from requesting offer approval (in which case a starting list of approvers always exists, either via DAR, frequent approvers, or pulling in the initial approvers from the requisition).
The user can add and reorder additional approvers, and remove approvers that he/she has added.
The user, if authorized, may amend approval paths once routed for approval (this is managed by another permission).
When the permission is not granted, the Delete icon will not be present when hovering over an approver and the order sequence drop-down boxes will be unable to be selected.
Configuring the Dynamic Approval Routing
The system administrator is responsible for configuring the Dynamic Approval Routing feature.
The configuration involves many steps:
Defining the Dynamic Approval Routing "Reports to" structure.
Defining the approval path properties, settings and notifications.
The Dynamic Approval Routing module is used to define the business rules for how approval workflows will operate. This module is implemented distinctly for each requisition type. So the configuration steps would need to be repeated for the requisition types for which the system administrator plans to implement Dynamic Approval Routing.
Dynamic Approval Routing "Reports to" Structure
The "Reports to" structure is used for the Dynamic Approval Routing to define to whom each user reports to.
If a customer intends to use hierarchical roles or the reports to ("up # levels") to populate the flow, the "Reports to" structure must be implemented for Dynamic Approval Routing. If a customer intends to use only functional roles, the customer can still implement Dynamic Approval Routing but the "Reports to" structure does not need to be populated.
The "Reports to" structure should be done via a user integration. If an integration is not used, the system administrator can alternatively manually configure all users involved in the Dynamic Approval Routing via the User Accounts feature in SmartOrg (Configuration > SmartOrg Administration > User Accounts). When configuring user accounts:
All users must be classified as having the "Current" employee status.
-
All users must have an "Employee Manager" specified. This is who the user reports to.
Defining the Dynamic Approval Routing Reports to Structure
Hierarchical Role
Hierarchical roles are the explicitly defined roles in the organization and their order of relationships.
Hierarchical roles are used in the Dynamic Approval Routing (DAR) feature to define the order of approval path relationships and the level in this hierarchy that must be achieved for different types of approvals.
Example: CEO > Senior Vice President > Vice President > Director > Manager > Team Leader.
It is recommended to use an employee integration to associate users to their hierarchical role so that this information stays current and synchronized with the HRMS. If an integration is not used, the creation and configuration of hierarchical roles can be done using the Hierarchical Roles feature (Configuration > Roles > Hierarchical Roles). When creating and configuring hierarchical roles:
Start from the top of the organization hierarchy and go down. It will be easier to associate subordinate roles if the highest level is active first.
Create codes that will allow you to sort them in an order that represents the organization hierarchy. For example, Code: 01 - Name: CEO; Code: 02 - Name: Senior VP; Code: 03 - Name: VP, and so on.
Specify the superior role in the hierarchy. For example, if creating the Manager role, the hierarchy will be Director, meaning that the Manager will report to the Director.
Associate users to a hierarchical role. Several users can be associated to one hierarchical role, but only one hierarchical role can be assigned to a user.
Creating and Configuring a Hierarchical Role
The Manage Functional and Hierarchical Roles user type permission is required.
The new role appears in the Hierarchical Roles list and can be used to choose the superior role of a hierarchy.
Functional Role
Functional roles are used in the Dynamic Approval Routing (DAR) feature. A role is used to choose users that will be assigned to approve a requisition or an offer based on contextualization (OLF).
Functional roles are created and configured via the Functional Roles feature (Configuration > Roles > Functional Roles).
Each functional role must be assigned a single default user. When requesting an approval, if no other users are selected for the role, the default assignee will be called upon for an approval using this role.
Each role may also have users assigned for specific Organization-Location-Job Field (OLF) structure and from there are called into play in approval workflows when objects are created for their structure. For example, you are creating an HR Leader role. You select John Smith as an assignee and associate him to the Canadian Operations organization. As a result, John is now the HR Leader for the Canadian Operations. When a functional role is invoked in an approval process, the employee matching the requisition's OLF will be used. If there is no matching employee for the OLF context, then the default assignee will be used.
It is possible to have multiple assignees have the same functional role in the exact same context. When this is the case, all people having that functional role will be included in the approval path, with the same sequence number, and will have to approve the requisition or offer.
Users can be associated to more than one role in the approval path. By default, the system will:
Create the list of roles based on the approval path inclusion rules.
Filter roles out based on exclusion rules.
Resolve users from roles.
Remove duplicated users.
For example, if an approval path looks like Hiring Manager, Role-1, Role-2 and an exclusion rule is created for Hiring Manager, the final approval path will look like Role-1, Role-2. However, if one specific user was both the Hiring Manager on the requisition and was also associated to the Role-1, then this user will still be part of the final approval path as it still includes Role-1.
Creating and Configuring a Functional Role
The Manage Functional and Hierarchical Roles user type permission is required.
The new role appears in the Functional Roles list.
Dynamic Approval Routing Rules
Rules are used in the Dynamic Approval Routing feature to allow the approval path to be very flexible and accommodate a myriad of business requirements. They are used to dynamically determine the circumstances whereby specific users/roles will be included in an approval path. Every user and/or role to be added to an approval path must be added by a rule.
Two types of rules are used for the Dynamic Approval Routing:
When configuring the Dynamic Approval Routing, it is recommended to create rules first, then create the approval paths because inclusion rules are required to populate paths. Once rules have been defined, the system administrator can configure the actual approval path.
Inclusion Rule
Inclusion rules define the roles that will be included in the approval path.
There are two types of inclusion rules:
-
Unconditional
-
Conditional
Unconditional inclusion rules always includes the role in the approval path, regardless of the context of the requisition or the offer (other than the specified requisition type for which the path is defined).
Example: Always include the job posting approver.
When creating an unconditional rule, the only thing that needs to be specified is the roles to be included. The operators for including roles are outlined below.
| Option | Description |
|---|---|
| From the manager role up to the number of specified direct reports. The system administrator then defines the # of direct reports. |
When this type of rule is used, the system will ignore all roles in the system and pay attention only to the employee "reports to" structure. The system will look at who is the Manager of the requisition/offer and will go up the number of specified direct reports from that manager. |
| Only the selected role. | Allows the selection of a specific hierarchical or functional role in the approval path. Note: when a hierarchical role is used, the system will look at who is the Manager of the requisition/offer and will go through the "reports to" structure until it finds an employee with the specified hierarchical role. It will then include the first matching employee in that hierarchical role. For example, if there were two directors in the "reports to" structure and the director hierarchical role was selected, only the first director in the hierarchy would be added to the flow ordered by how they report to one another. |
| All roles included up to the specified number of levels. The system administrator then specifies the role and the # of upper levels. |
Allows the selection of a series of employees using the hierarchical role structure in the approval path. The system will use the Hiring Manager of the requisition and will go through the reports to structure until it finds the first employee with the specified role. It will then include this person and every employee in the reporting structure up to and including the first employee it finds at # hierarchical roles above the specified role in the path. |
| All roles between the following roles. The system administrator defines the two roles. |
Allows the selection of a series of employees using the hierarchical role structure in the approval path. The system will use the Hiring Manager of the requisition and will go through the reports to structure until it finds the first employee with the lower level role. It will then include this person and every employee up to and including the first employee it finds at the upper level hierarchical role. |
Conditional inclusion rules include a role when certain conditions are met.
Example: Include the CFO on all requisitions where the base salary is > $100,000 and the Location is United States.
For conditional inclusion rules, the rule operator process is the same as it is with unconditional rules, but there is a another step involved where the user creates the conditions under which the specified roles will be included in the path. When creating a condition, the first step is to define the fields to be used in the condition. For each field there are available operators to define how the field condition will work. Conditions can be applied on requisition fields as well as on offer fields, depending on the approval type. For a requisition approval path, conditions can be applied only on requisition fields. For an offer approval path, conditions can be applied only on offer fields. All Offer and Requisition fields, either user-defined or system defined, can be used to create conditions. Conditional rules used within approval paths for offers may also contain a unique condition that compares the offer salary to the maximum salary on the requisition. Note that this comparison is entirely numeric, and does not take variables such as pay basis or currency into account when including an approver.
For example, for numeric fields, operator options include: is equal to, is less than, is greater than, is not equal to, is less than or equal to, is great than or equal to. Once the operator is set, the value is determined for the condition. An example of a condition might be: Salary is greater than or equal to 100,000K US.
Once a condition is created it can be added to the formula builder. The system administrator can add as many conditions as necessary to define the necessary rules. Once the conditions have been added, they can be strung together using boolean operator logic: And, Or, (,) and Not are supported functions. The conditions and formula functions can be moved around in the formula area by highlighting the item (represented in orange) using the < and > keys.
Creating an Unconditional Inclusion Rule
The Manage approval paths user type permission is required.
Under Dynamic Approval Routing, click on an approval path category.
Click Unconditional Rule next to Inclusion Rules.
Enter a code and a name.
Click Save.
Click Add next to Roles.
Select from the drop-down list how roles will be included in the approval process.
To select a role, click Search.
Click Save.
Click Activate.
The rule appears in the Inclusion Rules list of the Approval Paths and Rules page. The role is added to an approval path regardless of the Organization-Location-Job Field structure.
Creating a Conditional Inclusion Rule
The Manage approval paths user type permission is required.
Under Dynamic Approval Routing, click on an approval path category.
Click Conditional Rule next to Inclusion Rules.
Enter a code and a name.
Click Save.
Click Edit next to Conditions.
Create a condition by completing the fields then click Add this criteria to formula.
Click Save.
Click Add next to Roles.
Select from the drop-down list how roles will be included in the approval process.
To select a role, click Search.
Click Save.
Click Activate.
The rule appears in the Inclusion Rules list of the Approval Paths and Rules page.
Exclusion Rule
Exclusion rules define exceptional roles that may have been included in certain structure but an exception needs to be applied to remove that role in certain Organization-Location-Job Field circumstances.
Exclusion rules are optional. When activated, unlike inclusion rules, they automatically apply to all approval paths for that requisition, they do not need to be inserted into the approval path definition to work. Exclusion rules will omit matching approvers from the approval path.
Example: Never include the Director when the Organization is Canadian Operations.
When defining exclusion rules, three options are available:
| Option | Description |
|---|---|
| All roles included between the following roles | When this type of rule is used, the system will ignore all roles in the system and pay attention only to the employee "reports to" structure. The system will look at who is the Manager of the requisition/offer and will go up the number of specified direct reports from that manager. |
| Only the selected role | Allows the selection of a specific hierarchical or functional role in the approval path. Note: when a hierarchical role is used, the system will look at who is the Manager of the requisition/offer and will go through the "reports to" structure until it finds an employee with the specified hierarchical role. It will then include the first matching employee in that hierarchical role. For example, if there were two directors in the "reports to" structure and the director hierarchical role was selected, only the first director in the hierarchy would be added to the flow ordered by how they report to one another. |
| All roles included up to the specified number of levels. The system administrator specifies the role and the # of upper levels. |
Allows the selection of a series of employees using the hierarchical role structure in the approval path. The system will use the Hiring Manager of the requisition and will go through the reports to structure until it finds the first employee with the specified role. It will then include this person and every employee in the reporting structure up to and including the first employee it finds at # hierarchical roles above the specified role in the path. |
Exclusion of Users Based on Their Roles
It is possible to exclude people who have a particular role but also people having that role, regardless of which other inclusion rules their roles may fit. An option is available when configuring exclusion rules: Prevent users from being included by any inclusion rule. If this rules applies (based on OLF), it will definitively exclude the user from the approval path.
For example, a recruiter submits a requisition for approval. The hiring manager for the requisition, Dan, is also a director at the company. The DAR rules specify that hiring managers should not approve requisitions. The DAR rules also specify that directors must approve requisitions. The system administrator selected the new option Prevent users from being included by any inclusion rule. As a result, Dan the hiring manager and director is not an approver on the requisition (even though the inclusion rule specifies that directors must approve requisitions).
Creating an Exclusion Rule
The Dynamic Approval Routing feature must be activated.
The Manage approval paths user type permission is required.
The role to be excluded appears in the Roles section. Users associated to the role, and with a matching Organization, Location and Job Field, will not be requested for approval for that category of approval path.
Defining the Approval Path Properties, Settings and Notifications
The Manage approval paths user type permission is required.
A new approval path is available for the chosen approval path category.
Sequence
A sequence is the order in which the approvers will be displayed to the user when requesting approval.
Sequences are used in the Dynamic Approval Routing (DAR) feature. A sequence is part of the approval path and determines the order of approvers (roles) for the assigned context. Roles may be set as "required" on a sequence so that progress is halted if selected roles are not included. If these approvers are not available when the path is generated, the user will not be able to proceed in generating the approval request and will instead be required to contact their system administrator to proceed. This will allow the system administrator to intervene and review configuration to ensure the appropriate approvers are in place for the requisition.
Multiple sequences may be active on a path at one time. The sequences are contextualized, so the sequence can be different for different Organizations, Locations and/or Job Fields. Where DAR is activated, a sequence must exist. It is recommended that a default sequence be used to ensure approvals can proceed if a context does not match any other defined sequence.
It is possible to create a sequence and not give it a specific context. In this case, the sequence will reside at the root level and will apply as the default sequence to be used in any case where a more specific context matching sequence is not found.
It is important when defining a sequence to include all possible roles that may ever be included in an approval path. Any invoked role that has no defined sequence will be randomly appended to the end of the approval path. There is no need to include Legacy Onboarding specific roles such as New Hire or Process Owner as these roles never play a part in approval routing for requisitions or offers.
Note, when the From the manager role up to the number of specified direct reports inclusion rule option is used, these individuals will always appear first in the sequence before any other approvers.
Creating the Sequence of Approvers
The Manage approval paths user type permission must be granted in the SmartOrg User Types feature.
The approvers will be requested for approval in the selected order.
Linking Inclusion Rules
The Manage approval paths user type permission is required.
Under Dynamic Approval Routing, click on an approval path category.
Click an approval path.
Click Add next to Inclusion Rules.
Select one or several inclusion rules.
Click Select.
Click Save.
Testing the Dynamic Approval Routing Workflow
By narrowly constraining the Organization-Location-Job Field sequence contexts on the active workflow, it is possible to test your Dynamic Approval Routing workflow prior to full deployment with a small sample that can be easily controlled. This step is recommended to ensure that the desired results are achieved prior to enrolling out to the entire employee population.
Ensure roles are activated and assigned properly to users.
Ensure all DAR components are active (approval paths, rules, sequences).
Ensure inclusion rules are included on the active workflow for every role expected to be included in the approval workflow.
Ensure sequences are defined for the desired Organizations-Locations-Job Fields contexts and contain all possible approver roles.
Observe structure for active path and create entity (requisition) within that category.
Observe the approval path presented to the initiating user and ensure it is as expected.
Activating an Approval Path
The Manage approval paths user type permission is required.
Under Dynamic Approval Routing, click on an approval path category.
Click on an approval path.
Click Activate next to the name of the approval path.
The activated approval path can no longer be assigned the draft status. The approval path is available to users when requesting an approval for the given category.
Dynamic Approval Routing - Settings and Permissions
The following permissions and settings are used to configure the Dynamic Approval Routing (DAR) feature.
| User Type Permission | Location |
|---|---|
| Manage Functional and Hierarchical Roles | Configuration > [SmartOrg] Administration >User Types > Configuration > User Management |
| View Functional and Hierarchical Roles | Configuration > [SmartOrg] Administration >User Types > Configuration > User Management |
| Manage approval paths. | Configuration > [SmartOrg] Administration > User Types > Configuration > Approval path |
| Access exclusion rules. | Configuration > [SmartOrg] Administration > User Types > Recruiting >Administration |
| All requisition approval permissions are grouped under the Approval functional domain. | Configuration > [SmartOrg] Administration > User Types > Recruiting > Requisitions > Approval |
| Setting | Description | Default Value | Location |
|---|---|---|---|
| Enable Approval Models | Enhances the approval path model for requisitions and offers. Allows collaborative (parallel) approval in addition to sequential approval. Allows forwarding an approval request to another approver if the user has the permission to amend approval paths. | No | Configuration > [Recruiting] Settings |
Hierarchical Roles - Other Configuration Tasks
Activating a Hierarchical Role
The hierarchical role must be draft or inactive.
The Manage Functional and Hierarchical Roles user type permission is required.
In the Hierarchical Roles list, click on a role.
In the Hierarchical Role page, click Activate.
The role will be available in the Role Selector page when creating an approval path. The role can no longer be deleted.
Deactivating a Hierarchical Role
The hierarchical role must be active.
The Manage Functional and Hierarchical Roles user type permission is required.
In the Hierarchical Roles list, click on an role.
In the Hierarchical Role page, click Deactivate.
The role will no longer be available when creating an approval path and when selecting a superior role.
Deleting a Hierarchical Role
The hierarchical role must be draft.
The Manage Functional and Hierarchical Roles user type permission is required.
In the Hierarchical Roles list, click Delete next to a role.
The hierarchical role is permanently deleted from the database and will no longer appear in the Hierarchical Roles list.
Adding a User to a Hierarchy
The Manage Functional and Hierarchical Roles user type permission is required.
In the Hierarchical Roles list, click on a role.
In the Hierarchical Role page, click Add next to Users.
In the User Selector page, select a user.
Click Select.
The user will appear in the users list of the hierarchical role. The selected user will be called upon when an approval path uses this role.
Removing a User from a Hierarchy
The Manage Functional and Hierarchical Roles user type permission is required.
In the Hierarchical Roles list, click on a role.
In the Hierarchical Role page, click Remove next to a user.
Click Yes to confirm the deletion.
The user no longer appears in the users list of the hierarchical role. The selected user will no longer be called upon when an approval path uses this role.
Functional Roles - Other Configuration Tasks
Activating a Functional Role
The functional role must be draft or inactive.
The Manage Functional and Hierarchical Roles user type permission is required.
sClick on a role.
Click Activate.
The role will be available in the role selector when creating an approval path. The role can no longer be deleted.
Deactivating a Functional Role
The functional role must be active.
The Manage Functional and Hierarchical Roles user type permission is required.
Click on a role.
Click Deactivate.
The role will no longer appear in the Role Selector page when creating or editing an approval path.
Note that roles already selected in dynamic approval routing will continue to be resolved. You might want to review already defined DAR.
Deleting a Functional Role
The functional role must be draft.
The Manage Functional and Hierarchical Roles user type permission is required.
Click Delete next to the role.
The functional role is permanently deleted from the database and will no longer appear in the Functional Role list.
Creating an Assignee
Allows a system administrator to add an assignee to a functional role.
The Manage Functional and Hierarchical Roles user type permission is required.
In the Functional Role page, click on a functional role.
In the Role page, click Create next to Assignees.
In the New Assignee page, click Search.
In the User selector, select a user.
Click Select.
Click Save.
The selected user will appear in the Assignees list of the role.
Deleting an Assignee
Allows a system administrator to remove an assignee from a functional role.
The Manage Functional and Hierarchical Roles user type permission is required.
In the Functional Role page, select a functional role.
In the Role page, click Delete next to the assignee.
Click Yes to confirm the deletion.
Click Save.
The deleted assignee no longer appears in the Assignees list of the role. The assignee will no longer be called upon for approval when the role in which it was included will be used in an approval path.
Associating an Assignee to an Organization, Location or Job Field
Allows a system administrator to contextualize the use of an assignee in a role.
The assignee must be created.
The Manage Functional and Hierarchical Roles user type permission is required.
Click on a role.
Click on an assignee.
Click Add next to Organization, Location or Job Field.
Make a selection.
Click Select.
The assignee will be available in Recruiting only if the Organization, Location or Job Field matches the Organization, Location or Job Field specified for the requisition or the offer for which an approval is being requested.
Dissociating an Assignee from an Organization, Location or Job Field
The assignee must be created.
The Manage Functional and Hierarchical Roles user type permission is required.
Click on a role.
Click on an assignee.
Click Remove next to an organization, location or job field.
The assignee will be available in Recruiting when requesting an approval for any organization, location or job field.
Dynamic Approval Routing Rules - Other Configuration Tasks
Activating an Exclusion Rule
The Manage approval paths user type permission is required.
The exclusion rule must be draft or inactive.
Under Dynamic Approval Routing, click on an approval path category.
Click on an exclusion rule.
In the Exclusion Rule page, click Activate.
The exclusion rule appears as active in the Exclusion Rules list.
Deactivating an Exclusion Rule
The exclusion rule must be active.
The Manage approval paths user type permission is required.
Under Dynamic Approval Routing, click on an approval path category.
Click on an exclusion rule.
Click Deactivate.
The exclusion rule appears as inactive in the Exclusion Rules list and can no longer be used in an approval path.
Deleting an Exclusion Rule
The Manage approval paths user type permission is required.
The exclusion rule must be draft.
Under Dynamic Approval Routing, click on an approval path category.
Click Delete next to the exclusion rule.
The exclusion rule no longer appears in the Exclusion Rules list; it is permanently deleted. It therefore can no longer be used in an approval path.
Adding a Role to an Exclusion Rule
The Manage approval paths user type permission is required.
Under Dynamic Approval Routing, click on an approval path category.
Click on an exclusion rule.
Click Add next to Roles.
Select from the drop-down list how roles will be included in the approval process.
To select a role, click Search.
Click Save.
The role appears in the Roles list of the Exclusion Rule page. Users associated to the role will be excluded from the approval path.
Removing a Role from an Exclusion Rule
The Manage approval paths user type permission is required.
Under Dynamic Approval Routing, click on an approval path category.
Click on an exclusion rule.
Click Remove next to the role.
The role will no longer appear in the Roles list of the Exclusion Rule page. Users associated to the role can be selected in the approval process.
Activating an Inclusion Rule
The Manage approval paths user type permission permission is required.
Under Dynamic Approval Routing, click on an approval path category.
Click on an inclusion rule.
Click Activate.
The inclusion rule appears as active in the Inclusion Rules list so it can be used in an approval path to include users from approving requisitions or offers.
Deactivating an Inclusion Rule
The Manage approval paths user type permission is required.
Under Dynamic Approval Routing, click on an approval path category.
Click on an inclusion rule.
Click Deactivate.
The inclusion rule appears as inactive in the Inclusion Rules list and can no longer be used in an approval path.
Deleting an Inclusion Rule
The Manage approval paths user type permission is required.
The inclusion rule must be draft.
Under Dynamic Approval Routing, click on an approval path category.
Click Delete next to an inclusion rule.
Click Yes to confirm the deletion.
The inclusion rule no longer appears in the Inclusion Rules list and is permanently deleted from the database.
Adding a Role to an Inclusion Rule
The Manage approval paths user type permission is required.
Click on an approval path category.
Click on an inclusion rule.
Click Add next to Roles.
Select from the drop-down list how roles will be included in the approval process.
To select a role, click Search.
Click Save.
The role appears in the Roles list of the Inclusion Rule page. Users associated to the role will be requested for approval.
Activating an inclusion rule.
Removing a Role from an Inclusion Rule
The Manage approval paths user type permission is required.
Under Dynamic Approval Routing, click on an approval path category.
Click on an inclusion rule.
Click Remove next to the role.
The role no longer appears in the Roles list of the Inclusion Rule page.
Dynamic Approval Routing Categories - Other Configuration Tasks
Activating an Approval Path Category
The Manage approval paths user type permission must be granted in the SmartOrg User Types feature.
Under Dynamic Approval Routing, click Activate next to an approval path category.
When an approval is requested by a user, if the approval path category is activated for the approval being requested, then it is the dynamic approval routing process that will be used in Recruiting.
Deactivating an Approval Path Category
The Manage approval paths user type permission must be granted in the SmartOrg User Types feature.
In the Configuration page, under Dynamic Approval Routing, click Deactivate next to an approval path category.
When an approval is requested by a user, if the approval path category is deactivated for the approval being requested, then it is the standard approval process that will be used.
Deleting an Approval Path
The Manage approval paths user type permission must be granted in the SmartOrg User Types feature.
The approval path must be draft.
Under Dynamic Approval Routing, click on an approval path category.
Click Delete next to an approval path.
The approval path is no longer available for the chosen approval path category.
Deactivating an Approval Path
The Manage approval paths user type permission must be granted in the SmartOrg User Types feature.
The approval path must be active.
Under Dynamic Approval Routing, click on an approval path category.
Click on an approval path.
Click Deactivate next to the name of the approval path.
The approval path is no longer available to users when requesting an approval for the given approval path category.