5Lists and Filters
Lists and Filters
List Formats
List formats allow the display of candidate and requisition information within columns.
Default candidate and requisition list formats are provided with the application. However, system administrators can create new list formats to better suit their organization needs.
List formats are available in the List Formats page. Recruiting Center users can select (among the list formats made available by their system administrator) the list format they wish to use to display candidate and requisition information . They can also create up to three list formats and select columns to display specific information (if permissions were granted). Columns available to choose from have been previously defined by system administrators.
List Format Context
List formats are organized by context, that is pages in the system where candidate files and requisition files would be presented to Recruiting Center users.
List format contexts are provided by the system. System administrators cannot create new ones. A context can contain several list formats. The number of list formats that can be created for a context is defined by Oracle.
| Type of List | Default List Format Contexts |
|---|---|
| Candidate |
|
| Requisition |
|
List Format Variation
Variations are used to organize list format contexts.
Three variations are available. Each Recruiting Center user is linked to a variation via their configuration profile.
Configuring List Formats
The configuration of a list format consists of the following steps.
Configuring fields so they can be used as column headers in a list.
Assigning a list format variation to configuration profiles.
When a field was not made visible to the user for both internal and external candidates, the column will appear but data will be blank for situations where the user should not see the data.
When a field was made visible to the user for either internal or external candidates, the column will appear but data will be blank for situations where the user should not see the data.
When a field was made visible and available (active) to the user but was not used in the candidate file, data will be displayed if it exists. (This may happen if the field was supplied on another submission where the field is present).
When a field is not present on the file because it was not configured for display in a specific context (Organizations-Locations-Job Fields or staffing types), data will be displayed if it exists. (This may happen if the field was supplied on another submission where the field is present.)
Configuring a Field as a Column Header in a List
Click a field category.
Click the name of a field.
Click Edit Field Availability next to Properties.
Under Show Standard Fields, select Taleo Recruiting.
Click Save.
Creating a List Format
Click on the Candidate or Requisition tab.
Select a variation in the Show list.
Click the name of a context.
In the Context Details page, under the Formats for this Context tab, click New...
Provide a name for the list format.
Translate the name of the list format using the Languages list located on the top right hand side of the page.
Optional: Enter comments.
Optional: Specify if the list format you are creating will be the default list format for the context.
Choose columns for the list by selecting the check box next to each column name.
Order columns by selecting a number in the Sequence Number column, then click Reorder.
Sort candidate or requisition files that will be displayed in the list according to a specific criterion. Up to three different sorting criteria can be specified.
To select a criterion, click the Up Arrow icon in the Sort By column next to the desired column name.
To select a second sorting criterion, click Up Arrow icon in the Then by column next to the desired column name.
To select a third sorting criterion, click Up Arrow icon in the second Then by column next to the desired column name.
To select ascending or descending sorting order, click Up Arrow icon repeatedly.
Optional: Select the Group records by first sort criterion option if you want to group files in the list format.
Click the Active check box to activate the list format.
Click Done.
The list format appears in the Context Details page, under the Formats for this Context tab.
If you created a candidate list format, specify the candidate file identifier content.
Displaying Advanced Filters in a List
Click the Candidate or Requisition tab.
Select a variation in the Show list.
Click the name of a context.
Select Show Advanced Filters.
Click Done.
The Advanced Filters button is displayed in the Recruiting Center for the selected candidate or requisition list format context.
Displaying Quick Filters in a List
System administrators have the ability to configure quick filters available in requisitions and candidates lists.
For a list format context, system administrators can select quick filters amongst a predefined list of filters. See Candidate Quick Filters and Requisition Quick Filters.
System administrators can define a default value for certain quick filters. These default values are automatically applied to the list.
-
If a quick filter is displayed to users, users can choose to edit the default value for the filter.
-
If a quick filter is not displayed to users, this means that the users will only see candidates or requisitions according to this default value. As a result, the total number of candidates or requisitions can be different from what users see on their list.
Displaying Quick Filters
Quick filters are displayed in the Recruiting Center for the selected requisition or candidate list format context.
Creating Custom Instructions for a List Format Context
Only one text can be customized by context by language.
The text must be created for all available languages.
The text appears in a callout located to the left of the List Format Configuration icon which is available in the top right hand corner of a list. The callout only appears if instructions are provided. The instructions appear for all lists in the context.
Assigning a List Format Variation to Configuration Profiles
Click a configuration profile.
Click the Candidate List Format setting.
Click Edit.
Select a list format variation in the Value drop-down list.
Click Save.
Click the Requisition List Format setting.
Click Edit.
Select a list format variation in the Value drop-down list.
Click Save.
Go back to the SmartOrg Configuration menu.
Click User Accounts.
Click a user account.
Click Edit next to Account Information.
Select a configuration profile.
Click Save.
List Format - Other Configuration Tasks
Click the Candidate or Requisition tab.
Select a variation in the Show list.
Click the name of a context.
In the Formats for this Context tab, click a list format.
Select the check box next to a column.
Click Done.
Adding a Column to View Completed Submissions
When configuring list formats, system administrators can add a column, called Submission Completed Date, in requisition-specific candidate lists so that recruiters can view and sort candidate submissions based on the date when a job submission was completed.
Once the column Submission Completed Date is added to a requisition-specific candidate list, the title of the column in Recruiting is displayed as Submission Complete.
Job submissions are considered complete when:
A candidate completed a job submission and clicked the Submit button.
A candidate (usually internal candidate) refers someone when creating or updating a submission.
An agent refers someone when creating or updating a submission.
A recruiter matches a candidate to a requisition (when creating a new job submission or when a match is done with an incomplete job submission).
An import is done on a job submission.
A candidate is hired on a job submission.
This feature was developed to allow recruiters to look through a list of candidate submissions from top to bottom, where the candidate submission on the top is the oldest and the one at the bottom is the most recent. In some companies, this way of screening is mandatory as selection is performed in a first come first serve manner. To do this, the recruiter must see and sort on the submission completion date (ascending order) such that the oldest submissions are displayed on the top and the recruiter goes down through the list one candidate at a time. In addition to this, the correct filter must be activated in order not to include submissions that are not completed.
System administrators should verify if they were using the Submission Creation Date column in list formats to accomplish a behavior similar to the new Submission Completed Date column. If this is the case, it is recommended to use the new Submission Completed Date column instead because the Submission Creation Date column can include candidates that have not completed their submission (either because they saved as draft and never came back or simply because they simply dropped out of the process.
All candidate (submission) list contexts support the new Submission Completed Date column except for the following:
All Candidates by Folder
All Candidates by Offer
All Candidates by Talent Pool
Candidate Capture/Possible Duplicates
List of automatically pooled candidates
Search results/Advanced search
Search results/ Conceptual search
Search results/ Quick search
Ordering Columns in a List Format
Click the Candidate or Requisition tab.
Select a variation in the Show list.
Click the name of a context.
In the Formats for this Context tab, click a list format.
Select a number in the Sequence Number column.
Click Reorder.
Click Done.
Columns are placed in the list according to the order specified.
Selecting a Default List Format
The list format must be Active.
Click the Candidate or Requisition tab.
Select a variation in the Show list.
Click the name of a context.
In the Formats for this Context tab, click a list format.
Select the option Default format for this context.
Click Done.
In the Context Details page, under the Formats for this Context tab, a check icon appears in the Default column, next to the list format. The list format will be applied by default to the list.
Setting Sort Criteria in a List Format
The list format must be created in order to set sorting criteria.
Click the Candidate or Requisition tab.
Select a variation in the Show list.
Click the name of a context.
In the Formats for this Context tab, click a list format.
To select a criterion, click in the Sort By column next to the desired column name.
To select a second sorting criterion, click the Up Arrow icon in the Then by column next to the desired column name.
To select a third sorting criterion, click the Up Arrow icon in the second Then by column next to the desired column name.
To select ascending or descending sorting order, click the Up Arrow icon repeatedly.
Click Done.
Grouping Files in a List Format
Click the Candidate or Requisition tab.
Select a variation in the Show list.
Click the name of a context.
In the Formats for this Context tab, click a list format.
Select the option Group records by first sort criterion.
Click Done.
Files are grouped in the candidate or requisition list. For example, a system administrator could decide to group candidate files by cities. As a result, the candidate list could display candidate files grouped by the city of Boston, then the city of Los Angeles, New York, San Francisco, etc.
Ordering List Formats
Click the Candidate or Requisition tab.
Select a variation in the Show list.
Click the name of a context.
In the Formats for this Context tab, select a number in the Sequence Number column.
Click Reorder.
Click Done.
List formats for the context are displayed in the specified order.
Deactivating a List Format
Click the Candidate or Requisition tab.
Select a variation in the Show list.
Click the name of a context.
In the Formats for this Context tab, click a list format.
Clear the Active checkbox.
Click Done.
In the Context Details page, under the Formats for this Context tab, a check icon no longer appears in the Active column next to the list format. Also, the list format is unavailable when users select a list format for a candidate or requisition list.
If you no longer want this list format, you can delete it.
Deleting a List Format
A default list format cannot be deleted.
Click the Candidate or Requisition tab.
Select a variation in the Show list.
Click the name of a context.
In the Formats for this Context tab, select a list format.
Click the Delete icon.
The list format is deleted from the database. It no longer appears in the Context Details page, under the Formats for this Context tab and it is unavailable to users.
Adding a Column to a Context
Click the Candidate or Requisition tab.
Select a variation in the Show list.
Click the name of a context.
In the Columns in this Context tab, click Add...
Select a field group.
Select a field in the Available Fields list.
Click Add.
Click Done.
The column appears in the Columns in this Context tab. The column is available to Recruiting Center users when they customize their list formats.
Removing a Column from a Context
Click the Candidate or Requisition tab.
Select a variation in the Show list.
Click the name of a context.
In Columns in this Context tab, select a column.
Click Remove.
The column no longer appears in the Columns in this Context tab. Also, the column is not displayed to users when they customize their own candidate or requisition list format.
Reordering columns in the context.
Hiding Advanced Filters
Click the Candidate or Requisition tab.
Select a variation in the Show list.
Click the name of a context.
Clear Show Advanced Filters.
Click Done.
The Advanced Filters button is no longer displayed for the selected candidate or requisition list format context.
Candidate File Identifier
The candidate file identifier is used to specify which candidate-specific information is presented in the Candidate column of candidates lists.
The candidate file identifier can provide the following information in the form of text or icon:
Candidate name (first name, last name, middle initial)
Identification number
Ace Candidate icon
Internal Candidate icon
In Selection Process icon
Referred Candidate icon
The Candidate column is always displayed in candidates lists. System administrators are responsible of defining which information will appear by default in this column. However, Recruiting Center users can modify the default set by their system administrator via their personal preferences available under My Setup.
Specifying the Default Candidate File Identifier Content
Click Candidate.
Select the information you want to display.
Select a sorting key to determine which value will be used to sort the candidate column.
Click Done.
Selected values appear in the Record Identifiers page. Also, the elements selected will appear by default in the Candidate column of candidates lists.
List Format - Permissions and Settings
The following permissions and settings are used for the list format functionality.
| User Type Permission | Description | Location |
|---|---|---|
| Create personal list formats for the requisition list | Allows Recruiting Center users to create personalized requisition list formats. | Configuration > [SmartOrg] Administration > [Users] User Types > Recruiting > Requisitions |
| Create personal list formats for the candidate list | Allows Recruiting Center users to create personalized candidate list formats. | Configuration > [SmartOrg] Administration > [Users] User Types > Recruiting > Candidates |
| Access requisition-specific candidate lists | Allows Recruiting Center users to access requisition-specific candidate lists. | Configuration > [SmartOrg] Administration > [Users] User Types > Recruiting > Candidates |
| Setting | Description | Default Value | Location |
|---|---|---|---|
| Item Requiring Attention icon in Candidate Submissions | Removes the Item Requiring Attention icon from the candidate file upon some specific actions performed by a recruiter or a hiring manager against a candidate, even if the candidate's file has not been physically viewed. | On | Configuration > [Recruiting] Settings |
| Maximum Number of Items in List | Indicates the maximum number of items displayed in the list (tasks, requisitions, templates, submissions, etc). The maximum number of items allowed is 1000. Contact Oracle Support for details. | 1000 | Configuration > [Recruiting] Settings |
| Maximum Candidate List Columns | Sets the number of columns that can be used in a candidate list format. The default value is 17 columns. | 17 | Configuration > [Recruiting] Settings |
| Maximum Number of UDF for Candidate List Columns | Sets the number of columns of type user-defined field (UDF) that can be used in a candidate list format. The default value is 12. Contact Oracle Support for details. | 12 | Configuration > [Recruiting] Settings |
| Item Requiring Attention icon in Candidate Submissions | Removes the Item Requiring Attention icon when an action has been performed against a candidate, even if the candidate's file has not been physically viewed. | No | Configuration> [Recruiting] Settings |
| Last Activity Date Default Filter | By default, apply the filter "Last Activity Date". | No | Configuration> [Recruiting] Settings |
| Last Activity Date Default Filter Value | Show only candidate files whose last activity date has occurred during the last X days (0=today). | 30 | Configuration> [Recruiting] Settings |
The table below indicates the actions affected by the activation of the Item Requiring Attention icon in Candidate Submissions setting.
| Action | Is the Item Requiring Attention icon removed? |
|---|---|
| General Actions | |
| Go in the candidate profile | No |
| Offer Actions | |
| Create Offer | Yes |
| Make Offer | Yes |
| Cancel Offer | Yes |
| Capture Expectation | Yes |
| Capture Candidate Response | Yes |
| Capture Competitive Offer | Yes |
| Extend Offer | Yes |
| Renege Offer | Yes |
| Rescind Offer | Yes |
| Send Offer | Yes |
| Update Expiration Date | Yes |
| Update Start Date | Yes |
| Request Approval | Yes |
| Amend Approval Path | Yes |
| Decide on Approval | Yes |
| Terminate Approval | Yes |
| Candidate Selection Workflow Actions | |
| Move/Change Status Step | Yes |
| Bypass | Yes |
| Reject | Yes |
| Has Declined | Yes |
| Hire | Yes |
| Schedule Interview | Yes |
| Update Interview | Yes |
| Cancel Interview | Yes |
| Mark as Yes | Yes |
| Mark as No | Yes |
| Mark as Maybe | Yes |
| Move all to next step | Yes |
| Move to next step | Yes |
| Revert | Yes |
| Reset Selection Process | Yes |
| Candidate File Actions | |
| Match | No |
| Merge | No |
| Share | No |
| Fill Out Form | No |
| No | |
| File in folder | No |
| Compare | Yes |
| Add Comment | No |
| Add Grade | No |
| Attach File | No |
| Send Correspondence | No |
| Find Similar Candidate | No |
| Remove candidate | No |
| Delete Submission | Yes |
| Undelete Submission | Yes |
| Create Screening Request | No |
| Open Candidate Submission | Yes |
| Legacy Onboarding Actions | |
| Start Legacy Onboarding Process | Yes |
| Cancel Legacy Onboarding Process | Yes |
Column Width in Lists
The width of columns in lists differs whether the column header contains an icon or words.
The width of columns represented with an icon is 26 pixels.
The width of columns represented with a word (field) is set as follows: the word length + the sorting icon length. There is a minimum default width of 50 pixels. If a column has two fields (like Employer/Title or Step/Status), then the width would be increased by 30 pixels.
There are exceptions to the above rule. The table lists columns that have a specific hard-coded default width.
| Candidate List Column | Hard-coded Width |
|---|---|
| Application LinkedIn ID | 70 pixels |
| Profile LinkedIn ID | 70 pixels |
| Application City | 100 pixels |
| Profile City | 100 pixels |
| Application State, City | 100 pixels |
| Profile State, City | 100 pixels |
| Contest Number, Job Information, Title | 170 pixels |
| Job Information, Title | 170 pixels |
| Application CRI | 170 pixels |
| Profile CRI | 170 pixels |
| Requisition List Column | Hard-coded Width |
|---|---|
| Requisition Active Locales | 45 pixels |
| Requisition Mini Active Locales | 45 pixels |
| Job Active Locales | 45 pixels |
| Requisition Status | 100 pixels |
| Requisition Status Detail | 100 pixels |
| Requisition Mini Status Detail | 100 pixels |
| Job Status | 100 pixels |
| Requisition Recruiter | 100 pixels |
| Requisition Mini Recruiter | 100 pixels |
| Requisition Recruiter Assistant | 100 pixels |
| Requisition Mini Recruiter Assistant | 100 pixels |
| Job Recruiter | 100 pixels |
| Requisition ID | 100 pixels |
| Requisition Title | 170 pixels |
| Requisition Mini Title | 170 pixels |
| Requisition Job Information Title | 170 pixels |
| Requisition Mini Job Information Title | 170 pixels |
| Requisition Mini Title 2 | 170 pixels |
| Requisition Mini Title 3 | 170 pixels |
| Job Information Title | 170 pixels |
Maximum Number of Rows Displayed in a List
| Maximum number of rows returned | Results displayed if the maximum number of rows returned is exceeded | Results are sorted if not all rows can be displayed | Scrollbar available | |
|---|---|---|---|---|
| Requisitions List | 1000 | Yes (but, no indication that the results exceeded the limit) | Yes. A system sort is applied using the last modification date. The user can then perform a sort on the 1000 requisitions. | Yes |
| Candidates List | 1000 | No (but a message indicates to filter the list) | No | Yes |
| Job-Specific Candidate List | 1000 | No (but a message indicates to filter the list) | The user can perform a sort. | Yes |
| Automatic Candidate Pooling List | 300 | Yes (but, no indication that the results exceeded the limit) | No | Yes |
| Advanced Search Results List | 300 | Yes (but, no indication that the results exceeded the limit) | No | Yes |
| Offers List | 1000 | No (but a message indicates to filter the list) | No | Yes |
| Selectors (such as Organizations, Locations, Job Fields, Employers, Institutions, etc.) | 1000 | Yes (but, no indication that the results exceeded the limit) | Alphabetical sort | Yes |
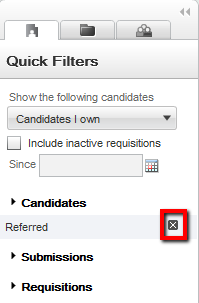
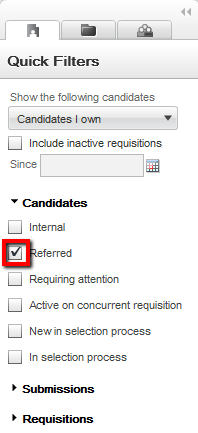
Quick Filters
Quick filters help Recruiting Center users to quickly filter a list down to relevant information.
Quick filters are displayed on the left panel of a page and are available in the following lists:
-
Tasks
-
Requisitions
-
Candidates
-
Offers
-
Requisition Templates
-
Questions
-
Interview Questions
-
Disqualification Questions
-
Competencies
Evaluation Categories
Evaluation Questions
Evaluation Questionnaires
By default, quick filter categories are collapsed and only display selected filtering criteria. When a filter category is collapsed, you can remove a criterion by clicking the Remove icon to the selected criterion. When a filter category is expanded, you can remove a criterion by clearing the criterion.
When no quick filter is selected, the list displays all available entries. As soon as one filter is selected, it is automatically applied to the list and the list refreshes according to the selection made. Users do not need to refresh the list. For example, in the Requisitions list, if the "Status - Open" quick filter is selected, only open requisitions are displayed in the list.
Several quick filters can be applied at a time. Some quick filters have a Refresh icon to refresh the related list. Also, when entering data in more than one field and clicking the Refresh icon or pressing the Enter key, the refresh action takes into account the data entered in all the fields.
Displaying Quick Filters in a List
System administrators have the ability to configure quick filters available in requisitions and candidates lists.
For a list format context, system administrators can select quick filters amongst a predefined list of filters. See Candidate Quick Filters and Requisition Quick Filters.
System administrators can define a default value for certain quick filters. These default values are automatically applied to the list.
-
If a quick filter is displayed to users, users can choose to edit the default value for the filter.
-
If a quick filter is not displayed to users, this means that the users will only see candidates or requisitions according to this default value. As a result, the total number of candidates or requisitions can be different from what users see on their list.
Displaying Quick Filters
Quick filters are displayed in the Recruiting Center for the selected requisition or candidate list format context.
Quick Filters in the Requisitions Lists
Quick filters are available in requisitions lists and mini requisitions lists.
Quick filters in the requisitions list:
Primary Location
Organization
Job Field
Status
Requisition Title
Primary Location
Organization
Job Field
Quick Filters in the Candidates Lists
The table presents the quick filters available in different candidates lists.
| Quick Filter | All Candidates by Requisition | All Candidates By Folder | All Candidates By Offer | Requisition Specific Candidate List | Search Results - Quick or Advanced | List of automatically pooled candidates |
|---|---|---|---|---|---|---|
| Candidates - Internal | Yes | Yes | Yes | Yes | Yes | Yes |
| Candidates - Referred | Yes | Yes | Yes | Yes | Yes | Yes |
| Candidates - Requiring Attention | Yes | Yes | Yes | Yes | Yes | |
| Candidates - In selection Process | Yes | Yes | ||||
| Candidates - Active on Current Requisition | Yes | Yes | ||||
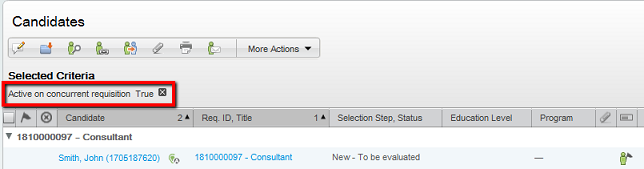
| Candidates - Active on concurrent requisition | Yes | Yes | Yes | Yes | ||
| Candidates - Exclude disqualified | Yes | Yes | ||||
| Candidates - New in selection process | Yes | Yes | ||||
| Submissions - Submission completed | Yes | Yes | ||||
| Submissions - Meet required criteria | Yes | Yes | ||||
| Submissions - ACE | Yes | Yes | ||||
| Submissions - Assets Met | Yes | Yes | ||||
| Submissions - Results between % | Yes | Yes | ||||
| Submissions -Creation Date | Yes | Yes | ||||
| Submissions -Completion Date | Yes | Yes | ||||
| Submissions - Last Activity Date | Yes | Yes | Yes | Yes | ||
| Submissions - Step | Yes | Yes | ||||
| Submissions -Status | Yes | Yes | ||||
| Submissions -Employer | Yes | Yes | Yes | Yes | ||
| Submissions -Program | Yes | Yes | Yes | Yes | Yes | |
| Submissions - Radius | Yes | |||||
| Requisitions - Status | Yes | |||||
| Requisitions - Organization | Yes | |||||
| Requisitions -Primary location | Yes | |||||
| Requisitions - Job Field | Yes | |||||
| Requisitions - Requisition ID | Yes | |||||
| Folder Name | Yes | |||||
| Offer Status | Yes | |||||
| Shift | Yes | Yes | ||||
| Offer Dates: Creation, Start, Approval, Expiration & Acceptance | Yes | |||||
|
Note: Candidates quick filters are considered a single select on different fields and the AND operator is used between filters. For example, when selecting the "Internal" and "Referred candidate" filters, the user will only see the candidates that are both Internal and Referred.
Note: The Candidates - Active on Current Requisition filter will display any candidates in an active step/status (excluding any that are in a rejection, decline, or in hire step/status). The Candidates - In selection Process filter will display any candidates in an active step/status (excluding any that are in a rejection, decline, or in a hire step/status) and not flagged as disqualified based on disqualification questions.
|
||||||
Quick Filters in the Offers List
Quick filters are available in the offers list.
Quick filters in the offers list:
Status
Accepted
Approval in Progress
Approval Rejected
Approved
Canceled
Draft
Extended
Has Declined
In Negotiation
Offer to be made
Refused
Rejected
Reneged
Rescinded
Creation Date
Start Date
Approval Date
Expiration Date
Acceptance Date
Candidates
Internal
Referred
Requiring attention
Most advanced progression status
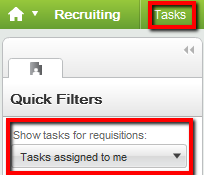
Quick Filters in the Tasks List
The table presents quick filters available in the Tasks list.
| Quick Filter | Description |
|---|---|
| Requiring attention | Displays tasks that have the Item Requiring Attention icon. Self-assigned tasks are the only type of tasks that do not have an Item Requiring Attention icon because it is always the assignee who creates the task. |
| Hide completed tasks | Removes tasks that have the Completed status. |
| Due date | Displays tasks for which the due date matches the selected value (All, Next Week, Today, Overdue). When the option "Exclude task without due date" is selected, tasks without a due date will not appear in the list. |
| Task type | Displays the type of task selected. If no task type is specified, all task types appear in the list. |
| Related to Candidate | Displays tasks related to the selected candidate. |
| Related to Requisition | Displays tasks related to the selected requisition. |
| Related to Assignee | Displays tasks related to the selected user. |
"Tasks assigned to me" filter
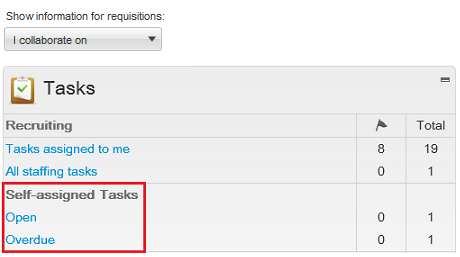
The "Tasks assigned to me" filter was created to eliminate the confusion of mixing tasks that users own with tasks that users might not own, but are for requisitions they own.
The "Tasks assigned to me" filter is available in the Tasks list and Tasks channel. In the Tasks list, the filter is available in the "Show tasks for requisitions:" drop-down menu. It is the default value when accessing the Tasks list. In the Tasks channel, the "Tasks assigned to me" link brings users to the Tasks list which displays tasks assigned to them.
In the Tasks channel, when a task is clicked under Self-assigned Tasks, users are brought to the Tasks list. The "Tasks assigned to me" value in the Tasks list is selected by default no matter what the "Show the following information" filter on the home page is set to.
Advanced Filters
Advanced filters help Recruiting Center users to filter lists using an expansive set of filtering criteria.
Both requisitions and candidates lists have an Advanced Filters button in the left panel, at the very bottom of the Quick Filters panel. Recruiting Center users can select several advanced filter criteria to filter a list. Once criteria are selected, the criteria are presented to the user across the top of the screen with a Remove icon next to the criteria. When clicking the Remove icon, the criteria is removed and the list is dynamically updated according to the updated criteria set. User-defined fields can also be available as filtering criteria.
Advanced filters are filtering on an already filtered list, that is whatever advanced filter criteria is selected, the list will be filtered based on what is already displayed in the list.
When using advanced filters for which words must be entered, users can enter partial words. For example, a user could filter a candidate list with candidates whose first name starts with "cath". The system would retrieve candidates whose first name is "cathy", "catherine" or "cathia".
Advanced Filter - Keyword
When using the Keyword advanced filter in a requisitions list, the system looks through this content of the requisition file:
Requisition number
Requisition title
Requisition title by manager
Requisition internal description
Requisition external description
Job board summary description
Internal qualifications
External qualifications
Abstract
Additional information
Department
Position
Requisition/Job Information UDF
Offer UDF
Department UDF
Displaying Advanced Filters in a List
Click the Candidate or Requisition tab.
Select a variation in the Show list.
Click the name of a context.
Select Show Advanced Filters.
Click Done.
The Advanced Filters button is displayed in the Recruiting Center for the selected candidate or requisition list format context.
Show Filters
The Show information for filter allows Recruiting Center users to filter information displayed in a list using ownership, collaboration or status criteria.
The Show information for filter can appear in the home page, the Requisitions list, Candidates list, Tasks list, Offers list, etc.
The Show filter:
Can be configured to be displayed everywhere except on the home page.
Can be configured to be displayed everywhere including the home page.
Can be hidden.
Values appearing in the Show filter depend on the permissions granted to the user and on the configuration of the application. Available values are the same for all three pages where the Show filter can appear. Possible values are:
... I own
... I collaborate on
... I own or collaborate on
... in my coverage area, I own or collaborate on
All
For example:
If a user's permissions does not allow the user to see requisitions he/she does not own, the user will only see the "I own" value.
If a user's permissions allow the user to see requisitions he/she does not own BUT the collaborator feature is not available in the company, the user will not see the following values related to the collaborator feature: "I own or collaborate on", "I collaborate on" and "in my coverage area, I own or collaborate on".
If a user's permissions allow the user to see requisitions he/she does not own AND the collaborator feature is available in the company, the user will see the following values related to the collaborator feature: "I own or collaborate on", "I collaborate on" and "in my coverage area, I own or collaborate on".
When displaying the Candidates list, a check box called Include inactive requisitions since appears just underneath the Show filter. Selecting this check box will add to the Requisitions list the Deleted, Canceled and Filled requisitions.
Displaying the Show Filter
The following settings are used to configure the Show filter.
| Setting | Description | Default Value | Location |
|---|---|---|---|
| Show information for Filter Visibility | To set whether the Show filter control is displayed on lists and the home page. If you think users will not need to change the value of the Show filter, consider not displaying the Show filter to them. |
Everywhere including in the home page | Configuration > [SmartOrg] Administration > [Users] Configuration Profiles |
| Default Value for the Show Information Filter | Default Value for the Show Information Filter | Requisitions I own | Configuration > [SmartOrg] Administration > [Users] Configuration Profiles |