9Offer Management
Offer Management
Offer Process
Recruiting Center users can create offers and approve offers.
The offer process may vary from one company to another. Here is a basic offer process. The recruiter or manager selects the Create Offer action in the More Actions menu when the candidate has reached the Offer step. The offer can be created quickly by selecting a template as a starting point. Such details as the salary information on the requisition or the candidate's current job salary can be included. The offer then gets sent for approval or it can be self-approved if the user has the appropriate permission. The recruiters can set up frequent approvers to make this a fairly easy step in the process. Once approved, the offer is sent to the candidate in writing via email, letter, or electronically. Verbal offers can also be extended and recorded at this time. If the offer is accepted, the recruiter can proceed to any additional CSW steps, confirm the start date and start the onboarding process. If the offer is not accepted, the recruiter has a choice to negotiate new offer terms and do the cycle again or rescind the offer and go back to the workflow.
Offers and Candidate Selection Workflows
Candidate selection workflows may be configured to contain an Offer step or an RSOffer step.
Candidate Selection Workflow and Offer step
Using the Offer step is a simplified way to track offer activity in a candidate hiring process without enabling the entire Offer Management module functionality. Placing this step in a workflow will not enable the use of the Offers tab and Offer Approvals tab. A candidate selection workflow containing an Offer step allows users to move candidates from one step to another using standard actions (Change Step/Status, Move, Revert).
When adding the Offer step to a candidate selection workflow, the following actions are available to users via the More Actions list.
Make an offer.
Reject candidates.
Candidate has declined.
Candidate Selection Workflow and RSOffer step
The RSOffer step is a special candidate selection workflow step created for the Offer Management module. The Offer Management module provides the tools for the creation of offers, offer approval, offer extension to the candidate, and capture of the candidate response. Users are also be able to capture competitive offer information as well as candidate current and future expectations.
With this type of workflow, instead of moving candidates using standard actions (Change Step/Status, Move, Revert), specific offer-related actions are presented in the More Actions list as they become an appropriate next activity in the Offer process.
System administrators are responsible for adding the RSOffer step in the appropriate candidate selection workflows. The RSOffer step must be placed before the Hire step. The RSOffer step cannot be customized or edited (except for qualifier groups and qualifiers that can be added to specific statuses).
When adding the RSOffer step to a candidate selection workflow, authorized users are able to:
Create offers.
Extend offers verbally, in writing, and electronically.
Send offers.
Capture a candidate response.
Capture a candidate expectations.
Capture a candidate current job terms.
Capture competitive offer information.
Approve offers.
etc.
Offer Form
The offer form presents the terms and conditions of a job offer.
The offer form is tied to the RSOffer step in a candidate selection workflow.
The offer form, available in the candidate file Offers tab, is where all the information is collected to make an offer. It contains not only the information about the current offer to be made to a candidate but it can also be used to collect and maintain information on the current requisition, previous offers, competitive offers, and current candidate expectations.
In the offer form, each offer appears in a column. When a new offer is created, it automatically appears in the first column to the left and is labeled Offer (New). It is possible to view up to four columns at a time. Users can use the arrows in the top right corner of the center panel to navigate through more offers. Users can also use the drop-down option at the top of each column to change or remove the context being viewed.
In the offer form, users with the appropriate permissions can view details about offers extended to the candidate for other requisitions. On the Job Submission card located on the left panel, users can click links available in the Other Submissions section.
Users can also view attachments and offer letters specific to each offer in the offer form.
Offer Statuses
An offer can go through different statuses.
| Status | Description |
|---|---|
| Offer to be made | Initial status of the Offer step. |
| Draft | Offer terms have been started and saved, but not approved. If offer approvals are not required, the offer may be extended at this point. |
| Cancelled | A draft offer has been created and then cancelled prior to routing for approval or extending to the candidate. |
| Approval in progress | Offer has been routed for approval. |
| Approval rejected | Offer approval request has been rejected. |
| Approved | Offer approval request has been approved and the offer is ready to be extended to the candidate. |
| Extended | Offer has been extended to the candidate. |
| Rescinded | After the offer has been extended or the candidate has accepted the offer, the user (company) rescinds/revokes the offer. |
| In negotiation | Offer was extended to the candidate. The user marked the candidate as wanting to negotiate the offer. If a new offer should be created, the user will need to rescind the offer in order to create a new offer. If a new offer is not required, then either recapture the candidate response (accept or refused) or status them as Rejected or Has Declined. |
| Refused | Offer was extended to the candidate. The user or the candidate marked the candidate as refusing the offer. A new offer can be created at this point. |
| Accepted | Offer was accepted by the candidate. |
| Reneged | After the candidate has accepted the offer, the candidate refuses the offer (goes back on his or her word). |
| Rejected | After the offer has been rescinded to a candidate, if the user does not wish to create and extend a different offer to the same candidate, the user should status the candidate as Rejected in the Offer step. This will allow an offer to another candidate be created and extended. |
| Has declined | After the offer has been refused or reneged by the candidate, if the user does not wish to create and extend a different offer to the same candidate, the user should status the candidate as Has Declined in the Offer step. This will allow another offer to be created and extended. |
Offer Actions - CSW and Offer Step
Making an Offer
Candidate must have reached the Offer step.
Candidate selection workflow must NOT contain the RSOffer step.
In the candidate list, open a candidate file.
Select Make Offer... in the More Actions list.
Complete mandatory information.
Select required information.
Click Save and Close.
The status is changed to Offer in a workflow that does not include offer management but does include a simple offer step.
Rejecting a Candidate for a Job
Candidate must have reached the Offer step.
Candidate selection workflow must NOT contain the RSOffer step.
-
In the candidate list, open a candidate file.
-
Select Reject Candidate... in the More Actions list.
-
Select the reason explaining the decision.
-
Enter comments.
-
Click Done.
Indicating a Candidate Has Declined a Job
Candidate must have reached the Offer step.
Candidate selection workflow must NOT contain the RSOffer step.
-
In the candidate list, open a candidate file.
-
Select Candidates have declined... in the More Actions list.
-
Select the reason explaining why the candidate no longer wants to be considered for the job.
-
Enter comments.
-
Click Done.
Offer Actions - CSW and RSOffer Step
Creating Offers
Recruiting Center users can create offers to detail the specific terms and conditions of a job.
Offer creation is tied to the RSOffer step in a candidate selection workflow.
To create an offer, users click Create Offer in the More Actions list. To create an offer, users must have been granted the proper user type permissions.
The offer form is where all the information is gathered to create an offer. When creating an offer for a candidate, it is possible to use information from another offer, such as the terms of a previous offer, by using the Copy Value icon. This icon appears when hovering the mouse at the top of a column or beside rows or sections of the offer form. By clicking this icon, users can move fields to the new offer all at once or individually. Previous offers are for reference only and cannot be modified. When the offer letter field is copied over, the letter will automatically update to reflect any revised offer terms and the letter will update automatically whenever edits to an offer are made.
In the offer form, users with the appropriate permissions can view details about offers extended to the candidate for other requisitions. On the Job Submission card located on the left panel, users can click links available in the Other Submissions section.
There can only be one current offer per candidate application at a time. The current offer can be modified until it is approved or extended to a candidate, after which only the start date and expiration date can be modified. Changes made to the start date and expiration date are tracked by the system.
Once all required offer fields have been completed, users can submit the offer for approval. Users can review the current offer approval details at any time by going to the candidate file Offer Approvals tab. Approval information is available in the candidate file Offer Approvals tab once an approval path exists.
If users have been granted the appropriate permissions, the Amend Approval Path and Terminate Approval buttons can be available.
Once a job offer has been created for a candidate, offer actions appear in the candidate file More Actions list if the actions are valid given the state of the submission. Offer actions are not possible from the submission list or the general profile.Creating an Offer
Candidate must have reached the Offer step.
A user type permission grants users access to this feature.
In the candidate list, open a candidate file.
Select Create Offer... in the More Actions list.
Complete mandatory information.
Click Save and Close.
Extending Offers
Recruiting Center users can extend offers in writing via email or letter, or electronically so that candidates can view and respond to these offers on line, as well as verbally.
The action of extending offers is tied to the RSOffer step in a candidate selection workflow.
The offer process starts as soon as an offer is ready to be extended. This can be done when the status is Approved (if an approval cycle is needed) or Draft (if an approval cycle is not needed or is configured to be skipped). In the Extend Offer window, recruiters can select several options:When extending an offer in writing (via email, regular mail, or fax), users can edit the offer letter after the offer has been approved, regardless of whether the approved offer contained an offer letter or not.
Extending an Offer Verbally
The offer must have been created.
If offer approvals are required, the offer must be approved.
In the candidate list, open a candidate file.
Select Extend Offer... in the More Actions list.
Select the Extend Verbally option.
Click the Calendar icon.
Select the current date in the calendar.
Capture the candidate response.
Click Done.
Verbal delivery of the offer is tracked in the candidate submission.
Extending an Offer via Email
The offer must have been created.
If offer approvals are required, the offer must be approved.
-
In the candidate list, open a candidate file.
-
Select Extend Offer... in the More Actions list.
-
Select the option Extend in writing.
-
Click Done.
-
Select the email option.
-
Click Next.
-
Click Send.
Written delivery of the offer is tracked in the candidate submission.
When extending an offer in writing, users can edit the offer letter after the offer has been approved, regardless of whether the approved offer contained an offer letter or not.
Extending an Offer via Regular Mail or Fax
The offer must have been created.
If offer approvals are required, the offer must be approved.
-
In the candidate list, open a candidate file.
-
Select Extend Offer... in the More Actions list.
-
Select the option Extend in writing.
-
Click Done.
-
Select the printed letter option.
-
Click Next.
-
Click Print.
Once printed, the offer can be delivered by regular mail or faxed. Written delivery of the offer is tracked in the candidate submission.
When extending an offer in writing, users can edit the offer letter after the offer has been approved, regardless of whether the approved offer contained an offer letter or not.
Extending an Offer Electronically (E-Offer)
Recruiting Center users can extend offers electronically so that candidates can view and respond to these offers on line.
Two E-Offer options are available:
The standard electronic offer using Recruiting.
The advanced electronic offer that requires Onboarding (Transitions). There can only be one Advanced E-Offer process in use at a time for each zone.
Standard Electronic Offer using Recruiting
Customers can use the Standard Electronic Offer feature to extend offers electronically to candidates. Candidates will then access the career section to respond to the offer on line.
To send offers electronically, the Electronic Offers setting must be set to the proper value, users must be granted the permission to extend offers electronically, and the candidate selection workflow must contain the RSOffer step.
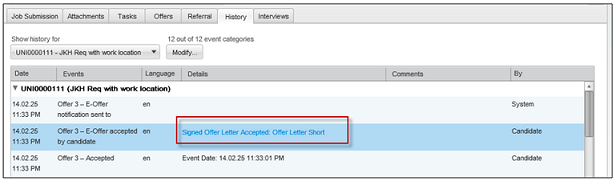
The E-Offer process starts as soon as an offer is ready to be extended. Recruiters select the Extend Offer action in candidate submissions with the status Approved (if an approval cycle is needed) or Draft (if an approval cycle is not needed or is configured to be skipped). In the Extend Offer window, the Extend in writing option is selected by default. In the Send Offer Letter window, the E-Offer option is selected by default. When an offer is extended electronically, a tracking event is created in the candidate file History tab indicating that an electronic offer was extended.
Candidates receive an email notification inviting them to access a secure career section portal to view the offer on line. Candidates click the URL link in their email notification, they are directed to the career section portal where they need to log in, they are then directly brought to the Offers tab where they can view the offer details and offer letter attachments, if any. They can also print the offer and the offer letter attachments. Candidates then decide to accept or refuse the offer and they must e-sign the offer by providing their full name and unique identifier. The electronic signature is mandatory but it is not validated and therefore any data can be entered.
When candidates accept an offer, the time and date of their e-signature is displayed at the bottom of the accepted offer page, along with the full name of the candidate who signed it. The unique identifier or specific other data which candidates entered is not displayed on the page.
When candidates accept an offer, the offer remains visible in the career section for future reference. When candidates refuse an offer, the offer disappears from the career section. When candidates have multiple concurrent offers, for example a candidate could be hired for a summer job and a long-term permanent position, the career section Offers tab lists all the offers, that is offers that still need a response and offers that were accepted. If an offer has an expiration date and that date is reached and the candidate has not yet responded to the offer on line, the offer disappears from the career section. If the candidate has accepted the offer before the expiration date, then the accepted offer remains visible in the career section for future reference. If the candidate refuses the offer before the expiration date, then the offer disappears from the career section.
As soon as candidates respond to the offer, recruiters receive an email notification. This notification is a configurable message template which contains the candidate's response. This notification can be modified to provide any other information and can also be sent to additional recipients like the Hiring Manager. Depending on the candidate's response, the candidate status is automatically changed to Offer - Accepted or Offer - Refused, and recruiters can then move the candidate to the next step in the candidate selection workflow.
Recruiters can capture the offer response on behalf of candidates after they have extended the offer. For example, if a candidate contacts the recruiter to give his/her response before responding to the offer on line, then the recruiter can capture the response. This can give recruiters the opportunity to capture decline motives or to put the offer into the In Negotiation status. If the response entered by the recruiter is Accepted, then the offer will continue to be displayed in the career section for the candidate to view, just like any accepted electronic offers. The offer will show as being accepted but it will not show the full name of the candidate at the bottom of the offer letter page because the candidate did not enter his/her own electronic signature. If the response entered by the recruiter is Refused, then the offer will disappear from the career section just like when candidates refuse an offer themselves.
It is also possible for recruiters to send an offer again once the offer has been extended. For example, an offer was extended in writing via email or printed letter and the recruiter wants to also send it by E-Offer to make it visible on line in the career section. Similarly, if an offer has already been extended and sent as an E-Offer, recruiters can still send it again via email or printed letter.
In standard electronic offers, users can adjust the offer and then extend/send it again. The mere act of adjusting the offer will require that the user rescind the already-accepted offer and create a new offer so that it can be extended again.
Advanced Electronic Offer using Onboarding (Transitions)
Customers who have more complex electronic offer requirements can configure advanced electronic offer workflows in Onboarding (Transitions) for use in Recruiting.
Some customers might require additional eSignatures, notifications extended to include additional people, calls to partner services, different tasks for executives. Clients like those who have more complex requirements might consider using the "Onboarding (Transitions) version" of electronic offers because offer workflows in this version can be configured to accommodate a wide variety of needs.
To send offers electronically using Onboarding (Transitions), the Electronic Offers setting must be set to the proper value, users must be granted the permission to extend offers electronically, and the Candidate Selection Workflow (CSW) must contain the RSOffer step.
The E-Offer process starts as soon as an offer is ready to be extended. Recreuiters select the Extend Offer action in candidate submissions with the status Approved (if an approval cycle is needed) or Draft (if an approval cycle is not needed or is configured to be skipped). In the Extend Offer window, the Extend in writing option is selected by default. In the Send Offer Letter window, the E-Offer option is selected by default. When an offer is extended electronically, a tracking event is created in the candidate file History tab indicating that an electronic offer was extended.
Candidates may receive an email notification (if the Onboarding (Transitions) process was configured like that) inviting them to access a secure career section portal to view the offer on line. Candidates click the URL link in their email notification, they are directed to the career section portal where they need to log in, they are then directly brought to the Tasks tab where they can view the offer details and offer letter attachments, if any. They can also print the offer and the offer letter attachments. Candidates then decide to accept or refuse the offer and they must complete any mandatory fields which may include an electronic signature.
As soon as candidates respond to the offer, the system task that must be configured into the process will then change the candidate status to Offer - Accepted or Offer – Refused, depending on the candidate's response. This adds a line to the History of the candidate's submission in the Recruiting Center, capturing the candidate's response. Then, recruiters or any other assignees can receive a configurable email notification (if the process is configured like that), which can contain the candidate's response, any e-signature information if desired, and any other data fields. The recruiters can then move the candidate to the next step in the CSW, while the rest of the Onboarding (Transitions) process can also continue automatically in parallel.
It is also possible for recruiters to send an offer again once the offer has been extended. For example, an offer was extended in writing via email or printed letter and the recruiter wants to also send it by E-Offer to make it visible on line in the career section. Similarly, if an offer has already been extended and sent as an E-Offer, recruiters can still send it again via email or printed letter.
As before, recruiters still retain the ability to capture the offer response on behalf of candidates after they have extended the E-offer, and before the candidates respond to it online themselves. This changes the status in the CSW to Offer - Accepted or Offer - Refused, depending on the candidate's captured response.Capturing this response in the Recruiting Center has no immediate effect on the offer letter that is still displayed to the candidate in the Career Section. However, the candidate's electronic response will not change the CSW status because the offer response was already inputted by the recruiter, and the offer is no longer in the Extended status. The offer letter will continue to be displayed in the Tasks tab as long as the process is running.Just as recruiters can track any process, they can also track the progression of the E-Offer process in the Onboarding (Transitions) Center. They can also view their current tasks regarding an E-Offer process in the Onboarding (Transitions) Center. Recruiters might receive an email notification (if such notification is configured) as soon as candidates respond to an advanced E-Offer.
Comparison of the Standard Electronic Offer and the Advanced Electronic Offer
| Standard Electronic Offer | Advanced Electronic Offer | |
|---|---|---|
| Where do offers appear in the career section? | In the Offers tab. Several offers can appear in the tab. | In the Tasks tab. Several Onboarding (Transitions) processes can appear in the tab. |
| When is the candidate invited? | When the offer is sent by the Recruiting Center user, either at the moment the offer gets extended or when an extended offer is sent again. |
Whenever, as configured within the E-Offer process. |
| Is the e-signature mandatory? | Yes. | It is configurable. |
| Is it possible to capture several e-signatures? | Two e-signatures on a single form for candidate. |
Unlimited different e-signatures can be configured to appear on any number of forms assigned to any participants. |
| Is it possible to validate the e-signature? | No, the two e-signatures are not validated but they are mandatory. |
Yes, by specifying the electronic signature method (first name, last name, birth date, SSN last 4 digits, etc.). |
| Is it possible to send different notifications or tasks per OLF? |
No | Yes, by configuring different steps, targeted per OLF or per any field, within the E-Offer process. Only one Onboarding (Transitions) process of type "E-Offer" can be created (not several based on OLF). |
| Is it possible to send reminders? | No | Yes, for the candidate E-Offer form and for any task as it approaches or passes its due date. |
| When is the status updated in the candidate selection workflow? |
Immediately when the electronic offer is submitted by the candidate on the career section. |
Whenever desired within the E-Offer process, at the point when the system task gets triggered for this purpose. |
| Can recruiters capture the offer response manually? |
Yes, the candidate selection workflow gets updated but the candidate can no longer e-sign the offer in the career section. The candidate will still see the accepted offers in the career section. |
Yes, the candidate selection workflow gets updated and the process can continue. The candidate can still e-sign the offer. However, if the candidate's response is different, the response that was first captured by the recruiter will be considered. |
| Is it possible to configure auto-progression of the candidate selection workflow, after receiving candidate response to an E-Offer? |
No | No |
| Do offers remain available in the career section when candidates refuse it? |
No | Yes, all submitted forms including the E-Offer form remain visible in read-only for the duration of the E-Offer process, until the candidate/new hire process reaches 100% completion (or gets cancelled or suspended). |
| Do offers remain available in the career section after candidates accept them? |
Yes, the offer remains visible until the candidate/offer information gets archived or purged. |
Yes, all submitted forms including the E-Offer form remain visible in read-only for the duration of the E-Offer process, until the candidate/new hire process reaches 100% completion (or gets cancelled or suspended). |
| If the candidate accepts the E-Offer while the start date is still tentative, will the system automatically create a task telling the recruiter to finalize it? | No | No |
| When the candidate accepts the E-Offer, will the system automatically create a task telling the recruiter to confirm the employee's presence on their start date? | No | No |
| Can recruiters rescind an electronic offer? | Yes, an electronic offer can be rescinded just like any other offer in the Extended status. | Yes, an electronic offer can be rescinded just like any other offer in the Extended status. |
| What happens when recruiters cancel a requisition containing an electronic offer? |
The requisition cannot be cancelled until any extended offers have first been rescinded. |
The requisition cannot be cancelled until any extended offers have first been rescinded. |
| What happens when the expiration date is reached? |
Candidates can no longer respond to the electronic offer, but recruiters can still respond for them. |
No effect, the process can continue. |
| What happens when recruiters mark an electronic offer as being accepted before the candidates give their own response on the career section? |
The candidate selection workflow gets updated (status is Accepted) but the candidate can no longer e-sign the offer in the career section. No e-signature will be visible at the bottom of the accepted offer on the career section because the candidate did not e-sign it. The candidate will still see the accepted offer in the career section. | No effect; the process can continue. The candidate selection workflow gets updated (status is Accepted) and the process can continue. The candidate can still e-sign the offer. However, if the candidate's response is different, the response that was first captured by the recruiter will be considered. |
| What happens when recruiters mark an electronic offer as being refused before the candidates give their own response on the career section? |
The candidate selection workflow gets updated (status is Refused) and the electronic offer disappears from the career section. | No effect; the process can continue and the candidate selection workflow gets updated by the recruiter to status Refused. The candidate can still e-sign the offer. However, if the candidate's response is different, the response that was first captured by the recruiter will be considered. |
| What happens when recruiters mark an electronic offer as being in negotiation? |
No effect. The status of the offer is changed and a row is written into History as usual, but the candidate can still view and respond to the E-Offer as usual. |
No effect. The status of the offer is changed and a row is written into History as usual, but the candidate can still view and respond to the E-Offer as usual. |
Extending an Offer Electronically
The Electronic Offer feature must be enabled.
The offer must have been created and approved.
The candidate submission must be in the status Approved (if an approval cycle is needed) or Draft (if an approval cycle is not needed or is configured to be skipped).
Open a candidate submission.
In the More Actions list, select Extend Offer.
In the Extend Offer window, the Extend in writing option is selected by default. Click Next.
In the Send Offer Letter window, the E-Offer option is selected by default. Click Next.
Click Send.
When an offer is extended electronically, a tracking event is created in the candidate file History tab indicating that an electronic offer was extended.
Sending an Offer
Offer must have been extended to the candidate.
In the candidate list, open a candidate file.
Select Send Offer... from the More Actions list.
Complete mandatory fields.
Select required information.
Click Next.
Click Send.
The offer previously communicated is sent to the candidate with the selected medium.
Capturing the Candidate Response for an Offer
Offer must have been extended to candidate.
In the candidate list, open a candidate file.
Select Capture Response... in the More Actions list.
Select the response the candidate has made to the offer.
Click Next.
Complete required information according to the response given by candidate.
Click Done.
The response to an offer made to a candidate is entered in the candidate file.
Editing an Offer
Candidate must have reached the Offer step.
Offer must be created but not approved or extended.
In the candidate list, open a candidate file.
Select the Offers tab.
Click Edit under an offer.
Edit information.
Click Save and Close.
Cancelling an Offer
Candidate must have reached the Offer step.
The offer was created but not extended to the candidate.
The action to cancel an offer is not possible while an approval process is underway. If an approval is underway, available actions are Amend Approval, Decide on Approval, or Terminate Approval Path. Cancelling an offer is only possible for draft offers or approved offers.
In the candidate list, select a candidate file.
Select Cancel Offer... in the More Actions list.
Add a comment.
Click Done.
The offer is no longer active, and the candidate status is updated to Offer Cancelled.
Cancelling an Accepted Offer
The offer must have been extended to the candidate.
A user type permission grants users access to this feature.
In the candidate list, open a candidate file.
Select Rescind Offer... in the More Actions list.
Add a comment.
Click Done.
The offer is canceled although it was sent to the candidate.
Indicating a Candidate has Declined an Accepted Offer
The offer must have been extended to the candidate.
A user type permission grants users access to this feature.
In the candidate list, open a candidate file.
Select Renege Offer... in the More Actions list.
Add a comment.
Click Done.
The candidate file indicates that the candidate has declined an offer previously accepted.
Updating the Offer Expiration Date
An offer must be created.
A user type permission grants users access to this feature.
In the candidate list, open a candidate file.
Select Update Expiration Date... in the More Actions list.
Select a new expiration date.
Click Done.
The date before which the candidate must respond to an offer is changed.
Specifying if the Offer Start Date is Tentative
The candidate must be at the Offer step.
-
In the candidate list, open a candidate file.
-
Click the Offer tab.
-
In the More Actions list, select Create Offer.
-
Under the start date section, select or not the Tentative option.
-
Click Save.
The offer form now indicates if the start date is tentative or not.
Updating the Offer Start Date
An offer must be created.
A user type permission grants users access to this feature.
In the candidate list, open a candidate file.
Select Update Start Date... in the More Actions list.
Select a new starting date.
Click Done.
The starting date on which the candidate is required to start working is changed in the offer.
Using the Salary Calculator
In the candidate list, open a candidate file.
Select the Offers tab.
Click Edit in a column.
Click the Calculator icon.
Complete fields as required.
Click Done.
Salary related values generated by the calculator are automatically included in the file.
Viewing E-Offer Letter PDFs
Recruiting Center users can view and print offer letter PDFs that are electronically accepted or refused by the candidate or employee
This feature is available for both the standard E-Offer in Recruiting and the advanced E-Offer in Onboarding (Transitions). For details, on the advanced E-Offer, refer to the Onboarding (Transitions) documentation.
Recruiters can use the Standard Electronic Offer feature in Recruiting to extend offers electronically to candidates. Once the offer is extended to the candidate, the candidate accesses the career section Offers tab to respond to the offer on line. Depending on the candidate's response, the candidate status is automatically changed to Offer - Accepted or Offer - Refused, and the recruiter can then move the candidate to the next step in the candidate selection workflow. The recruiter, if granted the proper permissions, can view and print the PDF of the completed E-Offer letter in:
the candidate file History tab, by clicking the hyperlinked name of the offer letter template shown in the Details column.
the offer grid for the current offer, by clicking the Print icon.
The E-signature information is displayed at the end of each E-Offer letter PDF:
Acceptance or refusal of the offer.
Time and date of the candidate e-signature (in the timezone of the recruiter who extended the offer).
IP address.
Full name of the candidate who signed the E-Offer.
Other Offer Actions
Capturing Candidate Expectations
Candidate expectations can be captured throughout the selection process, but most likely during an interview.
A user type permission grants users access to this feature.
In the candidate list, open a candidate file.
Select Capture Expectations... in the More Actions list.
Select the type of expectation.
Click Create.
In the Desires (New) column, complete information.
Click Save and Close.
Editing Candidate Expectations
Candidate expectations must be included in file.
A user type permission grants users access to this feature.
In the candidate list, open a candidate file.
-
Select the Offers tab.
Click Edit in the expectations column.
Change information.
Click Save and Close.
Capturing Candidate Current Job Terms
Users can capture candidate job terms for comparison purposes before a formal offer is made. Candidate current job terms can be captured throughout the selection process, but most likely during an interview.
A user type permission grants users access to this feature.
-
In the candidate list, open a candidate file.
-
Select Capture Expectations... from the More Actions list.
-
Select Current Job.
-
Click Create.
-
In the current Job (New) column, complete information.
-
Click Save and Close.
Editing Candidate Current Job Terms
A user type permission grants users access to this feature.
-
In the candidate list, open a candidate file.
-
Select the Offers tab.
-
Click Edit next to Current Job column.
-
Make changes.
-
Click Save and Close.
Capturing Competitive Offer Information
Competitive offer information can be entered in the offer form throughout the selection process, during interviews or telephone conversations.
A user type permission grants users access to this feature.
In the candidate list, open a candidate file.
Select Capture Competitive... in the More Actions list.
In the Competitive Offer (New) column, complete information.
Click Save and Close.
Editing Competitive Offer Information
Competitive offer must be captured.
A user type permission grants user access to this feature.
-
In the candidate list, open a candidate file.
-
Select Capture Competitive...from the More Actions list.
-
Click Edit under the Competitive Offer column.
-
Complete the information.
-
Click Save and Close.
Adding an Attachment to an Offer
A user type permission grants users access to this feature.
The file will be scanned for viruses. If a virus is detected, the file is not attached. The system displays file information or suggests attaching a different file.
In the candidate file, click the Add Attachment icon.
Select Offer in the Attach to option.
Browse to select a file.
Click Done.
The name of the attached file is displayed in the Attachments list under the Attachments tab of the candidate file.
Removing an Attachment from an Offer
A user type permission grants users access to this feature.
Candidate file must have a file attached to an offer.
In the candidate file, click on the Attachments tab.
Move your mouse over the name of the file to remove.
Click the Remove icon.
In the warning window, confirm deletion.
The file no longer appears in the list of attachments.
Offer Approvals
Requesting the Approval of Offers
Recruiting Center users can request the approval of offers.
Users with the appropriate permission can route offers for approval by selecting the Request Approval action in the More Actions list. This option is used when at least one person must approve an offer before extending it. See Requesting the Approval of an Offer.
When requesting the approval, users must choose from a list the people who will be required to do the approval. The list of approvers can be configured or not by the system administrator depending on the type of approval chosen by the organization.
-
If the standard approval process is used, users will select approvers from a list containing all of the active users of the database. Users will also be able to create a list of frequent approvers in the My Setup feature.
-
If Dynamic Approval Routing process is used, the list of approvers will be pre-populated upon selecting the Request Approval action. The list of approvers to be generated is configured by the system administrator within the Dynamic Approval Routing feature. These approvers are displayed based on the configured rules and conditions.
Selected approvers will approve offers using one of these methods:
If the approvers are Recruiting Center users, they will receive an Approve Offer task in the Tasks channel.
If the approvers are not Recruiting Center users (Note: They must still be created as users in the Oracle Talent Acquisition Cloud, with valid credentials), they will receive an eShare message via e-mail.
If the approvers are both Recruiting Center users and eShare users, they will receive an Approve Offer task in the Tasks channel as well as a message via e-mail.
When conducting the approval from either the Tasks list or from eShare, approvers will receive a PDF print version of the offer to review (rather than the actual file being visible in the system). Also, approval files are generated according to the user's permissions to view fields having specific security levels.
The approval path can be carried out in two ways:
-
Sequential: When the first approver receives an approval request, he/she approves the offer. Once approved, the approval request goes to the next approver, and so on. The offer does not move forward until each approver in the sequence has approved in order. If one person in the sequence rejects the offer, then the approval process ends.
-
Parallel: Multiple approvers receive an approval request and they can all approve the offer at the same time. Approvers can approve the offer without having to wait for the others.
If the standard approval process is used within an organization, the system administrator must activate settings to enable sequential or parallel approval. If the Dynamic Approval Routing is used within an organization, approval will be sequential unless there are more than one approver for the same role, then approval will be parallel.
Requesting the Approval of an Offer
A user type permission grants users access to this feature.
Candidate must have reached the Offer step.
Offer must be created.
If the approver is a Recruiting Center user, an Approve Offer task is assigned to the user.
If the approver is an eShare user, the approver receives an eShare approver message.
Methods to Approve Offers
Approvers can approve offers via different tools.
Using the Tasks Channel
If the approver is a Recruiting Center user, the approver will receive an Approve Offer task in the Tasks channel. See Approving an Offer via the Tasks Channel.
Using eShare
If the approver is not a Recruiting Center user, the approver will receive an eShare message via e-mail.
Using the Tasks Channel and/or eShare
If the approver is both a Recruiting Center user and an eShare user, the approver will receive an Approve Offer task in the Tasks channel as well as a message via e-mail.
When conducting the approval from either the Tasks list or from eShare, approvers will receive a PDF print version of the offer to review (rather than the actual file being visible in the system). Also, approval files are generated according to the user's permissions to view fields having specific security levels.Approving an Offer on Behalf of Another Approver
From time to time, it may be necessary to approve an offer on behalf of another approver. This is done by using the action called Amend Approval Path. Users with the appropriate permissions can update an approval decision manually on behalf of one of the approvers. See Approving an Offer on Behalf of Another Approver.
Approving an Offer via the Tasks Channel
A user type permission grants users access to this feature
In the Tasks channel, click Approve Offer.
-
In the Tasks list, click Approve Offer next to the desired requisition.
In the Decide on Approval window, select Approve.
Enter comments if mandatory.
Click Done.
Approving an Offer on Behalf of Another Approver
A user type permission grants users access to this feature.
Candidate must have reached the offer step.
Approval for offer must have been requested.
In the candidate list, click on a candidate file.
Select Amend Approval Path in the More Actions list.
Select Approve from the Decision drop-down menu.
Complete mandatory fields.
Click Done.
Offer Approval Path Amendment
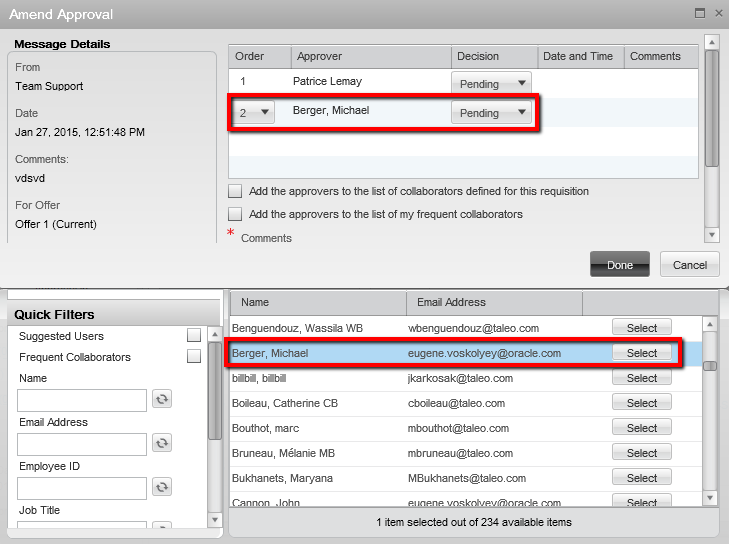
From time to time, it may be necessary to change the approvers that were originally selected for an offer. This is done by using the action called Amend Approval Path.
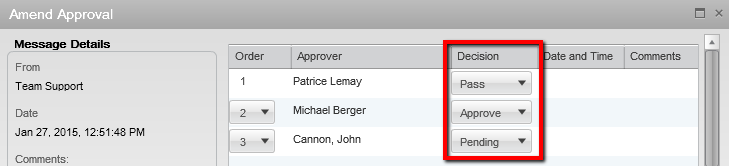
The Amend Approval Path action allows users to modify an existing offer approval path. Users, if they have the permission, can add or remove approvers, reorder them, and even decide for them.
the offer status is set to "Approval in Progress";
the user has the permission "View and Manage Offers".
the user has the permission "Amend an Approval Path".
Adding Approvers
It is possible to add approvers to an existing approval path. When clicking the Add Approvers button located at the bottom of the Amend Approval window, a window appears and users can filter and select one or many approvers. The newly added approvers appear at the top section of the window with the other approvers.
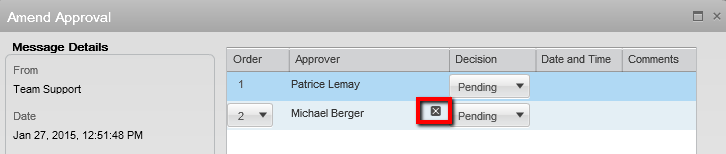
Removing Approvers
It is possible to remove approvers from an existing approval path. When clicking the Remove icon next to the approver's name, the approver is removed from the approval path.
To remove an approver, the user must have the permission "Edit approvers when requesting approvals".
Specific rules apply when removing approvers:
A user can remove approvers from an approval path only if the approvers have not yet received the Approve Offer task.
A user cannot remove an approver from an approval path if the approver has already render his decision.
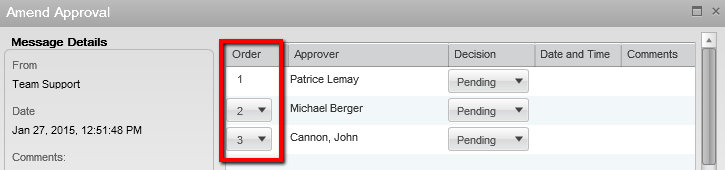
Reordering Approvers
It is possible to reorder approvers in an existing approval path.
To reorder approvers, the user must have the permission "Edit approvers when requesting approvals".Specific rules apply when reordering approvers:
A user can change the order of the approvers only if the approvers have not yet received the Approve Offer task.
A user can change the order of the approvers only if the approvers have not yet render their decision.
Deciding for Approvers
It is possible to take an approval decision for an approver.
Specific rules applies when deciding for approvers:
A user can decide for an approver only if the approver has not yet rendered his decision.
A user can decide for an approver even if the approver has already received the Approve Offer task.
A user can decide for an approver if the user has the permission "Decide for other approvers".
A user cannot set the decision to Pass for the last approver if all other approvers have also set their decision to Pass.
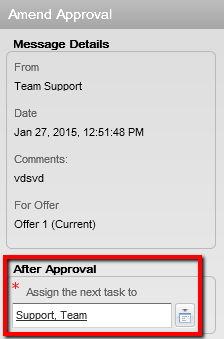
Assigning the Task After the Approval
It is possible to change the person who will perform the next task once the approval has been rendered. This is done using the selector next to the Assign the next task to field.
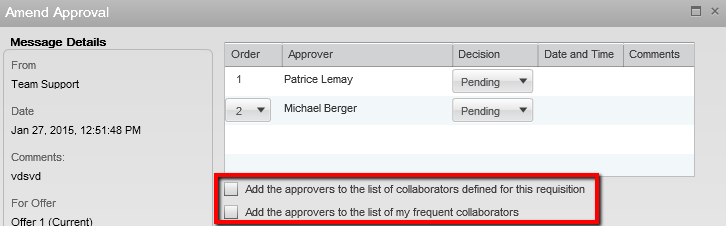
Adding Approvers to the List of Collaborators
When the option "Add the approvers to the list of collaborators defined for this requisition" is selected, the selected approvers will be automatically added to the requisition's collaborators list. This option is visible if:
the Collaborators list has been enabled for the requisition;
the user adding the approvers is the owner of the requisition (Recruiter, Recruiter Assistant, Hiring Manager, Hiring Manager Assistant). If the user is not the owner of the requisition, he must have the permission "Reassign requisitions to owners and collaborators if the user is not an owner".
When the option "Add the approvers to the list of my frequent collaborators" is selected, the selected approvers will automatically be added to the user's frequent collaborators list (available under My Setup > Preferences). It will not add the approvers in the collaborator's list of the requisition. This option is visible only if the Collaborators list has been enabled for the requisition.
Terminating the Offer Approval Process
A user type permission grants users access to this feature.
Approval must have been requested for the offer.
Offer must not have been extended to the candidate.
In the candidate list, click on a candidate file.
Select Terminate Approval Process... in the More Actions list.
Enter comments.
Click Done.
Resending an Offer Approval Request
This feature is only relevant to use if approvers are eShare users and are therefore receiving email based task requests.
A user type permission grants users access to this feature.
-
In a requisition file, click on the Offer Approvals tab.
-
Click Send Reminder.
An offer approval request reminder is sent to the currently assigned eShare approver.
Offer Approval Request Reminder
Recruiting Center users can send an offer approval request reminder.
Users with the appropriate permissions can click the Send Reminder button on the Approvals tab within the offer when an active approval is pending. This action will resend the approval request email to the approvers who it is the turn to render their decisions. If the approver is an eShare user, the eShare hyperlink will be present in the email.
Approvers and Frequent Approvers
An approver is a Recruiting Center user who will approve requisitions and/or offers.
A list of approvers can be defined by the system administrator at the department level. A list of personal default approvers, called frequent approvers, can also be defined by the Recruiting Center user in the My Setup feature. When a requisition and/or offer is ready to be approved (by selecting the Request Approval action), the approval path is selected by default as follows:
If frequent approvers were defined under My Setup, these approvers will be automatically selected.
If frequent approvers were not defined under My Setup, the approvers set at the department level by the system administrator will be selected automatically.
When a user selects approvers, the selector only displays users who can be potential approvers. It is possible that no approvers are displayed if none of them are allowed to do the approval. An approver must be an active user and have the user type permission to approve requisitions and/or offers.
Creating a List of Frequent Approvers
A setting allows the activation of this feature.
A user type permission grants users access to this feature.
In the auxiliary navigation bar, click Resources, then My Setup.
In the Frequent Approvers tab, click Add...
Select one or several approvers.
Click Done.
The approvers appear in the Approvers list. These approvers will be automatically selected when requesting the approval of a requisition and/or offer overwriting the default approvers set by the system administrator.
Modifying the List of Frequent Approvers
A setting allows the activation of this feature.
A user type permission grants users access to this feature.
In the auxiliary navigation bar, click Resources, then My Setup.
In the Frequent Approvers tab, click Modify...
Select one or several approvers.
Click Select.
Click Done.
The approvers appear in the Approvers list. These approvers will be automatically selected when requesting the approval of a requisition or offer overwriting the default approvers set by the system administrator. The system cannot modify the approver list a user has set under My Setup.
Adding an Approver to the Frequent Approvers List
A setting allows the activation of this feature.
A user type permission grants users access to this feature.
In the auxiliary navigation bar, click Resources, then My Setup.
In the Frequent Approvers tab, click Add...
Select one or several approvers.
Click Done.
The approvers appear in the Approvers list. These approvers will be automatically selected when requesting the approval of a requisition and/or offer. The system cannot modify the approver list a user has set under My Setup.
Removing an Approver from the Frequent Approvers List
A setting allows the activation of this feature.
A user type permission grants users access to this feature.
In the auxiliary navigation bar, click Resources, then My Setup.
In the Frequent Approvers tab, click Modify...
Hover your mouse on the name of an approver.
Click on the Remove icon.
Click Done.
The approver no longer appears in the Approvers list under My Setup.