3Requisition Management

Requisition Management

    Requisitions List

      Requisitions List

      The requisitions list displays requisition information into different columns and provides tools to filter requisitions and to customize the requisitions list.

      The requisitions list is organized into three sections:

      • The left pane contains the Show requisitions filter which allows users to filter requisitions using ownership values. Quick filters and advanced filters are also provided to filter the requisitions list down to relevant information. The pane can be expanded or collapsed.

      • The right pane contains online help and online clips if these were enabled. The pane can also be expanded or collapsed using the Hide/Show Supporting Tools icon.

      • The center pane displays requisitions. The List Format Configuration icon allows users to select the list format they wish to use to display requisitions in the list. Users can also create up to three list formats and select columns to display specific information (if permissions were granted). Several actions can be performed directly in the list. A contextual action menu is available by clicking the arrow next to the file title. For information on the tools available in the list, see List Usage.

      To navigate from one requisition to another within the requisitions list, users can use the navigation icons.

        Requisition File

          Requisition File

          A requisition file details the specific requirements for a job position.

          A requisition file is organized into three sections:

          • The left pane contains the requisition card in the top section and supporting information in the bottom section. The pane can be expanded or collapsed.

          • The right pane contains supporting tools such as the online help, the diagnostic tool, and the online clips if these were enabled. The pane can also be expanded or collapsed.

          • The center pane displays the requisition form. Information displayed will vary whether the view mode or edit mode is selected.

          View Mode

          When opening a requisition file, users are always in view mode and they can from there choose to go into edit mode. This provides a cleaner layout and eliminates the need to "close" the file (to exit out of it and reactivate other buttons on the screen) if only viewing the file. In view mode, only fields for which data is provided are displayed. If a field is empty, it does not display in view mode.

          An action bar is available at the top. Users can click an action or use the More Actions menu which is a dynamic menu of additional actions available during the lifecycle of the requisition.

          Tabs containing requisition-related information are available. The main content of the requisition file is within the Requisition tab, which includes various sections that can be expanded or collapsed. The other tabs contain peripheral information.

          From the Requisition tab, users can click the down arrow next to the word Requisition to access a table of contents that allows quick jumping to different sections and sub-sections of the file.

          Edit Mode

          In edit mode, all fields included in the requisition form are displayed. Fields that do not contain data are displayed according to user permissions. Required fields are highlighted with a red asterisk. To view required fields in different stages, users can use the Show fields required to menu.

          From the Requisition tab, users can click the down arrow next to the word Requisition to access a table of contents that allows quick jumping to different sections and sub-sections of the file.

          Field Labels in Multilingual Requisitions

          The field labels in a multilingual requisition will display in the language the user used to sign into the application. The user-entered values will display in the selected requisition locale.

          Below are two example to explain the behavior.

          Example 1: A requisition is available in English, French and Spanish. The user accesses the application in English and decides to view the Spanish version of the requisition. Each field label and drop-down will be displayed in English but the content of each input field will display the Spanish value.
          Example 2: A requisition is available in English, French and Spanish. The user accesses the application in Spanish and decides to view the Spanish version of the requisition. Each field label will displayed in Spanish and the content of each field will display the Spanish value as well.

            Requisition File Tabs

            The table shows tabs available in the requisition file.

            Requisition File Tab Description
            Requisition Contains all the details of the job.
            Alerts This is where users can set the ACE candidate alert which will inform them when a candidate meets specific required criteria. Users can also specify to request more information about these candidates.
            Attachments Contains attachments for the requisition.
            Approvals Displayed when an approval request has been generated. The tab appears for all users that can view the requisition. When no approval request has been generated, the Approvals tab is hidden. This tab provides an easy means to access and review the most recent approval information for the requisition. Authorized users can also modify or resend approval requests from this page.
            Posting and Sourcing Provides access to posting and sourcing features such as career section posting, job board distribution through eQuest, staffing agents, non-electronic media. Allows users to modify the list of sources associated with the requisition.
            Autopooling Criteria Contains autopooling criteria.
            History Contains a log of all actions performed on the requisition file. See Requisition File History.
            Reports Allows users to define if a daily recruiting report will be sent to individuals regarding the status of the requisition's progress.
            Interviews Allows users to add evaluation questionnaires, view completed questionnaires as well as feedback provided by evaluators.

              Requisition File History Tracking

              The History tab in the requisition file contains a log of all actions performed on the requisition.

              When a modification is made to the following fields, an event to track this modification is generated and is displayed in the requisition file History tab. The name of the user who performed the action is displayed as well as the date and details of the event.

              • Hiring Manager

              • Hiring Manager Assistant

              • Recruiter

              • Recruiter Assistant

              • Department

              • Job Role

              • Requisition Number

              • Location

              • Other Location

              • Job Field

              • Organization

                Requisition Statuses

                Requisition statuses and status details are listed below. Statuses are in bold.

                Draft

                Pending - To Be Approved

                Pending - Approval Rejected

                Open - Approved

                Open - Sourcing - Scheduled

                Open - Sourcing - Posted

                Open - Sourcing - Unposted

                Open - Sourcing - Expired

                On Hold

                Filled

                Canceled

                Deleted

                  Requisition Creation

                    Requisition Creation Process

                    Recruiting Center users can create requisitions to detail the specific requirements for a job position.

                    The creation of requisitions is done via the Create Requisition button which is available in the Requisitions channel as well as in the Requisitions page. This button is available to users if they have been granted the appropriate permissions.

                    The requisition creation process may vary from one company to another. Below is a basic requisition creation process.

                    When creating a requisition, the Create a Requisition assistant is launched. The steps in the assistant varies depending on how they were configured by the system administrator. The following presents a standard flow.

                    • The first step is to select a requisition type. This step is available if more than one requisition type was enabled and if specific permissions were granted to users.

                    • The second step is to select specific elements such as the position, the department, the hiring manager, the job role, and the requisition template. Depending on the element selected, the system will automatically fill certain fields in the requisition form.

                    • The third step is to select an Organization, Location and/or Job Field.

                    Note: In the Create a Requisition assistant, when you click the Requisition Template Selector icon, the Requisition Template Selector provides a Requisition Title field to search for requisition templates. When you enter a value in the Requisition Title field, the search engine will retrieve requisition templates whose requisition title starts with the exact same value that you entered. For example, if you enter “Manag” in the Requisition Title field, the search engine will retrieve requisition templates with titles such as “Management Director”, “Production Manager”, or “Product Manager”. However, if you enter “duct”, the search engine will retrieve requisition templates with titles starting with “duct” (requisition templates with the title “Product Manager” will not be retrieved).
                    When all of the above information has been provided, users complete any required fields (marked with a red asterisk) and other fields in the requisition form. Depending on the company's policies, the template may be very detailed or may include only basic information.

                    When saving the requisition, a message appears if information is missing in certain fields. Users can also use the diagnostic tool located on the right panel to know which fields must be filled to be able to save the requisition.

                    Once the requisition is completed, the requisition goes through an approval process before being posted on internal and/or external career sections or job boards.

                    Note: A best practice when creating a requisition is to select a requisition template; this will auto-populate many of the requisition fields based on the selected template. Users can select from all requisition templates available which align to their user group context or have no user group defined.

                      Creating a Requisition

                      A user type permission grants users access to this feature.

                      1. Click Create Requisition.

                      2. Follow on-screen instructions. The information you will need to provide depends on the flow and options configured by your system administrator.

                      3. Click Save.

                      The requisition appears in the Requisition list and the status is Draft.

                        Creating a Multilingual Requisition

                        The user's preferred languages are activated by default (the languages are displayed in the Activated Languages drop-down list).

                        Users are not forced to translate non-mandatory fields (a non-mandatory field completed in the base language can be left blank in other languages).

                        Users can change the value selected for a field (they are not limited to the value selected for the base language).

                        A user type permission grants users access to this feature.

                        1. Click Create Requisition.

                        2. Follow on-screen instructions. The information you will need to provide depends on the flow and options configured by your system administrator.

                        3. Complete the fields.

                        4. Click Save.

                        5. In the Activated Languages drop-down list, select the language in which you want to translate the requisition.

                        6. Complete the fields.

                        7. Click Save.

                        The requisition appears in the Requisition list and the status is Draft.

                          Requisition Description Writing Tips

                          The requisition description provides information about the job as well as the qualifications required. The description is displayed to candidates when they apply for a job.

                          A requisition can have two descriptions: an internal description for current employees, and an external description for external candidates.

                          An effective job description must be compelling, intelligent and honest. It must attract, intrigue and persuade top talents. It should include specific information and be focused on the talent.

                          When writing the description of a requisition, consider the tips presented in the table:

                          Tip Description
                          Clear and meaningful job title Make sure candidates outside the organization will know what it means.
                          Headline Start with a brief marketing statement, "grabber".
                          Structure Explain where and how the position fits into the organization.
                          Type of Environment Explain what it is like to work for the organization (fast-paced, small/large team, multiple projects, etc.).
                          Description of the Role Concentrate on important, positive aspects of the position.
                          Description of the Person Required List qualifications, important competencies, relevant experience, personal qualities. Be specific and keep it short.
                          Salary/Benefits/Training/Opportunities Highlight key benefits offered by the organization.

                          To improve the formatting of your job description, it is recommended to:

                          • Copy and paste your text to any simple text editor such as Windows Notepad.

                          • Copy your text from the text editor and paste it into the requisition Description field.

                          • Format your text using the Rich Text Editor provided in the Description field.

                            Diagnostic Tool and Show Required Fields

                            The Diagnostic Tool and Show Required Fields features allow Recruiting Center users to know which requisition fields must be completed for certain actions to take place.

                            The "Show fields required to" feature available in the requisition file, in edit mode, allows users to know which fields must be filled for certain actions to take place, that is, saving, posting and approval request. For example, when selecting the Save action, an asterisk would appear beside the fields that must be completed in order to perform the save action.

                            The diagnostic tool available in the requisition file right panel, in view and edit modes allows users to see all the fields that are missing information and to jump quickly to those fields to enter the missing information.

                              Information on Specific Requisition Fields

                              Important information regarding specific requisition fields is provided in the table.

                              Field Description
                              Budget Supports currency symbols, commas, and decimals.
                              Bonus Supports commas and decimals.
                              Salary Supports commas and decimals.
                              Opening Date and Closing Date The requisition Opening Date and Closing Date defined in the External Description section of the requisition form are used as the default dates when posting requisitions to staffing agents and agencies (instead of using the career section Start date and End Date). If these dates are not defined in the requisition, the dates defined by the system administrator will be used instead. The system administrator defines these dates in the Career Section properties, under the Posting section.

                                Requisition Approval

                                  Methods to Request the Approval of Requisitions

                                  When requesting the approval of requisitions, two options are presented to Recruiting Center users.

                                  Option 1: Approving requisitions yourself

                                  Users with the appropriate permission can approve requisitions themselves by selecting the Save as Open action in the More Actions list. See Approving Your Own Requisition.

                                  Option 2: Requesting someone to approve requisitions

                                  Users with the appropriate permission can route requisitions for approval by selecting the Request Approval action in the More Actions list. This option is used when at least one person must approve a requisition before it can be posted. See Requesting Someone to Approve a Requisition.

                                  When users are requesting the approval of a requisition, they must choose from a list the people who will be required to do the approval. The list of approvers can be configured or not by the system administrator depending on the type of approval chosen by the organization.

                                  • If the standard approval process is used, users will select approvers from a list containing all of the active users of the database. Users will also be able to create a list of frequent approvers in the My Setup feature.

                                  • If Dynamic Approval Routing process is used, the list of approvers will be pre-populated upon selecting the Request Approval action. The list of approvers to be generated is configured by the system administrator within the Dynamic Approval Routing feature. These approvers are displayed based on the configured rules and conditions.

                                  Selected approvers will approve requisitions using one of these methods:

                                  • If the approvers are Recruiting Center users, they will receive an Approve Requisition task in the Tasks channel and Tasks list.

                                  • If the approvers are not Recruiting Center users, they will receive an eShare message via e-mail.

                                  • If the approvers are both Recruiting Center users and eShare users, they will receive an Approve Requisition task in the Tasks channel and Tasks list as well as a message via e-mail.

                                  When conducting the approval from either the Tasks list or from eShare, approvers will receive a PDF print version of the requisition file to review (rather than the actual file being visible in the system). Also, approval files are generated according to the user's permissions to view fields having specific security levels.

                                  The approval path can be carried out in two ways:

                                  • Sequential: When the first approver receives an approval request, he/she approves the requisition. Once approved, the approval request goes to the next approver, and so on. The requisition does not move forward until each approver in the sequence has approved in order. If one person in the sequence rejects the requisition, then the approval process ends.

                                  • Parallel: Multiple approvers receive an approval request and they can all approve the requisition at the same time. Approvers can approve the requisition without having to wait for the others. 

                                  If the standard approval process is used within an organization, the system administrator must activate settings to enable sequential or parallel approval. If the Dynamic Approval Routing is used within an organization, approval will be sequential unless there are more than one approver for the same role, then approval will be parallel.

                                    Approving Your Own Requisition (Save as Open)

                                    A user type permission grants users access to this feature.

                                    The Save As Open action is available only if the requisition has the Draft status.

                                    A requisition can be approved only if mandatory fields have been filled, unless the system has been configured to accept partially filled requisitions.

                                    1. Open the requisition file.

                                    2. Select Save As Open... in the More Actions list.

                                    3. Enter comments.

                                    4. Click Done.

                                    An event is added to the requisition History tab with the comment entered and the name of the user who performed the action. The status of the requisition is changed to Open/Approved.

                                    A To be Completed task is generated for the requisition if the requisition does not have the completion level Ready For Sourcing. The To be Completed task is assigned to the recruiter assistants if any. Otherwise, it is assigned to the recruiter.

                                    A Ready for Sourcing task is generated for the requisition if the requisition has the completion level Ready For Sourcing. The Ready for Sourcing task is assigned to the recruiter assistants if any. Otherwise, it is assigned to the recruiter.

                                      Requesting Someone to Approve a Requisition

                                      A user type permission grants users access to this feature.

                                      The approver must be in the same group as the requisition.

                                      1. Open the requisition file.

                                      2. Select Request Approval... in the More Actions list.

                                      3. Select the approvers. Use Quick Filters to filter the list down to relevant information.

                                      4. Define the sequence of approval by assigning a sequence number using the drop-down list under the Order column.

                                        When the first approver receives an approval request, he/she approves the requisition. Once approved, the approval request goes to the next approver, and so on.
                                      5. In the After Approval section, select a user to whom you will assign the next task.

                                      6. Enter comments.

                                      7. Complete other necessary fields.

                                        Important information regarding the field “Add the approvers to the list of my frequent collaborators”. This functionality will only add these users as frequent collaborators under My Setup > Preferences. It will not add these users as collaborators on the requisition currently open. Users will need to log out and log back in to see the change applied to their list of frequent collaborators under My Setup > Preferences.
                                      8. Click Done.

                                      The system assigns the requisition to the first approver in the sequence.

                                      • If the approver is a Recruiting user, an Approve Requisition task is assigned to the user. The user can select the following actions: Approve, Reject, Pass, Pending.

                                      • If the approver is not a Recruiting user, the approver receives an eShare approval message. The user can select the following actions: Approve, Refuse to Approve.

                                        Methods to Approve Requisitions

                                        Approvers can approve requisitions via different tools.

                                        Using the Tasks Channel

                                        If the approver is a Recruiting Center user, the approver will receive an Approve Requisition task in the Tasks channel. See Approving a Requisition via the Tasks Channel.

                                        Using eShare

                                        If the approver is not a Recruiting Center user, the approver will receive an eShare message via e-mail.

                                        Using the Tasks Channel and/or eShare

                                        If the approver is both a Recruiting Center user and an eShare user, the approver will receive an Approve Requisition task in the Tasks channel as well as a message via e-mail.

                                        When conducting the approval from either the Tasks list or from eShare, approvers will receive a PDF print version of the requisition file to review (rather than the actual file being visible in the system). Also, approval files are generated according to the user's permissions to view fields having specific security levels.

                                        Approving a Requisition on Behalf of Another Approver

                                        From time to time, it may be necessary to approve a requisition on behalf of another approver. This is done by using the action called Amend Approval Path. Users with the appropriate permissions can update an approval decision manually on behalf of one of the approvers. See Approving a Requisition on Behalf of Another Approver.

                                          Approving a Requisition via the Tasks Channel

                                          A user type permission grants users access to this feature

                                          The approver must be in the same group as the requisition.

                                          1. In the Tasks channel, click Approve Requisition.

                                          2. In the Tasks list, click Approve Requisition next to the desired requisition.

                                          3. In the Decide on Approval window, select Approve.

                                          4. Enter comments if mandatory.

                                          5. Click Done.

                                            Approving a Requisition on Behalf of Another Approver

                                            A user type permission grants users access to this feature.

                                            The requisition status must be Pending - To be Approved.

                                            1. Open a requisition file.

                                            2. Select Amend Approval Path in the More Actions list.

                                            3. Select a decision for an approver.

                                            4. Optional: You can change the order of the approvers.

                                            5. Enter comments.

                                            6. Complete other necessary fields.

                                            7. Click Done.

                                            The system assigns the requisition to the first approver in the sequence.
                                            • If the approver is a Recruiting Center user, an Approve Requisition task is assigned to the user.

                                            • If the approver is an eShare user, the approver receives an eShare approver message.

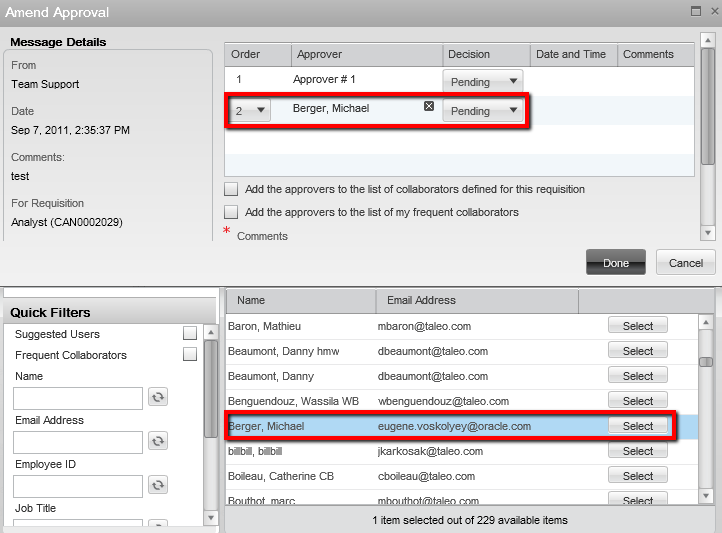
                                              Requisition Approval Path Amendment

                                              From time to time, it may be necessary to change the approvers that were originally selected for a requisition. This is done by using the action called Amend Approval Path.

                                              The Amend Approval Path action allows users to modify an existing requisition approval path. Users, if they have the permissions, can add or remove approvers, reorder them, and even decide for them.

                                              The Amend Approval Path action is available in the More Actions menu only if:
                                              • the requisition status is set to "Pending - To be Approved";

                                              • the user was granted the proper permissions.

                                              Adding Approvers

                                              It is possible to add approvers to an existing approval path. When clicking the Add Approvers button located at the bottom of the Amend Approval window, a window appears and users can filter and select one or many approvers. The newly added approvers appear at the top section of the window with the other approvers. When approvers are added to the approval path, the event "Approval Request Amended: Approvers Added" is added to the requisition's History tab.
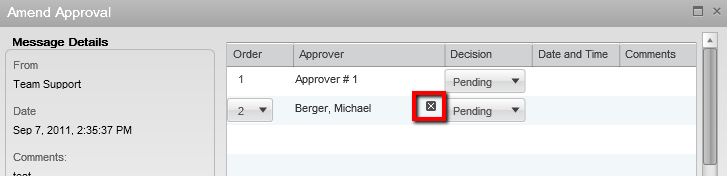

                                              Image showing the Amend Approval window and how to add approvers.

                                              Removing Approvers

                                              It is possible to remove approvers from an existing approval path. When clicking the Remove icon next to the approver's name, the approver is removed from the approval path. When approvers are removed from the approval path, the event "Approval Request Amended: Approvers Removed" is added to the requisition's History tab.

                                              Specific rules apply when removing approvers:

                                              • Users can remove approvers from an approval path only if the approvers have not yet received the Approve Requisition task.

                                              • Users can remove approvers from an approval path they created only if they have the permission "Remove approver, change decision of approver, or change approved requisition recipient when amending an approval path created by these users."

                                              • Users can remove approvers from an approval path created by another user only if they have the permission "Remove approver, change decision of approver, or change approved requisition recipient when amending an approval path created by another user."


                                              Image showing the Amend Approval window and how to remove approvers.

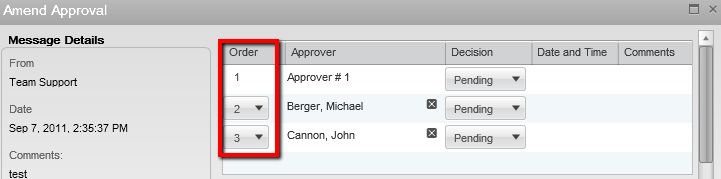
                                              Reordering Approvers

                                              It is possible to reorder approvers in an existing approval path. When approvers are reordered in the approval path, the event "Approval Request Amended: Approvers Reordered" is added to the requisition's History tab.

                                              Specific rules apply when reordering approvers:

                                              • A user can change the order of the approvers only if the approvers have not yet received the Approve Requisition task.

                                              • A user can change the order of the approvers only if the approvers have not yet render their decision.


                                              Image showing the order of approvals in the Amend Approval window.

                                              Deciding for Approvers

                                              It is possible to take an approval decision for an approver. When all the approvers have rendered their decision, an event is added for each decision in the requisition's History tab.

                                              Specific rules applies when deciding for approvers:

                                              • A user can decide for an approver only if the approver has not yet rendered his decision.

                                              • A user can decide for an approver even if the approver has already received the Approve Requisition task.

                                              • A user can decide for an approver in an approval path created by himself only if he has the permission "Remove approver, change decision of approver, or change approved requisition recipient when amending an approval path created by this user."

                                              • A user can decide for an approver in an approval path created by another user only if he has the permission "Remove approver, change decision of approver, or change approved requisition recipient when amending an approval path created by another user."

                                              • A user can set the decision to Pass for an approver only if he has the permission "Choose to pass when this user decides on behalf of another approver". Two exceptions: a) Except if the approval path has been created by himself and the option "But not when amending an approval path created by the user" was selected for that permission. b) Except if the approval path has been created by another user and the option "But not when amending an approval path created by another user" was selected for that permission.

                                              • A user cannot set the decision to Pass for the last approver if all other approvers have also set their decision to Pass.

                                              • When a decision has been taken for an approver, the decision is displayed in the requisition's Approvals tab: {Current User} on behalf of {Approver Name}.


                                              Image showing the decisions in the Amend Approval window.

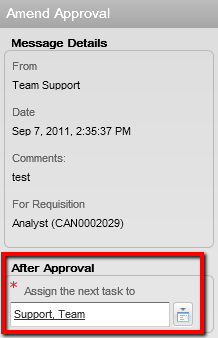
                                              Assigning the Task After the Approval

                                              It is possible to change the person who will perform the next task once the approval has been rendered. This is done using the selector next to the Assign the next task to field.


                                              Image showing the field Assign the next task to.

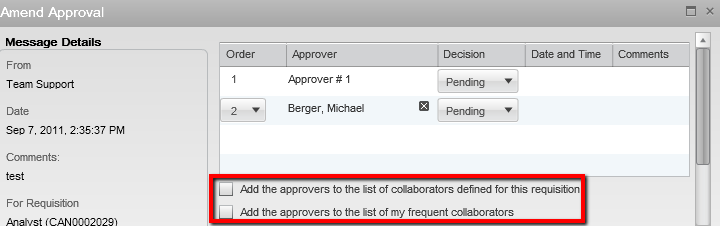
                                              Adding Approvers to the List of Collaborators

                                              When the option "Add the approvers to the list of collaborators defined for this requisition" is selected, the selected approvers will be automatically added to the requisition's collaborators list. This option is visible if:

                                              • the Collaborators list has been enabled for the requisition;

                                              • the user adding the approvers is the owner of the requisition (Recruiter, Recruiter Assistant, Hiring Manager, Hiring Manager Assistant). If the user is not the owner of the requisition, he must have the permission "Reassign requisitions to owners and collaborators if the user is not an owner".

                                              When the option "Add the approvers to the list of my frequent collaborators" is selected, the selected approvers will automatically be added to the user's frequent collaborators list (available under My Setup > Preferences). It will not add the approvers in the collaborator's list of the requisition. This option is visible only if the Collaborators list has been enabled for the requisition.


                                              Image showing the option Add the approvers to the list of collaborators defined for this requisition and the option Add the approvers to the list of my frequent collaborators.

                                                Requisition Approval Request Reminder

                                                Recruiting Center users can send a requisition approval request reminder.

                                                Users with the appropriate permissions can click the Send Reminder button on the Approvals tab within the requisition file when an active approval is pending. This action will resend the approval request email to the approvers who it is the turn to render their decisions. If the approver is an eShare user, the eShare hyperlink will be present in the email.

                                                  Sending a Requisition Approval Request Reminder

                                                  A user type permission grants users access to this feature.

                                                  1. In a requisition file, click the Approvals tab.

                                                  2. Click Send Reminder.

                                                  3. Enter comments.

                                                  4. Click Done.

                                                    Requisition Approval Acknowledgment

                                                    eShare users can receive a confirmation of their requisition approvals.

                                                    This feature is automatically available on all eShare approvals. When users respond to an eShare approval request, there is a check box to trigger the receiving of an approval acknowledgment. If users choose to receive the acknowledgment, upon completing their decision on the request, the users will receive an e-mail message confirming their action.

                                                    Three system message templates have been created for this purpose. There is a standard message available and if desired, system administrators can modify the text of the message sent. The acknowledgment sent will depend on the decision of the approver:

                                                    • Requisition Approved Acknowledgment

                                                    • Requisition Rejected Acknowledgment

                                                    • Requisition Passed Acknowledgment

                                                    Approvals decided via the Tasks channel do not have an acknowledgment option; users can view their completed tasks in the Tasks channel by clearing the Hide completed tasks option.
                                                      Approvers and Frequent Approvers

                                                      An approver is a Recruiting Center user who will approve requisitions and/or offers.

                                                      A list of approvers can be defined by the system administrator at the department level. A list of personal default approvers, called frequent approvers, can also be defined by the Recruiting Center user in the My Setup feature. When a requisition and/or offer is ready to be approved (by selecting the Request Approval action), the approval path is selected by default as follows:

                                                      • If frequent approvers were defined under My Setup, these approvers will be automatically selected.

                                                      • If frequent approvers were not defined under My Setup, the approvers set at the department level by the system administrator will be selected automatically.

                                                      When a user selects approvers, the selector only displays users who can be potential approvers. It is possible that no approvers are displayed if none of them are allowed to do the approval. An approver must be an active user and have the user type permission to approve requisitions and/or offers.

                                                        Creating a List of Frequent Approvers

                                                        A setting allows the activation of this feature.

                                                        A user type permission grants users access to this feature.

                                                        1. In the auxiliary navigation bar, click Resources, then My Setup.

                                                        2. In the Frequent Approvers tab, click Add...

                                                        3. Select one or several approvers.

                                                        4. Click Done.

                                                        The approvers appear in the Approvers list. These approvers will be automatically selected when requesting the approval of a requisition and/or offer overwriting the default approvers set by the system administrator.

                                                          Modifying the List of Frequent Approvers

                                                          A setting allows the activation of this feature.

                                                          A user type permission grants users access to this feature.

                                                          1. In the auxiliary navigation bar, click Resources, then My Setup.

                                                          2. In the Frequent Approvers tab, click Modify...

                                                          3. Select one or several approvers.

                                                          4. Click Select.

                                                          5. Click Done.

                                                          The approvers appear in the Approvers list. These approvers will be automatically selected when requesting the approval of a requisition or offer overwriting the default approvers set by the system administrator. The system cannot modify the approver list a user has set under My Setup.

                                                            Adding an Approver to the Frequent Approvers List

                                                            A setting allows the activation of this feature.

                                                            A user type permission grants users access to this feature.

                                                            1. In the auxiliary navigation bar, click Resources, then My Setup.

                                                            2. In the Frequent Approvers tab, click Add...

                                                            3. Select one or several approvers.

                                                            4. Click Done.

                                                            The approvers appear in the Approvers list. These approvers will be automatically selected when requesting the approval of a requisition and/or offer. The system cannot modify the approver list a user has set under My Setup.

                                                              Removing an Approver from the Frequent Approvers List

                                                              A setting allows the activation of this feature.

                                                              A user type permission grants users access to this feature.

                                                              1. In the auxiliary navigation bar, click Resources, then My Setup.

                                                              2. In the Frequent Approvers tab, click Modify...

                                                              3. Hover your mouse on the name of an approver.

                                                              4. Click on the Remove icon.

                                                              5. Click Done.

                                                              The approver no longer appears in the Approvers list under My Setup.

                                                                Requisition Search

                                                                  Requisition Search

                                                                  The requisition search allows Recruiting Center users to quickly find specific requisitions.

                                                                  The requisition search tool is available at the top right hand corner of the Recruiting Center pages. It is available to users if it has been configured in the user's configuration profile and if the user type permission has been granted.


                                                                  Image showing the requisition search field.

                                                                  When performing a requisition search, users enter the title, the number, or a keyword to find the desired requisition. A wild card search may also be used. The search engine only returns results appropriate to the user's permissions and group association.

                                                                  When performing a requisition search using a keyword, the search engine looks through this content of the requisition file:

                                                                  • Requisition number

                                                                  • Requisition title

                                                                  • Requisition title by manager

                                                                  • Requisition internal description

                                                                  • Requisition external description

                                                                  • Job board summary description

                                                                  • Internal qualifications

                                                                  • External qualifications

                                                                  • Abstract

                                                                  • Additional information

                                                                  • Department

                                                                  • Position

                                                                  • Requisition UDF

                                                                  • Offer UDF

                                                                  • Department UDF

                                                                  • Requisition Primary Location

                                                                  • Requisition standard fields (Hire Type, State, Job Schedule, Job Level, Job Shift, Job Type, Study Level, Will Travel, Employee Status)

                                                                  When performing a requisition search using a keyword, stop words are indexed. Stop words are small words not included in the index and excluded from a search because they are not considered to be significant. For example, words such as "no, not, the, one, and, or" and all single letters are stop words. Stop words are considered by the system when placed within quotation marks or parenthesis.

                                                                  For example, when users are searching for "The GAP" placed within quotation marks or parenthesis, the system will consider the stop word "the". When users are searching for The GAP without quotation marks nor parenthesis, the system will ignore the stop word in the query.

                                                                  For the requisition search, the system automatically applies the boolean operator AND. The AND, OR, and NOT operators can be entered manually.

                                                                  The search is not case sensitive.

                                                                  For performance and management reasons, a maximum of 300 matching files are displayed.

                                                                    Performing a Requisition Search

                                                                    A user type permission grants users access to this feature.

                                                                    1. In the Search tool, select Requisitions.

                                                                    2. Enter data in the field.

                                                                    3. Click the Search button.

                                                                    Requisitions that meet the search criteria are displayed in the search results list.

                                                                      Requisition Actions

                                                                        Duplicating Requisitions

                                                                        Recruiting Center users can duplicate requisitions to create requisitions similar to an existing one.

                                                                        A requisition can be duplicated using the Duplicate Requisition icon available in the requisition form. This icon is available to users if they have been granted the proper user type permission. Any requisition can be duplicated regardless of its status.

                                                                        When duplicating a requisition, all of the information is duplicated except the Alerts tab information (which defaults to your organization's ACE settings) and except the fields presented in the following table.

                                                                        Requisition File Section Field Not Duplicated
                                                                        Logistics - Identification Requisition Number
                                                                        Logistics - Identification Justification
                                                                        Logistics - Profile - In Contingent Requisition Target Start Date
                                                                        Logistics - Profile - In Contingent Requisition Target End Date
                                                                        Logistics - Profile - In Contingent Requisition Start Time
                                                                        Logistics - Profile - In Contingent Requisition End Time
                                                                        Logistics - Abstract Abstract
                                                                        Description (External) - General Opening Date
                                                                        Description (External) - General Closing Date
                                                                        Description (External) - General Contact Name
                                                                        Description (External) - General Contact Email
                                                                        Description (Internal) - General Opening Date
                                                                        Description (Internal) - General Closing Date
                                                                        Description (Internal) - General Contact Name
                                                                        Description (Internal) - General Contact Email
                                                                        Note: When a requisition is duplicated, it will carry over the list of approvers from the original requisition as the starting point for approvers on the requisition. If in fact the requisition is never routed for approval but is saved as open, these approvers will remain on the Approvals tab with no dates associated with conducting an approval. Users should understand that if an approver appears on a page with no date next to their name, they never approved the requisition. This scenario illustrates how this might come to occur.

                                                                          Duplicating a Requisition

                                                                          A user type permission grants users access to this feature.

                                                                          1. Open a requisition.

                                                                          2. Click the Duplicate Requisition icon.

                                                                          3. Modify the information as necessary.

                                                                            Some fields will not duplicated. For details, see Fields that are not duplicated.

                                                                          4. Click Save.

                                                                          The requisition appears in the Requisitions list and the status is Draft.

                                                                            Editing Requisitions

                                                                            Recruiting Center users can edit requisitions to modify the content of fields in the requisition form.

                                                                            Users can modify requisitions via the Edit button which is available in the requisition form. This button is available to users if they have been granted the proper user type permission. Users who can edit requisitions can also enter comments on requisitions they are allowed to edit.

                                                                            The edition of fields contained in a requisition is controlled by the security level set for each field. However, fields appearing in these sections are not editable once a requisition is posted

                                                                            • Profile (such as Employee Status, Job Type, Schedule, Job Level, Shift)

                                                                            • Organization-Location-Job Field

                                                                            • Prescreening (Questions or skills cannot be added, but they can be removed.)

                                                                            • Candidate Selection Workflow

                                                                            • Budget (such as Relocation Costs)

                                                                            • Compensation (such as Currency, Pay Basis, Commission, Vacation)

                                                                            • Other (such as Citizenship Status, Overtime Status)

                                                                            • Additional Information

                                                                            • Contact Name, Opening Date, and Closing Date in the Description section

                                                                              Editing Requisition Fields

                                                                              Settings allow the activation of this feature.

                                                                              A user type permission grants users access to this feature.

                                                                              1. Open a requisition.

                                                                              2. Click Edit.

                                                                              3. Make changes to the editable fields.

                                                                              4. Click Save and Close.

                                                                                Reopening Requisitions

                                                                                The Reopen Requisition action allows Recruiting Center users to reopen a requisition previously filled or canceled, with the option to cancel the current hiring or to add new openings.

                                                                                The Reopen Requisition action provides two options:

                                                                                • Add Openings: Users can enter a specific number of additional openings or select Unlimited to have an unlimited number of openings.

                                                                                • Cancel the Hiring of Candidates: This option will be displayed only if there is at least one hired candidate for the requisition.

                                                                                  Reopening a Filled Requisition and Adding Openings

                                                                                  The requisition status must be Filled.

                                                                                  A setting activates this feature.

                                                                                  A user type permission grants users access to this feature.

                                                                                  1. Open a requisition file.

                                                                                  2. Select Reopen Requisition in the More Actions list.

                                                                                  3. In the Reopen Requisition window, click the radio button next to Add Openings and then indicate a specific number of openings or click the radio button next to Unlimited.

                                                                                  4. Enter comments.

                                                                                  5. Click Done.

                                                                                  The system displays a window in which you indicate whether you want to post the requisition immediately or at a later time. If you click Yes, a new series of steps is displayed that enable you to post the reopened requisition. A candidate who was hired prior to reopening of the requisition remains on the requisition and retains the Hired step and status. The requisition that was filled is reopened and new openings are added while retaining candidates hired to fill the original opening.

                                                                                    Reopening a Requisition that Was Cancelled

                                                                                    The requisition status must be Cancelled.

                                                                                    This action does not apply to requisitions that were only draft then cancelled.

                                                                                    A setting activates this feature.

                                                                                    A user type permission grants users access to this feature.

                                                                                    1. Open a requisition file.

                                                                                    2. Select Reopen Requisition in the More Actions list.

                                                                                    3. Indicate a specific number of job openings or indicate Unlimited.

                                                                                    4. Enter comments.

                                                                                    5. Click Done.

                                                                                    The requisition that was cancelled without being filled is reopened. The system displays a window in which you indicate whether you want to post the requisition immediately or at a later time. If you click Yes, a new series of steps is displayed that enable you to post the reopened requisition.

                                                                                      Reopening a Filled Requisition and Cancelling the Hiring

                                                                                      The requisition status must be Filled.

                                                                                      This option will be displayed only if there is at least one hired candidate for the requisition.

                                                                                      A setting activates this feature.

                                                                                      A user type permission grants users access to this feature.

                                                                                      1. Open a requisition file.

                                                                                      2. Select Reopen Requisition in the More Actions list.

                                                                                      3. Click the radio button next to Cancel the hiring of the candidates.

                                                                                      4. Enter comments.

                                                                                      5. The system displays a reminder that you have to revert the hired candidate's step and status using the Revert action. Click Yes.

                                                                                        Clicking No is not a best practice: if you forget to change the candidate's step and status later, the reopened requisition will contain a candidate whose step and status is Hired.

                                                                                      6. The system displays the candidate list corresponding to the requisition.

                                                                                      7. Click the check box next to the candidate's name and click Revert... in the More Actions list.

                                                                                      8. Enter comments.

                                                                                      9. Click Done.

                                                                                      The filled requisition is reopened and the candidates who had been hired on the requisition are cancelled. If you click the Requisitions tab, the requisition now has Open status in the Requisitions window. If you click the corresponding number in the Candidates column, the candidate who was originally hired is still displayed in the requisition's Candidates list but the person has the step and status he/she had prior to reaching the Hired step.

                                                                                        Saving a Requisition as a Template

                                                                                        1. Open a requisition file.

                                                                                        2. Click the Save Requisition as Template icon.

                                                                                        The requisition is now a requisition template. It is available in the Libraries menu, under Templates.

                                                                                          Putting a Requisition on Hold

                                                                                          The Put on Hold action is available when the requisition has one of the following statuses: Sourcing - Unposted, Sourcing - Expired, Draft, Approved, Rejected, To be Approved.

                                                                                          The offers under the Offers tab must NOT have the status Accepted with Final Start Date, Accepted with Tentative Start Date, Negotiating, or Extended (waiting for candidate response).

                                                                                          A user type permission grants users access to this feature.

                                                                                          1. Open a requisition file.

                                                                                          2. In the More Actions list, click Put on Hold...

                                                                                          3. Enter comments.

                                                                                          4. Click Done.

                                                                                          Activities related to the requisition are restricted or postponed. The status of the requisition is changed to On Hold.

                                                                                            Reactivating an On Hold Requisition

                                                                                            The requisition status must be On Hold.

                                                                                            A user type permission grants users access to this feature.
                                                                                            1. Open a requisition file.

                                                                                            2. In the More Actions list, select Reactivate...

                                                                                            3. Enter comments.

                                                                                            4. Click Done.

                                                                                            Once the requisition is reactivated, its status will reverted to the one before the requisition was put on hold. If the setting Restart Approval Process After "On Hold" Step was used, the status of the requisition will change as follows:

                                                                                            • If the setting is set to Yes, the status of the requisition will become Draft when reactivating an on hold requisition.

                                                                                            • If the setting is set to No, the status of the requisition will be reverted to the status before the requisition was put on hold.

                                                                                              Indicating a Requisition was Filled

                                                                                              A user type permission grants users access to this feature.

                                                                                              The Fill action is available when the requisition has the following statuses: Open - Approved, Open - Posted, Open - Expired, Open - Unposted, Open - Scheduled.

                                                                                              1. Open a requisition.

                                                                                              2. In the More Actions list, select Fill...

                                                                                              3. Enter comments.

                                                                                              4. Click Done.

                                                                                              When a requisition is filled, the step of the remaining candidates changes to Rejected and the requisition no longer appears in the requisition list.

                                                                                                Requesting a Contribution

                                                                                                A user type permission grants users access to this feature.

                                                                                                1. Open a requisition file.

                                                                                                2. In the More Actions list, click Request Contribution....

                                                                                                3. Select a contributor.

                                                                                                4. Complete desired fields.

                                                                                                5. Click Done.

                                                                                                The selected colleague will receive an -mail requesting to contribute to the task.

                                                                                                  Returning a Contribution

                                                                                                  A contribution must have been requested.

                                                                                                  User must have completed the contribution.

                                                                                                  1. Open a requisition file.

                                                                                                  2. In the More Actions list, select Return my contribution.

                                                                                                  3. Select the contribution.

                                                                                                  4. Enter comments.

                                                                                                  5. Click Done.

                                                                                                  The originator of the request is notified that the user returned his/her contribution (the created task is flagged).

                                                                                                  If the requisition status is not sourcing, not rejected, not in a closing state, then:

                                                                                                  • If the requisition status is Draft, a "To be completed" task is created for the requisition.

                                                                                                  • If the requisition status is Approved and complete for sourcing, a "Ready for sourcing" task is created for the requisition.

                                                                                                  • If the requisition status is Approved and not complete for sourcing, a "To be completed" task is created for the requisition.

                                                                                                  The task is assigned to the originator of the contribution request and flagged (AIF) in the Tasks list.

                                                                                                    Adding a Comment in a Requisition

                                                                                                    A user type permission grants users access to this feature.

                                                                                                    1. Open a requisition file.

                                                                                                    2. Click the Add Comments icon.

                                                                                                    3. Enter a comment.

                                                                                                    4. Click Done.

                                                                                                    The comment is displayed in the requisition file History tab. The comment cannot be modified once entered.

                                                                                                      Adding an Attachment to a Requisition

                                                                                                      The file will be scanned for viruses. If a virus is detected, the file is not attached. The system displays file information or suggests attaching a different file.

                                                                                                      1. Open a requisition file.

                                                                                                      2. Under the Attachments tab, click Browse to select a file.

                                                                                                      3. Click Add.

                                                                                                      The attachment appears in the Attachments tab. The file is attached to the requisition file and can be shared with approvers and users having access to the requisition.

                                                                                                        Removing an Attachment from a Requisition

                                                                                                        1. Open a requisition file.

                                                                                                        2. Click the Attachments tab.

                                                                                                        3. Move the mouse over the name of an attachment.

                                                                                                        4. Click Delete.

                                                                                                        5. Confirm your deletion.

                                                                                                          Viewing Attachments in a Requisition

                                                                                                          1. Open a requisition file.

                                                                                                          2. Click the Attachments tab.

                                                                                                          3. Click the name of an attachment.

                                                                                                            Printing a Requisition

                                                                                                            A maximum of 15 requisition files can be printed at a time.

                                                                                                            1. Open a requisition file.

                                                                                                            2. Click the Print icon.

                                                                                                            3. Indicate if you want to have a page break after each section.

                                                                                                            4. Select the sections you want to print and their order.

                                                                                                            5. Click Print (PDF).

                                                                                                            6. Click in the page displaying the PDF.

                                                                                                            7. In the Windows File menu, select Print.

                                                                                                              Cancelling a Requisition

                                                                                                              A user type permission grants users access to this feature.

                                                                                                              The Cancel Requisition action is available when the requisition has one of the following statuses: Approved, Scheduled, Posted, Unposted, Expired, Draft.

                                                                                                              The Cancel Requisition action is not available when at least one candidate has been hired for the requisition or an offer was extended.

                                                                                                              1. Open a requisition file.

                                                                                                              2. In the More Actions list, click Cancel Requisition...

                                                                                                              3. Enter comments.

                                                                                                              4. Click Done.

                                                                                                              An event is added to the requisition History tab with the comment entered and the name of the user who performed the action. The status of the requisition is now Cancel. The requisition is automatically unposted from the corporate posting, the agency posting, and from job boards.

                                                                                                              If you cancelled the requisition by mistake, reopen the requisition via the More Actions list.

                                                                                                                Deleting a Requisition

                                                                                                                The requisition status must be Draft.

                                                                                                                A user type permission grants users access to this feature.

                                                                                                                1. Open a requisition file.

                                                                                                                2. In the More Actions list, click Delete...

                                                                                                                3. Enter comments.

                                                                                                                4. Click Done.

                                                                                                                The requisition status is changed to Deleted. The Delete Requisition action is deleting all the tasks and current activities related to the requisition. This is only a soft deletion, not a hard deletion in the database.

                                                                                                                  Using the Requisition Automatic Filling Option

                                                                                                                  A setting allows the activation of this feature.

                                                                                                                  A user type permission grants users access to this feature.

                                                                                                                  1. In the auxiliary navigation bar, click Resources, then My Setup.

                                                                                                                  2. In the Preferences tab, click Edit.

                                                                                                                  3. Select the option I want to use the automatic filling option of the requisition file.

                                                                                                                  4. Click Save.

                                                                                                                  When a user will create a requisition, certain fields will be automatically filled.

                                                                                                                    Previewing Candidates Matching a Requisition

                                                                                                                    Recruiting Center users can select a requisition and preview candidates who would be a fit for the requisition based on certain matching criteria and filters.

                                                                                                                    When a requisition has been posted to a career section, users can view a list of candidates whose profiles match default matching criteria and filters. This is done using the Preview Matching Candidates button available in the requisition Posting and Sourcing tab.

                                                                                                                    For the Preview Matching Candidates button to appear in a requisition file, the country specified in the requisition must correspond to the country specified by the system administrator. For example, if a user posts a requisition for a job available in the United States, the Preview Matching Candidates button will be displayed if the system administrator selected United States among the countries for which users can view matching candidates. This feature is useful if a company may not feel comfortable in showing to users a list of matching candidates for job posted in some countries because of regulation reasons (EEO regulations for example).

                                                                                                                    Default matching criteria are set by the system administrator. However, these default criteria can be modified by Recruiting Center users using the Modify Matching Criteria icon to find more relevant candidates for a particular requisition. Default matching filters are also set by the system administrator. These default filters can also be modified by users.

                                                                                                                    Once the user feels that he/she has found the right candidates, an email is sent to these candidates to invite them to apply for the job.

                                                                                                                    Matching Criteria

                                                                                                                    Matching criteria are:

                                                                                                                    • Competencies

                                                                                                                    • Education Level

                                                                                                                    • Employee Status

                                                                                                                    • Job Level

                                                                                                                    • Job Type

                                                                                                                    • Minimum Annual Salary

                                                                                                                    • Place of residence/Location

                                                                                                                    • Preferred Jobs/Job

                                                                                                                    • Preferred Locations/Locations

                                                                                                                    • Preferred Organizations/Organization

                                                                                                                    • Questions

                                                                                                                    • Schedule

                                                                                                                    • Shift

                                                                                                                    • Travel

                                                                                                                    Matching criteria (except for competencies and questions) can be set as Required or Desired:

                                                                                                                    • Required: The criterion is mandatory. The candidate has to meet this specific criterion to appear in the list of candidates displayed to the users.

                                                                                                                    • Desired: The criterion is not mandatory, it is considered an asset. Candidates who do not have an asset will be matched as long as they meet all the required criteria. Candidates who do not match a Desired criterion are not rejected. Candidates who meet all the Required criteria and who also meet some of the Desired criteria will appear at the top of the list of candidate displayed to the user.

                                                                                                                    Competencies and questions criteria are considered as wildcards. If these criteria are not set to Required in the requisition, or if candidates do not enter answers for these criteria, the answers will still be considered. The candidates will be matched if they match all the other required criteria. Answering these criteria will help determine the position of the candidates on the candidates list.

                                                                                                                    Matching Filters

                                                                                                                    Matching filters are:

                                                                                                                    • Submission Status: Do not invite candidates who have at least one submission with any of the selected statuses:
                                                                                                                      • New

                                                                                                                      • Reviewed

                                                                                                                      • 1st, 2nd, 3rd Interview

                                                                                                                      • Testing

                                                                                                                      • Offer

                                                                                                                      • Hired

                                                                                                                      • Rejected

                                                                                                                      • Declined

                                                                                                                    • Sourcing: Invite or not candidates:
                                                                                                                      • Who have applied through any source type or source.

                                                                                                                      • Who have applied at least once through any of the source types or sources selected.

                                                                                                                    • Other: Invite candidates from the following locations:
                                                                                                                      • All countries

                                                                                                                      • The requisition country

                                                                                                                      • The requisition state/province

                                                                                                                      • The requisition region

                                                                                                                    • A filter to invite candidates whose information has been modified during the last x months.

                                                                                                                    • A filter to invite internal candidates.

                                                                                                                      Viewing Candidates Matching a Requisition

                                                                                                                      A user type permission grants users access to this feature.

                                                                                                                      The requisition must be posted on a career section.

                                                                                                                      1. In the requisition file, select the Posting and Sourcing tab.

                                                                                                                      2. In the Career Sections section, click Preview Matching Candidates.

                                                                                                                      The Posting Requisitions - Filter Matching Candidates window displays candidates matching the requisition.

                                                                                                                        Modifying Matching Candidate Criteria

                                                                                                                        A user type permission grants users access to this feature.

                                                                                                                        The requisition must be posted on a career section.

                                                                                                                        1. In the requisition file, select the Posting and Sourcing tab.

                                                                                                                        2. In the Career Sections section, click Preview Matching Candidates.

                                                                                                                        3. In the Posting Requisitions - Filter Matching Candidates window, click the Modify Matching Criteria icon available in the Filters section on the left pane.

                                                                                                                        4. Modify criteria available in each tab.

                                                                                                                        5. Click Done.

                                                                                                                        In the Posting Requisitions - Filter Matching Candidates window, the list of candidates matching the requisition is updated according to the selected criteria.

                                                                                                                          Modifying Matching Candidate Filters

                                                                                                                          A user type permission grants users access to this feature.

                                                                                                                          The requisition must be posted on a career section.

                                                                                                                          1. In the requisition file, select the Posting and Sourcing tab.

                                                                                                                          2. In the Career Sections section, click Preview Matching Candidates.

                                                                                                                          3. In the Posting Requisitions - Filter Matching Candidates window, selected the desired filters in the Filters section on the left pane.

                                                                                                                          In the Posting Requisitions - Filter Matching Candidates window, the list of candidates matching the requisition is updated according to the selected filters.

                                                                                                                            Sending an Email to Candidates Matched to a Requisition

                                                                                                                            The requisition must be posted on a career section.

                                                                                                                            A setting allows the activation of this feature.

                                                                                                                            A user type permission grants users access to this feature.

                                                                                                                            1. In the requisition file, select the Posting and Sourcing tab.

                                                                                                                            2. In the Career Sections section, click Modify.

                                                                                                                            3. In the Posting Requisitions window, select the option Email this job posting to matching candidates.

                                                                                                                            4. Click Done.

                                                                                                                            Candidates matched to the requisition will receive an e-mail inviting them to apply for the job.

                                                                                                                              Requesting More Information to Candidates

                                                                                                                              The Request More Information alert allows Recruiting Center users to send an email to candidates who meet certain conditions but whose submission is incomplete.

                                                                                                                              The message invites the candidates to return to their submissions and provide the missing information. The system determines automatically which information is missing by reviewing fields identified by your company at the time of implementation.

                                                                                                                              When setting the Request More Information alert, the options in the following tables are provided:

                                                                                                                              Option Description
                                                                                                                              A candidate meeting all the required criteria achieves a result of at least x% (0/0) This option is used to set the minimum result. Select a percentage from the list. At the right of the percentage, the system displays the number of points the candidate must have to match the selected percentage. When changing the percentage, the value to the right is recalculated. Candidates who meet all the required criteria and the result value will be considered ACE candidates.
                                                                                                                              A candidate meeting all the required criteria has at least x assets out of y This option is used to set the minimum number of assets. Select a value from the list. Candidates who meet all the required criteria and the minimum number of assets will be considered ACE candidates.
                                                                                                                              Request information when candidate meets either condition This option is used to notify candidates who meet the result or asset condition.
                                                                                                                              Request information when candidate meets both conditions This option is used to notify candidates who meet the result and asset condition.

                                                                                                                                Setting the Request More Information Alert

                                                                                                                                Use totals that are equal to or slightly lower than those you used in the ACE candidate alert section.

                                                                                                                                A user type permission grants users access to this feature.

                                                                                                                                1. Open a requisition file.

                                                                                                                                2. Click the Alerts tab.

                                                                                                                                3. In the Request More Information section, click Set Alert.

                                                                                                                                4. Select the desired criteria.

                                                                                                                                5. Click Done.

                                                                                                                                In the requisition Alerts tab, the criteria are displayed in the Request More Information section. An email is sent to candidates meeting certain conditions but whose application information is incomplete.

                                                                                                                                  Requisition Types

                                                                                                                                    Requisition Type

                                                                                                                                    A requisition (or staffing) type allows Recruiting Center users to determine the type of candidates that they want to hire.

                                                                                                                                    These requisition types are available:

                                                                                                                                    • Professional: Requisitions for most professional employees.

                                                                                                                                    • Executive: Requisitions for executives. This type of requisition allows you to secure and protect private executive candidates in the system.

                                                                                                                                    • Hourly: Requisitions for hourly employees.

                                                                                                                                    • Campus: Requisitions for students or campus job fairs.

                                                                                                                                    • Contingent: Requisitions for contractual employees submitted by agencies.

                                                                                                                                    • Pipeline - General

                                                                                                                                    • Pipeline - Executive

                                                                                                                                    When creating a requisition, if more than one requisition type is activated, Recruiting Center users are asked to select the desired requisition type. When a requisition type is no longer available, it cannot be selected, but requisitions created with that type keep their original requisition type.

                                                                                                                                    In the Requisitions list, a column called Requisition Type may be added if system administrators made it available in the requisition list format. Also, Requisition Type may be available as a search criteria in the Advanced Filters if made available by system administrators.
                                                                                                                                    Note: When selecting Requisition Type in the Advanced Filters window, all requisition types are listed even if the Recruiting Center user has no access to some of those requisition types.

                                                                                                                                    For Integration purposes: Campus requisitions and Hourly requisitions must be identified by Oracle in order for the integration team to change requisition type with a manual script. This will be allowed only once by customer. If more than one requisition type is active, import files must be modified.

                                                                                                                                      Changing the Type of a Requisition Template

                                                                                                                                      A user type permission grants users access to this feature.

                                                                                                                                      1. In the Libraries menu, select Templates.

                                                                                                                                      2. Click on a template.

                                                                                                                                      3. Click the Modify Requisition Type icon.

                                                                                                                                      4. Select a requisition type.

                                                                                                                                      5. Click Done.

                                                                                                                                      The requisition template can now be used to create requisitions for the specified requisition type.

                                                                                                                                        Requisition Ownership and Collaboration

                                                                                                                                          Requisition Owner

                                                                                                                                          Requisition ownership refers to the individuals chosen as the recruiter, the hiring manager, the recruiter assistant or the hiring manager assistant for a specific requisition.

                                                                                                                                          To be available for a requisition, the recruiter assistant and the hiring manager assistant roles must be activated by your system administrator. These two assistant roles can carry out requisition-related activities to help out the recruiter or hiring manager while, from a reports perspective, the requisition is attributed to the recruiter and hiring manager.

                                                                                                                                          When creating a requisition, you can choose a recruiter assistant and/or a hiring manager assistant. To modify the recruiter, the hiring manager, the recruiter assistant and the hiring manager assistant, you must be the owner of the requisition or have the Reassign requisitions to owners and collaborators even if the user is not a owner user type permission.

                                                                                                                                          When viewing the Requisitions list, you can use the "I own" filter located on the left-hand side of the page to gain quick access to your requisitions. You can also use the advanced filters Recruiter, Hiring Manager, Recruiter Assistant, Hiring Manager Assistant to view requisitions owned by a specific user.

                                                                                                                                          When notifications (such as attention indicator flags, workflow event notifications) are sent, the recruiter, the hiring manager as well as the assistants will receive them.

                                                                                                                                          System-assigned tasks (such as To be completed, Ready for sourcing, Extend posting and To be filled) are assigned to the assistant (if an assistant was identified) instead of the recruiter. However, the recruiter also has access to these tasks even though they were assigned to the assistant.

                                                                                                                                          The recruiter, recruiter assistant, hiring manager, hiring manager assistant chosen for the requisition as well as the creator of the approval path can terminate the approval path.

                                                                                                                                            Changing the Ownership of a Requisition

                                                                                                                                            The user must be the owner of the requisition or have the appropriate user type permission.

                                                                                                                                            A user type permission grants users access to this feature.

                                                                                                                                            1. Open a requisition file.

                                                                                                                                            2. Click Edit.

                                                                                                                                            3. In the Owners section, select new individuals as recruiter, hiring manager, recruiter assistant, and hiring manager assistant for the requisition.

                                                                                                                                            4. Click Save and Close.

                                                                                                                                            Notifications will be sent to the new owners of the requisition.

                                                                                                                                              Collaborator

                                                                                                                                              A collaborator is a person chosen by the owner of a requisition who helps out or takes responsibility for certain parts of the requisition process.

                                                                                                                                              To provide special access to a number of users throughout the requisition's life cycle, a Collaborator role is available. The Collaborator field must be activated by the system administrator.

                                                                                                                                              Requisition owners (for example the recruiter, hiring manager, recruiter assistant and hiring manager assistant) can grant privileges and access to one or multiple users they identify as collaborators on their requisitions. The recruiter, the hiring manager and the assistants, if any, are the principal actors throughout the requisition's life cycle. Collaborators will help out or take responsibility for certain parts of the process.

                                                                                                                                              Any user (not deleted) can be a collaborator, even non-Recruiting Center users (these users can be involved in the approval process with the use of the eShare Center).

                                                                                                                                              When creating a requisition, a user can specify collaborators who would be responsible for selected steps within the requisition or recruitment process. If using the same individuals as collaborators, a user can create a list of frequent collaborators in the My Setup page. Once a list of frequent collaborators is created, these collaborators can quickly be added to requisitions by clicking the Add Frequent Collaborators button.

                                                                                                                                              If a user wants to modify the collaborators added in a requisition, the user must be the owner of the requisition and have a permission to reassign requisitions to owners and collaborators even if the user is not the owner of the requisition.

                                                                                                                                              When viewing the Requisition list, a user can use the "I collaborate on" quick filter located on the left-hand side of the page to gain quick access to requisitions he/she collaborates on.

                                                                                                                                                Adding a Collaborator in a Requisition

                                                                                                                                                A user type permission grants users access to this feature.

                                                                                                                                                The Owners section must be included in the requisition.

                                                                                                                                                1. Open a requisition file.

                                                                                                                                                2. In the Requisition tab of the requisition file, click Edit.

                                                                                                                                                3. Click Add in the Collaborators section.

                                                                                                                                                4. Select a user.

                                                                                                                                                5. Click Done.

                                                                                                                                                The name of the collaborator appears in the Collaborators section of the requisition.

                                                                                                                                                  Deleting a Collaborator in a Requisition

                                                                                                                                                  A user type permission grants users access to this feature.

                                                                                                                                                  The Owners section must be included in the requisition.

                                                                                                                                                  Collaborators must have been included in the requisition.

                                                                                                                                                  1. Open a requisition file.

                                                                                                                                                  2. In the Requisition tab of the requisition file, click Edit.

                                                                                                                                                  3. Select a collaborator in the Collaborators section.

                                                                                                                                                  4. Click Delete.

                                                                                                                                                  The collaborator no longer appears in the Collaborators section of the requisition.

                                                                                                                                                    Creating a List of Frequent Collaborators

                                                                                                                                                    A setting allows the activation of this feature.

                                                                                                                                                    A user type permission grants users access to this feature.

                                                                                                                                                    The Collaborators field must be activated by the system administrator.

                                                                                                                                                    1. In the auxiliary navigation bar, click Resources, then My Setup.

                                                                                                                                                    2. In the Frequent Collaborators tab, click Add...

                                                                                                                                                    3. Select one or several collaborators.

                                                                                                                                                    4. Click Done.

                                                                                                                                                    Individuals with whom users will work on a regular basis regarding requisitions, i.e. collaborators, will appear in the Collaborators list. These collaborators will be available via the Add Frequent Collaborators button when creating a requisition.

                                                                                                                                                      Adding a Collaborator to the Frequent Collaborators List

                                                                                                                                                      A setting allows the activation of this feature.

                                                                                                                                                      A user type permission grants users access to this feature.

                                                                                                                                                      The Collaborator field must be activated by the system administrator.

                                                                                                                                                      1. In the auxiliary navigation bar, click Resources, then My Setup.

                                                                                                                                                      2. In the Frequent Collaborators tab, click Modify...

                                                                                                                                                      3. Select a collaborator.

                                                                                                                                                      4. Click Done.

                                                                                                                                                      The collaborator appears in the Collaborators list. The collaborator will be available via the Add Frequent Collaborators button when creating a requisition.

                                                                                                                                                        Removing a Collaborator from the Frequent Collaborators List

                                                                                                                                                        A setting allows the activation of this feature.

                                                                                                                                                        A user type permission grants users access to this feature.

                                                                                                                                                        The Collaborator field must be activated by the system administrator.

                                                                                                                                                        1. In the auxiliary navigation bar, click Resources, then My Setup.

                                                                                                                                                        2. In the Frequent Collaborators tab, click Modify...

                                                                                                                                                        3. Hover your mouse on the name of a collaborator.

                                                                                                                                                        4. Click the Remove icon.

                                                                                                                                                        5. Click Done.

                                                                                                                                                        The collaborator no longer appears in the Collaborators list. It will no longer be available via the Add Frequent Collaborators button when creating a requisition.

                                                                                                                                                          Adding Frequent Collaborators in a Requisition

                                                                                                                                                          The list of frequent collaborators must be defined in the My Setup page.

                                                                                                                                                          A user type permission grants users access to this feature.

                                                                                                                                                          The Owners section must be included in the requisition.

                                                                                                                                                          1. Open a requisition file.

                                                                                                                                                          2. In the Requisition tab of the requisition file, click Edit.

                                                                                                                                                          3. Click Add Frequent Collaborators in the Collaborators section.

                                                                                                                                                          The list of frequent collaborators defined under My Setup appears in the Collaborators section.

                                                                                                                                                            Suggested Users

                                                                                                                                                            The User Selector may contain an option to display suggested users.

                                                                                                                                                            The Suggested Users option is available when accessing the User Selector from a requisition and if the Collaborators field has been activated.

                                                                                                                                                            When selecting the Suggested Users option, the owners (recruiter, recruiter assistant, hiring manager, hiring manager assistant) and collaborators associated to the requisition are displayed. Only users who are able to complete the selected action are available for selection. For example, when requesting the approval of a requisition, only users who have the permission to approve requisitions are displayed.

                                                                                                                                                              Displaying Suggested Users

                                                                                                                                                              1. In a requisition, click the Selector icon to open the User Selector.

                                                                                                                                                              2. In the Quick Filters panel, select the Suggested Users option. The list of suggested users is displayed.

                                                                                                                                                              3. Select the desired user.