6Candidate Management

Candidate Management

    Candidate File

      Candidate File

      A candidate file is a form containing candidate information such as personal information, work experience, certifications, references, EEO information, screening information.

      A candidate file is organized into three sections:

      • The left pane contains the candidate card in the top section and supporting information in the bottom section. The card can be flipped and the pane can be expanded or collapsed.

      • The right pane contains supporting tools such as the online help and the online clips if these were enabled. The pane can also be expanded or collapsed.

      • The center pane displays the candidate form. Information displayed will vary whether the view mode or edit mode is selected.

      To navigate from one candidate file to another, users can use the navigation icons.

      View Mode

      When opening a candidate file, users are always in view mode and they can from there choose to go into edit mode. This provides a cleaner layout and eliminates the need to "close" the file (to exit out of it and reactivate other buttons on the screen) if only viewing the file. In view mode, only fields for which data is provided are displayed. If a field is empty, it does not display in view mode. The landing tab when opening a candidate file can be configured in the My Setup feature, which is available via the auxiliary navigation bar.

      An action bar is available at the top. Users can click an action or use the More Actions menu which is a dynamic menu of additional actions. 

      Tabs containing candidate-related information are available. The main content of the candidate file is within the Job Submission/General Profile tab, which includes various sections that can be expanded or collapsed. The other tabs contain peripheral information. From the Job Submission/General Profile tab, users can click the down arrow to access a table of contents that allows quick jumping to different sections and sub-sections of the file.

      Edit Mode

      In edit mode, all fields included in the candidate form are displayed. Fields that do not contain data are displayed according to user permissions. Required fields are highlighted with a red asterisk.

      From the Job Submission/General Profile tab, users can click the down arrow to access a table of contents that allows quick jumping to different sections and sub-sections of the file.

        Candidate Card

        The candidate card provides quick information about the candidate.

        Located on the left pane of the candidate file, the candidate card quickly provides information about the candidate. The candidate card can be "flipped" by clicking its top-right corner.

        One side of the candidate card displays information on the general profile of the candidate such as:

        • name

        • address

        • phone number

        • e-mail address

        • etc.

        The other side of the candidate card displays information on the candidate's job submission(s) such as:

        • Candidate Selection Workflow step/status

        • prescreening results

        • etc.

        In addition, the candidate card displays links to other submissions of interest. This gives users a quick way of knowing which of the other submissions that have been created are still under "active" consideration. By hovering over the active or inactive link, users are presented with a callout with links to navigate to the relevant submissions. On this listing, there is also a column that indicates the step/status of the candidate for that specific submission. It is therefore easy to see at a glance without having to open and read through the actual submission, if the candidate is at the interview or at the offer stage on another position.

        The content of the candidate file left pane (bottom part) is also dependent on the candidate card side selected. For example, the submission date, the source type, the recruiter and hiring manager names can be displayed. A link to any existing offers is also available. Users will only be able to see information on submissions and offers that they are authorized to access.

        The content of the candidate file central pane is also dependent on the candidate card side selected. Depending on which side the candidate card is, the information displayed will vary:

        • If the candidate card is on the General Profile side, the General Profile tab is displayed. The general profile contains information provided by the candidate. The information can be related for example to preferred organizations, locations, job fields, education, work experience, personal information, source tracking information, etc. Candidates have at least one profile but can have more than one. For example one in English and one in French.

        • If the candidate card is on the Candidate Submission side, the Candidate Submission tab is displayed. Information relating to a specific requisition is displayed in the central pane. The candidate submission contains information about the candidate specific to that requisition.

          Candidate File History

          The History tab in the candidate file contains a log of all actions performed on the candidate file.

          When a candidate file is modified, either by the candidate or a user, an event to track this action is generated and is displayed in the candidate file History tab. The name of the user who performed the action is displayed as well as the date and details on the event. Candidate file tracking events belong to one of the following categories:

          • Agent and referrer

          • Attachments

          • Candidate file update

          • Candidate information

          • Candidate progression

          • Comments

          • Correspondence

          • Questions and competencies

          • Regulation

          • Resume

          • Screening services

          • Offer

          Comments relating to an event can be added and edited in the History tab if users have the required permissions.

          The Correspondence event category allows users to view previously sent correspondence. A user type permission allows users to resend the correspondence directly from the History tab.

          Users can see attachments and offer history tracking if they have the required permissions.

          A permission allows Recruiting Center users to view the content of deleted attachments in the History tab. When candidates submit attachments as part of their job application, your organization can remove these attachments. Your organization may decide to not provide access to these deleted attachments which are still visible in the History tab. If you have been granted the permission, you can click the attachment link in the History tab and view the content of deleted attachments. If you do not have the permission, you can see and click the attachment link but the system will display a message indicating that you do not have the permission to view the content of the deleted attachment.

          Modifying the Date of an Event

          Users can modify the date of an event and specify when an action on a candidate's file really took place, provided the feature has been activated and they have the required permissions. The use of the actual date enables reports to more accurately reflect user activity in the selection process. There might be a number of reasons why users would want to change certain dates in a candidate's file.

          Example. If a candidate had an interview on September 15, but that user was only able to enter this information in the system on September 20, the event date would indicate September 20. The user could then change this date to September 15, which would be more accurate. If the date and time related to an event can be edited, they appear as a hyperlink. The event date can only be between the application creation date and the current date.

          Hiding Confidential Information

          When the value of a confidential field is modified, users who do not have the permission to view confidential fields will not see any tracking event in the candidate file Tracking tab. In Recruiting, fields configured with a Confidential security level can be hidden from users who do not have the permission to view confidential fields. If the value of a confidential field is modified, users who do not have the permission to view confidential fields will not see any tracking event in the candidate file History tab regarding that change. If later on, the security level of that confidential field is changed to General or Protected, users will still be unable to see the change in the Tracking tab.

            Candidate File Tabs

            The table shows the tabs available in the candidate file.

            Candidate File Tab Description
            Job Submission/General Profile Contains information on prescreening, resume, employment preferences, EEO, etc. The contents of both the job submission and general profile are configured by the system administrator. Depending on the candidate card side being viewed, this tab will be either specific Job Submission OR General Profile.
            Attachments Contains resume and other attachments provided by the candidate and attachments provided by the user. Attachments are added using the Add Attachment icon. Job specific attachments are clearly identified from other attachments, and the name of the person who attached the file is also indicated. All attachments are managed centrally from this tab and when a user uploads an attachment, he/she will be able to specify if it will also be visible to the candidate.
            Tasks Contains a list of tasks to perform regarding the candidate. Tasks are self-assigned by users to remind them to complete a future activity. This tab only appears from the Candidate Submission card side. To be displayed, the feature must be activated and users must also have been granted the permission to manage self-assigned tasks.
            Offers Displayed if offer management is used. The Offers tab is displayed on a candidate submission once an offer is created. It contains offers submitted to the candidate, offers from competitors, candidate expectations and requisition offer information.

            The Offers tab and offer content are always job specific and visible only from the job submission view.

            • Competitive offers and current jobs are linked to the candidate and are thus shared between submissions for this candidate. Context based permission ownership is applied based on the owners of any requisition this candidate has applied to.

            • Candidate job offers and expectation offers are linked to the submission and can only be viewed by users who can view that submission.

            Offer Approvals Displayed if offer management and approvals are used. The Offer Approvals tab is displayed once an offer approval request is generated. The Offer Approvals tab is visible for any user who can view offers for the candidate submission. It contains the most recent offer approval information.
            Referrer Contains both employee/candidate referral and agency referral information and actions. The Referrer tab is always visible if the user can view the candidate's general profile or job submission.
            History Contains a log of all actions performed on the candidate file. See Candidate File History Tab.

              Candidates List

                Candidates List

                The candidates list displays candidate file information into different columns and provides tools to filter candidates and to customize the candidates list.

                The candidates list is divided into three sections:

                • The left pane contains three tabs:
                  • The filters tab contains the Show filter which allows users to filter candidates using ownership values. Quick filters and advanced filters are also provided to filter the candidates list down to relevant information.

                  • The folders tab is used to organize candidate files.

                  • The talent pool tab is used to see talent pools and match employees and candidates to requisitions.

                • The right pane contains online help and online clips if these were enabled. The pane can also be expanded or collapsed.

                • The center pane displays candidates. The List Format Configuration icon allows users to select the list format they wish to use to display candidates in the list. Users can also create up to three list formats and select columns to display specific information (if permissions were granted). Several actions can be performed directly in the list. A contextual action menu is available by clicking the arrow next to the file title. For information on the tools available in the list, see List Usage.

                  Candidate Search

                    Candidate Quick Search

                    The candidate quick search allows Recruiting Center users to quickly find specific candidates.

                    The candidate quick search is available at the top right hand corner of the Recruiting Center pages. It is available to Recruiting Center users if settings were configured and if user type permissions were granted.


                    Image showing the candidate quick search tool.

                    When performing a candidate quick search, the search engine searches for candidates who applied on a job, submitted a profile, or are registered but did not apply on a job (could be a person who referred a friend for a job and who had to register himself/herself as a new user, or a person who registered himself/herself while clicking My Account).

                    The candidate quick search engine searches information in the following fields of the candidate file:

                    • first name

                    • last name

                    • middle name

                    • email address

                    • username

                    • candidate identification number

                    When performing a candidate search, users can enter partial names (either the first or last name with the * wildcard) or complete names in the field. However, a best practice is to enter complete names to obtain better results.

                    Users can also perform a search with a middle initial if they know the person's full name (example: Sam P Jones). If searching for someone who's first name contains initials, we recommend entering just the initials (example: Jr. will give you the following results: Jr., j.r., or JR).

                    If looking for someone who hyphenates his/her name, it is not required to enter both names. Let's say Smith-Jones is the name you are looking for. Entering Smith, Jones, Smith space Jones or Smith-Jones, will bring back Smith-Jones.

                    The candidate quick search searches for all the search terms in the above mentioned fields. It works only for users having access to all the fields. For example, if the email field is hidden for a user type, searching by name will not work. For this reason, the specific candidate search often produces search results that are more relevant than those generated by the candidate quick search.

                      Performing a Candidate Quick Search

                      Settings allow the activation of this feature.

                      User type permissions grant users access to this feature.

                      1. In the Search tool, select Candidates.

                      2. Enter the candidate first name, last name, identification number, user name and/or e-mail address.

                      3. Click the Search button.

                      Users can quickly find a specific candidate file. Candidates who satisfy search criteria are displayed in the search results list.

                        Candidate Specific Search

                        The specific candidate search can be used when too many results are returned by the candidate quick search. It is considered to be an extension of the candidate quick search in that it offers greater result precision.

                        The specific candidate search is available at the top right hand corner of the Recruiting Center pages. It is available to Recruiting Center users if settings were configured and if user type permissions were granted.


                        Image showing the candidate search tool.

                        If Recruiting Center users have the permission to access candidate identification information, the candidate search will allow them to search by:

                        • candidate identification number only (you must use at least two numbers of the total identification number or more, otherwise the search will not work)

                        • candidate first name

                        • candidate last name

                        • candidate first and last names

                        • email address

                        Using the specific candidate search, users can enter the same or different search terms in any of the four fields. For this reason, the specific candidate search often produces search results that are more relevant than those generated by the candidate quick search.

                        Wild card can be used with one or two characters in the specific candidate search, to support searching for combined words.

                        For example, d* in first name and monroe in last name will return all monroe with first name starting by d.

                          Performing a Candidate Specific Search

                          A setting allows the activation of this feature.

                          A user type permission grants users access to this feature.

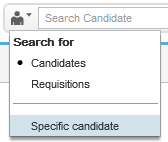
                          1. In the Search tool, select Specific Candidate.

                          2. Enter information in the fields.

                          3. Click Search.

                          Users can search for candidates using the First Name, Last Name, Initial, Email Address and/or Candidate ID fields. Candidates who satisfy the search criteria are displayed in the search results list.

                            Candidate Advanced Search

                            The Candidate Advanced Search allows Recruiting Center users to search for candidates using precise criteria in the form of keywords and structured fields.

                            The Candidate Advanced Search enables users to find and match relevant candidates to their open requisitions. Users can create search queries using keywords to search across numerous text fields of the candidate file and combine them with specific fields such as prescreening questions and skills that typically produce search that have a higher degree of precision.

                            The Candidate Advanced Search is available at the top right hand corner of the Recruiting Center pages. It is available to Recruiting Center users if settings were configured and if user type permissions were granted.


                            Image showing the Advanced Search link.

                              Advanced Candidate Search Form

                              Because system administrators can customize the Advanced Candidate Search form, the search form might have a different layout in different zones and even for different users, based on their configuration profile.

                              By default, the following search criteria are included in the Advanced Candidate Search form:

                              • Keywords

                              • Last Update

                              • Place of Residence: recruiters can select a reference location or a company location when searching for candidates.

                              Users who have the required permission can add other search criteria provided they were made available by the system administrator. This is done using the Customize... button. For a list of fields available for the Candidate Advanced Search, see Advanced Search Fields.

                              For many search fields, users can specify an additional criterion:

                              • Required: Only candidates with that criterion are retrieved.

                              • Excluded: Candidates with that criterion are excluded.

                              • Desired: Candidates with that criterion are considered more relevant than those without the criterion.

                              Users may also search on precise Organization-Location-Job Field (OLF) elements without incorporating candidates with parent preferences or null values in preferences. When this feature is enabled, if a user is performing a Candidate Advanced Search using Place of Residence as a Required criteria or Organization-Location-Job Field as a Required criteria, search results will display only candidates with an exact match at the same level. No parent or empty value will be returned. For example, searching for San Francisco will no longer return candidates within California, United States or that have an empty preference value.

                              When users perform a candidate advanced search and enter a value in the Institution, Program, Employer, Job Function or Certification field, the system looks for candidates who have the same value either in the corresponding field or in the corresponding "Others" field.

                              For example, if a recruiter performs an advanced search and enters "Oracle*" in the Employer field, the system will return candidates who have an Employer field with text starting with "Oracle" or an "Other Employer" field with text starting with "Oracle".

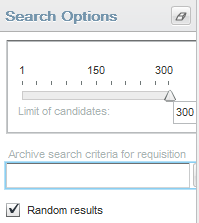
                              Two search options are available on the left side of the Advanced Candidate Search page: "Archive search criteria for requisition" and "Random results". These options support OFCCP requirements and are usually activated only for customers located in the United States through protected settings. The Archive search criteria for requisition field, once activated, can be optional or mandatory. Once a requisition is entered in this field, the search query and search results are kept in a log file and the retrieved candidates cannot be hard deleted from the database for the next two years. The Random results option generates a different set of candidates who match the required fields every time you run the same search if the total number of candidates matching your criteria is above the number of displayed candidates, usually set to 300. For details, see Search Results Archiving and Randomized Search Results.


                              Image showing the option Random results.

                              When performing a Candidate Advanced Search, the more you add search criteria, the narrower the scope of your search will be, typically resulting in fewer but more pertinent results. By adding multiple occurrences of the same criteria, you broaden the scope of your search, typically resulting in more search results.

                              A best practice is to start your Candidate Advanced Search with only a few criteria, and to then narrow your search down by going back to your search query and entering one or more additional search criteria. Your search results will then contain fewer candidates. It is simpler and more efficient to start with a general search and narrow down the results to a manageable candidate pool than to start with a tightly defined narrow search and then need to broaden the search in order to obtain a viable candidate pool.

                              The search engine can retrieve any number of candidate files although, for performance and management reasons, only 300 are displayed. By default, we suggest to display the top 300 by relevancy.

                                Candidate Advanced Search Fields

                                The table presents fields available in the Advanced Candidate Search page.

                                To be available to Recruiting Center users, these fields must first be made available by system administrators. Then, users who have the required permission can add these fields in the Advanced Candidate Search page using the Customize... button.

                                Fields available in the Advanced Candidate Search page:

                                • All user-defined fields (UDF) marked as "Candidate Search" at the field property level.

                                • Personal information:

                                  • Accepts Job Posting Notifications

                                  • Date of Birth

                                  • Email Address (or User Name)

                                  • Employee Number

                                  • First Name

                                  • Last Name

                                  • Middle Name

                                  • Prefix

                                  • Referred/Not Referred

                                  • Social Security Number

                                  • Work Phone Number

                                • Basic profile from the profile:

                                  • Advance Notice

                                  • Date of Availability is

                                  • Employee Status

                                  • Job Level

                                  • Job Shift

                                  • Job Type

                                  • Schedule

                                  • Travel

                                  • Preferred Job

                                  • Preferred Location

                                  • Preferred Organization

                                  • Shift Availability Grid

                                  • Willing to work on holidays

                                  • Willing to work on weekends

                                  • Expected Hourly Pay Rate

                                  • Hours per week willing to work

                                  • Hours per week, preferred

                                • Education from the profile:

                                  • Institution

                                  • Other Institution

                                  • Program

                                  • Other Program

                                  • Education level (Achieved)

                                  • Graduation date

                                  • Start Date

                                  • GPA (normalized value)

                                  • Graduated

                                  • Any searchable education user-defined field

                                • Experience from the profile:

                                  • Current Job

                                  • Employer

                                  • Other Employer

                                  • Job Function

                                  • Other Function

                                  • Any searchable experience user-defined field

                                • Questionnaires:

                                  • Questions from library (no local questions from requisition)

                                  • Skills

                                • Sources and mediums from all submissions:

                                  • Application Medium

                                  • Event ID

                                  • Source Name

                                  • Source Type

                                • Certification:

                                  • Certification

                                  • Other Certification

                                  • Location

                                  • Certification ID

                                  • Issuing Organization

                                  • Issue Date is between

                                  • Expiration Date is between

                                  Example of a Candidate Advanced Search

                                  This example shows search criteria used to perform an advanced search and the results of such a search.

                                  Search criteria:

                                  • Exclude Disqualified Candidate: Yes

                                  • Place of Residence (Required):
                                    • Within 25 miles of location

                                    • US > FL > Jacksonville

                                  • Preferred Job (Required):

                                    • Category: Technology

                                    • Function: Network Engineering

                                  • Preferred Job (Required):

                                    • Category: Technology

                                    • Function: System Administration

                                  • Education:

                                    • Program: Computer Engineering

                                    • Education Level: Bachelor's Degree

                                  After running the above search, the search engine would return the following candidates:

                                  • Candidates who had not been disqualified, AND

                                  • Candidates who lived within 25 miles of Jacksonville, Florida, AND

                                  • Candidates who had indicated a preference for work in network engineering or system administration, AND

                                  • Candidates without any job field, AND

                                  • Candidates who had a Bachelor's degree in computer engineering.

                                    Performing a Candidate Advanced Search

                                    A user type permission grants users access to this feature.

                                    1. In the top right-hand corner, click Advanced Search.

                                    2. Enter or select information in the displayed fields.

                                    3. Click Customize... if you want to use other search fields.

                                    4. Click Search.

                                    Candidates who satisfy the search criteria are displayed in the search results list.

                                      Setting Default Advanced Search Criteria

                                      A user type permission grants users access to this feature.

                                      1. Click Resources, then My Setup located in the top right-hand corner.

                                      2. In the Preferences tab, click Edit.

                                      3. Select a value in the Last Update field.

                                      4. Select a value in the Place of Residence field then click the Selector icon to select a location.

                                      5. Click Save.

                                      The value selected for the Last Update and Place of Residence search criteria will be used in all types of candidate search.

                                        Candidate Advanced Search with Keywords

                                        Keywords can be used when performing a Candidate Advanced Search.

                                        In earlier releases, when users used the candidate advanced search's Keywords field, the system searched a large number of Candidate Profile fields as well as the five most recently attached files (three attached by candidates and two attached by users). Now, system administrators can configure a setting that will determine the fields that will be searched when using the Keywords field in the Advanced Candidate Search form. The setting can be set to Optimal (default value) or Legacy. The Legacy value should only be chosen to revert to original list of profile fields used prior to 13C – primarily to include "comments" in keyword search.

                                        The table shows the fields searched by the candidate advanced search's Keywords field whether the setting is set to Optimal or Legacy.

                                        Fields searched when the setting is set to Optimal Fields searched when the setting is set to Legacy

                                        Personal information fields:

                                        • first name

                                        • last name

                                        • middle initial

                                        • employee number

                                        • street address

                                        • city

                                        • phone numbers

                                        • email address

                                        • postal code

                                        Text-based user-defined field answers.

                                        Text-based user-defined field answers.

                                        Pasted cover letter from the general profile.

                                        Pasted cover letter from the general profile.

                                        Pasted resume from the general profile.

                                        Pasted resume from the general profile.

                                        Career objectives from the general profile.

                                        Career objectives from the general profile.

                                        Additional information from the general profile.

                                        Additional information from the general profile.

                                        All file attachments from the candidate provided the attachments have one of the following supported file formats:

                                        • .doc, .docx (Word)

                                        • .txt (standard text file)

                                        • .rtf (rich text format)

                                        • .pdf (Adobe Portable Document Format)

                                        • .htm or .html (hypertext markup language documents)

                                        • .wpd (Word Perfect)

                                        • .odt (if Oracle 11G is used)

                                        The three most recent file attachments per candidate:

                                        • .doc, .docx (Word)

                                        • .txt (standard text file)

                                        • .rtf (rich text format)

                                        • .pdf (Adobe Portable Document Format)

                                        • .htm or .html (hypertext markup language documents)

                                        • .wpd (Word Perfect)

                                        • .odt (if Oracle 11G is used)

                                        The two most recent file attachments from users (displayed in the Attachments tab), limited to supported file format type.

                                        The two most recent file attachments from users (displayed in the Attachments tab), limited to supported file format type.

                                        Education [Institution, Program, Other institution, Other Program and text-based user defined fields] from the general profile.

                                        Education (Other institution, Other Program and text-based user defined fields) from the general profile.

                                        Work Experience (Employer, Job Function, Other Employer, Other Job Function, Achievements, and text-based user defined fields) from the general profile.

                                        Work Experience (Other Employer, Other Job Function, Achievements, and text-based user defined fields) from the general profile.

                                        Text-based answers to questions from the library.

                                        Text-based answers to questions from the library.

                                        Comments (from the History tab).

                                        Source and event names.
                                        User name.
                                        System administrators can also specify the types of attachments searched by the candidate advanced search's Keywords field:
                                        • all attachments

                                        • candidates visible attachments

                                        • attachments tagged as resumes

                                        Keywords and Boolean Operators

                                        Keyword search is considered to provide exact matches. However, if a user includes OR in a search query, the search engine looks of course for exact matches for one word or the other. Boolean operators are pretty straightforward but when a complex search query using multiple Boolean operators is incorrectly formulated, results are unpredictable. The Keywords search supports the following boolean operators:

                                        Boolean Operator Description
                                        AND By default, words entered in the Keywords field are linked (transparently) by the AND operator. If you searched for "product manager" (without the double quotation marks) or for "product and manager" (without the double quotation marks), the search results would be the same. The search engine would retrieve all candidates whose file contains both words (the words will not necessarily be next to each other).
                                        OR You can use the OR operator to change the default behavior (AND) or to build more complex queries. For example, if you searched for "competitor1 OR competitor2 OR competitor3" (without the double quotation marks), the system will retrieve candidates whose file contains at least one of the competitors' names.
                                        NOT You can use the NOT operator to exclude specific keywords from a query. For example, if you wanted to exclude from the search results candidates whose file contained the name of a specific company, but did refer to a specific competitor, you could search for "competitor1 NOT company1" (without the double quotation marks).
                                        Parentheses

                                        Operations enclosed in parentheses are performed before other operations. For example, a search query for candidates who worked as marketing or advertising consultants could look like the following: (market* or advertis*) and (consult* or agent or representative). The search engine would retrieve candidate files that satisfy the two conditions:

                                        • Candidate files containing a word that begins with market or advertis such as market, markets, marketing, advertise, advertising, advertisement AND,

                                        • Candidate files containing agent, representative, or a word beginning with consult such as agent, representative, consult, consults, consulting, consulted, consultant.

                                        Wild Card

                                        The wild card "*" (asterisk) can be placed at the end of a word. For example, a search for comput* will retrieve all words that begin with comput such as computer, computing, computers, computation.

                                        Wild cards within double quotation marks are not supported.
                                        Note: An update to the Lucene search server engine slightly modified the behavior when using the wild card * in the quick search, specific search, and advanced search. If the number of words returned by the query reaches 5000, no warning message will be displayed asking you to refine the search. Be aware that it might take a while for the search engine to return any result when the query is too generic. Also note that when performing a quick search using the wild card * at the beginning of a word, such request is heavier on the search server and you might have a longer response time.
                                        Double quotation marks around strings
                                        You can use double quotation marks to search for a specific string. For example, if you wanted to find product managers but not product specialists who are also assistant managers, you could type "product manager" ( with the double quotation marks).
                                        Note: You need to type the double quotes in the Keywords field; do not copy them from other applications such as Word and paste them into the field. Also note that double quotes can vary from one keyboard language to another. If you use a French keyboard and use these «quotes», the search engine does not recognize them as double quotes in the Keywords field.

                                        Keywords and Stop Words

                                        Stop words are indexed in the Keywords field when doing an advanced candidate search. Stop words are small words not included in the index and excluded from a search because they are not considered to be significant. For example, words such as "no, not, the, one, and, or" and all single letters are stop words.

                                        Stop words are considered by the system when placed within quotation marks or parenthesis. For example, when users are searching for "The Store" placed within quotation marks or parenthesis, the system will consider the stop word "the". When users are searching for The Store without quotation marks nor parenthesis, the system will ignore the stop word in the query.

                                        Keywords and Special Characters

                                        In general, special characters used as punctuation or separators are not included in the search index and cannot be used to retrieve information. This is the case for the following characters:

                                        • :

                                        • ;

                                        • .

                                        • ,

                                        • "

                                        • '

                                        • -

                                        • _

                                        • &

                                        • *

                                        Note: Exception: When used in email and phone number fields, some special characters are supported. For example, john.smith@taleo.net is supported as is, because the system recognizes this is an email address.

                                        Keywords and Exact Term

                                        When you perform a Keywords search with Exact Term selected, words that match exactly the terms you entered are returned and highlighted. You can use the wild card *, quotation marks, parentheses, and Boolean operators (AND, OR, NOT) to construct sophisticated candidate search queries. The system applies the AND operator between words.

                                        Keywords and Related Terms

                                        The OR operator is applied transparently when the Related Term option is selected. The search engine searches for occurrences of the word you entered but also searches for occurrences of related terms determined by the system. Such related terms might be particularly relevant to your search while other related terms might be less pertinent.

                                        You should use the Related Terms feature when your initial query did not retrieve a lot of candidates. The Related Term feature enables you to retrieve candidates whose file contains a word that is similar in meaning to your search word in addition to candidates whose file contains your exact search word. In addition to retrieving similar words, it retrieves words with the same first 6 letters, since those words are most likely in the same family. For example, if you search for "Administration" using related terms, the engine will also search for "administrative", "administrator", etc.

                                        Keywords and Conceptual Search

                                        The conceptual option for the advanced search is available if your system administrator has activated the proper setting.

                                        The conceptual search is an extension of the related term search, where instead of finding variations of entered words, the system automatically finds the right concepts to search for based on the text provided and then broaden its search. The conceptual search allows you to use large blocks of text (typically from a candidate's resume or a job description) to search for candidates. Conceptual search is typically the best tool to use when searching for candidates with attached files. This tool can be used when you are viewing a relatively large amount of text regarding particular sections of a candidate's resume such as experience and education, or a job description and you want to know if there are other candidates whose records contain similar information. For details, see Conceptual Search.

                                        Keywords and Highlighting

                                        Keyword highlighting is activated by your system administrator and is limited to Advanced Search results. Each occurrence of the keyword is highlighted in yellow on all tabs in the candidate file and in the attached files. Up to fifty different terms can be highlighted. A private setting is used to limit the number of highlighted words (contact Oracle Support for details). The search will highlight words together when the search keyword includes double quotes, to better match what is really retrieved by the search engine. For example, searching for "product manager" displays only candidates with "product manager" in their file. Words are highlighted throughout the entire candidate file, even the labels, so some of the highlighted words are not used to retrieve the candidates.

                                        Note: When performing a candidate advanced search with the Keywords field, an entire word or 3 characters with a wild card (*) can be used as a keyword.

                                          Candidate Advanced Search and Structured Fields

                                          If your company is using specific fields to capture experience or competencies, using the corresponding fields will generally produce better results than using the Keyword search.

                                          For example, an advanced search that included java skills in the competencies section of the search page and specifying both a minimum proficiency and experience level would retrieve candidates who met those criteria. A Keyword search for "java", on the other hand, might include candidates who liked this type of coffee in addition to candidates who had experience with the java programming language.

                                          There is an important "logical" grouping function that applies only to structured data.

                                          For example, if you wanted to search for candidates who had obtained a Master's degree in business administration from Harvard University, this would be possible using the Education block. If you used the Keyword search, however, to search for "Harvard university masters business administration", the search results might include candidates who were studying in sociology at any university but living in Harvard, Illinois and considered themselves "masters" in business administration!

                                          In conclusion, the use of structured fields can significantly reduce the number of irrelevant search results.

                                            Candidate Advanced Search and Multiple Occurrences of Blocks

                                            When performing a Candidate Advanced Search, it is possible to use multiple occurrences of the Education and Work Experience blocks.

                                            When using multiple blocks, the OR operator is used.

                                            If you use multiple occurrences of blocks, care should be taken in choosing fields and in making selections from the Required, Desired and Excluded options.

                                            The following examples demonstrate how multiple Education blocks can be used to perform highly precise searches. The same principles apply to multiple Work Experience blocks.

                                            Example 1: In this example, the search results would contain either candidates with a Bachelor's degree in computer information systems and a GPA between 3 and 4, or candidates with a college diploma in computer information systems and a GPA between 3.5 and 4. Both Education blocks are Required.

                                            Education Block 1 - Search Field Education Block 1 - Search Value
                                            Education Block 1 Required
                                            Program Computer Information System
                                            Education Level Achieved Bachelor's Degree
                                            GPA is at least 3 out of 4

                                            Education Block 2 - Search Field Education Block 2 - Search Value
                                            Education Block 2 Required
                                            Program Computer Information System
                                            Education Level Achieved Associate's Degree/College Diploma
                                            GPA is at least 3.5 out of 4

                                            Example 2: In this example, the search results would contain only candidates with a Bachelor's degree in computer information systems and a GPA between 3 and 4. Candidates who studied at McGill University—regardless of the program, education level, and GPA—would appear higher on the results list than those who had never attended the school. The first Education block is Required and the second one is Desired.

                                            Education Block 1 - Search Field Education Block 1 - Search Value
                                            Education Block 1 Required
                                            Program Computer Information System
                                            Education Level Achieved Bachelor's Degree
                                            GPA is at least 3 out of 4

                                            Education Block 2 - Search Field Education Block 2 -Search Value
                                            Education Block 2 Desired
                                            Institution McGill University
                                            GPA is at least 3.5 out of 4

                                            Example 3: In this example, the search results would contain only candidates with a Bachelor's degree in computer information systems and a GPA between 3 and 4 provided they never attain McGill University. The following candidates (among others) could conceivably appear in the search results:

                                            Education Block 1 - Search Field Education Block 1 - Search Value
                                            Education Block 1 Required
                                            Program Computer Information System
                                            Education Level Achieved Bachelor's Degree
                                            GPA is at least 3 out of 4

                                            Education Block 2 - Search Field Education Block 2 - Search Value
                                            Education Block 2 Excluded
                                            Institution McGill University
                                            Program Computer Information System
                                            Education Level Achieved Bachelor's Degree
                                            GPA is at least 3 out of 4
                                            • Candidates with a Bachelor's degree in computer information systems and a GPA between 3 and 4 at Brown University.

                                            • Candidates with a Bachelor's degree in computer information systems and a GPA between 3 and 4 at Brown University and with a Master's degree in computer information systems at McGill University.

                                            • Candidates with a Bachelor's degree in computer information systems and a GPA between 3 and 4 at Brown University and with a second Bachelor's degree in computer information systems at McGill University and a GPA of only 2.

                                            The first Education block is Required and the second one is Excluded.

                                              Candidate Advanced Search Using Locations

                                              When performing an advanced search, Recruiting Center users can select a reference location or a location defined by their organization when searching for candidates.

                                              For searches using locations, the accuracy of the results will depend on the accuracy of the information provided by your organization when defining the locations. To obtain more granular radius searches (for example, within 5 miles or 10 miles), your organization should have work locations defined with address level information to improve the accuracy of the search results.

                                                Candidates Retrieved by the Advanced Search

                                                Candidates retrieved by the advanced search may differ depending on different scenarios.

                                                For most clients, the default maximum number of retrieved candidates is set to 300. Some clients are using a smaller set, usually because they consider those candidates are typically qualified for a specific position. Regardless of the number of candidates matching the search criteria, if the query does find more than the maximum number, which candidates are actually displayed in the advanced search results?

                                                There are three scenarios:

                                                • If any relevancy is calculated, based on keywords and Desired criteria, then the most relevant candidates are displayed and then sorted.

                                                • Search with randomization will also return a list of 300 candidates or less, but instead of displaying the first 300 candidates, it will display any of 300 matching candidates, with no predetermined priority, and will sort them based on the sorting criteria set for the list. Any candidate matching the search criteria can be returned. Two subsequent searches using the exact same criteria typically retrieve two different result sets when randomization is used.

                                                • If no relevancy is associated with candidates, for example if only Required and Excluded criteria are used, then the list of displayed candidates is not random and is based on an internal key. When a user executes two searches in a row without using the randomized option, the system will retrieve the same set of candidates. But if the user executes two searches in a row with the randomized option, the system will return two different sets of candidates. Of course, this is true if the number of matching candidates is higher than the list size maximum, usually 300, and if the conditions are the same, thus no change in the criteria list and no new matching candidates.

                                                  Randomized Search Result

                                                  The randomized search result feature allows Recruiting Center users to specify that the information contained in the advanced search result list be returned in random order.

                                                  The randomized search results feature supports requirements from the Office of Federal Contract Compliance Programs (OFCCP) and is usually activated only for customers located in the United Stated through protected settings. Randomized search means that candidates displayed in the advanced search result list are picked randomly in the overall list of candidates matching search criteria. An advanced candidate search done with randomization will return a list of 300 candidates or less, but instead of displaying the first 300 candidates, it will display any 300 of the matching candidates, with no predetermined priority, and will sort them based according to the sorting criterion set for the list. Any candidate matching the search criteria can be returned.

                                                  In the Recruiting Center, the Random results option is disabled when users perform a Conceptual Search. In previous releases, when the Random results option was selected in the Advanced Candidate Search page and the number of matches was higher than the limit of returned results, the system returned a random set of results from the matching set (and the resulting set was sorted by relevancy). This is not an issue when search criteria are specific and the result set is small. However, when performing a Conceptual Search or a very broad search (using related terms, for example), the result set might be quite large and the Random results option might provide poor quality results:
                                                  • When performing a conceptual search, the Random results option is turned off.

                                                  • When using the "find candidates matching a job requisition" feature (available in the requisition file toolbar) or the "find similar candidates" feature (available in the candidate file toolbar), the Random results option is turned off.

                                                  Note: The Random results option continues to be available for both the Exact term and Related Terms keyword search. For customers who have the Search Randomize Enabled setting set to Yes, the Random results option will be selected by default for both the Exact term and Related Terms keyword search. In these types of search, if the number of matches is higher than the limit of returned results, the system will return a random set of results from the matching set. Conceptual Search analyzes a relatively large amount of text when performing a broad match against the candidate database. As such, this type of search is used to discover hard-to-find candidates and is not a tool to exclude candidates. The search results from a Conceptual Search only make sense when they are ranked in order of relevancy and as such is incompatible with the Random results option.

                                                    Randomizing Search Results

                                                    This feature supports OFCCP requirements and is usually activated only for clients located in the United States through protected settings.

                                                    1. In the top right-hand corner, click Advanced Search.

                                                    2. In the Search Option panel located on the left-hand side, select the Random results option.

                                                    3. Select a requisition.

                                                    4. Enter information in the displayed fields.

                                                    5. Click Customize... if you want to use other search fields.

                                                    6. Click Search.

                                                      Search Result Archiving

                                                      The search result archiving feature allows Recruiting Center users to select the requisition for which they want to archive search criteria and results.

                                                      The search result archiving feature supports requirements from the Office of Federal Contract Compliance Programs (OFCCP) and is usually activated only for customers located in the United Stated through protected settings. When performing an advanced search, search criteria and/or results are archived in the database. The information is kept in the database for two years for audit purposes and prevents candidates from hard deletion.

                                                      When the feature is activated, all search results, even those done for requisitions outside the US will be archived.

                                                        Archiving Search Results

                                                        This feature supports OFCCP requirements and is usually activated only for clients located in the United States through protected settings.

                                                        1. In the top right-hand corner, click Advanced Search.

                                                        2. In the Search Option panel located on the left-hand side, click the Selector icon next to Archive search criteria for requisition.

                                                          Once a requisition is entered in this field, the search query and search results are kept in a log file and the retrieved candidates cannot be hard deleted from the database for the next two years.
                                                        3. Select a requisition.

                                                        4. Enter information in the displayed fields.

                                                        5. Click Customize... if you want to use other search fields.

                                                        6. Click Search.

                                                          Why Advanced Search is Filtering Candidates on Your Behalf

                                                          Certain elements could have an impact on advanced search results.

                                                          Data segmentation: If your organization has activated data segmentation, this might exclude a lot of candidates from your search results. For this reason, it is important to verify if your organization has implemented such restrictions and, if this is the case, ask how they affect which candidates you are entitled to view. There are two dimensions to data segmentation: a user type permission whereby the candidates displayed to a user is determined by the person's staffing type; and the Organization, Location and Job Field (OLF) associated with groups that the user is a member of. While it might be easy to manage only a few groups around specific organizations, the effect of segmentation can be difficult to clearly understand if users are associated with multiple groups incorporating various OLF. Ask your system administrator if he/she has activated the Activate Segmentation in Search setting.

                                                          Incomplete submissions: Many candidates never complete their submissions for various reasons. An incomplete general profile will not be retrieved during a search if your organization has configured the system that way. In average, 33% of candidates might not have completed a job specific submission or a general profile. An interesting alternative to not displaying such candidates is to display them and add an Incomplete Submission column.

                                                          Remember that the "incomplete submission" flag refers to the online submission process, not to the completeness of the candidate file overall. If your organization does not display incomplete submissions, incomplete submissions that might contain a lot of information are obviously not displayed. On the other hand, you might have partial submissions, that were captured or imported, and those partial submissions have the "complete" flag, even if only few fields were captured. Thus, incomplete submission refers to online submissions or online profiles that have not passed the submission page, regardless of whether all the content has been provided or not. Ask your system administrator if the Display Incomplete Application Protected setting was activated.

                                                          Identification missing: "Identification missing" candidate files are missing a candidate's first and last name and do not have the official "anonymous" flag. Ask your system administrator if he/she has activated the Display Identification Missing Candidates setting.

                                                          Excluding candidates in selection process: Candidates who are in a selection process associated with an open requisition can be excluded from search results. Ask your system administrator if he/she has activated the Candidate Search Mask Processed setting.

                                                          Excluding candidates in selection process who have attained or proceeded beyond a specific status: The Threshold CSW Step - Hide from Search setting indicates the CSW reference model step at which, once reached, candidates will be excluded from search results (unless the user type has overriding permission). Candidates are excluded from search results once they have reached the threshold step or when they are at a step that comes after the threshold step in the reference model sequence. Ask your system administrator if he/she has activated that setting and user permission.

                                                          Matching the place of residence: By default, when a user searches for candidates associated with a specific place of residence, the system retrieves candidates associated with a "higher" location in addition to the specific location (place of residence). It is recommended that you include "higher" levels (country and state/province) because even if in theory candidates do have all levels (down to region), some might not. Exceptions are:

                                                          • If the place of residence field is not mandatory (usually only optional in capture candidate or through import).

                                                          • If it is a new country. Place of residence locations, which are centrally managed, increase in number as customers request that specific new countries be included. Oracle had numerous countries without states or regions in the past and started to add into the database such countries' regions on a customer-by-customer basis. Some candidates never had the opportunity to select a 2nd or 3rd level so it is important that they are not excluded by default when a search is performed.

                                                          The number of exceptions should be less than the number of candidates with an exact match and Oracle feels it is fair to retrieve those candidates who never had the opportunity to indicate their structured place of residence. Some Oracle customers might want to change this setting however.

                                                            Conceptual Search

                                                            Conceptual Search is an alternative way to search candidate files that broadens the search result by including documents that are similar based on concepts and proximities. The retrieved documents do not need to contain everything entered as search criteria, only related concepts.

                                                            In a Conceptual Search, most of the structured data elements are not part of the candidate file and are leveraged by the Advanced Search engine. Although Conceptual Search might be the preferred search method of some users, the Conceptual Search engine was built to complement the Advanced Search. Advanced Search can retrieve candidate files with more precision, using mandatory criteria used to source candidates for a specific requisition and can clearly define the required criteria set for a specific job. But what if you don't have precise criteria for a search? What if you have candidates without structured data and who have simply a pasted resume or an attached file? Or perhaps you cannot find any candidates using the Advanced Search and want to know what your database holds with regard to a hard-to-fill job description or candidates used as a basis to find other candidates. These are scenarios for which the Conceptual Search is most suitable.

                                                            Once the Conceptual Search module is enabled, the system administrator can control which users will have access to Conceptual Search by granting them a user type permission.

                                                            The Conceptual Search is available via the Advanced Search. When selecting the Conceptual option, users must enter significant text in the Keywords field (typically taken from a candidate's resume or a job description) to search for candidates. The search engine then looks through the following content of the candidate file:

                                                            Content Searched by the Conceptual Search

                                                            Pasted resume from the general profile.

                                                            Career objectives from the general profile.

                                                            Additional information from the general profile.

                                                            Education (Other Institution, Other Program, Education Level (Achieved), and text-based User Defined Fields) from the general profile.

                                                            Work Experience (Other Employer, Other Job Function, Achievements, and text-based User Defined Fields) from the general profile.

                                                            Text-based answers to questions from the library.

                                                            Text-based user-defined field answers.

                                                            The last three attachments per candidate provided the attachments use one of the following supported file formats:

                                                            • .doc, .docx (Word)

                                                            • .txt (standard text file)

                                                            • .rtf (rich text format)

                                                            • .pdf (Adobe Portable Document Format)

                                                            • .htm or .html (hypertext markup language documents)

                                                            • .wpd (Word Perfect)

                                                            • .odt (if Oracle 11G is used)

                                                            On top of that, users can increase the Conceptual Search with any specific search criteria made available to them. This provides the possibility to mine the database on various concepts to find interesting candidates, but also restricts the result with more precise criteria, which was not available before.

                                                            The conceptual search cannot retrieve disqualified candidates because they are not indexed in the database.

                                                            Below are a few tips when using Conceptual Search.

                                                            Tip 1: Provide enough text in the Keywords field

                                                            If you only need to type a few words, it is usually advisable to perform a Keyword search or Related Terms search instead of a Conceptual Search. The Conceptual Search analyzes a text, extracts the most significant elements and compares them with significant words and relationships between words extracted from a sample of about 100,000 candidate files from your database. The system discards non-significant words from its reference list in the knowledge base. A word used by only a few candidates or another used by almost all candidates might not have any weight in the Conceptual Search "brain".

                                                            For example, if you searched for the word "consultant" in a consultant database, then the word would occur so many times that it might not even share any concept with other words. The search engine would perform a search using the exact word "consultant" and most or all of the candidates would have this criterion.

                                                            If you performed a Conceptual Search using only a few words, chances are that some of the words would be non-significant. You would better off pasting entire paragraphs and let the system determine what is important in each one and identify the best candidates based on this information.

                                                            Tip 2: Sort results by decreasing relevancy

                                                            The Conceptual Search engine tends to retrieve a lot of candidates. What distinguishes them is the relevancy between the candidate file and the Conceptual text box. You will typically want to sort the retrieved candidates from most relevant to least relevant.

                                                              Performing a Conceptual Search

                                                              A user type permission grants users access to this feature.

                                                              1. In the top right-hand corner, click Advanced Search.

                                                              2. Enter text in the Keywords field.

                                                                You can enter large blocks of text (typically from a candidate's resume or a job description) to search for candidates.
                                                              3. Select the Conceptual option.

                                                              4. Enter information in the displayed fields.

                                                              5. Click Customize... if you want to use other search fields.

                                                              6. Click Search.

                                                              Candidates who satisfy the search criteria are displayed in the search results list.

                                                                Candidate Search Based on a Requisition

                                                                Recruiting Center users can create a search query based on a requisition.

                                                                This feature is available in the requisition file, using the Create Search Query icon. Clicking this icon creates an advanced candidate search query automatically. The default location and last update originate from the user preferences (available in the My Setup feature). In addition to the last update and place of residence default configuration, the search query will default to:

                                                                • Requisition in the archiving field, if activated.

                                                                • Keyword: will be filled by the job title. Default is Exact Term.

                                                                • Last update: user preference from My Setup or default value.

                                                                • Place of residence: user preference from My Setup or Network location based on the mapping of the primary location, as done in the foundation data by the system administrator. Default is Required.

                                                                • Preferred location: all locations are included; primary and additional ones. Default is Required.

                                                                • Preferred job. Default is Required.

                                                                • Employee Status: a Desired value affecting relevancy.

                                                                • Schedule: a Desired value affecting relevancy.

                                                                • Job Shift: a Desired value affecting relevancy.

                                                                • Job Type: a Desired value affecting relevancy.

                                                                • Travel (Willing to travel up to...): a Desired value affecting relevancy.

                                                                • Competencies: Desired values affecting relevancy and based on minimal criteria definition.

                                                                • Questions if from the library. Requisition-specific questions cannot be searched for.

                                                                Once the user executes the candidate search based on the requisition, the user has the option of matching any or all of the retrieved candidates to the requisition. To do this, the user selects the appropriate candidates in the results list and click the Add Candidates to Requisition icon. Because the criteria of the advanced search performed were based on a requisition, that requisition is typically displayed (along with others perhaps) in the Requisition Selector window. Make your selections and click Done to match the candidates you selected with the requisitions you selected.

                                                                  Searching for Candidates Based on a Requisition

                                                                  A user type permission grants users access to this feature.

                                                                  1. Open a requisition.

                                                                  2. Click the Create Search Query icon.

                                                                  3. Enter information in the displayed fields.

                                                                  4. Click Customize... if you want to use other search fields.

                                                                  5. Click Search.

                                                                  Candidates who satisfy the search criteria are displayed in the search results list.

                                                                    Similar Candidate Search

                                                                    Recruiting Center users can look for similar candidates based on information of an existing candidate.

                                                                    This type of search (often referred to as "more like this" search) can be performed from a candidate list or from within a candidate file by using the Find Similar Candidates icon.

                                                                    The "find similar candidates" search uses the candidate file, which includes the fields used in the Conceptual Search, as the search criteria.

                                                                    In addition to this information, the system uses default values for the Last Update and all the underlying search parameters applied in the Conceptual Search. The candidate's location is ignored because the system cannot assume you want to search for the current candidate location. You can, however, direct the "find similar candidates" search in your preferences to use your default search location. The 2,500 character limitation that applies to the Conceptual Search does not apply to the "find similar candidates" search. The Last Update value and Place of Residence (location) are user preferences that can be defined in My Setup.

                                                                    Performing a "find similar candidates" search using a candidate file that contains no information in any of the list of fields used in the Conceptual Search retrieves no candidates and even displays a message informing the end user that the selected candidate cannot return any candidate. A candidate selected as a reference for a Conceptual Search must have significant text information, like an attached resume or a plain text pasted resume.

                                                                    The "find similar candidates" search can be performed for one candidate file at a time.

                                                                    The "find similar candidates" is available for all types of job submissions, including hourly candidate job submissions.

                                                                      Finding Similar Candidates

                                                                      A user type permission grants users access to this feature.

                                                                      1. In the candidate list, select a candidate.

                                                                      2. Click the Find Similar Candidates icon.

                                                                      The Search Results list displays a list of candidates that match the selected candidate file.

                                                                        Searching for Candidates Matching Job Description and Qualifications

                                                                        Users can find candidates who match the external job description and qualifications of a requisition.

                                                                        This type of search can be performed from within a requisition file by using the Find Similar Candidates icon.

                                                                        The External Job Description and Qualifications fields are used as search criteria. It is as if you could paste the entire description and the qualifications in the Keywords field in the advanced search and there was no 2,500–character limit. In addition to these two fields, the system uses the default value for the Last Update field and Place of Residence field coming from the user's preferences in My Setup. If no place of residence is specified in the user's preferences, the location specified in the requisition is used.

                                                                        The place of residence used for searching is based on the Taleo Network Locations, while the location specified in a requisition is associated with a customer-defined location. The latter location is usually mapped to a Network location and this is the location used for searches.

                                                                        This type of search can be performed for one requisition file at a time.

                                                                          Searching for Candidates Matching Job Description and Qualifications

                                                                          A user type permission grants users access to this feature.

                                                                          1. Open a requisition file.

                                                                          2. Click the Find Similar Candidates icon.

                                                                          Candidate files that best match the external job description and qualifications contained in a requisition are displayed. The search results can include candidates who have already been matched to the requisition.

                                                                            General Profile Search

                                                                            It is possible to return search results of candidates who have only submitted a general profile but have not yet applied on any specific requisition.

                                                                            When this feature is enabled, users may add the "Exclude candidates who applied on requisitions" search criteria in the advanced search form and decide to search only for candidates who have submitted a general profile but have not yet applied for a specific position. This feature helps to ensure candidates who do not apply for a specific job are also considered.

                                                                              Exclusion of Agency Owned Candidates in Search Results

                                                                              Agency owned candidates can be excluded from candidate search results.

                                                                              When this feature is enabled, users may add the "Exclude candidates owned by agencies" search criteria in the advanced search form and decide to include or not agency owned candidates in search results.

                                                                                Exporting Candidate Search Results to Microsoft Excel

                                                                                Recruiting Center users can export candidates in a candidate list to a Microsoft Excel spreadsheet.

                                                                                The Download as Excel icon is available on all candidate lists. When selecting candidates and clicking that icon, the selected set of candidates is exported to an Excel spreadsheet.

                                                                                Columns in the Excel file are determined by the actual columns displayed in the candidate list. In the case of a column represented by an icon (such as the Item Requiring Attention icon), the column header will display the icon value (for example, Item Requiring Attention). In the case of a field with a boolean value, the table cell will display True or False. In the case of a field with multiple values, the table cell will display the actual text value.


                                                                                Image showing icons in the candidates list and the name of these icons in the Excel file.

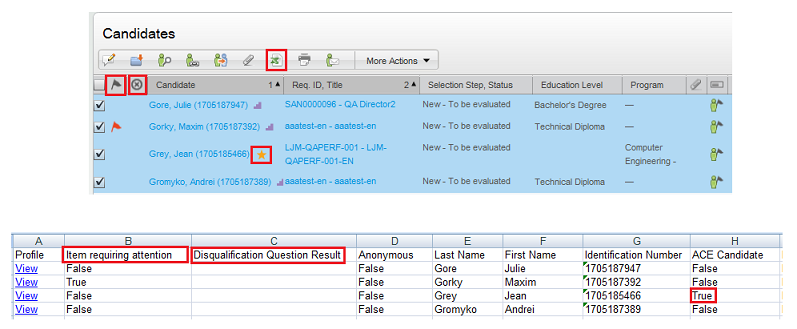
                                                                                The Excel spreadsheet contains a View link for each candidate file. When users click the View link, they are taken directly to the candidate job submission.

                                                                                The columns in the Excel spreadsheet are governed by the underlying list format. Users cannot specify a subset of columns to be exported into the Excel spreadsheet.

                                                                                  Search Query

                                                                                  A search query is an advanced candidate search that has been saved in order to be used repetitively and potentially shared with other Recruiting Center users.

                                                                                  A search query is a set of search criteria selected by a Recruiting Center user to perform an advanced candidate search. Each time an advanced search is performed, a search query can be created. A search query can be used as a basis for future searches and can be changed to narrow or broaden search results when needed.

                                                                                  The search query feature is available at the top right hand corner of the Recruiting Center pages.


                                                                                  Image showing the Search Queries link.

                                                                                  Users can save a search query if the feature is activated in the user's configuration profile and if the user type permission has been granted. The fields that can be selected in the Recruiting Center to customize a search query are set by the system administrator for each configuration profile. If a user is not linked to a configuration profile or is linked to a configuration profile for which the system administrator has not selected additional fields, then only the set of default fields are displayed when customizing a search query in the Recruiting Center.

                                                                                  Two types of queries can be created:

                                                                                  • Personal search queries will remain available only to the user that created the query.

                                                                                  • Shared search queries are queries that are made available to selected users.

                                                                                  Search queries can be saved in folders. For details, see Folder.

                                                                                    Saving an Advanced Candidate Search Query

                                                                                    A user type permission grants users access to this feature.

                                                                                    1. In the top right-hand corner, click Advanced Search.

                                                                                    2. Enter information in the fields.

                                                                                    3. Click Save Query...

                                                                                    4. Enter information in the fields.

                                                                                    5. Click Done.

                                                                                    The search query is available in the Search Queries window. Users will be able to repeat the same search in the future using the same fields and their respective values.

                                                                                      Adding a Search Criterion to an Advanced Candidate Search Query

                                                                                      A user type permission grants users access to this feature.

                                                                                      1. In the top right-hand corner, click Search Queries.

                                                                                      2. Click on a search query.

                                                                                      3. Click Customize...

                                                                                      4. Click Select next to the criterion you want to add.

                                                                                      5. Click Done.

                                                                                        Removing a Search Criterion from an Advanced Candidate Search Query

                                                                                        A user type permission grants users access to this feature.

                                                                                        1. In the top right-hand corner, click Search Queries.

                                                                                        2. Click on a search query.

                                                                                        3. Click Customize...

                                                                                        4. Click the Remove icon next to the criterion you want to remove.

                                                                                        5. Click Done.

                                                                                          Duplicating a Saved Search Query

                                                                                          A user type permission grants users access to this feature.

                                                                                          1. Click Search Queries.

                                                                                          2. Open an existing query.

                                                                                          3. Click the Duplicate Search Query icon.

                                                                                          4. Complete fields.

                                                                                          5. Click Done.

                                                                                          The query created from the duplication of another query is saved in the selected folder.

                                                                                            Editing the Search Query Properties

                                                                                            A user type permission grants users access to this feature.

                                                                                            1. Click Search Query.

                                                                                            2. Open a search query.

                                                                                            3. Click Properties.

                                                                                            4. Make desired changes.

                                                                                            5. Click Done.

                                                                                              Deleting an Advanced Candidate Search Query

                                                                                              A user type permission grants users access to this feature.

                                                                                              1. In the top right-hand corner, click Search Queries.

                                                                                              2. Select a search query.

                                                                                              3. Click the Delete icon.

                                                                                              The search query is no longer available in the Search Queries window.

                                                                                                Candidate Folders

                                                                                                  Folder

                                                                                                  In the Recruiting Center, folders are used for organizing candidate files and search queries.

                                                                                                  Recruiting Center users who have been granted the proper permissions can organize folders in ways that best suit their needs. They can store candidate files as well as candidate search queries in folders. They can create, delete, and rename folders and they can also share folders with other users.

                                                                                                  The Folder tab is available in the left panel of the Candidates list and Search Queries list.


                                                                                                  Image showing the Folders tab.

                                                                                                    Creating a Folder

                                                                                                    A user type permission grants users access to this feature.

                                                                                                    1. Click the Folder tab located in the left pane of the Candidates list or Search Queries page.

                                                                                                    2. Select the Personal folder.

                                                                                                    3. Click Manage.

                                                                                                    4. Select Create.

                                                                                                    5. Enter the folder name in the blank field that appears.

                                                                                                    6. Press Enter.

                                                                                                    A new folder appears in your personal list of folders to organize candidate files or search queries.

                                                                                                      Deleting a Folder

                                                                                                      A user type permission grants users access to this feature.

                                                                                                      Files included in the folder must not be opened by another user.

                                                                                                      1. Click the Folder tab located in the left pane of the Candidates list or Search Queries page.

                                                                                                      2. Select a folder.

                                                                                                      3. Click Manage.

                                                                                                      4. Select Delete.

                                                                                                      The folder is removed from your personal list of folders.

                                                                                                        Renaming a Folder

                                                                                                        A user type permission grants users access to this feature.

                                                                                                        1. Click the Folder tab located in the left pane of the Candidates list or Search Queries page.

                                                                                                        2. Select a folder.

                                                                                                        3. Click Manage.

                                                                                                        4. Click Rename.

                                                                                                        5. Enter a new folder name.

                                                                                                        6. Press Enter.

                                                                                                          Moving a Folder

                                                                                                          A user type permission grants users access to this feature.

                                                                                                          1. Click the Folder tab located in the left pane of the Candidates list or Search Queries page.

                                                                                                          2. Select a folder.

                                                                                                          3. Click Manage.

                                                                                                          4. Click File In...

                                                                                                          5. Select the desired personal folder.

                                                                                                          6. Drag the folder in the desired folder.

                                                                                                          7. Click Yes in the message that appears.

                                                                                                          The personal folder is moved into another folder.

                                                                                                            Modifying the Properties of a Folder

                                                                                                            A user type permission grants users access to this feature.

                                                                                                            1. Click the Folder tab located in the left pane of the Candidates list or Search Queries page.

                                                                                                            2. Select a folder.

                                                                                                            3. Click Manage.

                                                                                                            4. Select Properties...

                                                                                                            5. Enter information in the fields.

                                                                                                            6. Click Done.

                                                                                                            A name, an owner and comments are specified for the folder.

                                                                                                              Sharing a Folder

                                                                                                              A user type permission grants users access to this feature.

                                                                                                              1. Click the Folder tab located in the left pane of the Candidates list or Search Queries page.

                                                                                                              2. Select a folder.

                                                                                                              3. Click Manage.

                                                                                                              4. Click Sharing...

                                                                                                              5. Specify the users and/or groups who can have access to the folder.

                                                                                                              6. Click Done.

                                                                                                              The folder is available in the Shared folders section and a hand appears below the folder to show that it is shared. When a user shares a folder, this user will not see his/her own folder in the "shared" directory. Shared folders are only available to users who have been granted the permission to access shared folders.

                                                                                                                Storing a File in a Folder

                                                                                                                Allows users to put a file in a folder in order to consult it later on.

                                                                                                                1. Click the Folder tab located in the Candidates list or the Search Queries page.

                                                                                                                2. Select an element to file in a folder.

                                                                                                                3. Select a folder. You can also create a new folder if the ones available do not suit your needs.

                                                                                                                4. Click Done.

                                                                                                                  Candidate Creation

                                                                                                                    Candidate Creation Process

                                                                                                                    Recruiting Center users can create candidate general profiles and job-specific submissions.

                                                                                                                    The creation of candidates is done via the Create Candidate feature which is available in the home page as well as in the Candidates list via the More Actions list. This feature is available to users if they have been granted the proper user type permission; it also depends to which creation file the user's configuration profile was granted access to.

                                                                                                                    When selecting the Create Candidate action, the Create a Candidate assistant is launched. Users can create a general profile or a job-specific submission if these two types of files have been activated by the system administrator.

                                                                                                                    Note: When creating a candidate general profile or job-specific submission, the file presented to users does not take into consideration security level permissions in view and edit modes for those users and will allow them to input data into all the fields no matter the security level permissions granted or the security level set for the fields.

                                                                                                                    After deciding on the type of file to create, users have to select a template to create the candidate file. Templates are used to capture general profiles, job-specific submissions or referrals. The templates provided are based on the selected requisitions and their staffing type. All users do not have the same list of templates since the system administrator can activate a different set of templates for different configuration profiles.

                                                                                                                    During the creation process, the Resume Parsing option is available to extract key data elements from a candidate's resume and to use these data elements to automatically populate fields in the application. The candidate's resume cannot exceed 100 kilobytes or the size defined by the system administrator. It must also have the proper file format as defined by the system administrator. Resume Parsing has no impact on the formatting of a text (bold, italics, bullets). It can detect text in the header and footer. The following data elements are extracted from the candidate's resume:

                                                                                                                    Candidate Personal Information

                                                                                                                    • First Name

                                                                                                                    • Last Name

                                                                                                                    • Middle Name

                                                                                                                    • Address

                                                                                                                    • City

                                                                                                                    • Zip/Postal Code

                                                                                                                    • Home Phone Number

                                                                                                                    • Email Address

                                                                                                                    • Place of Residence

                                                                                                                    • Pasted Resume

                                                                                                                    Education

                                                                                                                    • Education Level

                                                                                                                    • Graduation Date

                                                                                                                    • Start Date

                                                                                                                    • Institution

                                                                                                                    • Program

                                                                                                                    Work Experience

                                                                                                                    • Start Date

                                                                                                                    • End Date

                                                                                                                    • Employer

                                                                                                                    • Job Function

                                                                                                                    • Responsibility

                                                                                                                    Before creating the actual candidate file, a duplicate check has to be performed to find out if the candidate already exists in the database. The following fields can be used for the duplicate check:

                                                                                                                    • First Name

                                                                                                                    • Last Name

                                                                                                                    • Middle Name

                                                                                                                    • Email Address

                                                                                                                    • Street Address

                                                                                                                    • City

                                                                                                                    • Phone Numbers (home, work, cellular, pager, or fax)

                                                                                                                    • Social Security Number

                                                                                                                    If duplicates are found, the system displays them in a list. Users can select the candidate file and edit the file. If no duplicates are found or if duplicates are found and the candidate is not on the list, users can create a new candidate file OR modify the duplicate search criteria and perform a new duplicate check.

                                                                                                                    When the candidate file template appears, users have to complete the required fields. The layout of the file is presented as a long form containing sections, blocks of information and fields selected by the system administrator.

                                                                                                                      Creating a Candidate General Profile

                                                                                                                      The information you will need to provide depends on the flow and options configured by the system administrator.

                                                                                                                      A user type permission grants users access to this feature.

                                                                                                                      1. In the Candidates list, select Create Candidate... in the More Actions list.

                                                                                                                      2. Select the Create a general profile option.

                                                                                                                      3. Select a candidate file creation template.

                                                                                                                      4. Select the language in which you want to create the candidate file.

                                                                                                                      5. Select the folder where you want to save the candidate file.

                                                                                                                      6. Indicate whether or not you want to use the Resume Parsing feature.

                                                                                                                        The file must not exceed 100 kilobytes and its format must be one of the following: Word (.doc, .docx), WordPerfect (.wpd), Text (.txt), Rich Text Format (.rtf), Hypertext Markup Language (.html, .htm), Portable Document Format (.pdf), Excel (.xls, .xlsx), OpenOffice Writer (.odt). Also, the processing of resumes written in other languages than the submission language might not be supported.
                                                                                                                      7. In the Duplicate Check step, provide information to make sure the candidate is not already registered into the database.

                                                                                                                        1. If duplicates are found, the system displays them in a list. You can select the candidate file and edit the file.

                                                                                                                        2. If no duplicates are found or if duplicates are found and the candidate is not on the list, you can create a new candidate file OR modify the duplicate search criteria and perform a new duplicate check.

                                                                                                                        Creating a Candidate Job-Specific Submission

                                                                                                                        The information you will need to provide depends on the flow and options configured by the system administrator.

                                                                                                                        A user type permission grants users access to this feature.

                                                                                                                        1. In the Candidates list, select Create Candidate... in the More Actions list.

                                                                                                                        2. Select the Create a job-specific submission option.

                                                                                                                        3. Select the language in which you want to create the candidate submission.

                                                                                                                        4. Select the requisition for which the candidate is applying.

                                                                                                                        5. Select a candidate file creation template.

                                                                                                                        6. Indicate whether or not you want to use the Resume Parsing feature.

                                                                                                                          The file must not exceed 100 kilobytes and its format must be one of the following: Word (.doc, .docx), WordPerfect (.wpd), Text (.txt), Rich Text Format (.rtf), Hypertext Markup Language (.html, .htm), Portable Document Format (.pdf), Excel (.xls, .xlsx), OpenOffice Writer (.odt). Also, the processing of resumes written in other languages than the submission language might not be supported.
                                                                                                                        7. In the Duplicate Check step, provide information to make sure the candidate is not already registered into the database.

                                                                                                                          1. If duplicates are found, the system displays them in a list. You can select the candidate file and edit the file.

                                                                                                                          2. If no duplicates are found or if duplicates are found and the candidate is not on the list, you can create a new candidate file OR modify the duplicate search criteria and perform a new duplicate check.

                                                                                                                          Candidate

                                                                                                                          A candidate is a person that applied on a job, that submitted a profile, or that was referred.

                                                                                                                          A candidate is a person:

                                                                                                                          • who has submitted a profile

                                                                                                                          • who has created a job submission

                                                                                                                          • for which a profile has been created by a user

                                                                                                                          • for which a job submission has been created by a user

                                                                                                                          • who has been referred by an agent for a job opening

                                                                                                                          • who has been referred by a friend for a job opening

                                                                                                                          • whose profile has been submitted by an agent

                                                                                                                          • whose profile has been submitted by a referrer

                                                                                                                          • who has been created by a Recruiting system user

                                                                                                                          Details regarding internal and external candidates

                                                                                                                          Candidate's internal/external state is tracked in the general profile and at the job submission level.

                                                                                                                          In the General Profile: Internal candidates are identified by the Internal Candidate icon. This icon is displayed in the candidate card located on the left pane and in the candidate list. In general, candidates applying on a job or submitting their profile from an internal career section are automatically considered internal candidates. All other candidates are considered external candidates by default. However, if coming from an external career section and if the application flow is configured to allow it, candidates applying from external career sections can indicate that they are internal candidates and will receive the internal designation.In addition, Recruiting Center users may change the internal/external state of a candidate directly in the candidate file by using the Internal Candidate check box (which is available in the Candidate Personal Information section of the candidate file, under the General Profile tab).

                                                                                                                          Recruiting Center users may also automatically identify a candidate as Internal so that candidates who reach the Hire/Hired status in a candidate selection workflow will automatically have their general profile updated to indicate Internal. The system will display the icon for those candidates in a candidate list. Candidates who have received the Internal designation at the general profile level are considered to be internal candidates on the general profile even if they applied via an external career section. Authorized system users or integrations are required to remove this designation from employees who leave the company. For integration and reporting purposes, this field is named "Candidate.InternalApplication".

                                                                                                                          In the Submission: Internal/external submissions are identified in the candidate submission, in the Submission Type field located under the candidate card. The internal/external state value is used to improve metrics and analysis. Because all hired candidates can become "internal" without an application level designation of Internal or External all hires might appear in metrics as "internal hires", which would be incorrect. Values for the Submission Type field are either External or Internal and this value is not currently editable. This field is derived strictly from the internal/external value on the candidates' profile at the time the job submission was completed. For integration and reporting purposes, this field is named "Application.IsInternal".

                                                                                                                            Candidate Actions

                                                                                                                              Editing a Candidate File

                                                                                                                              A user type permission grants users access to this feature.

                                                                                                                              1. In the Candidates list, click on the name of a candidate.

                                                                                                                              2. Click Edit under the Job Submission/General Profile tab.

                                                                                                                              3. Modify information as needed.

                                                                                                                              4. Click Save.

                                                                                                                                Deleting a Candidate File

                                                                                                                                A user type permission grants users access to this feature.

                                                                                                                                1. Enter the name of the candidate in the search widget.

                                                                                                                                2. In the Quick Search Results list, select a candidate file.

                                                                                                                                3. In the More Actions list, select Delete Candidate.

                                                                                                                                4. Click Yes to confirm the deletion.

                                                                                                                                The candidate file is permanently removed form the database.

                                                                                                                                Candidates who were involved in any Onboarding (Transitions) process that has not been deleted first in Onboarding (Transitions) will not be deleted. Onboarding (Transitions) has its own automated task to delete older completed and canceled processes. If that task is run and no processes associated with a candidate remain, then the candidate can be deleted afterward using one of the deletion methods in the Recruiting Center.

                                                                                                                                It is impossible to delete an employee file (as opposed to a candidate file) in the Recruiting Center. This is by design. For example, it is impossible to delete candidates whose file contains a hiring manager, Organization, Location or Job Field (OLF), photo, etc.

                                                                                                                                  Deleting a Candidate Submission

                                                                                                                                  A user type permission grants users access to this feature.

                                                                                                                                  1. In the Candidates list, select a candidate file.

                                                                                                                                  2. Select Delete Submission in the More Actions list.

                                                                                                                                  3. Click Save and Close.

                                                                                                                                  The candidate submission is removed from the requisition. The status of the candidate for the requisition is Deleted.

                                                                                                                                  Candidates who were involved in any Onboarding (Transitions) process that has not been deleted first in Onboarding (Transitions) will not be deleted. For details, see Onboarding (Transitions) Processes in Recruiting.

                                                                                                                                    Printing a Candidate File

                                                                                                                                    A maximum of 50 candidate files can be printed at a time.

                                                                                                                                    1. Select a candidate file.

                                                                                                                                    2. Click the Print icon.

                                                                                                                                    3. Specify printing parameters.

                                                                                                                                    4. Click Create PDF.

                                                                                                                                    5. Click in the page displaying the PDF.

                                                                                                                                    6. In the Windows File menu, select Print.

                                                                                                                                      Unlocking a Candidate Account

                                                                                                                                      A user type permission grants users access to this feature.

                                                                                                                                      1. In the candidate file, select the General Profile tab.

                                                                                                                                      2. Confirm the candidate identity.

                                                                                                                                      3. In the Account Information section, click Unlock Account.

                                                                                                                                        Generating a Password for a Candidate Account

                                                                                                                                        A user type permission grants user access to this feature.

                                                                                                                                        1. Confirm the candidate identity.

                                                                                                                                        2. In the candidate file, select the General Profile tab.

                                                                                                                                        3. In the Account Information section, click Generate New Password.

                                                                                                                                        4. Click Yes to confirm your choice.

                                                                                                                                        5. Click OK.

                                                                                                                                        A new password is generated at the candidate's request. The new system-generated password is temporary. The candidate will only be able to use this password once, at the next login. The system will then force the candidate to change his/her password.

                                                                                                                                          Changing the Internal/External State of a Candidate

                                                                                                                                          A user type permission grants users access to this feature.

                                                                                                                                          1. In the candidate file, select the General Profile tab. You may need to flip the candidate card on the left pane.

                                                                                                                                          2. Click Edit.

                                                                                                                                          3. In the Candidate Personal Information section, select or clear the Internal Candidate field.

                                                                                                                                          4. Click Save and Close.

                                                                                                                                            Entering a Grade in a Candidate File

                                                                                                                                            The action must have been added to a step of the candidate selection workflow.

                                                                                                                                            The candidate must be in a step that includes the action Enter grade.

                                                                                                                                            A user type permission grants users access to this feature.

                                                                                                                                            1. In the candidate file, select Enter Grade... in the More Actions list.

                                                                                                                                            2. Complete fields as required.

                                                                                                                                            3. Click Done.

                                                                                                                                            The grade is displayed in the History tab.

                                                                                                                                              Adding an Attachment to a Candidate File

                                                                                                                                              A user type permission grants users access to this feature.

                                                                                                                                              The file will be scanned for viruses. If a virus is detected, the file is not attached. The system displays file information or suggests attaching a different file.

                                                                                                                                              1. Select a candidate file.

                                                                                                                                              2. Click the Add Attachment icon.

                                                                                                                                              3. Click Browse to select a file.

                                                                                                                                              4. Indicate if you want to make the file visible to the candidate. By default, a maximum of five files visible to the candidate can be attached by the recruiter and the candidate.

                                                                                                                                              5. Click Done.

                                                                                                                                                Removing an Attachment from a Candidate File

                                                                                                                                                A user type permission grants users access to this feature.

                                                                                                                                                1. In the candidate file, click on the Attachments tab.

                                                                                                                                                2. Move the mouse over the name of an attachment.

                                                                                                                                                3. Click the Remove icon.

                                                                                                                                                4. In the warning window, confirm your deletion.

                                                                                                                                                  Viewing Attachments in a Candidate File

                                                                                                                                                  1. In the candidate file, click on the Attachments tab.

                                                                                                                                                  2. In the Attachments list, click on the name of an attachment.

                                                                                                                                                    Previewing Candidate Attachments in Candidates Lists

                                                                                                                                                    Recruiting Center users can quickly preview candidate attachments directly from a candidates list using a preview pane.

                                                                                                                                                    The candidates list provides a split screen which allows recruiters to preview candidate attachments without having to navigate away from the list.

                                                                                                                                                    There are two different ways to preview a candidate attachment:

                                                                                                                                                    1) By clicking the Show Attachment Preview icon located at the top of the candidates list and then selecting a candidate using the check box.


                                                                                                                                                    Image showing the Show Attachment Preview icon located at the top of the candidates list.

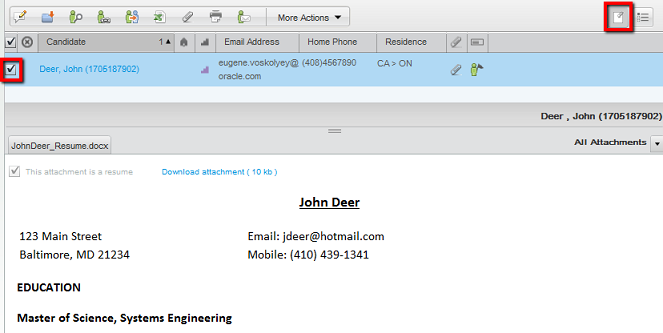
                                                                                                                                                    2) By clicking the Attachment icon on a candidate row. The Show Attachment Preview icon will be automatically enabled if it is turned off.


                                                                                                                                                    Image showing the Attachment icon on a candidate row.

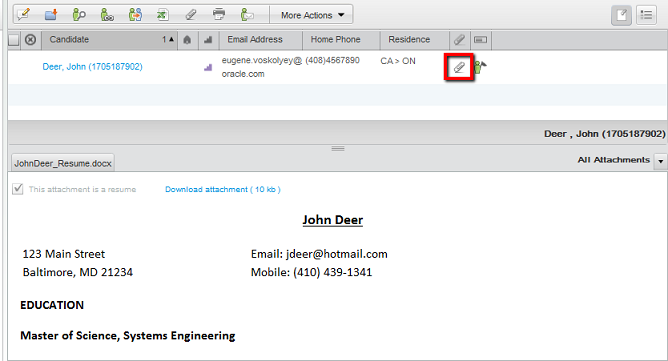
                                                                                                                                                    In the preview pane, files are converted into HTML and each attachment is displayed in its own tab. Recruiters can download the attachment or tag the attachment as being a resume. Recruiters can also choose to preview submission-specific attachments or other types of attachments. A splitter bar is available to resize the preview pane.

                                                                                                                                                    This feature is available in all candidate lists that is, the candidates list, the requisition-specific candidate list, the candidate search results list, the Folders tab and Talent Pools tab.

                                                                                                                                                      Adding a Comment in a Candidate File

                                                                                                                                                      A user type permission grants users access to this feature.

                                                                                                                                                      1. In the candidate file, click the Add Comments icon.

                                                                                                                                                      2. Add a comment.

                                                                                                                                                      3. Click Done.

                                                                                                                                                      The comment is displayed in the candidate file History tab. Comments become searchable 10 or 15 minutes after being saved. Comments are not case sensitive and do not require quotation marks to be searched. Comments cannot be seen by the candidate.

                                                                                                                                                        Modifying a Comment in the Candidate File History Tab

                                                                                                                                                        A user type permission grants users access to this feature.

                                                                                                                                                        1. In the candidate file, click on the History tab.

                                                                                                                                                        2. Click the Add Comments icon.

                                                                                                                                                        3. Modify the comment.

                                                                                                                                                        4. Click Done.

                                                                                                                                                        The modified comment is displayed in the Comments column of the History tab.

                                                                                                                                                          Modifying Event Categories in the Candidate File History Tab

                                                                                                                                                          A user type permission grants users access to this feature.

                                                                                                                                                          1. In the candidate file, click on the History tab.

                                                                                                                                                          2. Click Modify.

                                                                                                                                                          3. Select the desired event categories.

                                                                                                                                                          4. Click Done.

                                                                                                                                                          Events related to the event categories selected will be displayed in the candidate file History tab.

                                                                                                                                                            Modifying an Event Date in the Candidate File History Tab

                                                                                                                                                            A setting allows the activation of this feature.

                                                                                                                                                            A user type permission grants users access to this feature.

                                                                                                                                                            1. In the candidate file, click on the History tab.

                                                                                                                                                            2. Click the Calendar icon next to the event.

                                                                                                                                                            3. Change the date.

                                                                                                                                                            The date of an event is modified in order to specify when an action on a candidate's file really took place.

                                                                                                                                                              Moving a Candidate to the Next Step

                                                                                                                                                              Candidate must be in a step that includes the Move action.

                                                                                                                                                              Candidate must be at a completion status.

                                                                                                                                                              Candidate must not be in the RSOffer step.

                                                                                                                                                              A user type permission grants users access to this feature.

                                                                                                                                                              1. Select a candidate.

                                                                                                                                                              2. Select Change Status/Step in the More Actions list.

                                                                                                                                                              3. Select a new step.

                                                                                                                                                              4. Optional: Create a self-assigned task by entering a name, due date, and description.

                                                                                                                                                                It is currently not possible to setup a reminder to a self-assigned task when moving a candidate to the next step.
                                                                                                                                                              5. Optional: Send a correspondence.

                                                                                                                                                              6. Click Done.

                                                                                                                                                                Moving Several Candidates to the Next Step

                                                                                                                                                                Candidates must be at the same step.

                                                                                                                                                                Candidates must be at a completion status.

                                                                                                                                                                Step must include the Move action.

                                                                                                                                                                Candidate must not be in a RSOffer step.

                                                                                                                                                                A user type permission grants users access to this feature.

                                                                                                                                                                1. Select several candidates.

                                                                                                                                                                2. Select Change Status/Step in the More Actions list.

                                                                                                                                                                3. Select a new step.

                                                                                                                                                                4. Optional: Create a self-assigned task by entering a name, due date, and description.

                                                                                                                                                                5. Optional: Send a correspondence.

                                                                                                                                                                6. Click Done.

                                                                                                                                                                  Moving a Candidate to Any Step

                                                                                                                                                                  Candidate must be at a completion status.

                                                                                                                                                                  Step must include the Bypass action.

                                                                                                                                                                  Candidate must not be in a RSOffer step.

                                                                                                                                                                  A user type permission grants users access to this feature.

                                                                                                                                                                  1. Select a candidate.

                                                                                                                                                                  2. Select Bypass from the More Actions list.

                                                                                                                                                                  3. Select a new step.

                                                                                                                                                                  4. Optional: Create a self-assigned task by entering a name, due date, and description.

                                                                                                                                                                  5. Optional: Send a correspondence.

                                                                                                                                                                  6. Click Done.

                                                                                                                                                                    Moving Several Candidates to Any Step

                                                                                                                                                                    Candidates must be at the same step.

                                                                                                                                                                    Candidates must be at a completion status.

                                                                                                                                                                    Step must include the Bypass action.

                                                                                                                                                                    Candidate must not be in a RSOffer step.

                                                                                                                                                                    A user type permission grants users access to this feature.

                                                                                                                                                                    1. Select several candidates.

                                                                                                                                                                    2. Select Bypass in the More Actions list.

                                                                                                                                                                    3. Select a new step.

                                                                                                                                                                    4. Optional: Create a self-assigned task by entering a name, due date, and description.

                                                                                                                                                                    5. Optional: Send a correspondence.

                                                                                                                                                                    6. Click Done.

                                                                                                                                                                      Reverting to the Step/Status Previously Reached

                                                                                                                                                                      The step must include the Revert action.

                                                                                                                                                                      The step must not be an RSOffer step.

                                                                                                                                                                      1. In the candidate file, select Revert in the More Actions list.

                                                                                                                                                                      2. In the Revert window, add a comment.

                                                                                                                                                                      3. Click Done.

                                                                                                                                                                      The candidate is moved back to the step and status previously reached.

                                                                                                                                                                        Changing the Status of a Candidate

                                                                                                                                                                        Step in which the candidate is must include the Change Status action.

                                                                                                                                                                        Candidate must not be in a RSOffer step.

                                                                                                                                                                        A user type permission grants users access to this feature.

                                                                                                                                                                        1. Select a candidate file.

                                                                                                                                                                        2. In the More Actions list, select Change Status/Step.

                                                                                                                                                                        3. Select a new status.

                                                                                                                                                                        4. Click done.

                                                                                                                                                                        The status of the candidate is changed.

                                                                                                                                                                          Changing the Status of Several Candidates

                                                                                                                                                                          Step must include the Change Status action.

                                                                                                                                                                          Candidate must not be in a RSOffer step.

                                                                                                                                                                          A user type permission grants users access to this feature.

                                                                                                                                                                          1. In a candidate list, select several candidate files.

                                                                                                                                                                          2. In the More Actions list, select Change Status/Step.

                                                                                                                                                                          3. Select a new status.

                                                                                                                                                                          4. Click Done.

                                                                                                                                                                          The status of several candidate is changed.

                                                                                                                                                                            Filtering Candidates Based on their Place of Residence

                                                                                                                                                                            Recruiters can filter a list of candidates based on the distance between the candidate's place of residence and a central point, either a zip/postal code or a location.

                                                                                                                                                                            The Place of Residence advanced filter is available for candidate lists and requisition-specific candidate lists.


                                                                                                                                                                            Image showing the Place of Residence filter in the Advanced Filters list.

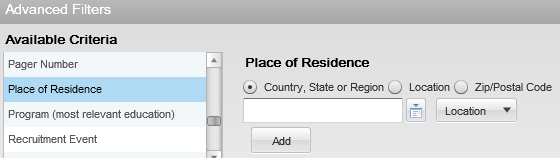
                                                                                                                                                                            Only one place of residence filter can be used at a time. If you add a filter criterion while one was already selected, the new filter will replace the one previously selected. It is possible however to combine multiple place of residence filters when using an exact location. For example, you could select the filters United States > California and United States > Nevada.

                                                                                                                                                                            When using radius filtering, the Miles or Kilometers distance unit is displayed according to the user's preferences (Path: Resources > My Setup > Preferences > Default Distance Unit).

                                                                                                                                                                            Place of Residence - Country, State or Region

                                                                                                                                                                            When selecting the Country, State or Region option, the location selector displays reference locations.

                                                                                                                                                                            When selecting a country and state region, the candidate list will be filtered to only show candidates whose place of residence is set to that specific country and state.


                                                                                                                                                                            Image showing the Place of Residence filter. A country and state are selected.

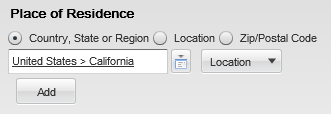
                                                                                                                                                                            When selecting a region, the candidate list will be filtered to only show candidates whose place of residence is set to that specific region or within a specific distance of the selected region.


                                                                                                                                                                            Image showing the Place of Residence filter. A country, state and region are selected. The Within 10 Miles of Location is selected.

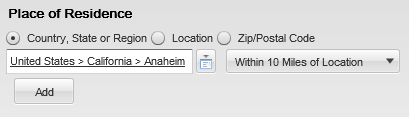
                                                                                                                                                                            When selecting a region (with no radius), the candidate list will be filtered to show candidates whose place of residence is set to that precise location or to a location that is lower in the hierarchy of that location (lower level). For example, if the selected location is "United States > California", candidates whose place of residence is set to "United States > California > Anaheim" will also be displayed.


                                                                                                                                                                            Image showing the Place of Residence filter. A country, state and region are selected.

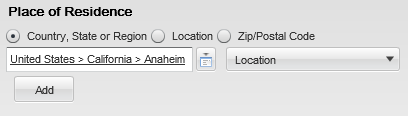
                                                                                                                                                                            Place of Residence - Location

                                                                                                                                                                            When selecting the Location option, the location selector displays customer's locations.

                                                                                                                                                                            When selecting a location, the candidate list will be filtered to only show candidates whose place of residence is within a specific distance of the selected location.


                                                                                                                                                                            Image showing the Place of Residence filter. A country, state and region are selected. The Within 10 Miles of Location is selected.

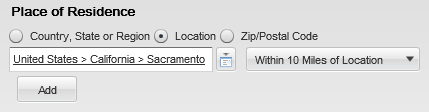
                                                                                                                                                                            Place of Residence - Zip/Postal Code

                                                                                                                                                                            The Zip/Postal Code option is used to specify a zip code or postal code as well as the country to which this code belongs to filter the candidate list to only show candidates whose place of residence is within a specific distance of the zip/postal code.

                                                                                                                                                                            If an invalid zip/postal code is entered or if the system cannot perform a radius filtering for the selected country, an error message will be displayed inviting the user to select a different country or zip/postal code.


                                                                                                                                                                            Image showing the Place of Residence filter. A country is selected. A zip code is selected.

                                                                                                                                                                            Note: When a user enters a location and a radius, the location's geo-code (that is, the latitude and longitude) is calculated and the radial distance is used to find the geo-boundary. Once the geo-boundary is calculated, the filtering is done based on whether the candidate's place of residence is within this area, with the help of the geo-code of the candidate's place of residence. If a candidate's place of residence does not have a geo-code (the place of residence is set to a country or state), this candidate will not be displayed.

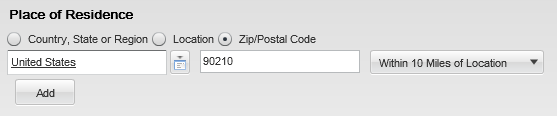
                                                                                                                                                                              Viewing Completed Submissions in Lists

                                                                                                                                                                              Recruiters can view and sort candidate submissions based on the date when a job submission was completed.

                                                                                                                                                                              This feature allows recruiters to look through a list of candidate submissions from top to bottom, where the candidate submission on the top is the oldest and the one at the bottom is the most recent. In some companies, this way of screening is mandatory as selection is performed in a first come first serve manner. To do this, the recruiter must see and sort on the submission completion date (ascending order) such that the oldest submissions are displayed on the top and the recruiter goes down through the list one candidate at a time. In addition to this, the correct filter must be activated in order not to include submissions that are not completed.

                                                                                                                                                                              If the column Submission Complete was added to requisition-specific candidate lists, information in the column appears as follows:

                                                                                                                                                                              • A blank value means that the submission has not yet been completed.

                                                                                                                                                                              • Dates are displayed using the format configured in Regional Settings, under the SmartOrg Administration (used throughout the system).

                                                                                                                                                                              • Ascending sorting (arrow pointing upwards) displays the oldest submissions at the top of the list. Note that when sorting on the Submission Complete Date column, blank values (incomplete submissions) are always displayed at the bottom of the list, whether sorting in an ascending or descending order.

                                                                                                                                                                              Job submissions are considered complete when:

                                                                                                                                                                              • A candidate completed a job submission and clicked the Submit button.

                                                                                                                                                                              • A candidate (usually internal candidate) refers someone when creating or updating a submission.

                                                                                                                                                                              • An agent refers someone when creating or updating a submission.

                                                                                                                                                                              • A recruiter matches a candidate to a requisition (when creating a new job submission or when a match is done with an incomplete job submission).

                                                                                                                                                                              • An import is done on a job submission.

                                                                                                                                                                              • A candidate is hired on a job submission.

                                                                                                                                                                                Candidate Email Address Verification

                                                                                                                                                                                Recruiters can verify whether candidate email addresses entered in the system are valid. Knowing that candidates have not validated their email address, recruiters can use alternate communication channels to send communications.

                                                                                                                                                                                When administrators enable the feature, candidates are sent a message asking them to validate their email address. The message contains a link to the career section. Once candidates click the link, they are taken to the career section login page. On successful login, candidates see the message “Email successfully verified”. If the validation fails, candidates see the message "Email verification failed" with a generic explanation. If the email address was already validated, candidates see the message "Email verification failed" with an explanation that their email address was already validated.

                                                                                                                                                                                In Recruiting Center, recruiters can see that a candidate’s email address was validated. The Email Validated icon appears in the candidates list. It also appears on the candidate card when viewing the general profile or submission of a candidate. The verification is done once per candidate unless the email address is changed.

                                                                                                                                                                                A quick filter is also available to display candidates who have validated their email address.

                                                                                                                                                                                Note: For existing candidates whose email address is yet to be validated, the email address validation message is sent if the candidate is active and when the candidate reaches the step as configured in the setting.

                                                                                                                                                                                  Candidate Duplicate Check

                                                                                                                                                                                    Checking for Duplicate Candidates

                                                                                                                                                                                    The Check for Duplicate action in the Recruiting Center allows users to verify if a candidate already exists in the database.

                                                                                                                                                                                    The Check for Duplicates action is available in the:

                                                                                                                                                                                    • Candidates list More Actions menu.

                                                                                                                                                                                    • Candidates list contextual action menu.

                                                                                                                                                                                    • Candidate file More Actions menu.

                                                                                                                                                                                    • Job-specific Candidates list More Actions menu.

                                                                                                                                                                                    • Job-specific Candidates list contextual action callout.

                                                                                                                                                                                    When selecting the Check for Duplicates action, the system performs a duplicate check against a duplicate check condition created by the system administrator. Candidates matching the condition are displayed in a Quick Search Results list. If two candidate files are duplicates, Recruiting Center users can then merge the files using the Merge Candidate Files icon.

                                                                                                                                                                                      Checking for Duplicate Candidates

                                                                                                                                                                                      A user type permission grants users access to this feature.

                                                                                                                                                                                      1. In the Candidates list, select a candidate.

                                                                                                                                                                                      2. In the More Actions list, select Check for Duplicates...

                                                                                                                                                                                      If duplicates are found, they are listed in a Quick Search Results list.

                                                                                                                                                                                        Candidate File Merge

                                                                                                                                                                                          Merging Candidate Files

                                                                                                                                                                                          Recruiting Center users can combine several candidate files into one file.

                                                                                                                                                                                          When using the Check for Duplicate action, or when in a candidates list, or after performing a quick search or advanced search, Recruiting Center users can select from two to ten candidate files and merge them using the Merge Candidate Files icon.

                                                                                                                                                                                          To verify if the selected candidate files are duplicate files, the system performs a duplicate check against a duplicate check condition created by the system administrator. Once the duplicate check is done, the system suggests a master candidate file by selecting the candidate file that contains the most up-to-date information or the candidate file that was first referred in the case of a referral.

                                                                                                                                                                                          Users can specify a different file as the master candidate file and remove unwanted candidate files.

                                                                                                                                                                                          Users can also select the order in which the duplicate files will be merged into the master file. Information from a duplicate candidate file added to empty fields in the master candidate file will not be overwritten with corresponding information from other duplicate candidate files positioned later in the merge process. For this reason, the order of files to be merged will affect the results.

                                                                                                                                                                                          When a merge occurs, the content of the duplicate files is added to the content of the master candidate file.

                                                                                                                                                                                          Note: Special rules regarding the Education block, Work Experience block, and Certification block. Each block is evaluated using specific fields (Institution, Program, Education Level, Employer, Job Function, Expiration Date, Issue Date, Number/ID):
                                                                                                                                                                                          • If the content of the fields within each block is different, a new entry is added in the master candidate file and the content is copied over.

                                                                                                                                                                                          • If the content of the fields within each block is identical, the data within the specific block is merged.

                                                                                                                                                                                          For the candidate address, the system considers the Date From and Date To fields.
                                                                                                                                                                                          • If the Date From field is different, the system looks at the Date To field. If the Date To field is also different, a new entry is added in the master candidate file and the content is copied over.

                                                                                                                                                                                          • If no data is available in these fields, a new entry is added in the master candidate file and the content is copied over.

                                                                                                                                                                                          • If the content of the two fields is identical, the data within the specific block is merged.

                                                                                                                                                                                          If the email notification option was selected when merging the candidate files, an email message is sent to the master candidate or agent owning the master candidate to inform the person that the candidate files were merged and to invite him/her to review the new candidate file.

                                                                                                                                                                                          Files attached to the duplicate files are also merged. If the maximum number of attachments allowed per candidate is reached or exceeded, the attachments will be merged but candidates will not be able to add additional files.

                                                                                                                                                                                          When the merge occurs, candidate submissions are added to the master candidate file. If submissions are in conflict with submissions in the master candidate file, the submissions are not added to the master candidate file.

                                                                                                                                                                                          The merging action can create multilingual candidate files. When merging candidate files with different languages, the master candidate file will have multiple languages. The language of the master candidate file will be used for the general correspondence. Submission-specific correspondence will be in the candidate's preferred language.

                                                                                                                                                                                          The merge action can be performed with candidate files having the following offer statuses:

                                                                                                                                                                                          • Draft

                                                                                                                                                                                          • Accepted

                                                                                                                                                                                          • Rescinded

                                                                                                                                                                                          • Canceled

                                                                                                                                                                                          • Reneged

                                                                                                                                                                                          • Approval Rejected

                                                                                                                                                                                          • Refused

                                                                                                                                                                                          Duplicate candidate files (that is, files that could be merged into the master file) cannot be merged if:

                                                                                                                                                                                          • The candidate is already in an onboarding process.

                                                                                                                                                                                          • The candidate has a pending interview request.

                                                                                                                                                                                          • The candidate file has an employee file.

                                                                                                                                                                                          • The candidate file contains an incomplete external service request (that is, an open Passport transaction) such as a background check, a tax credit check, an assessment.

                                                                                                                                                                                          Note: Before starting an onboarding process or before hiring a candidate, it is a best practice to use the Duplicate Check function to make sure there is no duplicate file before locking down the current candidate with a Legacy Onboarding or Onboarding (Transitions) process or by creating an employee file for performance management.
                                                                                                                                                                                          Note: Regarding Onboarding (Transitions): When two or more candidate files are merged, the selected master candidate file is kept and possibly enriched with information from the other candidate files that will be deleted. Onboarding (Transitions) processes can be associated with the master candidate file. If Onboarding (Transitions) processes (regardless of their status) are associated with any of the other candidate files involved in the merge, the merge will fail however.

                                                                                                                                                                                            Merging Candidate Files

                                                                                                                                                                                            A user type permission grants users access to this feature.

                                                                                                                                                                                            The merge feature cannot be used if one of the duplicate candidate file is already in an onboarding process, contains a pending interview request, contains an incomplete external service request such as a background check, or a candidate file has an employee file.

                                                                                                                                                                                            1. In a candidates list, select candidate files.

                                                                                                                                                                                              A maximum of ten candidate files can be selected.
                                                                                                                                                                                            2. Click the Merge Candidate Files icon.

                                                                                                                                                                                              The system performs a duplicate check to verify if a candidate already exists in the database. Once the duplicate check is done, the system suggests a master candidate file by selecting the candidate file that contains the most up-to-date information or the candidate file that was first referred in the case of a referral.
                                                                                                                                                                                            3. Optional: Use the Master drop-down list to select a different master candidate file.

                                                                                                                                                                                            4. Optional: Use the Remove icon next to the candidate file name to remove unwanted duplicate candidate files.

                                                                                                                                                                                            5. Optional: Use the Reorder button to select the order in which the duplicate files will be merged into the master file.

                                                                                                                                                                                            6. Specify if you want to send an e-mail notification to the master candidate or agent owning the master candidate to inform the person that the candidate files were merged and to invite him/her to review the new candidate file.

                                                                                                                                                                                            7. Click Done.

                                                                                                                                                                                              Candidate Comparison

                                                                                                                                                                                                Comparing Candidate Files

                                                                                                                                                                                                Recruiting Center users can display candidate files side by side for comparison purposes.

                                                                                                                                                                                                From a requisition-specific candidate list, a user can select two or more candidate files and invoke the Compare action in the More Actions list.

                                                                                                                                                                                                Up to four candidate files can be displayed simultaneously side by side. However, more than four candidate files can be compared. After expanding or collapsing sections of information to focus on the most interesting criteria for a given comparison of four candidate files, the user can click the Pin icon to lock a candidate file as being the reference against which the other candidate files will be compared. The user can scroll through the other candidates selected earlier, continue the comparison and remove unwanted candidates from the comparison view as needed using the using the small x in the top right corner of the column for the candidate.

                                                                                                                                                                                                The sections of information displayed when comparing candidate files match the blocks configured for the candidate file. The following fields are included in the compare process if they are present in the candidate file. UDFs (other than screening results) are not included among the fields being compared.

                                                                                                                                                                                                Block Field
                                                                                                                                                                                                Basic Profile
                                                                                                                                                                                                • Education Level

                                                                                                                                                                                                • Job Level

                                                                                                                                                                                                • Job Type

                                                                                                                                                                                                • Schedule

                                                                                                                                                                                                • Shift

                                                                                                                                                                                                • Employee Status

                                                                                                                                                                                                • Minimum Annual Salary

                                                                                                                                                                                                • Currency

                                                                                                                                                                                                • Travel

                                                                                                                                                                                                • Advance Notice

                                                                                                                                                                                                • Date of Availability

                                                                                                                                                                                                Work Experience
                                                                                                                                                                                                • Achievements

                                                                                                                                                                                                • Current Job

                                                                                                                                                                                                • Employer

                                                                                                                                                                                                • Start Date

                                                                                                                                                                                                • End Date

                                                                                                                                                                                                • Job Function

                                                                                                                                                                                                • Other Employer

                                                                                                                                                                                                • Other Function

                                                                                                                                                                                                Work Conditions
                                                                                                                                                                                                • Currency

                                                                                                                                                                                                • Expected Hourly Pay Rate

                                                                                                                                                                                                • Hours per week willing to work

                                                                                                                                                                                                • Hours per week, preferred

                                                                                                                                                                                                • Willing to work on holidays

                                                                                                                                                                                                • Willing to work on weekends

                                                                                                                                                                                                Certifications
                                                                                                                                                                                                • Certification

                                                                                                                                                                                                • Expiration Date

                                                                                                                                                                                                • Issue Date

                                                                                                                                                                                                • Location

                                                                                                                                                                                                • Organization

                                                                                                                                                                                                • Other Certification

                                                                                                                                                                                                Education
                                                                                                                                                                                                • Program

                                                                                                                                                                                                • Institution

                                                                                                                                                                                                • Other Institution

                                                                                                                                                                                                • Other Program

                                                                                                                                                                                                • Start Date

                                                                                                                                                                                                • Graduation Date

                                                                                                                                                                                                • GPA / GPA out of

                                                                                                                                                                                                • Graduated from High School or GED

                                                                                                                                                                                                • City

                                                                                                                                                                                                Prescreening
                                                                                                                                                                                                • All questions

                                                                                                                                                                                                • All competencies

                                                                                                                                                                                                Shift Availability
                                                                                                                                                                                                • Grid

                                                                                                                                                                                                Source Tracking
                                                                                                                                                                                                • Display source or event

                                                                                                                                                                                                Screening Services
                                                                                                                                                                                                • Most recent result for each service

                                                                                                                                                                                                Submission Medium
                                                                                                                                                                                                • Display Medium

                                                                                                                                                                                                Contingent
                                                                                                                                                                                                • Bill Rate

                                                                                                                                                                                                • Charge Sales Tax

                                                                                                                                                                                                • Pay Rate

                                                                                                                                                                                                • Worker Type

                                                                                                                                                                                                When comparing candidates, certain actions can be taken. The action will apply to all candidates residing in the compare window at the time the action is taken. Individual actions can also be taken using the drop- down arrow. Available actions are:

                                                                                                                                                                                                • Change Step/Status

                                                                                                                                                                                                • Bypass

                                                                                                                                                                                                • Revert

                                                                                                                                                                                                • Send Correspondence

                                                                                                                                                                                                • Add Comments

                                                                                                                                                                                                • Create Self-assigned Task

                                                                                                                                                                                                • Enter Grade

                                                                                                                                                                                                • File in a Folder

                                                                                                                                                                                                • Find Similar Candidates

                                                                                                                                                                                                • Match

                                                                                                                                                                                                • Share

                                                                                                                                                                                                  Comparing Candidate Files

                                                                                                                                                                                                  Candidate files must be linked to the same requisition.

                                                                                                                                                                                                  A user type permission grants users access to this feature.

                                                                                                                                                                                                  A setting allows the activation of this feature.

                                                                                                                                                                                                  1. In the Requisitions list, for the desired requisition, click on the number located in the Candidate Count column.

                                                                                                                                                                                                  2. In the candidate list of the selected requisition, select candidates to compare.

                                                                                                                                                                                                  3. In the More Actions list, select Compare...

                                                                                                                                                                                                  4. Compare candidates as desired.

                                                                                                                                                                                                    Candidate Sharing

                                                                                                                                                                                                      Sharing Candidate Files

                                                                                                                                                                                                      The Candidate Share functionality allows Recruiting Center users to share one or several candidate files with people via email. When sharing a candidate file, the system generates a PDF file containing candidate data.

                                                                                                                                                                                                      The Share action is available in the candidates list and the candidate file toolbar.

                                                                                                                                                                                                      Note: Sharing more than 50 candidate files is not recommended. If more than 50 candidate files are shared, the information shared will be limited to the Personal Information block. Sharing more than 50 candidate files can also affect system performance lengthening considerably the time required to complete the sharing action.

                                                                                                                                                                                                      Two sharing modes are available (based on specific setting values):

                                                                                                                                                                                                      • The legacy mode where one PDF is generated for each candidate being shared.

                                                                                                                                                                                                      • The new mode where a single PDF containing the consolidated data and attachments of all shared candidates is generated and stored on the cloud.

                                                                                                                                                                                                      The legacy Candidate Share mode

                                                                                                                                                                                                      When the legacy Candidate Share mode is used:

                                                                                                                                                                                                      • A PDF is generated for each candidate being shared.

                                                                                                                                                                                                      • A separate email is sent to each recipient, for each candidate being shared.

                                                                                                                                                                                                      • The "Share Candidate Notification" message template is used and contains the PDF as well as the attachments.

                                                                                                                                                                                                      The new Candidate Share and Print mode (Flipbook)

                                                                                                                                                                                                      When the new Candidate Share and Print mode is used:

                                                                                                                                                                                                      • A single PDF containing the consolidated data and attachments of all shared candidates is generated and stored in the cloud.

                                                                                                                                                                                                      • A single email is sent to each recipient (instead of one email per shared candidate).

                                                                                                                                                                                                      • The message template called "Share Candidate Notification - Link to Access Shared Candidate Information" is used and contains a link to access the PDF and attachments in the cloud (instead of attaching the PDF file and attachments to the email). Token variables such as {Candidate.FullName} can be added to this message template but they will not be populated if more than one candidate is being shared. In such a case, there is only one message for several candidates.

                                                                                                                                                                                                      • The generated PDF contains a Table of Contents so that users can easily navigate through the candidate files. Clicking the Bookmarks icon in the PDF displays the Table of Contents.

                                                                                                                                                                                                      • If an attachment cannot be converted, a link to access it directly in the cloud is included in the PDF. A conversion log containing all conversion errors for all selected candidates is inserted at the beginning of the PDF. A "place holder" page is placed in PDF where the conversion file was to be located.

                                                                                                                                                                                                      • While many common fonts are supported by the PDF converter used to generate PDFs,the system does not support all possible fonts candidates may decide to use as part of the documents they submit during their application.

                                                                                                                                                                                                      Note: The Candidate Share and Print mode converts submission attachments as a PDF file. However, the PDF file may not be a pixel perfect representation of the original attachments. As a result, there will be formatting differences between the original document and the converted PDF version of the document. Starting version 13C MP7, the new Candidate Share and Print mode (Flipbook) embeds links to the original attachments shared. The links to these attachments are provided at the beginning of each candidate section. Users can click these links to open the original attachments. This allows users to download and view shared submission attachments. Users do not need to log in to access these attachments. The PDF conversion process for the new Candidate Share and Print mode supports UTF-8 encoding.
                                                                                                                                                                                                      Note: The generated PDF contains links to the original attachments. When sharing candidates, users do not require authentication. The download starts as soon as the user clicks a link. However, when using batch printing to print the PDF, users will require authentication prior to being able to download attachments for security purposes.
                                                                                                                                                                                                      Note: The Recruiting setting "Share Other Attachments" does not prevent users from printing a PDF including other attachments. When using bulk printing or when sharing multiple candidates/submissions, users will not see a difference when selecting chosen segments. However, the output will differ if the setting is enabled. For example, the printed document will include other attachments not flagged as relevant to the submission.
                                                                                                                                                                                                      Attachments in the generated PDF

                                                                                                                                                                                                      Attachments can be included when sharing a candidate file. Three options are available:

                                                                                                                                                                                                      • Most recent flagged resume

                                                                                                                                                                                                      • Visible by candidate (Excludes flagged resume)

                                                                                                                                                                                                      • Not visible by candidate (Excludes flagged resume)

                                                                                                                                                                                                      History Tracking in the Share Candidate Feature

                                                                                                                                                                                                      The history can be included when sharing a candidate file.

                                                                                                                                                                                                      If the History option is selected, the tracking events of the shared candidate is included. When sharing a general profile, only the related general profile history is shared. When sharing a job submission, only the history related to that job submission is shared.

                                                                                                                                                                                                      Offer history information is included in the file if:

                                                                                                                                                                                                      • The user sharing the file has the View offers permission.

                                                                                                                                                                                                      • The user selects the Offer option in the Share Candidate assistant.

                                                                                                                                                                                                      • The candidate file contains offer data. Offer data is not available when sharing multiple candidates.

                                                                                                                                                                                                      Candidate Sharing Behavior

                                                                                                                                                                                                      When a user is sharing a candidate:

                                                                                                                                                                                                      • Only the content that the user is allowed to access or that a company allows to share is available.

                                                                                                                                                                                                      • The candidate file content that can be shared is defined by what the user can view. If a section is available to view, it will be available to share.

                                                                                                                                                                                                      • Attachments can be shared depending on the user's ability to see attached files.

                                                                                                                                                                                                      • Offer content can be selected for sharing if:
                                                                                                                                                                                                        • The user can view offer content.

                                                                                                                                                                                                        • The file being shared is a job submission.

                                                                                                                                                                                                        • The file contains offer data.

                                                                                                                                                                                                      • Referrals can be shared.

                                                                                                                                                                                                      • The history tracking can be shared.

                                                                                                                                                                                                      • Tasks are never available to share.

                                                                                                                                                                                                      • Approvals are never available to share.

                                                                                                                                                                                                      When a recipient receives the shared candidate file:

                                                                                                                                                                                                      • Sections that contain no data are removed from the shared file even if they were selected. Screening Services, eSignature and Regulation sub-sections are never included even if they are within a section of the candidate file that was included by the share sender when sending the share file.

                                                                                                                                                                                                      • Shared files follow a restricted profile for field level security. Fields with a Confidential security level are never shared, and fields with the General or Restricted security level are always shared, regardless of the sharing user's permissions. As a result, the shared candidate file may include or exclude content that a user is otherwise able to see while in the Recruiting Center.

                                                                                                                                                                                                      • Tasks are never included.

                                                                                                                                                                                                      • Approvals are never included.

                                                                                                                                                                                                        Sharing Candidate Files

                                                                                                                                                                                                        A user type permission grants users access to this feature.

                                                                                                                                                                                                        A maximum of 50 candidate files can be shared at once.

                                                                                                                                                                                                        1. Select one or multiple candidate files.

                                                                                                                                                                                                        2. Click the Share Candidate icon.

                                                                                                                                                                                                        3. Select a recipient. Two options are available:

                                                                                                                                                                                                          • You can add an external recipient by entering the email address of the person in the Email Address field. Or,

                                                                                                                                                                                                          • You can select a recipient entered in the system database.

                                                                                                                                                                                                        4. Click Next.

                                                                                                                                                                                                        5. Select content (sections) of the candidate file to share.

                                                                                                                                                                                                        6. Click Share.

                                                                                                                                                                                                        An e-mail is sent to the recipient. If the Legacy Candidate Share mode is used, the "Share Candidate Notification" message template is sent to the recipient and it contains the PDF of the candidate file as well as the attachments. If the New Candidate Share mode is used, the message template called "Share Candidate Notification - Link to Access Shared Candidate Information" is sent to the recipient and it contains a link to access the PDF and attachments in the cloud (instead of attaching the PDF file and attachments to the email).

                                                                                                                                                                                                          Candidate Matching to Requisitions

                                                                                                                                                                                                            Matching Candidates to Requisitions

                                                                                                                                                                                                            Recruiting Center users can select one or several candidate files and to match them to one or several requisition files.

                                                                                                                                                                                                            The Matching action is available in the candidates list and the candidate file toolbar.

                                                                                                                                                                                                            Basically, a user selects a candidate file, clicks the Add Candidates to Requisition icon and the system presents a list of requisitions. Requisitions are displayed by the system if they match the default matching requisition criteria set by the system administrator. These default criteria can be modified by the user to find more relevant requisitions for a particular candidate. This is done by clicking the Add Candidates to Requisition icon, selecting the Matching Requisitions option at the bottom of the quick filters and clicking the Modify Matching Criteria icon. Once a candidate has been matched to a requisition, the user can decide to send an email to the candidate to inform him/her that a match has been done and to obtain more information on his/her application. Emails are sent only for posted requisitions, to avoid inviting candidates to requisitions they cannot see on the career section.

                                                                                                                                                                                                            Matching criteria are:

                                                                                                                                                                                                            • Preferred Jobs/Job

                                                                                                                                                                                                            • Preferred Locations/Locations

                                                                                                                                                                                                            • Preferred Organizations/Organization

                                                                                                                                                                                                            • Place of residence/Location

                                                                                                                                                                                                            • Competencies

                                                                                                                                                                                                            • Questions

                                                                                                                                                                                                            • Job Level

                                                                                                                                                                                                            • Job Type

                                                                                                                                                                                                            • Schedule

                                                                                                                                                                                                            • Shift

                                                                                                                                                                                                            • Employee Status

                                                                                                                                                                                                            • Education Level

                                                                                                                                                                                                            • Travel

                                                                                                                                                                                                            • Minimum Annual Salary

                                                                                                                                                                                                            Matching criteria (except for competencies and questions) can be set as desired or required:

                                                                                                                                                                                                            • Required: The criterion is mandatory. A match must exist between the content of the candidate file and of the requisition file. If a requisition file meets the criterion, it will appear in the list of requisitions presented to the user.

                                                                                                                                                                                                            • Desired: The criterion is an asset. A match is not required between the content of the candidate file and of the requisition file. Desired criteria are considered as a plus. A requisition file that does not match a desired criterion is not rejected.

                                                                                                                                                                                                            Requisition files that meet all the required criteria and that also meet some desired criteria will appear at the top of the requisitions list presented to the user.

                                                                                                                                                                                                            Competencies and questions criteria are considered as wildcards. If these criteria are not selected as required in the requisition, or if a candidate does not enter answers for these criteria, the answers will still be considered.

                                                                                                                                                                                                              Matching a Candidate to a Requisition

                                                                                                                                                                                                              A candidate can only be matched to a requisition that has the Approved status.

                                                                                                                                                                                                              A candidate file must not be identified as registered person (the Registered Person icon would appear beside the candidate name).

                                                                                                                                                                                                              A user type permission grants users access to this feature.

                                                                                                                                                                                                              1. Select a candidate file.

                                                                                                                                                                                                              2. Click the Add Candidates to Requisition icon.

                                                                                                                                                                                                              3. Click Select next to the desired requisition. If no requisitions are displayed, select different values in the quick filters.

                                                                                                                                                                                                              4. Click Done.

                                                                                                                                                                                                              Users selected a candidate file and matched it to a specific requisition. Selected candidate will be considered for the requisition.

                                                                                                                                                                                                                Modifying Matching Requisition Criteria

                                                                                                                                                                                                                1. Select a candidate file.

                                                                                                                                                                                                                2. Click the Add Candidates to Requisition icon.

                                                                                                                                                                                                                3. In the Quick Filters pane, select the option Matching Requisitions and click the Modify Matching Criteria icon.

                                                                                                                                                                                                                4. In the Matching Criteria window, modify criteria available in the tabs.

                                                                                                                                                                                                                5. Click Done.

                                                                                                                                                                                                                Criteria to find requisitions are modified to find a better fit for a candidate. The list of requisitions is modified according to the criteria selected.

                                                                                                                                                                                                                  Emailing Candidates Matched to a Requisition

                                                                                                                                                                                                                  A user type permission grants users access to this feature.

                                                                                                                                                                                                                  1. In the requisition file, select the Posting and Sourcing tab.

                                                                                                                                                                                                                  2. In the Careers Section, select Preview Matching Candidate.

                                                                                                                                                                                                                  3. In the Postings Requisitions- Filter Matching candidates window, select candidates to email to.

                                                                                                                                                                                                                  4. Click Done.

                                                                                                                                                                                                                  An email is sent to selected candidates to invite them to apply on a job.

                                                                                                                                                                                                                    Confirmed Candidate Accounts

                                                                                                                                                                                                                    Recruiters can know which candidates have viewed and confirmed their profile. This feature ensures that candidates had an opportunity to verify their profile content when their profile was sourced through recruiters, referrals, third party applications, or agencies.

                                                                                                                                                                                                                    When candidates get to the career section Thank You page, the system automatically marks their profile as being confirmed by the candidate. Recruiters are then able to know which candidates have confirmed their profile by viewing the Candidate Confirmed Account icon next to the candidate name.

                                                                                                                                                                                                                      Candidate Original Submission Medium and Latest Submission Medium

                                                                                                                                                                                                                      Recruiting Center users can see which medium was used to submit information about a candidate initially and which medium was used most recently.

                                                                                                                                                                                                                      Submissions for a job can be entered into the system in a number of ways: candidates can apply through a standard or mobile career section; candidate submissions can also be submitted by way of an agency, a referral, or a match performed in the Recruiting Center. The candidates are later invited to visit the career section to complete the application workflow.

                                                                                                                                                                                                                      The Recruiting Center displays in the Profile section of the candidate file, two fields for medium:
                                                                                                                                                                                                                      • The Original Submission Medium field indicates the medium used when the candidate submission was submitted the first time. The Original Submission Medium is read-only.

                                                                                                                                                                                                                      • The Latest Submission Medium field indicates the medium used for the most recent submission. The Latest Submission Medium field is updated automatically when a submission is updated using a medium that is different from the one last used.

                                                                                                                                                                                                                      Recruiting Center users can manually indicate the most recent medium used by making a selection from the corresponding list. The list contains the following choices:
                                                                                                                                                                                                                      • Agency

                                                                                                                                                                                                                      • Email

                                                                                                                                                                                                                      • External Import: A value created to support future functionality for creating submissions from candidate information imported from external systems.

                                                                                                                                                                                                                      • Fax

                                                                                                                                                                                                                      • Import

                                                                                                                                                                                                                      • Internet Mining

                                                                                                                                                                                                                      • Matched to Job

                                                                                                                                                                                                                      • Online

                                                                                                                                                                                                                      • Online Mobile: A value associated with candidates who use a mobile career section.

                                                                                                                                                                                                                      • Phone

                                                                                                                                                                                                                      • Referral: A value associated with candidates created through an employee referral.

                                                                                                                                                                                                                      • Resume

                                                                                                                                                                                                                      • Staffing Station: Though unavailable for selection in the Create Candidate process because the Staffing Station is no longer offered, "Staffing Station" is still available for selection in the candidate file in edit mode. If the submission medium of a candidate was "Staffing Station" before migration, this value is retained for that candidate.

                                                                                                                                                                                                                      • Talent Exchange: Though unavailable for selection in the Create Candidate process because the Talent Exchange no longer exists, "Talent Exchange" is still available for selection in the candidate file in edit mode. If the submission medium of a candidate was "Talent Exchange" before migration, this value is retained for that candidate.

                                                                                                                                                                                                                      Recruiting Center users can configure list formats to include the Original Submission Medium and Latest Submission Medium in candidate lists.

                                                                                                                                                                                                                        Candidate Interview

                                                                                                                                                                                                                          Candidate Interview

                                                                                                                                                                                                                          A candidate interview is a formal meeting to evaluate the qualifications and work experience of a candidate.

                                                                                                                                                                                                                          Recruiting Center users can schedule, update and cancel interviews directly in the Recruiting Center. Attendees invited to a meeting receive an interview notification by email and they add the meeting to their calendars. Each time an interview is scheduled, updated or cancelled in the Recruiting Center, an email message is sent to selected attendees.

                                                                                                                                                                                                                          Here is how the candidate interview scheduling feature basically works.

                                                                                                                                                                                                                          A recruiter wants to interview a candidate for a job. For that, the candidate must be at the right interview step/status. From the Candidates list or the requisition-specific candidate list, the recruiter selects the candidate file and chooses the Schedule an Interview action in the More Actions list. The recruiter invites the candidate and can also invite other attendees to the interview meeting. The hiring manager of the requisition is invited by default. However, if the meeting organizer is the hiring manager, the recruiter is invited instead. Non-Recruiting Center users can also be invited to the meeting via their email address.

                                                                                                                                                                                                                          A default interview invitation message is proposed by the system. The most appropriate message template is pre-selected based on the requisition's Organization-Location-Job Field structure and the application language. However, it is possible to select another message.

                                                                                                                                                                                                                          If the recruiter has the appropriate permission, he/she can attach the candidate file and requisition file to the interview being scheduled and the message being sent.

                                                                                                                                                                                                                          When all the interview details are entered, the recruiter sends the interview meeting invitation.

                                                                                                                                                                                                                          The candidate, the meeting organizer and the attendees receive the interview meeting invitation by email and they can add the invitation directly into their calendars. If the candidate has no email address, the interview organizer can print the invitation and send it to the candidate by fax or regular mail.

                                                                                                                                                                                                                          After the interview meeting has been scheduled, the recruiter can view interview scheduling information in the candidate list Interview column and in the candidate file History tab. The Interview column must have been activated and added to the candidate list by the system administrator.

                                                                                                                                                                                                                          The recruiter also has the ability to update the interview meeting by changing the attendees, the schedule or other information, and also cancel the interview.

                                                                                                                                                                                                                          The candidate interview feature generates iCalendar entities that can then be integrated with any mail system that supports this specification, including Microsoft Outlook. Events occurring in MS Outlook calendar or any iCalendar system are not managed by Recruiting. For example, if an interview meeting is modified in Outlook, the new information will not appear in Recruiting.

                                                                                                                                                                                                                          MS Outlook 2000 and higher are supported. Other calendar products may be functional but are not officially supported.

                                                                                                                                                                                                                          When the candidate file and requisition file (or other candidate attachments) are included in the interview meeting invitation, these do not follow in the Calendar meeting.

                                                                                                                                                                                                                          A candidate can only have one interview scheduled per application at a time. If a candidate has no email address, users can still schedule an interview; they simply need to print the interview invitation and send it to the candidate by fax or regular mail.

                                                                                                                                                                                                                          Note: When scheduling or updating a 1st interview, the meeting organizer will not be able to add the appointment to his Outlook calendar using the ics link contained in the interview meeting invitation he will receive. This is a Microsoft Office issue that occurs with Outlook 2007 and Outlook 2010 (version 14). This issue is happening to meeting organizers only.

                                                                                                                                                                                                                            Files Attached to an Interview Invitation

                                                                                                                                                                                                                            Users can attach the candidate file and requisition file to the interview being scheduled and the message being sent.

                                                                                                                                                                                                                            The candidate file attached to the interview meeting never contains the Regulations block and Screening Services results. Blocks available in the candidate file do not display confidential information. Files attached to the candidate file (for example, a resume) are not included in the interview invitation.

                                                                                                                                                                                                                            The requisition file attached to the interview meeting never contains the Compensation block. Blocks available in the requisition file do not display confidential information.

                                                                                                                                                                                                                            User type permissions grant users access to the content of the candidate and requisition files. Depending on the user type permissions granted to the user scheduling the interview, some attendees may not have access to information they normally would have. The candidate will not receive the candidate file nor requisition file.

                                                                                                                                                                                                                            When the candidate file and requisition file (or other candidate attachments) are included in the interview meeting invitation, these do not follow in the Calendar meeting.

                                                                                                                                                                                                                              Scheduling an Interview

                                                                                                                                                                                                                              The candidate must be at an interview step.

                                                                                                                                                                                                                              The candidate can only have one interview scheduled per requisition at a time.

                                                                                                                                                                                                                              The language icon in the Schedule an Interview page indicates the language in which the candidate submission was submitted; ensure that the interview information is in the candidate's language.

                                                                                                                                                                                                                              Validate email addresses of internal attendees before sending the interview request.

                                                                                                                                                                                                                              A user type permission grants users access to this feature.

                                                                                                                                                                                                                              1. In the candidate file, select Schedule an Interview... in the More Actions list.

                                                                                                                                                                                                                              2. Follow the on-screen instructions.

                                                                                                                                                                                                                              3. Click Done.

                                                                                                                                                                                                                              4. Change the status of the candidate to Scheduled.

                                                                                                                                                                                                                              5. Enter comments.

                                                                                                                                                                                                                              6. Click Done.

                                                                                                                                                                                                                              A formal meeting is organized with a candidate to obtain more information regarding his/her qualifications and work experience. An e-mail message containing the interview details is sent to all attendees. Attendees can add the interview meeting in their calendar. Scheduling information is available in the candidate list Interview column as well as in the candidate file History tab.

                                                                                                                                                                                                                                Changing Interview Attendees

                                                                                                                                                                                                                                Only one user at a time can modify interview information.

                                                                                                                                                                                                                                An interview must have been scheduled.

                                                                                                                                                                                                                                The candidate must have the scheduled status.

                                                                                                                                                                                                                                A user type permission grants users access to this feature.

                                                                                                                                                                                                                                1. In the candidate file, select Update the Interview... in the More Actions list.

                                                                                                                                                                                                                                2. Add or remove attendees.

                                                                                                                                                                                                                                3. Click Done.

                                                                                                                                                                                                                                An e-mail message containing the interview details is sent to existing and new attendees. The e-mail message is identical to the original message except that (Updated) appears in the subject of the e-mail. Attendees that have been removed receive a cancellation message. The ics file attachment is now named "Update my calendar.ics". In the candidate file, the Tracking tab indicates that the interview has been updated.

                                                                                                                                                                                                                                  Changing Interview Information

                                                                                                                                                                                                                                  Only one user at a time can modify interview information.

                                                                                                                                                                                                                                  An interview must have been scheduled.

                                                                                                                                                                                                                                  The candidate must have the scheduled status.

                                                                                                                                                                                                                                  A user type permission grants users access to this feature.

                                                                                                                                                                                                                                  1. In the candidate file, select Update the Interview... in the More Actions list.

                                                                                                                                                                                                                                  2. Follow on-screen instructions.

                                                                                                                                                                                                                                  3. Click Done.

                                                                                                                                                                                                                                  An e-mail message containing the interview details is sent to the attendees. The e-mail message is identical to the original message except that (Updated) appears in the subject of the e-mail. The ics file attachment is now named "Update my calendar.ics". In the candidate file, the Tracking tab indicates that the interview has been updated.

                                                                                                                                                                                                                                    Adding an Interview to MS Outlook

                                                                                                                                                                                                                                    For MS Outlook 2000 and higher.

                                                                                                                                                                                                                                    The iCalendar plug-in has been tested with Lotus Notes version 5.5 and higher.

                                                                                                                                                                                                                                    Other calendar products may be functional but are not officially supported.

                                                                                                                                                                                                                                    1. In MS Outlook, open the e-mail containing the interview message.

                                                                                                                                                                                                                                    2. Double-click the Add to my calendar.ics attachment.

                                                                                                                                                                                                                                    3. Click Accept.

                                                                                                                                                                                                                                    4. You can send a response to the meeting organizer.

                                                                                                                                                                                                                                    The candidate interview invitation is added to the MS Outlook calendar. The subject, location, date and time of the meeting are recorded.

                                                                                                                                                                                                                                      Cancelling an Interview

                                                                                                                                                                                                                                      An interview must have been scheduled.

                                                                                                                                                                                                                                      A user cannot cancel an interview that is being updated by another user.

                                                                                                                                                                                                                                      A user type permission grants users access to this feature.

                                                                                                                                                                                                                                      1. In the candidate file, select Cancel the Interview... in the More Actions list.

                                                                                                                                                                                                                                      2. Select to send or not a cancellation message to the candidate.

                                                                                                                                                                                                                                      3. Select a new status for the candidate.

                                                                                                                                                                                                                                      4. Enter comments.

                                                                                                                                                                                                                                      5. Click Done.

                                                                                                                                                                                                                                      An e-mail message is sent to the attendees. The e-mail message is identical to the original message except that (Canceled) appears in the subject of the e-mail. The ics file attachment is now named "Remove from my calendar.ics". In the candidate file, the Tracking tab indicates that the interview has been canceled.

                                                                                                                                                                                                                                        Candidate Autopooling

                                                                                                                                                                                                                                          Automatic Candidate Pooling

                                                                                                                                                                                                                                          The Automatic Candidate Pooling feature allows customers to add autopooling criteria to a requisition or requisition template to find candidates in the database who are available and qualified for a job. Managers can then access the autopool results with a single click.

                                                                                                                                                                                                                                          The Automatic Candidate Pooling feature is typically used in decentralized hiring environments, for example in high volume retail and hourly hiring where managers may have to quickly identify candidates on their own without the assistance of recruiters.

                                                                                                                                                                                                                                          For the Automatic Candidate Pooling feature to be available, the feature must be enabled by the system administrator. Users creating or defining autopooling criteria must be granted the required user type permissions, but no permission is required to access the autopool results.

                                                                                                                                                                                                                                          Autopooling criteria can be added to a requisition via the Autopooling Criteria tab (if autopooling criteria were added to a requisition template, they will be inherited by the requisition). This is like a saved search that managers can use to find candidates who are both available and qualified. The following autopooling criteria may include any criteria from the Advanced Search, plus an additional set of basic criteria. For example:

                                                                                                                                                                                                                                          • Exclude candidates in selection process

                                                                                                                                                                                                                                          • Candidate's general profile language must match the requisition language

                                                                                                                                                                                                                                          • Exclude expired job submissions (selected by default)

                                                                                                                                                                                                                                          • Exclude rejected candidates - Within the last x days

                                                                                                                                                                                                                                          • Exclude hired candidates - Within the last x days (selected by default)

                                                                                                                                                                                                                                          • Candidate's place of residence - Within a radius of x kilometers/miles from the primary location of the job opening

                                                                                                                                                                                                                                          • Submissions must match the following organization-location-job field structure

                                                                                                                                                                                                                                          As a best practice, when defining autopooling criteria:

                                                                                                                                                                                                                                          • Define autopooling criteria in requisition templates so criteria are inherited as requisitions are created.

                                                                                                                                                                                                                                          • Define the widest possible set of candidates from the database that would be both qualified and available. This way, no time is wasted on unqualified or unavailable candidates. For example:

                                                                                                                                                                                                                                            • Set Organizations, Locations and Job Fields to only include candidates from other jobs with overlapping skills and/or who applied to nearby locations. Filter by Organization and Location if appropriate (specific country, specific division, etc.).

                                                                                                                                                                                                                                            • Exclude candidates being considered in another requisition, who were recently hired, whose submissions have expired.

                                                                                                                                                                                                                                            • Use the parameter to limit results to candidates who live within X kilometers/miles of the primary location of the requisition.

                                                                                                                                                                                                                                          Once autopooling criteria have been defined and enabled, the system will automatically generate a list of candidates matching the criteria anytime on demand. Only candidates who have applied on another requisition will be considered. This list of candidates is accessible in the requisition-specific candidate list or in the requisition file via the Autopooling icon. A maximum of 300 candidates can be displayed. The user then has the ability to:

                                                                                                                                                                                                                                          • View candidate files.

                                                                                                                                                                                                                                          • Match candidates to the current job opening (candidates are moved from the autopool results list to the requisition-specific candidate list, and they can then be moved along the workflow like any other candidate).

                                                                                                                                                                                                                                          • Match candidates to the current job opening and reject them in a single action (which will remove undesired candidates from continuing to appear in the candidate pool for this requisition; by default this option is disabled).

                                                                                                                                                                                                                                          • Filter the list of candidates using quick filters defined by the system administrator.

                                                                                                                                                                                                                                          • Sort the list of candidates by clicking a column heading.

                                                                                                                                                                                                                                          When viewing a candidate file, the user may be able to view the other job applications that the candidate has submitted, depending on the permissions he/she was granted.

                                                                                                                                                                                                                                          The user is able to match a candidate to the requisition via the autopooling feature even if he/she was not granted the permission to match candidates to a requisition in general.

                                                                                                                                                                                                                                          The user may also be able to match and reject candidates in one action if he/she was granted the proper permission. When rejecting a candidate, the manager must specify the qualifiers (motives) and provide comments as required by the workflow.

                                                                                                                                                                                                                                          If configured by the system administrator, the Automatic Candidate Pooling feature may also provide the ability to create optional repooling rules which automatically set a candidate's submission to an Inactive status after X days of inactivity. If the autopooling criteria for other jobs include the criteria to exclude candidates who are in a selection process, candidates who are automatically set to an inactive status will no longer be excluded and thus will be included in pool results.

                                                                                                                                                                                                                                            Defining Autopooling Criteria

                                                                                                                                                                                                                                            The automatic candidate pooling feature must be activated.

                                                                                                                                                                                                                                            A user type permission grants users access to this feature.

                                                                                                                                                                                                                                            1. Click on a requisition or requisition template.

                                                                                                                                                                                                                                            2. Click the Autopooling Criteria tab.

                                                                                                                                                                                                                                            3. Click Edit.

                                                                                                                                                                                                                                            4. Select autopooling criteria.

                                                                                                                                                                                                                                            5. Yo can select advanced search criteria by clicking the Customize... button.

                                                                                                                                                                                                                                            6. Click Save.

                                                                                                                                                                                                                                              Activating Autopooling Criteria

                                                                                                                                                                                                                                              The automatic candidate pooling feature must be activated.

                                                                                                                                                                                                                                              A user type permission grants users access to this feature.

                                                                                                                                                                                                                                              1. Click on a requisition or requisition template.

                                                                                                                                                                                                                                              2. Click the Autopooling Criteria tab.

                                                                                                                                                                                                                                              3. Click Edit.

                                                                                                                                                                                                                                              4. Select the Enabled status.

                                                                                                                                                                                                                                              5. Click Save.

                                                                                                                                                                                                                                                Viewing Autopooling Criteria

                                                                                                                                                                                                                                                The automatic candidate pooling feature must be activated.

                                                                                                                                                                                                                                                A user type permission grants users access to this feature.

                                                                                                                                                                                                                                                1. Click on a requisition or requisition template.

                                                                                                                                                                                                                                                2. Click the Autopooling Criteria tab.

                                                                                                                                                                                                                                                  Viewing the List of Automatically Pooled Candidates

                                                                                                                                                                                                                                                  The automatic candidate pooling feature must be activated.

                                                                                                                                                                                                                                                  Autopooling criteria must have been defined.

                                                                                                                                                                                                                                                  1. Open a requisition file or access a requisition-specific candidate list.

                                                                                                                                                                                                                                                  2. Click the Autopooling icon.

                                                                                                                                                                                                                                                    Matching a Candidate to a Requisition via Autopooling

                                                                                                                                                                                                                                                    The automatic candidate pooling feature must be activated.

                                                                                                                                                                                                                                                    A user type permission grants users access to this feature.

                                                                                                                                                                                                                                                    1. Click on a requisition file or a requisition-specific candidate list.

                                                                                                                                                                                                                                                    2. Click the Autopooling icon.

                                                                                                                                                                                                                                                    3. Select a candidate file.

                                                                                                                                                                                                                                                    4. Click the Add Candidates to Requisition icon.

                                                                                                                                                                                                                                                    5. Specify if you wish to send an e-mail to the candidate to request more information.

                                                                                                                                                                                                                                                    The candidate is matched to the current job opening. The candidate is moved from the autopool results list to the requisition-specific candidate list, and he/she can then be moved along the workflow like any other candidate.

                                                                                                                                                                                                                                                      Rejecting a Candidate Selected via Autopooling

                                                                                                                                                                                                                                                      The automatic candidate pooling feature must be activated.

                                                                                                                                                                                                                                                      A user type permission grants users access to this feature.

                                                                                                                                                                                                                                                      1. Click on a requisition file or a requisition-specific candidate list.

                                                                                                                                                                                                                                                      2. Click the Autopooling icon.

                                                                                                                                                                                                                                                      3. Select a candidate file.

                                                                                                                                                                                                                                                      4. Click the Reject Candidate icon.

                                                                                                                                                                                                                                                      5. Specify the reason why the candidate was rejected.

                                                                                                                                                                                                                                                      6. Enter comments.

                                                                                                                                                                                                                                                      7. Click Done.

                                                                                                                                                                                                                                                      The candidate will no longer in the candidate pool for this requisition.

                                                                                                                                                                                                                                                        Candidate Referral

                                                                                                                                                                                                                                                          Referring Candidates

                                                                                                                                                                                                                                                          A candidate can be referred by several referrers (agents and/or employees) and referral ownership can be set at the candidate profile level, the job submission level, or at both levels.

                                                                                                                                                                                                                                                          In previous releases, candidates could be referred on multiple jobs by a single referrer only. The referral ownership was kept at the candidate profile level, encompassing all job submissions done through all means by all actors. Now, a candidate can have multiple referrers (agents and employees) and candidate information is shared between multiple referrers.

                                                                                                                                                                                                                                                          How it Works for Agents How it Works for Referrers (Usually Employees) How it Works for Referred Candidates How it works for Recruiters

                                                                                                                                                                                                                                                          Agents can:

                                                                                                                                                                                                                                                          • Refer candidates who already exist in the database.

                                                                                                                                                                                                                                                          • Refer an already referred candidate at the job submission level.

                                                                                                                                                                                                                                                          • See candidate information entered by other referrers.

                                                                                                                                                                                                                                                          • Have a maximum number of job submissions referred per requisition.

                                                                                                                                                                                                                                                          Referrers can:

                                                                                                                                                                                                                                                          • Refer previously referred candidates.

                                                                                                                                                                                                                                                          • Refer an already referred candidate at the job submission level.

                                                                                                                                                                                                                                                          • See candidate information entered by other referrers.

                                                                                                                                                                                                                                                          Candidates can:
                                                                                                                                                                                                                                                          • Receive emails from multiple referrers.

                                                                                                                                                                                                                                                          Recruiters can:
                                                                                                                                                                                                                                                          • See various referrers for the same candidate.

                                                                                                                                                                                                                                                          • Might not always know there are referrers associated to a candidate. The fact that no agent is displayed in the candidate profile Referral tab does not mean that no agent referred the candidate. The referral might exist at the job submission level.

                                                                                                                                                                                                                                                          • See only the candidate profile referrer in search list and folder list.

                                                                                                                                                                                                                                                          To allow agents and employees to refer candidates or candidate submissions that already exist in the database, settings must be configured by your system administrator.

                                                                                                                                                                                                                                                          A referrer can be the owner of a candidate job submission and also the owner of the candidate general profile. To support this candidate ownership mode, a setting must be configured by your system administrator. Three modes of ownership are available:

                                                                                                                                                                                                                                                          • Candidate Ownership: The referrer is the owner of the candidate. Regardless of where the referral occurs (general profile or job submission), there is only one owner.

                                                                                                                                                                                                                                                          • Submission Ownership: The referrer is the owner of the candidate job submission. The referral ownership is limited to where the job submission occurs. If the referral is done at the job submission level, only the referrer will have ownership of this job-specific submission. Referring a candidate general profile is possible but not recommended.

                                                                                                                                                                                                                                                          • Submission and Candidate Ownership: The referrer is the owner of the candidate job submission and the candidate general profile. The referral ownership is set on the job-specific submission but also on the candidate if the candidate is not already owned by a referrer.

                                                                                                                                                                                                                                                          In the Recruiting Center, when the Candidate Ownership mode is enabled, the candidate submission referrer is displayed in the candidate submission Referral tab. If there is no submission referrer, the candidate referrer is displayed.A submission-specific referrer can only exist if the ownership mode was changed to the Submission and Candidate Ownership mode or the Submission Ownership mode and was reverted to the Candidate Ownership mode.

                                                                                                                                                                                                                                                          In the Recruiting Center, when the Submission Ownership mode or the Submission and Candidate Ownership mode is enabled, only the local referrer is displayed in the candidate submission. If a candidate submission has no referrer, the candidate submission Referral tab is empty even if the candidate was referred at the profile level.

                                                                                                                                                                                                                                                          In the Career Section, under the Referrals tab, the display rules are always the same, regardless of the ownership mode selected.

                                                                                                                                                                                                                                                          In the Career Section, a referred candidate submission with an active link is always displayed, regardless of the setting enabled or the ownership mode selected. A non-referred candidate submission is only displayed if the candidate was referred.Candidate referrals are created for all referrals when the Candidate Ownership mode or the Candidate and Submission Ownership mode is enabled (they are not created when the Submission Ownership mode is enabled).

                                                                                                                                                                                                                                                          Customers can limit the number of candidate submissions a single agent can submit for a specific requisition. To support such a limit, a setting must be configured by your system administrator. When an agent reaches the limit set by the setting, this message is displayed to the agent: "You cannot refer this candidate because you have reached your maximum number of referrals for this requisition."

                                                                                                                                                                                                                                                          Important Information

                                                                                                                                                                                                                                                          If the Candidate Ownership mode is enabled and a candidate is matched to a requisition, no job-specific ownership is created. If the Submission Ownership mode or the Candidate and Submission Ownership mode is enabled, the current ownership is carried over.

                                                                                                                                                                                                                                                          When the Submission Ownership mode or the Submission and Candidate Ownership mode is enabled, there are job-specific submissions with various referrers or no referrer. As such, the referrer ownership is only visible in the context where it applies and might not be visible in another context, like a non-referred job submission or a non-referred profile.

                                                                                                                                                                                                                                                            LinkedIn

                                                                                                                                                                                                                                                              LinkedIn Profile Preview

                                                                                                                                                                                                                                                              This feature links LinkedIn and Oracle Talent Acquisition Cloud (OTAC) together using the LinkedIn Profile Preview feature in the Recruiting Center and LinkedIn. It allows recruiters to view a candidate's LinkedIn profile with a single click through the candidate file and candidate submission.

                                                                                                                                                                                                                                                              LinkedIn in Candidate File and Candidates List

                                                                                                                                                                                                                                                              Once the feature is activated, system administrators can define where the LinkedIn Profile Preview is available to Recruiting Center users.

                                                                                                                                                                                                                                                              A block called LinkedIn can be added to any candidate files, that is candidate submission and general profile. The LinkedIn block contains a View link. When the LinkedIn block is added to the candidate file, the LinkedIn View option becomes available in the Candidate Compare feature as well. Access is controlled via field contextualization, security level, and file setup.

                                                                                                                                                                                                                                                              A column called LinkedIn can be added to any candidates lists (including Quick Search Results list) by system administrators. When this column is added, a View link is also available.

                                                                                                                                                                                                                                                              LinkedIn View Link

                                                                                                                                                                                                                                                              When clicking the View link in the candidate file or candidates list:

                                                                                                                                                                                                                                                              • The candidate's LinkedIn Profile is displayed if the candidate's LinkedIn ID is present.

                                                                                                                                                                                                                                                              • The candidate's LinkedIn Profile is displayed if an exact match to the candidate's e-mail is present in a LinkedIn Profile.

                                                                                                                                                                                                                                                              • The LinkedIn Search feature is displayed if the candidate does not have a LinkedIn ID and an exact match to the candidate's e-mail cannot be found. From there, users can view and then select the correct candidate's profile to view.

                                                                                                                                                                                                                                                              When clicking the View link, the system sends the following data to LinkedIn in order to display the candidate's LinkedIn Profile:

                                                                                                                                                                                                                                                              • LinkedIn Unique ID that is stored in the candidate file (if available).

                                                                                                                                                                                                                                                              • E-mail address of the candidate.

                                                                                                                                                                                                                                                              • First name and last name of the candidate.

                                                                                                                                                                                                                                                              • Current employer name of the candidate.

                                                                                                                                                                                                                                                              • Current job title of the candidate.

                                                                                                                                                                                                                                                              • Country and zip/postal code of the candidate.

                                                                                                                                                                                                                                                              When clicking the View link and the LinkedIn Search feature is displayed:

                                                                                                                                                                                                                                                              • Search results are based on searching the LinkedIn database based on the candidate's first name, last name, current job title, and current employer's name.

                                                                                                                                                                                                                                                              • The way the LinkedIn Search works is that only candidates that meet all the requirements are displayed. As a result, users can remove or change the job title and employer to expand or change search results.

                                                                                                                                                                                                                                                              • Once the right candidate's profile is found, users can select to view the profile. This will then store the candidate's LinkedIn ID in the candidate file for future preview. If the customer has a LinkedIn corporate account, this action will also send to LinkedIn the Taleo Candidate ID to allow deep linking back to this record from within LinkedIn (provided the user has access to the Recruiting Center).

                                                                                                                                                                                                                                                              • Recruiters can choose to unlink the LinkedIn ID if it is the wrong candidate's LinkedIn Profile. This action will remove the LinkedIn ID from the candidate file. If the customer has a LinkedIn corporate account, the action of unlinking will also remove the Candidate ID from the LinkedIn record.

                                                                                                                                                                                                                                                              • The information displayed in the LinkedIn Preview window is entirely owned and defined by LinkedIn. The content presented will vary depending on the user's account level with LinkedIn. No corporate license is required for the LinkedIn Preview window to work, but users must be logged into LinkedIn as a user for content to display.

                                                                                                                                                                                                                                                              • If the customer has a LinkedIn Corporate Account or a user has a specific Recruiter user account, more information may display in the LinkedIn Preview window.

                                                                                                                                                                                                                                                              The actual LinkedIn ID will not be displayed to users. If users can see the field in Recruiting, they will only ever see the View link according to any other field contextualization and security behavior.

                                                                                                                                                                                                                                                              LinkedIn is responsible for the following:

                                                                                                                                                                                                                                                              • The LinkedIn Preview window content.

                                                                                                                                                                                                                                                              • The LinkedIn Search window, results and content.

                                                                                                                                                                                                                                                              • The storing of the Taleo Candidate ID in LinkedIn.

                                                                                                                                                                                                                                                              • The display to see if the candidate is already in Taleo from LinkedIn.

                                                                                                                                                                                                                                                              Best Practices

                                                                                                                                                                                                                                                              Only activate this feature if there are no concerns regarding the transmission of candidate personal data to LinkedIn. Clients will need to acknowledge this during the activation of the feature.

                                                                                                                                                                                                                                                              Important Information

                                                                                                                                                                                                                                                              The language in which the LinkedIn Preview window is displayed is determined by the display language selected in the user's LinkedIn account. It is not based on the language in which the user logged into Oracle Talent Acquisition Cloud (OTAC). Example: A recruiter set the display language in his/her LinkedIn Profile to French. If the recruiter logs into OTAC in English, the LinkedIn Preview window is displayed in French.

                                                                                                                                                                                                                                                              The language of the candidate's profile content in the LinkedIn Preview window is determined by the base language selected in the candidate's LinkedIn Profile. Example: A candidate set the base language in his/her LinkedIn profile to French. If the recruiter logs into OTAC in English and views the LinkedIn Profile in the LinkedIn Preview window, the content is displayed in French.

                                                                                                                                                                                                                                                              This feature is not supported in the Remote Manager Experience.

                                                                                                                                                                                                                                                              The LinkedIn field is not displayed in the print, share, correspondence, forms, ACE alerts, or PDF forms generated for approvals or interview requests.

                                                                                                                                                                                                                                                              The LinkedIn ID field is not available for use in Integration or Reporting.

                                                                                                                                                                                                                                                              Clients may want to purchase a LinkedIn Corporate Account and/or LinkedIn Recruiter license for more advanced functionalities to appear in the LinkedIn Profile window.

                                                                                                                                                                                                                                                                Displaying a Candidate LinkedIn Profile

                                                                                                                                                                                                                                                                For the LinkedIn Preview feature to work, the Internet Explorer option called Enable Protected Mode (requires restarting Internet Explorer) must be enabled (Internet Explorer > Internet Options > Security Tab > Trusted Site). Once enabled, Trusted Sites - Protected Mode: On will be displayed at the bottom of your screen.

                                                                                                                                                                                                                                                                The LinkedIn block must have been added in candidate files by your system administrator.

                                                                                                                                                                                                                                                                A candidate LinkedIn Profile can also be accessed via the Candidates list if the LinkedIn column was enabled by your system administrator.

                                                                                                                                                                                                                                                                1. Open a candidate file.

                                                                                                                                                                                                                                                                2. Click the View link located in the LinkedIn block.

                                                                                                                                                                                                                                                                The candidate's LinkedIn Profile is displayed if the candidate's LinkedIn ID is present and if an exact match to the candidate's e-mail is present in a LinkedIn Profile. If the candidate does not have a LinkedIn ID and an exact match to the candidate's e-mail cannot be found, the LinkedIn Search feature is displayed. From there, you can view and then select the correct candidate's profile to view.

                                                                                                                                                                                                                                                                  Merge Form/Fill Out Form

                                                                                                                                                                                                                                                                    Merge Form

                                                                                                                                                                                                                                                                    A merge form is a PDF document that can be tied to candidate selection workflows, steps, and statuses and that can be generated/filled out at any point on demand by a user.

                                                                                                                                                                                                                                                                    Merge forms are used during the hiring process. For example, during interviews with candidates, a recruiter may use a PDF form as a template to complete a candidate's "Do not disclose" information. PDF forms are most typically used for various new hire paperwork or to print a candidate submission in a particular, customized format.

                                                                                                                                                                                                                                                                    Merge forms are first built in Adobe Acrobat. System administrators then add them in the Recruiting Administration. If desired, they can also tie them to candidate selection workflows, steps, and statuses to make them available to users. Merge forms can be printed by a user, then further completed if needed and signed by the candidate. (None of this is tracked in the system).

                                                                                                                                                                                                                                                                    If a field in the form is confidential to the user, a warning message is displayed and that field is left blank.

                                                                                                                                                                                                                                                                    Merge forms can be pre-populated with variables retained in the system within the Message Template feature. These variables can be added using the Adobe Acrobat Professional Forms feature. For example, you could take a merge form (such as the I-9 form) and insert variables that will automatically pull information from the candidate file. Instead of typing the name of a candidate, the name would automatically appear in the form.

                                                                                                                                                                                                                                                                    By default, the maximum file size of a merge form is 2 MB.

                                                                                                                                                                                                                                                                    Merge forms may be available in any language. Merged data is available in English only. Most Asian languages are not supported, based on PDF conversion issues with tokens. The merged data will pull what is in the candidates file, so it may not be in English.

                                                                                                                                                                                                                                                                      Using the Fill Out Form

                                                                                                                                                                                                                                                                      The Fill Out Form action is available in a candidate list, a job-specific candidate list, a candidate file submission and a candidate general profile.

                                                                                                                                                                                                                                                                      1. Click on a candidate.

                                                                                                                                                                                                                                                                      2. In the More Actions list, select Fill Out Form.

                                                                                                                                                                                                                                                                      3. In the Fill Out Form list, click on a form. Acrobat® Reader opens, displaying the form. The form is filled automatically using the corresponding fields of the candidate file or requisition.

                                                                                                                                                                                                                                                                      4. Validate the information.

                                                                                                                                                                                                                                                                      5. Click Print.

                                                                                                                                                                                                                                                                      A PDF form containing information automatically generated by the system is created.

                                                                                                                                                                                                                                                                        Talent Pools

                                                                                                                                                                                                                                                                          Talent Pool

                                                                                                                                                                                                                                                                          Talent pools created in Taleo Performance are available in the Recruiting Center.

                                                                                                                                                                                                                                                                          A talent pool is a list of people nominated by pool collaborators. In Taleo Performance, talent pools can be created at anytime for any purpose, providing the flexibility to track unlimited groups of employees, such as high-potential employees, future leaders, and successors.

                                                                                                                                                                                                                                                                          In the Recruiting Center, authorized users are able to see talent pools and match employees and candidates to their requisitions, file them into folders for additional pooling functionalities, or contact them directly.

                                                                                                                                                                                                                                                                          The Talent Pool tab is available in the left panel of the Candidates list.


                                                                                                                                                                                                                                                                          Image showing the Talent Pools folder.

                                                                                                                                                                                                                                                                          From the Talent Pool tab, users can select a talent pool to display the candidates and employees included in the pool. Users can also use quick filters (Internal, Referred, In selection process, Employer, Program) and advanced filters to filter the list down to relevant information. An advanced filter of interest is the Employee Potential which allows users to display candidates or employees with a low, medium, or high potential.

                                                                                                                                                                                                                                                                          As with any other lists, actions can be performed on employees and candidates included in the talent pool using actions in the menu bar, in the More Actions list, and in the contextual action menu. Users can also select another list format or create a personalized list format.

                                                                                                                                                                                                                                                                            Employee Metrics

                                                                                                                                                                                                                                                                              Employee Metrics

                                                                                                                                                                                                                                                                              Recruiting Center users are able to see employee metrics directly in the Candidates list and candidate file, to use employee metrics fields as advanced filters, and to search employee metrics.

                                                                                                                                                                                                                                                                              The following key employee metrics are available in the Candidates list and candidate file. For these fields to be available, they must be configured and added in the candidate file user-defined form and in the candidates list format. If included, they are available to anyone based on field level confidentiality definition. If the Show Advanced Filters option is selected for the list format context, employee metrics become available as advanced filters in the Recruiting Center.

                                                                                                                                                                                                                                                                              Employee metrics in the Candidates list and candidate file are:

                                                                                                                                                                                                                                                                              • Competency Rating

                                                                                                                                                                                                                                                                              • Employee Potential

                                                                                                                                                                                                                                                                              • Employee Risk of Loss

                                                                                                                                                                                                                                                                              • Goal Rating

                                                                                                                                                                                                                                                                              • Last Review Rating

                                                                                                                                                                                                                                                                              • Promotability Readiness

                                                                                                                                                                                                                                                                              • Reassignment Candidate

                                                                                                                                                                                                                                                                              The following key employee metrics are available in the Advanced Candidate Search page. For these fields to be available in the Advanced Candidate Search page, they must have been configured and added by the system administrator. Once added, they are available to anyone authorized to search internal candidates.

                                                                                                                                                                                                                                                                              Employee Metrics in the Advanced Candidate Search Available Values
                                                                                                                                                                                                                                                                              Last Review Rating Greater than or equal to a % between 0 and 100.
                                                                                                                                                                                                                                                                              Potential Low, Medium, High, Not Specified, Does Not Matter.
                                                                                                                                                                                                                                                                              Reassignment Candidate Yes, No, Not Specified, Does Not Matter.
                                                                                                                                                                                                                                                                              Readiness for Promotion Ready Now, Ready in 6 months, Ready in 1-2-3-4-5 years, Not Specified, Does Not Matter.
                                                                                                                                                                                                                                                                              Risk of Loss Low, Medium, High, Not Specified, Does Not Matter.
                                                                                                                                                                                                                                                                              Note: The Last Review Rating is expressed as a % in the Recruiting Center; in Taleo Performance, it is expressed differently and it is a customizable scale.