2Getting Started

Getting Started

    Login

      Login Procedure

      When users open the Oracle Talent Acquisition Cloud (OTAC) solution, the User Sign In page is typically displayed.

      On the Sign In page, users can select the language in which they want to use the application. If users change the default language on the Sign In page, the page is displayed in the new language and subsequent OTAC product pages are presented in that language. After selecting a language, users can also instruct the system to "remember" their selection so that the next time they sign in, the User Sign In page will be presented in the language they selected.

      If single sign-on (SSO) is not enabled within an organization, users must enter a user name and password on the user Sign In page. The user name and password are provided by system administrators. Users can modify their password. If SSO was configured through a consulting engagement (which requires a statement of work (SOW)), the Sign In page is not displayed and the default language that was configured is used.

      Once a user's credentials are accepted, the Welcome Center or table of contents page is displayed. The OTAC products available for use are dependent on which products were purchased by the organization and on the user's user type and permissions. If a user has permission to see only one OTAC product and the Display Welcome Center setting is set to "Yes", the product is displayed directly.

        Accessing an Oracle Talent Acquisition Cloud Application

        You must have received a user name and password from your system administrator.

        1. Select the language in which you want to use the application.

        2. Enter your user name and password.

        3. Click Sign In.

          Welcome Center

          The Welcome Center is a home page that is displayed to users immediately after they log in. It provides a "one-click" access to Oracle Talent Acquisition Cloud (OTAC) products.

          The Welcome Center contains an auxiliary navigation bar, a core navigation bar, a Quick Access panel, and a central panel.

          • The auxiliary navigation bar contains links to additional resources such as the online help, setup, and the Sign Out link.

          • The core navigation bar is a set of tabs that provide direct links to OTAC products. A user might have a tab for any or all of the following products: Performance, Recruiting, Compensation, Oracle Business Intelligence, Learn, and Configuration.

          • The Quick Access panel provides an alternative "one-click" access to the same products available in the core navigation bar. It also provides access to modules within products for example, Onboarding (Transitions), Scheduling Center, and to specific content such as a requisitions and candidate files.

          • In the central panel, customers can put information of interest to all product users. Alternatively, they can create distinct sets of information and associate an information set with a configuration profile.

          If the Welcome Center is enabled, it replaces the table of contents page.

            Recruiting Center Home Page

            The Recruiting Center home page is the page that users see when they click the Recruiting tab.

            The home page provides key information and links to underlying functionalities. The home page can be customized by system administrators to meet specific needs. Depending on the user logging into Recruiting, the information displayed in the home page varies.

            There are three default home pages:

            • Recruiter

            • Hiring Manager

            • Hourly Manager

            System administrators can modify these default home pages. They can also create brand new home pages or duplicate existing ones.

            The home page can contain channels, links and lists.

            Channels display status-oriented data about a user's activities. When clicking the links on the channels, users can access information on requisitions, candidates, or job offers. The following channels can be displayed:

            • Candidates

            • Offers

            • Legacy Onboarding

            • Requisitions

            • Tasks

            • New Hire

            • Pre-Hire


            Image showing the Candidates channel.

            A channel always includes a list of elements as well as the number of items associated to each element. The elements on the list are clickable and bring users to a more detailed area of the application, for example the candidate list, requisition list, etc. The elements on the list are also dependent on the value selected in the "Show information for requisitions" filter.

            The number in the following two columns work as follows:

            • The number in the Items Requiring Attention column (flag) is specific to you (not to your user groups). It represents the number of items that are new or have been updated by another user since you last viewed them. For example, if you approve your own requisition, a "new" task is added to your Ready for sourcing tasks, and the number in this column for Ready for sourcing element increases by one.

            • The number in the Total column represents the total number of items including new, previously viewed, and updated. For example, if you choose your user name in the Show list and Ready for sourcing appears in the Tasks channel, the number in the Total column represents the total number of your requisitions that are ready for sourcing.

            Channels are updated immediately after login, or when selecting the "Show information for requisitions" filter, or anytime a user returns to the home page, or when clicking the Refresh button.

            Links redirect users to another part of the application. The following links are available:

            • Create a Requisition

            • Legacy Onboarding Process

            • Search for candidates

            • View Candidates

            • View Requisitions

            • Onboarding (Transitions)


            Image showing the Create a Requisition link.

            A mini requisition list can be available in the home page. This mini requisition list allows users to access a candidate list directly from the home page without having to go through the standard requisition list page. This mini requisition list can contain up to four columns of summary information about each requisition, including the number of candidates. It can also display up to 30 requisitions (the ones with the most recent submission activity). This mini requisition list is used by default with the Hourly Manager home page.

            The home page displays a Refresh button to allow users to update all the channels with the latest numbers. The Refresh button is only present when there is a channel that needs to be refreshed with dynamic content. For example, if only links are present on the home page, the Refresh button will not be present.

            Information in the home page may be displayed as follows:

            • Single column: Channels, links, and lists are displayed in one single column.

            • Two columns: Channels, links, and lists are displayed in two columns. System administrators can choose which column and the order in which each widget will appear in that column.

            • Two columns with header: Channels, links, and lists are displayed in either the header or one of the two columns, as specified by system administrators when placing the widgets.

              Getting Help

                Online Help

                The Recruiting Center offers comprehensive help about concepts or tasks to perform.

                The online help is available in the Help tab located in the supporting tools panel in the right-hand side of all pages. When clicking the Help tab, a table of contents of available help topics is displayed. It is also possible to search the help database to locate specific subjects.

                  Online Clips

                  The Recruiting Center offers short clips describing essential user interface elements.

                  These online clips present basic information about the design, navigation, and certain features of the application. Each clip is no more than one minute in length to give users a quick way to get up to speed with how to use the product.

                  When online clips are enabled, they are available in the Clips tab located in the supporting tools panel in the right-hand side of all pages.

                  Default online clips come with the product. Oracle reserves the right to add new online clips, modify existing clips, or delete clips at any time without notice to customers. The tab where these online clips are available is configurable. Organizations may choose to disable the tab or replace the content with their own content linking to alternative learning materials for their end users.

                    Communications Tool

                    The Communications tool allows the display of useful information to Recruiting Center users.

                    The Communications tool is available in the supporting tools panel in the right-hand side of the home page. The Communications tool provided by default contains three sections, each being expandable and collapsible.
                    • Documentation Center: Contains a link to the latest What’s New which provides information on new features. A link to Customer Connect is also available.

                    • Resource Center: Contains a link giving access to information about the hiring cycle, articles, research content, and more.

                    • Support: Contains information to contact Oracle Support.

                      Tooltip

                      A tooltip is a short, explanatory text which appears when "hovering" a mouse over a button, a link, a table cell heading or icon without clicking it.

                      Tooltips are available throughout the system and they give additional information about an action before performing it. Tooltips are provided for buttons, links, icons, and table header cells. These tooltips are not configurable. However, for screening services, the system administrator can create tooltips for some types of user-defined fields.

                        Release Notes Message

                        A pop-up message containing new release information, system improvements, important messages and other information can be displayed when users log into the product.

                        The same release notes message is displayed to users regardless of the product.

                        Once users are logged in, they can turn off the Release Notes message by selecting the Don't display this message again option. The message will then reappear only when new release information or other important information is available or if the users clear their browser cookies.

                          Navigation Tools and Page Layout

                            Auxiliary Navigation Bar

                            The auxiliary navigation bar is the bar located at the top right of pages. If enabled, the auxiliary navigation bar is available at all times for users to see and access.

                            The content of the auxiliary navigation bar varies depending on the features enabled and permissions granted to users to access those features.

                            Element Description
                            Home
                            • If you have access to multiple Oracle Talent Acquisition Cloud (OTAC) products and you click Home, the Welcome Center is displayed.

                            • If you have access to Recruiting only and you click Home, the Recruiting Center front page is displayed.

                            Resources May include:
                            • My Setup: Access to personal preferences.

                            • Training: Access to online training materials.

                            • e-Learning: Access to eLearning materials.

                            • Support: Access to Oracle Support.

                            • Help: Access to online help.

                            • About: Information about the product such as the version number and the build number that you need to provide to Oracle Support when you need to contact them.

                            Talent Grid Provides access to Solution Exchange and Knowledge Exchange.
                            Sign Out Terminates the session and you are automatically signed out of all products.

                              Core Navigation Bar

                              The core navigation bar provides access to specific recruiting features. It is located just above the central panel. If enabled, the core navigation bar is available at all times for users to see and access.

                              The table presents elements that may be available in the core navigation bar (if they were enabled and users were granted access to them):

                              Element Description
                              Home If your organization has multiple Oracle Talent Acquisition Cloud (OTAC) products, clicking the Home icon displays the Welcome Center. If your organization has no other OTAC products apart from Recruiting, clicking the Home icon displays the Recruiting Center. The arrow provides direct links to products as well as to specific modules within the products.
                              Recruiting Access to the Recruiting Center main page.
                              Tasks Access to the Tasks list.
                              Requisitions Access to the Requisitions list.
                              Candidates Access to the Candidates list.
                              Offers Access to the Offers list.
                              Reports Access to reports previously generated and reports that can be generated.
                              Libraries Access to requisition templates, questions, disqualification questions, competencies, evaluation categories, evaluation questions, evaluation skills, evaluation questionnaires.

                                Recruiting Center Icons

                                The table presents icons available in the Recruiting Center.

                                Icon Description
                                Previous page icon Displays the previous page.
                                Previous 10 pages icon Goes to the previous 10 pages.
                                Next page icon Displays the next page.
                                Next 10 pages icon Goes to the next 10 pages.
                                Item requiring attention icon Draws a user's attention to items that he/she owns and that require viewing.
                                New or modified item icon Indicates a new or modified item.
                                Disqualification question icon Indicates that the Disqualification Questions functionality is enabled.
                                ACE candidate icon ACE Candidate icon. Identifies top candidates, those who meet all required criteria.
                                Most advanced progression status of a candidate on other requisitions icon Indicates the most advanced progression status of a candidate on other requisitions across all positions where the candidate is being considered.
                                Candidate in selection process icon Indicates that a candidate is in at least one selection process.
                                Attachment icon Indicates that a file was attached.
                                Internal candidate icon Indicates that the candidate is internal, that he/she already works for your organization.
                                Referred candidate icon Indicates that the candidate was referred by a colleague.
                                Candidate is new in the selection process icon Indicates that the candidate is new in the selection process.
                                Candidates who applied on requisition icon Indicates the number of candidates who applied on a requisition.
                                Registered person icon Indicates a registered person file. The Registered Person icon is also known as the Ghost icon. A registered person is created in the following circumstances:
                                • A candidate creates a user name and password on a career section and signs out immediately. This candidate would show as Identification Missing.

                                • A candidate creates a user name and password on a career section and provides some personal information via My Account Options instead of providing the information via an application flow.

                                • An unknown candidate makes a referral.

                                • A referred candidate has not completed the action of applying for the job referred to.

                                • A user with an SSO ID accesses an SSO internal career section but does not have a candidate account.

                                • When using the career section preview functionality, if the SSL security setting is enabled, the user will be automatically signed in on the career section. If the user does not have a candidate profile, the system will create one.

                                To remove the Registered Person icon:
                                • Have the candidate complete the general profile application flow from a career section. Or,

                                • Have the candidate complete a job-specific application flow from a career section. Or,

                                • Capture the candidate in the Recruiting Center.

                                Job posting notification icon Indicates the number of candidates who received a job posting notification.
                                Item requiring immediate attention icon Indicates that a requisition requires the recruiter/hiring manager's immediate attention.
                                Prevent posting requisition icon Prevents users from posting a requisition.
                                Daily recruiting report icon Indicates that the daily recruiting report function has been activated for that requisition.
                                List format configuration icon List format configuration.
                                Online help icon Online help.
                                Clips icon Clips
                                Comment icon Indicates a comment.
                                Print icon Print function.
                                Filter icon Filtering section.
                                Folder icon Folder management section.
                                Talent pool icon Talent pool section.
                                Calendar icon Calendar.
                                Comments icon Add comments.
                                file in folder icon File in a folder.
                                Find similar candidates icon Find similar candidates.
                                Match candidates icon Match candidates.
                                Merge candidate files icon Merge candidate files.
                                Share information icon Share information about a candidate.
                                Candidate referred by agent icon Candidate referred by an agent.
                                Diagnostic tool icon Diagnostic tool for requisitions.
                                Duplicate requisition icon Duplicate a requisition.
                                Save requisition as template icon Save requisition as a template.
                                Search query icon Create a search query based on a requisition.
                                Delete requisition icon Delete a requisition.
                                Change status icon Changes the candidate's status to the next appropriate status.
                                Rejected candidate icon Changes the candidate's status to Rejected.
                                Under consideration icon Changes the candidate's status to Under consideration.
                                New status icon Candidate progression status - New
                                Reviewed status icon Candidate progression status - Reviewed
                                First Interview status Candidate progression status - First Interview
                                Second Interview status Candidate progression status - Second Interview
                                Third Interview status Candidate progression status - Third Interview
                                Testing status Candidate progression status - Testing
                                Offer status Candidate progression status - Offer
                                Hired status Candidate progression status - Hired
                                Pipeline status Candidate progression status - Pipeline
                                Contact status Candidate progression status - Contact

                                  My Setup and Personal Preferences

                                    Personal Preferences

                                    Recruiting Center users can set certain elements of the application according to their personal preferences.

                                    Users can set personal preferences such as personal information, contact information (address, email), password, person to whom tasks can be delegated, frequent collaborators, frequent approvers, display preferences. Users can also override options that were previously configured by the system administrator to fit their personal preferences.

                                    Personal preferences are set in My Setup, which is available under the Resources link in the auxiliary navigation bar. For a list of options that can be modified, see Personal Preferences Options.

                                      Personal Preferences Options

                                      The table presents options and preferences that can be modified in the My Setup page.

                                      Element Description
                                      General
                                      Personal Information
                                      • Prefix
                                      • First Name

                                      • Middle Name

                                      • Last Name

                                      • Suffix

                                      • Employee ID

                                      • Title

                                      • Department Name

                                      Contact
                                      • E-mail address

                                      • Fax Number

                                      • Work Phone Number

                                      • Cellular Phone Number

                                      • Pager Number

                                      • Home Phone Number

                                      Address
                                      • Address

                                      • State/Province

                                      • Zip/Postal Code

                                      • Country

                                      Account
                                      • User Name

                                      • Password

                                      • Task Delegation

                                      Preferences
                                      General
                                      • Enable eShare Email for Response Center Access

                                      • Distance Unit

                                      • Correspondence Language

                                      • Content Language

                                      • Time Zone
                                      • Workflow Event Notification

                                      • Fax Notification

                                      • Default Theme
                                      • Default Text Size

                                      • Selected Item Color
                                      • Accessibility Features

                                      Search
                                      • Last Update

                                      • Place of Residence

                                      Candidates
                                      • Identifier Content

                                      • Sorting Key

                                      • Display candidates on first CSW step

                                      • Candidate List Content

                                      • Tab displayed when accessing a candidate file in navigation

                                      • Tab displayed when accessing a candidate file from a list

                                      Requisitions
                                      • Default Hiring Manager

                                      • Default Recruiter

                                      • Requisition File Automatic Filling

                                      • Preferred Non-Electronic Media

                                      • Display Question Details in Libraries

                                      Frequent Collaborators
                                      Frequent Collaborators
                                      • Individuals who are frequently requested to act as collaborators.

                                      Frequent Approvers
                                      Frequent Approvers
                                      • Individuals who are frequently requested to approve requisitions and offers.

                                        Color Theme

                                        The theme is the color used for the core navigation bar in Oracle Talent Acquisition Cloud (OTAC) products.

                                        The table presents the available color themes.

                                        Taleo Image showing the Taleo green color.
                                        Aqua Image showing the Aqua color.
                                        Sand Image showing the sand color.
                                        Ice Image showing the ice light gray color.
                                        Silver Image showing the silver dark grey color.
                                        Skyros Image showing the Skyros blue color.

                                        The Skyros theme is available for Oracle Talent Acquisition Cloud (OTAC) products. The Skyros theme is the default theme for new customers. The Skyros theme provides a blue header. Because of the blue header, organization logos that have a white background are not recommended for use with this theme.

                                        A default theme is selected by system administrators. However, Recruiting Center users can modify the default theme in their user preferences (Resources > My Setup > Preferences tab).

                                          Selected Item Color

                                          Color displayed when selecting elements in the user interface.

                                          The following colors are available:

                                          • Green

                                          • Soft blue (default)

                                          • Yellow

                                          • Blue (inverted)

                                          • Dark (inverted)

                                          The Dark (inverted) color is a high contrast color scheme for visually impaired users.

                                          A default color is selected by system administrators. However, Recruiting Center users can modify the default color in their user preferences (My Setup > Preferences tab).

                                            Screen Resolution

                                            The recommended screen resolution for the page layout is 1024 x 768.

                                            To hide or show the right or left pane, users simply have to click the Hide/Show Supporting Tools icon available in the corresponding pane.

                                              Languages

                                                Understanding Languages

                                                Oracle Talent Acquisition Cloud (OTAC) products are available in different optional languages.

                                                Not all languages are available for all OTAC products. Languages must be activated by the system administrator before they can be used in an application.

                                                There are several concepts around languages:

                                                The application language is the language used for a product. This is the language selected by the user when signing in the OTAC suite. The language selected defines the language of every UI labels and elements of the product.

                                                The content language is the language of a specific entity. The content language is selected when creating an entity. For example, it is possible to create a requisition in French even when using the Recruiting Center in English. The content language of a user is set in the user's account by the system administrator. However, a user can change this default content language under My Setup > Preferences > Content Language. The preferred content language is used by the system as the default content language which is the same across all OTAC products. If a product does not support the same set of content languages, it will have its own preference configuration.

                                                The correspondence language is the language used for email messages. The correspondence language of a user is set in the user's account by the system administrator. However, a user can change this default correspondence language under My Setup > Preferences > Correspondence Language.

                                                In Oracle Talent Acquisition Cloud (OTAC) products, the languages in which an element (for example, a requisition) is available are indicated in the Activated Languages field. When creating or editing an element, the user can choose a base language as well as languages in which the element will be available. The base language of an element is the item's reference language, usually used as a reference for other languages or fallback display in list mode. The user's preferred content language is used as the default base language when the user creates an element. The base language of an element can be changed at any time by the user. A language must be activated before it can be designated as a base language.

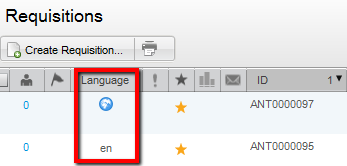
                                                When an element is available in one language, the name of the language is displayed in the list; for example "en". When only one language is used within a company, there is no special indicator. When an element is available in several languages, the Earth icon is displayed. Hovering the mouse over the icon displays the languages in which the element is available.


                                                Image showing the language in which an element is available.

                                                  Setting My Preferred Content Language

                                                  A setting allows the activation of this feature.

                                                  A user type permission grants users access to this feature.

                                                  1. In the auxiliary navigation bar, click Resources, then My Setup.

                                                  2. In the Preferences tab, click Edit.

                                                  3. Select the desired language in the Content Language drop-down list.

                                                  4. Click Save.

                                                  When creating a requisition or candidate file, the file will be created in the selected preferred language.

                                                    Setting My Preferred Correspondence Language

                                                    A setting allows the activation of this feature.

                                                    A user type permission grants users access to this feature.

                                                    1. In the auxiliary navigation bar, click Resources, then My Setup.

                                                    2. In the Preferences tab, click Edit.

                                                    3. Select the desired language in the Correspondence Language drop-down list.

                                                    4. Click Save.

                                                    When creating a message, the message will be created in the selected correspondence language.

                                                      Selecting the Base Language

                                                      Language must be active.

                                                      If only one language is activated, the base language option is not displayed.

                                                      1. Edit an element.

                                                      2. In the Activated Languages drop-down list, select Configure.

                                                      3. Select the Base option for the desired language.

                                                      4. If necessary, select Active in the Status drop-down list.

                                                      5. Click Save.

                                                      The word Base appears next to the language in the Activated Languages drop-down list.

                                                        Activating Languages for an Element

                                                        1. Edit an element.

                                                        2. In the Activated Languages drop-down list, select Configure.

                                                        3. Select one or several language.

                                                        4. For each language, select Active in the Status drop-down list.

                                                        5. Click Save.

                                                        Activated languages will be displayed in the Activated Languages drop-down list.

                                                          Deactivating a Language

                                                          The element must be in Edit mode and the language must not be the base language.

                                                          1. Open an element.

                                                          2. Select Configure next to the Language drop-down list.

                                                          3. For each language, select Not Used in the Status drop-down list.

                                                            If the language to deactivate is the Base language, you will need to select another active language as the base language.

                                                          4. Click Save.

                                                          Selected languages no longer appear in the Language drop-down list of the element.

                                                            Supported Languages

                                                            The languages supported for Oracle Talent Acquisition Cloud products as well as specific features are listed below. For details regarding language availability for Oracle Learn Cloud and Oracle Taleo Business Edition, see the documentation for those products.

                                                            • Scheduling Center: All listed languages are supported except Portuguese (Portugal).

                                                            • Assessment: All listed languages are supported except Indonesian (Bahasa).

                                                            • OBIEE: All listed languages are supported except Indonesian (Bahasa), Lithuanian, Malaysian (Malay), Serbian, Slovenian.

                                                            Language Locale Recruiting and Onboarding Performance Mobile Sourcing Resume Parsing
                                                            Bulgarian bg Available Available
                                                            Chinese (China) zh_CN Available Available Available Available
                                                            Chinese (Taiwan) zh_TW Available Available Available Available
                                                            Croatian hr Available Available
                                                            Czech cs Available Available Available
                                                            Danish da Available Available
                                                            Dutch nl Available Available Available Available Only Personal Details extraction, not full resume
                                                            English en Available Available Available Available Full resume extraction available
                                                            English (U.K.) en_GB Available Available Available Available Full resume extraction available
                                                            Finnish fi Available Available Available
                                                            French (Canada) fr Available Available Available Full resume extraction available
                                                            French (France) fr_FR Available Available Available Available Full resume extraction available
                                                            German de Available Available Available Available Full resume extraction available
                                                            Greek el Available Available
                                                            Hungarian hu Available Available Available
                                                            Italian it Available Available Available Available Only Personal Details extraction, not full resume
                                                            Indonesian (Bahasa)* in Available Available Available
                                                            Japanese ja Available Available Available Available
                                                            Korean ko Available Available Available Available
                                                            Lithuanian* lt Available Available
                                                            Malaysian (Malay)* ms Available Available
                                                            Norwegian no Available Available Available
                                                            Polish pl Available Available Available Available
                                                            Portuguese (Brazil) pt_BR Available Available Available Available Only Personal Details extraction, not full resume
                                                            Portuguese (Portugal)* pt Available Available Available
                                                            Romanian ro Available Available Available
                                                            Russian ru Available Available Available Available
                                                            Serbian* sr (sh) Available Available
                                                            Slovak sk Available Available Available
                                                            Slovenian* sl Available Available
                                                            Spanish (Worldwide) es Available Available Available Available Only Personal Details extraction, not full resume
                                                            Swedish sv Available Available Available Available
                                                            Thai th Available Available Available
                                                            Turkish tr Available Available Available

                                                              Lists and Filters

                                                                List Usage

                                                                Several tools are available to manage requisition and candidate lists.

                                                                List Filtering: Several filters are available to filter information in a list:
                                                                • quick filters: filter a list according to selected criteria.

                                                                • advanced filters: filter a list using an expansive set of filtering criteria.

                                                                • show filters: filter a list using ownership, collaboration or status criteria.

                                                                Actions Directly in the List: Several actions can be performed directly in a list. A contextual action menu is available in the Requisitions list, Requisition Templates list, and Candidates list. To display the list of actions, users simply have to click the Access Contextual Actions icon next to the file title. See Actions Available Directly in a List.

                                                                Column Sorting: Columns in a list are sortable by clicking on the column header. Columns made of a user-defined field are also sortable. An up or down arrow is displayed in the column header to indicate a descending or ascending sorting order.

                                                                Column Drag and Drop: Columns in a list can be moved on the page using a drag and drop action. Changes in columns are kept during the user's session.

                                                                Column Width: It is possible to enlarge or reduce the width of columns in lists. Changes in columns are kept during the user's session.

                                                                Wrapped Text: Text is wrapped in every column, except for the Candidate Record Identifier column.

                                                                Column Header and Row Colors: When a cursor passes over a column header or column row, the element is highlighted in light blue. When clicking on a column header to sort elements or when selecting one or several rows, the elements are highlighted with a dark color.

                                                                Candidate Count Column: The Candidate Count column indicating the number of candidates who applied on a requisition is available on the left of the list to make it easier and faster for users to get to the list of candidates.

                                                                Callouts: A callout is a small window or bubble containing information on an element. To see information contained in a callout, users must place their mouse over the element. See Callout.

                                                                Candidate Bulk Actions: The following actions can be performed for 1000 candidate files at a time:

                                                                • All candidate selection workflow actions such as move, change step and status, add comments, enter grade, revert, bypass, reject candidate, candidate has declined, hire, etc.).

                                                                • All queue and route actions.

                                                                • Delete and undelete.

                                                                • Start and/or cancel Legacy Onboarding processes.

                                                                • Start and/or cancel Onboarding (Transitions) processes such as New Hire or Pre-Hire processes.

                                                                • Share.

                                                                • Match.

                                                                The share and match bulk actions are delayed scheduled actions if the following requirements are met:

                                                                • For the Share action if (number of candidates) * (number of recipients) >= 10.

                                                                • For the Match action if (number of candidates) * (number of requisitions) >= 10.

                                                                When the action is delayed, a new task is scheduled for immediate execution. The execution of the action depends on the scheduler's load. As a general rule, the action is executed a few minutes after the task is created.

                                                                The processing of actions by the system is done in groups of 20 and is committed within that group of 20.

                                                                For example, if a recruiter wants to hire 21candidates on a requisition and the requisition only has 20 positions available, the system will hire the first 20 candidates and commit the data. Once candidate 21 is processed, the system will fail and will display a message to the recruiter indicating that he/she cannot hire the last candidate because there is no longer any positions available. If the recruiter needs to undo the first 20 hired transactions, he/she will have to do it manually.

                                                                The Send Correspondence is limited to 150 candidates at a time. For the Print action, a maximum of 50 candidate files and 15 requisition files can be printed at a time.

                                                                Maximum Number of Rows Displayed in a List: To maintain good performance, a limit has been set to display results in a list.

                                                                Maximum number of rows returned Results displayed if the maximum number of rows returned is exceeded Results are sorted if not all rows can be displayed Scrollbar available
                                                                Requisitions List 1000 Yes (but, no indication that the results exceeded the limit) Yes. A system sort is applied using the last modification date. The user can then perform a sort on the 1000 requisitions. Yes
                                                                Candidates List 1000 No (but a message indicates to filter the list) No Yes
                                                                Job-Specific Candidate List 1000 No (but a message indicates to filter the list) The user can perform a sort. Yes
                                                                Automatic Candidate Pooling List 300 Yes (but, no indication that the results exceeded the limit) No Yes
                                                                Advanced Search Results List 300 Yes (but, no indication that the results exceeded the limit) No Yes
                                                                Offers List 1000 No (but a message indicates to filter the list) No Yes
                                                                Selectors (such as Organizations, Locations, Job Fields, Employers, Institutions, etc.) 1000 Yes (but, no indication that the results exceeded the limit) Alphabetical sort Yes

                                                                  Actions Available Directly in a List

                                                                  Recruiting Center users can take actions on files directly from a list without having to open the file first.

                                                                  These actions are available using the Access Contextual Actions icon next to the file title.
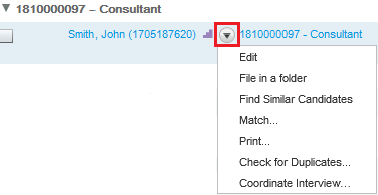

                                                                  Image showing the actions available for a requisition when clicking the Access Contextual Actions icon.

                                                                  Actions available for the candidate files, requisition files and requisition templates are listed in the table.

                                                                  Actions for Candidate File Actions for Requisition File Actions for Requisition Template
                                                                  Edit Add Comments Edit
                                                                  File in a folder Allow Posting Create Requisition...
                                                                  Find similar candidates Amend Approval Path Duplicate this template
                                                                  Match... Cancel Requisition Print...
                                                                  Print... Create Requisition...
                                                                  Decide on Approval
                                                                  Delete
                                                                  Duplicate this requisition
                                                                  Edit
                                                                  Fill
                                                                  Posting and Sourcing...
                                                                  Prevent Posting
                                                                  Print...
                                                                  Put on Hold
                                                                  Reactivate
                                                                  Reopen Requisition
                                                                  Request Approval
                                                                  Request Approval Path Amendment
                                                                  Request Contribution
                                                                  Request Sourcing Configuration
                                                                  Return my Contribution
                                                                  Save as Open
                                                                  Send an approval request reminder
                                                                  Terminate Approval Process

                                                                    Candidate Lists Exceeding 1000 Candidates

                                                                    In a job-specific candidate list, the list filtering capabilities can handle mass applicant volumes.

                                                                    When viewing candidates who applied on a requisition, if more than 1000 candidates match the filter(s) selected, Recruiting Center users are prompted to narrow down the list. Two solutions are available:

                                                                    • use quick filters to narrow down the list of candidates, or

                                                                    • choose the "View First 1000 Candidates" option.

                                                                    When selecting the "View First 1000 Candidates" option, the user is brought to the list of candidates and the first 1000 candidate files are displayed. Candidates will be presented initially in descending order, beginning with the candidate who most recently applied. Anytime a new quick filter criterion or list sort action is applied, the list will refresh considering the entire set of applicable candidates. In the case of list sorting, this means a different list of 1000 candidates may be returned. In the case of applying filters, this link may or may not appear again depending on whether the list is still greater than 1000 candidates. To view the entire list, use the Step/Status filters and disposition candidates out of the quick filter view being used. This way the entire list can be accessed and reviewed.

                                                                    When using the "View First 1000 Candidates" option, users should place candidates into a Step/Status other than New/New so that they can continue to access the first 1000 new files using this feature by reapplying the filter and continuing to successively go thought the list.

                                                                    If needing to reject more than 1000 candidates at one time, users should not put them all into the Rejected status and then try to perform this action because the list will not easily render. Instead, if sending manual reject correspondence, users should send them prior to putting candidates into the Rejected status.

                                                                    Note: Users cannot use advanced filters until there are at least some candidates displayed in the list. Therefore, advanced filters cannot be used to do the initial list filtering.

                                                                    Prerequisites to this feature are:

                                                                    • More than 1000 candidates have applied on a requisition.

                                                                    • Quick filters in use do not narrow the list below 1000 candidate files.

                                                                    This feature is only available for job-specific candidate lists. It does not apply to:

                                                                    • Search results: This view shows a maximum of 300 candidates.

                                                                    • Folders: When more than 1000 files exist, users need to use quick filters to narrow down the list.

                                                                    • Candidates List: When more than 1000 files exist, users are prompted to narrow down the list. Users can use quick filters, or they can view candidates that applied on specific requisitions (one requisition at a time), or they can use the advanced search or quick search if looking for a specific candidate.

                                                                      Candidate File Identifier

                                                                      The candidate file identifier is used to specify which candidate-specific information is presented in the Candidate column of candidates lists.

                                                                      The candidate file identifier can provide the following information in the form of text or icon:

                                                                      • Candidate name (first name, last name, middle initial)

                                                                      • Identification number

                                                                      • Ace Candidate icon

                                                                      • Internal Candidate icon

                                                                      • In Selection Process icon

                                                                      • Referred Candidate icon

                                                                      The Candidate column is always displayed in candidates lists. System administrators are responsible of defining which information will appear by default in this column. However, Recruiting Center users can modify the default set by their system administrator via their personal preferences available under My Setup.

                                                                        List Formats

                                                                        List formats allow the display of candidate and requisition information within columns.

                                                                        Default candidate and requisition list formats are provided with the application. However, system administrators can create new list formats to better suit their organization needs.

                                                                        List formats are available in the List Formats page. Recruiting Center users can select (among the list formats made available by their system administrator) the list format they wish to use to display candidate and requisition information . They can also create up to three list formats and select columns to display specific information (if permissions were granted). Columns available to choose from have been previously defined by system administrators.

                                                                          Creating a Personalized List Format

                                                                          A user type permission grants users access to this feature.

                                                                          1. In the Requisitions or Candidates list, click the List Format Configuration icon.

                                                                          2. Click the Edit icon next to Personal Format 1, 2 or 3.

                                                                          3. Provide a name for the list format.

                                                                          4. Select the check box next to the columns you want to activate.

                                                                          5. Specify how you want files to be sorted.

                                                                            1. To select one sort criterion, click in the Sort By column next to the desired column name.

                                                                            2. To select a second sort criterion, click in the Then By column next to the desired column name.

                                                                            3. To select a third sort criterion, click in the second Then By column next to the desired column name.

                                                                            4. To select ascending or descending sorting order, click the triangle icon repeatedly.

                                                                            5. To disable sorting for a specific column, click the triangle icon again. The triangle icon disappears.

                                                                            6. To modify the order of the columns selected, use the arrows.

                                                                          6. Click Save.

                                                                            Editing a Personalized List Format

                                                                            A user type permission grants users access to this feature.

                                                                            1. In the Requisitions or Candidates list, click the List Format Configuration icon.

                                                                            2. Select a personal format then click the Edit icon.

                                                                            3. Make necessary changes.

                                                                            4. Click Save.

                                                                              Deleting a Personalized List Format

                                                                              A user type permission grants users access to this feature.

                                                                              1. In the Requisitions or Candidates list, click the List Format Configuration icon.

                                                                              2. In the List Formats window, select a personal list format then click the Delete icon.

                                                                                Changing the Candidate List Sorting Key

                                                                                A setting allows the activation of this feature.

                                                                                A user type permission grants users access to this feature.

                                                                                1. Click My Setup located in the Resources drop-down list of the auxiliary navigation bar.

                                                                                2. Click the Preferences tab.

                                                                                3. Click Edit.

                                                                                4. Select the desired value in the Sorting Key drop-down list.

                                                                                5. Click Save.

                                                                                  Quick Filters

                                                                                  Quick filters help Recruiting Center users to quickly filter a list down to relevant information.

                                                                                  Quick filters are displayed on the left panel of a page and are available in the following lists:

                                                                                  • Tasks

                                                                                  • Requisitions

                                                                                  • Candidates

                                                                                  • Offers

                                                                                  • Requisition Templates

                                                                                  • Questions

                                                                                  • Interview Questions

                                                                                  • Disqualification Questions

                                                                                  • Competencies

                                                                                  • Evaluation Categories

                                                                                  • Evaluation Questions

                                                                                  • Evaluation Questionnaires

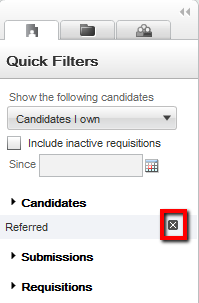
                                                                                  By default, quick filter categories are collapsed and only display selected filtering criteria. When a filter category is collapsed, you can remove a criterion by clicking the Remove icon to the selected criterion. When a filter category is expanded, you can remove a criterion by clearing the criterion.


                                                                                  Image showing the quick filters with the Remove icon to remove a criterion.

                                                                                  Image showing the quick filters with the checkbox to remove a criterion.

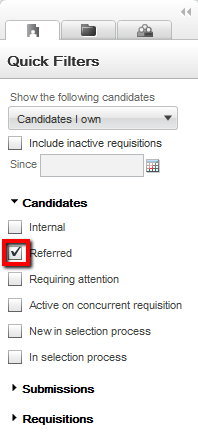
                                                                                  When no quick filter is selected, the list displays all available entries. As soon as one filter is selected, it is automatically applied to the list and the list refreshes according to the selection made. Users do not need to refresh the list. For example, in the Requisitions list, if the "Status - Open" quick filter is selected, only open requisitions are displayed in the list.

                                                                                  Several quick filters can be applied at a time. Some quick filters have a Refresh icon to refresh the related list. Also, when entering data in more than one field and clicking the Refresh icon or pressing the Enter key, the refresh action takes into account the data entered in all the fields.

                                                                                  Note: When applying Organization, Location or Job Field quick filters, select the desired value and then click into another field in the quick filter area to get the list to refresh with the criteria applied.

                                                                                    Quick Filters in the Requisitions Lists

                                                                                    Quick filters are available in requisitions lists and mini requisitions lists.

                                                                                    Quick filters in the requisitions list:

                                                                                    • Primary Location

                                                                                    • Organization

                                                                                    • Job Field

                                                                                    • Status

                                                                                    • Requisition Title

                                                                                    Note: The Status quick filter is considered a multi-select within the same field and acts as an OR filter. For example, when selecting the Draft and Open status filters, the user will see all requisitions that are either in Draft or Open status.
                                                                                    Quick filters in the mini requisitions list:
                                                                                    • Primary Location

                                                                                    • Organization

                                                                                    • Job Field

                                                                                      Quick Filters in the Candidates Lists

                                                                                      The table presents the quick filters available in different candidates lists.

                                                                                      Quick Filter All Candidates by Requisition All Candidates By Folder All Candidates By Offer Requisition Specific Candidate List Search Results - Quick or Advanced List of automatically pooled candidates
                                                                                      Candidates - Internal Yes Yes Yes Yes Yes Yes
                                                                                      Candidates - Referred Yes Yes Yes Yes Yes Yes
                                                                                      Candidates - Requiring Attention Yes Yes Yes Yes Yes
                                                                                      Candidates - In selection Process Yes Yes
                                                                                      Candidates - Active on Current Requisition Yes Yes
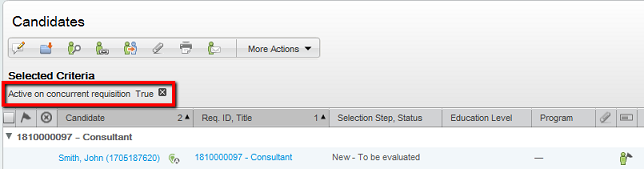
                                                                                      Candidates - Active on concurrent requisition Yes Yes Yes Yes
                                                                                      Candidates - Exclude disqualified Yes Yes
                                                                                      Candidates - New in selection process Yes Yes
                                                                                      Submissions - Submission completed Yes Yes
                                                                                      Submissions - Meet required criteria Yes Yes
                                                                                      Submissions - ACE Yes Yes
                                                                                      Submissions - Assets Met Yes Yes
                                                                                      Submissions - Results between % Yes Yes
                                                                                      Submissions -Creation Date Yes Yes
                                                                                      Submissions -Completion Date Yes Yes
                                                                                      Submissions - Last Activity Date Yes Yes Yes Yes
                                                                                      Submissions - Step Yes Yes
                                                                                      Submissions -Status Yes Yes
                                                                                      Submissions -Employer Yes Yes Yes Yes
                                                                                      Submissions -Program Yes Yes Yes Yes Yes
                                                                                      Submissions - Radius Yes
                                                                                      Requisitions - Status Yes
                                                                                      Requisitions - Organization Yes
                                                                                      Requisitions -Primary location Yes
                                                                                      Requisitions - Job Field Yes
                                                                                      Requisitions - Requisition ID Yes
                                                                                      Folder Name Yes
                                                                                      Offer Status Yes
                                                                                      Shift Yes Yes
                                                                                      Offer Dates: Creation, Start, Approval, Expiration & Acceptance Yes
                                                                                      Note: Candidates quick filters are considered a single select on different fields and the AND operator is used between filters. For example, when selecting the "Internal" and "Referred candidate" filters, the user will only see the candidates that are both Internal and Referred.
                                                                                      Note: The Candidates - Active on Current Requisition filter will display any candidates in an active step/status (excluding any that are in a rejection, decline, or in hire step/status). The Candidates - In selection Process filter will display any candidates in an active step/status (excluding any that are in a rejection, decline, or in a hire step/status) and not flagged as disqualified based on disqualification questions.

                                                                                        Quick Filters in the Offers List

                                                                                        Quick filters are available in the offers list.

                                                                                        Quick filters in the offers list:

                                                                                        • Status

                                                                                          • Accepted

                                                                                          • Approval in Progress

                                                                                          • Approval Rejected

                                                                                          • Approved

                                                                                          • Canceled

                                                                                          • Draft

                                                                                          • Extended

                                                                                          • Has Declined

                                                                                          • In Negotiation

                                                                                          • Offer to be made

                                                                                          • Refused

                                                                                          • Rejected

                                                                                          • Reneged

                                                                                          • Rescinded

                                                                                        • Creation Date

                                                                                        • Start Date

                                                                                        • Approval Date

                                                                                        • Expiration Date

                                                                                        • Acceptance Date

                                                                                        • Candidates

                                                                                          • Internal

                                                                                          • Referred

                                                                                          • Requiring attention

                                                                                          • Most advanced progression status

                                                                                          Quick Filters in the Tasks List

                                                                                          The table presents quick filters available in the Tasks list.

                                                                                          Quick Filter Description
                                                                                          Requiring attention Displays tasks that have the Item Requiring Attention icon. Self-assigned tasks are the only type of tasks that do not have an Item Requiring Attention icon because it is always the assignee who creates the task.
                                                                                          Hide completed tasks Removes tasks that have the Completed status.
                                                                                          Due date Displays tasks for which the due date matches the selected value (All, Next Week, Today, Overdue). When the option "Exclude task without due date" is selected, tasks without a due date will not appear in the list.
                                                                                          Task type Displays the type of task selected. If no task type is specified, all task types appear in the list.
                                                                                          Related to Candidate Displays tasks related to the selected candidate.
                                                                                          Related to Requisition Displays tasks related to the selected requisition.
                                                                                          Related to Assignee Displays tasks related to the selected user.

                                                                                          "Tasks assigned to me" filter

                                                                                          The "Tasks assigned to me" filter was created to eliminate the confusion of mixing tasks that users own with tasks that users might not own, but are for requisitions they own.

                                                                                          The "Tasks assigned to me" filter is available in the Tasks list and Tasks channel. In the Tasks list, the filter is available in the "Show tasks for requisitions:" drop-down menu. It is the default value when accessing the Tasks list. In the Tasks channel, the "Tasks assigned to me" link brings users to the Tasks list which displays tasks assigned to them.


                                                                                          Image showing the Tasks assigned to me filter in the Tasks list.

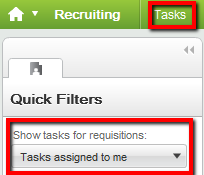
                                                                                          In the Tasks channel, when a task is clicked under Self-assigned Tasks, users are brought to the Tasks list. The "Tasks assigned to me" value in the Tasks list is selected by default no matter what the "Show the following information" filter on the home page is set to.


                                                                                          Image showing the Self-assigned Tasks in the Tasks channel.

                                                                                          In the Tasks channel, when a task is clicked under Requisitions, Candidates, Offers, etc., users are brought to the Tasks list and the value in the "Show tasks for requisitions:" filter is identical to the value selected in the "Show information for requisitions:" filter of the home page. Example: If "I own" is selected in the home page, then "I own" will be selected by default in the "Show tasks for requisitions:" filter of the Tasks list. If a group is selected in the "Show information for requisitions:" filter on the home page, then the same group will be selected in the Tasks list.

                                                                                          Note: The Default Value for the Show Information Filter setting that can be set in a configuration profile has no effect on the Tasks list view and the Tasks channel view.

                                                                                            Advanced Filters

                                                                                            Advanced filters help Recruiting Center users to filter lists using an expansive set of filtering criteria.

                                                                                            Both requisitions and candidates lists have an Advanced Filters button in the left panel, at the very bottom of the Quick Filters panel. Recruiting Center users can select several advanced filter criteria to filter a list. Once criteria are selected, the criteria are presented to the user across the top of the screen with a Remove icon next to the criteria. When clicking the Remove icon, the criteria is removed and the list is dynamically updated according to the updated criteria set. User-defined fields can also be available as filtering criteria.


                                                                                            Image showing an advanced filter selected for a candidate list.

                                                                                            Advanced filters are filtering on an already filtered list, that is whatever advanced filter criteria is selected, the list will be filtered based on what is already displayed in the list.

                                                                                            Example: A user filters a requisitions list using the "Pending", "Open" and "On Hold" status quick filters (he does not select the Draft status filter). The user then applies the advanced filter "Status Details/Draft". The list will display "No matches found". In this example, the system first displays all requisitions except Draft ones. Then, from the results displayed by the quick filters, the system finds those requisitions that are draft.

                                                                                            When using advanced filters for which words must be entered, users can enter partial words. For example, a user could filter a candidate list with candidates whose first name starts with "cath". The system would retrieve candidates whose first name is "cathy", "catherine" or "cathia".

                                                                                            Advanced Filter - Keyword

                                                                                            When using the Keyword advanced filter in a requisitions list, the system looks through this content of the requisition file:

                                                                                            • Requisition number

                                                                                            • Requisition title

                                                                                            • Requisition title by manager

                                                                                            • Requisition internal description

                                                                                            • Requisition external description

                                                                                            • Job board summary description

                                                                                            • Internal qualifications

                                                                                            • External qualifications

                                                                                            • Abstract

                                                                                            • Additional information

                                                                                            • Department

                                                                                            • Position

                                                                                            • Requisition/Job Information UDF

                                                                                            • Offer UDF

                                                                                            • Department UDF

                                                                                              Filtering Candidates Based on their Place of Residence

                                                                                              Recruiters can filter a list of candidates based on the distance between the candidate's place of residence and a central point, either a zip/postal code or a location.

                                                                                              The Place of Residence advanced filter is available for candidate lists and requisition-specific candidate lists.


                                                                                              Image showing the Place of Residence filter in the Advanced Filters list.

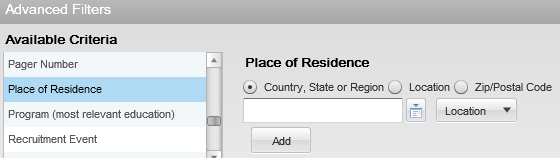
                                                                                              Only one place of residence filter can be used at a time. If you add a filter criterion while one was already selected, the new filter will replace the one previously selected. It is possible however to combine multiple place of residence filters when using an exact location. For example, you could select the filters United States > California and United States > Nevada.

                                                                                              When using radius filtering, the Miles or Kilometers distance unit is displayed according to the user's preferences (Path: Resources > My Setup > Preferences > Default Distance Unit).

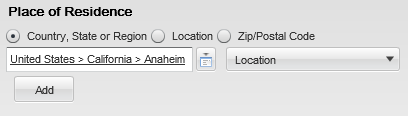
                                                                                              Place of Residence - Country, State or Region

                                                                                              When selecting the Country, State or Region option, the location selector displays reference locations.

                                                                                              When selecting a country and state region, the candidate list will be filtered to only show candidates whose place of residence is set to that specific country and state.


                                                                                              Image showing the Place of Residence filter. A country and state are selected.

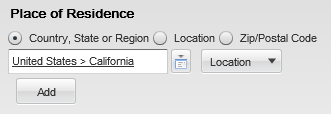
                                                                                              When selecting a region, the candidate list will be filtered to only show candidates whose place of residence is set to that specific region or within a specific distance of the selected region.


                                                                                              Image showing the Place of Residence filter. A country, state and region are selected. The Within 10 Miles of Location is selected.

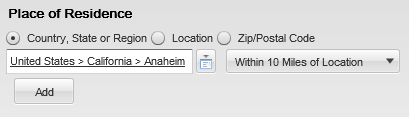
                                                                                              When selecting a region (with no radius), the candidate list will be filtered to show candidates whose place of residence is set to that precise location or to a location that is lower in the hierarchy of that location (lower level). For example, if the selected location is "United States > California", candidates whose place of residence is set to "United States > California > Anaheim" will also be displayed.


                                                                                              Image showing the Place of Residence filter. A country, state and region are selected.

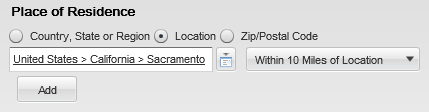
                                                                                              Place of Residence - Location

                                                                                              When selecting the Location option, the location selector displays customer's locations.

                                                                                              When selecting a location, the candidate list will be filtered to only show candidates whose place of residence is within a specific distance of the selected location.


                                                                                              Image showing the Place of Residence filter. A country, state and region are selected. The Within 10 Miles of Location is selected.

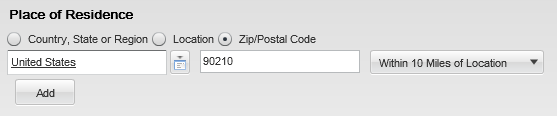
                                                                                              Place of Residence - Zip/Postal Code

                                                                                              The Zip/Postal Code option is used to specify a zip code or postal code as well as the country to which this code belongs to filter the candidate list to only show candidates whose place of residence is within a specific distance of the zip/postal code.

                                                                                              If an invalid zip/postal code is entered or if the system cannot perform a radius filtering for the selected country, an error message will be displayed inviting the user to select a different country or zip/postal code.


                                                                                              Image showing the Place of Residence filter. A country is selected. A zip code is selected.

                                                                                              Note: When a user enters a location and a radius, the location's geo-code (that is, the latitude and longitude) is calculated and the radial distance is used to find the geo-boundary. Once the geo-boundary is calculated, the filtering is done based on whether the candidate's place of residence is within this area, with the help of the geo-code of the candidate's place of residence. If a candidate's place of residence does not have a geo-code (the place of residence is set to a country or state), this candidate will not be displayed.

                                                                                                Show Filters

                                                                                                The Show information for filter allows Recruiting Center users to filter information displayed in a list using ownership, collaboration or status criteria.

                                                                                                The Show information for filter can appear in the home page, the Requisitions list, Candidates list, Tasks list, Offers list, etc.

                                                                                                The Show filter:

                                                                                                • Can be configured to be displayed everywhere except on the home page.

                                                                                                • Can be configured to be displayed everywhere including the home page.

                                                                                                • Can be hidden.

                                                                                                Values appearing in the Show filter depend on the permissions granted to the user and on the configuration of the application. Available values are the same for all three pages where the Show filter can appear. Possible values are:

                                                                                                • ... I own

                                                                                                • ... I collaborate on

                                                                                                • ... I own or collaborate on

                                                                                                • ... in my coverage area, I own or collaborate on

                                                                                                • All

                                                                                                For example:

                                                                                                • If a user's permissions does not allow the user to see requisitions he/she does not own, the user will only see the "I own" value.

                                                                                                • If a user's permissions allow the user to see requisitions he/she does not own BUT the collaborator feature is not available in the company, the user will not see the following values related to the collaborator feature: "I own or collaborate on", "I collaborate on" and "in my coverage area, I own or collaborate on".

                                                                                                • If a user's permissions allow the user to see requisitions he/she does not own AND the collaborator feature is available in the company, the user will see the following values related to the collaborator feature: "I own or collaborate on", "I collaborate on" and "in my coverage area, I own or collaborate on".

                                                                                                When displaying the Candidates list, a check box called Include inactive requisitions since appears just underneath the Show filter. Selecting this check box will add to the Requisitions list the Deleted, Canceled and Filled requisitions.

                                                                                                  Basic Concepts

                                                                                                    Application Time-out

                                                                                                    A security feature warns users when the application has not been used for more than thirty minutes even if a user is still signed into the application. When the time-out delay is reached, a message notifies users that the time-out delay for the application is imminent.

                                                                                                    Two scenarios are possible:

                                                                                                    • User takes action: When the application has been idled for thirty minutes, a message notifies the user that the application requires attention. Clicking "Access the application" directs the user to the application. When the user accesses the application, he/she can reset the application and a message indicates the remaining time before the session expires.

                                                                                                    • User does not take action: If the user does not reset the application within the defined delay, a message is displayed, indicating that the user has been signed out of the application and has to sign in again to use the application.

                                                                                                    The time-out delay is set by default to thirty minutes. The reminder displayed before time-out is set by default to ten minutes before time-out.

                                                                                                      Concurrent Management

                                                                                                      Concurrent management ensures that only one user can edit a given element at a time.

                                                                                                      Concurrent management applies by default to requisitions and requisition templates.

                                                                                                      If you try to open a requisition that another user is editing, a message appears indicating that you have read-only access. You cannot edit the requisition until the other user closes it. Same thing with requisition templates. If a user applies a template to a requisition while the template is being edited, the last-saved version of the template in the database will be used.

                                                                                                        Print

                                                                                                        The print functionality allows Recruiting Center users to create a PDF version of a requisition file or candidate file and to print the PDF.

                                                                                                        The print function is available in the candidates list and requisitions list as well as within candidate files and requisition files. When using the print function, users can decide to print the content in a list format where information is presented in different columns, or they can choose to print the details of the file where content is presented into sections.

                                                                                                        • When users are printing the content in a list format, the content of the file is presented in different columns and the content of each file is displayed in a row. The format of the list (that is, the columns used to display the information) is identical to the requisition or candidate list format used. A maximum of 1000 lines can be printed in the list.

                                                                                                        • When users are printing the details of the file, all sections of the file or only specific sections can be printed. For example, a user can choose to print from a candidate file only prescreening and basic profile information. Sections selected by a user when using the print function are saved as defaults for the next print action, but blocks selected within the main submission file section are not. Also, sections available to a user are based on how the file is configured and on user permissions. This means, if a system administrator wanted to allow users to more precisely control what is printed, he/she can do this by increasing the sections in the file layout. For candidate files, a maximum of 50 files can be printed. For requisition files, a maximum of 15 files can be printed.

                                                                                                        When printing candidate files:

                                                                                                        • Attachment content is included within the generated PDF, along with the candidate information. When clicking the Print icon, users can select the type of attachments they wish to include in the generated PDF. These attachments are part of the generated PDF, along with the candidate information. Three options are available: Most recent flagged resume, Visible by candidate (Excludes flagged resume), Not visible by candidate (Excludes flagged resume).

                                                                                                        • A Table of Contents is available in the generated PDF so that users can easily navigate through the candidate files. Clicking the Bookmarks icon in the PDF will display the Table of Contents.

                                                                                                        • Print candidate actions are tracked in the candidate file History tab.

                                                                                                        When using the print functionality, only fields containing data are visible in the view/print mode; this means fields with no data will not be rendered when printing. The PDF generated by the print function is identical to the data presented to the user for the selected sections while looking at the information in view mode.

                                                                                                        When selecting one or several candidate files in a candidates list or requisition-specific candidate list in order to print them, the Submission file is printed. When selecting one or several candidate general profiles in a search results list or folders list, the General Profile file is printed.

                                                                                                        Regarding tracking information in the candidate file History tab, the system displays the 1000 most recent tracking items no matter if printing 1 or 50 candidate files. Therefore, if printing one candidate file, the 1000 most recent tracking items are displayed. If printing five candidate files for example, 200 tracking items are displayed per candidate. For a given candidate, when the maximum is reached, the following message is displayed: "The history contains the {0} most recent items".

                                                                                                        Note: When printing a candidate file and the Candidate Share mode (Flipbook) is enabled, it is possible to include attachments in the printed document, as long as the user is choosing to print 50 candidates or less. When printing a candidate file and the Candidate Share mode (Flipbook) is not enabled, it is not possible while printing to include the name of candidate facing attached files. Attachments appear in the Attachments tab; they are not part of the candidate file and they are not printed with the file.

                                                                                                          Attachment

                                                                                                          Files can be attached to requisitions and candidate files.

                                                                                                          The following file formats are supported by the system. System administrators define which formats are available to users.

                                                                                                          • Any File Format

                                                                                                          • Excel (.xls and .xlsx)

                                                                                                          • Hypertext Markup Language (.htm and .html)

                                                                                                          • OpenOffice Writer (.odt)

                                                                                                          • Portal Document Format (.pdf)

                                                                                                          • Rich Text Format (.rtf)

                                                                                                          • Text (.txt)

                                                                                                          • Word (.doc and .docx)

                                                                                                          • Word Perfect (.wpd)

                                                                                                          • Zip Format

                                                                                                          When attaching a file to a requisition, the attachment appears in the requisition file Attachments tab. The attachment can be shared with approvers and users having access to the requisition.

                                                                                                          When attaching a file to a candidate file (general profile or job submission), Recruiting Center users can indicate if the attachment will be visible to the candidate. They can also indicate if the attachment is a candidate resume. The Resume column in the Attachments tab allows users to easily view which attachments are resumes. Once a file is tagged as being a resume, users can remove the Resume tag by clicking the Edit button in the Attachments section and selecting No. Files attached through the resume parsing feature are automatically marked as being resumes.

                                                                                                          Recruiting Center users can view candidate attachments of type .docx or .odt directly from a browser without having to download and open the file with a native application. In the candidate file Attachments tab, when users click an attachment of type .docx and .odt files, the attachment is converted into HTML and can be viewed directly from a browser. HTML conversion for these other document types is still supported:

                                                                                                          • Excel (.xls and .xlsx)

                                                                                                          • Hypertext Markup Language (.htm and .html)

                                                                                                          • OpenOffice Writer (.odt)

                                                                                                          • Portal Document Format (.pdf)

                                                                                                          • Rich Text Format (.rtf)

                                                                                                          • Text (.txt)

                                                                                                          • Word (.doc and .docx)

                                                                                                            History Tracking

                                                                                                            The History tab presents useful tracking details on actions performed on different elements.

                                                                                                            A History tab is available in candidate files, requisition files, competencies, questions, and disqualification questions. The History tab displays read-only content except for the History tab of the candidate file. See Candidate File History.

                                                                                                            Depending on which part of the application the History tab is displayed, the information provided will vary.

                                                                                                            The table presents information available on the History tab of requisitions, competencies, questions, and disqualification questions.

                                                                                                            Information Description
                                                                                                            Date Date when an event occurred.
                                                                                                            Type Event or action performed on an element.
                                                                                                            Comments Comments entered by the user.
                                                                                                            By The "actor" (person or system) who performed the event.

                                                                                                            The table presents information available on the History tab of candidate files.

                                                                                                            Information Description
                                                                                                            Date Date when an event occurred.
                                                                                                            Events When a candidate file is modified, either by the candidate or a user, an event to track this action is generated and is displayed.
                                                                                                            Language Language of the candidate file.
                                                                                                            Details Details about the event.
                                                                                                            Comments Comments entered by the user.
                                                                                                            By The "actor" (person or system) who performed the event.
                                                                                                            A permission allows Recruiting Center users to view the content of deleted attachments in the History tab. When candidates provide attachments as part of their job application, your organization can remove these attachments. Your organization may decide to not provide access to these deleted attachments which are still visible in the History tab. If you have been granted the permission, you can click the attachment link in the History tab and view the content of deleted attachments. If you do not have the permission, you can see and click the attachment link but the system will display a message indicating that you do not have the permission to view the content of the deleted attachment.

                                                                                                              Rich Text Editor

                                                                                                              The Rich Text Editor enables users to edit and format text contained in competency definitions, correspondence, requisitions, requisition templates and review forms (definitions, sections and section items). Text formatted with the editor is presented to users in the TE applications with the specific formatting defined in the editor.

                                                                                                              The Rich Text Editor contains standard text processing tools such as:
                                                                                                              • cut, copy, and paste functions

                                                                                                              • font types and sizes

                                                                                                              • bold, italics, and underline

                                                                                                              • text and background color

                                                                                                              • left, right, and center alignment

                                                                                                              • numbered and bulleted lists

                                                                                                              • spell checker

                                                                                                              Image or Link Insertion

                                                                                                              Image or link insertion may only be available via the enlarged view of the editor, accessible when you first click the Enlarged View icon.

                                                                                                              Spell Checker

                                                                                                              The spell checker uses the application language, not the content language. The spell checker is available in several languages.

                                                                                                              Internet Explorer 8

                                                                                                              Users on Internet Explorer 8 may experience issues with the toolbar icons operating as expected. Users who experience this issue may either try viewing the page in Compatibility Mode, or use the Rich Text Editor in another browser such as another version of Internet Explorer or Firefox.

                                                                                                              Copying and Pasting Text

                                                                                                              When copying content from MS Word and pasting it in the Rich Text Editor tool, some reformatting may be required due to the complexities of mapping MS Word formatting to the Rich Text Editor. Capabilities supported by the Rich Text Editor tool are presented in the following table.

                                                                                                              Item Description
                                                                                                              Bold Full support for the bold style.
                                                                                                              Italic Full support for the italic style.
                                                                                                              Underline Full support for the underline style.
                                                                                                              Heading styles and fonts Heading styles as well as fonts used in heading styles are preserved. Fonts not used in heading styles are treated as a default normal style.
                                                                                                              Font name (font face) Font names (font faces) are generally preserved, even those that are not part of the Rich Text Editor's natively supported fonts (Arial, Comic Sans MS, Courier New, Tahoma, Times New Roman, Verdana).
                                                                                                              Font size The Rich Text Editor supports seven sizes. A "best guess" font size conversion is done by the system. Conversion of font sizes may not be accurate in some unspecified cases (depending on browser, MS Word version, etc.).
                                                                                                              Text color Full support for text color.
                                                                                                              Text background color Full support for text background color.
                                                                                                              Hyperlinks Full support for hyperlinks.
                                                                                                              Bulleted and numbered lists Lists should be created using the bullets, numbering and multilevel list features in MS Word. List types that do not conform to the recommended practice are not supported.

                                                                                                              The bullet type is preserved (bullet or number), but the symbol (circle, square, etc.) or notation (number, roman numerals, alphabetical) will be replaced by the browser's defaults.

                                                                                                              Numbering continuation between two distinct numbered lists is not supported.

                                                                                                              The color of the bullet is not preserved.

                                                                                                              Spacing around list blocks is browser-specific.

                                                                                                              Indentation level is preserved if made using the indent buttons. Custom indentations made using the MS Word ruler is not supported.

                                                                                                              Line spacing No line spacing information is preserved. All custom line spacing is converted to a single line. The only exceptions are:
                                                                                                              • Headings: the line spacing is browser-specific.

                                                                                                              • Lists: line spacing is browser-specific.

                                                                                                              Images Images are not supported and will not be included.
                                                                                                              Tables

                                                                                                              Table row and column dimensions are preserved.

                                                                                                              The presence or absence of borders is preserved.

                                                                                                              Colors are not preserved, default is black. Background and border colors are not preserved.

                                                                                                              Styles are not preserved, default is solid line.

                                                                                                              Custom widths are not preserved, default is 1px.

                                                                                                              Custom table and cell widths are converted to their pixel / percent equivalent. This conversion runs differently, based on the browser being used. This may result in discrepancies from the original table. Merged cells are preserved.

                                                                                                              Recommended Practices for Constructing MS Word Documents to Minimize Reformatting Required When Pasting Content Into the Rich Text Editor

                                                                                                              In general, the less complex the MS Word document is, the less reformatting a user will need to do when copying content from MS Word and pasting it in the Rich Text Editor. Below are some recommendations for creating MS Word templates.

                                                                                                              Use the more common fonts that come with MS Word, such as:

                                                                                                              • Arial

                                                                                                              • Times New Roman

                                                                                                              • Courier New

                                                                                                              • Verdana

                                                                                                              • Comic MS Sans

                                                                                                              Avoid using images in the MS Word template documents, as they are not supported in the Rich Text Editor.

                                                                                                              Avoid using the horizontal ruler to customize indent lines, as this type of formatting is not supported in the Rich Text Editor. Use the standard indent buttons.

                                                                                                              Minimize the use of custom line spacing, as this is not supported in the Rich Text Editor.

                                                                                                              Avoid using colored bullets in the MS Word template documents, as they are not supported in the Rich Text Editor.

                                                                                                              Avoid using custom ruler indentation on bullets, as custom indentation on bullets is not supported in the Rich Text Editor. Use standard indent buttons.

                                                                                                              Avoid mixing bullet types in the MS Word template documents, as mixed bullet types are not supported in the Rich Text Editor.

                                                                                                              Create lists using the standard bullet types, numbering, multilevel list and indent features available in MS Word.

                                                                                                                Statuses: Draft, Active, Inactive

                                                                                                                A status indicates the current state of an item in the system. It allows users to create items without making them available right away and to remove an existing item from use without removing it form the database.

                                                                                                                Items can have one of the following statuses:

                                                                                                                • Draft: A Draft item can be modified. A Draft item cannot be used. It must be Active before it can be used.

                                                                                                                • Active: When an item is Active, only the name and description can be modified. It is not possible to update the behavior of the item.

                                                                                                                • Inactive: When an item is Inactive, only the status can be modified. The only possibility is to go back to the Active status.

                                                                                                                A Draft item can become Active. An Active item can become Inactive. An Inactive item can become Active. However, an Active item cannot "go back" to the Draft status.

                                                                                                                  Callout

                                                                                                                  A callout is a small window or bubble containing information on an element.

                                                                                                                  Callouts are available throughout the application. To see information contained in a callout, users must place their mouse over the element.

                                                                                                                  No configuration is required for the callouts. If a user has access to a specific area based on permissions and that area has a callout, the user will be able to see the callout. If there is content that the user cannot see based on the user's permissions and the callout behavior, the field label will be displayed, but the field will be blank. For example, if a user does not have the permission to see the name of internal candidates, the user will still have access to the callout, but the name will show as blank for internal candidates.

                                                                                                                  The table presents callouts available in the product, fields available in each callout, where the callout is used, and if field security level and availability are taken into consideration.

                                                                                                                  Callout Fields in the Callout Where the Callout is Used Security Level/Field Availability Impact
                                                                                                                  Attendee Callout First Name, Last Name, Home Phone, Cellular Phone, Work Phone, Email. In the Schedule an Interview tool. None
                                                                                                                  CSW Callout Step Name, Step Information. In the Change Step and Status screen of the requisition-specific candidate list. None
                                                                                                                  Requisition Callout - Small Requisition Title (with an hyperlink to the file), Requisition ID, Activated Languages, Activated Features (such as ACE Alert, Daily Recruiting Report, Urgent Need, Prevent Posting). In the Requisitions list and Tasks list (in the Requisition column). For security reasons, the requisition callout on the Tasks list will show the callout. However, there will be no access to the requisition for all tasks that are in the Approve Requisition or Approve Offer status for any users. The user can get access to view a PDF of the requisition from within the Approval screen. None
                                                                                                                  Requisition Callout - Large Requisition Title (with an hyperlink to the requisition file), Requisition ID, Status, Recruiter, Status Details, Hiring Manager, Primary Location, Requisition Type, Hired Candidates, Offers Accepted, Activated Languages, Activated Features (such as ACE Alert, Daily Recruiting Report, Urgent Need, Prevent Posting), Department. In the Requisition Selector of the Match Candidates to Requisitions feature, the Offers list (in the Requisition column), the Requisition Title on the Candidate Job Submission page, the Requisition Title on the Candidate All tab (when grouped by Requisition). None
                                                                                                                  Candidate Callout Candidate Name (with an hyperlink to the file), Home Phone, Cellular Phone, Work Phone, Email. In the Tasks list (in the Candidate column), the Offers list (in the Candidate column), the Search Results list, the requisition-specific candidate list, the Candidates list, the candidate submission list. Field security level permissions and field availability are taken into consideration.
                                                                                                                  Candidate Comment Callout Comment content. In the candidate file History tab. None
                                                                                                                  Requisition Comment Callout Comment content. In the requisition file History tab. None
                                                                                                                  Task Callout Task name (with an hyperlink to the file), Task Type, Assignment Date, Owner. In the Tasks list (in the Task column). None
                                                                                                                  Task Comment Callout Comment content. In the Tasks list (in the Comment column). None
                                                                                                                  Submission Active/Inactive Callout Requisition Title (with an hyperlink to the file), Step/Status, Comment. In the candidate card of the candidate file. The requisition title viewing permission is ignored; only submissions the user can see will be listed.
                                                                                                                  List Format Callout List format information. In the Requisitions list, the Mini Requisition list, the requisition-specific candidate list, the All Candidate by Requisition list, the All Candidates by Folder list, the All Candidates by Offer list, the quick search results list, the advanced search results list, the candidate capture/possible duplicates list of automatically pooled candidates. None
                                                                                                                  Message Template Callout Message title, information, structure. In the Send Correspondence feature, when selecting a message template. None
                                                                                                                  Message Paragraph Callout Paragraph title, preview of paragraph body (in active language). In the Send Correspondence feature, when the message template selected contains many paragraphs. None
                                                                                                                  Group Callout User Name, Employee ID, Job Title, Email, Department. In the Requisitions list, the Candidates list, the Offers list. None
                                                                                                                  Create Candidate Callout For job-specific submission: Selected Language, Selected Requisitions. For general profile: Selected Language, Folder location and name. In the Create a Candidate feature. None
                                                                                                                  Create Candidate Flow Description Callout Create candidate flow title and description. In the Create a Candidate feature when selecting a candidate file creation template. None
                                                                                                                  Most Advanced Progression Status Callout Requisition Title (with an hyperlink to the file if the user has the required permission), Requisition ID, Status, date when moved into that status. In the Candidates list, in the Most Advanced Progression Status column. If a user does not have the permission to see the Most Advanced Requisition, the hyperlink to the requisition will not be available.
                                                                                                                  Disqualification Question Explanation Callout Disqualification Question Explanation Title, Disqualification Question Explanation Comment. In the Disqualification Questions library (Detailed mode), the requisition file and the candidate submission. None
                                                                                                                  User Information Callout First Name, Last Name, Title (of user), ID (of user), Email Address, Work Phone Number, Extension, Fax Number. In the User Selector available in the Share Candidate feature, Request Approval feature and Request Contribution feature. None
                                                                                                                  Requisition Template Callout Requisition Template Title, Job Code, Status, Requisition Type, User Group, Recruiter. In the Requisition Template Selector when selecting a template for a requisition file. None
                                                                                                                  Requisition Template List Callout Requisition Template Title, Activated Languages. In the Requisition Templates library. None
                                                                                                                  Attachment Callout Candidate Name, Job Specific Attachments, Other Attachments. In the Candidates lists. Users must have the Access Attachments tab permission to see the callout.
                                                                                                                  Primary Location Callout Primary Location, Country, State/Province, Region, Address, City, Zip/Postal Code. In the left pane of requisitions and requisition templates. None
                                                                                                                  Screening Description Callout Screening Description. In the job submission Screening block. None

                                                                                                                    Autosuggest in Selectors

                                                                                                                    The autosuggest feature is available for selectors having a large list of values.

                                                                                                                    When typing letters in a large selector, a drop-down list appears and the system presents values that are relevant with the letters entered and retrieves as many entries as possible.

                                                                                                                    The lookup trigger begins to work as soon as two characters are entered. A list of matching values beginning with the two characters that were entered is displayed.

                                                                                                                    For example, if you are looking for Bishop University, if you type "bi" or "un", Bishop University will match. But if you type "shop", Bishop University will not show up.

                                                                                                                    The list continues to narrow as more characters are entered. The match is made based on a "contains" search to increase likelihood of finding what the user is seeking. A list of ten elements is displayed in the suggested list. When more then ten elements are available, the {more...} option is available. Clicking {more...} opens a selector with pre-filtered data. When the right entry is found, the user simply selects it from the list.

                                                                                                                    To increase selection speed of relevant values, for Organization, Location and Job Field, the autosuggest works across the entire structure hierarchy using a single autosuggest field. In addition to the autosuggest feature, users at any time can use the Selector icon to the far right of the field to open up a full search browser to find the value they are looking for.

                                                                                                                    For example, if a user types the letters ca to find a primary location, the autosuggest feature might suggest:
                                                                                                                    • Canada

                                                                                                                    • Canada > British columbia

                                                                                                                    • Canada > Nunavut

                                                                                                                    • Canada > Ontario

                                                                                                                    • Canada > Ontario > Ottawa

                                                                                                                    • Canada > Ontario > Toronto

                                                                                                                    For example, if using a more precise term such as Toronto, the autosuggest feature then might just suggest Canada > Ontario > Toronto.
                                                                                                                    Note: Capitalization and accentuated characters are ignored. For example: é=e, C=c. To find the word École, type École or Ecole. The following special characters are supported: &, - and ' . All other special characters are ignored.

                                                                                                                    For very large lists like employees or organizations containing sometimes more than 100 000 values, there might be a small delay because the filtering applied to the result set is based on user permissions. Newly created elements or changed elements are available within minutes.

                                                                                                                    The table shows the content appearing in a selector where the autosuggest feature is available.

                                                                                                                    List Content

                                                                                                                    User (Recruiter, Hiring Manager, Collaborator, Recipient, etc.)

                                                                                                                    First Name and Last name, alphabetically sorted.
                                                                                                                    User Group Group description, alphabetically sorted.
                                                                                                                    Job Role, Position, Department Code and name, alphabetically sorted.
                                                                                                                    Requisition Template Code and title, alphabetically sorted.
                                                                                                                    Candidate Selection Workflow Name, alphabetically sorted.
                                                                                                                    Organization, Location, Job Field Name, sorted by sequence defined in SmartOrg.
                                                                                                                    Employer, Institution, Program, Certification Description, alphabetically sorted.
                                                                                                                    Message Template Name, alphabetically sorted.
                                                                                                                    Time Zone Description, alphabetically sorted.
                                                                                                                    Requisition Number and title, alphabetically sorted.
                                                                                                                    Email

                                                                                                                    Name, alphabetically sorted.

                                                                                                                    Large User-Defined Selection Code and description, alphabetically sorted. The configuration of the code and description display has no impact on the autosuggest feature.

                                                                                                                      Item Requiring Attention Icon

                                                                                                                      The Item Requiring Attention icon appears in Candidates list and Requisitions list to draw users' attention to items that they own and that require viewing.

                                                                                                                      The Item Requiring Attention is only displayed to the owner of an element. A user who creates a requisition is considered the owner of the requisition. However, when creating a requisition, the user can specify other owners for the requisition by completing the Recruiter, Recruiter Assistant, Hiring Manager and/or Hiring Manager Assistant fields.

                                                                                                                      The icon is removed when:

                                                                                                                      • An item that has the Item Requiring Attention icon is opened.

                                                                                                                      • The user takes action on an item from the list view (without opening the item).

                                                                                                                        Time Zone

                                                                                                                        Time zones are used throughout the system where a date or time is required.

                                                                                                                        In the Recruiting Center, dates and time are presented in a manner that takes into account the user's time zone thereby making dates easier to understand and freeing users from the task of converting the dates themselves.

                                                                                                                        System administrators can set the default time zone for an entire company. Users who are in the same time zone as the company do not need to modify their time zone. However, users who are not located in the same time zone as their company will need to modify their time zone to view information in their own time zone (for interview scheduling, for example). Time zone changes can be done by users via the My Setup feature if they were granted the permission by their system administrator.

                                                                                                                        Note: As a best practice, users should set their time zone under My Setup if they want to have the correct time displayed.

                                                                                                                        An example where time zone is used is for scheduling interviews with candidates. When scheduling an interview, the time zone of the person scheduling the meeting is used as a reference value. This means that the time of the meeting in the Recruiting Center is displayed according to the time zone selected by the person who scheduled the meeting, but the time of the meeting in Outlook or Lotus Notes is displayed according to the time zone set in the recipients' Windows settings.

                                                                                                                        For example, a user living in San Francisco schedules an interview from 2 p.m. to 3 p.m. Pacific Time. For an attendee living in New-York, the time of the meeting in Recruiting is from 2 p.m. to 3 p.m. Pacific Time, but the time of the meeting in Outlook is from 5 p.m. to 6 p.m. Eastern Time.

                                                                                                                        Another example where time zone is used is for requisition posting. When posting requisitions, the time zone taken into account is the time zone of the user doing the posting (and not where the requisition is posted).

                                                                                                                          Daylight Savings Time

                                                                                                                          The same calculation is used during the daylight savings period across the Recruiting Center.

                                                                                                                          Daylight savings time is properly calculated for dates handled across the Recruiting Center. Many dates are time zone sensitive and as such are converted.

                                                                                                                            Algorithm to Determine a User's Time Zone

                                                                                                                            To determine a user's time zone, the algorithm is as follows:

                                                                                                                            • Use the user's preferred time zone (under Recruiting Center > Resources > My Setup > Preferences > Time Zone and also under Configuration > [SmartOrg] Administration > User Accounts > select a user account > General Preferences > Time Zone).

                                                                                                                            • If the above was not defined, use the user's preferred time zone (Configuration > General Configuration > Settings > Time Zone).

                                                                                                                            • If the above was not defined (unlikely), use the user's operating system UTC offset.

                                                                                                                            • If the above was not defined, use the default time zone (Configuration > [Career Section] Settings).

                                                                                                                              Time Zones in Oracle Talent Acquisition Cloud (OTAC)

                                                                                                                              City Time Zone Name UTC Offset
                                                                                                                              Midway Islands, Samoa Samoa Time UTC -11:00
                                                                                                                              Honolulu Hawaii Time UTC -10:00
                                                                                                                              Anchorage Alaska Time UTC -9:00
                                                                                                                              Tijuana Pacific Mexico Time UTC -8:00
                                                                                                                              Vancouver, San Francisco, Los Angeles Pacific Time UTC -8:00
                                                                                                                              Chihuahua, La Paz, Mazatlan Western Mexico Time UTC -7:00
                                                                                                                              Edmonton, Denver, Boise, Salt Lake City Mountain Time UTC -7:00
                                                                                                                              Arizona, Hermosillo Mountain US Time UTC -7:00
                                                                                                                              Cancun, Merida Atlantic Mexico Time UTC -6:00
                                                                                                                              Chicago, Winnipeg, Dallas Central Time UTC -6:00
                                                                                                                              San Jose, Managua Central America Time UTC -6:00
                                                                                                                              Regina (Saskatchewan) Central Canada Time UTC -6:00
                                                                                                                              Mexico City Mexico General Time UTC -6:00
                                                                                                                              Bogota, Lima, Quito, Panama City Pacific South America Time UTC -5:00
                                                                                                                              Montreal, New York, Washington D.C. Eastern Time UTC -5:00
                                                                                                                              Kingston, Georgetown Jamaica Time UTC -5:00
                                                                                                                              Caracas Venezuela Time UTC -4:30
                                                                                                                              Asuncion Paraguay Time UTC -4:00
                                                                                                                              Cuiaba Western Brazil Time UTC -4:00
                                                                                                                              La Paz, San Juan Western South America Time UTC -4:00
                                                                                                                              Santiago Chile Time UTC -4:00
                                                                                                                              Halifax Atlantic Time UTC -4:00
                                                                                                                              St-John's (Newfoundland) Newfoundland Time UTC -3:30
                                                                                                                              Buenos Aires, Georgetown Eastern South America Time UTC -3:00
                                                                                                                              Greenland, Saint-Pierre and Miquelon Greenland Time UTC -3:00
                                                                                                                              Brasilia Eastern Brazil Time UTC -3:00
                                                                                                                              Mid Atlantic Mid-Atlantic Time UTC -2:00
                                                                                                                              Azores Azores Time UTC -1:00
                                                                                                                              Cap Verde Islands Cape Verde Time UTC -1:00
                                                                                                                              Dublin, Edinburgh, Lisbon, London Western European Time UTC 0:00
                                                                                                                              Abidjan, Dakar, Reykjavik Greenwich Mean Time UTC 0:00
                                                                                                                              Casablanca Casablanca Time UTC 0:00
                                                                                                                              Abuja, Alger, Kinshasa, Luanda, Niamey, Yaounde Western Central Africa Time UTC +1:00
                                                                                                                              Namibia South Western Africa Time UTC +1:00
                                                                                                                              Brussels, Copenhagen, Madrid, Paris Central Europe Time UTC +1:00
                                                                                                                              Sarajevo, Skopje, Warsaw, Zagreb Central Europe Time UTC +1:00
                                                                                                                              Belgrade, Bratislava, Budapest, Ljubljana, Prague Central Europe Time UTC +1:00
                                                                                                                              Amsterdam, Berlin, Bern, Rome, Stockholm, Vienna Central Europe Time UTC +1:00
                                                                                                                              Cairo Egypt Time UTC +2:00
                                                                                                                              Harare, Pretoria South Africa Time UTC +2:00
                                                                                                                              Jordan Jordan Time UTC +2:00
                                                                                                                              Beirut Lebanon Time UTC +2:00
                                                                                                                              Damascus Syria Time UTC +2:00
                                                                                                                              Gaborone, Harare, Lilongwe, Lubumbashi, Lusaka, Maputo Central Africa Time UTC +2:00
                                                                                                                              Athens, Bucharest Eastern Europe Time UTC +2:00
                                                                                                                              Helsinki, Riga, Tallinn, Sofia, Vilnius, Kiev Baltic States Time UTC +2:00
                                                                                                                              Jerusalem Israel Time UTC +2:00
                                                                                                                              Baghdad Iraq Time UTC +3:00
                                                                                                                              Kuwait City, Riyadh Arabian Peninsula Time UTC +3:00
                                                                                                                              Nairobi Eastern Africa Time UTC +3:00
                                                                                                                              Moscow, St. Petersburg, Volgograd Russia Time UTC +4.00
                                                                                                                              Tehran Iran Time UTC +3:30
                                                                                                                              Abu Dhabi, Muscat, Dubai Persian Gulf Time UTC +4:00
                                                                                                                              Baku, Tbilisi, Yerevan Caucasus Time UTC +4:00
                                                                                                                              Kabul Afghanistan Time UTC +4:30
                                                                                                                              Bishkek Kyrgyzstan Time UTC +5:00
                                                                                                                              Dushanbe, Islamabad, Karachi, Toshkent West Asia Time UTC +5:00
                                                                                                                              Calcutta, Chennai, Mumbai, New Delhi India Time UTC +5:30
                                                                                                                              Kathmandu Nepal Time UTC +5:45
                                                                                                                              Almaty, Astana Kazakhstan Time UTC +6:00
                                                                                                                              Dhaka Central Asia Time UTC +6:00
                                                                                                                              Novosibirsk North Central Asia Time UTC +6:00
                                                                                                                              Rangoon Myanmar Time UTC +6:30
                                                                                                                              Krasnoyarsk North Asia Standard Time UTC +7:00
                                                                                                                              Bangkok, Hanoi, Jakarta South Eastern Asia Time UTC +7:00
                                                                                                                              Irkutsk, Ulaan Bataar North Eastern Asia Time UTC +8:00
                                                                                                                              Perth Western Australia Time UTC +8:00
                                                                                                                              Beijing, Chongqing, Hong Kong, Urumqi China Time UTC +8:00
                                                                                                                              Singapour Singapore Time UTC +8:00
                                                                                                                              Yakutsk Yakutsk Time UTC +9:00
                                                                                                                              Osaka, Sapporo, Tokyo Japan Time UTC +9:00
                                                                                                                              Seoul Korea Time UTC +9:00
                                                                                                                              Adelaide South Australia Time UTC +9:30
                                                                                                                              Darwin Australia Northern Territory Time UTC +9:30
                                                                                                                              Canberra, Melbourne, Sydney South Eastern Australia Time UTC +10:00
                                                                                                                              Vladivostok Vladivostok Time UTC +10:00
                                                                                                                              Brisbane Queensland Time UTC +10:00
                                                                                                                              Hobart Tasmania Time UTC +10:00
                                                                                                                              Port Moresby Papua New Guinea Time UTC +10:00
                                                                                                                              Lord Howe Lord Howe Island Time UTC +10:30
                                                                                                                              Magadan, Solomon Islands, New Caledonia Central Pacific Time UTC +11:00
                                                                                                                              Anadyr Chukot Time UTC +12:00
                                                                                                                              Auckland, Wellington New Zealand Time UTC +12:00
                                                                                                                              Fiji, Kamchatka, Marshall Islands Fiji Time UTC +12:00
                                                                                                                              Eniwetok, Kwajalein Date Line Time UTC +12:00
                                                                                                                              Chatham Islands Chatham Islands Time UTC +12:45
                                                                                                                              Enderbury Phoenix Islands Time UTC +13:00
                                                                                                                              Nuku'alofa Tonga Islands Time UTC +13:00
                                                                                                                              Kiritimati Line Islands Time UTC +14:00

                                                                                                                                Time Zone Sensitive Dates in the Recruiting Center

                                                                                                                                Requisition File - External Description Block - Opening Date Requisition File - External Description Block - Closing Date
                                                                                                                                Requisition File - Internal Description Block - Opening Date Requisition File - Internal Description Block - Closing Date
                                                                                                                                Requisition File - History Tab - Event Dates Requisition File - Posting & Sourcing - Corporate Posting Dates
                                                                                                                                Requisition File - Posting & Sourcing - eQuest Posting Date Requisition File - Posting & Sourcing - Staffing Agents
                                                                                                                                Requisition File - Posting & Sourcing - Staffing Agency (Contingent) Requisition File - Posting & Sourcing - Source - Event List - Start Date (View & Edit)
                                                                                                                                Requisition File - Posting & Sourcing - Source - Event List - End Date (View & Edit) Events in the Candidate Source Tracking Block
                                                                                                                                Requisition List - Status Detail Requisition List - Contacted Candidates ("From" in the Callout)
                                                                                                                                Requisition Template File - Effective From (Status) Requisition Template File - Effective Till (Status)
                                                                                                                                Requisition Template List - Effective From Requisition Template List - Effective Till
                                                                                                                                Prescreening Question File - Creation Date Prescreening Question File - History - Event Date
                                                                                                                                Prescreening Competency File - History - Event Date Prescreening Disqualification Question File - Creation Date
                                                                                                                                Prescreening Disqualification Question File - History - Event Date Requisition Action - Share - Date in Printed PDF
                                                                                                                                Requisition Approval Task & eShare - Date in Requisition Detail PDF (must reflect the file)

                                                                                                                                Candidate Action - Schedule an Interview - Meeting Date Candidate Action - Update an Interview - Meeting Date
                                                                                                                                Candidate Action - Cancel Interview - Meeting Date Candidate File - Detail - Creation Date
                                                                                                                                Candidate File - Basic Profile - Date of Availability
                                                                                                                                Candidate File - Attachments Tab - Submission-specific Attachments Candidate File - Attachments Tab - Other Attachments
                                                                                                                                Candidate File - Self-Assigned Task List - Creation Date Candidate File - History Tab - Event Dates
                                                                                                                                Candidate File - History Tab - Workflow Event Date Candidate List - Quick Filters - Since (Effect on filtering)
                                                                                                                                Candidate List - Quick Filters - Last Activity Date (From & To) (Effect on filtering) Candidate List - Advanced Filters - Fields of Type Date
                                                                                                                                Candidate List - Standard Fields of Type Date Candidate Advanced Search - Date Type criteria
                                                                                                                                Candidate Workflow Assistant - Workflow Event Date Candidate Workflow Assistant - Self-Assigned Task - Due Date
                                                                                                                                Candidate Workflow Assistant - (Hire candidate) Start Date (with the setting "Ignore Time Zone for Offer Start Date"=NO) Candidate Action - Print/Share - Date in Printed PDF
                                                                                                                                Task List - Due Date - Task List - Task Callout (Assignment Date)

                                                                                                                                Offer Grid - Expiration Date Offer Grid - Created On
                                                                                                                                Offer Grid - Approved Offer Grid - Extended
                                                                                                                                Offer Grid - Start Date (with the setting "Ignore Time Zone for Offer Start Date"=NO) Offer Action - Update Expiration Date
                                                                                                                                Offer Action - Update Start Date (with the setting "Ignore Time Zone for Offer Start Date"=NO) Offer Action - Extend Offer Verbally
                                                                                                                                Offer Action - Capture Response (Accepted) - Accepted On Offer Action - Capture Response (Accepted) - Start Date (with the setting "Ignore Time Zone for Offer Start Date"=NO)
                                                                                                                                Offer Approval Tab - Decision Date & Time Candidate Selection Workflow - Update Start Date (No RSOffer) (with the setting "Ignore Time Zone for Offer Start Date"=NO)
                                                                                                                                Offer Approval Task & eShare - Date in Offer detail PDF (must reflect the grid) (with the setting "Ignore Time Zone for Offer Start Date"=NO) Offer Approval Task & eShare - Date in Candidate Submission detail PDF (must reflect the file)

                                                                                                                                  Fundamental Data Structure: Organization-Location-Job Field (OLF)

                                                                                                                                  The data structure enables each customer to customize Oracle Talent Acquisition Cloud (OTAC) products such that they reflect how the customer does business. Each customer's organization is defined as a combination of three main elements: Organizations, Locations, Job Fields (OLF). OLF is also referred to as contextualization.

                                                                                                                                  Organization describes the hierarchical structure of an organization. Up to 20 organization levels can be created. The system proposes the following organization structure, but other terms may be chosen to better reflect the hierarchical structure of a company:

                                                                                                                                  • Company

                                                                                                                                  • Sector

                                                                                                                                  • Department

                                                                                                                                  • Division

                                                                                                                                  Location represents a geographical area, such as a country or state. Locations are listed in a hierarchical order, from the broadest geographical area (often a country) to increasingly specific areas (work location). Up to 5 location levels can be created. Locations must be associated to network locations used for various purposes, mainly integration with external systems, using a common and standard universal structure. Oracle strongly recommends defining a zip code for the location. A common location structure is:

                                                                                                                                  • Country

                                                                                                                                  • State/Province

                                                                                                                                  • Region

                                                                                                                                  • City

                                                                                                                                  • Work Location

                                                                                                                                  Worker locations can be mapped to the Location structure. The worker location is used as an employee (post-hire) function whereas the location (in OLF) is meant for recruiting purposes. For example, a location could be 100 Main Street and a worker location could be "Sector 44" or "Cubicle A". Worker locations are not created in Configuration. Worker locations are typically imported from an external HRMS system. Once worker locations are imported, worker locations can be mapped to the Location structure via Integration or by the system administrator in Configuration. Any Location element can be given the Worker Location and the Worker Location Address properties. System administrators can then configure worker locations to appear in requisitions, offers, correspondences, requisitions lists, and candidates lists just like any other fields. For details, see Worker Location.

                                                                                                                                  Job Field represents the employment sectors or domains. Up to 4 job field levels can be created. Job fields must also be mapped to the network job fields, again to have a common language with the external world, be for posting or integrations. This mapping also serves to inherit existing classification for competencies. The system proposes the following job field structure, but other terms may be chosen to better reflect the structure of a company:

                                                                                                                                  • Category

                                                                                                                                  • Function

                                                                                                                                  • Specialty

                                                                                                                                  Contextualization, that is the Organization-Location-Job Field structure associated to an element, represents the framework the application uses to organize, classify, link, match or search for information in the application. Although Organization-Location-Job Field structures are configured with the help of an Oracle representative during the implementation phase, modifications to structure elements can be done in maintenance mode at any time. It is possible to customize the system to reflect a company's unique structure and make modifications to Organization-Location-Job field elements in real time so that the data accounts for any changes in the structure.

                                                                                                                                  There are several key elements of the Oracle Talent Acquisition Cloud (OTAC) products that are tied to the Organization-Location-Job field structure such as candidate selection workflows, requisitions and requisition templates, message templates, user management, prescreening, approvals, etc.

                                                                                                                                  The purpose of contextualizing an element is to make the element relevant according to a specific context. Below is an example of contextualization with candidate selection workflows. The CSW1 would not be available to the user for this requisition, because the last level of its Location does not match that of the requisition. The CSW2 could be available to the user for this requisition. The parent element of the lowest level of the requisition for each dimension (Organization, Location or Field) must be the same as the lowest level of the workflow for each dimension.

                                                                                                                                  Example:

                                                                                                                                  Requisition:

                                                                                                                                  • Organization: Urban transportation

                                                                                                                                  • Location: United States/California/Los Angeles

                                                                                                                                  • Job Field: Bus driver

                                                                                                                                  CSW1:

                                                                                                                                  • Organization: Urban transportation

                                                                                                                                  • Location: United States/California/San Jose

                                                                                                                                  • Job Field: Bus driver

                                                                                                                                  CSW2:

                                                                                                                                  • Organization: Urban transportation

                                                                                                                                  • Location: United States

                                                                                                                                  • Job Field: Bus driver

                                                                                                                                  When using contextualization, the system applies the AND operator between Organizations, Locations and Job Fields entities. However, the OR operator is applied between elements of the same entity.

                                                                                                                                  In the following example, a field would be displayed if Canada (or any of its children) AND Architecture were selected.

                                                                                                                                  • Location: Canada

                                                                                                                                  • Job Field: Architecture

                                                                                                                                  In the following example, a field would be displayed if Canada AND Architecture were selected, or if United States AND Architecture were selected.
                                                                                                                                  • Location: Canada

                                                                                                                                  • Location: United States

                                                                                                                                  • Job Field: Architecture