3Central Configuration
Central Configuration
Settings
Settings
Settings are used to configure features in Oracle Talent Acquisition Cloud (OTAC) products.
There are two types of settings:
-
Global settings: Settings that affect multiple OTAC products.
-
Product settings: Settings specific to an OTAC product, for example, Recruiting, Career Section, Onboarding (Transitions), Performance, Reporting and Analytics.
| Setting | Location |
|---|---|
| Global settings | Configuration > [Central Configuration] Settings |
| SmartOrg settings | Configuration > [SmartOrg] Settings |
| Recruiting settings | Configuration > [Recruiting] Settings |
| Career Section settings | Configuration > [Career Section] Settings |
| Onboarding (Transitions) settings | Configuration > [Onboarding (Transitions)] Settings |
| Performance settings | Configuration > [Performance] Settings |
| Reporting and Analytics settings | Configuration > [Reporting and Analytics] Settings |
A setting has one of the following security levels: Public, Protected, Private.
| Security Level | Description |
|---|---|
| Public | System administrators can view and change the setting. |
| Protected | System administrators can view the setting, but changes can only be performed by Oracle. |
| Private | System administrators cannot view or change the setting. Only Oracle can view and change the setting. |
Candidate Information Integrity While Editing
The system prevents people from making changes to candidate information while someone else is editing it.
It is common to have situations where more than one person has the permissions required to edit candidate files. These people might be candidates, Onboarding (Transitions) Center users, Recruiting Center users. The system prevents someone (the candidate, an Onboarding (Transitions) Center or a Recruiting Center user) from editing a candidate file while someone else is making changes. After the changes are saved, the file becomes unavailable automatically and anyone who has the required permissions can edit the file.
If a candidate attempts to edit his/her own file while a Recruiting Center or Onboarding (Transitions) Center user is editing it, a message is displayed in the career section, inviting the candidate to return later to make changes.
If a Recruiting Center or Onboarding (Transitions) Center user attempts to edit a candidate file while the candidate or another Recruiting Center or Onboarding (Transitions) Center user is editing it, the message displayed to the user includes the name of the person currently editing the candidate file.
While a candidate file is being edited by someone, other people who have the required permissions can still access read-only information related to the file.
If someone is editing candidate information and the Booker Release Interval setting value is exceeded, the candidate file becomes available for editing automatically. In other words, if the individual ceases to actively edit candidate information and the elapsed time exceeds the Booker Release Interval setting value, the candidate file becomes available and someone else can then edit it.
Configuration
| Setting | |
|---|---|
| Name | Location |
| Booker Release Interval | Configuration > (General Configuration) Settings |
Onboarding (Transitions) Settings
The following table presents settings specific to Onboarding (Transitions) and that are available via the Settings feature in the Onboarding (Transitions) Administration menu.
| Onboarding (Transitions) Setting | Description | Security Level | Default Value |
|---|---|---|---|
| Antivirus Timeout | Maximum time taken by the antivirus to perform a virus check. | Private | 5000 Milliseconds |
| Antivirus Zone URL | URL address of the virus checker. | Private | |
| Automatically Delete Old Onboarding (Transitions) Processes | Automatically executes a permanent deletion of Onboarding (Transitions) processes completed or canceled at least X days ago. All tasks in these processes will also be deleted. Ongoing processes will be ignored and excluded from permanent, automatic deletions. See Automatically Deleting Old Processes. The automatic delete process will run twice per month (unless customers change the value to 0). Setting is enabled by default for new and existing customers. For new customers, the default value is set to 2 years (730 days). For existing customers, the default value is set to 5 years (1825 days). System administrators can modify the default value or disable the automatic deletion completely by changing the value to 0. |
Public | 730 |
| Contact Information | Indicates which contact to display in Onboarding (Transitions). The "contact" for a process is the person who is available to answer questions for candidates/new hires. The contact's phone number and email address can be configured to display in content pages, message templates, user-defined forms and PDFs. There are 5 choices regarding whose information can be displayed: Recruiter, Recruiter Assistant, Hiring Manager, Hiring Manager Assistant, and Process Owner. Remember that the Process Owner might be configured to be a specific user or a functional role with context-sensitive assignees depending on the OLF of each requisition. Therefore, this contact information can be specifically tailored for new hires. |
Public | Process Owner |
| Details Link for Processes | Enables the Details link in the General Information section of the Process page (which is available in the Onboarding (Transitions) Center). Enter the code of the desired form in the Value field. | Public | |
| Email Address for Onboarding (Transitions) Process | Before an Onboarding (Transitions) process can be started for a candidate/employee, an email address must be associated with the candidate/employee in the database. This is the case even if the process is configured such that no notifications or reminders are sent to the individual. If no value is provided for this setting, no Onboarding (Transitions) process can be started for candidates for whom there is no email address. If a value is provided for this setting, the value is reproduced in the “Personal Email Address” and “Correspondence Email” fields in the SmartOrg user account of every candidate who lacks an email address. The value is not reproduced where candidates already have an SmartOrg user account with an email address). See: Launching an Onboarding (Transitions) Process for Candidates/Employees with no Email Address for a complete explanation. | ||
| eSignature Timestamp Display Property | Controls whether all E-Signature dates are displayed with the exact time that the signature was captured. The date is always formatted using a default short date style. The time is displayed using Greenwich Mean Time (GMT) timezone format. If the organization is spread across time zones, it is better to have an "absolute" time shown on the E-Signatures when displayed back on read-only forms or PDFs. If the organization is localized or consolidated in one time zone, it might be more suitable to omit the time entirely when displaying E-Signature dates. |
Public | Date |
| From Address | Email address used in the "From" field when an email reminder or notification is sent out to an assignee or recipient. | Public | |
| From Address Alias Level | Alias associated with the email address used in the "From" field, when an email reminder or notification is sent to an assignee or recipient. | Public | |
| Image in PIT Snapshot | Determine whether the image information need to be included in the PIT snapshot. | Public | No |
| Learn Integration URL | This is the URL the new hires/employees will use to access their learning page. When the new hires/employees click the E-Learning variable on their assigned user-defined form, they are sent to the destination specified in this setting to access their learning program. For details, see Onboarding (Transitions) and Learn. | Private | |
| Mail Server | Mail server name. | Private | |
| Maximum Batch Print Size | Batch printing of PDF documents enables Taleo Onboarding (Transitions) users to select PDF files associated with a candidate or employee involved in a process and print them as a single document. This setting enables administrators to set the maximum size (in megabytes) of the combined document. The maximum size suggested is 15 megabytes. | Private | 0 |
| Maximum Size for File-based Documents | Onboarding (Transitions) administrators can set the maximum size of file-based documents that they can upload to the system. The default value is also the largest possible value: 10 Mb. The value can be set from 1 Kb up to 10 Mb. This setting is independent of the "Attached File Maximum Size" setting ([General Configuration] Settings) that applies to other Oracle Taleo products. | Protected | 10 (Mb) |
| Onboarding (Transitions) Single Image Maximum Size | Determines the maximum size (in kilobytes) of any image in Onboarding (Transitions). Graphics can be uploaded to be hosted in the Taleo zone, including .jpg, .gif, and .png types. Images must have been first uploaded by the Onboarding (Transitions) administrator. These small hosted images can be used in content pages, user-defined forms, and message templates. |
Protected | 20 |
| Onboarding (Transitions) Total Image Size | Determines the maximum size (in megabytes) of the sum of all images in Onboarding (Transitions). There is no limit on the number of images hosted in a zone; this setting governs the total size of all the images taken together. | Protected | 25 |
| Working Days | List of working days. Working Days configures which days of the week are counted when calculating task due dates and notification trigger times. Select all 7 days of the week if the organization prefers not to omit weekends in these calculations. This setting is shared by both Onboarding (Transitions) and Taleo Performance. Updates to the setting in one product will also update the setting in the other product. See Creating a Task Reminder. | Public | Monday, Tuesday, Wednesday, Thursday, Friday. |
General Configuration Settings
The following configuration settings apply to multiple Taleo Enterprise products including Taleo Onboarding (Transitions).
| Other Settings | |||
|---|---|---|---|
| Setting Name | Description | Security Level | Default Value |
| Attached File Maximum Number | The maximum number of file attachments per entity record allowed. | Protected | 10 |
| Attached File Maximum Size | The maximum size of a file attachment (in bytes) allowed. | Protected | 1048576 |
Configuring a Setting
The security level of the setting must be Public.
The Manage Settings user type permission is required.
For global settings:
For product settings:
Locate the setting using the Refine by list or the Feature column.
Click the name of a setting.
Click Edit next to the name of the setting.
Make changes.
Click Save.
Restoring the Default Value of a Setting
The security level of the setting must be Public.
The Manage Settings user type permission is required.
For global settings:
For product settings:
Locate the setting using the Refine by list or the Feature column.
Click the name of a setting.
Click Reset next to the name of the setting.
The default value of the setting is restored and the change is reflected in the product.
User Types and Permissions
Onboarding (Transitions) Permissions
Permissions can be granted to the Onboarding (Transitions) administrator and Onboarding (Transitions) Center users.
Many Onboarding (Transitions) permissions are located at Configuration > [SmartOrg] Administration > [Users] User Types > Recruiting > Onboarding (Transitions).
| Category | Onboarding (Transitions) Permission | Description |
|---|---|---|
| Administration | View public product settings | Enables users to view all Protected and Public settings in Onboarding (Transitions) Administration. |
| Administration | Update Human Resources Product Settings | Permits users to update all Public settings in Onboarding (Transitions) Administration. |
| Administration | View protected product settings | Enables users to view protected product settings. |
| Administration | Update system product settings | Enables users to modify system product settings. |
| Administration | Manage user-defined forms to display and collect data | Enables the User-defined Forms feature in Onboarding (Transitions) Administration. Users can create, edit and disable user-defined forms. |
| Administration | Manage message templates for email correspondence and reminders | Enables the Message Templates feature in Onboarding (Transitions) Administration. Users can create, edit and disable message templates sent to recipients. |
| Administration | Manage text documents and paragraphs for use in content pages and message templates | Enables the Documents feature in Onboarding (Transitions) Administration. Users can create, edit and disable text documents and PDF documents. |
| Administration | Manage user-defined fields, e-signatures, and user-defined reporting | Enables the User-defined Fields and User-defined Selections features in Onboarding (Transitions) Administration. Users can create, edit and disable user-defined fields and selections. Most user-defined fields and selections used in Onboarding (Transitions) are managed in Recruiting Administration. Separate permissions control the creation of these fields. In a future release, users will have the ability to configure user-defined fields that appear in reports. |
| Administration | Manage task definitions, related sources, content pages, and images | Enables the Task Definitions feature in Onboarding (Transitions) Administration. Users can create, edit and disable Onboarding (Transitions) tasks. The Content Pages section (and corresponding links) are displayed in Onboarding (Transitions) Administration. |
| Administration | Manage Onboarding (Transitions) processes of all types | Enables the Processes feature in Onboarding (Transitions) Administration. Users can create, edit and disable Onboarding (Transitions) processes. This permission also enables users to create and update steps within processes. |
| Administration | Manage services that are provided by partners | Controls whether the Onboarding (Transitions) administrator can view the section for controlling OVI services that have been enabled for the zone. |
| New Hire | Send email correspondence on demand | Permits Onboarding (Transitions) Center users to send ad hoc correspondences at any time from the Process page. |
| New Hire | View processes I own or supervise, or that have been shared with me | Permits Onboarding (Transitions) Center users to view processes for which they are the process owner or one of the supervisors. |
| New Hire | View, suspend, and restart processes that I own or supervise or share | Enables Onboarding (Transitions) Center users to suspend and resume processes for which they are the process owner or that they shared in Onboarding (Transitions) and for which they are one of the supervisors. |
| New Hire | View, suspend, restart and share processes that I own or supervise or share | Permits Onboarding (Transitions) Center users to explicitly allow another user to view a new hire's process temporarily. |
| New Hire | View all processes | Permits Onboarding (Transitions) Center users to view processes for new hires. |
| New Hire | View, suspend, and restart all processes | Enables Onboarding (Transitions) Center users to suspend, restart or cancel processes for new hires, and to change the assigned users, the hiring manager, recruiters or assistants while the process is running. |
| New Hire | View, suspend, restart, and share all processes | In addition to the previous permission, permits Onboarding (Transitions) Center users to share processes in Onboarding (Transitions) and to revoke sharing. |
| New Hire | View, add, and print attached files (PDFs) | Enables Onboarding (Transitions) Center users to view the System Documents section on the Process page. If this permission is enabled, PDF documents associated with the new hire via the Open PDF task are displayed. Also, with this permission, Onboarding (Transitions) Center users can add PDF documents, from the document library, to the System Documents section of the new hire's running process. |
| New Hire | Delete processes that are completed or canceled | Administrators can "purge" or delete candidates/new hires from the Taleo system manually or through an automated action provided the candidates/new hires are not involved in any process. This permission enables Onboarding (Transitions) Center users to delete information about the process status, completion, tasks, task completion dates, etc. All the personal information about the candidate/new hire is unaffected. |
| Tasks | Manage tasks assigned to me | Permits Onboarding (Transitions) Center users to view tasks in the Onboarding (Transitions) Center for which they are an assignee, and tasks they created for themselves. Note that there is no specific permission such as "Execute tasks assigned to me". If a task is displayed and assigned to an Onboarding (Transitions) Center user, the person can execute it. |
| Tasks | View and execute tasks assigned to me | When this permission is granted, Onboarding (Transitions) Center users cannot modify task details such as its due date but they can execute the task. Note that this permission is similar to the "View and execute all tasks assigned to anyone" permission except that it applies only to tasks assigned to the user. |
| Tasks | View, edit, and execute tasks assigned to me | Permits Onboarding (Transitions) Center users to edit tasks in the Onboarding (Transitions) Center for which they are an assignee, and tasks they created for themselves. Enables the users to change the due date and priority of tasks that they can access. Enables Onboarding (Transitions) Center users to "retry" a task that has Error or Canceled status. |
| Tasks | Create tasks assigned to me, and view, edit, and execute tasks assigned to me | Enables Onboarding (Transitions) Center users to change the due date and priority of assigned tasks, and to execute their own tasks if they can view them. Also enables Onboarding (Transitions) Center users to create tasks they want to assign to themselves. Enables Onboarding (Transitions) Center users to "retry" a task that has Error or Canceled status. |
| Tasks | Reassign tasks assigned to me | Enables Onboarding (Transitions) Center users to reassign tasks in Onboarding (Transitions) that they have created for themselves. |
| Tasks | View related sources of tasks assigned to me, to see their forms and documents | Permits Onboarding (Transitions) Center users viewing a new hire's steps and tasks to view the forms and PDFs that are part of the task assigned to them. This permission is useful for viewing the data that was entered in the fields by the task assignees. It also enables the viewer to see all the OVI request information and the More Details link to the partner's web site for tasks that are of External Service Request type. |
| Tasks | Manage tasks in processes for which I am the supervisor (same capabilities as the owner) | |
| Tasks | View all tasks assigned to anyone, and execute tasks assigned to me | Permits Onboarding (Transitions) Center users to view all tasks in the Onboarding (Transitions) Center regardless of a task's status and assignees. |
| Tasks | View and edit all tasks assigned to anyone, and execute tasks assigned to me | Enables Onboarding (Transitions) Center users to edit all tasks in the Onboarding (Transitions) Center, such as changing the title or due-date of the assigned task. This permission is unrelated to executing a task because a task's assignee(s) can always execute the task. Enables Onboarding (Transitions) Center users to "retry" a task that has Error or Canceled status. |
| Tasks | View, edit, and reassign all tasks assigned to anyone, and execute tasks assigned to me | Enables Onboarding (Transitions) Center users to reassign all tasks in the Onboarding (Transitions) Center to other users who will complete them. Users can also reassign tasks for which they were not the original assignees to themselves. Enables Onboarding (Transitions) Center users to "retry" a task that has Error or Canceled status. |
| Tasks | View related sources (forms, email correspondence, and documents) related to all tasks | Permits Onboarding (Transitions) Center users viewing the new hire's steps and tasks to view the forms and PDF documents that are part of the task. This permission is useful for viewing the data that was entered in the fields by the task assignees. |
| Tasks | View and execute my tasks in the Response Center (do not combine with other permissions) | Provides external users with a simplified view to access their assigned tasks (an alternative to the Onboarding (Transitions) Center). The Response Center displays only the users' open tasks. When completed, tasks are no longer displayed in the task list in the Response Center. Email messages do not require a specific variable to direct users to the Response Center. The “{TransitionsURLs_Para.TaskAccessURL}” field brings each assignee to the appropriate place where he/she can complete the assigned task. This means that a single message template can be used for a task assigned to different people: a candidate or a new hire, a Response Center user and an Onboarding (Transitions) Center user. Clicking the link displays the right page and the right task to each type of user. Alternatively, a specific message template can contain the “{TransitionsURLs_Para.ResponseCenterURL}” field to ensure that people are directed to the Response Center only. The people must have Response Center permissions. (See Message Template Key Concepts.) Because Response Center users have simple needs, other Onboarding (Transitions) permissions must not be selected in addition to the "View and execute my tasks in the Response Center (do not combine with other permissions)" permission. Likewise, the Response Center permission must not be selected for other Onboarding (Transitions) Center users who have other more substantial needs and consequently other Onboarding (Transitions) permissions. If the "View and execute my tasks in the Response Center (do not combine with other permissions)" permission is selected along with other Onboarding (Transitions) permissions, this can cause a variety of problems for those users. |
Onboarding (Transitions)-related permissions for the Recruiting Center are located at Configuration > [SmartOrg] Administration > [Users] User Types > Recruiting > Other.
| Category | Onboarding (Transitions) Permission | Description |
|---|---|---|
| Onboarding (Transitions) | Initiate a prehire process for a candidate | Enables Recruiting Center users to start a prehire process for candidates when the latter reach a step configured for such an action (in a candidate selection workflow). |
| Onboarding (Transitions) | Cancel a prehire process in progress | Enables Recruiting Center users to cancel a prehire process that was started and whose status is In Progress. |
| Onboarding (Transitions) | Initiate a new hire process for a new resource | Enables Recruiting Center users to start a new hire process for candidates when the latter reach a step configured for such an action (in a candidate selection workflow). |
| Onboarding (Transitions) | Cancel a new hire process in progress | Enables Recruiting Center users to cancel a new hire process that was started and whose status is In Progress. |
An Onboarding (Transitions)-related permission for offers is located at Configuration > [SmartOrg] Administration > [Users] User Types > Recruiting > Offers.
| Category | Onboarding (Transitions) Permission | Description |
|---|---|---|
| General | Extend offers electronically | Enables Recruiting Center users to extend offers electronically to candidates when the latter reach a step configured for such an action (in a candidate selection workflow). E-Offer processes can be started and canceled from the Recruiting Center or using Taleo Connect. |
An Onboarding (Transitions)-related permission for integration is located at Configuration > [SmartOrg] Administration > [Users] User Types > Integration > Onboarding (Transitions).
| Category | Onboarding (Transitions) Permission | Description |
|---|---|---|
| Allow this user type to perform integration tasks | Enables users to perform integration tasks related to Onboarding (Transitions). This permission should only be granted to people who use Taleo Connect. It is a permission that can produce unexpected results when it is granted to other users. Take the case of users who have permissions required to view only their processes and tasks. If the users are also granted the "Allow this user type to perform integration tasks" permission, they will be able to view everyone's processes and tasks. |
Organizations, Locations, Job Fields
Fundamental Data Structure: Organization-Location-Job Field (OLF)
Taleo designed a data structure that enables each customer to customize Taleo products such that they reflect how the customer does business. Taleo defines each organization (customer) as a combination of three main elements: Organizations, Locations, Job Fields (OLF). OLF is also referred to as contextualization.
Organization describes the hierarchical structure of an organization. Up to 20 organization levels can be created. The system proposes the following organization structure, but other terms may be chosen to better reflect the hierarchical structure of a company:
Company
Sector
Department
Division
Location represents a geographical area, such as a country or state. Locations are listed in a hierarchical order, from the broadest geographical area (often a country) to increasingly specific areas (work location). Up to 5 location levels can be created. Locations must be associated to Taleo network locations used for various purposes, mainly integration with external systems, using a common and standard universal structure. Taleo strongly recommends defining a zip code for the location. A common location structure is:
Country
State/Province
Region
City
Work Location
Job Field represents the employment sectors or domains. Up to 4 job field levels can be created. Job fields must also be mapped to the network job fields, again to have a common language with the external world, be for posting or integrations. This mapping also serves to inherit existing classification for competencies. The system proposes the following job field structure, but other terms may be chosen to better reflect the structure of a company:
Category
Function
Specialty
Contextualization, that is the Organization-Location-Job Field structure associated to an element, represents the framework the application uses to organize, classify, link, match or search for information in the application. Although Organization-Location-Job Field structures are configured with the help of an Oracle representative during the implementation phase, modifications to structure elements can be done in maintenance mode at any time. It is possible to customize the system to reflect a company's unique structure and make modifications to Organization-Location-Job field elements in real time so that the data accounts for any changes in the structure.
Configuration
To manage organizations, locations and job fields in SmartOrg, the Manage foundation data permission is required.
| User Type Permission | Location |
|---|---|
| Manage foundation data | Configuration > [SmartOrg] Administration > [Users] User Types > Configuration > Foundation Data |
Operation Modes
Operation Mode
The operation mode can be changed for service, configuration, or implementation purposes.
-
implementation
-
maintenance
-
production
System administrators have the ability to switch to maintenance mode or production mode for each product individually or for all. Products supported by the operation mode feature are:
-
Recruiting (includes Remote Manager Experience)
-
Performance
-
Career Section
-
New Hire Portal
Onboarding (Transitions)
For the above products, except the New Hire Portal, system administrators know the number of users using both the product as well as the administrative area related to the product. Note that candidates/new hires who are doing their Onboarding (Transitions) processes are logged into the Career Sections, not into the New Hire Portal.
Implementation Mode: The implementation mode is usually only for new customers or new zones (databases). It is used during the initial configuration and implementation stages of the system. Once the implementation is completed, the implementation mode is no longer available to system administrators and a request must be made through Oracle Support. In implementation mode, system administrators can:
-
Create, delete and modify the Organization-Location-Job Field structure.
-
Create, delete and modify levels in the Organization-Location-Job Field structure.
-
Create, delete and modify elements in the Organization-Location-Job Field structure.
If Recruiting is in implementation mode, users cannot connect to the Remote Manager Experience.
f changes need to be made to the structure of the database after implementation, system administrators must contact Oracle Support and request that the system be put back into implementation mode.
Maintenance Mode: The maintenance mode is a special administrative feature used to protect the integrity of the database when editing Organizations, Locations, or Job Fields.
In maintenance mode, the application is inactive. All users, except system administrators, are logged out automatically. The application displays a message to users as well as to candidates in Career Sections, indicating that the application is in maintenance mode. If users are logged in and have not saved data they were entering, this data will be lost.
In maintenance mode, system administrators can:
-
Delete departments, both via Integration and SmartOrg.
-
Delete positions, both via Integration and SmartOrg.
-
Import job positions via Integration.
-
Modify the Organization-Location-Job Field structure, both via Integration and SmartOrg.
-
Modify levels in the Organization-Location-Job Field structure, both via Integration and SmartOrg.
-
Edit Organization, Location, and Job Field elements (Element Management), both via Integration and SmartOrg.
There are no transactions in Onboarding (Transitions) or Performance that require the maintenance mode. If Onboarding (Transitions) is in maintenance mode and a user is performing a Start Onboarding (Transitions) Process or a Cancel Onboarding (Transitions) Process action from Recruiting, the transaction will still be scheduled to process.
If Recruiting is in maintenance mode, users can connect to the Remote Manager Experience.
Production Mode: In production mode, all users as well as guests, agents, and system administrators have access to the application. In production mode, system administrators can:
-
View structure elements for Organizations, Locations, and Job Fields.
-
Save agencies, both via Integration and SmartOrg.
-
Create and edit job templates.
-
Select and view positions.
-
Create and edit departments.
All tasks listed above can also be performed in maintenance mode and in implementation mode.
To import/export candidates (by Integration) and move candidates in the candidate selection workflow (by Integration), the system must be in production mode.
Modifying the Operation Mode
The Manage Application Mode user type permission is required.
In the Operation Modes page, click Edit.
In the Operation Mode Editor page, select the desired mode for each product, that is production or maintenance mode.
Click Save.
The selected operation mode appears beside each product. If the system is put in Maintenance mode, users currently logged will receive a message and will be logged out.
Release Notes Messages
Release Notes Message
A pop-up message containing new release information, system improvements, important messages and other information can be displayed when users log into the product.
The same release notes message is displayed to users regardless of the product.
Once users are logged in, they can turn off the Release Notes message by selecting the Don't display this message again option. The message will then reappear only when new release information or other important information is available or if the users clear their browser cookies.
Configuring the Release Notes Message Feature
The configuration of the release notes feature consists of the following steps.
No default release notes message is provided with the product. A blank page is displayed unless the system administrator decides to customize the page to present important information to users.
Creating the Release Notes Message Content
The Edit release notes user type permission is required.
Release Notes - Permissions and Settings
The following permissions and settings are used for the release notes functionality.
| User Type Permission | Description | Location |
|---|---|---|
| Edit release notes | Allows users to edit the release notes message content in the Central Configuration menu. | Configuration > [SmartOrg] Administration > [Users] User Types > Configuration > Foundation Data |
| Setting | Description | Default Value | Location |
|---|---|---|---|
| Release Notes | Displays the release note information when accessing the application. Once the system administrator has created the content of the release notes message, the Release Notes setting must be set to Yes in the user's configuration profile. | No | Configuration > [SmartOrg] Administration > [Users] Configuration Profiles |
Configuring Configuration Profiles to Display Release Notes Information
The Release Notes message must be created.
Click a configuration profile.
Click the Release Notes setting.
Click Edit.
Select Yes.
Click Save.
Release Notes - Other Configuration Tasks
Editing the Release Notes Message
The Edit release notes user type permission is required.
Click Edit.
Modify the fields as required.
Click Save.
Setting the Release Notes Message Validity Period
The Edit release notes user type permission is required.
Click Edit.
Set the validity period with the Calendar icon.
Click Save.
The release notes message is displayed to users when they sign in the application only for the determined period provided the Do not display release note information is not selected and the Release Notes setting has been activated in the user's configuration profile.
Displaying the Release Notes Message
The Edit release notes user type permission is required.
Click Edit.
Clear the Do not display release note information check box.
Click Save.
Hiding the Release Notes Message
The Edit release notes user type permission is required.
Click Edit.
Select the Do not display release note information check box.
Click Save.
SmartOrg User Accounts and Transitions
SmartOrg User Account Creation When Process Started
Starting an Onboarding (Transitions) process for the first time for a candidate creates an associated user account in SmartOrg.
It is important to note that the first time an Onboarding (Transitions) process is started for a candidate, a SmartOrg user account of type Onboarding (Transitions) is created automatically unless the candidate already has an employee and/or user account. This means that SmartOrg administrators as well as Recruiting Center users can access the associated candidate information. A candidate who has an Onboarding (Transitions)-type SmartOrg account is not granted automatically any permissions to use Taleo products and is not automatically considered an employee of the organization. The candidate continues to log into the career section using his/her candidate credentials as before and completes Onboarding (Transitions) tasks on the Tasks tab.
The information used to create the SmartOrg account comes from the candidate profile. The User Name value is created as a concatenation of "tr", the Taleo candidate number and 4 system-generated characters, linked by underscores. In the following example, the SmartOrg user name is tr_1705185584_2m4X. The candidate profile is unchanged and is linked to the SmartOrg user account (i.e. some fields are shared).

If additional Onboarding (Transitions) processes are started for the candidate in the future, the original SmartOrg account is used; no additional ones are created. An Onboarding (Transitions)-type SmartOrg user account can be transformed into an employee of the organization if the administrator assigns OLF Organization or Location. This can also be done through integration. An Onboarding (Transitions)-type SmartOrg user account can be transformed into a user of the Taleo system if the administrator grants user types with permissions required to use Taleo products. This can also be done through integration. When the user obtains an Employee or Operator user account, the individual receives notification by email (provided such notification was configured). Such users cease to be Onboarding (Transitions)-type users automatically and their user account is no longer displayed if the Onboarding (Transitions) filter is used in User Accounts (see the following image). These changes do not affect the individual's ability to view and complete their Onboarding (Transitions) tasks on the career section's Tasks tab.
An Onboarding (Transitions) user account is not created if a process is started for candidates who already have a SmartOrg user account (Onboarding (Transitions), Employee or Operator). Here are three examples:
Former employees who therefore have an existing Employee or Operator user account in SmartOrg and who are candidates hoping to return to the organization.
A Taleo Connect HRMS feed can automatically create an association between candidates and Operator or Employee user accounts.
When Performance Management users of type Employee log in, they can be asked to confirm their existing candidate account.
Onboarding (Transitions) user accounts cannot be created manually via SmartOrg or be imported into SmartOrg via Taleo Connect. Existing Employee user accounts and Operator user accounts cannot be transformed into Onboarding (Transitions) user accounts.
Because starting an Onboarding (Transitions) process for the first time for a candidate results in the creation of an Onboarding (Transitions)-type user account in SmartOrg, customers should not be surprised if the number of accounts in SmartOrg (Configuration > [SmartOrg] Administration > User Accounts) surpasses the number of employees in SmartOrg.
SmartOrg Onboarding (Transitions) User Account Administration
SmartOrg administrators can select the Onboarding (Transitions) user type on the User Accounts page in SmartOrg. Onboarding (Transitions)-type users can be searched for, identified, and managed like other types of users (Operator and Employee).
Impact in SmartOrg When There Are Duplicate Candidate Files and Onboarding (Transitions) Process is Started
Before starting an Onboarding (Transitions) process for a candidate, it is important that Recruiting Center users ensure there is only one candidate file for the person. Performing a check for duplicates (More Actions list > Check for Duplicates) enables Recruiting Center users to determine if a candidate created multiple candidate profiles. If more than one candidate file is found for the person, Recruiting Center users are strongly encouraged to perform the Merge Candidate Files action before starting an Onboarding (Transitions) process.
Starting an Onboarding (Transitions) process for a candidate results in the creation of a user account in SmartOrg (assuming the candidate file is not already linked to a user account). Each person should have a single candidate file and it should be linked to a single SmartOrg user account.
Suppose a candidate is hired using candidate file "A" and an Onboarding (Transitions) process is started. This action results in the creation of a linked user account "A" in SmartOrg. Suppose the person later creates a second candidate file “B” at the external career site and applies for a different job in the organization. If a Recruiting Center user does not perform the Check for Duplicates action and starts an Onboarding (Transitions) process, an unnecessary user account "B" is created in SmartOrg. These two conflicting user accounts can easily become problematic for integrations, Learn accounts and single sign-on configurations.
In addition, the two user accounts cannot be merged and even the two candidate files cannot be merged because each is associated with a distinct Onboarding (Transitions) process. (Please see Automatically Deleting Old Processes). Such problematic situations can be avoided if Recruiting Center users perform the Check for Duplicates action and merge candidate files that refer to the same person before starting an Onboarding (Transitions) process.
Single Sign-On
Single Sign-On
Single Sign-On (SSO) enables users to log into Oracle Talent Acquisition Cloud (OTAC) applications using their corporate credentials.
In an SSO environment, users are authenticated by an Identity Provider (e.g. OIF, ADFS) that is maintained by their corporate IT department. Both employees and candidates who have access to internal career sections can use SSO to access Oracle Talent Acquisition Cloud (OTAC) products. SSO cannot be used for external career sections.
Customers who want to use SSO can implement it themselves through the SSO configuration interface. Customers perform easy configuration steps to enable and support one or more identity providers. The feature supports two flows to authenticate users:
Users are authenticated through their company portal, then they access OTAC products through the portal (Identity Provider initiated flow).
Users access the OTAC product URL directly and are redirected to their identity provider for authentication (Service Provider initiated flow).
Customers can configure the authentication request flows, and exit and error URLs for seamless integration with their environment.
SSO setup requires:
An Identity Provider with SAML 2.0 support.
A user/candidate synchronization feed between the Identity Provider and OTAC. This can be developed using Taleo Connect Client (TCC).
A corporate portal (optional).
Oracle Talent Acquisition Cloud (OTAC)
SAML 2.0 based SSO
SSO Identity Provider (IdP) setup
Taleo Connect Client (TCC)
Identity Provider (IdP) and Service Provider
Single Sign-On (SSO) in Oracle Talent Acquisition Cloud (OTAC) is accomplished through the use of SAML (version 2.0). SAML provides a mechanism to exchange authentication and authorization data between two trusting entities.
In a generic SAML context, the entities are:
The Asserting party (or SAML authority)
The Relying party (or SAML requester)
In an SSO context, the Asserting party is the Identity Provider (IdP) and the Relying party is the Service Provider (SP). The Identity Provider is the customer's SAML federation server (OIF, ADFS etc.) and the Service Provider is the Oracle Talent Acquisition Cloud (OTAC) application.
A trust relationship is established between the Identity Provider and the Service Provider. The Service Provider trusts the information received from the Identity Provider. The information sent is called the SAML assertion. It contains the identity of the user that has been authenticated by the IdP. Upon receiving the assertion, Oracle grants the appropriate level of access to resources, based on the identity of the user.
Metadata File
SSO is set up by exchanging metadata files between the Identity Provider (IdP) and the Service Provider (SP).
The SAML 2.0 metadata file format is supported. This metadata file contains information about each SSO entity (URLs, protocols supported, certificates etc.). The IdP's metadata file can be imported into the SSO user interface. If any changes are made to the IdP, the metadata file must be re-imported.
Also, metadata files can be generated for the Taleo Service Providers (SmartOrg and Career Section). These files must be imported into the IdP. A separate metadata file will be generated for each SP-IdP combination. For example, if the customer has 2 IdPs, then up to 4 metadata files will be generated (2 for SmartOrg and 2 for Career section).
For an example of an Identity Provider metadata file, see Identity Provider Metadata Example.
For an example of a SmartOrg metadata file, see SmartOrg Metadata Example.
For an example of a career section Service Provider metadata file, see Career Section Metadata Example.
Single Sign-On Flows
There are two types of Single Sign-On flows: Identity Provider (IdP)-initiated and Service Provider (SP)-initiated.
Identity Provider (IdP)-initiated Flow
In the IdP-initiated flow, the user logs in first to the IdP. The person then requests access to the Service Provider (SmartOrg or career section) – often through an SSO Portal. The Identity Provider will initiate an SSO connection to the Oracle Talent Acquisition Cloud (OTAC) product and provide an assertion. The assertion contains the identity, attributes and entitlements of the requesting user. Oracle will grant access to the user based on the assertion information.
The image represents an Identity Provider (IdP)-initiated flow.
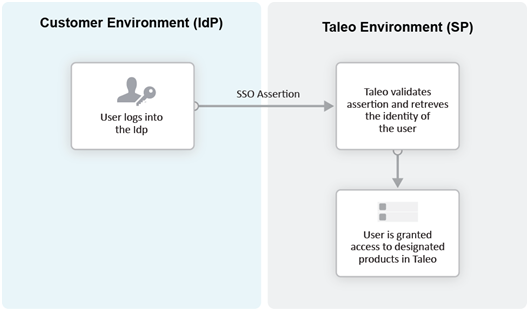
The IdP-initiated flow is the most commonly used configuration.
When SSO is configured, the IdP-initiated flow is activated by default.
Multiple IdPs are supported for IdP-initiated flows. Each IdP can redirect users to the Service Provider (SmartOrg and career section). The Service Provider accepts request from each IdP as long as the IdP is properly defined.
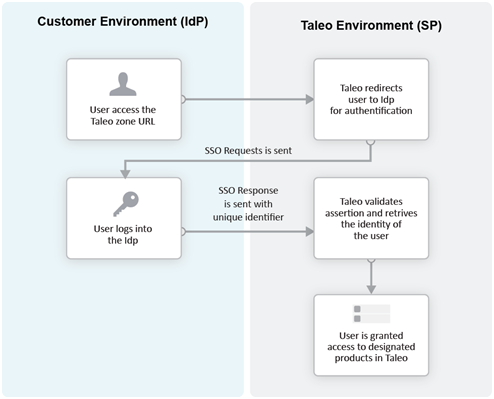
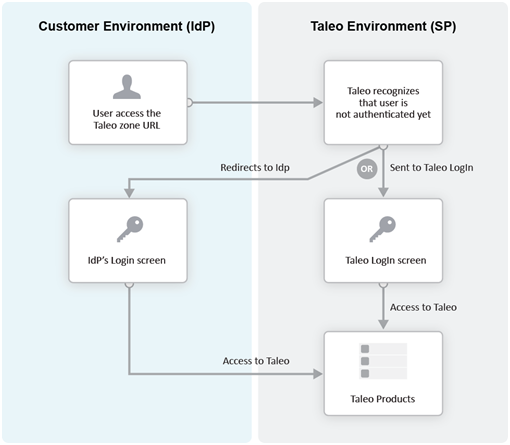
Service Provider (SP)-initiated Flow
In the Service Provider-initiated flow, the user accesses the Oracle Talent Acquisition Cloud (OTAC) product (SP) directly. For example, this can be done by typing the URL of the zone in the browser. The Service Provider then redirects the user to the Identity Provider. After authenticating the user, the IdP generates and sends an assertion back to the SP. The assertion contains the identity, attributes and entitlements of the requesting user. Oracle grants access to the user based on the assertion information.
The Challenge URL setting, depicted in the following illustration, is used to set up a Service Provider-initiated flow.
The customer can choose to optionally activate SP-initiated flow as well.
For SP-initiated flow from SmartOrg, only one IdP can be configured. All SP-initiated requests from SmartOrg are redirected to this IdP.
For SP-initiated flow from career sections, by default all requests are redirected to a single default IdP. However, individual career sections can be set up to redirect requests to a different IdP.
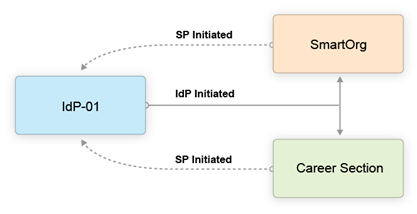
The following illustration depicts a single Identity Provider, SmartOrg and single career section:
-
Users can access both SmartOrg and the career section from the Idp (IdP-initiated flows).
-
When users access SmartOrg directly, they are redirected to the IdP for authentication (SP-initiated flows).
-
When users access the career section directly, they are redirected to the IdP for authentication (SP-initiated flows).
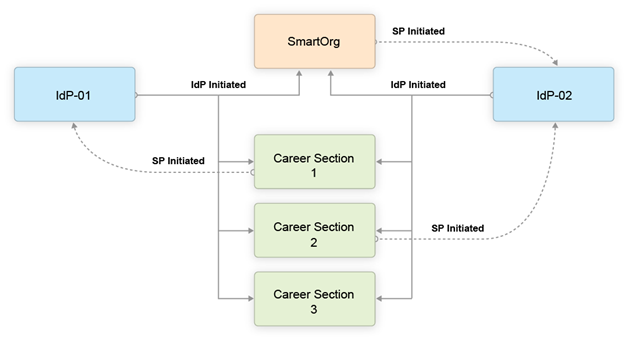
The following illustration depicts an SSO setup with two Identity Providers, SmartOrg and three career sections:
-
Users can access both SmartOrg and each career section from the Idp-01 (IdP-initiated flows).
-
Users can access both SmartOrg and each career section from the Idp-02 (IdP-initiated flows).
-
When users access SmartOrg directly, they are redirected to the IdP-02 for authentication (SP-initiated flows).
-
When users access career section 1 directly, they are redirected to the IdP-01 for authentication (SP-initiated flows).
-
When users access career section 2 directly, they are redirected to the IdP-02 for authentication (SP-initiated flows).
-
When users access career section 3 directly, they are not redirected to any IdPs. Instead, they are prompted for their credentials.
Challenge, Error and Exit URLs
Challenge, Error and Exit URLs can be defined to configure the destination to which the user will be redirected under various conditions.
One set of URLs can be configured for each SP (SmartOrg and career section). In addition, individual career sections can have their own values for these URLs. These values will override the defaults for the career section SP.
Challenge URL
The Challenge URL setting defines the page where the user will be directed to present his credentials. There are two options:
Default login page: Standard OTAC page. No redirection to the IdP.
SP Initiated Servlet redirect: The user is redirected to the IdP's login page. This option must be selected to enable SP initiated flows from SmartOrg and career section to the chosen IdP.
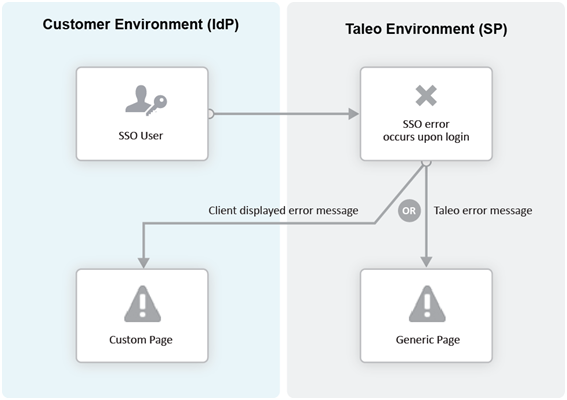
Error URL
The Error URL setting defines the page where the user will be directed when an SSO error occurs. It can be the default Oracle Talent Acquisition Cloud (OTAC) error page or a custom page defined by the customer. Typical errors that would generate an SSO error are:
Locked user account
Invalid Assertion (generic SSO response issue)
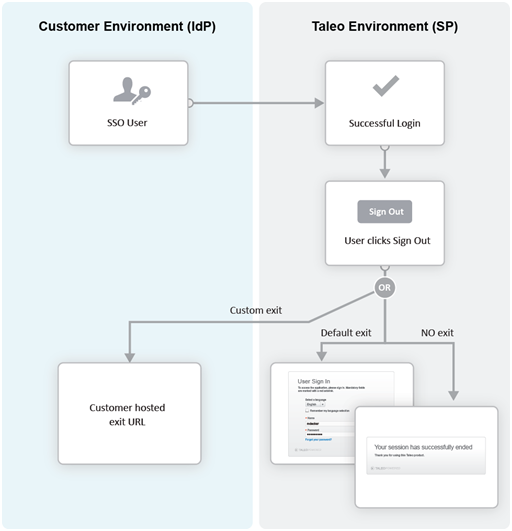
Exit URL
This Exit URL setting defines where the Service Provider sends the user upon exiting the application. Three options are available:
Default exit page – Display the login screen
Custom URL – Display a custom page defined by the customer
No exit page – Display the exit screen
Certificate and Validation
A trust relationship is established between the IdP and the SP when both exchange their respective certificates.
All communications (SAML Request and Response) will be signed by the issuing party. The receiving party will use the certificate to validate the received communication.
IdP Certificates
The IdP's certificate is usually available in its metadata file. The certificate will be automatically imported when the metadata file is imported. After import, this certificate can be viewed and managed in the SSO interface. Certificates can also be manually imported. The certificate can be associated to one or both Service Providers (SmartOrg and career section). Each certificate will have a validity period defined by a start data and an end date.
Multiple certificates can be imported for an IdP. At least one has to be valid for SSO connections to be established.
SP Certificates
The SP certificates are available through SP's metadata file. A separate certificate is generated for each SP-IdP combination.
Validation
Upon receiving an assertion, each Service Provider performs the following validity checks.
Signature – Validate that the assertion has been signed by the IdP.
Timeout – Validate that the age of assertion has not exceeded a specified timeout period. The age is calculated as the time difference between the moment the assertion was received (by the SP) and the moment the assertion was issued (by the IdP). A timeout period of up to 30,000 milliseconds can be configured.
User Synchronization
The customer must configure synchronization of users between the Identity Provider(s) and Oracle Talent Acquisition Cloud (OTAC).
The IdP will identify the user (subject) in the assertion. This user identifier must also be stored in the system. Upon receiving the assertion, Oracle extracts the user identifier from the assertion and then searches for the user in the system. Upon finding a match, the appropriate privileges are granted to this user.
Taleo Connect Client (TCC) can be used to import the user identifier into Oracle Talent Acquisition Cloud (OTAC). A TCC import file can be created and scheduled for automatic import into OTAC. Both user and candidate information must be updated. The following fields must be updated with the SSO user identifier:
Employee/Username (for SmartOrg Service Provider)
Candidate/Credentials/SSOID (for career section Service Provider)
For information about TCC, please refer to the Taleo Connect Client documentation.
Users can also be created manually:
SmartOrg users: Create the users manually through the SmartOrg interface.
Internal career sections: Use the career section SSO Configuration Wizard. See Career Section SSO Configuration Wizard.
Identity Provider Bindings
Identity provider bindings specify the IdP URLs that can be used to perform various SAML transactions.
These URLs will be used by the Taleo Service Providers. It is expected that some bindings will be identical. The metadata file provides values for these bindings automatically, however, you can edit the values as needed.
Identity Provider Trusted Certificates
Trusted certificates are needed to confirm the identity of Identity Providers. Each assertion received will be validated against these certificates.
IdP certificates included in the metadata file are imported and displayed automatically. Certificates can also be imported manually in the Identity Provider Trusted Certificates section. Certificates can be chosen to confirm the identity of Identity Providers for SmartOrg, career sections or both. Afterward, each assertion received is validated against the certificates.
Configuring Single Sign-On
Recommended SSO Implementation
The Manage SSO configuration user type permission is required. (See: Granting Permission to Manage Single Sign-On (SSO)).
It is recommended that you enable and test IdP initiated flows before enabling SP initiated flows. If both IdP and SP initiated flows are enabled at the same time, you run the risk of completely locking out users due to incorrect SSO configuration.
Obtain the metadata file for the corporate Identity Provider from your IT department.
Register the Identity Provider in Oracle Talent Acquisition Cloud (OTAC).
Decide which Service Providers (SmartOrg, career section or both) must be activated for this IdP.
Initially activate just IdP initiated flows.
Set up the exit and error URLs if necessary.
Export the Service Provider metadata files from Oracle Talent Acquisition Cloud (OTAC).
Register the Service Providers in the IdP by importing the metadata files.
Synchronize SmartOrg SSO user identity (either using TCC or manually).
Test IdP initiated access to SmartOrg.
Activate SSO in one or more career sections.
Synchronize career section SSO identity (either using TCC or the career section SSO wizard).
Test IdP initiated access to these career sections.
Activate SP initiated flows for the IdP.
Test SP initiated access to SmartOrg.
Test SP initiated access to career section.
Granting Permission to Manage Single Sign-On
Click the check box next to Manage SSO Configuration.
Click Save.
Users who have the user type will be able to configure SSO.
Configuring an Identity Provider
The Manage SSO configuration user type permission is required.
SmartOrg Service Provider Settings
| Setting | Description |
|---|---|
| Default for SP Initiated Flow |
|
| Challenge URL |
|
| Error URL |
|
| Exit URL |
|
| Execute Global Logout |
|
Career Section Service Provider Settings
| Setting | Description |
|---|---|
| Default for SP Initiated Flow |
|
| Challenge URL |
|
| Error URL |
|
| Exit URL |
|
Exporting SmartOrg Service Provider Metadata Files
To download the metadata file associated with a SmartOrg Service Provider, go to: https://ZoneName/smartorg/sp/metadata.jss?target=EntityID, replacing ZoneName by your Taleo zone name, and replacing EntityID by the Entity ID value imported from the IdP metadata file.
Registering Service Providers (SmartOrg and Career Section) in the IdP
The metadata files exported in previous steps can be imported into your IdP system (OIF, ADFS etc.). You should set up a single Service Provider for SmartOrg and a single, different Service Provider for Career Section.
Deleting an Identity Provider
The Manage SSO configuration user type permission is required.
Ensure that all SSO flows are disabled before deleting an IdP. The IdP to be deleted should not be the default for any Service Provder-initiated flows.
Next to Identity Provider Configuration, click Show.
Click the Delete that corresponds to the Identity Provider you want to delete.
Click Yes.
Adding an IdP Trusted Certificate to an Identity Provider
The Manage SSO configuration user type permission is required.
Deleting an IdP Trusted Certificate from an Identity Provider
The Manage SSO configuration user type permission is required.
Next to Identity Provider Configuration, click Show.
Click the IdP you want to remove a trusted certificate from.
Next to Identity Provider Trusted Certificates, click Edit.
Locate the trusted certificate you want to delete and click the corresponding Delete.
Click Yes.
Click Save.
Configuring Career Sections Individually for Service Provider-Initiated Access
The Manage SSO configuration user type permission is required.
Displaying SSO-protected URLs
The Manage SSO configuration user type permission is required.
Next to SSO Protected URLs, click Show.
Bypassing Single Sign-On
You are logged into Oracle Talent Acquisition Cloud (OTAC) directly, bypassing Single Sign-On.
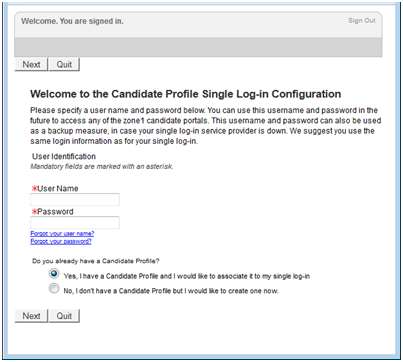
Career Section SSO Configuration Wizard
The Single Sign-On wizard enables internal candidates to link a candidate account to their SSO user identifier.
This method can be used instead of running a Taleo Connect-based integration feed to populate the SSO user identifier in the candidate account.
If the wizard is enabled, the first time that internal candidates log into an internal career section through their Single Sign-On portal, they are prompted to associate their SSO user identifier (profile) with a candidate account. The users can either create a new candidate account or use an existing account. Upon successfully logging in using the candidate account credentials, the SSO user identifier is associated with this candidate account by the Single Sign-On wizard. This operation has to be performed only once. The user will be automatically authenticated in the internal career section for subsequent logins.
Identity Provider Metadata Example
This is an example of an IdP metadata file.

SmartOrg Metadata Example
This is an example of a metadata file for SmartOrg.
Career Section Metadata Example
This is an example of a metadata file for Career Section.
Configuring Oracle Identity Federation
To register SmartOrg and career sections, begin by logging into Fusion Middleware's Enterprise Manager.
Locate the OIF instance and click it.
Click Oracle Identity Federation.
Click Administration.
Click Federation.
Click Add.
Select the federation you created and click Edit.
Click the Oracle Identity Federation Settings tab.
Click the icon to the left of the Identity Provider/Authority Settings section to display the section.
In the Identity Provider/Authority Settings section:
Set the Default SSO Response Binding to: HTTP POST.
Select the check box next to Response with Assertion – SOAP.
Select the check box next to Response with Assertion – HTTP POST.
Click Apply.