9Documents
Documents
Document
Text documents can be added to content pages and message templates while file-based documents can be added to content pages, message templates and PDF tasks.
You can create two types of documents:
-
File-based documents which are PDFs created with Adobe and which can contain variables.
-
Text documents which are created by the Onboarding (Transitions) administrator by assembling paragraphs. Variables can also be added to the text documents.
As reference documents linked from a content page.
As information to be viewed in a task of type "Open PDF".
As attached files viewed in the Onboarding (Transitions) Center for a candidate's/new hire's process.
As the body of a content page.
As the body of any message template that can be emailed by the system.
Code
Name
Status: Active, Inactive, Draft.
Format: HTML, PDF.
Creation Date
Last Modification Date
Actions
Paragraph
A paragraph is a block of text added to a document.
Paragraphs can be accessed from three places:
Onboarding (Transitions) Administration menu, in the Documents section.
Quick Access panel, within the Documents list page.
Quick Access panel, within the Message Templates list page.
Paragraphs can be created from either the Paragraph List or from within a document. When creating a paragraph from the Paragraph List, the paragraph is available for new and existing documents. When creating a paragraph from within a document, the paragraph is only available for that document and will not be available in the Paragraphs list.
Content in a paragraph is created by typing text and/or by adding variables. Standard variables are provided with the system and represent a specific value in the database. For example, a paragraph contains the standard variable {PersonalInfo_Para.LastName}. When opening the document, the system will replace the variable by the new hire's last name.
Edits made to a paragraph in the Paragraphs list will affect all documents using the paragraph, regardless of whether the edits are made directly from within a document or from within the Paragraphs list.
The Paragraphs list displays information in the following columns:
Code
Name
Status: Active or Inactive.
Creation Date
Last Modification Date
Actions
Creating a Text Document
The creation of a text document consists of the following steps:
Defining the Properties of a Text Document
The Manage text documents and paragraphs for use in content pages and message templates permission is required.
-
Click Create a text document.
-
Enter a code and a name for the document.
-
Click Save.
Adding a Paragraph to a Text Document
The Manage text documents and paragraphs for use in content pages and message templates permission is required.
The paragraph appears in the Paragraphs section of the document.
Creating a New Paragraph for a Text Document
The Manage text documents and paragraphs for use in content pages and message templates permission is required.
The paragraph appears in the Paragraphs section of the document.
Reordering Paragraphs in a Text Document
The Manage text documents and paragraphs for use in content pages and message templates permission is required.
The text document must have the Draft status.
-
Select a text document.
-
Click Reorder.
-
Reorder paragraphs using the up and down arrows.
-
Click Save.
Previewing a Text Document
-
Open a text document.
-
Click Preview.
Enabling a Document
The document must have the Draft status.
-
Select a document.
-
Click Activate.
The status of the document is now Active. Once the status of a document is Active, the document cannot be deleted; it can only be disabled if no longer needed.
Documents - Other Configuration Tasks
Removing a Paragraph Included in a Text Document
The text document must have the Draft status.
-
Click a text document.
-
Click Remove next to the paragraph.
-
Click Yes in the message box.
Editing a Paragraph Included in a Text Document
The text document must have the Draft status.
-
Click a text document.
-
Click Edit next to the paragraph.
-
Make changes.
-
Click Save.
Duplicating a Text Document
-
Click a text document.
-
Click Duplicate next to the document name.
-
In the message box:
-
Select Create Copy if you want to create a copy of the paragraphs that the original document contains and link the document copy to this new set of paragraphs.
-
Select Link Copy if you want to link the document copy to the original set of paragraphs.
-
-
Complete the fields.
-
Click Save.
Disabling a Document
The document must have the Active status.
-
Click a document.
-
Click Deactivate next to the document name.
The status of the document is now Inactive. Once a document is disabled, it can no longer be attached to objects within the system. However people who already have the document attached to their file will still be able to see it.
Disabling a Paragraph
The Manage text documents and paragraphs for use in content pages and message templates permission is required.
-
Click a paragraph.
-
Click Deactivate.
Deleting a Document
The document must have the Draft status.
-
In the Actions column, click Delete next to the desired document.
-
Click Yes in the message box.
PDF Documents
PDF documents are useful for displaying in the form of a formatted page current personalized information about a candidate.
PDF documents are different from forms used for data entry in that new information cannot be typed directly into them. Instead, the Onboarding (Transitions) system is designed to display the most recent information in each field in a PDF at the time the document is opened or exported—information entered by the candidate, new hire or other users on a form that had been assigned to them or information imported into the system using Taleo Connect.
A PDF is sort of a "canvas" or "generic paper", and the values for each new hire/candidate are merged with the PDF to display information on the PDF in the desired places. Candidates/new hires can view their own version of the PDF containing the most recent data stored in the system. This data can be viewed, printed or saved locally by each candidate/new hire and by any user or assignee who has the permission required to access the PDF. The Oracle Taleo system is dynamic: these PDFs will always show the most up-to-date information the moment they are opened or exported.
The Oracle Taleo system is not intended to be a long-term system of record. If the business requires a permanent record of the data as of a certain point in time, each candidate's/new hire's PDFs should be saved manually or exported from the system. Organizations can save the PDF manually to a computer or other storage device or export it through Taleo Connect. Take the case of an electronically-signed employee agreement in the form of a PDF document. Suppose the document included a candidate's name: John Smith. The organization could export the PDF document as is though Taleo Connect for long-term storage. If the candidate or Recruiting Center user later changed the name to Jack Smith, a PDF document generated afterward would display the new name while the organization would also have the older PDF document including "John Smith" in storage.
Onboarding (Transitions) administrators can examine the variables (if present) in PDFs provided they have Adobe Acrobat Pro. The following example shows the variables in an I-9 PDF.
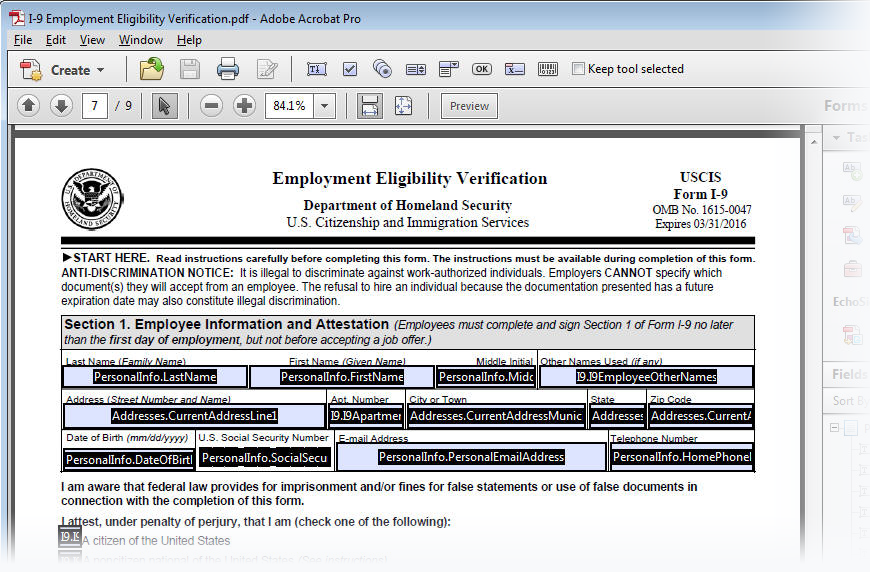
To display such variables in Acrobat Pro, administrators select from the main menu: View > Tools > Forms.
Creating a File-based Document
-
Click Create a file-based document.
-
Enter a code and a name.
-
Click Browse and select the PDF file that you created and want to add to the Documents library. The PDF can include variables.
-
Enter a description of the PDF file.
-
Click Save.
-
Click Activate.
Viewing a PDF Attached to a File-based Document
In Configuration, Onboarding (Transitions) administrators can display a PDF file attached to a document.
The Onboarding (Transitions) document library typically contains a great number of documents and many of those documents might have file attachments. Unsurprisingly, administrators can have difficulty often remembering the kind of information a specific file attachment contains. Administrators can click the file name of a PDF file in the System Documents section of a document in Onboarding (Transitions) Administration and Adobe Acrobat will display the content of the file.
Variable values are not rendered when the content of the file attachment is displayed in the document library. This is because neither the document, nor the file attachment are assigned to a process in the document library.
Important Notes
If you plan to use the synchronization tool, keep in mind that PDF files attached to documents in Taleo Legacy Onboarding might contain variables that are inappropriate in a Taleo Onboarding (Transitions) context. In such cases, you should download a copy of the files and make your changes to the variables using Acrobat. Perform synchronization. Afterward, you can attach your modified PDF files to your Onboarding (Transitions) documents.
Variables in PDF Documents
PDF documents can be prepopulated with variables retained in the system.
A PDF document containing variables will automatically display the most recent information from Onboarding (Transitions). Take the case of an electronically-signed employee agreement in the form of a PDF document. Suppose the document included a candidate's name: John Smith. The organization could export the PDF document as is though Taleo Connect for long-term storage. If the candidate or Recruiting Center user later changed the name to Jack Smith, a PDF document (containing the variables) generated afterward would display the new name.
Variables can be added using Adobe Acrobat Professional or Adobe Acrobat 3D. For example, you could take a PDF document, such as the I-9 form, and insert variables that would automatically extract information from the new hires' candidate file. Instead of offering the new hire or Onboarding (Transitions) users who view the PDF during a process a PDF containing no personalized information, you could offer them a PDF that included the most recent information about the new hire. In other words, the fields in the PDF would be filled in automatically with the most recent corresponding data in the Oracle Taleo system. See PDF Documents and Inserting Variables in a PDF Document.
Inserting Variables in a PDF Document
Adobe Acrobat Professional or Adobe Acrobat 3D is required.
The procedure described here assumes the user is using Adobe Acrobat 3D Version 8.0. The procedure may differ somewhat if a different version of Adobe Acrobat Professional is used.
Create a document in Word, leaving an area in which you will create fields, and save the document in PDF format.
In Adobe Acrobat 3D Version 8.0:
The PDF document contains variables that will automatically extract information from each new hire and insert it into the document. The names of the variables will never be displayed to the viewer of the PDF. If no data exists for a new hire, the area will appear empty when the finished PDF is displayed.
Upload the PDF into the Onboarding (Transitions) Document Library.
Updating PDF Documents in an Existing Process
Normally, a process definition and all of its elements become unchangeable after they have been enabled. However, business requirements sometimes require a change to the PDF documents within an active process.
One of the method changes the PDF for new assignees who will get the PDF in the future. For example, after many new employees have reviewed an annual PDF policy document, any needed changes for next year should be updated using a new PDF for new assignees only, not affecting the prior completed PDF by new hires. To do so:
Open the document and replace the PDF file in the Document properties. This will update the document on all historical, current, and future process instances. This can be done without taking the process off line or duplicating the process.
Workflow for Capturing Information to Be Displayed in PDFs
Distinct phases are involved to create forms aligned with PDFs for capturing new hire information, configuration and runtime.
In Adobe Acrobat Professional or Adobe Acrobat 3D, the Onboarding (Transitions) administrator creates the PDF that will display all those fields which are desired for long-term static use. This PDF contains variables, created with fields analogous to the items on a user-defined form. Almost all the variables available in the Onboarding (Transitions) system that can be placed onto a form can also be placed into a PDF document. The only exception is multi-row fields. In the form builder or message template builder, the forward slash "/" used in variables must be replaced by a dot ".". For example, PersonalInfo/LastName must be changed to PersonalInfo.LastName.
Configuring a process to enter data into the system and display the data in a PDF to the candidate:
The Onboarding (Transitions) administrator puts standard and user-defined fields onto a form: Creating User-defined Forms.
The Onboarding (Transitions) administrator puts standard and user-defined fields (variables) onto a PDF (using Adobe Acrobat Pro usually): Creating a File-based Document.
-
The Onboarding (Transitions) administrator puts the user-defined form on a task: Creating a Task.
-
The Onboarding (Transitions) administrator puts the form task into a process: Creating a Step.
-
The Onboarding (Transitions) administrator uploads the PDF into a document: Creating a File-based Document.
Because a PDF can be displayed in different ways administrators should consider:
-
As a PDF task into a process, to have its completion tracked for any assignee and will be available for export at runtime.
-
On a content page task that includes the variables {ContentPage.GeneralDocuments} and {ContentPage.PersonalizedDocuments} which will not be available for export but which can be viewed, saved, and/or printed by the new hire/candidate.
-
Onboarding (Transitions) Center users who have the necessary permissions can view the Process page of any candidate/new hire process, and from there they can associate a PDF from the zone's library to that person in the System Documents section. In this way, the PDF will display all the specific values in the fields for that person and the personalized PDF will be available for export.
Runtime Use
Each new hire process is composed of a series of steps. Assignees of a PDF task can view the associated PDFs when the task becomes active in the step sequence. Whenever a PDF is viewed within a PDF task by assignees, field values originating from any variables in the PDF reflect the most current information available.
At some moment in time, a specific PDF (including any variables) is viewed by an assignee about a specific candidate/new hire. Then, some data in the system gets updated for that specific candidate/new hire, either via a form, Taleo Connect, the Career Section, the Recruiting Center. That same specific PDF (including variables) can be viewed again for that same candidate/new hire, and the updated values now appear. In short, these PDFs are dynamic and do not retain their original values; they always show the most current values for their variables. This PDF variable behavior is true in all places where PDFs are viewed at runtime:
When an Open PDF task is viewed later in the process by any assignee, it will display the current values for these variables. An assignee merely opening the PDF is sufficient to make the task Complete.
When this PDF document is viewed later in the process by anyone with permission to view Related Sources for tasks, they too will see the current values for its variables.
When candidates/new hires view their documents within their content pages on the Career Section's Tasks tab, this PDF will contain the current values for its variables.
Onboarding (Transitions) Center users can manually associate any PDF document from the Onboarding (Transitions) list into the System Documents section of the candidates/new hires' process pages and then this too will display this new hire's current values in any variables. This page is only visible to Onboarding (Transitions) users with the permission to view processes.
Exporting PDFs
A task of type Open PDF has reached the In Progress status within the process, though it is not necessary that the task is in Completed status. .
-
An Onboarding (Transitions) Center user has manually associated the PDF with the person's process.Note: PDFs associated with a content page in the new hire's process are unavailable for export.
Completed user-defined forms can also be viewed and printed, by the new hire or any task assignees after submitted, but these forms are not as easy as PDFs to closely control the formatting. These forms cannot be exported via Taleo Connect for long-term storage.
At any point during a new hire's Onboarding (Transitions) process after a PDF is ready for them, another form could seek to update the fields that were contained in that PDF. If the assignee changes the data in these fields, any previously completed PDF will instead show the updated data when viewed or exported after the moment of this change.
Export the PDFs as soon as they are expected to be complete. For example, export them if they are completed around Day 3 even if the new hire process is configured to run through the employee's ninetieth day.
Try to ensure that no unwanted changes are made to the data before the export is completed: do not configure any additional Onboarding (Transitions) forms to capture information into the fields that also appear on the PDF; prevent Recruiting Center users from making updates to these fields; do not configure any way for the candidates themselves to make updates to their information for example in other job submissions; do not run any Taleo Connect imports to these fields.
Export the PDFs before any subsequent process is run for a new hire. For example, if an employee is terminated and rehired later for a job in the organization, some of the fields might be updated on forms in the new process and some of fields might be shared between old and new processes.
Common Onboarding (Transitions) Field Types and Corresponding Adobe Acrobat Fields
To view accurate information in fields in a PDF document that includes variables, the fields in the PDF document must match the field types in the user-defined form.
| Onboarding (Transitions) Field Types and Corresponding Adobe Acrobat Fields | |||
|---|---|---|---|
| Onboarding (Transitions) Field Type | Corresponding Adobe Acrobat Field | Description | Adobe Form Toolbar Button |
|
Text | Values entered into an online form by a task assignee or exist in the database and will display in the PDF document. |  |
| Check Box | Check Box | Create a check box field in the PDF document for every selection choice. Multiple selections are allowed. |  |
| Radio Button | Radio Button | Create a radio button field in the PDF document for every selection choice. Multiple selections are not allowed, only one radio button may be selected. |  |
Getting Help in Adobe Acrobat
Adobe Acrobat provides Help within the product that can be utilized when building a form.
This information may differ according to the version of Adobe Acrobat Professional being used. This information is described using Adobe Acrobat 3D Version 8.0. Access Help using .
Creating and editing forms
Laying out new form fields
Form fields behaviors
If additional assistance is needed, Adobe offers online support at