15E-Offer Process
E-Offer Process
Advanced Electronic Offer
Recruiting Center users have the ability to extend offers electronically so that candidates can view and respond to these offers on line.
Two E-Offer options are available:
The standard electronic offer.
The advanced electronic offer that requires Taleo Onboarding (Transitions).
Standard Electronic Offer
For a full explanation of standard electronic offers, please see the Oracle Taleo Recruiting Configuration Guide.
Advanced Electronic Offer using Taleo Onboarding (Transitions)
Customers who have more complex electronic offer requirements can configure Onboarding (Transitions)-based advanced electronic offer workflows for use in Taleo Recruiting. Some customers might require additional E-Signatures, notifications extended to include additional people, calls to external service providers, different tasks for executives. Customers like those who have more complex requirements might consider using the "Onboarding (Transitions) version" of electronic offers because offer workflows in this version can be configured to accommodate a wide variety of needs.
Typical Sequence of EventsThe advanced E-Offer process can be started as soon as an offer is ready to be extended by way of the Recruiting Center. This can be done when the offer status is Approved (if an approval cycle is needed) or Draft (if an approval cycle is not needed or is configured to be skipped). Recruiting Center users click More Actions > Extend Offer > Extend in writing > E-Offer.
Once the E-Offer process is started, the system begins assigning the tasks configured for the process. The offer letter is typically displayed on the Tasks tab of all the Taleo-based career sections the candidates might visit because a form was configured containing the offer letter. Candidates receive an email message if the Onboarding (Transitions) process was configured that way inviting them to go to a secure career section portal to view the offer on line. When candidates click the URL link in the message, they are directed to the career section portal where they log in. They can examine the offer (but cannot modify it) and provide new information or update existing information on the form as necessary. They can print the offer details from the Tasks tab and if the OfferLetterAttachments variable was added to the E-Offer letter form, they can print offer letter attachments. The form can include fields, such as an electronic signature, that can be configured as optional or mandatory. Candidates accept or refuse the offer by providing a value for a field configured for that purpose (the field should therefore be mandatory). If the form contains E-Signature fields, these are validated by the system.
As soon as candidates submit their decision, Recruiting Center users and Onboarding (Transitions) Center users are informed automatically by way of an email message (provided this was configured). The message, which originates from a configurable message template, includes the candidates' response and can provide other information and be sent to additional recipients such as a hiring manager.
When candidates submit their decision using the form, an (appropriately configured) Send E-Offer response task updates the offer status to Offer-Accepted or Offer-Refused in the candidate selection workflow. This task can also be configured to create a PDF consisting of the offer letter, the candidates' offer status and the cover page. The PDF will be available in the Onboarding (Transitions) Center and the users will be able to view and print the PDF. More importantly, the PDF will be available for export through Taleo Connect. A task can be configured to display the PDF on the candidates' or employees' Tasks tab at an appropriate moment in the process. For a full explanation of this feature, see Viewing E-Offer Letter PDFs with the Advanced E-Offer Process.
No offer letter and cover page PDF is created if a Recruiting Center user manually captures a candidate's decision—thereby changing the step status to Offer – Accepted or to Offer - Refused. Instead, the candidates must submit the form including their decision through an advanced E-Offer step.
The following table shows some of the ways in which advanced electronic offers differ from standard electronic offers.
| Question | Standard E-Offer (Recruiting) | Advanced E-Offer (Onboarding (Transitions)) |
|---|---|---|
| Configuration required? | No, the two standard E-Offers and the workflow cannot be configured. | Yes, you configure related forms, email messages and the workflow. |
| E-Offer is displayed on which tab? | Offer tab (which includes other offers if any). | Tasks tab (which includes tasks from the E-Offer process and (typically) tasks from other processes). |
| When is offer sent electronically? | As soon as E-Offer is extended. | Wherever you have configured this action in the E-Offer process. |
| Can multiple E-Signatures be captured? | Two on a single form (candidate) | Unlimited including E-Signatures required from candidate or others (e.g. manager) for the offer and any attachments. |
| Are E-Signatures validated? | E-Signatures are mandatory, not validated. | Yes, choose validation method e.g. DOB, last-4 digits of SSN, initials, etc. E-Signature can be made mandatory for candidates and/or others. |
| Can OLF be used to send different notifications or tasks? | No. | Yes, using "branching" (routing) logic in E-Offer process. |
| Can reminders be sent? | No. | Yes, for candidate E-Offer forms or any overdue tasks. |
| When is the status updated in the candidate selection workflow? | When candidate submits an E-Offer form on a career section. | Whenever it is configured to be updated, using the "system task". |
| Can a recruiter still capture a response manually? | Yes, the candidate selection workflow is updated accordingly and candidate cannot respond on the E-Offer page. | Yes, the candidate selection workflow is updated accordingly and the process can continue. The system can also capture candidate response (which might be different from the manual response). |
| Is auto-progression in the candidate selection workflow available? | No. | No. |
| Is the offer still displayed after a candidate declines an E-Offer? |
No. | Yes, in read-only format for duration of E-Offer process. |
| Is the offer still displayed after a candidate accepts an E-Offer? |
Yes, displayed until candidate/offer info is archived or purged, or until offer is rescinded or the candidate or employee reneges after accepting. | Yes, displayed in read-only format for duration of E-Offer process. |
| Who can access the PDF of the most recent e-signed offer letter? | Recruiting Center users and Taleo Connect users. | Onboarding (Transitions) Center users, candidates, and Taleo Connect users. |
| Can PDFs of older e-signed offer letters be viewed or exported? | Yes, PDFs of past offers, accepted or refused, are available provided the organization is using 12C or a later version. | No, the complete PDF is only available for the current offer, not for a rescinded or reneged offer. |
| Which data fields are added to the offer letter in the PDF? | The candidate's name, decision, IP address, and date/time-stamp appear at the end of offer letter. | The candidate's name, decision, and date/time-stamp appear at end of offer letter as well as any fields that were added to the cover page. |
| Can more fields be added to the PDF? | No. | Fields can be added to cover pages and a cover page can be configured to be part of the PDF). Also, administrators can create multiple cover pages, configuring them to include different sets of fields. Each cover page can target a different audience within the same process. |
| Security to control who can view the PDF? | Whether a user can view an offer and cover letter PDF is governed by three factors: the security level selected for the "Letter Used" offer field (General, Restricted or Confidential); the security level selected for the Security level for offers (in view mode) permission; the selections made for the View offers permission. | Whether a user can view offer and cover letter PDFs is governed by Onboarding (Transitions) permissions:
|
The following table shows some of the ways in which advanced electronic offer PDFs differ from standard electronic offer PDFs.
| Question | Standard E-Offer (Recruiting) | Advanced E-Offer (Onboarding (Transitions)) |
|---|---|---|
| Who has access to the current electronically signed E-Offer letter PDF? | Recruiting Center and Taleo Connect users. | Onboarding (Transitions) Center and Taleo Connect users, the candidate or employee. |
| Can earlier electronically signed E-Offer letter PDFs be viewed or exported? | Yes, PDFs are available for all standard E-Offer letters, accepted or refused, as far back as (and including) 12C. | No, only the current E-Offer letter and cover page are available in the form of a PDF and only as long as the offer is not rescinded and the candidate does not renege. |
| Which fields are included automatically in the E-Offer letter portion of the PDF? | Candidate's name, decision, IP address, date and time of decision are displayed at end of offer letter. | Candidate's name, decision, date and time of the decision are all displayed at end of offer letter in addition to any additional fields the Onboarding (Transitions) administrator added to cover page, which is displayed before or after the offer letter. |
| Can the administrator add other fields to the PDF? | No. | Onboarding (Transitions) administrators can add fields to cover pages. Also note that they can create different cover pages, each one with its own set of fields. This makes possible cover pages that target different audiences within the same process. |
| Who can view and print a PDF? | The "Security level for offers" permission can be set to "General", "Restricted" or "Confidential". The permission is used to specify who can view and print offers and this on different subsets of requisitions. | Ability to view and print a PDF is controlled through the View, add, and print attached files (PDFs) permission, this for two subsets of Onboarding (Transitions) processes. |
Advanced electronic offers using Onboarding (Transitions) are explained in more detail in the following pages. For information on standard electronic offers, please refer to the Recruiting Configuration Guide.
Launching the Advanced E-Offer Process
An advanced E-Offer process can be started in the Recruiting Center in two ways. The same type of process can also be started through Taleo Connect.
While changing the offer status to Extended in the Recruiting Center, a screen appears in which recruiters can choose to extend an offer to a candidate. On that screen, recruiters can indicate how to communicate the offer. When selecting Extend in writing, the recruiters can then select E-Offer. This will trigger the Onboarding (Transitions) E-Offer process.
After an offer is extended through the Recruiting Center, there is always the Send option in the More Actions menu that recruiters can select to communicate the same offer again to the candidate. This could be the case if, for example, the offer was extended in writing via email and the recruiter wants to also send it by E-Offer. On the screen, the Extend in writing option appears and if the recruiters choose E-Offer, this will trigger the Onboarding (Transitions) E-Offer process.
An advanced E-Offer process can be started through Taleo Connect for candidates who have made a job submission whose offer status is Extended. An advanced E-Offer process can also be canceled using Taleo Connect.
When an electronic offer is extended, this creates two new lines in the candidate file History tab: one indicating that the offer was extended, and another one indicating that the offer was sent as an E-Offer. When using the Send option to resend the offer as an E-Offer, this creates only one new line in the History tab indicating that the offer was sent as an E-Offer. In both cases, the name of the Recruiting Center user who performed the action is indicated.
The advanced E-Offer process that is launched can be configured to have various emails, forms, tasks, and participants, just like any other Onboarding (Transitions) process, and one of these tasks is to view and respond to the offer letter.Responding to the Advanced Electronic Offer
Candidates typically receive an email notifying them of the advanced electronic offer and indicating how to respond. This email notification typically contains a link that leads the candidates to the career section.
The candidates need to log into the career section to see the advanced E-Offer process; the confidential details of the offer are not included in the email.
The advanced electronic offer is displayed on the career section Tasks tab much like any other task in an Onboarding (Transitions) process. (An electronic offer sent using the standard electronic offer method is displayed on the career section Offers tab.) The Tasks tab appears in every career section to which the candidates have access, not only in the career section where they applied for the job.The advanced E-Offer tasks on the career section Tasks tab are displayed as soon as the candidates are assigned any task, for example, as soon as the advanced E-Offer form reaches "In Progress" status. In other words, if the process is configured to gather additional information or E-Signatures from managers before the advanced E-Offer is displayed to the candidates, the latter will be unaware of these tasks.
The offer letter and any attached documents can be printed or saved by the candidates when viewing the task.
After the candidates submit their response to the advanced E-Offer and provide all E-Signatures that might be required on the offer form, their Onboarding (Transitions) process is typically configured to move forward. Just like any onboarding form in a process whose status is In Progress, the submitted offer form is displayed on the candidates' Tasks tab in read-only format.
Tasks can be configured such that candidates who have accepted or refused an offer originating from an advanced E-Offer process can view and print a PDF that includes the offer letter, a cover page, their full name, their acceptance or refusal, and the date their decision was submitted. They can view and print the PDF as long as there are uncompleted tasks in the process, whether the tasks are assigned to the candidates or other participants. In addition, Onboarding (Transitions) Center users can also view and print the most recent advanced E-Offer letter and cover page PDF by accessing the System Documents section of the candidates' Onboarding (Transitions) process.
As soon as the overall process reaches 100% completion, the process, the offer letter, and the offer letter and cover page PDF are no longer displayed in the career sections.
Depending on the configuration of the advanced E-Offer process, if the candidates refuse the offer, further tasks will be assigned or the process may end in which case all tasks related to the process, including the offer letter task and the offer letter and cover page PDF task will no longer be displayed in the career sections.
Receiving the Candidate's Response to the Offer
As soon as candidates respond to the advanced E-Offer, the "Send E-Offer response" task that must be configured into the process changes the candidate's status to Offer – Accepted or Offer – Refused, depending on the candidate's response.
As a result of this action an entry is added to the History tab of the candidate's submission in the Recruiting Center, capturing the candidate's response. Recruiting Center users or any other assignees can then receive a configurable email notification (if the process is configured in this manner), and the notification can contain the candidate's response, E-Signature information if desired and any other data fields. Recruiting Center users can then move the candidate to the next step in the candidate selection workflow while the rest of the Onboarding (Transitions) process can continue automatically in parallel.
Even if an advanced E-Offer has been extended, recruiters still can perform all the activities on the offer in the Recruiting Center that they could always do in past releases. If the candidate contacts the recruiter directly to provide a response to the offer, the recruiter can still capture that response manually in the Recruiting Center. If the candidate wishes to negotiate the offer, the recruiter can do this manually (there is no option for candidates themselves to give an online response that puts an offer into the status Offer - Negotiating). If the recruiter needs to rescind the advanced E-Offer, he can do so. Note however that rescinding the advanced E-Offer causes the Onboarding (Transitions) advanced E-Offer process to be immediately canceled.
Just like any process, recruiters can track the progression of the advanced E-Offer process in the Onboarding (Transitions) Center. They can also view their current tasks regarding an advanced E-Offer process in the Onboarding (Transitions) Center.
Updating the Offer Once the Advanced E-Offer Process is Running
After recruiters have extended an advanced E-Offer, the Onboarding (Transitions) process is underway. If the recruiters need to make changes to that offer, they can rescind the offer as usual in the Recruiting Center.
Rescinding an offer causes any running advanced E-Offer process to be canceled immediately. Any tasks that are currently in progress are terminated and all of the candidate's tasks for this process are no longer displayed in the career section. The recruiters can then update the offer fields and extend the offer, sending it as a new advanced E-Offer from the first step.
Monitoring the Advanced E-Offer Process
As is the case for any Onboarding (Transitions) process, participants such as hiring managers or HR coordinators might be involved in the candidate's advanced E-Offer process. These participants might be assigned certain actions provided they have the necessary permissions.
They can execute any tasks that the process has assigned to them such as reviewing the e-offer information.
They can open and view the completed E-Offer forms and/or PDFs if they have the permission to view the related sources of their tasks.
They can view the overall completion percentage and progress of the process, if they have the permission to view processes.
They can filter the list to view only the E-Offer-type processes or use other filters to view processes that their permissions permit them to see.
If the process was configured to create a PDF containing the offer letter and cover page, the candidate's decision and perhaps other information, users can view and print the PDF.
Any participants who have the "View and execute my tasks in the Response Center (do not combine with other permissions)" permission can see and complete their currently-assigned tasks on the Response Center's simple Web pages. For example, a Response Center task might involve reviewing E-Offer information. Response Center users cannot view related sources or track overall progress towards process completion.
Starting and Canceling the Advanced E-Offer Process with the Recruiting Center and Taleo Connect
The advanced E-Offer process can be started and canceled from the Recruiting Center or using Taleo Connect.
In the Recruiting Center, the advanced E-Offer process is launched when extending an offer electronically. There is no action in the More Actions menu to start the advanced E-Offer process, unlike the New Hire and Pre-Hire processes. There is also no action in the More Actions menu to cancel a running advanced E-Offer process; the only way a Recruiting Center user can do this is by rescinding the offer for a candidate.
Onboarding (Transitions) Center users who have the proper permissions can cancel an advanced E-Offer process, and any other running processes.
The advanced E-Offer process can be started using Taleo Connect, by providing a specific candidate with a specific offer in the status of Offer-Extended. The advanced E-Offer process can also be canceled using Taleo Connect.
Things to Consider when Configuring the Advanced Electronic Offer
To extend offers electronically using Taleo Onboarding (Transitions), the Electronic Offers setting must be set to Advanced Electronic Offer, users must be granted the permission to extend offers electronically, and the candidate selection workflow must contain the RSOffer step.
The advanced E-Offer process that is launched can be configured to have various emails, forms, tasks, and participants, just like any other Onboarding (Transitions) process. Most customers will configure at least a few similar steps, as follows. Candidates can receive an email notification inviting them to access a secure career section portal to view the offer on line. Those candidates click the URL link in the email notification and are directed to the career section portal where they are required to log in. The Tasks tab is displayed and the candidates can view and print the offer details and, provided the OfferLetterAttachments variable was added to the E-Offer letter form, offer letter attachments, if any. Candidates then accept or refuse the offer and complete any mandatory fields. which may include an electronic signature.
The Advanced E-Offer Process Must Reach Completion
When configuring the advanced E-Offer process in Onboarding (Transitions), every candidate will go through this process, following any branching logic that has been configured. When designing the advanced E-Offer process, it is important to make the process reach the END and be 100% completed even if the candidate refuses the offer. After notifying the recruiter about the candidate response to the offer, the process should have a branch for when the candidate accepts the offer and another branch for when the candidate refuses the offer. When the offer is refused, the process should go directly to the final routing step. This is required if you want to be able to issue a new offer after a refusal.
Using the Offer Expiration Date
Some organizations use expiration dates on their offers in the Recruiting Center to indicate the latest date by which a candidate can respond to an offer. By default, the Onboarding (Transitions) advanced E-Offer process does not take the expiration date into consideration when updating the candidate's status. Instead, the advanced E-Offer "Send E-Offer response" task verifies that the status is still Offer-Extended and then it updates it to Offer-Accepted or Offer-Refused. So. if the offer expiration date is important to your organization, the advanced E-Offer process must be configured to handle this specifically.
One suggestion is to create a condition immediately after the candidates submit the form containing their response to the offer. This condition checks to see whether the expiration date is in the past.
If the expiration date is not in the past, the process should proceed as expected: triggering the task that updates the status and then notifying the recruiter of the offer's new status.
If the expiration date is in the past, the process should be configured to take a different action: perhaps to tell the candidates that they are too late, or to tell the recruiter that a late response has been received, or to do whatever the company's business requirements dictate.
Using the {Offer_Para.StatusDescription} Variable
When creating the message informing recruiters of the candidate response to the offer, the variable {Offer_Para.StatusDescription} displays the current status of the offer, which presumably is the same as the response that the candidate provided on the E-Offer form. In cases where something in the process was not properly configured, or the recruiter manually entered a different response for the offer before the candidate submitted the form, or Taleo Connect imported a different response before the candidate submitted the form, there is the possibility that the response from the form and the actual status will be out of sync.
Validating E-Signatures
Several methods are available to validate the E-Signatures provided by candidates, and a subset of these methods are available for other participants' E-Signatures. For details, see Electronic Signature.
These signatures are validated, which means that the value entered by the assignee must match the information already known about that assignee. If these values do not match, then the form on which th E-Signature field is placed cannot be successfully submitted and the task cannot be completed.
It is recommended to configure the E-Signature field(s) as required fields on the Onboarding (Transitions) form, to ensure that it cannot be submitted without confirming the assignee's identity.
Understanding the "Send E-Offer response" Task
The task whose action is "Send E-Offer response" is used to communicate the candidate response back into the Recruiting Center candidate selection workflow. This task must be placed after the candidate response is captured, and preferably before the recruiters/participants are notified. The task will update the Offer status automatically in the candidate selection workflow to Offer - Accepted or Offer - Refused but the task requires an assignee. It is recommended to use a "dummy" assignee (it is best not to use the candidate or new hire). The task will quickly disappear because it gets completed as soon as it is triggered in the process.Adjusting the Advanced E-Offer Process
Sometimes, changes in an organization business requirements cause the need to make adjustments to the advanced E-Offer process definition. A new process must be defined, tested, and then enabled to replace the prior process that was in use. However, there can only be one advanced E-Offer process in use at a time for each zone.You can create a new advanced E-Offer process (usually by duplicating the old active process) and make the necessary changes to it. Give this process a temporary name such as “Do Not Use – E-Offer Test Process”. Then, give this process a process type such as Pre-Hire (but not E-Offer), and then enable it. Now, test that candidates can be launched into this process to ensure that no configuration errors were made. These candidates can be started by any Recruiting Center user who has the permission to start Pre-Hire processes for a new resource. As soon as you are satisfied that this new process is working smoothly, you can change its process type to E-Offer and then disable the old advanced E-Offer process.
Configuring the Advanced Electronic Offer
The configuration of advanced electronic offers for Onboarding (Transitions) consists of the steps listed in this section. Other steps can be added depending on your requirements and process. Only one advanced E-Offer type process can be active in the zone at one time. Consequently, the process must be designed such that it is appropriate for every person in every location and for every job. It can be designed with as many different possibilities as needed.
Creating the message inviting the candidates to view the offer on line.
Creating the message informing the recruiter about the candidate's response to the offer.
Configuring the E-Signature validation method used to capture the candidate response to the offer.
Creating the form that will enable the candidate to respond to the offer.
-
Creating a task to update candidate's offer status and generate offer letter PDF.
. -
Creating a task for the candidate to complete the form used to respond to the offer.
-
Creating the E-Offer process that includes the tasks you created in the earlier steps.
Enabling the Advanced Electronic Offer Setting
Granting the Permission to Extend Offers Electronically
-
Select a user type.
-
Click Recruiting.
-
Next to Offers, click Edit.
-
Click the radio button next to Extend offers electronically.
-
Click Save.
Creating the Message Inviting Candidates to View the Offer On Line
Creating the Message Informing Recruiters of the Candidate's Response to the Offer
Configuring the E-Signature Validation Method for the Offer
Creating a Form for the Candidate to Respond to the Offer
The Manage user-defined forms to display and collect data permission is required.
Click Create.
Provide a code, a name, and a page name in the corresponding fields.
To add a section, position your cursor in an existing section, click the Insert a Section icon. A section entitled Default section title is inserted in the form just below where your cursor was positioned.
To modify a section title, click the Default section title and make your changes in the Selected Element Properties section.
To add a table, position your cursor in the appropriate section of the form and click the Insert a Table icon. A table containing two columns and five rows is inserted in the form.
To add or remove rows and columns, use the corresponding tools in the Toolbox.
To add text, position your cursor in a cell and click the Insert Text icon to place a text area on the form. In the Selected Element Properties section, in the Value field, use the rich text editor to add formatting, graphics, links, etc.
To add fields, select a category in the drop-down list, select a field in the updated list and drag and drop it in the desired section.
To edit the properties of a field, select the field then scroll to the Selected Element Properties section at the bottom of the form.
Include the variables listed in this step. To add variables, select a category in the drop-down list, select a field in the updated list, and drag and drop the field in the desired section.
Category: Offer; Variable: CandidateOfferResponse: Provides the offer response options. Choices will be displayed as "Accept the offer" and "Refuse the offer". Make the field mandatory. A response must be captured; otherwise it will be impossible to update the candidate selection workflow.
Category: Offer; Variable: OfferLetterBody: This is the content of the offer letter.
Category: ESignature; Variable: EOfferSignature: To capture the validated electronic signature of the candidate. Make the field mandatory.
Category: Offer; Variable: OfferLetterAttachments: If this variable is placed on a form, it will display the names of all files attached to the offer letter in the Recruiting Center. If there were no attachments, nothing will be displayed on the form. Please note that if a label is provided for this variable, the label will be displayed on the form regardless of whether any attachments exist for this offer letter.
Click Save. The form appears in the User-defined Forms list and its status is Draft.
Enable the form by clicking the corresponding Activate in the User-defined Forms list.
Creating a Task to Update Candidate's Offer Status and Generate Offer Letter PDF
If the task is later included in a process, and candidates or employees in the process respond to the offer displayed on the Tasks tab: the status of the offer will be updated to Offer-Accepted or Offer-Refused. If a cover page is specified, Onboarding (Transitions) Center users as well as the candidates or employees will be able to view and print a PDF containing the offer letter and cover page. External systems specified will be able to pull the PDFs.
Creating a Task to Send the Message to Candidates
Creating a Task to Send the Message to the Recruiter/Participants
Creating a Task to Provide a Form to Respond to the Offer
Creating the E-Offer Process
-
Click Create.
-
Define the properties of the process:
-
Enter a code, name, and description.
-
In the Type field, select Process.
-
Specify the process owner, by searching for a role or specific user.
-
Select none, one or multiple supervisors.
-
In the Guidelines field, enter instructions as needed, which will appear in the Candidate Portal.
-
Click Save.
-
-
Create the steps of the process:
-
Click Create Step on the Steps tab.
-
Select Task as the type of step you want to create and click Continue.
-
Click the Search button, select the radio button next to one of the tasks you created earlier and click Select.
-
Click Continue.
-
You can provide a description if you wish.
-
If you are configuring the offer form step, it is important to enter a value of 1 in the Sequence field. If you are configuring the content page step, it is equally important to enter a value of 2 in the Sequence field. No value is required in that field for the other steps in the advanced E-offer process.
-
In the Duration field, enter the number of days required to perform the step. This field will be used in the calculation of the due date of each task for its assignee(s).
-
Select one or multiple assignees who are to perform the step. You can select specific users or specific roles. A best practice is to select a role.
-
From the Execute Step list, select when the task is to be performed. See Understanding Step Execution.
-
Click Finish.
-
Repeat the above steps for all the tasks you created (that is, task to send a message to candidates, task to send a message to the recruiter, task to complete the form to respond to the offer).
-
-
Create transitions:
-
Click Create in the Transitions tab.
-
Indicate where the transition starts and where it goes next.
-
Click Continue.
-
Verify From Step and To Step.
-
Select a condition requirement.
-
Click Finish.
-
-
Select the type of process:
-
In the Transition Types section, click Add.
-
Select E-Offer.
-
Click Select.
-
-
Activate the process.
Viewing E-Offer Letter PDF with the Advanced E-Offer Process
Candidates and employees can view and print PDFs of standard and advanced E-Offer letters they accepted or refused. Onboarding (Transitions) Center users can view and print the PDFs as well.
Electronically signed advanced E-Offer letter PDFs can include the offer letter, a cover page, the candidate's or employee's full name, the person's acceptance or refusal, and the date the decision was submitted.
Standard E-Offer Letter PDF
Recruiting Center users can view and print PDFs of standard E-Offers. For a full description of this feature, see the Oracle Taleo Recruiting Configuration Guide.
Advanced E-Offer Letter PDF
Candidates and employees who have accepted or refused an offer originating from an advanced E-Offer process can view and print a PDF that includes the offer letter and a cover page. The offer letter portion of the PDF includes the candidate's or employee's full name, his/her decision, and the date and time the decision was submitted. The cover page can contain text, images, variables and branding. Onboarding (Transitions) Center users can also view and print the most recent advanced E-Offer letter and cover page PDF including the candidate's or employee's decision by accessing the System Documents section of the candidate's or employee's Onboarding (Transitions) process. All documents available in the System Documents section can be exported via Taleo Connect to a long-term system of record.
Typical Sequence of Events
No offer letter and cover page PDF is created if a Recruiting Center user manually captures a candidate's decision—thereby changing the step status to Offer – Accepted or to Offer - Refused. Instead, the candidates must submit the form including their decision through an advanced E-Offer step.
The Onboarding (Transitions) administrator usually will have created a task whose purpose is to render the PDF available to candidates or employees who can then view and print the offer letter and cover page. There are two ways to do this. The administrator may have created a task whose action is Open PDF. If this is the case, a task will be displayed on the Tasks tab and the candidate can click a link in the task to display the PDF. If the administrator created and configured a task whose action is Display Content Page instead, a content page task will be displayed on the Tasks tab. The content page typically contains a link to the PDF, perhaps links to other documents, text, the organization's logo and other images, variables and branding. Onboarding (Transitions) Center users who have access to the candidate's process and who have the required permissions can also view and print the PDF by clicking the corresponding link in the System Documents section of the candidate's process. As mentioned earlier, all documents available in the System Documents section can be exported via Taleo Connect to a long-term system of record.
As long as the status of the process is In Progress, the candidate can click the link to open the PDF containing the offer letter and cover page. Once the process is completed, none of the associated tasks or documents are displayed on the Tasks tab.
The following table shows some of the ways in which advanced electronic offer PDFs differ from standard electronic offer PDFs.
| Question | Standard E-Offer (Recruiting) | Advanced E-Offer (Onboarding (Transitions)) |
|---|---|---|
| Who has access to the current electronically signed E-Offer letter PDF? | Recruiting Center and Taleo Connect users. | Onboarding (Transitions) Center and Taleo Connect users, the candidate or employee. |
| Can earlier electronically signed E-Offer letter PDFs be viewed or exported? | Yes, PDFs are available for all standard E-Offer letters, accepted or refused, as far back as (and including) 12C. | No, only the current E-Offer letter and cover page are available in the form of a PDF and only as long as the offer is not rescinded and the candidate does not renege. |
| Which fields are included automatically in the E-Offer letter portion of the PDF? | Candidate's name, decision, IP address, date and time of decision are displayed at end of offer letter. | Candidate's name, decision, date and time of the decision are all displayed at end of offer letter in addition to any additional fields the Onboarding (Transitions) administrator added to cover page, which is displayed before or after the offer letter. |
| Can the administrator add other fields to the PDF? | No. | Onboarding (Transitions) administrators can add fields to cover pages. Also note that they can create different cover pages, each one with its own set of fields. This makes possible cover pages that target different audiences within the same process. |
| Who can view and print a PDF? | The "Security level for offers" permission can be set to "General", "Restricted" or "Confidential". The permission is used to specify who can view and print offers and this on different subsets of requisitions. | Ability to view and print a PDF is controlled through the "View, add, and print attached files (PDFs)" Onboarding (Transitions) permission, this for two subsets of Onboarding (Transitions) processes. |
Advanced electronic offers using Onboarding (Transitions) are explained in more detail in the following pages. For information on standard electronic offers, please refer to the Oracle Taleo Recruiting Configuration Guide.
Configuration
Detailed configuration steps are located in the "Configuring an Advanced Electronic Offer Letter PDF" section and following sections.
To create the PDF, the administrator must create a task whose action is Send E-Offer response and includes a cover page. When candidates and employees later reach this task in a process, the offer letter and cover page will be generated automatically.
If an organization wanted an advanced E-Offer letter PDF to be created but didn't want it to have a cover page for some reason, a solution would be to create a one-page PDF containing no information, select it as the cover page to display, and select the radio button next to "At the end".
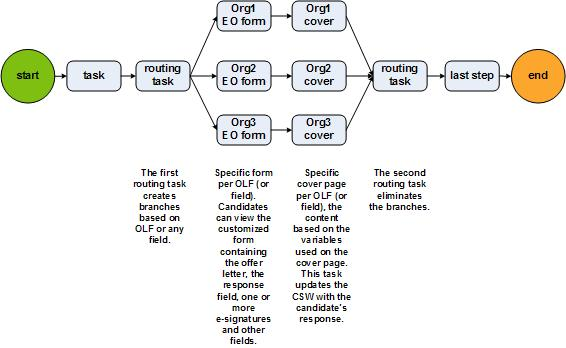
The ability to configure branches (in a process) for multiple forms, each branch with its own "Send E-Offer response" task, and the ability to assign a different cover page to each advanced "Send E-Offer response" task can be used effectively to deliver customized cover pages to specific audiences. The following (greatly simplified) process illustrates how cover pages could target specific groups of candidates.
Configuring an Advanced Electronic Offer Letter PDF
An advanced E-Offer process can be configured to create a PDF that includes the offer letter, a cover page and the candidate's decision to accept or refuse the offer.
If all of the following steps are performed by the Onboarding (Transitions) administrator, in addition to the steps for configuring an advanced E-Offer and described in
"Configuring the Advanced Electronic Offer", candidates as well as Recruiting Center users and Onboarding (Transitions) Center users (who have the required permissions) will be able to view and print the resulting PDF.Configuration
Creating the cover page PDF (typically using Acrobat Professional). Although the candidate's full name, his/her decision, and the date and time when the candidate submitted his/her decision are added automatically to the offer letter section of the PDF, most organizations will want to add the ESignature.EOfferSignature variable and similar variables to the cover page. In addition, Onboarding (Transitions) administrators can add text, images (for example, the organization's logo) and branding that serve to personalize the text of the cover page. The cover page can be configured for display either before or after the letter.
Creating a text document that includes the {ContentPage.PersonalizedDocuments} variable for use in the Content Page. (This step is required only if you plan to include a Content Page task including a link to the offer letter and cover page PDF.)
Creating a Content Page that includes the text document and {ContentPage.PersonalizedDocuments} variable. . (This step is required only if you plan to include in the process a Content Page task with a link to the offer letter and cover page PDF.)
Creating a task to display the Content Page (task whose action is Display Content Page) or a task to display a link to the PDF (task whose action is Open PDF). In the first case, the PDF will be displayed afterward as a link on the Content Page and the Content Page task will be displayed on the Tasks tab. The task will include all links, text, images and branding that the administrator configured for the content page. In the second case, the PDF will be displayed afterward as a simple link in a task on the Tasks tab.
Add the task to the advanced E-Offer process in the most suitable position. Remember that the task that captures the candidate's decision (i.e. the one whose action is "Send E-Offer response") must precede this task (the one whose action is "Display Content Page" or "Open PDF"). This is because the content of the PDF requires the information gathered by the first task.
Creating a File-based Document
-
Click Create a file-based document.
-
Enter a code and a name.
-
Click Browse and select the PDF file that you created and want to add to the Documents library. The PDF can include variables.
-
Enter a description of the PDF file.
-
Click Save.
-
Click Activate.
Creating a Text Document
The Manage text documents and paragraphs for use in content pages and message templates permission is required.
-
Click Create a text document.
-
Enter a code and a name for the document.
-
Click Save.
Adding paragraphs. You can add existing paragraphs or you can create new paragraphs.
Creating a Content Page
The Manage task definitions, related sources, content pages, and images permission is required.
The content page can be specifically associated with a task by the Onboarding (Transitions) administrator and it will be selected automatically by the system in a task with no associated content page if it is the best match for a candidate's or employee's requisition.
Associate any personalized or general PDF documents with this content page if desired.
Associate OLF information with this content page if the page will not be specifically included in any content task.
Creating Content Page Task or Open PDF Task
Exporting E-Offer Letter PDFs using Taleo Connect
Using Taleo Connect, standard and advanced E-Offer letter PDFs can be exported to an external system for storage for audit and legal purposes. Taleo Consulting Services frequently build integrations from Taleo to export PDFs.
Both standard and advanced E-Offer letter PDFs can be exported like any other PDFs.
A second reason for exporting the PDFs as soon as they become available: information in the system can change—a candidate's or an employee's name, the organization's logo, etc.—and that information can be updated instantly throughout the product.