14Processes
Processes
Key Concepts
Process
A process is a series of steps typically performed by multiple stakeholders for a single person. All necessary steps must be completed before the process gets completed.
A process includes steps, usually dozens of steps, and each step is built upon only one single task. Once tasks are created and you have a suitable task library, a process can be created. In a single process, multiple tasks can be configured to be assigned concurrently or you can specify that a task must be complete before the process continues.
Onboarding (Transitions) must be created between steps. For example, you could specify that the “Complete personal information” task is to be performed before the “Send thank you correspondence” task. This could guarantee that you will have the new hire's information needed to populate the correspondence.
You can also configure steps to be assigned based on whether or not some condition is met, by adding a condition to a transition. This enables steps to take place based on conditions, such as whether the value contained in the new hire's job field is that of a salesperson or regional manager.
You can target different processes to specific audiences according to Organizations, Locations and Job Fields.Process Status
Processes can be in Draft, Active, or Inactive. The status of a process affects the availability of a process for a new hire when the process is first launched, if changes can be made to a process, or if it can be deleted.
Draft: When processes are created initially they are in Draft status. A process that is in Draft status cannot be seen nor selected in the Recruiting Center nor by Taleo Connect. Processes in Draft status may be modified. When a process leaves the Draft status and changes to Active, it cannot return to the Draft status. Only processes in Draft status can be deleted.
Active: This is the status where people can be launched into a process, either using the Recruiting Center or Taleo Connect. An Active process cannot be modified. Steps within it cannot be changed nor removed. To test a process, it must be enabled. If changes are needed, a duplicate process must be created. The duplicate will be created in Draft mode where changes can be made.
Inactive: A process that is in Inactive status cannot be seen nor selected in the Recruiting Center nor can it be launched from Taleo Connect. Any new hires/candidates/employees currently going through a process will not be affected if the process status changes to Inactive. Inactive processes cannot be modified in any substantial way.
Process Types
Four types of processes can be created in Onboarding (Transitions). You must associate only one process type to a process.
Pre-Hire Validation: A process used when the organization requires more information from new hires before the latter begin working , or when the organization wants to request paid external third-party services in a configurable, logical flow. A Pre-Hire process can be launched from the Recruiting Center for a candidate on a requisition provided all the right actions and permissions were configured. It can also be launched from Taleo Connect. This type of process is tied to user type permissions. Recruiting Center users require the "Initiate a new hire process for a new resource" " permission, for example, to start processes you created of type Pre-Hire Validation.
New Hire: A process used for bringing new employees into the organization. A New Hire process can be launched from the Recruiting Center for a candidate on a requisition provided all the right actions and permissions were configured. It can also be launched from Taleo Connect. This type of process is tied to user type permissions. Recruiting Center users require the "Initiate a prehire process for a candidate" permission, for example, to start processes you created of type New Hire.
E-Offer: Two E-Offer processes are available. The standard E-Offer process enables candidates to accept or refuse offers. The advanced E-Offer process, which requires Taleo Onboarding (Transitions), enables candidates to accept or refuse offers on line through the organization's career sections and provides additional tasks, forms, electronic signatures, etc. While an offer is being extended to a candidate, the advanced E-Offer process can be launched from the Recruiting Center provided all the right settings and permissions were configured. It can also be launched from Taleo Connect. See Advanced Electronic Offer.
Offboarding: A process designed for situations where employees are leaving an organization. An Offboarding process can only be launched from Taleo Connect, not from the Recruiting Center. Before the offboarding process is run using Taleo Connect, the candidate record must exist in the database or it will have to be imported into Taleo Connect. The employee does not have to be matched to a requisition. Creation of a dedicated Onboarding (Transitions) offboarding portal, one with a Tasks tab but without job searching capability, is an option to consider. The notification and reminder emails would have to be configured to include the URL leading to the dedicated portal.
A candidate's or employee's running and completed prehire, new hire, E-Offer, offboarding processes are consistent regardless of which career sections, internal or external, the person visits in the customer's zone.
Some organizations may choose to use Taleo Connect to launch their processes, triggering them automatically from an HRMS system or some other system rather than relying on recruiters to launch processes from the Recruiting Center.
Associating a process to a process type is useful for Onboarding (Transitions) Center users so they can filter their list of processes by process type.
Processes Require A Single, Final Step
In Taleo Onboarding (Transitions), administrators must ensure that the processes they configure have a single, final step.
A process can include branches and "tasks in parallel" but all must ultimately lead to a single, final step from which no further steps are possible. If the process is viewed in “Preview” mode, a single, last step must have an arrow leading to the “End” circle and there must be exactly one "End" circle, as illustrated below.

This design ensures more accurate calculation of the "percentage-complete" number as a candidate or employee progresses through the process. When the single, last step is completed, the process reaches 100% completion and the process status changes to Complete.
If a process is created in Taleo Onboarding (Transitions) 13A or later and includes more than one final step, the process cannot be enabled (assigned Active status). If a process created prior to 13A includes more than one final step, and has Active status, the status can be kept as is, however, Active status cannot be granted to any duplicate of the process.
Routing steps are useful for designing processes so they have a single, final step. Where the branches of a process differ significantly and paths are mutually exclusive, Onboarding (Transitions) administrators can insert a routing step that contains no task or other action as the final step. Such routing steps serve only to converge divergent steps before the process ends. For example, a process might include a path that culminates in successful completion of a 6-month-long onboarding process while another path in the same process might be short, designed to exit from the process candidates who fail a background check or a work-eligibility check. The final routing step, containing no task or other action, could be configured to execute “when one, and only one, of the preceding steps has been completed”.
Process Owner
The process owner is responsible for ensuring the completion of a process.
The purpose of having a process owner is to ensure that a single individual is responsible for moving a process forward toward completion when task assignees are tardy in completing their tasks. With the appropriate permissions, process owners can view and manage all the tasks in their respective processes regardless of who is assigned to each task. The process owner can execute or reassign any task in a process they own to a different person to avoid or resolve bottlenecks while the process is in progress. Also, a process can be configured such that the process owner's name and contact information are displayed to candidates and employees who might have questions.
To execute or reassign tasks within their processes, process owners require at least the "minimum" permissions for both processes and tasks, i.e. "View processes I own or supervise, or that have been shared with me" and "View and execute tasks assigned to me". These permissions enable process owners to view their processes on the Onboarding (Transitions) Center main page, click into each process, and click into each of the process steps to access the corresponding task. Process owners can access the "Execute" and "Reassign" links for each task, and their name is displayed as the "Task Owner" of each task in the processes they own.
Note that if process owners have the permission to view their processes but do not have the permission to view and execute tasks, they can view their processes and each step within them but they cannot access or execute the task in each step.
Functional Role as Process Owner
Onboarding (Transitions) processes can be configured by the Onboarding (Transitions) administrator such that the process owner is a functional role. Functional roles are groups of people assigned to perform similar tasks but for their specific Organization, Location or Job Field (OLF). When an Onboarding (Transitions) process is started for a specific candidate/employee, the "best-match" person in the functional role is chosen as the process owner.
If functional roles are used to designate process owners, it is a best practice to ensure that only one person is assigned to each Organization, Location and Job Field within each functional role. If more than one person is equally appropriate for an OLF, only one of them will be designated the process owner when processes are started.
Functional Role Assignment
When an Onboarding task is assigned to a functional role, the assignees are resolved at run time according to the assignment's position OLF information, which is populated from the requisition's OLF if initiated from Recruiting.
For each functional role, the tasks will be assigned to the user(s) who have the highest score when their role OLF data is compared with the target values. If no user is a suitable match for the target data, the functional role's default assignee is selected.
The system assigns each user a partial score for each criterion (O, L or F) and then adds score to a final score. The partial scores are calculated from the offset between the structure levels of the target and the matching element in the user's OLF. If the match is partial (the user's information is applicable but less specific than the required value), a point is deduced for every level difference.
Org1 > Org11 > Org112
Job3 >J ob32> Job325
United States>Pennsylvania>Philadelphia
If a user has all three exact matches, the person will obtain 100 + 100 + 100=300 points. Anyone else who has exact matches will obtain 300 points and will also be assigned because they share the top score.
Suppose there are no perfect matches. User A has Org1>Org11>Org112, Job3>Job32>Job325, and United States>Pennsylvania and user B has Org1>Org11, Job3>Job32, and United States>Pennsylvania>Philadelphia.
User A obtains 100 + 100 + 99=299 points because their location is 1 level higher than the target value. User B gets 99 + 99 + 100=298 points so only user A will be assigned to the task.
If user C happens to have Org1>Org11>Org112, Job3>Job32>Job325, but no location information at all, the individual would obtain 100 + 100 + 97=297 points. 3 points are deduced for location because they are all levels away from the third level that is required.
Suppose the target values are Org1>Org12>Org123>Org1234>Org12345>Org123456>Org1234567, Job1>Job12>Job123 and US>NY>New York>Manhattan.
User A has Org123456, New York and no Job information, so 99+99+97=295 points. User B has the required values Job123 and Manhattan but no Organization information. The score will be 100+100+93=293 points because not having organization positions the user 7 levels away from the requirement. This means that user A will be assigned even though user B is a better match for 2 out of 3 requirements.
Note that if the task is to be assigned to more than one role, the computations will be made independently for each role and combined into one consolidated list.
Role A -> Users A and B + Role B -> Users C and D: task will be assigned to users A, B, C, and D.
If the same user happens to be assigned to both roles, and obtains the highest score for both, the person would only appear once as the task assignee:
Role A -> Users A and B + Role B -> Users A and D: task will be assigned to users A, B, and D.
So if user A was the only match for one of the two roles but was chosen in both, it might appear as if one of the roles hadn't been resolved.
The results can be even more counter intuitive if users appear in several roles with different OLF info for each.
Supervisor
Supervisors are people who can be assigned to do any of the things that the process owner can do thereby further ensuring that a process is completed.
Someone can become a supervisor of a process in two ways:
The Onboarding (Transitions) administrator designated the individual (by name) as supervisor in the process or assigned a functional role as supervisor and the individual has the functional role when the process is launched. This type of responsibility cannot be removed.
Someone shared the process with the individual while the process was in progress. The sharing, and consequently the supervisor role, can be ended using the Revoke Sharing action.
To view how their processes are progressing, supervisors require the "View processes I own or supervise, or that have been shared with me" permission. This allows them to see their processes on the main page of the Onboarding (Transitions) Center and to click into each one to view the corresponding steps. This permission is insufficient for executing tasks within these processes.
To execute or reassign tasks within their processes, supervisors require at least three permissions: "View processes I own or supervise, or that have been shared with me", "View and execute tasks assigned to me" and "Manage processes for which I am the supervisor (same capabilities as the owner)". These permissions enable supervisors to view their processes on the Onboarding (Transitions) Center main page, click into each process, and click into each of the process steps to access the corresponding task. For each of these tasks the supervisors can access the "Execute" and "Reassign" links, and their name is displayed in the "Supervised by" area.
Step
A step is the "envelope" in which a task gets assigned to participants.
A process contains steps. Steps are created for each process and they are the "container" for tasks (a task can be reused in the same process or across different processes). A step provides information about the assignee and sequence of tasks. Business logic ensures that the work to be done is routed correctly between steps.
Type of Step
When creating a step, the Onboarding (Transitions) administrator needs to select a type of step.
| Step Type | Description |
|---|---|
| Task | The step will consist of a task selected from a defined list of tasks which are available in the Tasks library in the Onboarding (Transitions) Administration. |
| Sub-process | The step will consist of a sub-process. A sub-process is a small process used inside a larger process. For example, if you always reuse the same sequence for internal requests such as computer, office space, phone and business card requests, but have some variability for the welcome messages and paperwork for the new hire, you could create a sub-process and reuse it in various processes to simplify management. Like regular processes, a sub-process cannot be substantively changed after being enabled. However, when a sub-process gets incorporated into a larger "parent" process, then any later adjustments to the definition of the "child" sub-process do not have an effect on this larger "parent" process. |
| Routing | The step brings together multiple parallel tasks. Routing steps are like placeholder steps that do not contain any tasks to assign to any users. They are used to facilitate the workflow design for steps that split into parallel branches and then need to be brought together. Standard tasks can also be used to handle branching and reconnecting, if their transitions are built to do so. See Understanding Routing Steps. |
Step Execution
For each step defined in a process, the Onboarding (Transitions) administrator must specify the Execute Step and the After Step Execution properties.
The Execute Step is used to indicate if:
The step will wait for all previous steps before becoming active.
The step will wait for one of the step before becoming active.
The After Step Execution is used to indicate if the step will execute:
All subsequent steps.
One subsequent step.
For details, see Understanding Step Execution.
Duration
When configuring a step, the Duration field is used for calculating the due date of each task for its assignee(s). At the moment the task gets assigned, its due date is determined to be a certain number of days in the future, depending on the task's expected duration. This due date only takes into account the working days and not the weekends that are configured in the zone. Also, the duration of a task contributes to calculating percentage complete of the overall process. The duration acts as a weighting factor because tasks which take longer are considered to be worth a larger percentage of the total work needed to complete the process. For example, a person's Onboarding (Transitions) process might have 9 out of 10 tasks complete. If every task including that one remaining task was configured to have a duration of 1 day, the process would be at 90% completion, with only one small task left to go. However, if that one remaining task had a duration of 10 days, the process would be more like at 50% completion, because 9 days’ worth of work have been completed but another 10 days’ worth of work still remains to go.
Specific versus Fallback Assignees
In Onboarding (Transitions), the work in a step's task can be assigned to one or more person.
If one person is assigned, then this person must complete the task. If the person fails to do so (even after configurable reminders are emailed to him/her) then the process owner and/or supervisor may be able to execute the task themselves and/or reassign the task to another user(s).
If more than one person is assigned, then just one of these person must complete the task. It appears on each person's open task list. As soon as any one person completes it, then it disappears from all open task lists and becomes visible only in the Completed lists.
There are several ways that more than one person can become assigned to a step:
The Onboarding (Transitions) administrator explicitly selects two or more individual users of the system.
-
The Onboarding (Transitions) administrator explicitly selects one or more individual users and/or one or more roles defined in the system, either Taleo-defined system roles or user-defined functional roles. Please note that a system role can be a Hiring Manager, a Hiring Manager Assistant, a Recruiter, a Recruiter Assistant. If no user is found in the context for that role, the system falls back on the Recruiter role. If there is no Recruiter, the system then falls back to the Process Owner. In some rare cases, the Process Owner can also be empty for instance if the Process Owner is also defined to be a System Role which happens to be empty for a candidate/new hire. This situation should be avoided, because the Onboarding (Transitions) process will be unable to start for this person. The action in the Recruiting Center will appear to proceed smoothly, but the candidate/new hire will not appear on the Onboarding (Transitions) Center's list of In Progress processes.
Form Snapshots in Steps that Contain a Fill User-Defined Form Tasks
Form snapshots secure the contents from important forms filled out by New Hires as they go through an Onboarding process. Enabling this feature allows Administrators the ability to create a “snapshot” in time of a form that can be viewed, printed, or exported and that will remain unaffected by future changes in the data.
Onboarding steps consisting of a “fill user-defined form” task can be configured such that submitting the corresponding form will also collect a snapshot of that form. All the snapshots will be tracked within the Onboarding process itself and will be available in the New Hire’s Onboarding process details. Snapshots are generated when New Hires click Submit. Snapshots will be saved in the language in which the form data was originally entered. All snapshots can be exported using TCC.
-
Candidate Name and ID
-
Requisition Name and ID
-
Process Name and Code
-
Step, Task, Form Name and Code
-
Submitted by, Date and Language
Understanding Step Execution
The options available for executing steps enable the Onboarding (Transitions) administrators to account for their organization's specific process requirements, depending on whether certain steps are mandatory or optional and if subsequent steps should be repeated.
Once included in a process, each step has an Execute Step property that administrators can configure to specify when the process can advance to the step.
The following scenarios should be considered and used as best practice models when implementing a process.
Scenario 1: All steps are required: Select the option When all previous steps have been completed when there are multiple prior parallel steps that each have a transition into a specific step and this specific step should execute only after all prior steps are completed. This means that the specific step cannot begin until each prior individual step is complete. Also note that a step having this option will not start if one of the incoming transitions has a condition preventing its execution.
Scenario 2: One mutually exclusive step is required: Select the option When one, and only one, of the previous steps has been completed when there are multiple prior parallel steps that each have a transition into a specific step, but these prior steps are mutually exclusive based on conditions and only one of these prior steps will ever be completed.Scenario 3: One or more dependent steps may be completed: Select the option When one of the previous steps has been completed when there are multiple prior parallel steps that each have a transition into the same specific step, and one or more of these prior steps may eventually be completed, and the specific step must be executed each time one of the prior steps gets completed. This can be useful in an instance where someone wanted to receive an email each time one of a group of prior tasks assignees completed their work. Or when a loop is introduced (a set of steps and transition that forms a cycle) and would make a step to be executed more than once.
Scenario 4: One or more steps may be completed: Select the option When one, and only one, of the previous steps has been completed when there are multiple prior parallel steps that each have a transition into the same specific step and one or more of these prior steps may eventually be completed, but you only want the specific step to be executed once and then allow the process to progress further. This means that as soon as the first of the preceding parallel steps get completed, the specific step will execute. Subsequently, if another prior step is completed it does not initiate a repeat execution of the specific step.
Be sure to view step execution options in isolation. While repeating a step may not impact the relationship between it and the previous step that triggered it, it could have unwanted downstream implications for repeating other tasks.
The default value of a second property, After step execution, should be left as is (Execute all subsequent steps). Selecting Execute one of the subsequent steps can produce unexpected results and is therefore not recommended.
More predictable control can be obtained by using conditions on the transitions that lead to subsequent steps. As a candidate or new hire advances through the process, steps whose conditions are met will be assigned while steps whose conditions are not met will not be assigned. This method of control always be used rather than the After step execution value: Execute one of the subsequent steps.
Understanding Routing Steps
Routing steps are used to facilitate the workflow for steps that split into parallel branches and then reconnect as needed.
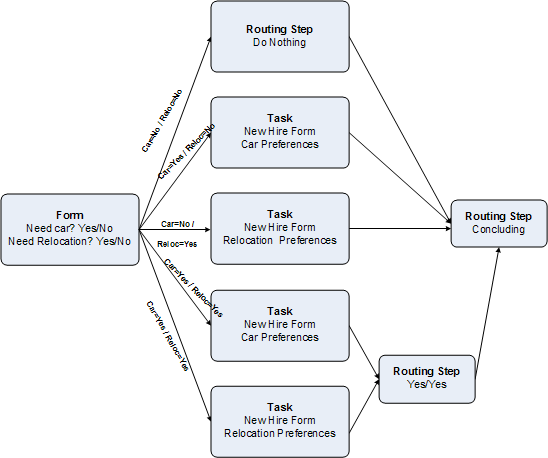
The example above considers that new hires may need certain things in order to proceed with their new job. The manager must determine if the new hires will need to fill out forms for a company car and/or relocation expenses. The above example will require the Onboarding (Transitions) administrator to define a process that includes routing steps. Note that the above illustration is not a faithful graphical representation of a process created in Onboarding (Transitions). It is only given as an example.
Create one form that gets assigned to the manager and which contains these two user-defined fields that both have yes/no answers: Does the new hire need a car? Does the new hire need relocation reimbursement?
Create a routing step to act as the conclusion of all the variations that will arise from every combination of responses to these two user-defined fields from each new hire. This step is named Concluding routing step.
Create the required steps.
-
Create transitions with conditions that proceed from the form and cover each possible answer combination. These transitions need to have specific conditions that handle yes-no, no-yes, yes-yes, and no-no situations. Example:
Does the new hire need a car?: Yes, No, Yes No
Does the new hire need relocation reimbursement? No, Yes, Yes, No
For yes-no, the transition should lead to one task "New Hire Form Car Preferences" and then that form-step should connect to the Concluding routing step.
For no-yes, the transition should lead to the task "New Hire Form Relocation Preferences" and then that form-step should connect to the Concluding routing step.
For yes-yes, there should be two transitions from the form to assign both the car and relocation tasks in parallel. Subsequently, each of these two tasks should have a transition to another small Yes-Yes routing step. Only these two tasks feed into this routing step. The setting on this routing step must be to execute when all of the previous steps are completed, as we know that both are appropriate and required for the type of new hire who requires a company car and relocation expenses. The small Yes-Yes routing step must have a transition into the Concluding routing step.
For no-no, it is necessary to configure one more routing step, called Do Nothing. This step contains no task and takes no action. This is appropriate because nothing is necessary for new hires who need no car and no relocation. However, this routing step is still necessary. A transition needs to proceed from the Do Nothing routing to the Concluding routing step.
The Concluding routing step must be configured to be satisfied when one and only one of its prior tasks is completed. If no car and no relocation is needed, then the Do Nothing routing step will be immediately completed by the system. This in turn will trigger the completion of the Concluding routing step.
While configuring an Onboarding (Transitions) process, keep in mind that a process having more than one end-point cannot be enabled and used. Anytime a step is configured to have no subsequent step after it, this automatically becomes an end-point where the process stops and achieves a percentage completion of 100% and a status of Complete.
For instance, a new hire process might receive results from an external partner indicating whether or not the candidate is qualified to work in the United States. If the result is positive, the process should continue to advance assigning tasks to various assignees until the new hire is considered as being ready to begin working. If this partner's response is negative, the process might need to assign only a handful of concluding steps. Even in this situation the process must be configured to have only one end-point. This can be achieved by configuring the process to have a routing step as the final step. In the process illustrated earlier in this section, both main paths—the long one for qualified employees and the short one for candidates who are ultimately unsuitable—can lead to a single routing step. This routing step must be configured to be triggered "when one and only one of the prior steps is complete". This works because a candidate can only follow one of the two main paths, never both. The routing step must be satisfied as soon as one of the two main paths is finished and because the routing step has no subsequent steps, it is followed only by "End". As soon as this routing step is complete, the overall process reaches 100% completion status and its status becomes Complete.
Transition
Transitions are created to bring steps together.
Viewing Details on Transitions Added to a Process
When looking at the transitions created for steps in a process, it is possible to display a spreadsheet-like view of the entire process including information about each step and transition to assist the Onboarding (Transitions) administrator who is configuring and reviewing processes.
The Process page displays two tabs.
The Steps tab lists each step, its description, perhaps its position (relative to the other steps) on the Tasks tab in the career section, and a Delete button.
The Transitions tab lists the process by transition. Each row in the Transitions list can be collapsed or expanded, controlling the level of detail given for each transition.
The information listed for each transition in the collapsed state is described in the following table:
| Column | Description |
|---|---|
| Name | The name of the transition as a transition to the Connection page. |
| From Step | The originating step when entering the transition. |
| To Step | The landing step when leaving the transition. |
| Conditions | Possible entries:
|
| Required | Possible entries:
|
| Actions | Deletes the transition. |
When the transition is expanded, detailed information is provided for both the originating step and the landing step that encompass the transition. The information listed for each step when the transition is expanded is described in the following table:
| Row | Description |
|---|---|
| Assignees | The name or role of the assignee(s). |
| Task | The name of the task as a transition to the Task Definition page, if any (no tasks are associated to Routing Steps). |
| Execute Step | Description of when the step will be executed. |
| After step execution | Description of what will occur after the step is executed. |
Condition
A transition can contain conditions, that is a set of circumstances that must be met to complete a transition from one step to another.
Once a transition is created, it is possible to add a condition. This means that the transition will be executed only if and when the condition is met. It enables you to further tailor your process, expanding the scope of scenarios the process can handle.
Every piece of data can be used to drive the process forward depending on its value. For instance, you can create a condition to execute a specific task if the new hire's location is X but not Y or Z. You can set different branches of the processes for different people.A transition can have multiple conditions. To ensure that a task is assigned only if two or more elements are true, the Onboarding (Transitions) administrator can use the Condition Requirements field when configuring the transition. This field provides two options:
All conditions must be valid
At least one of the conditions must be valid
Once a process has been enabled, it cannot be modified for the most part. This is to ensure that all new hires associated with a process advance through the same series of steps. One exception to this is that the conditions on transitions between steps can be modified even while a process has Active status. Consequently, there is no need to create a duplicate (with Draft status) of the process if changes to the conditions to existing transitions between steps are required. This was actually the behavior prior to version 12C and has been restored in version 13A.
Conditions are indicated in the preview process graphic mode with a bold or thick arrow, but no written details are available on the condition in the preview mode. However, the Transitions tab in the Process page has a column that provides a useful view of whether or not a transition has any conditions. Another column in the Transitions tab also shows whether one or all of the conditions must be met in order for the transition's To task to get assigned.
Operators used in Conditions
| Operator | Description |
|---|---|
| Contains | The element, word, or number entered in the Value field must be found somewhere in the field. For example: Field: TransitionsProcess/ProcessName Operator: Contains Value: Computer Setup The name of the Onboarding (Transitions) process must contain the words "Computer Setup." |
| Is | The element, word, or number entered in the Value field must be exact match for the whole field. For example: Field: AssignmentOffer/Annual Bonus Operator: Is Value: 10% The following task will only be reached if the annual bonus in the offer for this new hire is exactly 10%. |
| Is null | Value field is empty |
| Is not null | Value field is not empty |
| Is equal to | The resulting information must be equal to the numerical value entered in the Value field. |
| Is not equal to | The resulting information must not be equal to the value entered in the Value field. |
| Is less than | The resulting information must be less than the value entered in the Value field. |
| Is greater than | The resulting information must be greater than the value entered in the Value field. |
| Is less than or equal to | The resulting information must be less than or equal to the value entered in the Value field. |
| Is greater than or equal to | The resulting information must be greater than or equal to the value entered in the Value field. |
Below examples are conditions used for the following fields:
|
|
| Is | Returns true if Variable is one of the elements in the Collection. For example: User.city IS {Montreal, Toronto} would return true if User.city was Montreal or Toronto and false otherwise. |
| Is in | Returns true if Variable is in one of the elements in the Collection. For example: User.city IS_IN {Canada, USA} would return true if user.city was Montreal but false if it was Paris. Note that the IS_IN operator does not behave like the IS operator when the operand is one of the Collection member.For example: Salesman.region IS_IN {Ontario, Alberta} would return false if Salesman.region was Ontario. To express both the IS or IS_IN operators use the IS_OR_IS_IN operator. |
| Contains | Returns true if Variable contains one or more of the elements in the Collection. For example: Salesman.region CONTAINS {Toronto, Montreal} would return true if Salesman.region was Ontario, Quebec or Canada. |
| Contains all | Returns true if Variable contains all of the elements in the Collection. For example: Salesman.region CONTAINS_ALL {Toronto, Montreal} would return true if Salesman.region was Canada but would return false if it was Ontario. |
| Is or is in | Returns true if Variable IS or IS_IN Collection. This condition returns true if the IS condition or the IS_IN condition is true. For example: User.city IS_OR_IS_IN {Montreal, Toronto, USA} would return true if User.city was Montreal, Toronto, or New York. |
| Is or contains | Returns true if Variable IS or CONTAINS the Collection. This condition returns true if the IS condition or the CONTAINS condition is true. For example: Salesman.region IS_OR_CONTAINS {Toronto, Montreal} would return true if Salesman.region was Toronto, Montreal or Canada. |
| Is or contains all | Returns true if Variable IS or CONTAINS_ALL the Collection. This condition returns true if the IS condition or the CONTAINS_ALL condition is true. For example: Salesman.region IS_OR_CONTAINS_ALL {Toronto} would return true if Salesman.region was Canada or Toronto. |
| Is not | Returns the negation of Is. An example of this negation would be to create an alternate branch of the process which would apply to all the rest of the New Hires who did not fall into the other opposite conditions that were more specifically defined. |
| Is not in | Returns the negation of Is in. |
| Does not contain | Returns the negation of Contains. |
| Does not contain any | Returns the negation of Contains all. |
| Is not and is not in | Returns the negation of Is or is in. |
| Is not and does not contain | Returns the negation of Is or contains. |
| Is not and does not contain any | Returns the negation of Is or contains all. |
Date Based Condition
Date based conditions can be used to start or delay a process for a number of days before executing the next task.
When setting dates, always use is less than or equal to as the operator.
When you want a task to wait and not be sent until 5 days before the New Hire's official Start Date for their job, use this formula: “<= -5”. The negative sign indicates the countdown before start date, while the equals sign indicates when it should begin. If preceding tasks finish early, the process will wait until 5 days before start, and then will assign this task. If preceding tasks finish late, this task will fire as soon as possible after 5 days before start date, due to the inclusion of the '<' character.
When you want a task to wait and not be sent until 5 days after the New Hire's official Start Date for their job, use this: “<= 5”. The positive number means that they have already been on the job for 5 days. If preceding tasks finish early, the process will wait until 5 days after Start Date, and then assign this task. If preceding tasks finish late, this task will fire as soon after 5 days as possible.
In date formulas, 0 or zero means now or the current date.
For example, to set a condition to send a correspondence four days before the start the field values for this equation would be:
Operator: Is less than or equal to
Value: -4
These date-based conditions can be configured to use AssignmentForCondition.StartDate, which refers specifically to the start date for the job, Process Start Date or LastPreviousStepEndDate.
LastPreviousStepEndDate is useful for waiting until a certain number of days after the immediately preceding task is completed. This means that negative numbers cannot be used with LastPreviousStepEndDate, as it is impossible to trigger a task days before its preceding task is supposed to be completed. Other dates such as “Expected Start Date” may be less reliable, and any changes that were made in Recruiting after the process was started will not be transferred into Onboarding (Transitions). However, Start Date changes are immediately transferred from Recruiting into Onboarding (Transitions).
When calculating a condition start date, only working or business days are considered. That is, if working days are from Monday to Friday, then Saturday and Sunday are not considered in the equation. For example, if Saturday and Sunday are not checked ON in the Calendar Days area of the Settings, then these days will not be counted. Therefore a task that is assigned on Thursday the 5th and is defined to take 2 days in duration, will have its due date automatically calculated to be Monday the 9th.
Evaluation of Conditions on Partner Update
When an update is received from an OVI partner, Onboarding (Transitions) reevaluates conditions automatically thereby enabling the process to proceed to the next step as quickly as possible.
In prior releases, Onboarding (Transitions) customers sometimes created processes designed to advance to a certain step and then "wait" until an OVI partner sent an update (either a status change or a value stored in a field) before continuing. Customers accomplished this by creating a "loop" using a date-based condition that reevaluated if the appropriate condition had been reached. Reevaluations were performed only once per day (unless other actions triggered reevaluations of the condition). See Date Based Condition Consequently, many hours might elapse between the moment when a partner update was received and when the reevaluation occurred.
Three situations could "wake up" such a process causing the latter to reevaluate all conditions on transitions and thereby determine if any of the transitions could be executed:
Completing any task in the process.
Stopping and resuming the process.
A date-based condition (on a transition) whose value changed to True (i.e. can be executed).
A fourth situation can trigger a process to reevaluate all conditions on transitions: receiving an update from an OVI partner. (The one exception where conditions will not be reevaluated is described in the following paragraph.) This enhancement renders date-based conditions on transitions unnecessary in many cases. When a process is designed to "wait" for a specific value to be provided by a partner, the process will automatically "wake up" when a partner update is received, reevaluate the condition and if the value is the one waited for, the process will proceed to the next step.
When designing such processes, administrators can use very effectively the case where a step has multiple outgoing transitions with a condition and none of those transitions has been executed. In such cases, the process will reevaluate the condition of the outgoing transitions. Likewise, if a step has multiple outgoing transitions with a condition and at least one of the transitions was executed, the process will not reevaluate any of those transitions.
Consider the following greatly simplified process including an OVI partner system task and two manual tasks.
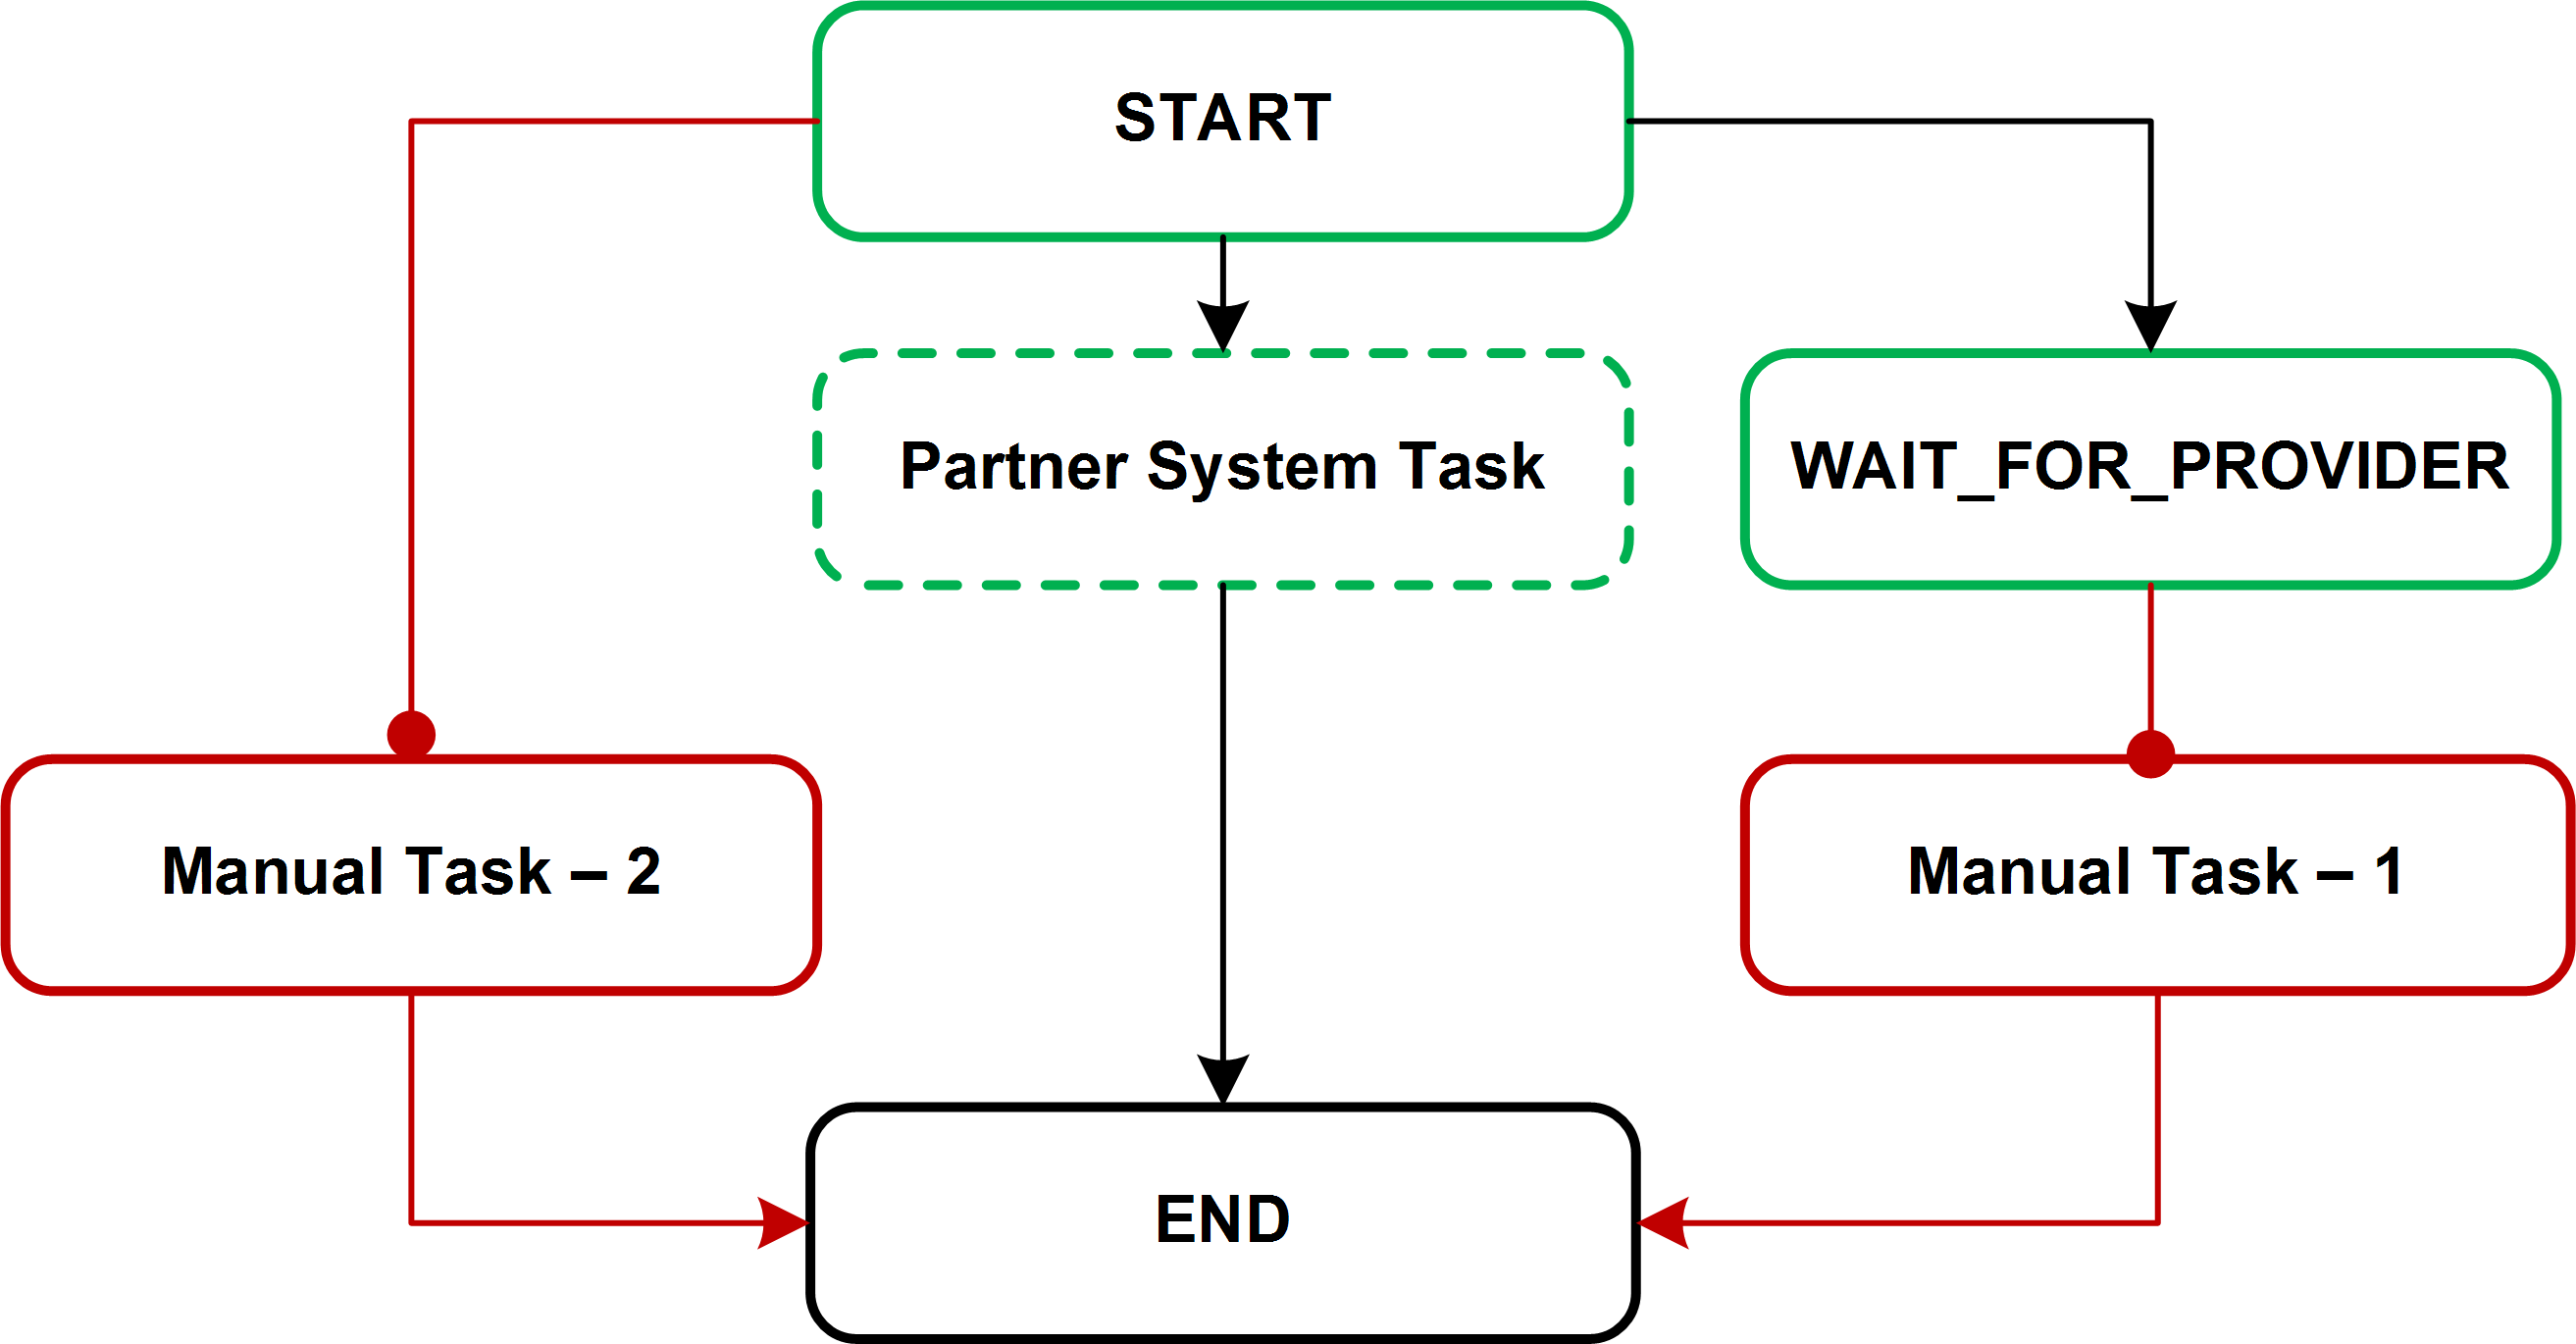
Suppose that the manual tasks can only be executed when a specific value is received from the partner. The router at the beginning of the process has three outgoing transitions:
To Manual Task - 2 if condition "Provider Status=Pending Employer" (condition currently "false"; transition not executed).
To Partner System Task (no condition; executed right away).
To WAIT_FOR_PROVIDER (no condition; executed right away), which in turn has a "Provider Status=Pending Employer" condition to Manual Task - 1 (condition currently "false"; transition not executed).
The process cannot advance (it "waits") because the conditions were "false" when evaluated and there are no date-based conditions that might become "true" at some point.
Whenever an update is received from the partner, the "Provider Status" is set to "Pending Employer", the process "wakes up" and reevaluates the relevant conditions as depicted in the following illustration.
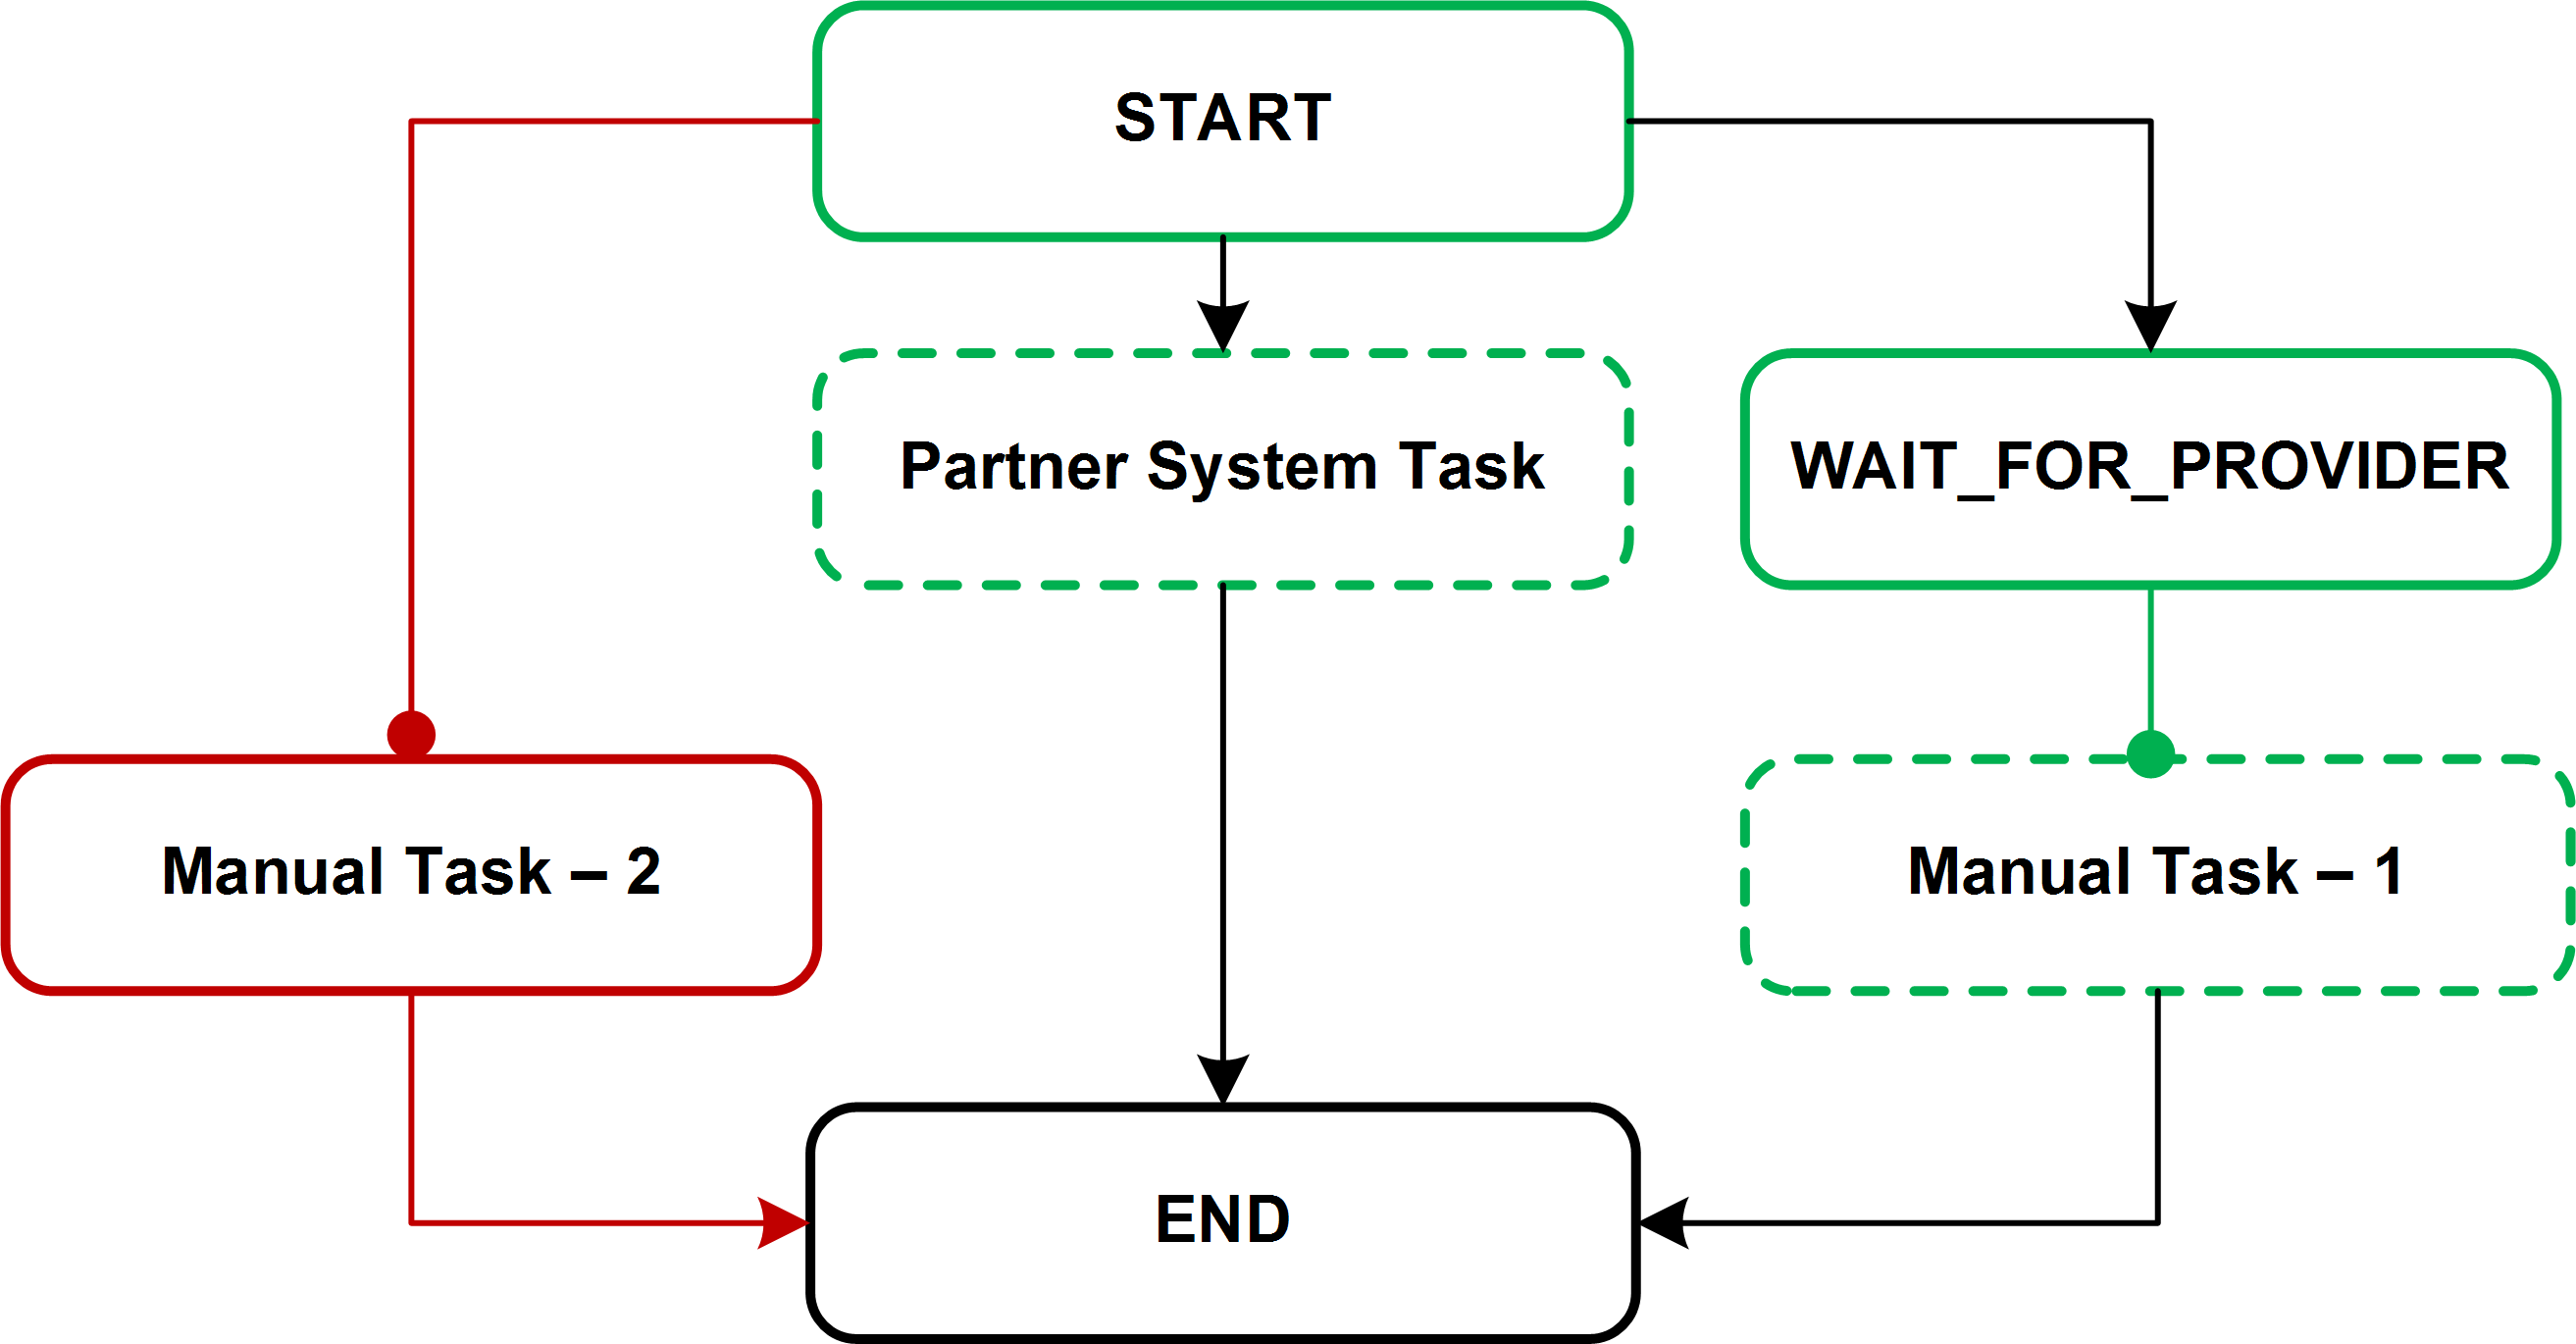
The transition to Manual Task - 2 is not reevaluated. This is because Start has multiple outgoing transitions and the WAIT_FOR_PROVIDER and Partner System Task transitions were executed immediately, before Manual Task - 2. The "Provider Status=Pending Employer" condition associated with the transition to Manual Task - 1 is reevaluated because no outgoing transition associated with WAIT_FOR_PROVIDER was executed. And because the value is now true, Manual Task - 1 can be executed and the process can continue.
OVI Partner System Tasks
Customers should ensure that listening to partner statuses does not trigger parallel workflows (branches) or otherwise modify user interactions included in the OVI partner system tasks. All user interactions should be confined to the system task.
LastPreviousStepEndDate Field
(The information provided in this section is not new.)
When date-based conditions are still required in processes, administrators might use the LastPreviousStepEndDate field sometimes to force a process to wait until a certain field contains a value (that would typically be provided by an OVI partner).
Take the case of a "loop" in a process where a transition with a "LastPreviousStepEndDate is less than or equal to 1" condition, combined with a routing step that verifies if a particular value is found in a specific field. If the transition with the date-based condition is executed and the value is not yet present, the process will wait until LastPreviousStepEndDate is less than or equal to 1.
Use of the LastPreviousStepEndDate field can sometimes produce waiting periods longer than expected for a number of reasons.
LastPreviousStepEndDate does not represent the number of days that have elapsed since the immediately preceding task was completed; it represents the number of days that have elapsed since any other task in the process was completed.
If a process includes multiple branches, a task in one branch of the process, once completed, will change the LastPreviousStepEndDate value, affecting the condition in another branch that uses the field.
In such cases, conditions such as "LastPreviousStepEndDate is less than or equal to 1" will not necessarily become "true" when the immediately preceding task was completed one day ago if another task in the process was completed more recently (the process would have to wait an additional day before reevaluating this condition).
The LastPreviousStepEndDate field considers only steps of the main (root) process. A step completed in a subprocess does not affect the LastPreviousStepEndDate field. Even if used in a condition of a subprocess, the value considered is the one from the main process.
If the system considers a time zone when executing a date-based condition, and the candidate is the person who completed the task that triggered the condition, the time zone of the candidate's computer is the one that is used. If a Transitions backend user (typically a Recruiting Center user) completed the task, the time zone specified in the person's user preferences is used, and if no time zone is specified there, the time zone of the customer is used.
For all of the reasons mentioned previously, date-based conditions that use the LastPreviousStepEndDate field should always be combined with another condition such that whenever one of the two conditions is met, the process will advance. For example, a transition could be configured to have two conditions: "LastPreviousStepEndDate is less than or equal to 1" and the value of ProviderStatus is equal to "Pending Employer". The transition could then be configured to be complete whenever at least one of the conditions was "true". This approach is recommended to ensure that processes created prior to 15A do not "wait" unnecessarily. In 15A and later releases, these conditions will be reevaluated as soon as an update is received from the OVI partner and the process will advance to the next step.
Conditions Based on Null Values
Taleo Onboarding (Transitions) accepts null values for transition conditions for processes.
When creating a condition for a transition between steps in a process, an administrator can select the operators of null or not null for the field specified in the condition. This allows the new hire or any other form assignee to either answer or not answer a question on a form that may or may not be applicable to them, with the lack of answer value being considered in the condition logic. Taleo Onboarding (Transitions) can then move forward through the process according to whether or not there is a value in the condition field.
Preview Process
Once a process is created, it is possible to obtain a visual representation of the process by clicking the Preview Process link in the Quick Access box. This system generated flow chart can help you validate the process you just created.
The start and the end are automatically generated by the system to help you visualize the transitions among your tasks. For any task that has no following or next transition, an End circle is created. Therefore if different parallel branches are created, each of them could have an independent End, unless a later step or task which reunifies the branches downstream has been created.
Transitions with one or multiple conditions are represented with a bold and thick black arrow. Transitions without conditions are represented with a lighter black arrow.
It is a best practice to preview your developing process often to ensure that any errors can be caught and corrected.
Setting Hold Until Prior Task Completion
You can make a task wait until a prior task completes by using the variable LastPreviousStepEndDate.
By using the variable LastPreviousStepEndDate from the CurrentProcess group, you can specify that a task will wait until a prior task hits its completion mark. You can also specify the number of days you want the process to wait before restarting.
Revisiting Tasks by Looping
You can make a process backtrack to pick up the process from a previous step but you must anticipate these likely backtrack points and build them into your overall process.
Processes cannot be reversed, but steps can be configured to lead back to prior steps based on whether or not each new hire record currently meets certain conditions. Using any standard field or user-defined field as a decision point, a task can have a transition to one downstream task if the decision field is "true", and have a transition to a different task if the decision field is currently false. This different or secondary task can eventually have a transition back to the original task, forming a loop. When the information in the new hire's decision field finally is true, then the main downstream task can be successfully assigned, and the process stops looping and moves further along towards the end.
As an example, there is a possibility that the company may not be ready for the new hire to start on their prearranged start date, so a loop can be defined that allows pushing back that start date a few times if needed. As the start date approaches, a form can get assigned to the Manager, asking whether they are ready for next week's start date or not. If yes, the process proceeds to the next downstream tasks as usual. If no, the process follows a transition to a different step, which waits for 7 days and may do other activities. Then a task asks the manager again: Are we ready for the new hire to start next week? If no, then the process follows the same loop back to the waiting step. If yes, then the process exits the loop and proceeds to the next downstream task as usual.
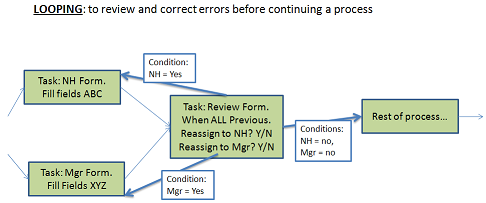
In the previous diagram, the new hire and the manager both fill in a form. Then data from these forms is shown to the required reviewer. If the reviewer can make changes to the data, looping is unnecessary. However, if the reviewer can only view the information and must therefore work with the new hire or manager to make changes, the workflow can anticipate this and include a "loop back".
If the reviewer decides that a change is necessary either from the new hire or the manager, the reviewer will fill in two UDFs created for this purpose. Based on these choices, the transitions cause an “earlier” form to be reassigned to its proper assignee. As soon as that assignee submits that form again, the same outgoing transition is triggered and the reviewer has another chance to review the newly corrected data. In this way the loop is completed and the process appears to “return to a prior step” while still following the normal rules.
Dynamic Condition Evaluation (DCE)
Dynamic Condition Evaluation (DCE) allows Onboarding processes to react to changing data in Recruiting.
When a supported field’s value is entered or updated in Recruiting, the system checks to see whether this data is used in a waiting condition in an active Onboarding process. If so, the waiting conditions are re-evaluated according to that new information.
As an example, a customer’s Onboarding process has a business requirement to only proceed beyond a certain point once the new hire's Social Security Number (SSN) is entered into the system. This SSN value is populated after the process has been started.
Up through 15B.7, administrators had to configure a loop in the process, by which the process checks once a day to see whether the SSN field is still null, or whether it is has a value. (The administrator would use the condition “LastPreviousStepEndDate ” and several routing steps to configure such a loop). Only when the field is no longer null, could the process continue. While this meets the business requirement, it creates the situation where processes are delayed a day or more after a field is populated before the process can continue.
With DCE such a loop configuration which checks for data is no longer needed. The administrator can configure a transition with a condition of “SSN is not null.” When the prior task completes, this transition and condition will attempt to be fulfilled. In our example, the SSN is still null, and therefore, the transition does not execute and does not invoke subsequent steps. (Up through 15B.7, this would be a dead end in the process, and therefore an invalid configuration).
Next, in our example, the SSN becomes known, and is populated. At that moment, all transitions with conditions which are in such a waiting status are re-evaluated. This transition which had a previous failed attempt is again attempted. In this case, the transition had a condition of “SSN is not null.” Since there is now a SSN, the condition can be fulfilled. The transition executes, and the balance of the process continues.
Also, with DCE enabled, future dated tasks will recalculate when they should execute if the date populated in the field changes in Recruiting. Those future dated tasks may have conditions which reference date format fields such as Start Date, Offer Accept Date and Offer Date UDFs.
| Setting | Description | Default Value | Location |
|---|---|---|---|
| Proactive update of waiting conditions |
Evaluate waiting conditions when corresponding trigger information is provided or updated. |
No (off) | Configuration > [Onboarding (Transitions)] Settings |
| Field Category | Field Name | Entity Extension Information |
|---|---|---|
| Addresses_WF | CurrentAddressLine1 | com.taleo.functionalcomponent.talent.entity.candidate.CSUser#address |
| Addresses_WF | CurrentAddressLine2 | com.taleo.functionalcomponent.talent.entity.candidate.CSUser#address2 |
| Addresses_WF | CurrentAddressMunicipality | com.taleo.functionalcomponent.talent.entity.candidate.CSUser#city |
| Addresses_WF | CurrentAddressZipPostalCode | com.taleo.functionalcomponent.talent.entity.candidate.CSUser#zipCode |
| PersonalInfo_WF | CellularNumber | com.taleo.functionalcomponent.talent.entity.candidate.CSUser#mobilePhone |
| PersonalInfo_WF | DateOfBirth | com.taleo.functionalcomponent.talent.entity.candidate.CSUser#birthday |
| PersonalInfo_WF | FirstName | com.taleo.functionalcomponent.talent.entity.candidate.CSUser#firstName |
| PersonalInfo_WF | HomePhoneNumber | com.taleo.functionalcomponent.talent.entity.candidate.CSUser#homePhone |
| PersonalInfo_WF | LastName | com.taleo.functionalcomponent.talent.entity.candidate.CSUser#lastName |
| PersonalInfo_WF | PersonalEmailAddress | com.taleo.functionalcomponent.talent.entity.candidate.CSUser#emailAddress |
| PersonalInfo_WF | Prefix | com.taleo.functionalcomponent.talent.entity.candidate.CSUser#prefixName |
| PersonalInfo_WF | SocialSecurityNumber | com.taleo.functionalcomponent.talent.entity.candidate.CSUser#socialSecurityNumber |
| PersonalInfo_WF | Suffix | com.taleo.functionalcomponent.talent.entity.candidate.CSUser#suffixName |
| PersonalInfo_WF | WorkPhoneNumber | com.taleo.functionalcomponent.talent.entity.candidate.CSUser#workPhone |
| PersonalInfo_WF | UDF | com.taleo.functionalcomponent.talent.entity.candidate.CSUser#UDF |
| Offer_WF | AcceptanceDate | com.taleo.functionalcomponent.recruiting.entity.offer.Offer#acceptedDate |
| Offer_WF | AnnualBonus | com.taleo.functionalcomponent.recruiting.entity.offer.AbstractOffer#annualBonus |
| Offer_WF | Approved | com.taleo.functionalcomponent.recruiting.entity.offer.Offer#approvedDate |
| Offer_WF | CarAllowance | com.taleo.functionalcomponent.recruiting.entity.offer.AbstractOffer#carAllowance |
| Offer_WF | Comission | com.taleo.functionalcomponent.recruiting.entity.offer.AbstractOffer#commissionAmount |
| Offer_WF | CreatedOn | com.taleo.functionalcomponent.recruiting.entity.offer.AbstractOffer#captureDate |
| Offer_WF | DaysAWeek | com.taleo.functionalcomponent.recruiting.entity.offer.AbstractOffer#daysPerWeek |
| Offer_WF | ExpenseAccount | com.taleo.functionalcomponent.recruiting.entity.offer.AbstractOffer#expenseAccount |
| Offer_WF | ExpirationDate | com.taleo.functionalcomponent.recruiting.entity.offer.Offer#expirationDate |
| Offer_WF | Extended | com.taleo.functionalcomponent.recruiting.entity.offer.Offer#extendDate |
| Offer_WF | HoursADay | com.taleo.functionalcomponent.recruiting.entity.offer.AbstractOffer#hoursPerDay |
| Offer_WF | Notes | com.taleo.functionalcomponent.recruiting.entity.offer.AbstractOffer#notes |
| Offer_WF | Options | com.taleo.functionalcomponent.recruiting.entity.offer.AbstractOffer#stockOption |
| Offer_WF | OtherBonus | com.taleo.functionalcomponent.recruiting.entity.offer.AbstractOffer#otherBonus |
| Offer_WF | OtherCompensation | com.taleo.functionalcomponent.recruiting.entity.offer.AbstractOffer#otherCompensation |
| Offer_WF | RefusedDate | com.taleo.functionalcomponent.recruiting.entity.offer.Offer#refusedDate |
| Offer_WF | RelocationAmount | com.taleo.functionalcomponent.recruiting.entity.offer.AbstractOffer#relocationAmount |
| Offer_WF | Salary | com.taleo.functionalcomponent.recruiting.entity.offer.AbstractOffer#salary |
| Offer_WF | SalaryPayBasis | com.taleo.functionalcomponent.recruiting.entity.offer.AbstractOffer#payValue |
| Offer_WF | SignOnBonus | com.taleo.functionalcomponent.recruiting.entity.offer.AbstractOffer#signOnBonus |
| Offer_WF | StartDate | com.taleo.functionalcomponent.recruiting.entity.offer.Offer#actualStartDate |
| Offer_WF | Stock | com.taleo.functionalcomponent.recruiting.entity.offer.AbstractOffer#stockAmount |
| Offer_WF | Vacation | com.taleo.functionalcomponent.recruiting.entity.offer.AbstractOffer#vacation |
| Offer_WF | UDF | com.taleo.functionalcomponent.recruiting.entity.offer.AbstractOffer#UDF |
Launching an Onboarding (Transitions) Process for Candidates/Employees with no Email Address
To launch an Onboarding (Transitions) process via the Recruiting Center or Taleo Connect, whether it is a Pre-Hire, a New Hire, an E-Offer or an Offboarding process, candidates/employees need to have an email address. Customers can configure Taleo Onboarding (Transitions) such that Onboarding (Transitions) processes can be launched for candidates or employees even if they do not have an email address.
System administrators have the possibility to set a fallback email address for candidates/employees with no email address. This email address will be used for every candidate/employee who lacks an email address so that Onboarding (Transitions) processes can be launched. A setting is available for that feature.
| Setting | Description | Default Value | Location |
|---|---|---|---|
| Email Address for Onboarding (Transitions) Process | To run an Onboarding (Transitions) process, the email address of the candidate/employee is a prerequisite even if the process is configured such that no notifications or reminders are sent to the individual. For candidates for whom there is no email address, leaving this email address field with no value means that no Onboarding (Transitions) process can be run for them. If a value is provided for this setting, for every candidate who lacks an email address, the value is reproduced in the “Personal Email Address” and “Correspondence Email” fields in the candidate's SmartOrg user account (unless the candidate already has an associated SmartOrg user account with an email address). |
Blank value, no email address entered. | Configuration > [Onboarding (Transitions)] Settings |
The table shows the type of communication a candidate/employee will get if a fallback email address has been saved in their candidate profile and how they will get the communication (via the career section Tasks tab or via email).
| Correspondence tasks | OVI-triggered invitations/messages | Notifications of assigned tasks | Reminders of upcoming/overdue tasks | |
|---|---|---|---|---|
| Candidates/employees with a fallback email address | Tasks tab | Tasks tab | None | None |
| Candidates/employees with an email address | Tasks tab |
Tasks tab |
When launching a Transitions process for a candidate/employee, the candidate/employee must be linked to a user account in SmartOrg.
If the candidate/employee is already linked to a SmartOrg user account, this user account is used.
If the candidate is not linked to a SmartOrg user account, a new SmartOrg user account of type "Onboarding (Transitions)" gets created automatically by the system when an Onboarding (Transitions) process gets launched for a candidate with no preexisting SmartOrg user account.
The system automatically configures the email address of the newly-created Onboarding (Transitions) SmartOrg user account using the email address provided by the candidate or the fallback email address entered in the Email Address for Onboarding (Transitions) Process setting. If the system cannot any of these addresses, then the Onboarding (Transitions) process cannot be launched because the new Onboarding (Transitions) user cannot be created at all by the system.
Important Notes
Customers may want to set up a "dead-letter email address" to receive any stray email messages and ignore these communications. For example, Do_Not_Reply@company.com.
Building a Process
Several steps are involved when building a process.
Analyzing Your Process
Before creating a process in Onboarding (Transitions), it is important to analyze your business requirements and the activities and participants that you will need.
During the analysis, you need to identify the steps involved in building the process, define what is required to perform the task in each step, decide who will complete each step, determine the order of the steps and any dependencies, identify the transitions from one step to another.
Take the example of a task you wanted to ensure was assigned at a precise time, for example, five days after the employees' start date. You would not want the assignment of the task to be delayed just because some earlier tasks in the process were taking longer to complete than planned.
A good solution would be to construct your process such that the "time-critical" task was independent on other tasks that might encounter a delay. You could create a transition from a task placed early in the process and certain not to encounter a delay to the "time-critical" task. You could assign a condition to the transition such as Start Date less-or-equal to five days. If other tasks in the process encountered a delay and took longer to complete than planned, the "time-critical" task would still be assigned no later than five days after the employees' start date.
You may want to create a flowchart to assist with the above analysis or you can simply use a pen and paper.
Once your process is well defined, you can build it in Onboarding (Transitions) Administration.Defining the Properties of a Process
-
Click Create.
-
Enter a code, name, and description.
-
Select the type of process: Process or Sub-process.
-
Specify the process owner, by searching for a role or specific user.
-
(Optional) Select one or more supervisors.
-
In the Guidelines field, enter instructions as needed.
-
Click Save.
Creating User-defined Forms
The creation of a user-defined form consists of the following steps.
Creating Message Templates for Onboarding (Transitions)
The creation of a message template consists of the following steps.
Creating a Task
After completion, you can configure a notification and/or a reminder if desired.
Creating a Step
The process must be in Draft status.
Enabling Form Snapshots within a Step
Configuration - [Onboarding (Transitions)] Administration - Processes
Configuration - [Onboarding (Transitions)] Administration - Settings
Creating a Transition
-
In the process you just created, click Create in the Transitions tab.
-
Indicate which two steps are to be connected: the starting step and the ending step.
-
Click Continue.
-
In the Name field, you can provide a meaningful name for the transition you just created. By default, the name of the transition consists of the word "From" and the name of the first step, plus the word "to" and the name of the second step.
-
In the Description field, you can enter a description that can help explain what is the intention of this transition between the steps, and/or the intention of any conditions that will be placed on it.
-
Select whether any or all conditions must be met in order for the "To" step to get assigned, if you intend to create any conditions in the next step.
-
Click Finish.
You can add a condition to the transition.
To view the transition graphically, click Preview Process located on the left hand side of the window, under Quick Access. The Preview Process feature is very helpful to get a quick visual of whether all the steps are connected together as intended.Creating a Condition
The process must have Draft status.
Associating a Process to a Process Type
You can associate only one process type to a process.
Associating a Process with Organizations, Locations and Job Fields
-
Select the process.
-
To associate the process to an Organization, Location or Job Field, click Add where relevant.
-
Select an element.
-
Click Select.
-
Click Save.
Previewing a Process
Click the Preview Process link in the Quick Access box.
Enabling a Process
In the process you just created, click Activate.
Processes - Other Configuration Tasks
Creating a Task Reminder
A task must be created and must have a duration, because at runtime for each new hire, the due date gets calculated by adding the duration onto the date that the task gets assigned.
The due date takes into account only the working days that are used in the zone, for example not Sunday or any days configured. See Onboarding (Transitions) Settings.
A reminder entry appears in the Reminders section. On the day specified, if the task remains In Progress, the reminder recipient will receive an email with the selected message template.
Deleting a Task Reminder
-
Click the name of a task.
-
In the Reminders section, find the reminder and click the corresponding Delete button.
-
Click Yes in the message box to confirm the deletion.
The reminder no longer appears in the Reminders section of the Task page. At runtime, from the perspective of the assignees, anyone who will reach this date for an unfinished task in the future will not receive this reminder.
Creating a Task Notification
-
Click the name of a task.
-
Click Edit next to Notifications.
-
Click Search for Task Assignment Correspondence, sent to assignees, or Task Completion Correspondence, sent to owner, to select the appropriate message template.
-
Click Save.
Removing a Task Notification
-
Click the name of a task.
-
Click Edit next to Notifications.
-
Click Clear buttons.
-
Click Save.
Disabling a Process
-
Click a process.
-
Click Deactivate.
Deleting a Draft Process
The process must be in Draft status.
Click Delete.
Automatically Deleting Old Processes
Completed and canceled processes associated with a specific new hire/candidate can be automatically deleted.
The Automatically Delete Old Onboarding (Transitions) Processes is a setting that the Onboarding (Transitions) administrator can configure to determine when to delete obsolete processes. These processes are associated with a specific candidate/new hire and have been either completed or canceled. The Onboarding (Transitions) administrator determines the number of days processes have aged beyond their completion or cancellation date as the criteria for deletion. The number of days is entered as the setting value, with zero representing no automatic deletion of processes.
After the initial setting is set and enabled, the first delete occurs 14 days later and a new delete is performed automatically twice per month thereafter. All completed and canceled processes that have reached at least the configured age are automatically deleted. Therefore, it is recommended to complete any process-related Taleo Connect exports before the setting is configured and saved and again before any other subsequent automatic deletions. Processes that are deleted through the automatic deletion process are not recoverable.
When a candidate/new hire completed or canceled process has reached the defined age value in days, the process is automatically deleted. All tasks associated with the process are also deleted, as are all history entries related to the process. Personalized PDFs and forms for the new hire/candidate can no longer be generated. However, the candidate/new hire user account is not deleted. Candidate/new hire data is retained in the database and is available for reporting purposes.
| Setting | Description | Location |
|---|---|---|
| Automatically Delete Old Onboarding (Transitions) Processes | Automatically executes a permanent deletion of new hires’ Onboarding (Transitions) processes completed or canceled at least X days ago. All tasks within these processes will also be deleted. Value of 0 days means no automatic deletion will occur. Ongoing processes will be ignored and not included in permanent, automatic deletions. | Configuration > [Onboarding (Transitions)] Settings |
Impact with the Automated Candidate Deletion Process in Recruiting
The automatic deletion of candidates that is set through the Recruiting Administration Automated Task feature will no longer work if a candidate/new hire has any associated Onboarding (Transitions) processes in any status whether In Progress, Canceled, Completed or even Suspended.
The Onboarding (Transitions) automated process deletion mechanism is critical if organizations want to free up the candidates/new hires to be deleted from the Recruiting automated candidate deletion mechanism. The Onboarding (Transitions) administrator can configure the Automatically Delete Old Onboarding (Transitions) Processes setting to delete processes that are older than X days. Then, after this deletion has occurred, the next time candidates/new hires are matched to the Recruiting automated candidate deletion mechanism, they will get removed from the Taleo system entirely.
Removing the Onboarding (Transitions) processes does not delete the data about candidates/new hires. Only the record of what processes and what tasks they completed, and what PDFs were completed, etc., gets deleted by the Onboarding (Transitions) deletion mechanism. The Recruiting deletion mechanism is required to truly wipe out the data pertaining to the candidates/new hires themselves.Deleting a Task
-
In the Task Definitions list, click Delete next to the task.
-
Click Yes to confirm the deletion.
Deleting a Step
-
Click a process.
-
Click the Steps tab.
-
Click Delete next to a step.
Deleting a Transition
-
Click a process.
-
Click the Transitions tab.
-
Click Delete next to a transition.
Launching and Canceling Onboarding (Transitions) Processes in the Recruiting Center
Candidate Selection Workflows can be configured such that users who have the necessary permissions can start or cancel Onboarding (Transitions) pre-hire and new hire processes from the Recruiting Center.
Start Onboarding (Transitions) Pre-Hire Process
Start Onboarding (Transitions) New Hire Process
Cancel Onboarding (Transitions) Pre-Hire Process
Cancel Onboarding (Transitions) New Hire Process
Like any other actions, these actions are available via the Candidates list More Actions menu, the Candidates list contextual action menu, and the candidate file More Actions menu. Processes can also be launched when using the Bypass action and the Change Step/Status action.
As a system administrator, you can add the Start Onboarding (Transitions) Pre-Hire Process and the Start Onboarding (Transitions) New Hire Process actions to candidate selection workflow steps (Configuration > [Recruiting] Administration > Candidate Selection Workflow > Steps tab > Actions Usage tab).
You must also grant these permissions to users so they can access these actions:
| User Type Permission | Location |
|---|---|
| Initiate a pre-hire process for a candidate | Configuration > SmartOrg Administration > Users > User Types > select a user type > Recruiting > Other |
| Cancel a pre-hire process in progress | Configuration > SmartOrg Administration > Users > User Types > select a user type > Recruiting > Other |
| Initiate a new hire process for a new resource | Configuration > SmartOrg Administration > Users > User Types > select a user type > Recruiting > Other |
| Cancel a new hire process in progress | Configuration > SmartOrg Administration > Users > User Types > select a user type > Recruiting > Other |
Viewing Transitions Processes Via Channels and Links in the Recruiting Center
The Recruiting Center center stage provides channels and links to view Transitions processes.
These channels and links are:
Pre-Hire channel
New Hire channel
Transitions link
If the Pre-Hire channel, New Hire channel, or Transitions link are displayed, users can click the title of any of those channels/link to go to the Transitions Center. Users can also click a status in the Pre-Hire or New Hire channel. That action opens the Transitions Center and, in the Processes section, "Pre-Hire Validation" or "New Hire" is displayed in the Process Type list.
Also, in the Tasks channel, a Transitions section displays the number of Transitions tasks owned by the user and that are due today, that are overdue, and those that are opened. The counts consider the New Hire and Pre-Hire processes. If the Transitions section is displayed, users can click any link in that section to go to the Transitions Center. That action opens the Transitions Center and, in the Tasks section, the status you selected is displayed in the Refine by list.
To display these channels and links, you must add them in the desired center stages ( Configuration > [Recruiting] Administration > Center Stage).You must also grant the following permissions to users so they can view the channels:
| Channel | User Type Permission | Location |
|---|---|---|
| Pre-Hire and New Hire channels |
One of the following permissions:
And one of the following permissions:
|
Configuration > [SmartOrg] Administration > [Users] User Types > Transitions Configuration > [SmartOrg] Administration > [Users] User Types > Recruiting > Other |
Restarting a Process from the Recruiting Center and Onboarding (Transitions) Center
Sometimes an error is made during an Onboarding (Transitions) process, and it is deemed necessary to restart the process to correct the error. This can be done by the Recruiting Center user in the same way that the process was initially started, or it can be done by the Onboarding (Transitions) Center user as well. Note that there is no way to re-open a specific task or form after it has been submitted, if the process was not designed to allow corrections on a later form. This is why an important error in a submitted form might warrant restarting the whole process again from the beginning.
Anytime a process is started in Onboarding (Transitions), it uses the most up-to-date information. If a process is restarted, it starts from the beginning, assigning every task to the right participants. Usually this means that the same forms will be assigned to the same people when the new process is running. Fortunately, the system has saved almost all of the information that they had entered into the system the first time they submitted the form. This means that almost all of the fields will appear prefilled when the assignees revisit the form in the restarted process. The only fields that are empty are those designed to store their data uniquely per process (e.g. E-Signature): these are expected to be filled every time the process runs. For example, an assignee's electronic signature must be re-entered each time the form is presented, regardless of whether the data on the form has been updated. By contrast, most fields do not store their information uniquely per process: the majority of information in Taleo is related to the candidates/employees themselves, or the requisition, or the offer. So these values do not disappear or change just because a process has been restarted for the same candidate, requisition, and offer. Rather, they retain the most recently updated information about the candidate, from any source (an onboarding form, a career section, Taleo Recruiting or Taleo Connect). Remember that it is impossible to update information about the requisition or the offer inside an onboarding form: these must be edited following the normal business logic in the Recruiting Center.
Provided users have the required permissions, they can restart a process using the following methods:
From the Recruiting Center, users select the candidate submission and cancel the running process (if it was originally started there). Then, they start the process again by choosing the exact same process. This method works for New Hire and Pre-Hire processes only. For details, see Restarting a Process from the Recruiting Center.
From the Onboarding (Transitions) Center, users select the candidate's process, and from the Process page they click Restart. This launches the exact same process again for the same person, from the beginning. This method works for all running process types. For details, see Restarting a Process from the Onboarding (Transitions) Center.
From Taleo Connect, the Cancel Process action can be called for this running process. Then the Start Process action can be called for this same process definition and person and submission (if any). This method works for all running process types.
If a process is canceled, tasks whose status is In Progress are terminated/canceled.
Restarting a Process from the Recruiting Center
This method can be used for the New Hire and Pre-Hire processes only.
-
Click the name of a new hire.
-
In the More Actions menu, select Cancel Onboarding (Transitions) Pre-Hire Process or Cancel Onboarding (Transitions) New Hire Process.
-
In the More Actions menu, select Start Onboarding (Transitions) Pre-Hire Process or Start Onboarding (Transitions) New Hire Process.
-
From the drop-down list, select the exact same process.
-
Click Done.
Restarting a Process from the Onboarding (Transitions) Center
This method works for all running process types.
-
In the Processes section, click a candidate/employee.
-
Click Restart.
Files Uploaded from Tasks Tab Available in Onboarding (Transitions) Center
Organizations can invite or require new hires to submit files through the Career Section Tasks tab as part of their Onboarding (Transitions) processes and the uploaded files will be available in the Onboarding (Transitions) Center.
Tasks on the Career Section Tasks tab can be used to invite or require new hires to upload files. A driver's license, social security card, and academic transcripts are a few examples of documents that some organizations might want new hires to submit in digital form as part of an Onboarding (Transitions) process.
Career Section Tasks Tab
When new hires are involved in a process that includes a content page configured for file uploading, the corresponding task is displayed on the Career Section Tasks tab. The following screenshot is an example of how the task might be displayed on the Tasks tab to new hires.
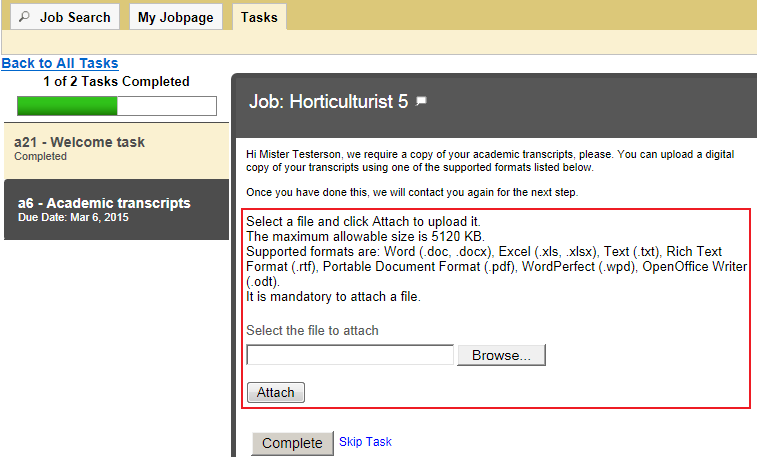
The new hires locate and attach the file they want to upload to complete the task. They can select a different file from the one they initially selected provided they have not yet clicked Complete. Once they click Complete, the file is uploaded immediately and usually cannot be changed afterward.
Files are scanned for viruses before they are uploaded to the Oracle Taleo system.
What if the task was completed and it was necessary to replace the file with another version of the same file or with a different file altogether? There are two possibilities.
The Onboarding (Transitions) administrator could configure a loop (in the process) triggered by some other data parameter (such as a UDF submitted on a form) to assign the same content page task a second time. The same paragraphs would be displayed on the content page. A file uploaded through the content page task displayed the first time would be replaced by a file uploaded through the same content page task displayed later.
The Onboarding (Transitions) administrator could include a second content page task later in the process, a task assigned the same file category. The file uploaded first would be replaced by the file uploaded later.
Onboarding (Transitions) Center
In the Onboarding (Transitions) Center, the uploaded files associated with a process are displayed in the Candidate Files section on the process page, whether the process's status is In Progress or Completed. To display or download an uploaded file, users click the corresponding link.
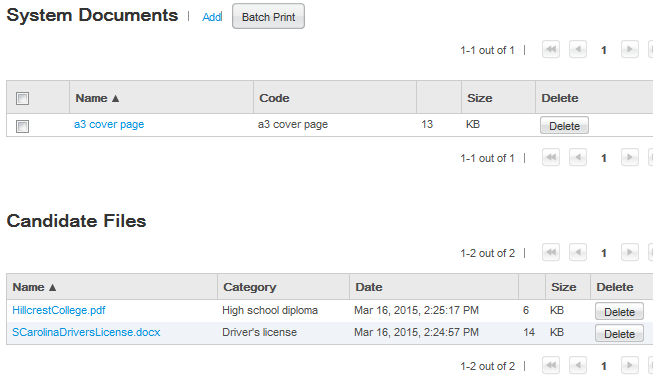
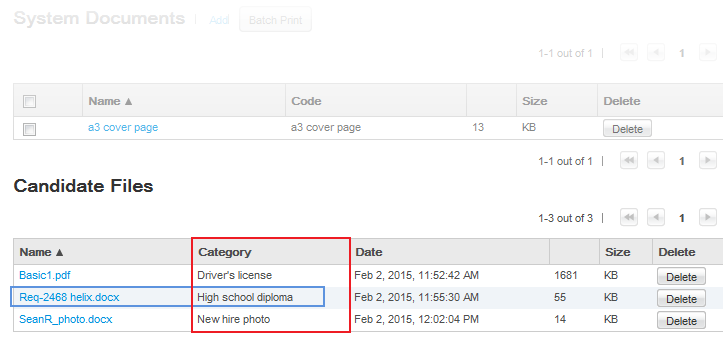
Onboarding (Transitions) Center users can delete file attachments from the Candidate Files section but they cannot upload file attachments to it. A deleted file cannot be restored. The dates and times displayed in the Candidate Files section are the dates and times when the uploads occurred and might differ from the dates and times when the new hires completed the tasks.
Configuration
To create a task enabling new hires to upload a file as part an onboarding process, Onboarding (Transitions) administrators need to create file categories, configure a content page that includes the file upload section, and then create a content page-based task that includes the content page.
-
Administrators create a file category for the type of document they plan to ask new hires to upload as part of an onboarding process. Perhaps a category for PDFs of university transcripts, or one for new hire photos, or another for a list of references and so forth.
Administrators create or edit a content page, add the file category they created in the previous step, and designate a file upload mandatory or optional.
Administrators create a content page-based task that contains the content page.
File Category
File categories are created in an operation separate from the creation of content pages. See Creating a file category. Only file categories whose status is Draft can be deleted; categories whose status is Active can be disabled at any time.
Though the same file category can be assigned to multiple content pages, a 1:1 relationship is far more typical.
The following file category codes are used by the system and therefore cannot be used by Onboarding (Transitions) administrators: candidate, CONTACT, default, FLIPBOOK, GOAL, MESSAGE_SENT, MESSAGE_TEMPLATE, OFFER, OTHER, recruiter, REQUISITION, RESUME, REVIEW, TALENTUSER. Because these internal codes are case sensitive, administrators could use words as file category codes provided a different case is used.
Content Page - File Upload Section
While creating or editing a content page, Onboarding (Transitions) administrators can add a file upload section, assign a category relevant to the type of file that new hires will be requested to upload, and specify whether uploading a file is mandatory or optional. If the action is mandatory, new hires will be unable to complete the task until they upload a file.
A content page can include only one file category and new hires can upload a single file via a content page. If organizations want to request multiple files, they can create as many categories and content pages as their needs require.
| Permission required to create and configure file categories | Location |
|---|---|
| Manage task definitions, related sources, content pages, images, and file categories | Configuration > [SmartOrg] Administration > User Types > (select a user type) > Recruiting > [Onboarding (Transitions)] Edit |
| Permission required to view, download and delete candidates files in Onboarding (Transitions) Center | Location |
|---|---|
| View, add, print, and delete System Documents (PDFs), and view and delete Candidate Files | Configuration > [SmartOrg] Administration > User Types > (select a user type) > Recruiting > [Onboarding (Transitions)] Edit |
| Setting Name | Location |
|---|---|
| Attached File Maximum Number | Configuration > [General Configuration] Settings |
| Attached File Maximum Size | Configuration > [General Configuration] Settings |
| Attachments Format Filter | Configuration > [General Configuration] Settings |
| New Content Page Properties | Location |
|---|---|
| Show file upload section below the content page | Configuration > [Onboarding (Transitions)] Administration > Content Pages |
| File upload is mandatory | Configuration > [Onboarding Transitions] Administration > Content Pages > (click content page) |
Creating a File Category
The "Manage task definitions, related sources, content pages, and images" user type permission is required.
The file category is created but it cannot be added to content pages until you change its status to Active. See Enabling a File Category.
Enabling a File Category
The "Manage task definitions, related sources, content pages, and images" user type permission is required.
The file category's status must be Draft or Inactive.
Perform one of the following steps.
Locate the file category in the list and click the corresponding Activate.
Click the file category code in the list and click Activate.
In the Files Categories list, Status column, the file category's status is Active.
Mentors for New Hires
A mentoring process can be automated to help welcome and assimilate new hires.
New hire mentoring programs formally pair the new hire with more experienced employees to help the new hire obtain information, get advice and learn the company culture. Studies show that new employees who are paired with a mentor are twice as likely to remain in the job and are more productive quicker than those who do not receive mentorships.
The new hire can also be paired with another new hire or a peer to encourage communication and provide camaraderie.
Mentoring is also used to prepare new or veteran employees for leadership or executive roles.
Creating Forms to Assign Mentors
The Onboarding (Transitions) administrator can use the following variables to create mentor forms on which the assignee can provide information to associate a specific mentor to each new hire. Taleo Connect can be used to import the desired mentor information that corresponds to each new hire's running process.
MentorEmail
MentorFirstName
MentorInitial
MentorLastName
MentorPrefix
MentorSuffix
MentorTitle
Assigning a Mentor to a New Hire
A form must be assigned to some HR person (or Taleo Connect) who knows the intentions of the organization. Only after the right mentor information has been entered into the system, then email or form(s) can be shown to the new hire about their mentor, and any email(s) can be sent to the mentor him/herself.
Mentors do not have to be first entered as users in the Taleo system, as Hiring Managers or Recruiters are entered. They can be anyone within the organization or anyone desired at all. Users can use mentor variables to assign a mentor to each new hire. These variables are found in the User-defined form editor category of “Requisition Owners.”
Using Mentor Variables in Forms, PDFs, and Correspondence
The information that has been entered for each new hire can now be used just like any information about them or the process. The name or title or e-mail address of the mentor can be displayed on forms or PDFs, or can be used to e-mail the new hire to introduce their new mentor.
Because mentors might not be in the system, the Onboarding (Transitions) administrator cannot directly assign tasks to them.
Mentors Can Get Email but No Tasks
Because mentors do not need to be Taleo users in the system, it is not possible for the Onboarding (Transitions) administrator to assign any tasks to them. Only users in SmartOrg and roles can be step/task assignees. However, email messages can be configured to be sent to mentors when appropriate. This is done by adding the Mentor email variable on message templates, on the To, CC, or BCC lines. However, because tasks cannot be assigned directly to mentors, please note that there must be a different assignee in addition. In other words, when the Onboarding (Transitions) administrator creates the step during implementation, a regular SmartOrg user must be designated as the task assignee. This person will also receive the correspondence, in addition to the mentor who was listed on the Message Template recipient line.