2Central Configuration
Central Configuration
Operation Modes
Operation Mode
The operation mode can be changed for service, configuration, or implementation purposes.
-
implementation
-
maintenance
-
production
System administrators have the ability to switch to maintenance mode or production mode for each product individually or for all. Products supported by the operation mode feature are:
-
Recruiting (includes Remote Manager Experience)
-
Performance
-
Career Section
-
New Hire Portal
Onboarding (Transitions)
For the above products, except the New Hire Portal, system administrators know the number of users using both the product as well as the administrative area related to the product. Note that candidates/new hires who are doing their Onboarding (Transitions) processes are logged into the Career Sections, not into the New Hire Portal.
Implementation Mode: The implementation mode is usually only for new customers or new zones (databases). It is used during the initial configuration and implementation stages of the system. Once the implementation is completed, the implementation mode is no longer available to system administrators and a request must be made through Oracle Support. In implementation mode, system administrators can:
-
Create, delete and modify the Organization-Location-Job Field structure.
-
Create, delete and modify levels in the Organization-Location-Job Field structure.
-
Create, delete and modify elements in the Organization-Location-Job Field structure.
If Recruiting is in implementation mode, users cannot connect to the Remote Manager Experience.
f changes need to be made to the structure of the database after implementation, system administrators must contact Oracle Support and request that the system be put back into implementation mode.
Maintenance Mode: The maintenance mode is a special administrative feature used to protect the integrity of the database when editing Organizations, Locations, or Job Fields.
In maintenance mode, the application is inactive. All users, except system administrators, are logged out automatically. The application displays a message to users as well as to candidates in Career Sections, indicating that the application is in maintenance mode. If users are logged in and have not saved data they were entering, this data will be lost.
In maintenance mode, system administrators can:
-
Delete departments, both via Integration and SmartOrg.
-
Delete positions, both via Integration and SmartOrg.
-
Import job positions via Integration.
-
Modify the Organization-Location-Job Field structure, both via Integration and SmartOrg.
-
Modify levels in the Organization-Location-Job Field structure, both via Integration and SmartOrg.
-
Edit Organization, Location, and Job Field elements (Element Management), both via Integration and SmartOrg.
There are no transactions in Onboarding (Transitions) or Performance that require the maintenance mode. If Onboarding (Transitions) is in maintenance mode and a user is performing a Start Onboarding (Transitions) Process or a Cancel Onboarding (Transitions) Process action from Recruiting, the transaction will still be scheduled to process.
If Recruiting is in maintenance mode, users can connect to the Remote Manager Experience.
Production Mode: In production mode, all users as well as guests, agents, and system administrators have access to the application. In production mode, system administrators can:
-
View structure elements for Organizations, Locations, and Job Fields.
-
Save agencies, both via Integration and SmartOrg.
-
Create and edit job templates.
-
Select and view positions.
-
Create and edit departments.
All tasks listed above can also be performed in maintenance mode and in implementation mode.
To import/export candidates (by Integration) and move candidates in the candidate selection workflow (by Integration), the system must be in production mode.
Modifying the Operation Mode
The Manage Application Mode user type permission is required.
In the Operation Modes page, click Edit.
In the Operation Mode Editor page, select the desired mode for each product, that is production or maintenance mode.
Click Save.
The selected operation mode appears beside each product. If the system is put in Maintenance mode, users currently logged will receive a message and will be logged out.
Release Notes Messages
Release Notes Message
A pop-up message containing new release information, system improvements, important messages and other information can be displayed when users log into the product.
The same release notes message is displayed to users regardless of the product.
Once users are logged in, they can turn off the Release Notes message by selecting the Don't display this message again option. The message will then reappear only when new release information or other important information is available or if the users clear their browser cookies.
Configuring the Release Notes Message Feature
The configuration of the release notes feature consists of the following steps.
No default release notes message is provided with the product. A blank page is displayed unless the system administrator decides to customize the page to present important information to users.
Creating the Release Notes Message Content
The Edit release notes user type permission is required.
In the Release Notes page, click Edit.
In the Release Notes Editor page, write the message. Apply formatting to the text to organize information, facilitate readability and draw attention to particular passages.
Clear the "Do not display release note information" check box.
Specify the validity period of the message by indicating the period of time when the message will be displayed.
Click Save.
Configuring Configuration Profiles to Display Release Notes Information
The Release Notes message must be created.
Click a configuration profile.
Click the Release Notes setting.
Click Edit.
Select Yes.
Click Save.
Release Notes - Other Configuration Tasks
Editing the Release Notes Message
The Edit release notes user type permission is required.
Click Edit.
Modify the fields as required.
Click Save.
Setting the Release Notes Message Validity Period
The Edit release notes user type permission is required.
Click Edit.
Set the validity period with the Calendar icon.
Click Save.
The release notes message is displayed to users when they sign in the application only for the determined period provided the Do not display release note information is not selected and the Release Notes setting has been activated in the user's configuration profile.
Displaying the Release Notes Message
The Edit release notes user type permission is required.
Click Edit.
Clear the Do not display release note information check box.
Click Save.
Hiding the Release Notes Message
The Edit release notes user type permission is required.
Click Edit.
Select the Do not display release note information check box.
Click Save.
Release Notes - Permissions and Settings
The following permissions and settings are used for the release notes functionality.
| User Type Permission | Description | Location |
|---|---|---|
| Edit release notes | Allows users to edit the release notes message content in the Central Configuration menu. | Configuration > [SmartOrg] Administration > [Users] User Types > Configuration > Foundation Data |
| Setting | Description | Default Value | Location |
|---|---|---|---|
| Release Notes | Displays the release note information when accessing the application. Once the system administrator has created the content of the release notes message, the Release Notes setting must be set to Yes in the user's configuration profile. | No | Configuration > [SmartOrg] Administration > [Users] Configuration Profiles |
Deletion Tasks
Employee Information Deletion Task
System administrators use the employee information deletion task to permanently delete information related to former employees' employment at the organization (as might be required by law in EMEA and other regions).
The Person Model
The following "objects" are associated with a person:
User Account – to access the system with granted permissions.
Candidate Account – to apply for jobs through the career section.
Profile – to store the common profile. Employee and candidate share the same profile.
Employee – to store employee-related data.
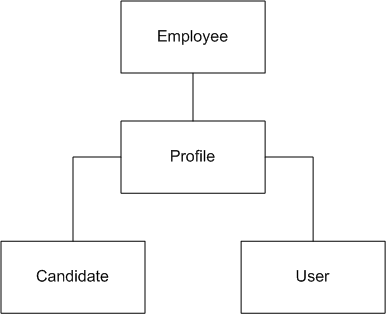
When candidates are hired, a user account and an employee associated with their profile are created:
As an employee, the profile is maintained through Performance talent profile.
As a candidate, the profile is maintained through Recruiting and the career section.
Employee Information Deletion Strategy
Employee information deletion task permanently deletes employee-specific data only. The candidate account and common profile are unaffected. This enables a person to be rehired in the future by the organization. The person can remain in current pools and succession plans. The candidate account can eventually be deleted through a distinct task if Recruiting is available in the system.
| Deleted |
Not Deleted |
|---|---|
| Employee Specific Data
|
Other Performance Data
Profile and Candidate Data
Talent Pools & Succession Plans
User Specific Data
|
Employee Information Deletion Rules
Employee-related information can be permanently deleted provided all of the following conditions are met:
The Employee Status of the user account is Former Employee (this is typically achieved by deleting the user account (status: Deleted)).
The employee must not be the owner manager of positions. A transfer of ownership is required prior to deletion.
The employee must not be the owner of talent pools. A transfer of ownership is required prior to deletion.
Employee Information Deletion Process
Employee information deletion is a four step process:
User account deletion (see Deleting a User Account From the User Account Page, Deleting the User Account of an Employee Using the Wizard and Deleting the User Account of an Employee Manually).
Deletion task creation (see Creating a Deletion Task).
Preview of employees to be deleted (see Previewing Employees to be Deleted).
Execution of the deletion task (manually or, more often, automatically according to the date and frequency chosen by the administrator).
Limitations
-
No archiving capabilities at this time.
-
A user account cannot be permanently deleted from the system.
User accounts, once deleted, are no longer displayed but remain in the system.
The user accounts do not contain employee-related data.
-
Products for which the data will not be automatically deleted by the employee information deletion task:
Learn
Evaluation Management
Assessment
Screening Services
Analytics
Any other external products integrated with Oracle Taleo Enterprise Edition
Deleting a User Account From the User Account Page
The Manage user accounts - Including HMRS fields user type permission is required..
Locate the user in the User Accounts list.
Click Delete in the Actions column.
The action(s) you perform next vary depending on whether the user account is associated with an employee.
If the user account is associated with an employee who owns requisitions, templates or folders, or was assigned yet uncompleted actions, or reports to a manager, or has pending tasks or work items, perform the steps in the wizard.
If the user account is associated with someone for whom none of the previous conditions applies, click Yes.
Once deleted, the user account status is set to Deleted and the user account is deactivated.
To permanently delete employee data related to the employee, including employee metrics and all Performance data (as might be required in EMEA and other regions), see Employee Information Deletion Task.
Deleting the User Account of an Employee Using the Wizard
The Manage users - Including HMRS fields user type permission is required.
The user account has Deleted status and therefore is no longer displayed on the User Accounts page if Active is selected in the View field. The Employee Status value is changed to Former Employee.
To permanently delete employee data related to the employee, including employee metrics and all Performance data (as might be required in EMEA and other regions), see Employee Information Deletion Task.
Deleting the User Account of an Employee Manually
The Manage users - Including HMRS fields user type permission is required.
Click user account you want to disable.
Edit the Employee Information section as necessary.
Set employee status to Former Employee.
Provide a termination date.
Remove the manager.
Transfer direct reports to another manager if applicable.
Transfer ownership of talent pools and positions to another user.
Transfer pending tasks to another user.
Return to the User Accounts page, locate the user account in the list and click the corresponding Delete in the Actions column.
Click Yes.
Once deleted, the user account status is Deleted and the user account is deactivated.
To permanently delete employee data related to the employee, including employee metrics and all Performance data (as might be required in EMEA and other regions), see Employee Information Deletion Task.
Creating a Deletion Task
The Access Deletion Tasks permission is required (User Types > [Functional Domains] Configuration > Data Lifecycle Management).
Click Create.
Select Employees, click Next.
Select Permanently delete, click Next.
Click the check box next to each criterion you want to include and click Next.
Enter values for the Name, Code, Status, Start Date, Recurrence fields and click Next.
Review your selections and click Finish.
The task is displayed in the Tasks list. If you selected a date and frequency for the task, the task will run automatically on the dates that correspond to your selections.
Previewing Employees to be Deleted
The Access Deletion Tasks permission is required (User Types > [Functional Domains] Configuration > Data Lifecycle Management).
In the Task list, click the task you want to examine.
Click Count.
Click the x out of y total items link to view the list of former employees to be deleted.
Global, Product, Regional Settings
Settings
Settings are used to configure features in Oracle Taleo Enterprise Edition products.
There are two types of settings:
-
Global settings: Settings that affect multiple Oracle Taleo Enterprise Edition products.
-
Product settings: Settings specific to an Oracle Taleo Enterprise Edition product, for example, Recruiting, Career Section, Onboarding (Transitions), Performance, Reporting and Analytics.
| Setting | Location |
|---|---|
| Global settings | Configuration > [Central Configuration] Settings |
| SmartOrg settings | Configuration > [SmartOrg] Settings |
| Recruiting settings | Configuration > [Recruiting] Settings |
| Career Section settings | Configuration > [Career Section] Settings |
| Onboarding (Transitions) settings | Configuration > [Onboarding (Transitions)] Settings |
| Performance settings | Configuration > [Performance] Settings |
| Reporting and Analytics settings | Configuration > [Reporting and Analytics] Settings |
A setting has one of the following security levels: Public, Protected, Private.
| Security Level | Description |
|---|---|
| Public | System administrators can view and change the setting. |
| Protected | System administrators can view the setting, but changes can only be performed by Oracle. |
| Private | System administrators cannot view or change the setting. Only Oracle can view and change the setting. |
Configuring a Setting
The security level of the setting must be Public.
The Manage Settings user type permission is required.
For global settings:
For product settings:
Locate the setting using the Refine by list or the Feature column.
Click the name of a setting.
Click Edit next to the name of the setting.
Make changes.
Click Save.
Restoring the Default Value of a Setting
The security level of the setting must be Public.
The Manage Settings user type permission is required.
For global settings:
For product settings:
Locate the setting using the Refine by list or the Feature column.
Click the name of a setting.
Click Reset next to the name of the setting.
The default value of the setting is restored and the change is reflected in the product.
Regional Settings
Regional settings are used to configure settings which control the number, date, currency, and language formats for a locale.
In the Regional Settings page, the Identifier list varies according to languages activated in the Oracle Taleo Enterprise Edition products. For example, if an organization only supports English (en) and French (fr), the Identifier list will contain en and fr as well as all specific locale identifiers related to fr and en, that is, fr-FR, fr-CA, en-GB, en-Au, etc.
The regional settings of a locale consist of four elements:
Number: Defines the decimal symbol, digit grouping, maximum number of decimals, negative number format, etc.
Currency: Defines the decimal symbol used for currencies, the default currency, the maximum number of decimals for currencies, etc.
Date: Defines the date format used in the application. A date can be represented by text, number or a combination of both.
-
Language: With each locale, comes a set of predefined values that are specific to the specified language, regardless of the country or region.
Configuring the Number Format
Click the name of an identifier.
Click Edit next to Number.
Select a value for each setting.
Click Done.
Configuring the Currency
Click the name of an identifier.
Click Edit next to Currency.
Select the values for each setting.
Click Done.
Configuring the Date Format
Click the name of an identifier.
Click Edit next to Date.
Select a value for each setting. See Date Format Properties.
Click Done.
Date Format Properties
| Date Format | Description |
|---|---|
| Full date format | Date represented by the day of the week, month, date and year. Default is EEEE, MMMM D, YYYY. Maximum number of characters: 255. |
| Long date format | Date represented by month, date and year. Default is MMMM D, YYYY. Maximum number of characters: 255. |
| Medium date format | Date represented by date, month and/or year. Default is D-MMM-YYYY. Maximum number of characters: 255. In the case of regions that do not use commas, periods or slashes with dates, an additional format is included that is specific to the region. When no date format is selected, the medium format is the default format used by the application. |
| Short date format | Date represented by date, month and/or year. Default is DD/MM/YY. Short date formats are used for lists and calendars. Numeric values only. |
| Shortest date format | Date represented by date and month. Default is DMMM. Shortest date format are used in candidate files and other lists that include many columns. |
| Date Format Details | Description |
|---|---|
| Text | A date element that always appears in the form of text, such as days of the week, will be displayed in long form if four letters are used for its representation. If less than four letters are used, the date element will appear in an abbreviated form. For example, configuring a date format using "EEE" would produce "Fri" for Friday, while using "EEEE" would produce the long form "Friday". |
| Numbers | The system adds zeros to single numbers in certain cases. For example, if the date element "DD" is part of the date format, the ninth day of the month will be displayed with a leading zero, thus, "09". If the date element is "D", however, the system will display "9" without a leading zero. |
| Text and Numbers | When the date format element is composed of one or two characters, a numeric value results. For example, if the date format element is "M" or "MM", the month of February will be depicted as "2" and "02" respectively. On the other hand, a date format element made up of three or more characters will result in a textual representation of the date: in the case of "MMM", February will appear as "FEB", if "MMMM" is used, February will be displayed as "February". |
| Date Format Syntax | Meaning | Presentation | Example (US locale) |
|---|---|---|---|
| Y | Year | Numeric | 2009 |
| M | Month of the year | Alphanumeric | July, Jul. or 07 |
| D | Day of the month | Numeric | 10 |
| H | Hour AM/PM (1-12) | Numeric | 12 |
| h | Hour of the day (0-23) | Numeric | 22 |
| m | Minute of the hour | Numeric | 38 |
| s | Seconds | Numeric | 59 |
| E | Day of the week | Textual | Tue, Tuesday |
| a | AM/PM marker | Textual | PM |
| K | Hour in AM/PM (0-11) | Numeric | 0 |
| ‘ | Escape for text | Delimiter | ‘ |
| ‘‘ | Single quotation mark (twice the escape character) | Literal |
Legal Agreements
Legal Agreement
A legal agreement is a disclaimer text displayed to users when accessing a Oracle Taleo Enterprise Edition product.
A legal agreement can be created so that users must agree to abide by before they can log into Oracle Taleo Enterprise Edition products. The text of such agreement typically reminds all users that the computers they are accessing are government or private industry owned and must be used in accordance with good security practices.
A legal agreement is displayed to users when accessing a Oracle Taleo Enterprise Edition product, except the Career Section. System administrators are responsible of entering the disclaimer text either by typing the text or by pasting it from another source. They can format the text using HTML features such as bold, italic, color, font type and size, images, etc.
There is no limit in the number of legal agreements that can be created. However, only one agreement can be active at a time. It is possible to change the currently active agreement at any time.
If the legal agreement feature is implemented, pages are typically displayed to users in the following order:
-
Oracle Taleo Enterprise Edition product list page
-
Legal Agreement page
-
User Sign In page
If your organization prefers that users be authenticated as the first step, they can request Oracle to change the sequence, in which case the Oracle Taleo Enterprise Edition product list page is "protected" and pages are displayed in the following order:
-
Legal Agreement page
-
User Sign In page
-
Oracle Taleo Enterprise Edition product list page
Creating a Legal Agreement
The Manage legal agreements user type permission is required.
Click Create.
Enter a code and a name.
Type the legal agreement text. Apply formatting to the text to organize information, facilitate readability and draw attention to particular passages.
Click Save.
Activating a Legal Agreement
The Manage legal agreements user type permission is required.
Only one legal agreement can be activated at a time.
The legal agreement must be deactivated or draft.
Click the name of a legal agreement.
Click Activate next to Properties.
The activated legal agreement is displayed to users if the Show the legal agreement to users at login security policy is set to Yes. See Showing the Legal Agreement to Users at Login.
Showing the Legal Agreement to Users at Login
The Manager security policies user type permission is required.
Click Edit next to Sign In.
Select Yes for the Show the legal agreements to users at login option.
Click Save.
Deleting a Legal Agreement
The Manage legal agreements user type permission is required.
The legal agreement must be active or draft.
Click Delete next to the agreement.
Answer Yes to the message that appears.
The legal agreement is permanently deleted from the database. If the legal agreement was active, it will no longer be displayed to users when signing in a product.
Deactivating a Legal Agreement
The Manage legal agreements user type permission is required.
The legal agreement must be active.
Click on the name of a legal agreement.
Click Deactivate next to Properties.
The legal agreement becomes inactive. It is no longer displayed when users sign in a product. The legal agreement is still available in the list of legal agreements.
Security
Security Policies
Security policies are settings related to the security of Oracle Taleo Enterprise Edition products.
Security policy settings are organized into four groups:
Sign in
User Accounts
Password
Forgot Username / Password
The History section provides information on actions performed on security policy settings such as the date and time, the event, details on the event, and the "actor" (person or system) who performed the action.
For details on each setting, see Security Policy Settings.
Security Policy Settings
| Security Policy - Sign In Setting | Description | Location |
|---|---|---|
| Show the legal agreement to users at login. | Yes, No (default). | Configuration > [Security] Security Policies |
| Security Policy - User Account Setting | Description | Location |
|---|---|---|
| Number of incorrect sign-in attempts allowed per user before his/her account is locked | Unlimited, 3 (default), 5, 10, 15, 20, 100. Determines the maximum number of times a user can enter incorrect information during sign-in before the user's account is locked. | Configuration > [Security] Security Policies |
| Period during which the system prevents access to an account that has been locked | Permanent (default); 2, 5, 10, 15 minutes; 1, 4 hours; 1 day; 1 week; 30 days. | Configuration > [Security] Security Policies |
| When creating a user account, send an email to user to confirm registration and password. | Yes, No (default). | Configuration > [Security] Security Policies |
| Maximum age of Access Codes which are accepted for authentication (in hours) | 1 to 1440 (default is 720) | Configuration > [Security] Security Policies |
| When creating a user account, generate automatically a user name. | Yes, No (default). | Configuration > [Security] Security Policies |
| When creating a user account, generate automatically a password. | Yes, No (default). | Configuration > [Security] Security Policies |
| User account validation on creation | Yes, No (default). For details, see Details on the "User account validation on creation" setting. |
Configuration > [Security] Security Policies |
| Security Policy - Password Setting | Description | Location |
|---|---|---|
| Allow a password to be valid for X days (leave the field empty if you want passwords to be always valid) | Number of days before a user must change his/her password. Putting no values means that the password is always valid. | Configuration > [Security] Security Policies |
| When a password change is required, prevent the reuse of the previous X passwords | Number of password changes required before a user can use a password that he/she has used previously. Putting 0 means that the feature is disabled. 0 (default value). | Configuration > [Security] Security Policies |
| Require passwords that contain at least X characters | 6 to 20. | Configuration > [Security] Security Policies |
| Require passwords that contain no more than X characters | 6 to 50. The system will start counting the number of characters from the maximum number of characters selected in the setting "Require passwords that contain at least x characters". For example, if you selected 10 characters, the system will indicate a possible value between 10 and 50. | Configuration > [Security] Security Policies |
| Require passwords that contain at least X letters of the Roman alphabet | 0 to 20. The number of characters cannot exceed the number indicated in the setting "Require passwords that contain at least x characters". | Configuration > [Security] Security Policies |
| Require passwords that contain at least X lowercase letters of the Roman alphabet | 0 to 20. The number of characters cannot exceed the number indicated in the setting "Require passwords that contain at least x characters". | Configuration > [Security] Security Policies |
| Require passwords that contain at least X uppercase letters of the Roman alphabet | 0 to 20. The number of characters cannot exceed the number indicated in the setting "Require passwords that contain at least x characters". | Configuration > [Security] Security Policies |
| Require passwords that contain at least X numeric characters | 0 to 20. The number of characters cannot exceed the number indicated in the setting "Require passwords that contain at least x characters". | Configuration > [Security] Security Policies |
| Require passwords that contain at least X characters other than letters and numbers (! # $ % & ( ) * + , - . / : ; < = > ? @ [ ] _ ` { | } ~) | 0 to 20. The number of characters cannot exceed the number indicated in the setting "Require passwords that contain at least x characters". | Configuration > [Security] Security Policies |
| Require passwords that contain no more than X identical consecutive characters | 2, 3, 4, 5. The number of characters cannot exceed the number indicated in the setting "Require passwords that contain at least x characters". | Configuration > [Security] Security Policies |
| Require passwords that do not contain the user's first name | Yes, No (default). | Configuration > [Security] Security Policies |
| Require passwords that do not contain the user's last name | Yes, No (default). | Configuration > [Security] Security Policies |
| Require passwords that do not contain the corresponding user name | Yes (default), No. | Configuration > [Security] Security Policies |
| Require passwords that do not contain the user's email address | Yes, No (default). | Configuration > [Security] Security Policies |
| Security Policy - Forgot Password Setting | Description | Location |
|---|---|---|
| Use this method to change passwords | There are several options for users to recover their password. It can be via an access code, security questions, or by contacting the system administrator. For details on each of the option, see Details regarding the "Use this method to change passwords" setting. | Configuration > [Security] Security Policies |
| Require X security questions | Possible values are 1, 2, 3. | Configuration > [Security] Security Policies |
| Require answers that contain at least X characters (X must be greater than 0) | Configuration > [Security] Security Policies | |
| Number of attempts allowed per user to answer the security question | Possible values are 3, 5. | Configuration > [Security] Security Policies |
| Lock a user's account when the number of attempts allowed to answer the security question is exceeded | Yes, No. | Configuration > [Security] Security Policies |
| Mask the security answer values | Yes, No. | Configuration > [Security] Security Policies |
Details on the "Use this method to change passwords" setting
The change password procedure contains six options of authentication:
| Options of the "Use this method to change passwords" Setting | Description |
|---|---|
| Access Code | An email containing an access code is sent to the user once the user has confirmed his/her email address. |
| Security Questions | The user is asked to answer the security questions (from 1 to 3) previously entered in his/her profile. If the answer is correct, the user is invited to enter a new password. |
| Security Questions and Access Code | The user is asked to answer the security questions (from 1 to 3) previously entered in his/her profile. If the answer is correct, an email containing an access code is sent to the user once the user has confirmed his/her email address. |
| Security Questions or Access Code | The user is asked to answer the security questions (from 1 to 3) previously entered in his/her profile. If the answer is correct and the user has an email address, an access code is sent to the user once the user has confirmed his/her email address. If the user does not have an email address and the answer to the security question is correct, the access is granted to the application and the user is invited to change his/her password. |
| Security Questions and/or Access Code | When this option is activated, one of the following situation will happen. See the Security Questions and/Or Access Code Option section. |
| Contact System Administrator | The user is asked to contact the system administrator. Only the system administrator can then generate a new password and communicate it to the user. |
Details on the "Security Question and/or Access Code" option
The change password procedure contains six options of authentication:
| The user has an email address | Security questions were activated | |
|---|---|---|
| Yes | Yes | The user will have to answer the security questions correctly and an access code will be emailed. |
| Yes | No | The user will receive an access code by email. |
| No | Yes | The user will have to answer the security questions correctly to be able to access the application. |
| No | No | The user will be asked to contact the technical support. |
Details on the “User account validation on creation” setting
A two-step validation process is available when creating user accounts.
Step 1: When you create a user account, the system checks if the email address is unique among the user account created in SmartOrg.
If the email address exists, an error message is displayed.
If the email address doesn’t exist, the user account is created and is set as Inactive.
Step 2: The user receives an email requesting to activate their account. The email contains a link that the user must use to activate the account. Once the account is activated, the user can to log in in the system.
This process supersedes the option to send a user’s password by email.
Temporary user accounts created through a candidate onboarding process bypasses the email uniqueness criterion but must be activated before the user can log in.
This process also works for user accounts created with TCC. The administrator must enable the setting Allow Integration Sending Email.
Configuring Security Policies
The Manage security policies user type permission is required.
In the Security Policies page, click Edit next to a topic.
In the Editor page, select a value for each required setting.
Click Save.
Security Message Templates
Security message templates are messages relating to the security of Oracle Taleo Enterprise Edition products. They are provided by Oracle.
Security message templates are located in the Configuration menu, under Security. For a list of message templates, see Message Templates Related to Security. System administrators can change the languages available and the wording of messages. They cannot create new message templates.
To edit security message templates, the Manage Message Templates for email correspondence and reminders permission is required (SmartOrg Administration > User Types > Configuration > Security Management).
Single Sign-On
Single Sign-On
Single Sign-On (SSO) enables users to log into Oracle Taleo Enterprise Edition applications using their corporate credentials.
In an SSO environment, users are authenticated by an Identity Provider (e.g. OIF, ADFS) that is maintained by their corporate IT department. Both employees and candidates who have access to internal career sections can use SSO to access Oracle Taleo Enterprise Edition products. SSO cannot be used for external career sections.
Customers who want to use SSO can implement it themselves through the SSO configuration interface. Customers perform easy configuration steps to enable and support one or more identity providers. The feature supports two flows to authenticate users:
Users are authenticated through their company portal, then they access Oracle Taleo Enterprise Edition products through the portal (Identity Provider initiated flow).
Users access the Oracle Taleo Enterprise Edition product URL directly and are redirected to their identity provider for authentication (Service Provider initiated flow).
Customers can configure the authentication request flows, and exit and error URLs for seamless integration with their environment.
SSO setup requires:
An Identity Provider with SAML 2.0 support.
A user/candidate synchronization feed between the Identity Provider and Oracle Taleo Enterprise Edition. This can be developed using Taleo Connect Client (TCC).
A corporate portal (optional).
Oracle Taleo Enterprise Edition
SAML 2.0 based SSO
SSO Identity Provider (IdP) setup
Taleo Connect Client (TCC)
Single Sign-On Basic Concepts
Identity Provider (IdP) and Service Provider
Single Sign-On (SSO) in Oracle Taleo Enterprise Edition is accomplished through the use of SAML (version 2.0). SAML provides a mechanism to exchange authentication and authorization data between two trusting entities.
In a generic SAML context, the entities are:
The Asserting party (or SAML authority)
The Relying party (or SAML requester)
In an SSO context, the Asserting party is the Identity Provider (IdP) and the Relying party is the Service Provider (SP). The Identity Provider is the customer's SAML federation server (OIF, ADFS etc.) and the Service Provider is the Oracle Taleo Enterprise Edition application.
A trust relationship is established between the Identity Provider and the Service Provider. The Service Provider trusts the information received from the Identity Provider. The information sent is called the SAML assertion. It contains the identity of the user that has been authenticated by the IdP. Upon receiving the assertion, Oracle grants the appropriate level of access to resources, based on the identity of the user.
Metadata File
SSO is set up by exchanging metadata files between the Identity Provider (IdP) and the Service Provider (SP).
The SAML 2.0 metadata file format is supported. This metadata file contains information about each SSO entity (URLs, protocols supported, certificates etc.). The IdP's metadata file can be imported into the SSO user interface. If any changes are made to the IdP, the metadata file must be re-imported.
Also, metadata files can be generated for the Oracle Taleo Enterprise Edition Service Providers (SmartOrg and Career Section). These files must be imported into the IdP. A separate metadata file will be generated for each SP-IdP combination. For example, if the customer has 2 IdPs, then up to 4 metadata files will be generated (2 for SmartOrg and 2 for Career section).
For an example of an Identity Provider metadata file, see Identity Provider Metadata Example.
For an example of a SmartOrg metadata file, see SmartOrg Metadata Example.
For an example of a career section Service Provider metadata file, see Career Section Metadata Example.
Single Sign-On Flows
There are two types of Single Sign-On flows: Identity Provider (IdP)-initiated and Service Provider (SP)-initiated.
Identity Provider (IdP)-initiated Flow
In the IdP-initiated flow, the user logs in first to the IdP. The person then requests access to the Service Provider (SmartOrg or career section) – often through an SSO Portal. The Identity Provider will initiate an SSO connection to the Oracle Taleo Enterprise Edition product and provide an assertion. The assertion contains the identity, attributes and entitlements of the requesting user. Oracle will grant access to the user based on the assertion information.
The image represents an Identity Provider (IdP)-initiated flow.
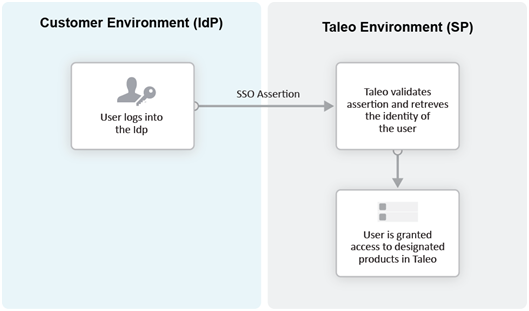
The IdP-initiated flow is the most commonly used configuration.
When SSO is configured, the IdP-initiated flow is activated by default.
Multiple IdPs are supported for IdP-initiated flows. Each IdP can redirect users to the Service Provider (SmartOrg and career section). The Service Provider accepts request from each IdP as long as the IdP is properly defined.
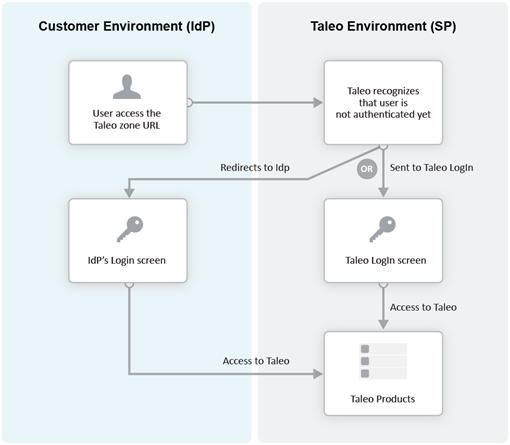
Service Provider (SP)-initiated Flow
In the Service Provider-initiated flow, the user accesses the Oracle Taleo Enterprise Edition product (SP) directly. For example, this can be done by typing the URL of the zone in the browser. The Service Provider then redirects the user to the Identity Provider. After authenticating the user, the IdP generates and sends an assertion back to the SP. The assertion contains the identity, attributes and entitlements of the requesting user. Oracle grants access to the user based on the assertion information.
The Challenge URL setting, depicted in the following illustration, is used to set up a Service Provider-initiated flow.
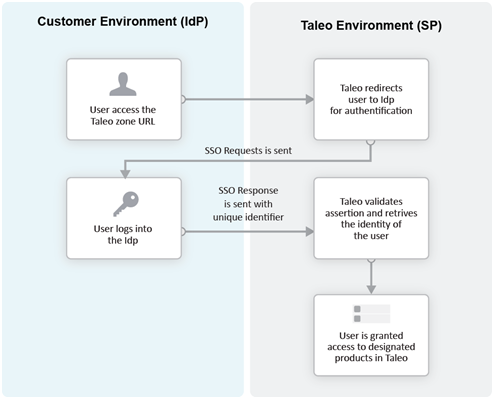
The customer can choose to optionally activate SP-initiated flow as well.
For SP-initiated flow from SmartOrg, only one IdP can be configured. All SP-initiated requests from SmartOrg are redirected to this IdP.
For SP-initiated flow from career sections, by default all requests are redirected to a single default IdP. However, individual career sections can be set up to redirect requests to a different IdP.
The following illustration depicts a single Identity Provider, SmartOrg and single career section:
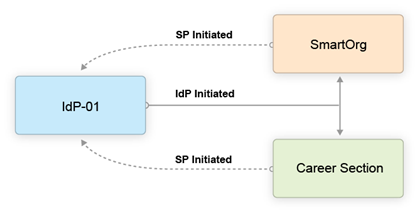
-
Users can access both SmartOrg and the career section from the Idp (IdP-initiated flows).
-
When users access SmartOrg directly, they are redirected to the IdP for authentication (SP-initiated flows).
-
When users access the career section directly, they are redirected to the IdP for authentication (SP-initiated flows).
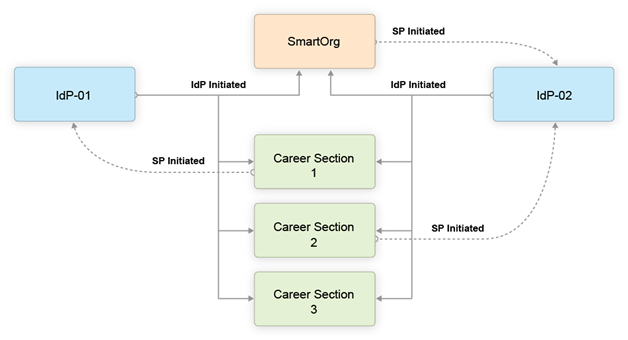
The following illustration depicts an SSO setup with two Identity Providers, SmartOrg and three career sections:
-
Users can access both SmartOrg and each career section from the Idp-01 (IdP-initiated flows).
-
Users can access both SmartOrg and each career section from the Idp-02 (IdP-initiated flows).
-
When users access SmartOrg directly, they are redirected to the IdP-02 for authentication (SP-initiated flows).
-
When users access career section 1 directly, they are redirected to the IdP-01 for authentication (SP-initiated flows).
-
When users access career section 2 directly, they are redirected to the IdP-02 for authentication (SP-initiated flows).
-
When users access career section 3 directly, they are not redirected to any IdPs. Instead, they are prompted for their credentials.
Challenge, Error and Exit URLs
Challenge, Error and Exit URLs can be defined to configure the destination to which the user will be redirected under various conditions.
One set of URLs can be configured for each SP (SmartOrg and career section). In addition, individual career sections can have their own values for these URLs. These values will override the defaults for the career section SP.
Challenge URL
The Challenge URL setting defines the page where the user will be directed to present his credentials. There are two options:
Default login page: Standard Oracle Taleo Enterprise Edition page. No redirection to the IdP.
SP Initiated Servlet redirect: The user is redirected to the IdP's login page. This option must be selected to enable SP initiated flows from SmartOrg and career section to the chosen IdP.
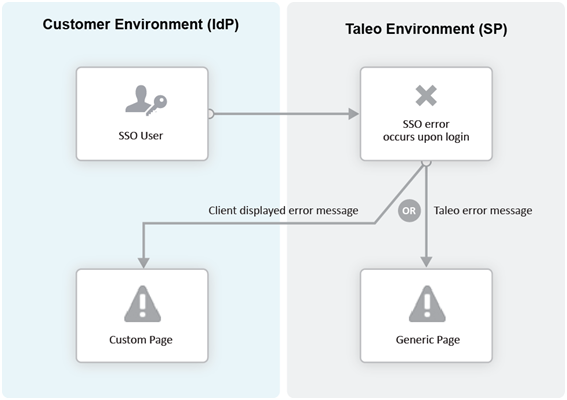
Error URL
The Error URL setting defines the page where the user will be directed when an SSO error occurs. It can be the default Oracle Taleo Enterprise Edition error page or a custom page defined by the customer. Typical errors that would generate an SSO error are:
Locked user account
Invalid Assertion (generic SSO response issue)
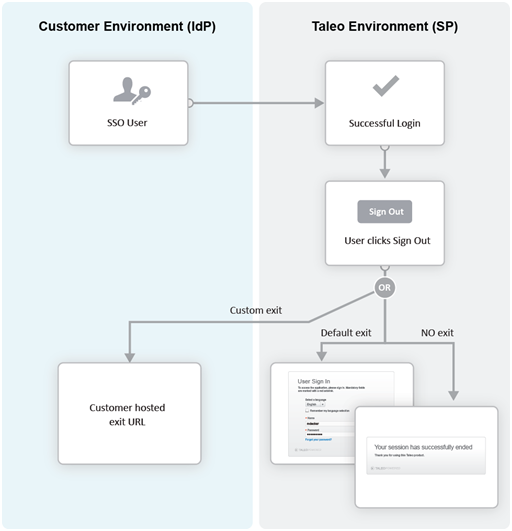
Exit URL
This Exit URL setting defines where the Service Provider sends the user upon exiting the application. Three options are available:
Default exit page – Display the login screen
Custom URL – Display a custom page defined by the customer
No exit page – Display the exit screen
Certificate and Validation
A trust relationship is established between the IdP and the SP when both exchange their respective certificates.
All communications (SAML Request and Response) will be signed by the issuing party. The receiving party will use the certificate to validate the received communication.
IdP Certificates
The IdP's certificate is usually available in its metadata file. The certificate will be automatically imported when the metadata file is imported. After import, this certificate can be viewed and managed in the SSO interface. Certificates can also be manually imported. The certificate can be associated to one or both Service Providers (SmartOrg and career section). Each certificate will have a validity period defined by a start data and an end date.
Multiple certificates can be imported for an IdP. At least one has to be valid for SSO connections to be established.
SP Certificates
The SP certificates are available through SP's metadata file. A separate certificate is generated for each SP-IdP combination.
Validation
Upon receiving an assertion, each Service Provider performs the following validity checks.
Signature – Validate that the assertion has been signed by the IdP.
Timeout – Validate that the age of assertion has not exceeded a specified timeout period. The age is calculated as the time difference between the moment the assertion was received (by the SP) and the moment the assertion was issued (by the IdP). A timeout period of up to 30,000 milliseconds can be configured.
User Synchronization
The customer must configure synchronization of users between the Identity Provider(s) and Oracle Taleo Enterprise Edition.
The IdP will identify the user (subject) in the assertion. This user identifier must also be stored in the system. Upon receiving the assertion, Oracle extracts the user identifier from the assertion and then searches for the user in the system. Upon finding a match, the appropriate privileges are granted to this user.
Taleo Connect Client (TCC) can be used to import the user identifier into Oracle Taleo Enterprise Edition. A TCC import file can be created and scheduled for automatic import into Oracle Taleo Enterprise Edition. Both user and candidate information must be updated. The following fields must be updated with the SSO user identifier:
Employee/Username (for SmartOrg Service Provider)
Candidate/Credentials/SSOID (for career section Service Provider)
For information about TCC, please refer to the Taleo Connect Client documentation.
Users can also be created manually:
SmartOrg users: Create the users manually through the SmartOrg interface.
Internal career sections: Use the career section SSO Configuration Wizard. See Career Section SSO Configuration Wizard.
Identity Provider Bindings
Identity provider bindings specify the IdP URLs that can be used to perform various SAML transactions.
These URLs will be used by the Oracle Taleo Enterprise Edition Service Providers. It is expected that some bindings will be identical. The metadata file provides values for these bindings automatically, however, you can edit the values as needed.
Identity Provider Trusted Certificates
Trusted certificates are needed to confirm the identity of Identity Providers. Each assertion received will be validated against these certificates.
IdP certificates included in the metadata file are imported and displayed automatically. Certificates can also be imported manually in the Identity Provider Trusted Certificates section. Certificates can be chosen to confirm the identity of Identity Providers for SmartOrg, career sections or both. Afterward, each assertion received is validated against the certificates.
Configuring Single Sign-On
Recommended SSO Implementation
The Manage SSO configuration user type permission is required. (See: Granting Permission to Manage Single Sign-On (SSO)).
It is recommended that you enable and test IdP initiated flows before enabling SP initiated flows. If both IdP and SP initiated flows are enabled at the same time, you run the risk of completely locking out users due to incorrect SSO configuration.
Obtain the metadata file for the corporate Identity Provider from your IT department.
Register the Identity Provider in Oracle Taleo Enterprise Edition.
Decide which Service Providers (SmartOrg, career section or both) must be activated for this IdP.
Initially activate just IdP initiated flows.
Set up the exit and error URLs if necessary.
Export the Service Provider metadata files from Oracle Taleo Enterprise Edition.
Register the Service Providers in the IdP by importing the metadata files.
Synchronize SmartOrg SSO user identity (either using TCC or manually).
Test IdP initiated access to SmartOrg.
Activate SSO in one or more career sections.
Synchronize career section SSO identity (either using TCC or the career section SSO wizard).
Test IdP initiated access to these career sections.
Activate SP initiated flows for the IdP.
Test SP initiated access to SmartOrg.
Test SP initiated access to career section.
Granting Permission to Manage Single Sign-On
Click the check box next to Manage SSO Configuration.
Click Save.
Users who have the user type will be able to configure SSO.
Configuring an Identity Provider
The Manage SSO configuration user type permission is required.
SmartOrg Service Provider Settings
| Setting | Description |
|---|---|
| Default for SP Initiated Flow |
|
| Challenge URL |
|
| Error URL |
|
| Exit URL |
|
| Execute Global Logout |
|
Career Section Service Provider Settings
| Setting | Description |
|---|---|
| Default for SP Initiated Flow |
|
| Challenge URL |
|
| Error URL |
|
| Exit URL |
|
Exporting SmartOrg Service Provider Metadata Files
To download the metadata file associated with a SmartOrg Service Provider, go to: https://ZoneName/smartorg/sp/metadata.jss?target=EntityID, replacing ZoneName by your Oracle Taleo Enterprise Edition zone name, and replacing EntityID by the Entity ID value imported from the IdP metadata file.
Registering Service Providers (SmartOrg and Career Section) in the IdP
The metadata files exported in previous steps can be imported into your IdP system (OIF, ADFS etc.). You should set up a single Service Provider for SmartOrg and a single, different Service Provider for Career Section.
Deleting an Identity Provider
The Manage SSO configuration user type permission is required.
Ensure that all SSO flows are disabled before deleting an IdP. The IdP to be deleted should not be the default for any Service Provder-initiated flows.
Next to Identity Provider Configuration, click Show.
Click the Delete that corresponds to the Identity Provider you want to delete.
Click Yes.
Adding an IdP Trusted Certificate to an Identity Provider
The Manage SSO configuration user type permission is required.
Deleting an IdP Trusted Certificate from an Identity Provider
The Manage SSO configuration user type permission is required.
Next to Identity Provider Configuration, click Show.
Click the IdP you want to remove a trusted certificate from.
Next to Identity Provider Trusted Certificates, click Edit.
Locate the trusted certificate you want to delete and click the corresponding Delete.
Click Yes.
Click Save.
Configuring Career Sections Individually for Service Provider-Initiated Access
The Manage SSO configuration user type permission is required.
Displaying SSO-protected URLs
The Manage SSO configuration user type permission is required.
Next to SSO Protected URLs, click Show.
Bypassing Single Sign-On
You are logged into Oracle Taleo Enterprise Edition directly, bypassing Single Sign-On.
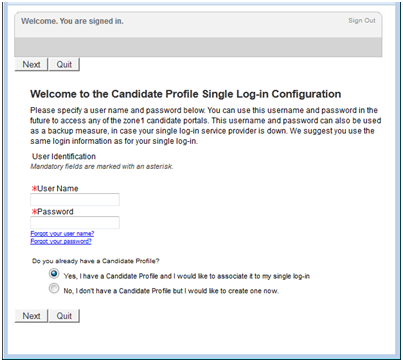
Career Section SSO Configuration Wizard
The Single Sign-On wizard enables internal candidates to link a candidate account to their SSO user identifier.
This method can be used instead of running a Taleo Connect-based integration feed to populate the SSO user identifier in the candidate account.
If the wizard is enabled, the first time that internal candidates log into an internal career section through their Single Sign-On portal, they are prompted to associate their SSO user identifier (profile) with a candidate account. The users can either create a new candidate account or use an existing account. Upon successfully logging in using the candidate account credentials, the SSO user identifier is associated with this candidate account by the Single Sign-On wizard. This operation has to be performed only once. The user will be automatically authenticated in the internal career section for subsequent logins.
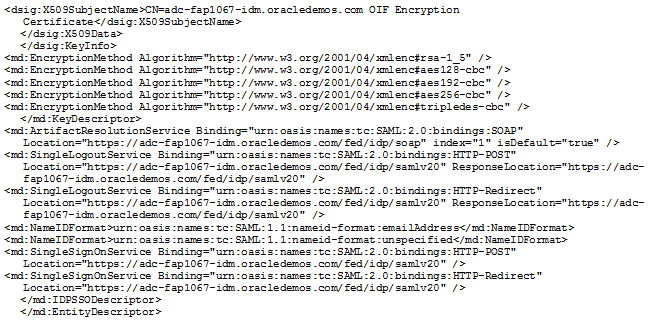
Identity Provider Metadata Example
This is an example of an IdP metadata file.
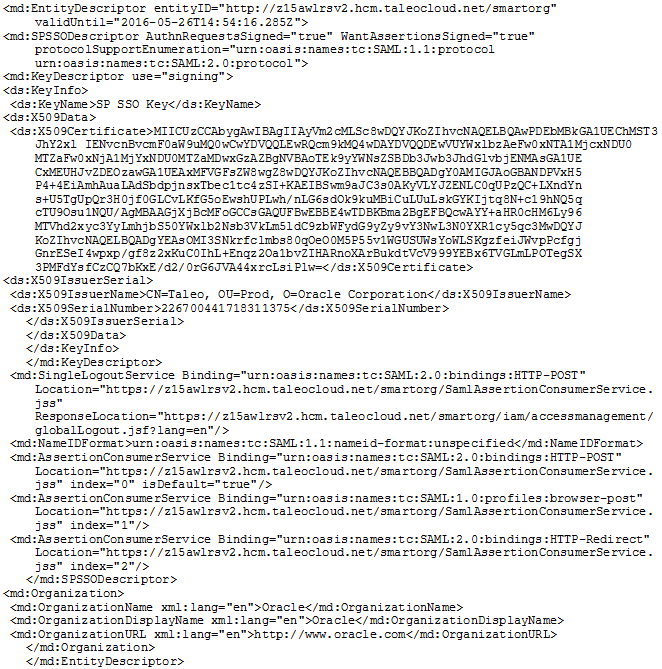
SmartOrg Metadata Example
This is an example of a metadata file for SmartOrg.
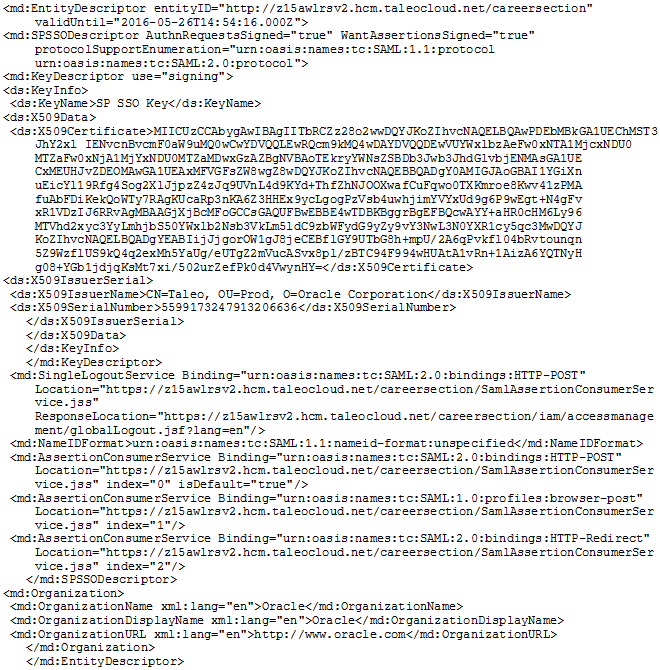
Career Section Metadata Example
This is an example of a metadata file for Career Section.
Configuring Oracle Identity Federation
To register SmartOrg and career sections, begin by logging into Fusion Middleware's Enterprise Manager.
Locate the OIF instance and click it.
Click Oracle Identity Federation.
Click Administration.
Click Federation.
Click Add.
Select the federation you created and click Edit.
Click the Oracle Identity Federation Settings tab.
Click the icon to the left of the Identity Provider/Authority Settings section to display the section.
In the Identity Provider/Authority Settings section:
Set the Default SSO Response Binding to: HTTP POST.
Select the check box next to Response with Assertion – SOAP.
Select the check box next to Response with Assertion – HTTP POST.
Click Apply.
Legacy SSO Deactivation
Customers can deactivate all legacy single sign-on (SSO) configurations and enable the self-serve sign-on.
A setting is available: Legacy SSO Deactivation (Path: Configuration > General Configuration > Settings).
The setting is set to No by default. Changing the setting to Yes has the following effects:
All Legacy SSO values are permanently erased and cannot be reactivated. As a result, all SSO flows active with the Legacy SSO setup will stop working.
Access to the self-serve sign-on interface is granted. Administrators can provide the self-serve sign-on service to users.
TCC Security
TCC Security
TCC Security allows system administrators to manage the TCC Certificate Authentication feature.
Oracle supports the signing of requests and responses between Taleo Connect Client (TCC) and the Oracle Taleo Enterprise Edition zone. Both requests and responses get signed through the TCC Security feature. To activate communication signing, a certificate must be generated in TCC and imported in the Oracle Taleo Enterprise Edition zone. A certificate must also be generated in the Oracle Taleo Enterprise Edition zone and imported in TCC. Both certificates are needed for the signing feature to work.
When requests and responses are sent by both TCC and Oracle Taleo Enterprise Edition, they are signed by the sender. The signature is validated by the receiver before processing the payload.
To use the TCC Security feature, a private setting must be enabled. Once enabled, the system administrator can access the feature under Configuration > Security > TCC Security.
The TCC and TEE Certificate Management page is divided into two sections:
TEE Certificates
TCC Certificates
TEE Certificates
You can generate, delete, and download TEE certificates. When generating a TEE certificate, you must set the certificate’s validity start date and end date. An alias is also required to identify the certificate. Only one certificate can be valid at a given time. You must create validity periods that do not overlap. Once the certificate is generated, you download it. To complete the certificate setup, the TCC administrator accesses the Certificate Management feature in TCC and imports the TEE certificate. For instructions on how to import the TEE certificate in TCC, see the Connect Client User Guide.
TCC Certificates
You can upload certificates created in TCC to validate the signature of incoming TCC requests. Uploaded certificates can be deleted and downloaded.
Generating a TEE Certificate
The TCC Security feature must be enabled.
In the TCC and TEE Certificate Management page, click Generate Certificate under TEE Certificates.
Enter a start date and end date. You must create validity periods that do not overlap.
Enter an alias to identify the certificate.
Click Generate. The certificate is displayed in the TCC and TEE Certificate Management page, under TEE Certificates.
Click Download to download the certificate in TCC.
Once the certificate is downloaded in TCC, you need to import the certificate in TCC. For import instructions, see the Connect Client User Guide.
Uploading a TCC Certificate
The TCC Security feature must be enabled.
A TCC certificate must be generated in TCC.
In the TCC and TEE Certificate Management page, click Upload Certificate under TCC Certificates.
Select the TCC certificate file.
Click Upload.
Network Data
Network Data Management
Network data management gives system administrators limited control over network data elements.
Network data elements are data common to all Oracle Taleo Enterprise Edition products. With network data management, system administrators can activate, deactivate, filter, and synchronize network data elements within four network data element categories: certifications, employers, institutions, and programs. The values within each category constitute the network data elements.
Data element synchronization is done between the customer's database and NDA central, the master data repository.
Activating All Network Data Elements
You must have the Manage Foundation Data user type permission at Configuration [SmartOrg] Administration [Users] User Types.
This task applies to activating certification, employer, institution, and program network data elements.
Filter list if necessary.
Click Activate All.
Click Yes.
The status of all network data elements in the list changes to Active.
All network data elements are added to the respective list in Recruiting, Performance, Onboarding (Transitions).
Activating a Network Data Element
You must have the Manage Foundation Data user type permission at Configuration [SmartOrg] Administration [Users] User Types.
The status of the network data element must be Inactive.
This task applies to activating certification, employer, institution, and program network data elements.
Click Activate in the Actions column of the network data element you want to activate.
The status of the network data element changes to Active.
The activated network data element is added to the respective list in Recruiting, Performance, Onboarding (Transitions).
Deactivating All Network Data Elements
You must have the Manage Foundation Data user type permission at Configuration [SmartOrg] Administration [Users] User Types.
This task applies to deactivating certification, employer, institution, and program network data elements.
Filter list if necessary.
Click Deactivate All.
Click Yes.
The status of all network data elements in the list changes to Inactive.
All network data elements are removed from the respective list in Recruiting, Performance, Onboarding (Transitions).
Data elements in lists that were selected before the element was deactivated remain selected.
Deactivating a Network Data Element
You must have the Manage Foundation Data user type permission at Configuration [SmartOrg] Administration [Users] User Types.
The status of the network data element must be Active.
This task applies to deactivating certification, employer, institution, and program network data elements.
Click Deactivate in the Actions column of the network data element you want to deactivate.
The status of the network data element changes to Inactive.
The deactivated network data element is removed from the respective list in Recruiting, Performance, Onboarding (Transitions).
Data elements in lists that were selected before the element was deactivated remain selected.
Filtering Network Data Elements
You must have the Manage Foundation Data user type permission at Configuration [SmartOrg] Administration [Users] User Types.
This task applies to filtering certification, employer, institution, and program network data elements.
The filtered items are listed.
Synchronizing the Database with the NDA Central Database
You must have the Manage Foundation Data user type permission at Configuration [SmartOrg] Administration [Users] User Types.
This task applies to synchronizing certification, employer, institution, and program network data elements.
Click Synchronize.
Click OK.
An email is sent to you when the synchronization is complete.
When synchronizing institutions, reference locations are also synchronized because institutions are associated to reference locations.
Deep Linking
Deep Linking
Oracle Taleo Enterprise Edition supports certain URLs that provide a direct access to Oracle Taleo Enterprise Edition products. Oracle Taleo Enterprise Edition also supports certain URLs to get access to specific actions within a Oracle Taleo Enterprise Edition product.
Users can click on a hyperlink in an email, portal or other environments outside Oracle Taleo Enterprise Edition's application and navigate directly to a screen in the application.
Using the deep linking feature, system administrators can provide URLs to users that directly place the users on the Recruiting Center home page, directly into the create requisition process, or directly into a specific job requisition or candidate file.
If single sign-on (SSO) is used, users are directed directly where the URL points to, without having to go through the User Sign In page. If SSO is not used, users are first prompted to enter their credentials in the User Sign In page before being able to access the page defined by the URL.
To create a URL that directs users to a specific action, specific parameters are required. For example, the following URL directs users to a specific requisition:
https://taleo.taleo.net/enterprise/publicurl/viewRequisition?requisitionNumber=8765&language=en
| Parameter | Description | Value |
|---|---|---|
| <Product URL> | Taleo product identifier URL. | taleo.taleo.net |
| <action> | Action available for the product. | viewRequisition |
| <parameter1> | Parameter identifier. | requisitionNumber |
| <value1> | Key value. | 8765 |
| <parameter2> | Language (fixed string). | language |
| <value2> | Language for users to view the page. If no language is specified, the browser language is used. If no language is specified by the browser, the default language used is English. | en |
System administrators should evaluate how users are using the product. If specific URLs are appropriate for some audiences, they should implement them to provide easier product or action access.
Supported Product URLs
Oracle supports certain URLs that provide a direct access to Oracle Taleo Enterprise Edition (Oracle Taleo Enterprise Edition) products.
Change the "client.taleo.net" with the actual zone name.
| Supported Product URLs |
|---|
| Central Configuration |
| https://client.taleo.net/smartorg/index.jsf |
| Note: Users are redirected to the central configuration menu. |
| Table of Contents page |
| https://client.taleo.net/smartorg/smartorg/common/toc.jsf |
| Sign Out |
| https://client.taleo.net/smartorg/iam/accessmanagement/globalLogout.jsf |
| Recruiting Center - Home Page |
| https://client.taleo.net/enterprise/enterprise/flex.jsf |
| Career Section - Internal |
| https://client.taleo.net/careersection/x/jobsearch.ftl?lang=en |
| Note: x must be replaced by the ID of the internal career section. |
| Career Section - Job Application |
| https://client.taleo.net/careersection/<cs_no>/jobapply.ftl?lang=<language>&job=<contest_no_OR_req_id> |
| Note: <cs_no> needs to be the number of the career section. <language> needs to be replaced with the language abbreviation code. <contest_no_OR_req_id> needs to replaced with the requisition number or the requisition identification ID. |
| Career Section - Job Details |
| https://client.taleo.net/careersection/<cs_no>/jobdetail.ftl?lang=<language>&job=<contest_no_OR_req_id> |
| Note: <language> needs to be replaced with the language abbreviation code. <contest_no_OR_req_id> needs to be replaced with the requisition number or the requisition identification ID. |
| Career Section - Job Referral |
| https://client.taleo.net/careersection/<cs_no>/jobrefer.ftl?lang=<language>&job=<contest_no_OR_req_id> |
| Note: <cs_no> needs to be the number of the career section. <language> needs to be replaced with the language abbreviation code. <contest_no_OR_req_id> needs to be replaced with the requisition number or the requisition identification ID. |
| Career Section - Urgent Jobs Only |
| https://client.taleo.net/careersection/<url code>/jobsearch.ftl?lang=<language>&urgent =<true> |
| Career Section - OLF Criteria |
| https://client.taleo.net/careersection/<url code>/jobsearch.ftl?lang=<language>&location=<location's ID> |
| https://client.taleo.net/careersection/<url code>/jobsearch.ftl?lang=<language>&organization =<organization's ID> |
| https://client.taleo.net/careersection/<url code>/jobsearch.ftl?lang=<language>&jobfield=<job field's ID> |
| Career Section - Keyword |
| https://client.taleo.net/careersection/<url code>/jobsearch.ftl?lang=<language>&keyword=<keyword criteria> |
| Career Section - Expanded Search Panel |
| https://client.taleo.net/careersection/<url code>/jobsearch.ftl?lang=<language>&searchExpanded=<true or false> |
| Career Section - Radius Search |
| https://client.taleo.net/careersection/<url code>/jobsearch.ftl?lang=<language>&radiusType=<K or M, for metric/imperial>& radi us=<radius value>& locationRad=<ID of the location used for radius search> |
| Career Section - Study Level |
| https://client.taleo.net/careersection/<url code>/moresearch.ftl?lang=<language>&studylevel=<ID> |
| Career Section - Employee Status |
| https://client.taleo.net/careersection/<url code>/moresearch.ftl?lang=<language>&employeestatus=<ID> |
| Career Section - Schedule |
| https://client.taleo.net/careersection/<url code>/moresearch.ftl?lang=<language>&jobschedule=<ID> |
| Career Section - Will Travel |
| https://client.taleo.net/careersection/<url code>/moresearch.ftl?lang=<language>&travel=<ID> |
| Career Section - Job Type |
| https://client.taleo.net/careersection/<url code>/moresearch.ftl?lang=<language>&jobtype=<ID> |
| Career Section - Shift |
| https://client.taleo.net/careersection/<url code>/moresearch.ftl?lang=<language>&jobshift=<ID> |
| Career Section - Job Level |
| https://client.taleo.net/careersection/<url code>/moresearch.ftl?lang=<language>&joblevel=<ID> |
| Onboarding (Transitions) |
| https://client.taleo.net/transition/index.jsf |
| Performance |
| https://client.taleo.net/orion/flex.jsf?lang=en |
Supported Action URLs
Oracle supports certain URLs to get access to specific actions within a Oracle Taleo Enterprise Edition (Oracle Taleo Enterprise Edition) product.
| Supported Action URLs |
|---|
| Create a requisition |
| http://client.taleo.net/enterprise/publicurl/createRequisition |
| Open a specific requisition |
| http://client.taleo.net/enterprise/publicurl/viewRequisition?requisitionNumber=8765 |
| Note: Instead of requisitionNumber you can also specify the contest number: http://client.taleo.net/enterprise/publicurl/viewRequisition?contestNumber=TOR0000334 |
| Open a candidate list specific to a requisition |
| http://client.taleo.net/enterprise/publicurl/viewCandidates?requisitionNumber=8765 |
| Open a candidate file |
| http://client.taleo.net/enterprise/publicurl/viewProfile?candidateNumber= 5159 |
| Open a candidate submission |
| http://client.taleo.net/enterprise/publicurl/viewApplication?applicationNumber=35097 |
| Open a candidate list for managers |
| http://client.taleo.net/enterprise/publicurl/viewRequisitions |
| View recruiting tasks |
| http://client.taleo.net/enterprise/publicurl/tasks |
| Approve a requisition |
| http://client.taleo.net/enterprise/publicurl/tasks?type=approveRequisition&requisitionNumber=7317 |
| Extend posting |
| http://client.taleo.net/enterprise/publicurl/tasks?type=posting&requisitionNumber=8178 |
| Amend an approval path |
| http://client.taleo.net/enterprise/publicurl/tasks?type=amendApprovalPath&requisitionNumber=7498 |
| Confirm employee presence |
| http://client.taleo.net/enterprise/publicurl/tasks?type=confirmEmployeePresence&applicationNumber =7322 |
| Complete selection process |
| http://client.taleo.net/enterprise/publicurl/tasks?type=completeSelectionProcess&application Number=7347 |
| Ready for sourcing |
| http://client.taleo.net/enterprise/publicurl/tasks?type=readyForSourcing&requisitionNumber=5300 |
| Contribute |
| http://client.taleo.net/enterprise/publicurl/tasks?type=contribute&requisitionNumber=7517 |
| Sourcing strategy to be defined |
| http://client.taleo.net/enterprise/publicurl/tasks?type=sourcingStrategyToBeDefined&requisitionNumber =7537 |
| To be completed |
| http://client.taleo.net/enterprise/publicurl/tasks?type=toBeCompleted&requisitionNumber=7483 |
| To be filled |
| http://client.taleo.net/enterprise/publicurl/tasks?type=toBeFilled&requisitionNumber=6477 |
| Duplicate check |
| http://client.taleo.net/enterprise/publicurl/tasks?type=verify |
Response Center (eShare)
Logging In Before Accessing the Response Center
eShare users must log in before being able to access the Response Center. These users must know their Recruiting user name and password (or their SSO credentials) to log in and process requests from the Response Center.
Time Zones
Time Zone
Time zones are used throughout the system where a date or time is required.
In the Recruiting Center, dates and time are presented in a manner that takes into account the user's time zone thereby making dates easier to understand and freeing users from the task of converting the dates themselves.
System administrators can set the default time zone for an entire company. Users who are in the same time zone as the company do not need to modify their time zone. However, users who are not located in the same time zone as their company will need to modify their time zone to view information in their own time zone (for interview scheduling, for example). Time zone changes can be done by users via the My Setup feature if they were granted the permission by their system administrator.
An example where time zone is used is for scheduling interviews with candidates. When scheduling an interview, the time zone of the person scheduling the meeting is used as a reference value. This means that the time of the meeting in the Recruiting Center is displayed according to the time zone selected by the person who scheduled the meeting, but the time of the meeting in Outlook or Lotus Notes is displayed according to the time zone set in the recipients' Windows settings.
Another example where time zone is used is for requisition posting. When posting requisitions, the time zone taken into account is the time zone of the user doing the posting (and not where the requisition is posted).
Daylight Savings Time
The same calculation is used during the daylight savings period across the Recruiting Center.
Daylight savings time is properly calculated for dates handled across the Recruiting Center. Many dates are time zone sensitive and as such are converted.
Algorithm to Determine a User's Time Zone
To determine a user's time zone, the algorithm is as follows:
Use the user's preferred time zone (under Recruiting Center > Resources > My Setup > Preferences > Time Zone and also under Configuration > [SmartOrg] Administration > User Accounts > select a user account > General Preferences > Time Zone).
If the above was not defined, use the user's preferred time zone (Configuration > General Configuration > Settings > Time Zone).
If the above was not defined (unlikely), use the user's operating system UTC offset.
If the above was not defined, use the default time zone (Configuration > [Career Section] Settings).
Time Zones in Oracle Taleo Enterprise Edition
| City | Time Zone Name | UTC Offset |
|---|---|---|
| Midway Islands, Samoa | Samoa Time | UTC -11:00 |
| Honolulu | Hawaii Time | UTC -10:00 |
| Anchorage | Alaska Time | UTC -9:00 |
| Tijuana | Pacific Mexico Time | UTC -8:00 |
| Vancouver, San Francisco, Los Angeles | Pacific Time | UTC -8:00 |
| Chihuahua, La Paz, Mazatlan | Western Mexico Time | UTC -7:00 |
| Edmonton, Denver, Boise, Salt Lake City | Mountain Time | UTC -7:00 |
| Arizona, Hermosillo | Mountain US Time | UTC -7:00 |
| Cancun, Merida | Atlantic Mexico Time | UTC -6:00 |
| Chicago, Winnipeg, Dallas | Central Time | UTC -6:00 |
| San Jose, Managua | Central America Time | UTC -6:00 |
| Regina (Saskatchewan) | Central Canada Time | UTC -6:00 |
| Mexico City | Mexico General Time | UTC -6:00 |
| Bogota, Lima, Quito, Panama City | Pacific South America Time | UTC -5:00 |
| Montreal, New York, Washington D.C. | Eastern Time | UTC -5:00 |
| Kingston, Georgetown | Jamaica Time | UTC -5:00 |
| Caracas | Venezuela Time | UTC -4:30 |
| Asuncion | Paraguay Time | UTC -4:00 |
| Cuiaba | Western Brazil Time | UTC -4:00 |
| La Paz, San Juan | Western South America Time | UTC -4:00 |
| Santiago | Chile Time | UTC -4:00 |
| Halifax | Atlantic Time | UTC -4:00 |
| St-John's (Newfoundland) | Newfoundland Time | UTC -3:30 |
| Buenos Aires, Georgetown | Eastern South America Time | UTC -3:00 |
| Greenland, Saint-Pierre and Miquelon | Greenland Time | UTC -3:00 |
| Brasilia | Eastern Brazil Time | UTC -3:00 |
| Mid Atlantic | Mid-Atlantic Time | UTC -2:00 |
| Azores | Azores Time | UTC -1:00 |
| Cap Verde Islands | Cape Verde Time | UTC -1:00 |
| Dublin, Edinburgh, Lisbon, London | Western European Time | UTC 0:00 |
| Abidjan, Dakar, Reykjavik | Greenwich Mean Time | UTC 0:00 |
| Casablanca | Casablanca Time | UTC 0:00 |
| Abuja, Alger, Kinshasa, Luanda, Niamey, Yaounde | Western Central Africa Time | UTC +1:00 |
| Namibia | South Western Africa Time | UTC +1:00 |
| Brussels, Copenhagen, Madrid, Paris | Central Europe Time | UTC +1:00 |
| Sarajevo, Skopje, Warsaw, Zagreb | Central Europe Time | UTC +1:00 |
| Belgrade, Bratislava, Budapest, Ljubljana, Prague | Central Europe Time | UTC +1:00 |
| Amsterdam, Berlin, Bern, Rome, Stockholm, Vienna | Central Europe Time | UTC +1:00 |
| Cairo | Egypt Time | UTC +2:00 |
| Harare, Pretoria | South Africa Time | UTC +2:00 |
| Jordan | Jordan Time | UTC +2:00 |
| Beirut | Lebanon Time | UTC +2:00 |
| Damascus | Syria Time | UTC +2:00 |
| Gaborone, Harare, Lilongwe, Lubumbashi, Lusaka, Maputo | Central Africa Time | UTC +2:00 |
| Athens, Bucharest | Eastern Europe Time | UTC +2:00 |
| Helsinki, Riga, Tallinn, Sofia, Vilnius, Kiev | Baltic States Time | UTC +2:00 |
| Jerusalem | Israel Time | UTC +2:00 |
| Baghdad | Iraq Time | UTC +3:00 |
| Kuwait City, Riyadh | Arabian Peninsula Time | UTC +3:00 |
| Nairobi | Eastern Africa Time | UTC +3:00 |
| Moscow, St. Petersburg, Volgograd | Russia Time | UTC +4.00 |
| Tehran | Iran Time | UTC +3:30 |
| Abu Dhabi, Muscat, Dubai | Persian Gulf Time | UTC +4:00 |
| Baku, Tbilisi, Yerevan | Caucasus Time | UTC +4:00 |
| Kabul | Afghanistan Time | UTC +4:30 |
| Bishkek | Kyrgyzstan Time | UTC +5:00 |
| Dushanbe, Islamabad, Karachi, Toshkent | West Asia Time | UTC +5:00 |
| Calcutta, Chennai, Mumbai, New Delhi | India Time | UTC +5:30 |
| Kathmandu | Nepal Time | UTC +5:45 |
| Almaty, Astana | Kazakhstan Time | UTC +6:00 |
| Dhaka | Central Asia Time | UTC +6:00 |
| Novosibirsk | North Central Asia Time | UTC +6:00 |
| Rangoon | Myanmar Time | UTC +6:30 |
| Krasnoyarsk | North Asia Standard Time | UTC +7:00 |
| Bangkok, Hanoi, Jakarta | South Eastern Asia Time | UTC +7:00 |
| Irkutsk, Ulaan Bataar | North Eastern Asia Time | UTC +8:00 |
| Perth | Western Australia Time | UTC +8:00 |
| Beijing, Chongqing, Hong Kong, Urumqi | China Time | UTC +8:00 |
| Singapour | Singapore Time | UTC +8:00 |
| Yakutsk | Yakutsk Time | UTC +9:00 |
| Osaka, Sapporo, Tokyo | Japan Time | UTC +9:00 |
| Seoul | Korea Time | UTC +9:00 |
| Adelaide | South Australia Time | UTC +9:30 |
| Darwin | Australia Northern Territory Time | UTC +9:30 |
| Canberra, Melbourne, Sydney | South Eastern Australia Time | UTC +10:00 |
| Vladivostok | Vladivostok Time | UTC +10:00 |
| Brisbane | Queensland Time | UTC +10:00 |
| Hobart | Tasmania Time | UTC +10:00 |
| Port Moresby | Papua New Guinea Time | UTC +10:00 |
| Lord Howe | Lord Howe Island Time | UTC +10:30 |
| Magadan, Solomon Islands, New Caledonia | Central Pacific Time | UTC +11:00 |
| Anadyr | Chukot Time | UTC +12:00 |
| Auckland, Wellington | New Zealand Time | UTC +12:00 |
| Fiji, Kamchatka, Marshall Islands | Fiji Time | UTC +12:00 |
| Eniwetok, Kwajalein | Date Line Time | UTC +12:00 |
| Chatham Islands | Chatham Islands Time | UTC +12:45 |
| Enderbury | Phoenix Islands Time | UTC +13:00 |
| Nuku'alofa | Tonga Islands Time | UTC +13:00 |
| Kiritimati | Line Islands Time | UTC +14:00 |
Time Zone Sensitive Dates in the Recruiting Center
| Requisition File - External Description Block - Opening Date | Requisition File - External Description Block - Closing Date |
| Requisition File - Internal Description Block - Opening Date | Requisition File - Internal Description Block - Closing Date |
| Requisition File - History Tab - Event Dates | Requisition File - Posting & Sourcing - Corporate Posting Dates |
| Requisition File - Posting & Sourcing - eQuest Posting Date | Requisition File - Posting & Sourcing - Staffing Agents |
| Requisition File - Posting & Sourcing - Staffing Agency (Contingent) | Requisition File - Posting & Sourcing - Source - Event List - Start Date (View & Edit) |
| Requisition File - Posting & Sourcing - Source - Event List - End Date (View & Edit) | Events in the Candidate Source Tracking Block |
| Requisition List - Status Detail | Requisition List - Contacted Candidates ("From" in the Callout) |
| Requisition Template File - Effective From (Status) | Requisition Template File - Effective Till (Status) |
| Requisition Template List - Effective From | Requisition Template List - Effective Till |
| Prescreening Question File - Creation Date | Prescreening Question File - History - Event Date |
| Prescreening Competency File - History - Event Date | Prescreening Disqualification Question File - Creation Date |
| Prescreening Disqualification Question File - History - Event Date | Requisition Action - Share - Date in Printed PDF |
| Requisition Approval Task & eShare - Date in Requisition Detail PDF (must reflect the file) | |
| Candidate Action - Schedule an Interview - Meeting Date | Candidate Action - Update an Interview - Meeting Date |
| Candidate Action - Cancel Interview - Meeting Date | Candidate File - Detail - Creation Date |
| Candidate File - Basic Profile - Date of Availability | |
| Candidate File - Attachments Tab - Submission-specific Attachments | Candidate File - Attachments Tab - Other Attachments |
| Candidate File - Self-Assigned Task List - Creation Date | Candidate File - History Tab - Event Dates |
| Candidate File - History Tab - Workflow Event Date | Candidate List - Quick Filters - Since (Effect on filtering) |
| Candidate List - Quick Filters - Last Activity Date (From & To) (Effect on filtering) | Candidate List - Advanced Filters - Fields of Type Date |
| Candidate List - Standard Fields of Type Date | Candidate Advanced Search - Date Type criteria |
| Candidate Workflow Assistant - Workflow Event Date | Candidate Workflow Assistant - Self-Assigned Task - Due Date |
| Candidate Workflow Assistant - (Hire candidate) Start Date (with the setting "Ignore Time Zone for Offer Start Date"=NO) | Candidate Action - Print/Share - Date in Printed PDF |
| Task List - Due Date - Task List - Task Callout (Assignment Date) | |
| Offer Grid - Expiration Date | Offer Grid - Created On |
| Offer Grid - Approved | Offer Grid - Extended |
| Offer Grid - Start Date (with the setting "Ignore Time Zone for Offer Start Date"=NO) | Offer Action - Update Expiration Date |
| Offer Action - Update Start Date (with the setting "Ignore Time Zone for Offer Start Date"=NO) | Offer Action - Extend Offer Verbally |
| Offer Action - Capture Response (Accepted) - Accepted On | Offer Action - Capture Response (Accepted) - Start Date (with the setting "Ignore Time Zone for Offer Start Date"=NO) |
| Offer Approval Tab - Decision Date & Time | Candidate Selection Workflow - Update Start Date (No RSOffer) (with the setting "Ignore Time Zone for Offer Start Date"=NO) |
| Offer Approval Task & eShare - Date in Offer detail PDF (must reflect the grid) (with the setting "Ignore Time Zone for Offer Start Date"=NO) | Offer Approval Task & eShare - Date in Candidate Submission detail PDF (must reflect the file) |
Time Zone - Permissions and Settings
The following permissions and settings are used to configure the time zone functionality.
| Setting or Preference | Description | Default Value | Location |
|---|---|---|---|
| Time Zone | Indicates the preferred time zone. | Configuration > [Central Configuration] > Settings | |
| Default Time Zone | Indicates the default time zone for Oracle Taleo Enterprise Edition products. | Configuration > [Career Section] > Settings | |
| Time Zone | This is the preferred time zone set by the system administrator for a user. | Configuration > [SmartOrg] Administration > [Users] User Accounts > select a user account > General Preferences | |
| Time Zone | This is the preferred time zone set by the user. | Recruiting Center > Resources > My Setup > Preferences | |
| Ignore Time Zone for Offer Start Date | Ignore the time zone when using the offer start date. This is a Private setting. Contact Oracle Support for details. | No | Configuration > [Recruiting] > Settings |
| User Type Permission | Description | Location |
|---|---|---|
| Access the "Preferences" section in 'My Set-up' menu | For users to have the ability to modify their time zone, the following permission is required. Once the permission is granted, users can modify their time zone in the My Setup feature, in the Preferences tab. | Configuration > [SmartOrg] Administration > [Users] User Types > Recruiting > Other |
Using the Time Zone for the Offer Start Date
By default, the time zone is used for the offer start date. A private setting controls this feature. If you do not wish to use the time zone for the offer start date, communicate with Oracle Support to have this setting modified.