1Getting Started
Getting Started
Login
Login Procedure
When users open the Oracle Taleo Enterprise Edition solution, the User Sign In page is typically displayed.
On the Sign In page, users can select the language in which they want to use the application. If users change the default language on the Sign In page, the page is displayed in the new language and subsequent Oracle Taleo Enterprise Edition product pages are presented in that language. After selecting a language, users can also instruct the system to "remember" their selection so that the next time they sign in, the User Sign In page will be presented in the language they selected.
If single sign-on (SSO) is not enabled within an organization, users must enter a user name and password on the user Sign In page. The user name and password are provided by system administrators. Users can modify their password. If SSO was configured through a consulting engagement (which requires a statement of work (SOW)), the Sign In page is not displayed and the default language that was configured is used.
Once a user's credentials are accepted, the Welcome Center or table of contents page is displayed. The Oracle Taleo Enterprise Edition products available for use are dependent on which products were purchased by the organization and on the user's user type and permissions. If a user has permission to see only one Oracle Taleo Enterprise Edition product and the Display Welcome Center setting is set to "Yes", the product is displayed directly.
Accessing an Oracle Taleo Enterprise Edition Application
You must have received a user name and password from your system administrator.
Select the language in which you want to use the application.
Enter your user name and password.
Click Sign In.
Using the Forgot Password Link
You must have a valid username and email address in your user profile.
Click Forgot Your Password?.
Enter your username and email address.
Click OK.
If the request comes from an authorized user, an email is sent to the supplied address with a code to access the application.
You must click the link provided in the email, enter your username and access code, and provide a new password.
Welcome Center
The Welcome Center is a home page that is displayed to users immediately after they log in. It provides a "one-click" access to Oracle Taleo Enterprise Edition products.
The Welcome Center contains an auxiliary navigation bar, a core navigation bar, a Quick Access panel, and a central panel.
The auxiliary navigation bar contains links to additional resources such as the online help, setup, and the Sign Out link.
The core navigation bar is a set of tabs that provide direct links to Oracle Taleo Enterprise Edition products. A user might have a tab for any or all of the following products: Performance, Recruiting, Compensation, Oracle Business Intelligence, Learn, and Configuration.
The Quick Access panel provides an alternative "one-click" access to the same products available in the core navigation bar. It also provides access to modules within products for example, Onboarding (Transitions), Scheduling Center, and to specific content such as a requisitions and candidate files.
In the central panel, customers can put information of interest to all product users. Alternatively, they can create distinct sets of information and associate an information set with a configuration profile.
If the Welcome Center is enabled, it replaces the table of contents page.
Getting Help
Online Help
The administration module offers an online help that provides comprehensive information about concepts or tasks to perform.
The online help, represented by the Question Mark icon or the Help link, is available in the auxiliary navigation bar located in the top right-hand corner of all pages. When clicking the icon or link, a table of contents of available help topics is displayed. It is also possible to search the help database to locate specific subjects.
Support Link
The Support link gives users access to the My Oracle Support.
The Support link is available in the auxiliary navigation bar of all pages of the application. From the site, you can:
Search and browse the Knowledge database.
Obtain product documentation.
Submit an incident.
Tooltip
A tooltip is a short, explanatory text which appears when "hovering" a mouse over a button, a link, a table cell heading or icon without clicking it.
Tooltips are available throughout the system and they give additional information about an action before performing it. Tooltips are provided for buttons, links, icons, and table header cells. These tooltips are not configurable. However, for screening services, the system administrator can create tooltips for some types of user-defined fields.
Release Notes Message
A pop-up message containing new release information, system improvements, important messages and other information can be displayed when users log into the product.
The same release notes message is displayed to users regardless of the product.
Once users are logged in, they can turn off the Release Notes message by selecting the Don't display this message again option. The message will then reappear only when new release information or other important information is available or if the users clear their browser cookies.
Deactivating the Release Notes Message
The release notes message must have been enabled.
Log into a product.
On the Release Notes page, select the "Don't display this message again" option.
The release notes message will no longer be displayed until new release information or other important information is available. If you want to see the release note information again before new released information is available, delete your browser cookies.
Navigation Icons
When information is spread across multiple pages, navigation icons are available.
| Icon | Description |
|---|---|
 |
Displays the previous page. |
 |
Goes to the previous 10 pages. |
 |
Displays the next page. |
 |
Goes to the next 10 pages. |
Recently Viewed Items
The Recently Viewed Items pane contains direct links to the last ten pages you most recently accessed (according to your permissions) during the current session or previous ones. They can be pages where you made modifications or simply pages that you accessed without making modifications. To access a recently viewed item, simply click the item.
Basic Concepts
Application Time-out
A security feature warns users when the application has not been used for more than thirty minutes even if a user is still signed into the application. When the time-out delay is reached, a message notifies users that the time-out delay for the application is imminent.
Two scenarios are possible:
User takes action: When the application has been idled for thirty minutes, a message notifies the user that the application requires attention. Clicking "Access the application" directs the user to the application. When the user accesses the application, the user can reset the application and a message indicates the remaining time before the session expires.
User does not take action: If the user does not reset the application within the defined delay, a message is displayed, indicating that the user has been signed out of the application and has to sign in again to use the application.
The time-out delay is set by default to thirty minutes. The reminder displayed before time-out is set by default to ten minutes before time-out.
Statuses: Draft, Active, Inactive
A status indicates the current state of an item in the system. It allows users to create items without making them available right away and to remove an existing item from use without removing it form the database.
Items can have one of the following statuses:
Draft: A Draft item can be modified. A Draft item cannot be used. It must be Active before it can be used.
Active: When an item is Active, only the name and description can be modified. It is not possible to update the behavior of the item.
Inactive: When an item is Inactive, only the status can be modified. The only possibility is to go back to the Active status.
A Draft item can become Active. An Active item can become Inactive. An Inactive item can become Active. However, an Active item cannot "go back" to the Draft status.
History Tracking
The History feature presents useful tracking details on an item.
The three most recent events are displayed in the History section. To view a more complete listing of events, click More Info.
| History Item | Description |
|---|---|
| Date and Time | Date and time when an event occurred. |
| Event | Event or action performed on an element. |
| Details | Information regarding the event. |
| By | The "actor" (person or system) who performed the event. |
Information of the user that performed an action on an item can be viewed for better tracking and troubleshooting purposes.
History Events Retention Period Before Deletion
History events are deleted systematically from the system after a certain period of time. This deletion applies to SmartOrg, General Configuration, Recruiting and Performance.
| SmartOrg Item | Retention (Months) |
|---|---|
| User Account (user access) | 6 |
| User Defined Selection | 12 |
| User | 12 |
| Welcome Center Content | 12 |
| Seat | 12 |
| Coverage Area | 12 |
| Message Template | 12 |
| Document | 12 |
| Paragraph | 12 |
| Message | 12 |
| User Type | 12 |
| Group | 12 |
| Configuration Profile | 12 |
| User File | 18 |
| Organization | 18 |
| Organization Level | 12 |
| Location | 18 |
| Location Level | 18 |
| Job Field | 18 |
| Job Field Level | 18 |
| Business Organization | 18 |
| Business Organization Level | 18 |
| Positions | 18 |
| Competency | 18 |
| Competency Category | 18 |
| Competency Group | 18 |
| Competency Context | 18 |
| Competency Definition Context | 18 |
| Competency Guidance Plan | 18 |
| Rating Dimension | 18 |
| Rating Model | 18 |
| Job Role | 18 |
| Job Role Context | 18 |
| Job Profile Classification | 18 |
| Product Setting | 24 |
| General Configuration Item | Retention (Months) |
|---|---|
| Reminder | 12 |
| Custom Selection | 24 |
| Recruiting Item | Retention (Months) |
|---|---|
| Automated Tasks | 24 |
| Taleo Performance Item | Retention (Months) |
|---|---|
| Batch Transaction | 0 |
| User-defined Selections | 12 |
| Talent Pool Management Center | 12 |
| Performance Management Center | 12 |
| Chart Configuration | 12 |
| Matrix Configuration | 12 |
| Competency Goal | 14 |
| Pool Item | 14 |
| Pool | 14 |
| Message Templates | 12 |
| Documents | 12 |
| Paragraphs | 12 |
| Product Setting | 12 |
| User Account (user access) | 6 |
| Review Text | 12 |
| Review Definition | 12 |
| Review Cycle | 12 |
| Business Goal | 14 |
| Business Project | 12 |
| Business Theme | 12 |
| Business Period | 12 |
| Employee Goal | 14 |
| Employee Goal Plan | 14 |
| Goal Template | 12 |
| Succession Plan | 14 |
| Development Activity | 14 |
| Development Plan | 14 |
| Development Plan Template | 12 |
| Development Activity | 12 |
| Development Activity Category | 12 |
| Mentoring Relationship | 14 |
| Rating Dimension | 12 |
| Rating Model | 12 |
| Partners | 12 |
Refine by Filter
The Refine by filter allows users to filter a list of items according to different criteria.
The Refine by filter is available throughout the system. When an item is selected in the Refine by list, users have to enter data in a field or select an item by which the list will be filtered. The Refresh button must then be clicked to refresh the list.
Rich Text Editor
The Rich Text Editor enables users to edit and format text contained in competency definitions, correspondence, requisitions, requisition templates and review forms (definitions, sections and section items). Text formatted with the editor is presented to users in the TE applications with the specific formatting defined in the editor.
cut, copy, and paste functions
font types and sizes
bold, italics, and underline
text and background color
left, right, and center alignment
numbered and bulleted lists
spell checker
Image or Link Insertion
Image or link insertion may only be available via the enlarged view of the editor, accessible when you first click the Enlarged View icon.
Spell Checker
The spell checker uses the application language, not the content language. The spell checker is available in several languages.
Internet Explorer 8
Users on Internet Explorer 8 may experience issues with the toolbar icons operating as expected. Users who experience this issue may either try viewing the page in Compatibility Mode, or use the Rich Text Editor in another browser such as another version of Internet Explorer or Firefox.
Copying and Pasting Text
When copying content from MS Word and pasting it in the Rich Text Editor tool, some reformatting may be required due to the complexities of mapping MS Word formatting to the Rich Text Editor. Capabilities supported by the Rich Text Editor tool are presented in the following table.
| Item | Description |
|---|---|
| Bold | Full support for the bold style. |
| Italic | Full support for the italic style. |
| Underline | Full support for the underline style. |
| Heading styles and fonts | Heading styles as well as fonts used in heading styles are preserved. Fonts not used in heading styles are treated as a default normal style. |
| Font name (font face) | Font names (font faces) are generally preserved, even those that are not part of the Rich Text Editor's natively supported fonts (Arial, Comic Sans MS, Courier New, Tahoma, Times New Roman, Verdana). |
| Font size | The Rich Text Editor supports seven sizes. A "best guess" font size conversion is done by the system. Conversion of font sizes may not be accurate in some unspecified cases (depending on browser, MS Word version, etc.). |
| Text color | Full support for text color. |
| Text background color | Full support for text background color. |
| Hyperlinks | Full support for hyperlinks. |
| Bulleted and numbered lists | Lists should be created using the bullets, numbering and multilevel list features in MS Word. List types that do not conform to the recommended practice are not supported. The bullet type is preserved (bullet or number), but the symbol (circle, square, etc.) or notation (number, roman numerals, alphabetical) will be replaced by the browser's defaults. Numbering continuation between two distinct numbered lists is not supported. The color of the bullet is not preserved. Spacing around list blocks is browser-specific. Indentation level is preserved if made using the indent buttons. Custom indentations made using the MS Word ruler is not supported. |
| Line spacing | No line spacing information is preserved. All custom line spacing is converted to a single line. The only exceptions are:
|
| Images | Images are not supported and will not be included. |
| Tables | Table row and column dimensions are preserved. The presence or absence of borders is preserved. Colors are not preserved, default is black. Background and border colors are not preserved. Styles are not preserved, default is solid line. Custom widths are not preserved, default is 1px. Custom table and cell widths are converted to their pixel / percent equivalent. This conversion runs differently, based on the browser being used. This may result in discrepancies from the original table. Merged cells are preserved. |
Recommended Practices for Constructing MS Word Documents to Minimize Reformatting Required When Pasting Content Into the Rich Text Editor
In general, the less complex the MS Word document is, the less reformatting a user will need to do when copying content from MS Word and pasting it in the Rich Text Editor. Below are some recommendations for creating MS Word templates.
Use the more common fonts that come with MS Word, such as:
Arial
Times New Roman
Courier New
Verdana
Comic MS Sans
Avoid using images in the MS Word template documents, as they are not supported in the Rich Text Editor.
Avoid using the horizontal ruler to customize indent lines, as this type of formatting is not supported in the Rich Text Editor. Use the standard indent buttons.
Minimize the use of custom line spacing, as this is not supported in the Rich Text Editor.
Avoid using colored bullets in the MS Word template documents, as they are not supported in the Rich Text Editor.
Avoid using custom ruler indentation on bullets, as custom indentation on bullets is not supported in the Rich Text Editor. Use standard indent buttons.
Avoid mixing bullet types in the MS Word template documents, as mixed bullet types are not supported in the Rich Text Editor.
Create lists using the standard bullet types, numbering, multilevel list and indent features available in MS Word.
Disabling Icons in the Rich Text Editor
System administrators can disable icons in the rich text editor to reduce complexity or prevent users from including JavaScript code into requisition descriptions, e-mail notifications or correspondence.
Using the setting Rich Text Editor Disabled Icons (available under General Configuration), system administrators can disable any or all icons except for the Enlarged View icon. They need to enter the icon code name of the icons that they want to disable, separated by a comma.
| Icon Name | Icon Code Name |
|---|---|
| Source | Source |
| Cut | Cut |
| Copy | Copy |
| Paste | Paste |
| Paste as plain text | PasteText |
| Paste from Word | PasteWord |
| Spell Checker | SpellChecker |
| Find | Find |
| Replace | Replace |
| Select All | SelectAll |
| Remove Format | RemoveFormat |
| Format | FontFormat |
| Font | FontName |
| Size | FontSize |
| Text Color | TextColor |
| Background Color | BGColor |
| Bold | Bold |
| Italic | Italic |
| Underline | Underline |
| Insert or remove ordered list | OrderedList |
| Insert or remove bulleted list | UnorderedList |
| Decrease indent | Outdent |
| Increase indent | Indent |
| Insert or edit image | Image |
| Align left | JustifyLeft |
| Center | JustifyCenter |
| Align right | JustifyRight |
| Justify | JustifyFull |
| Insert or edit link | MyCreateLink |
| Remove link | Unlink |
| Insert or edit table | Table |
Understanding Languages
Oracle Taleo Enterprise Edition products are available in different optional languages.
Not all languages are available for all Oracle Taleo Enterprise Edition products. Languages must be activated by the system administrator before they can be used in an application.
There are several concepts around languages:The application language is the language used for a product. This is the language selected by the user when signing in the Oracle Taleo Enterprise Edition suite. The language selected defines the language of every UI labels and elements of the product.
The content language is the language of a specific entity. The content language is selected when creating an entity. For example, it is possible to create a requisition in French even when using the Recruiting Center in English. The content language of a user is set in the user's account by the system administrator. However, a user can change this default content language under My Setup > Preferences > Content Language. The preferred content language is used by the system as the default content language which is the same across all Oracle Taleo Enterprise Edition products. If a product does not support the same set of content languages, it will have its own preference configuration.
The correspondence language is the language used for email messages. The correspondence language of a user is set in the user's account by the system administrator. However, a user can change this default correspondence language under My Setup > Preferences > Correspondence Language.
In Oracle Taleo Enterprise Edition products, the languages in which an element (for example, a requisition) is available are indicated in the Activated Languages field. When creating or editing an element, the user can choose a base language as well as languages in which the element will be available. The base language of an element is the item's reference language, usually used as a reference for other languages or fallback display in list mode. The user's preferred content language is used as the default base language when the user creates an element. The base language of an element can be changed at any time by the user. A language must be activated before it can be designated as a base language.
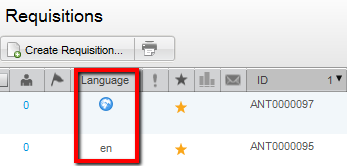
When an element is available in one language, the name of the language is displayed in the list; for example "en". When only one language is used within a company, there is no special indicator. When an element is available in several languages, the Earth icon is displayed. Hovering the mouse over the icon displays the languages in which the element is available.
Selecting the Base Language
The item must be in Edit mode and the language must be active before it can be set as the base language.
Open an item.
Select Configure next to the Language drop-down list.
In the Language Configuration page, select the Base option for the desired language.
Set the language to Active if that is not already the case.
Click Save.
The word Base appears next to the language in the Language drop-down list of the item.
You will need to complete the required fields (usually the Name) in the new base language.
Activating a Language
The item must be in Edit mode.
Open the item that you want to make available in another language so its fields are in edit mode.
Select Configure next to the Language drop-down list.
On the Language Configuration page, select Active from the Status drop-down list for each required language.
Click Save.
Activated languages appear in the Language drop-down list of item.
Once a new language has been enabled, values for some related fields (most often Name) will need to be provided.
Deactivating a Language
The item must be in Edit mode and the language must not be the base language.
Selected languages no longer appear in the Language drop-down list of the item.
Supported Languages
The languages supported for Oracle Taleo Enterprise Edition products as well as specific features are listed below. For details regarding language availability for Oracle Learn Cloud and Oracle Taleo Business Edition, see the documentation for those products.
Scheduling Center: All listed languages are supported except Portuguese (Portugal).
Assessment: All listed languages are supported except Indonesian (Bahasa).
OBIEE: All listed languages are supported except Indonesian (Bahasa), Lithuanian, Malaysian (Malay), Serbian, Slovenian.
Resume Parsing: Resume parsing is delivered using a third party partner service. The functionalities are deliveredas is. Customers needing additional or different resume parsing capabilities should explore partner services.
| Language | Locale | Recruiting and Onboarding | Performance | Mobile | Sourcing | Resume Parsing |
|---|---|---|---|---|---|---|
| Bulgarian | bg | Available | Available | |||
| Chinese (China) | zh_CN | Available | Available | Available | Available | |
| Chinese (Taiwan) | zh_TW | Available | Available | Available | Available | |
| Croatian | hr | Available | Available | |||
| Czech | cs | Available | Available | Available | ||
| Danish | da | Available | Available | |||
| Dutch | nl | Available | Available | Available | Available | Limited |
| English | en | Available | Available | Available | Available | Supported |
| English (U.K.) | en_GB | Available | Available | Available | Available | Supported |
| Finnish | fi | Available | Available | Available | ||
| French (Canada) | fr | Available | Available | Available | Limited | |
| French (France) | fr_FR | Available | Available | Available | Available | Limited |
| German | de | Available | Available | Available | Available | Limited |
| Greek | el | Available | Available | |||
| Hungarian | hu | Available | Available | Available | ||
| Italian | it | Available | Available | Available | Available | Limited |
| Indonesian (Bahasa)* | in | Available | Available | Available | ||
| Japanese | ja | Available | Available | Available | Available | |
| Korean | ko | Available | Available | Available | Available | |
| Lithuanian* | lt | Available | Available | |||
| Malaysian (Malay)* | ms | Available | Available | |||
| Norwegian | no | Available | Available | Available | ||
| Polish | pl | Available | Available | Available | Available | |
| Portuguese (Brazil) | pt_BR | Available | Available | Available | Available | Limited |
| Portuguese (Portugal)* | pt | Available | Available | Available | ||
| Romanian | ro | Available | Available | Available | ||
| Russian | ru | Available | Available | Available | Available | |
| Serbian* | sr (sh) | Available | Available | |||
| Slovak | sk | Available | Available | Available | ||
| Slovenian* | sl | Available | Available | |||
| Spanish (Worldwide) | es | Available | Available | Available | Available | Limited |
| Swedish | sv | Available | Available | Available | Available | |
| Thai | th | Available | Available | Available | ||
| Turkish | tr | Available | Available | Available |