24Partner Services
Partner Services
Screening Services
Screening Service
An organization may choose to have external partners provide specialized screening services.
A screening services partner can supply services such as:
candidate assessment
background check
tax credit eligibility
interview guides
interview scheduling
validated tests to identify and measure a candidate's qualifications, motivations, abilities and eligibility
Screening services must be activated by Oracle Support before they can be used in a requisition flow. Services are sourced to the application using an external tool, and enabled by default if the service does not require any additional configuration.
Once a service is made available by Oracle Support, the service can be activated or deactivated by system administrators and made available or not to Recruiting Center users when creating a requisition.
All screening services have the same properties, however, the settings of these properties will vary according to the service. System administrators can configure the screening service that is, modify input fields, phases, etc.
The languages in which an external service is available depend on the languages used by the service providers and vendors.
Screening services are available to Recruiting Center users provided they have been granted the proper user type permission.
Configuration
| User Type Permission | Location |
|---|---|
| Access Screening Services configuration | Configuration > [SmartOrg] Administration > [Users] User Types > Recruiting > Administration |
| Services permissions are grouped under the Recruiting functional domain. | Configuration > [SmartOrg] Administration > [Users] User Types > Recruiting > Other |
Input Field
An input field is a specified area of the application where a user must enter or choose information that will be sent to request a partner service.
Input fields used in the application are specific to the service, therefore depending on the service used, the fields displayed in the application will differ from one service to another.
The properties of an input field are:
Code: The internal name of the input field. The code is a read-only property.
Name: The label of the field used in the requisition file. Depending on the service definition, the name can be an editable property.
Domain: The type of field. The domain is a read only property. The possible values are:
Text
Multilingual text
Numerical
Selection
Date
Date UTC sensitive
Boolean
Mandatory: If the service definition specifies the field as mandatory, then the input field will always be mandatory. If the service definition specifies the input field as optional, then the customer will be able to configure the field as being either mandatory or not.
Default Value: this is the value of the field used by default by the system. Depending on the service definition, this can be an editable property.
Input fields are displayed in the requisition file under the Screening section.
Result Field
A result field is a field for which a partner service will send one result value per service request.
Result fields are specific to the service, therefore depending on the partner service used, the result fields displayed will differ from one service to another. When requesting an external partner service, the result fields will be displayed to the service partner to enter or select the results of the requested service.
The properties of a result field are:
Domain: The type of field. The domain is a read only property. The possible values are:
Text
Multilingual text
Numerical
Selection
Date time sensitive
Boolean
Code: The internal name of the result field. The code is a read-only property.
Name: The label of the field used to return results. Depending on the service definition, this can be an editable property.
Default Value: depending on the service definition, this can be an editable property.
Result fields are never mandatory because the service partner can send the value of the results incrementally. Once the service partner sends results in their entirety to the application, the application from which the service was requested will use a predetermined user-defined form to display the results supplied by the partner.
Result Set Field
A result set field is a field for which the partner will send more than one result value per service request.
Result set fields are specific to the service, therefore depending on the partner service used, the fields displayed will differ from one service to another. When requesting an external partner service, the result set fields will be displayed to the service partner to enter or select the results of the selected service:
The properties of a result set field are:
Domain: The type of field. The domain is a read only property. The possible values are:
Text
Multilingual text
Numerical
Selection
Date
Date time sensitive
Boolean
Code: The internal name of the result set field. The code is a read-only property t
Name: The label of the field used to return results. Depending on the service definition, this can be an editable property.
Default Value: this is the value of the field used by default by the system. Depending on the service definition, this can be an editable property.
Result fields are never mandatory because the service partner can send the value of the results not all at once.
Taleo Assessment
Assessments
Assessments in the workplace are used to measure the knowledge, skills, abilities and behavioral attributes related to a job or corporate culture. They can also be referred to as screening services, tests, surveys, exams, evaluations, simulations, work samples, assessment centers, interview guides, or realistic job previews. Employers use assessments to hire applicants, develop and promote employees, and collect talent intelligence on internal and external talent pools.
Professional fields related to the scientific research, development and use of workplace assessments include Industrial Organizational (I/O) Psychology and Organizational Development (OD). Also, the fair use of workplace assessments is overseen at the state and federal level or the territory, national and regional/multinational level by various government organizations, such as the U.S. Equal Employment Opportunity Commission (EEOC).
Depending on their professional credentials, authors may also be involved with the following assessment services:
Job Analysis – determines job-related competencies to include in the assessment.
Validation Study – determines if the assessment is a reliable and valid measure of the selected competencies and to what degree it predicts job performance.
Adverse Impact Analysis – determines if the assessment could potentially impact protected groups or promote unfair bias.
Business Impact Study – determines the cost and time savings, or return on investment, from using a validated assessment over a period of time.
Configuring the Assessment in Recruiting Administration
The configuration of assessments in the Recruiting Administration consists of the following steps.
Assessments must be activated in the Assessment Authoring Center before they can be used in a requisition flow. Authored assessments must be activated by Oracle Support. Assessments are sourced to the application using an external tool and enabled by default if the service does not require any additional configuration. Contact Oracle Support for details.
Configuring Assessment Settings
The Access Administration user type permission is required.
Click an assessment.
Click Edit next to Properties.
In the Settings section, configure the assessment settings as desired.
Click Save.
Configuring Assessment Input Fields
The Access Administration user type permission is required.
Click an assessment.
Click the link under Input Fields.
Click Edit next to Properties.
Under Default Value, select the assessment that will appear by default in the assessment field located in the requisition Screening block.
Click Save.
Configuring Assessment Result Fields
Assessment results fields are not configurable by the system administrator. For details, see Assessment Result Fields.
Configuring Assessment User-defined Forms
The Access Administration user type permission is required.
Click an assessment.
Under User-defined Forms, configure the following elements. For details, see Assessment User-defined Forms.
Capture of input fields: This is where you define how the Assessment Version field (input field) will appear in the requisition file in Edit mode. You can define elements such as the field type (drop-down list, radio button) and if the field is mandatory.
Display of input fields: This is where you define how the Assessment Version field (input field) will appear in the requisition file in View mode. You can define elements such as the field type (drop-down list, radio button) and if the field is mandatory.
Display of result fields: This is where you define how the Assessment result fields will appear in the candidate submission. Available fields are: Band, Details, Exceptional, Interview Guide, Passed, Score.
Display of result set fields: This is used only for those external partners whose certification includes result set fields. Assessment does not use this kind of fields. Therefore, nothing to configure here.
Click Save.
Configuring the Assessment Message Displayed to Candidates
The Access Administration user type permission is required.
Click an assessment.
Click Edit next to Labels.
Select the language in which you want to create the message.
Complete the fields as desired. For details, see Assessment Labels.
Click Save.
Click Preview next to Labels to see how the message will appear to candidates.
Configuring the Assessment Candidate Selection Workflow
The Access Administration user type permission is required.
Click an assessment.
Click Create next to CSW Actions.
Complete the fields as desired. For details, see Assessment Candidate Selection Workflow.
Click Save.
When the candidate selection workflow is used in the Recruiting Center, the execution of the Assessment will be carried out automatically.
Selecting Message Templates for the Assessment
Message templates are used either when the recruiter manually requests an assessment for a candidate, or when a candidate decides on the Career Section to receive an e-mail with a link to the Assessment service instead of taking the assessment immediately during the submission process.
The Access Administration user type permission is required.
Click an assessment.
Click Edit next to Correspondence.
Click Select under Message template (internal candidates).
Select the message template you want to send to internal candidates.
Click Select.
Click Select under Message template (external candidates).
Select the message template you want to send to external candidates.
Click Select.
Click Save.
The candidate will receive an e-mail based on these templates, depending on whether the candidate is an internal or external candidate. The e-mail will contain a link where to take the Assessment.
Activating the Assessment
The Access Administration user type permission is required.
The screening service must be Draft.
Click an assessment.
Click Activate located next to the name of the assessment.
The status of the assessment is changed to Active. The Assessment is then available in the Recruiting Center and Career Section provided that the Assessment is included in a requisition and then the requisition is posted to a Career Section.
Adding the Screening Block in the Requisition File
The user-defined file must have the inactive or draft status.
At least one section must be created in the user-defined file.
Click on a user-defined file of type Requisition File.
Click Edit next to Section Ordering.
Enter the name of the Screening section in the Add a Section field.
Click Create Section.
Select the Screening block in the Available Blocks section and drag and drop it to the Screening section you created.
Click Save.
Adding the Screening Block in the Candidate File
The user-defined file must have the inactive or draft status.
At least one section must be created in the user-defined file.
Click on a user-defined file of type Candidate File.
Click Edit next to Section Ordering.
Enter the name of the Screening section in the Add a Section field.
Click Create Section.
Select the Screening block in the Available Blocks section and drag and drop it to the Screening section you created.
Click Save.
Granting Assessment Permissions
The following permissions are used for assessments.
| User Type Permission | Description | Location |
|---|---|---|
| Request services from Taleo partners | Allows Recruiting Center users to request an Assessment service for candidates. The Request Screening Service is then available in the More Actions list. | Configuration > [SmartOrg] Administration > [Users] User Types > Recruiting > Other |
| Access Taleo partners summary results | Allows Recruiting Center users to access summary results in the candidate submission file. | Configuration > [SmartOrg] Administration > [Users] User Types > Recruiting > Other |
| Access Taleo partners detailed results | Allows Recruiting Center users to access detailed results regarding the assessment. The Provider Detailed Results link becomes available in the candidate submission file. | Configuration > [SmartOrg] Administration > [Users] User Types > Recruiting > Other |
Adding the Screening Block in the Career Section Application FlowAdding the Screening Block in the Career Section Application Flow
The Access the Career Section administration section user type permission is required.
The application flow must be inactive.
Click an application flow.
Click Edit.
Enter the name of the Screening section in the Add a Page field.
Click Create a Page.
Select the Screening block in the Available Blocks section and drag it to the Screening section you created.
Click Save.
Configuring the Screening Block in the Career Section Application FlowConfiguring the Screening Block in the Career Section Application Flow
The Access the Career Section administration section user type permission is required.
The application flow must be inactive.
Click the application flow containing a Screening block.
In the Application Flow Properties page, under Page Ordering, click the Screening link.
Click Edit next to Properties.
Complete the fields. For details, see Screening Block Properties.
Click Save.
Assessment Properties, Settings, and Fields in Recruiting Administration
The table presents the properties, settings, and fields used to configure Assessment in the Recruiting Administration.
| Assessment Property | Description | Location |
|---|---|---|
| Name | Name of the assessment. | Configuration > [Recruiting] Administration > Screening Services > Assessment > [Properties] > Edit |
| Description | Description of the assessment. | Configuration > [Recruiting] Administration > Screening Services > Assessment > [Properties] > Edit |
| Provider Name | Name of the provider. | Configuration > [Recruiting] Administration > Screening Services > Assessment > [Properties] > Edit |
| Provider Description | Description of the provider. | Configuration > [Recruiting] Administration > Screening Services > Assessment > [Properties] > Edit |
| Type | Type of screening service. | Configuration > [Recruiting] Administration > Screening Services > Assessment > [Properties] > Edit |
| Status | Status of the assessment. Possible values are Active, Inactive. | Configuration > [Recruiting] Administration > Screening Services > Assessment > [Properties] > Edit |
| Code | Code given to the assessment. | Configuration > [Recruiting] Administration > Screening Services > Assessment > [Properties] > Edit |
| Assessment Setting | Description | Location |
|---|---|---|
| Validity Period | The validity period is the number of days that an assessment result is valid. If a candidate takes an assessment after the validity period, a request is made to the Assessment Authoring Center for an assessment. The Assessment Authoring Center will respond based on the behavior of the assessment configured in the Assessment Authoring Center. It is a best practice to use the setting "Defined by user" with a date range specified that will not exceed the validity of the assessment. Possible values are:
|
Configuration > [Recruiting] Administration > Screening Services > Assessment > [Properties] > Edit |
| Candidate must answer email within (in hours) | Time frame in hours in which the candidate has to take an assessment. The assessment must be completed in the time frame specified. | Configuration > [Recruiting] Administration > Screening Services > Assessment > [Properties] > Edit |
| This service is mandatory for new requisitions and for those updated while in "Draft" status | If this setting is activated, the Assessment is mandatory on the requisition file, meaning that it is preselected in the Screening section and cannot be removed. |
Configuration > [Recruiting] Administration > Screening Services > Assessment > [Properties] > Edit |
| Access this service through the browser full-screen mode | If using pop-up assessment delivery, this setting determines that the browser ignores the latest defined pop-up size and instead presents the assessment in full screen mode. | Configuration > [Recruiting] Administration > Screening Services > Assessment > [Properties] > Edit |
| Client Identifier | Name to identify the company as a customer. This value must be identical to the value defined in the Assessment Authoring Center. | Configuration > [Recruiting] Administration > Screening Services > Assessment > [Properties] > Edit |
| Delay to wait before timing out a request (in hours) | When a request times out the system will no longer try to receive a candidate assessment summary. The assessment author should be consulted if requests are not being completed. A higher value gives candidates more time to take and complete an assessment. Once a request expires, Recruiting will NOT accept results for this assessment. |
Configuration > [Recruiting] Administration > Screening Services > Assessment > [Properties] > Edit |
| Assessment Input Field | Description | Location |
|---|---|---|
| Version | The assessment version is selected by Recruiting Center users in the Screening block of the requisition.
The properties of the input field are:
|
Configuration > [Recruiting] Administration > Screening Services > Assessment > Input Fields > Version [Properties] > Edit |
| Assessment Result Field | Description | Location |
|---|---|---|
| Band | The band is the candidate global band. | Configuration > [Recruiting] Administration > Screening Services > Assessment > Result Fields > Band |
| Details | This is the label of the Details link displayed in the candidate job submission, under the Screening block. | Configuration > [Recruiting] Administration > Screening Services > Assessment > Result Fields > Details |
| DetailsUrl | This is the label for the URL used to request the interview guide (if enabled) from the Assessment application. | Configuration > [Recruiting] Administration > Screening Services > Assessment > Result Fields > DetailsUrl |
| Exceptional | No global bands have been denoted as "Exceptional". This value will always be "No" and is not relevant to the assessment interpretation. | Configuration > [Recruiting] Administration > Screening Services > Assessment > Result Fields > Exceptional |
| Passed | A status of "Yes" indicates that the candidate received a passing green or yellow global band. Passed status of "No" indicates that the candidate received a failing red global band. | Configuration > [Recruiting] Administration > Screening Services > Assessment > Result Fields > Passed |
| Score | The score is the candidate's global score. It is best to focus on the global band and dimension bands rather than the global score. | Configuration > [Recruiting] Administration > Screening Services > Assessment > Result Fields > Score |
| Assessment User-Defined Form | Description | Location |
|---|---|---|
Capture of input fields |
This is where you define how the Assessment Version field (input field) will appear in the requisition file in Edit mode. You can define elements such as the field type (drop-down list, radio button) and if the field is mandatory. |
Configuration > [Recruiting] Administration > Screening Services > Assessment > User-defined Forms |
Display of input fields |
This is where you define how the Assessment Version field (input field) will appear in the requisition file in View mode. You can define elements such as the field type (drop-down list, radio button) and if the field is mandatory. |
Configuration > [Recruiting] Administration > Screening Services > Assessment > User-defined Forms |
Display of result fields |
This is where you define how the Assessment results fields will appear in the candidate submission. Available fields are: Band, Details, Exceptional, Interview Guide, Passed, Score. |
Configuration > [Recruiting] Administration > Screening Services > Assessment > User-defined Forms |
Display of result set fields |
This is used only for those external partners whose certification includes result set fields. Assessment does not use this kind of fields. Therefore, nothing to configure here. |
Configuration > [Recruiting] Administration > Screening Services > Assessment > User-defined Forms |
| Assessment Label | Description | Location |
|---|---|---|
| Service Name | This is the name of the service. Default value: Assessment (AAWT) |
Configuration > [Recruiting] Administration > Screening Services > Assessment > Labels |
| Label 1 | Default value: We would like you to provide additional information that will help us evaluate your qualifications for the job. |
Configuration > [Recruiting] Administration > Screening Services > Assessment > Labels |
| Label 2 | Default value: Therefore, we invite you to fill out an online assessment questionnaire. This process occurs in another window. You must answer all questions in a page before clicking Next. |
Configuration > [Recruiting] Administration > Screening Services > Assessment > Labels |
| Label Before Link to Service | Default value: Do not use the browser's Back or Forward buttons to view previous or following questions. If you do so, you will lose all the information you have entered. |
Configuration > [Recruiting] Administration > Screening Services > Assessment > Labels |
| Link to Service | Default value: Fill out the assessment questionnaire |
Configuration > [Recruiting] Administration > Screening Services > Assessment > Labels |
| Tooltip for Link to Service | Default value: Access the assessment questionnaire |
Configuration > [Recruiting] Administration > Screening Services > Assessment > Labels |
| Label 3 | Default value: After completing the questionnaire, you will automatically return to this page. |
Configuration > [Recruiting] Administration > Screening Services > Assessment > Labels |
| Assessment CSW Action | Description | Location |
|---|---|---|
| Workflow | The action will take place when a candidate uses the specified workflow. | Configuration > [Recruiting] Administration > Screening Services > Assessments > CSW Actions |
| Step | The action will take place when the specified step is reached or later if the status criteria is not yet met. | Configuration > [Recruiting] Administration > Screening Services > Assessments > CSW Actions |
| Status | The candidate must have this status when they reach the selected step or the action will not take place until this status is reached. | Configuration > [Recruiting] Administration > Screening Services > Assessments > CSW Actions |
| Action | Send Online Screening Assessment | Configuration > [Recruiting] Administration > Screening Services > Assessments > CSW Actions |
| Phase | The phase is used with the candidate selection workflow (CSW). If a certain step/status is reached in the CSW, then the system can send out a Phase request to the partner (like perform additional assessment for the candidate after the candidate reached a certain step in the CSW). Phases are not used with Assessment. | Configuration > [Recruiting] Administration > Screening Services > Assessments > CSW Actions |
| Assessment Message Template | Description | Location |
|---|---|---|
Message template (internal candidate) |
Message templates are used either when the recruiter manually requests an assessment for a candidate, or when a candidate decides on the Career Section to receive an email with a link to the Assessment service instead of taking the assessment immediately during the submission process. A message template is selected for internal candidates. |
Configuration > [Recruiting] Administration > Screening Services > Assessment > Correspondence |
Message template (external candidate) |
Message templates are used either when the recruiter manually requests an assessment for a candidate, or when a candidate decides on the Career Section to receive an email with a link to the Assessment service instead of taking the assessment immediately during the submission process. A message template is selected for external candidates. |
Configuration > [Recruiting] Administration > Screening Services > Assessment > Correspondence |
Career Section Screening Block PropertiesCareer Section Screening Block Properties
| Screening Block Property | Value | Location |
|---|---|---|
| Allow candidates to receive questionnaire information later by email |
|
Configuration > [Career Section] Administration > Application Flows > Click an application flow > Screening link > Edit |
| Show this block to the following candidates |
|
Configuration > [Career Section] Administration > Application Flows > Click an application flow > Screening link > Edit |
| Display Mode (The assessment can be delivered in a separate window (pop-up) or in the same window (inline) of the Career Section.) |
|
Configuration > [Career Section] Administration > Application Flows > Click an application flow > Screening link > Edit |
| This service is mandatory (candidates must click the link to access the questionnaire immediately or choose to receive it by email, if the latter is activated. |
|
Configuration > [Career Section] Administration > Application Flows > Click an application flow > Screening link > Edit |
| Service (The services available to the zone.) |
No | Configuration > [Career Section] Administration > Application Flows > Click an application flow > Screening link > Edit |
Assessment Fields in the Recruiting Center
The illustration presents assessment fields configured in the Recruiting Administration.
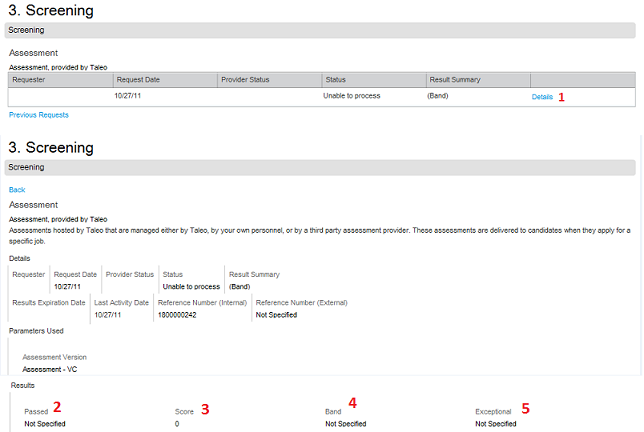
| Element | Description |
|---|---|
| 1: Details | Configured via Details field in Configuration > [Recruiting] Administration > Screening Services > Assessment > Result Fields > Details |
| 2: Passed | Configured via Passed field in Configuration > [Recruiting] Administration > Screening Services > Assessment > Result Fields > Passed |
| 3: Score | Configured via Score field in Configuration > [Recruiting] Administration > Screening Services > Assessment > Result Fields > Score |
| 4: Band | Configured via Band field in Configuration > [Recruiting] Administration > Screening Services > Assessment > Result Fields > Band |
| 5: Exceptional | Configured via Exceptional field in Configuration > [Recruiting] Administration > Screening Services > Assessment > Result Fields > Exceptional |
Scheduling Center
Scheduling Center
The Scheduling Center is a product used with Recruiting to handle automated and high volume scheduling of candidates.
This add-on scheduling functionality allows users to schedule any number of screening functions for candidates, including but not limited to:
job fair or campus appointments
mass recruitment events
interviews
The Scheduling Center facilitates the scheduling of these functions through the creation and management of calendars, which are populated with timeslots, into which candidates can schedule appointments. The Scheduling Center sends follow-up invitations (triggered through the candidate selection workflow) and reminder emails and records status messages in the candidate file each time a candidate performs a scheduling activity. The Scheduling Center displays a calendar view for users showing the resulting timetables of which invites are scheduled for each time slot on each day. The Scheduling Center sends email messages to candidates requesting them to schedule an appointment. It also sends emails confirming appointments and reminding candidates about their scheduled appointments.
The Scheduling Center screening service is available in two types of integration:
Self-service: This integration type is supplied with all applications. In this type, an initial invitation email is sent to the candidate. Emails sent at the different phases of the workflow are controlled through candidate permissions set at the calendar level. The employer (recruiter) is able to manage the appointments of a candidate only if the candidate has logged in to the Scheduling Center at least once.
Proctored: This integration type is optional and must be activated by Oracle Support. In this type, no initial invitation email is sent to the candidate. Emails sent at the different phases of the workflow are controlled through candidate permissions set at the calendar level. The employer (recruiter) can manage the appointments of a candidate even if the candidate has not logged into the Scheduling Center.
Although two types of integrations exist for the Scheduling Center, both types are configured, activated and used the same way.
Configuring Scheduling Center in Recruiting Administration
The following steps are required to configure the Scheduling Center as a service in Recruiting Administration.
Phases must be configured before the Scheduling Center Screening Service can be configured.
All steps must be completed for both the Scheduling Center screening service and the Scheduling Center (Proctored) service.
Activating a Screening Service
The Access Screening Services configuration and the Access Administration user type permissions are required.
The Scheduling Center and the Scheduling Center (Proctored) services have been created.The screening service must be inactive.
Click Scheduling Center service name.
Click Activate located next to the name of the service.
Click the Scheduling Center (Proctored) service name.
Click Activate located next to the name of the service.
The service is available in the Recruiting Center when users request an external service.
Activating the Scheduling Center (Proctored) screening service.
Configuring Scheduling Center Screening Service Settings
The Access Administration user type permission is required.
Click Scheduling Center.
Click Edit next to Properties.
In the Settings section, configure the assessment settings as desired. For details, see Scheduling Center Screening Service Properties, Settings, and Fields.
Click Save.
Configuring Screening Service Settings for Scheduling Center (Proctored).
Configuring Scheduling Center Input Fields
The Access Administration user type permission is required.
Click Scheduling Center.
Click the name of an Input field.
Click Edit next to Properties.
Under Name, enter the name of the field if you want to override the default name.
Under Default Value, select the calendar that will appear by default in the calendar field located in the requisition Screening block. For details, see Scheduling Center Screening Service Properties, Settings, and Fields.
Click Save.
Configuring Input Fields for Scheduling Center (Proctored).
Configuring Scheduling Center Result Fields
The Access Administration user type permission is required.
Click Scheduling Center.
Click the name of a Result field.
Click Edit next to Properties.
Under Name, enter the name of the field if you want to override the default name.
Click Save.
Configuring Result Fields for Scheduling Center (Proctored).
Configuring Scheduling Center Screening Service User-defined Forms
The Access Administration user type permission is required.
Click Scheduling Center.
Under User-defined Forms, configure the following elements.
Capture of input fields: This is where you define how the Scheduling Center field (input field) will appear in the requisition file in Edit mode. You can define elements such as the field type (drop-down list, radio button) and if the field is mandatory.
Display of input fields: This is where you define how the Scheduling Center field (input field) will appear in the requisition file in View mode. You can define elements such as the field type (drop-down list, radio button) and if the field is mandatory.
Display of result fields: This is where you define how the Scheduling Center result fields will appear in the candidate submission.
Display of result set fields: This is used only for those external partners whose certification includes result set fields. Scheduling Center does not use this kind of fields. Therefore, nothing to configure here.
Click Save.
Configuring User-defined Forms for Scheduling Center (Proctored).
Previewing a Screening Service User-defined Form
The Access Screening Services configuration and the Access Administration user type permissions are required.
Click a screening service.
Click Preview this form located beside the form you want to preview.
The final layout of a user-defined form used in a screening service is displayed to the system administrator.
Configuring Scheduling Center Screening Service Labels
The Access Administration user type permission is required.
Click Scheduling Center.
Click Edit next to Labels.
Select the language of the message.
Complete the fields as desired. For details, see Scheduling Center Screening Service Properties, Settings, and Fields.
Click Save.
Click Preview next to Labels to see how the message will appear to candidates.
Previewing a Service Label
The Access Screening Services configuration and the Access Administration user type permissions are required.
Click on the name of the service.
Click Preview next to Labels.
The labels will be displayed as the candidate will see them.
Configuring the Scheduling Center Candidate Selection Workflow
The Access Administration user type permission is required.
Click Scheduling Center.
Click Create next to CSW Actions.
Complete the fields as desired. For details, see Assessment CSW Actions.
Click Save.
When the candidate selection workflow is used in the Recruiting Center, the execution of the Assessment will be carried out automatically.
Configuring Candidate Selection Workflow for Scheduling Center (Proctored).
Selecting Message Templates for the Scheduling Center
The Access Administration user type permission is required.
Click Scheduling Center.
Click Edit next to Correspondence.
Click Select under Message template (internal candidates).
Select the message template you want to send to internal candidates.
Click Select.
Click Select under Message template (external candidates).
Select the message template you want to send to external candidates.
Click Select.
Click Save.
The candidate will receive an e-mail based on these templates, depending on whether the candidate is an internal or external candidate. The e-mail will contain a link to an appointment invitation.
Configuring Message Templates for Scheduling Center (Proctored).
Adding the Screening Block in the Career Section Application FlowAdding the Screening Block in the Career Section Application Flow
The Access the Career Section administration section user type permission is required.
The application flow must be inactive.
Click an application flow.
Click Edit.
Enter the name of the Screening section in the Add a Page field.
Click Create a Page.
Select the Screening block in the Available Blocks section and drag it to the Screening section you created.
Click Save.
Configuring the Screening Block in the Career Section Application FlowConfiguring the Screening Block in the Career Section Application Flow
The Access the Career Section administration section user type permission is required.
The application flow must be inactive.
Click the application flow containing a Screening block.
In the Application Flow Properties page, under Page Ordering, click the Screening link.
Click Edit next to Properties.
Complete the fields. For details, see Screening Block Properties.
Click Save.
Scheduling Center Screening Service Properties, Settings, and Fields
| Scheduling Center Screening Service Property | Description | Location |
|---|---|---|
| Name | Value: Scheduling Center or Scheduling Center (Proctored) | Configuration > [Recruiting] Administration > Screening Services > Scheduling Center > [Properties] > Edit |
| Description | Value: The Scheduling Center automatically schedules candidates you designate on calendars you can control. | Configuration > [Recruiting] Administration > Screening Services > Scheduling Center > [Properties] > Edit |
| Provider Name | Taleo | Configuration > [Recruiting] Administration > Screening Services > Scheduling Center > [Properties] > Edit |
| Provider Description | Taleo | Configuration > [Recruiting] Administration > Screening Services > Scheduling Center > [Properties] > Edit |
| Type | Scheduling Center | Configuration > [Recruiting] Administration > Screening Services > Scheduling Center > [Properties] > Edit |
| Status | Possible values are Active, Inactive. | Configuration > [Recruiting] Administration > Screening Services > Scheduling Center > [Properties] > Edit |
| Code | Code given to Scheduling Center. | Configuration > [Recruiting] Administration > Screening Services > Scheduling Center > [Properties] > Edit |
| Scheduling Center Screening Service Setting | Description | Location |
|---|---|---|
| Validity Period | Value: Always valid |
Configuration > [Recruiting] Administration > Screening Services > Scheduling Center > [Properties] > Edit |
| Candidate must answer email within (in hours) | Value: 0 This setting is not used by Scheduling Center. |
Configuration > [Recruiting] Administration > Screening Services > Scheduling Center > [Properties] > Edit |
| This service is mandatory for new requisitions and for those updated while in "Draft" status | This setting is not used by Scheduling Center. |
Configuration > [Recruiting] Administration > Screening Services > Scheduling Center > [Properties] > Edit |
| Access this service through the browser full-screen mode | Provided pop-up calendar delivery is used, this setting directs the browser to ignore the latest defined pop-up size and instead present the Scheduling Center in full-screen mode. | Configuration > [Recruiting] Administration > Screening Services > Scheduling Center > [Properties] > Edit |
| Client Identifier | Client ID is assigned when Scheduling Center is created. | Configuration > [Recruiting] Administration > Screening Services > Scheduling Center > [Properties] > Edit |
| Delay to wait before timing out a request (in hours) | When a request times out the system will no longer try to receive a candidate appointment. | Configuration > [Recruiting] Administration > Screening Services > Scheduling Center > [Properties] > Edit |
| Scheduling Center Screening Service Input Field Property | Description | Location |
|---|---|---|
| AssessmentID | The calendar associated with the initial interview phase of the CSW.
The properties of the input field are:
|
Configuration > [Recruiting] Administration > Screening Services > Scheduling Center > Input Fields > Version [Properties] > Edit |
| AssessementId2-AssessementId10 | The calendar associated with the interview phases of the CSW, after the initial phase.
The properties of the input field are:
|
Configuration > [Recruiting] Administration > Screening Services > Scheduling Center > Input Fields > Version [Properties] > Edit |
| Scheduling Center Screening Service Result Field | Description | Location |
|---|---|---|
| Appointment | The status of the first phase appointment. The Recruiting administrator can change the name of the label of the field. | Configuration > [Recruiting] Administration > Screening Services > Scheduling Center > Result Fields > Appointment |
| ApointmentStatus2-10 | The status of an appointment possibly in phase 2 through 10. The Recruiting administrator can change the name of the label of the field. | Configuration > [Recruiting] Administration > Screening Services > Scheduling Center > Result Fields > ApointmentStatus1-10 |
| DetailsUrl | Appears as the More Details link by default. The Recruiting administrator can change the name of the link by editing the Name field. | Configuration > [Recruiting] Administration > Screening Services > Scheduling Center > Result Fields > DetailsUrl |
| SchedulingError | The value, Scheduling Center returned an error, will appear if there is a communication error between Recruiting and Scheduling Center. If the error pertains to an error within Scheduling Center, a code will follow the text. The Recruiting administrator can change the name of the label of the field. |
Configuration > [Recruiting] Administration > Screening Services > Scheduling Center > Result Fields > SchedulingError |
| SchedulingStatus | The status of scheduling the appointment. The Recruiting administrator can change the name of the label of the field. | Configuration > [Recruiting] Administration > Screening Services > Scheduling Center > Result Fields > SchedulingStatus |
| SchedulingNoShowStatus | The value of this field is displayed in the Results Summary in the Screening tab of the Job Submission. | Configuration > [Recruiting] Administration > Screening Services > Scheduling Center > Result Fields > SchedulingNoShowStatus |
| Summary | The Recruiting administrator can change the name of the label of the field. | Configuration > [Recruiting] Administration > Screening Services > Scheduling Center > Result Fields > Summary |
| Scheduling Center Screening Service User-Defined Form | Description | Location |
|---|---|---|
| Capture of input fields | This is where you define how the Scheduling Center field (input field) will appear in the requisition file in Edit mode. You can define elements such as the field type (drop-down list, radio button) and if the field is mandatory. |
Configuration > [Recruiting] Administration > Screening Services > Scheduling Center > User-defined Forms |
| Display of input fields | This is where you define how the Scheduling Center field (input field) will appear in the requisition file in View mode. You can define elements such as the field type (drop-down list, radio button) and if the field is mandatory. |
Configuration > [Recruiting] Administration > Screening Services > Scheduling Center > User-defined Forms |
| Display of result fields | This is where you define how the Scheduling Center result fields will appear in the candidate submission. | Configuration > [Recruiting] Administration > Screening Services > Scheduling Center > User-defined Forms |
| Display of result set fields | This is used only for those external partners whose certification includes result set fields. Scheduling Center does not use these kinds of fields. Therefore, nothing to configure here. | Configuration > [Recruiting] Administration > Screening Services > Scheduling Center > User-defined Forms |
| Scheduling Center Screening Service Label | Description | Location |
|---|---|---|
| Service Name | This is the name of the service. Default value: Select an Interview Schedule |
Configuration > [Recruiting] Administration > Screening Services > Scheduling Center > Labels |
| Label 1 | Default value: Our initial review indicates that you may be qualified for this position. Additional information could facilitate your selection. This information will allow us to rank you with regard to other candidates as part of our total assessment process. |
Configuration > [Recruiting] Administration > Screening Services > Scheduling Center > Labels |
| Label 2 | Default value: Therefore, we invite you to fill out an online assessment questionnaire. This process occurs in another window. You must answer all questions in a page before clicking Next. If you don't know the answer to a question, select the option that makes more sense to you. |
Configuration > [Recruiting] Administration > Screening Services > Scheduling Center > Labels |
| Label Before Link to Service | Default value: Do not use the browser's Back or Forward buttons to view previous or following questions. If you do so, you will lose all the information you have entered. |
Configuration > [Recruiting] Administration > Screening Services > Scheduling Center > Labels |
| Link to Service | Default value: Schedule an Appointment |
Configuration > [Recruiting] Administration > Screening Services > Scheduling Center > Labels |
| Tooltip for Link to Service | Default value: Access the assessment questionnaire |
Configuration > [Recruiting] Administration > Screening Services > Scheduling Center > Labels |
| Label 3 | Default value: After completing the questionnaire, you will automatically return to this page. |
Configuration > [Recruiting] Administration > Screening Services > Scheduling Center > Labels |
| Scheduling Center Screening Service CSW Action | Description | Location |
|---|---|---|
| Workflow | The action will take place when a candidate uses the specified workflow. | Configuration > [Recruiting] Administration > Screening Services > Scheduling Center > CSW Actions |
| Step | The action will take place when the specified step is reached or later if the status criteria are not yet met. | Configuration > [Recruiting] Administration > Screening Services > Scheduling Center > CSW Actions |
| Status | The candidate must have this status when he or she reaches the selected step or the action will not take place until this status is reached. | Configuration > [Recruiting] Administration > Screening Services > Scheduling Center > CSW Actions |
| Action | Send Online Screening Assessment | Configuration > [Recruiting] Administration > Screening Services > Scheduling Center > CSW Actions |
| Phase | The phase is used with the candidate selection workflow (CSW). If a certain step/status is reached in the CSW, then the system can send out a Phase request to the partner (like perform additional assessment for the candidate after the candidate reached a certain step in the CSW). Phases are not used with Taleo Assessment. | Configuration > [Recruiting] Administration > Screening Services > Scheduling Center > CSW Actions |
| Scheduling Center Screening Service Correspondence | Description | Location |
|---|---|---|
| Message template (internal candidate) | Message templates are used either when the recruiter manually requests an appointment invitation for a candidate, or when a candidate decides on the Career Section to receive an email with a link to the scheduling service. A message template is selected for internal candidates. | Configuration > [Recruiting] Administration > Screening Services > Taleo Assessment > Correspondence |
| Message template (external candidate) | Message templates are used either when the recruiter manually requests an appointment invitation for a candidate, or when a candidate decides on the Career Section to receive an email with a link to the scheduling service. A message template is selected for external candidates. | Configuration > [Recruiting] Administration > Screening Services > Taleo Assessment > Correspondence |
Career Section Screening Block PropertiesCareer Section Screening Block Properties
| Screening Block Property | Value | Location |
|---|---|---|
| Allow candidates to receive questionnaire information later by email |
|
Configuration > [Career Section] Administration > Application Flows > Click an application flow > Screening link > Edit |
| Show this block to the following candidates |
|
Configuration > [Career Section] Administration > Application Flows > Click an application flow > Screening link > Edit |
| Display Mode (The assessment can be delivered in a separate window (pop-up) or in the same window (inline) of the Career Section.) |
|
Configuration > [Career Section] Administration > Application Flows > Click an application flow > Screening link > Edit |
| This service is mandatory (candidates must click the link to access the questionnaire immediately or choose to receive it by email, if the latter is activated. |
|
Configuration > [Career Section] Administration > Application Flows > Click an application flow > Screening link > Edit |
| Service (The services available to the zone.) |
No | Configuration > [Career Section] Administration > Application Flows > Click an application flow > Screening link > Edit |
Screening Service - Other Configuration Tasks
Activating a Screening Service
The Access Screening Services configuration and the Access Administration user type permissions are required.
The screening service must be inactive.
Click the name of a service.
Click Activate located next to the name of the service.
The service is available in the Recruiting Center when users request an external service.
Editing a Screening Service
The Access Screening Services configuration and the Access Administration user type permissions are required.
Click the name of a service.
Click Edit next to Properties.
Modify the settings and properties as required.
Click Save.
The modifications applied to the properties and settings of the service are displayed in the service page and in Recruiting Center under the Screening section of a requisition.
Deactivating a Screening Service
The Access Screening Services configuration and the Access Administration user type permissions are required.
Click the name of a service.
Click Deactivate located next to the name of the service.
The service is no longer available in the Recruiting Center when requesting a service.
Creating a Screening Service Field
A system administrator cannot create an input, result or result set field for a screening service.
Editing a screening service field.
Editing a Screening Service Field
The Access Screening Services configurationand the Access Administration user type permissions are required.
Click the name of a service.
Click the name of a field.
Click Edit next to properties.
Edit the information.
Click Save.
The input, result or result set fields of the screening service re customized to a specific need.
Deleting a Screening Service Field
A system administrator cannot delete an input, result or result set field of a screening service.
Editing a screening service field.
Editing a Screening Service User-defined Form
The Access Screening Services configuration and the Access Administration user type permissions are required.
Click on the name of a service.
Click on a user-defined form.
Make desired changes.
Click Save.
The properties and fields of a screening service user-defined form are modified.
Previewing a Screening Service User-defined Form
The Access Screening Services configuration and the Access Administration user type permissions are required.
Click a screening service.
Click Preview this form located beside the form you want to preview.
The final layout of a user-defined form used in a screening service is displayed to the system administrator.
Adding a Screening Service to a Candidate Selection Workflow
The Access Screening Services configuration and the Access Administration user type permissions are required.
Click on the name of a service.
Click Create next to CSW Action.
Select values in the fields as required.
Click Save.
When the candidate selection workflow will be used in the Recruiting Center, the execution of the screening service will be carried out automatically.
Removing a Screening Service from a Candidate Selection Workflow
The Access Screening Services configuration and the Access Administration user type permissions are required.
Click on the name of a screening service.
In the CSW Actions section of the service page, click Remove located beside the CSW you want to remove.
This action will no longer be executed during the candidate selection workflow.
Editing a Service Label
The Access Screening Services configuration and the Access Administration user type permissions are required.
Click on the name of a service.
Click Edit next to Labels.
Complete the fields as required.
Click Save.
When a screening request is sent to a candidate, labels will reflect changes in the e-mail sent to the candidate.
Previewing a service label.
Previewing a Service Label
The Access Screening Services configuration and the Access Administration user type permissions are required.
Click on the name of the service.
Click Preview next to Labels.
The labels will be displayed as the candidate will see them.
Selecting a Message Template for a Screening Service
The Access Screening Services configuration and the Access Administration user type permissions are required.
Click on the name of a service.
Click Edit next to Correspondence.
Click select
Select a Message template.
Click Select.
Click Save.
The new templates will be used when requesting a screening service.
Deleting a Message Template from a Screening Service
The Access Screening Services configuration and the Access Administration user type permissions are required.
Click on the name of a service.
Click Edit next to Correspondence.
Click Delete next to a message template
Click Save.
The template can no longer be used when requesting a screening service.
Creating a Phase
The Access Screening Services configuration and the Access Administration user type permissions are required.
A new phase is now available in the drop down list under phase in the CSW Action section of the service.
Adding an invitation phase to a requisition.