Using Data with Forms
When you're in a form, you can make the data more meaningful in many ways.
Explore Form Functionality
Explore ways to access, calculate, manipulate, create, analyze, or comment on data. Click Actions, and then select from the following options:
-
Analyze: Perform ad hoc analysis on a form.
-
New Ad Hoc Grid: Create an ad hoc grid.
-
Show Reasons for Read-Only Cells: Learn why you can't change data in some cells.
-
Business Rules: View the business rules that are used in a form and launch them.
-
Smart Push Details: Analyze data coming from different cubes.
-
Grid Validation Messages: Check how the data conforms to rules that an administrator set up.
-
Clear Formatting: Clear the formatting that you set.
-
Spreadsheet Export: To explore "what-if" scenarios in Excel before copying and pasting values back to your business process, click Actions, and then select Spreadsheet Export.
-
Open in Smart View: Work with a form in Oracle Smart View for Office. See Opening Forms and Ad Hoc Grids from Web Applications in Smart View for Office User's Guide 23.100.
View Form Properties
View the properties of a form by clicking ![]() (Property Panel).
(Property Panel).
Focus the Data
Explore what you can do with ad hoc grids. In a form, click ![]() (Property Panel), and then click
(Property Panel), and then click ![]() (Adhoc Options).
(Adhoc Options).
Enter Data for Suppressed or Excluded Members
Enter data for members that are not included in or not immediately visible on the form.
Emphasize Data with Formatting
Improve the presentation quality of the data. Click ![]() (Property Panel), and then click
(Property Panel), and then click ![]() (Format) to explore options for setting the font, font size, font color,
underscore, and background color.
(Format) to explore options for setting the font, font size, font color,
underscore, and background color.
Adjust and Spread Data
Change values by a specific amount. Select the cell or cells. Click ![]() (Property Panel), then
(Property Panel), then ![]() (Data), and then click any of the following:
(Data), and then click any of the following:
-
Adjust to increase or decrease the cell data by a value or percentage.
-
Spread to specify an amount or percentage by which to increase or decrease values across multiple dimensions, based on the existing values in the target cells. You can select a Proportional, Evenly Split, or Fill spread pattern.
To use Spread, your administrator must enable Grid Spread as a form property.
-
Allocate. Only administrators who are assigned the Allocate role can use this powerful feature. Also, Allocate must be enabled as a form property.
-
Lock to temporarily lock cells while you calculate and fill in other values. To unlock the cells, click Lock again.
Add Comments and Attachments and View History
Explain assumptions behind the data or, if enabled, view change history. Click a
cell, then ![]() (Property Panel), and then
(Property Panel), and then ![]() (Data). Under Details, click:
(Data). Under Details, click:
-
 (Attachment) to attach an external file.
-
 (Comment) to add a comment.
-
 (Show Change History) if your administrator enabled auditing for
Data, see who changed cell values and when they did so.
Sort and Filter Data
Simplify the data presentation. Control which rows or columns are displayed (or
hidden) by clicking ![]() (Property Panel), then
(Property Panel), then ![]() (Data), and then Keep or
Exclude under Filter.
(Data), and then Keep or
Exclude under Filter.
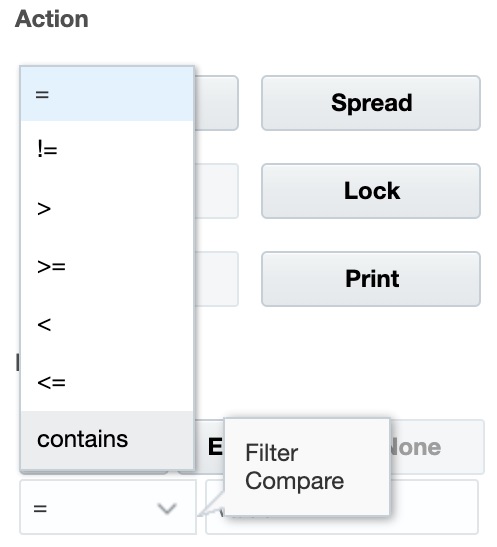
To limit the view to certain comparison results, click the Filter Compare menu to choose an operator and then specify a value for comparison in the value field.

You can also sort the values in a row or column by ascending or descending order by selecting the row or column, and then clicking an arrow under Sort.
View Supporting Detail
Build logic into a data value. Click a cell, then ![]() (Property Panel), and then
(Property Panel), and then ![]() (Data), and then Supporting Detail.
(Data), and then Supporting Detail.