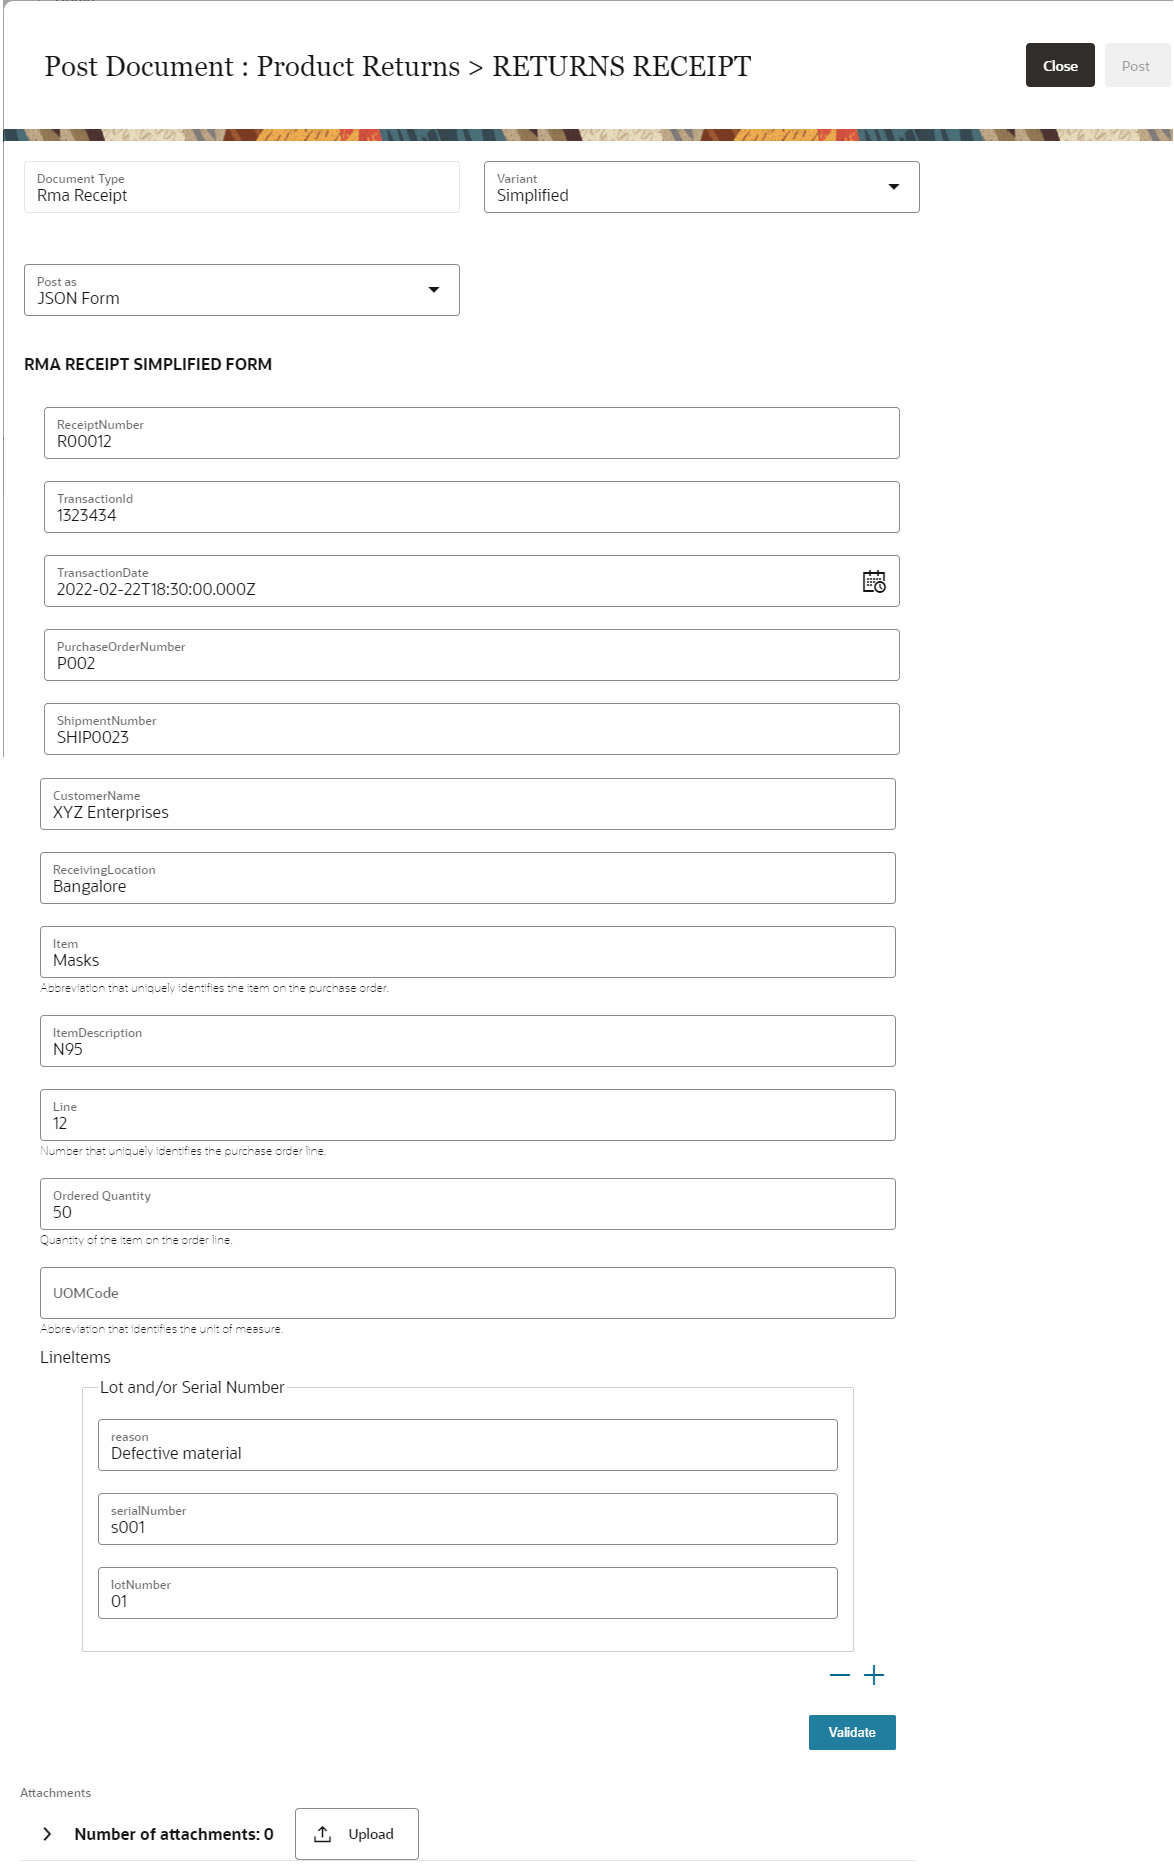
Upload Documents as JSON Form
As a submitter in the business flow step, you have the option to fill document data directly in to a JSON form and then submit the transaction document.
-
Click Menu (
 ) and then click
Operations.
) and then click
Operations.
-
On the bottom navigation bar, click Document Submission
(
 ).
The Document Submission dashboard displays the business flows, its business steps, and the corresponding document type names for which you are a submitter.
).
The Document Submission dashboard displays the business flows, its business steps, and the corresponding document type names for which you are a submitter. -
Identify the business flow and its step for which you'll upload a document.
Hover your mouse over the record and click Post (
 ).
The Post Document page is displayed.
).
The Post Document page is displayed. -
On the Post Document page, select or
click the following:
- Variant: Click the drop-down list and select the name of the document type definition.
- From the Post as drop-down list, select JSON Form.
A simplified HTML form is displayed.
 Ensure that JSON Form follows the JSON schema provided by Oracle Intelligent Track and Trace. The following JSON constructs are not supported in the JSON schema definition.Unsupported JSON schema constructs
-
null -
union -
anyOf -
oneOf -
allOf -
not -
media types
For example, line 39 to 47 in the sample
DEMO PURCHASE ORDERdocument schema definition shows unsupported schema constructs.1 { 2 "$schema": "http://json-schema.org/draft-07/schema", 3 "$id": "http://oitt-ns.oracle.com/demos/fr/demo_purchase_order", 4 "definitions": { 5 "Address": { 6 "title": "Address", 7 "type": "object", 8 "properties": { 9 "addressLine1": { 10 "title": "addressLine1", 11 "type": "string" 12 }, 13 "addressLine2": { 14 "title": "addressLine2", 15 "type": "string" 16 }, 17 "city": { 18 "title": "city", 19 "type": "string" 20 }, 21 "state": { 22 "title": "state", 23 "type": "string" 24 }, 25 "country": { 26 "title": "country", 27 "type": "string" 28 }, 29 "postalCode": { 30 "title": "postalCode", 31 "type": "string" 32 }, 33 "FileContents": { 34 "format": "binary", 35 "type": "string", 36 "description": "Contents of the attachment file.", 37 "title": "File Contents" 38 }, 39 "termsAndConditions": { 40 "anyOf": [ 41 { 42 "type": "string" 43 }, 44 { 45 "type": "array", 46 "items": { 47 "type": "integer" 48 } 49 } 50 ] 51 } 52 },In this case, the
DEMO PURCHASE
                                                  ORDER FORM
will not be generated and the following error will be displayed.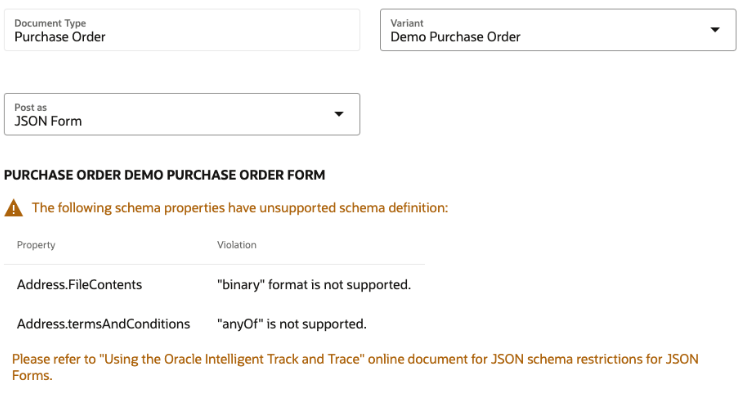 Note: Here, the
PURCHASE ORDER FORMis the name of the document for which the schema document restrictions are being violated.Additionally, in a document schema, if an object type property is defined as optional but one or more of its property node objects is defined as required, then the whole property is considered as a required field.
For example, in the following sample JSON schema, the
totalOrderAmountobject type property is not defined as required, but thecurrencyCodeandAmountsub-fields formoneyTypeproperty is defined as required, hence thetotalOrderAmountobject type property is considered as a required property."definitions": { "moneyType": { "title": "moneyType", "type": "object", "properties": { "currencyCode": { "title": "currencyCode", "type": "string" }, "amount": { "title": "amount", "type": "number" } }, "required": [ "currencyCode", "amount" ], "additionalProperties": false }, "link": { "properties": { "href": { "type": "string", "description": "The URI to the related resource.", "title": "hyperlink reference" }, "rel": { "type": "string", "description": "The name of the relation to the resource instance. Example: self.", "title": "relation" } }, "type": "object", "additionalProperties": false } }, "properties": { "totalOrderAmount": { "$ref": "#/definitions/moneyType" }, -
Optionally, you can add or remove multiple LineItems by
clicking the (
 ) or
(
) or
( )
icons.
)
icons.
Results:
Verify that submitted document appears in the Documents dashboard.