1System Overview
Parent-Child Company Hierarchy
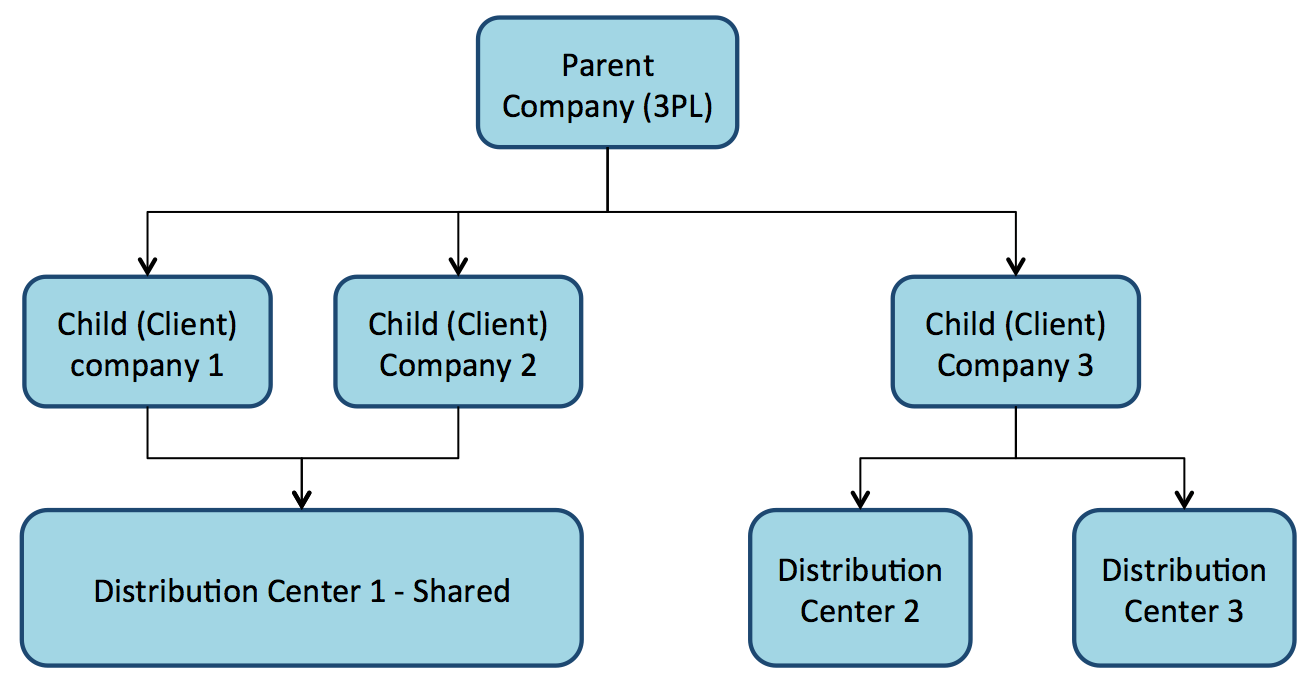
In WMS, companies are divided into parent and child companies. This structure exists in order to help 3PLs view and manage their clients’ inventory separately. Depending on how many clients and how many warehouses the 3PL has, views can be managed accordingly:

To toggle a specific Distribution Center (DC) view for a company, select the choices from the two drop-down menus located at the top right of the UI screen.
In the following screen, the first drop-down denotes a facility (DC), while the second drop-down denotes the companies in the environment:

Creating Users
You can create new users via the user’s screen where you can define the following:
- Username and password
- The facilities and companies the user has access for
- The user’s role (Administrator, Management, Supervisor, etc.)
- The user’s default group (UI and RF Menus)
- The user’s language (corresponding/desired/appropriate supported language)
- The user’s fixed equipment type
Creating New Users
- On the Users screen.
- Click the Create button and populate the necessary fields:
- Click Save when done.
- To configure the Facilities and Companies that the user needs to have access to, select the user and click the Eligible Facilities/Eligible Companies buttons. This takes you to the respective views that lists all the facilities/companies.

- Click the Create button to add new Facilities or Companies.
- When finished, return to the main screen.
- To assign Equipment Types to a user:
- Select user.
- Click on assign_equipment_type.
- Select an Equipment Type from the drop-down menu.
- Click on submit.
Note: Equipment Types must be first defined in the Equipment Types screen before assigning them to users.
Note for Key Fields
- RUT: Unique identifier (alphanumeric). Must be same as defined in WMS for this user
- Type: Field used to distinguish between internal and external users.
- Facility: Defines the default Facility that the user is displayed upon login.
- Company: Defines the default company that the user is displayed upon login.
- Shift: Defines the user’s shift, if applicable. Shifts are created in the Shifts screen, which defines the start and end time.
- Role: Defines the user’s role in the warehouse. Each role has a different set of permissions for viewing reports in Oracle Workforce Management Cloud (UI permissions only).
- Language: Sets the user’s language (English or Spanish).
- Default Group: Defines the default group that is displayed when this user logs in. Users can be assigned to multiple groups via the Groups button. If a user is assigned to multiple groups, user can switch Group views by clicking the drop-down next to his name on the top right and then clicking View, and finally selecting the desired Group.
System Integration Framework
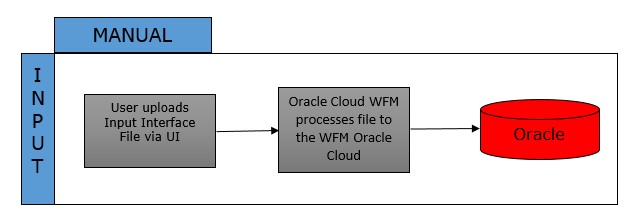
Oracle Workforce Management Cloud uses the following methods for processing interface files into Oracle Workforce Management Cloud:


Supported Formats
Oracle Workforce Management Cloud supports the following formats with interfaces:
- Flat files
- XML files
- CSV files
- XLS files
Input Interfaces
- User
- Sku Lines
- Prod Goal Line
- Prod Goal VAS
- Clock
Uploading Interface Files with Oracle Workforce Management Cloud
If you are manually preparing the input interface file via Excel, it is important to follow these best practices:
- The filename must start with the phrase as specified in the Input File Formats document (the filename must begin with USR for uploading User files).
- The columns specified as required in the interface specification document must be populated.
- You must populate the correct sequence in the seq_nbr field (i.e. no duplicate values).


