1How to Set Up Scheduled Jobs with Job Type
How to Set Up Scheduled Jobs with Job Type
This document provides details of setting up a Scheduled Job with different Job Type for Oracle Warehouse Management Cloud.
The Schedule Job consist different types of Job Type:
Extract Job Types
This schedule job types extracts data from the source system and process to generate the record in required format.
The following table list different Extract Job Types and their job parameters to be set:
Table Extract Job Type
| Job Type | Description |
|---|---|
| Extract Order | Extracts information pertaining to the order from the source database such as Order number, status, destination information and shipment details. |
| Extract IBLPN | Extracts information of the inventory received in the warehouse. |
| Extract IB Shipment | Extracts information about the inventory shipment received in the warehouse. |
| Extract Vendor | Extracts vendors details such as name, address, phone number and so on. |
| Extract PO | Extracts information about the purchase order and relevant details such as vendor and customer information, shipment details, and order quantity. |
| Extract OBLPNS | Extract information of the inventories that are shipped from the warehouse from source system. |
| Extract IB LPNS LOCK | Extracts information of the inbound LPNs that has locks applied on them. |
| Extract Inventory History | Extracts inventory history records for the orders. |
| Extract Active Inventory | Extracts information about every active inventory or items in the warehouse. |
| Extract Parcel Manifest | Extracts manifest information such as carrier, trailer number, schedule departure and delivery information. |
| Extract OB LOAD | Extracts information of an outbound load and also captures information such as externally planned load number, order number, route number and destination company. |
| Extract Item | Extracts header information about item(s) from the source system. |
To setup the job type, do the following:
- From the Scheduled Jobs screen, click Create (+).
- Enter the mandatory field. Refer to mandatory section for field description.
- Select the specific Extract Job Type from the Job Type drop-down.

- Enter the Job Parameters. Refer to job parameter section for field description.
- Click Save or Save/New.
For more information, please refer to OWM-ScheduleJob-v1-R21B.xlsx file.
Mandatory Field
This table lists the Mandatory field required to run the schedule job:
Table Mandatory Fields
| Mandatory Fields | Required Action from the User |
|---|---|
| Job Number | Enter a name for the schedule job your creating. |
| Job Type | Select the job type. |
| Schedule Name | Name can be up to the customer |
| Enable | Must be check in order to run |
| Schedule Type | Can be set up to be Interval or Crontab |
| If set up as Interval | Your required to enter Every and Period field. |
| If set up as Crontab | Your required to enter Minute, Hour, Day of the week, Day of the Month, Month of the year, where:
|
Job Parameter
This table lists the Job Parameter field required to run the Schedule job:
Table Job Parameter
| Job Parameter | Required Action from the User |
|---|---|
| Username | Name of the user responsible to run to schedule job within the facility/company. |
| Start hours back | Enter the start hour period you want the data to be extracted. For example, Let's say system clock is 02:00 AM of 05 of July, 2009, you set the interval for Every =1, Period = Hour and Start Hours back = 3, then the schedule job is run every 1 hour and the system starts extracting all the modified data from the start hour period (3 hours behind from the system's clock, i.e., 23:00 PM of 04 of July, 2009) till the stop hour period set in the job parameter.
Note: The recommended clock is set to 24 hours format.
|
| Stop hours back | Enter the stop hour period until when you want the data to be extracted. For example, Let's say system clock is 02:00 AM of 05 of July, 2009, you set your interval Every =1, Period = Hour and Stop hour back =1, then the schedule job is run every 1 hour and the system stops extracting all the modified data till the stop hour period (1 hour from the system's clock, i.e., 01:00 AM of 04 of July, 2009).
Note: Stop hours must not be greater than Start hours. An error is thrown "Stop time cannot be before start time", and the data will not be generated.
|
| Delimiter | Users can use this delimiter to seprate the data fields. By default, “|” is set as delimter. User’s can define their own delimited for example, *. |
| Header Required | Whether we populate a header row at the beginning of the file. Valid value ("y" or "n"). |
| Header Prefix | Enter the prefix of your choice. For example, Header prefix = ABC. Then the output generated will have [ABC]|[Comp]|[FAC]|[ORD]
Note: The system has default prefix defined. If the header prefix is left blank, system uses the default prefix to generate the file in the following format: {Hdrprefix}{comp}{fac}_{user}_{from_time}_{to_time}
For information on the default prefix, refer Default Prefix. |
| Detail Prefix | Enter prefix of your choice. The file format is as follows: {dtlprefix}{comp}{fac}_{user}_{from_time}_{to_time} |
| Now | This is for internal use only. |
| Debug | This is for internal use only. |
Default Prefix
These are system coded prefix that are used by default while generating output file.
Table Default Prefix for Extract Schedule Job
| Job Type | Header | Detail |
|---|---|---|
| Extract Order | ORH | ORD |
| Extract IBLPN | IBH ( iblpn header) | IBD (iblpn detail) |
| Extract IB Shipment | ISH ( Ib shipment header) | ISD (ib shipment detail) |
| Extract Vendor | VEN | |
| Extract PO | POH (for PO header) | POD (for PO detail) |
| Extract OBLPNS | LPH ( oblpn header) | LPD (oblpn detail) |
| Extract IB LPNS LOCK | IBLPN_LOCK | |
| Extract Inventory History | XIHT | |
| Extract Active Inventory | ACT | |
| Extract Parcel Manifest | OPS (header) | OPL (detail) |
| Extract OB LOAD | OBS (header) | OBL (detail) |
| Extract Item | ITM |
Extract All Job Type
On selecting Extra All job, you need to specifically enter the following job parameters:
- Facility Code : Facility code id
- Company Code: Company code id
- Start day: example 1 for yesterday, 7 for seven days ago
- Stop day: example 1 for yesterday, 7 for seven days ago
Copy Files Job Type
The Oracle WMS Cloud allows you to copies all the fiels from the source folder path to the destination path folder provided in the job parameter.
To set up the schedule job type, do the following:
- From the Scheduled Jobs screen, click Create (+).
- Select Copy Files from the Job Type drop-down.

- Populate the rest of the required fields.
- Click Save.
Table Copy Files Job
Job Parameter Required Action from the User Username Valid user name for the facility. Source Folder Path $LGF_FILES_HOME/interfaces/<company_code>/<fac_code>/output/ETL
Replacing <company_code> with the actual company code and the <fac_code> with the actual facility code.
Destination Folder Path Set up by client. File Pattern If you have only set up one of the extract and will like to copy this info, then the value should be:
- Order > ORH (for order header) ORD (for order dtl) OR* (for both)
- IBLPN > IBH (iblpn header) IBD (iblpn detail) IB* (for both)
- IB Shipment > ISH (Ib shipment header) ISL (ib shipment detail) IS* (for both)
- Vendor > VEN (no detail)
- PO > POH (for PO header) POD (for PO detail) PO* (for both)
- OBLPNS > LPH ( oblpn header) LPD (oblpn detail) LP* (for both)
- IB LPNS LOCK > IBLPN_LOCK (no detail)
- Inventory History > XIHT
- Active Inventory > ACT_INV
- Parcel Manifest > OPS (header) OPL (detail) OP*(for both)
- OB LOAD > OBS (header) OBL (detail) OB*(for both)
- Item > ITM (no detail)
Note: To set more than 1 copy file, you need to set up the value to *.Include Sub Folder Level 1 Not supported. Do Not Use. Encrypt Not supported. Do Not Use. Encrypt Recipient Not supported. Do Not Use. Decrypt Not supported. Do Not Use. Send Acknowledgement file Not supported. Do Not Use.
Generating Job Type
The Oracle WMS Cloud provides an ability in the system to generate output reports for the following job type via Generate Schedule Job.
- Generate Inventory Summary
- Generate Order Files
- Generate LPN Modes
- Generate OB LPN Billing Report
- Generate Inventory History Extract
- Generate Verify Shipment Alert
- Generate Custom Inventory Summary
- Generate IB Shipment Files
- Generate OB Load Files
- Generate Parcel Manifest Files
- Generate IHT by billing location type
To set up the Generate job type, do the following:
- From the Scheduled Jobs screen, click Create (+).
- Select the specific Generate Job Type from the Job Type drop-down.

- Enter the mandator field for selected job type. Refer to the Mandatory Field section for field description.
- Configure the respective parameter for the selected Job Parameter – Refer to OWM-ScheduleJob-v1-R21A.xlsx file
Run Job Type
The Oracle WMS Cloud provides you an ability to execute and run template based schedule job via Run Job Type:
- Run Stage Interface
- Run Wave Template
- Run Work Order Wave Template
- Run Replenishment Template
- Run Report
- Run CC Task Template
- Run Wave Group Template
- Run Web Report
- Run Iblpn Report
- Run WMS WFM Interface
- Run Web Report Gen2
To set up the Run job type, do the following
- From the Scheduled Jobs screen, click Create (+).
- Select the specific Run Job Type from the Job Type drop-down.

- Enter the mandator field for selected job type. Refer to the Mandatory Field section for field description.
- Configure the respective parameter for the selected Job Parameter – Refer to OWM-ScheduleJob-v1-R21A.xlsx file.
SFTP GET and PUT
Oracle Warehouse Management (WMS) Cloudis discontinuing the SFTP site hosted by Oracle WMS Cloud (LogFire). The date for this shutdown is May 31, 2019. This was originally announced to customers last year. This document details alternatives that are available.
Prior to this change, customers were able to directly connect to the Oracle WMS Cloud SFTP site using their own username and password, to transfer input files for loading into the WMS or extracting output files. If you currently do not use this feature, then you can ignore this notification as it does not impact you.
Oracle recommends REST WebServices as the path forward for integration. This provides a much more real time integration, eliminates unnecessary scheduled jobs, and simplifies configuration. All interfaces available earlier via SFTP are available via REST WebServices. Please review the Integration API document for details. You can contact support if you do not have this document.
Customers that are not able to immediately switch to web services, have the option to host their own SFTP server (either their own or a third party one they can purchase on their own), and to transfer files into WMS and from WMS into their site. New scheduled jobs for this purpose were made available as of patch bundle 4a for version 18C and 9.0.0.
This document provides examples to show customers what needs to be configured, so they can get files from their new remote SFTP or put files from Oracle WMS Cloud to their new remote SFTP. In order to accomplish this, the new scheduled jobs have been created to allow you to either pull or get files:
- SFTP GET Files
- SFTP PUT Files
- Multi Facility - SFTP Put Files
These jobs are designed to be configured in addition to your current input interface processing jobs and output interface configuration. No changes to your input interface processing job should be required normally. For output interfaces, there is a recommended change that will be useful to do since it will be more efficient and faster (see Recommended Change in SFTP PUT Files) for more details.
To set up the schedule job type, do the following:
- From the Scheduled Jobs screen, click Create (+).
- Populate all required fields and select the specific SFTP Job Type from the Job Type drop-down.
Scheduled Job Configuration
The following example explains the configuration needed to set up these two new jobs.
For the purpose of this example we will pretend we have the following information:
- Current Oracle WMS Cloud SFTP information is:
-
Host: sftp://sftp.wms.ocs.oraclecloud.com
Username: Customer1
Password: 123Password!
-
- New Remote customer provided SFTP information is:
-
Host: sftp://clienthost.com
Username: myremotesftp
Password: 567Password!
-
SFTP GET Files
The SFTP GET Files job was created, so customers have the ability to “drop” files to the Oracle WMS Cloud site. It can be used for Inbound Interfaces, including Purchase Orders, Advance Shipment Notices, Orders, etc.
Example:
Moving Advance Shipment Notice (ASN) from your remote SFTP into your local SFTP.
You will place your ASN file in your new remote SFTP folder that you have assigned for your ASNs.
/Data/Input/ASN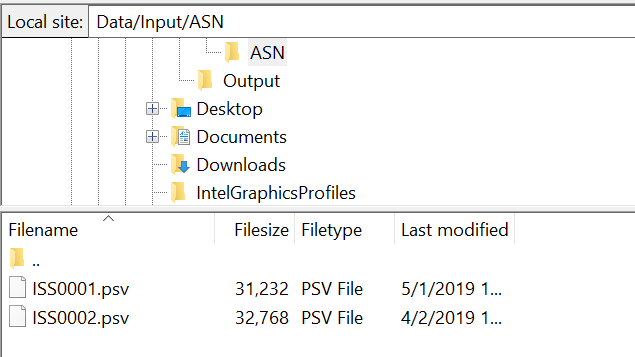

Table SFTP Get Files Job Parameter
| Job Parameter | Required Action from the User |
|---|---|
| Hostname | sftp://clienthost.com |
| SFTP User | Your remote SFTP user. In our example: myremotesftp |
| Password | Your remote SFTP password. In our example: 567Password! |
| Port | 22 |
| Remote Directory | Your remote directory where you want us to get the files from. Please note this is case sensitive, so the scheduled job may failed if written incorrectly or if the path does not exist. In our example the path is: data/input/asn |
| Local Directory | This is the local directory where you want to drop the files, so they could be picked up by Oracle WMS Cloud. It is important this is configured correctly as it is case sensitive. Please refer to the SFTP Troubleshooting section for more details. If you already have input interface jobs setup earlier to process these files, then this path can be copied from that scheduled job as is. See the SFTP Troubleshooting section for more details on which section needs to be copied here: $LGF_FILES_HOME/interfaces/<COMPANY_CODE>/<FACILITY_CODE>/input/ |
| File Search Pattern | This file search pattern selects the specific files to be pick up. It is a mandatory field. In our example: ISS* You could provide: Only one file patter, multiple file patterns separated by a comma, a list of file matching patterns such as *.png or *.jpg separated by a comma. If there is a Folders in the directory to be searched, it will not be transferred. Once files are picked up by this job, they will get deleted from the remote site. Customers are urged to keep a backup copy in a different path, prior to dropping the files into the remote site |
The SFTP Get Files job will pick up the files that start with ISS from your new remote sftp, and it will drop them into Cloud WMS in an internal location, so that they can be picked up and processed as usual.
SFTP PUT Files
The SFTP Put Files job allows Oracle WMS Cloud to communicate with the new remote hosted SFTP services to transfer files such as Order confirmation, inventory history, etc.
RECOMMENDED CHANGE: As of 9.0.0, Output Interface Configuration allows these files to be sent directly to external SFTP sites (instead of the internal LogFire SFTP) and that is the recommended way over using “SFTP PUT files” as it will skip the internal file transfer step and improve the overall processing speed. For example, if you currently have output interface configuration setup with “Logfire internal sftp” or “Logfire internal file location” as the target, these files get created in that location which is accessible via your LogFire SFTP username and password. You have the option to leave it that way and use the SFTP PUT files job to transfer the file to your external site, but you can skip this step and instead configure the output interface to use “External SFTP” and directly send the file out.
If you use SFTP to extract Web reports, then you will need to use SFTP PUT files.
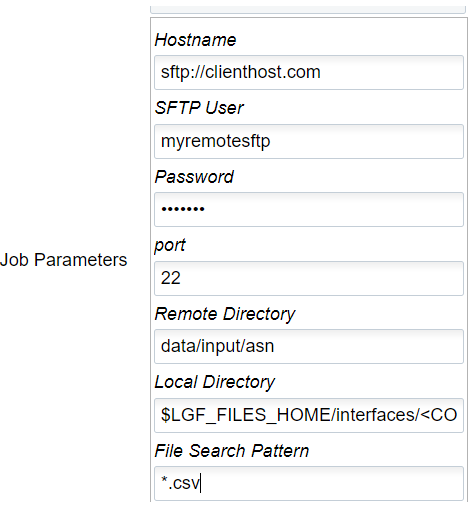
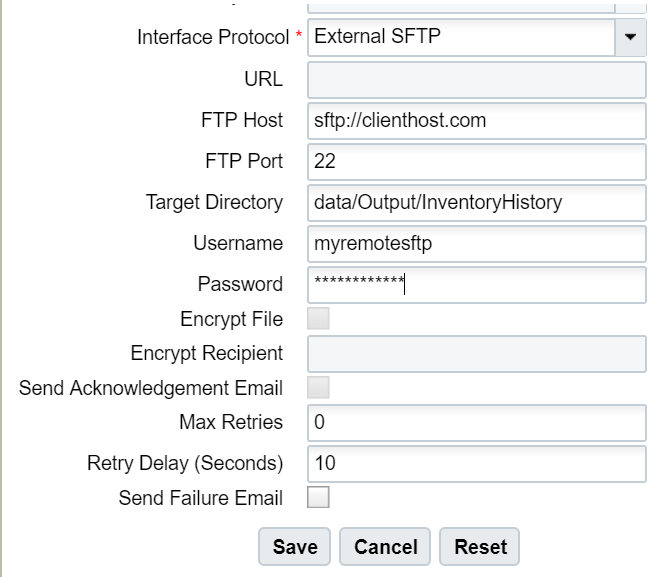
If instead, you prefer to use the SFTP PUT files job, please see details below.
Example: You have configured your Inventory History file to be drop in a specific target directory using Output Interface Configuration.
As you will not be able to get direct access to the Local SFTP folder, you will have to configure this SFTP Get Schedule Job, so Oracle WMS Cloud can drop the file to your assigned folder.

Table SFTP Put Files
| Job Parameter | Required Action from the User |
|---|---|
| Hostname | sftp://clienthost.com |
| SFTP User | your remote SFTP user. In our example: myremotesftp |
| Password | your remote SFTP password. In our example: 567Password! |
| Port | 22 |
| Remote Directory | your remote directory where you want us to get the files from. Please note this is case sensitive, so the schedule job may failed if written incorrectly or if the path does not exist. In our example, the path is: data/Output/InventoryHistory |
| Local Directory | This is the local directory where you want to pick the files from the Oracle WMS Cloud inorder to drop at the customer’s SFTP folder. It is important this is configured correctly as it is case sensitive. Please refer to the SFTP Troubleshooting section for more details. $LGF_FILES_HOME/interfaces/<COMPANY_CODE>/<FACILITY_CODE>/output/ |
| File Search Pattern | This file search pattern selects the specific files to be pick up. It is a mandatory field. In our example:*.csv (if you want to narrow down the files picked up by this job) You could provide: Only one file patter, multiple file patterns separated by a comma, a list of file matching patterns such as *.png or *.jpg separated by a comma. If there is a Folders in the directory to be searched, it will not be transferred. Once files are picked up by this job, they will get deleted from the remote site. Customers are urged to keep a backup copy in a different path, prior to dropping the files into the remote site. |
This job will pick up the files generated in Oracle WMS Cloud, and it will drop them in the path configured in your remote SFTP. The files picked up will be moved to an internal success folder, customers will not have direct access to it. Customers are urged to make additional backups on their side if needed.
Multi-Facility - SFTP PUT Files
Previously, the SFTP PUT files scheduled job supported only one facility. Also, some extra steps like copy files were required if the job had to send multiple files across different interfaces. As a result, the user would need to configure and maintain a large number of scheduled jobs, which could also overload the system.
To enhance ease and use of SFTP PUT, a new type of SFTP PUT Job, "Multi Facility - SFTP Put Files" is now available.
The following screen shows Multi-Facility – SFTP Put Files parameters:
Table Multi-Facility SFTP Put Files
| Job Parameter | Required Action from the User |
|---|---|
| Hostname | Your remote SFTP hostname. For example: sftp://clienthost.com |
| SFTP User | Your remote SFTP user. For example: myremotesftp |
| Password | Your remote SFTP password. For example: 567Password! |
| Port | SFTP Port server. The default port is 22. |
| Remote Directory (Required) | Root folder where the file will be transferred to. At least one folder with an absolute path (/data for e.g.) must be provided. |
| Remote Sub Directory (Optional) | Sub directory under the Remote Directory where the file(s) will be transferred. If left blank, this job will replicate the WMS folder structure on the remote system, starting with each facility. The following are examples:
|
| Interface (Required) | Represents a valid output interface. Attempting to provide an un-supported interface will give a meaningful error with the supported interfaces. Currently, the supported interfaces are:
Note: These are case-sensitive.
|
| File Search Pattern (Required) | Pattern to pick up files from WMS. for example, CINS*.csv or CINS*.
Note: "," comma is NOT supported here. "CINS,IHT*" will not work.
|
| Max files to transfer (Optional) | For one execution of the job maximum number of files to transfer. Leave blank to transfer all files |
| WMS username | User eligible for the COMPANY under which all facilities will be considered for this job. |
SFTP Troubleshooting
- It is important to have read and write permissions checked in your folders in SFTP. Otherwise, the system will not be able to get files or send files to your folder.
- Configuration of the Local Directory is important. This is case sensitive. Please note that if the folder doesn’t exist currently, it will be created. Also, for get SFTP jobs, typically this path will be the same as your existing input interface processing jobs.
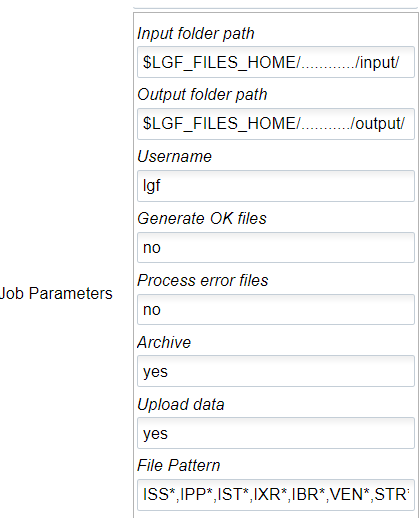
- Set up of Process Input Files: If you are using Local Oracle WMS Cloud SFTP, you currently have this scheduled job set up. If you are setting up the new SFTP GET scheduled job, then you can copy the input folder path (highlighted below) to the Local directory section in SFTP GET scheduled jobs.
-
What is the goal of using SFTP Put files with a target as a LogFire system? Put is intended to transfer files to the client system because they will not have a way to download the file.
-
After a file has been processed it will be returned with a .tmp extension.
Process Input Files
The Process Input Files Job Type allows you to process different input files based on different interface types. For example, if you process an ISS file pattern, this will allow you to process an Inbound Shipment.
- You need to run the SFTP Get schedule job to fetch the required fiels from the clients SFTP folder. Refer SFTP GET Files section.
- Place the acquired files in the internal lgf Home folder.
- To run the Process Inout File:
- Go to the Scheduled Jobs screen, click Create (+).
- Select Process Input Files from the Job Type drop-down and populate all remaining Mandatory fields. Refer to Mandatory Field section for description.
- Configure the respective parameter for the selected Job Parameter – Refer to OWM-ScheduleJob-v1-R21A.xlsx file.
Note: This job does not support XML files. You need to use the API - Init Stage to process any XML files.
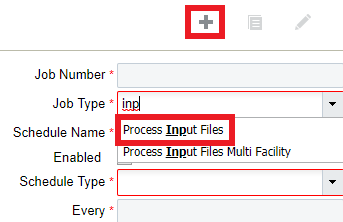
Process Input File - Job Parameter
After you complete all of the required Scheduled Job fields, you need to complete the Job Parameters fields.
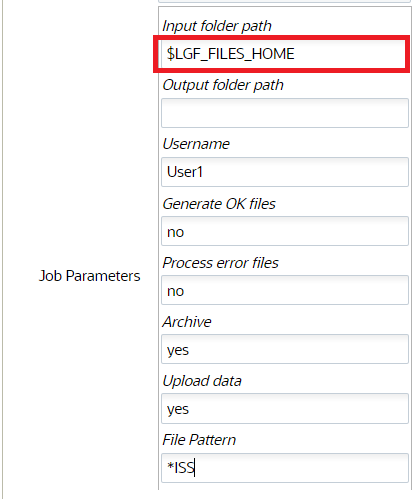
The following are the job parameters for the Process Input Files Job Type:
Table Process Input Job Parameter
| Job Parameter | Required Action from Users |
|---|---|
| Input Folder path | $LGF_FILES_HOME/interfaces/<company_code>/<fac_code>/input/ Replacing <company_code> with the actual company code and the <fac_code> with the actual facility code. |
| Output Folder path | Not required |
| Username | Enter the username that has access to this facility / company |
| Generate .ok files | No |
| Process .error files | No |
| Archive files | Yes |
| Upload data | Yes |
| File Pattern | ISS*,ITM*,IPP*,IST*,IXR*,IBR*,VEN*,STR*,POS*,ORR*,PLI*,ISH* (these are prefixes for the different interfaces types such as POS = Purchase Orders) |
Process Input File - Multi-Facility
In cases where you need to process input files for multiple facilities, you can process Input Files for Multi Facilities via the Scheduled Jobs screen.
This schedule job is useful when you have multiple physical facilities that use Oracle WMS Cloud and you want to avoid creating multiple jobs for each facility.
- Go to the Scheduled Jobs screen, and click Create (+).
- Select Process Input Files Multi Facility from the Job Type drop-down and populate all remaining required fields.
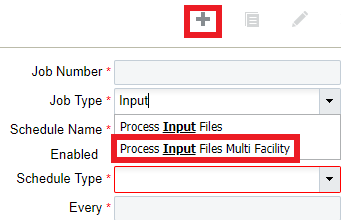 After you complete all of the required Scheduled Job fields for your
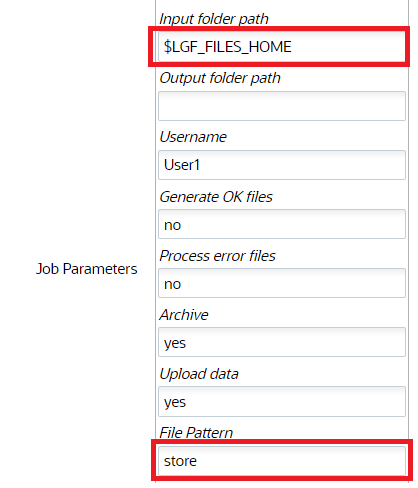
Process Input Files Multi Facility Job Type, complete the Job Parameters fields.The following are the job parameters for the
Process Input Files Multi Facility Job Type:
Table Process Input Files Multi Facility
| Job Parameter | Required Action from the User |
|---|---|
| Input Folder path | $LGF_FILES_HOME/interfaces/<company_code>/<fac_code>/input/ Replacing <company_code> with the actual company code and the <fac_code> with the actual facility code. |
| Output Folder path | Not required |
| Username | Enter the username that has access to this facility / company. |
| Generate .ok files | No |
| Process .error files | No |
| Archive files | Yes |
| Upload data | Yes |
| File Pattern | ISS*,ITM*,IPP*,IST*,IXR*,IBR*,VEN*,STR*,POS*,ORR*,PLI*, ISH* (these are prefixes for the different interfaces types such as POS = Purchase Orders) |
| Facility Group | This field is an optional parameter. If you do not provide a Facility Group, by default, this job uses a common internal folder to process all of the data. If you need to create more than one Process Input Files Multi Facility Job Type, you must provide a text value (with no special characters or spaces.) Ideally, you should add the same value as the path on the input directly. |
If you are specifying a Facility Group, the following are two examples of what your Input folder paths should look like:
Example path:
$LGF_FILES_HOME/interfaces/<COMPANY_CODE>/<FACILITY_CODE>/input/store
Example path:
$LGF_FILES_HOME/interfaces/<COMPANY_CODE>/<FACILITY_CODE>/input/fc
Calculating Storage Billing by Cube for Locations
Typically, on running this schedule job, the system determines the storage volume for each item per location and the corresponding IHT records os written. During the execution, the SJ checks for the inventory to determine all the available location types. Now, in case of volume, the SJ checks for the dimensions for cases/packs first and then units.
Following explains the sequential flow:
- If std case qty is populated for an item, then std case LxWxH is used for computing the volume. The total inventory for the item times standard case LxWxH.
- If std case qty is not populated for an item or any of the item's std case LxWxH is not populated, then items' std pack and pack LxWxH will be used.
- If std pack qty for an item is not populated or any of the item's std pack LxWxH is not populated, then items' unit LxWxH will be used in computing the volume.
- IHT-79 will be written for each item/location combination irrespective of batch/attributes/expiry date. Orig_Qty on the IHT will contain the volume computed above.
To set up the schedule job type, do the following:
- From the Scheduled Jobs screen, click Create (+).
- Select Calculate storage billing by Cube for location from the Job Type drop-down.
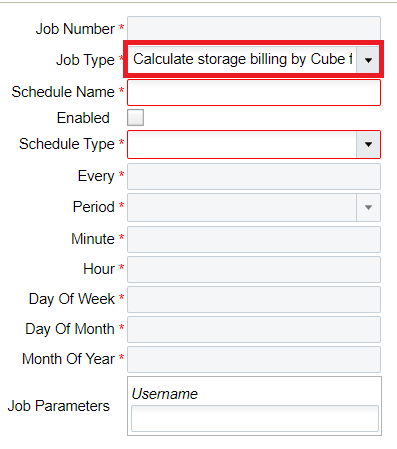
- Populate the required fields and Click Save.
Purge Job Type
You can use this schedule job to delete older records from a selected period of time with status.
There are two types of Purge schedule Job:
- Purge Stage Track Record - Deletes records that are older than a period of time and with status FAILED, PROCESSED, IGNORED or CANCELLED.
- Purge WMS Stage Record - Deletes the records from the wms_activity_track table which are older than a certain period of time and have SUCCESS or ERROR as status.
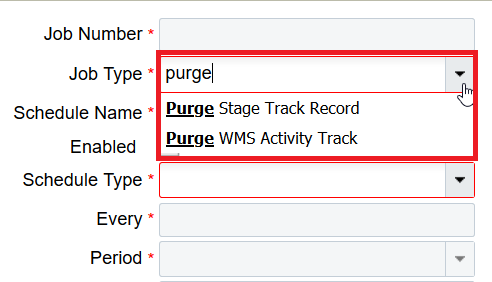
Purge Stage Track Record
To set up the Purge Stage Track Record schedule job type, do the following:
- From the Scheduled Jobs screen, click Create (+).
- Select Purge Stage Track Record Type drop-down.
- Enter the number_of_days job parameter Click Save.
Based on the value you enter in the number of days field, the system determines from which date-time should the records be deleted. That is, the system calculates the date-time based on the following equation:
Calculated Date-Time = Current Date-Time – Number of days.
On completion of deletion, the system writes logs on the total number of records being deleted from stage_track_record table.
Note: Default value of nbr_of_days = 5For example,
You’re current date-time (facility time) = 20-01-2020 and the nbr_of_days =5 days.
The Calculated Date-Time = 15/02/2020 (20/01/2020 – 5 days).
Purge WMS Stage Record
This schedule job calculates the WMS activity track based on the following facility parameter:
- PURGE_NUMBER_OF_DAYS (default value = 30days)
- PURGE_UNKNOWN_SKU (default value =N)
- PURGE_UNKNOWN_USER (default value =N)
- PURGE_UNKNOWN_TRANSACTION (default value =N)
To set up the Purge WMS Stage Record schedule job type, do the following:
- From the Scheduled Jobs screen, click Create (+).
- Select Purge WMS Stage Record Type drop-down.
- Enter the Username and the facility field and Click Save.
- If facility params are set to 'Y', then unknown sku transaction records will be deleted along with success records based on Nbr of days set.
- If facility params are set to 'N', then unknown sku transaction records will not be deleted only success records will be deleted based on Nbr of days set
Based on the PURGE_NUMBER_OF_DAYS determined, the system calculates the Purge_calculated_date from the current date on the following equation:
Purge_calculated_date = Current Date - PURGE_NUMBER_OF_DAYS
If the parameter are set to Y, then the system behaves as follows:
- If PURGE_UNKNOWN_SKU = ‘Y’, all the records with date in create_ts older than the calculated Purge_till_date and with status ERROR, then unknown_sku_line_name that is not NULL is selected and deleted. While deleting the records, its corresponding records in the tran_wms_activity_xref table are deleted.
- If PURGE_UNKNOWN_USER = ‘Y’, all the records with date in create_ts older than the calculated Purge_till_date and status ERROR, then unknown_wms_user is not NULL is selected and deleted. While deleting the records its corresponding records in the tran_wms_activity_xref table are deleted.
- If PURGE_UNKNOWN_TRANSACTION = ‘Y’, all the records with date in create_ts older than the calculated Purge_till_date and status ERROR, then unknown_sub_option_name is not NULL is selected and deleted. While deleting the records its corresponding records in the tran_wms_activity_xref table are deleted.
After completion of all the above deletion procedure, all the records with date in create_ts (column in wms_activity_track table) older than the calculated Purge_till_date and status SUCCESS (with stat_code = 11) are selected and deleted. While deleting the records its corresponding records in the tran_wms_activity_xref table are deleted.
After every deletion, the system writes logs on the total number of records being deleted from wms_activity_track table for each part.
Auto-Verify IB Shipment
Auto-Verify IB Shipment will mark shipments that are received and due for verification for a specified duration (or 72 hours from the last LPN received time) as verified depending on the configuration of the scheduled job. Auto-Verify IB Shipment will not only mark shipments as verified, it will also generate the shipment verification output file. This is beneficial because you don't have to verify the shipmentyou are not interested in tracking the shipment.
To set up the Auto-verify IB Shipemt schedule job type, do the following:
- From the Scheduled Jobs screen, click Create.
- Select Auto-Verify IB Shipemt Type drop-down and and populate all remaining required fields.
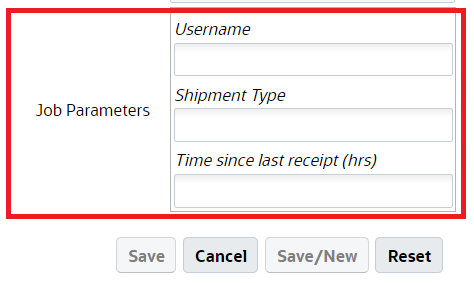
- Enter the following fields:
- Username: Enter the valid username (Login) in WMS should be provided.
- Shipment Type: This is a mandatory field. When the job is run, all IB Shipments that have matching Shipment Type and fulfill other criteria for verification will be considered. You can provide one or more shipment types with comma(,) as the delimiter.
Note:
- If no values are entered and you attempt to save the job, the system errors out.
- Asterisk [*] is not an accepted value for 'Shipment Type' field on the job parameter. You will have to provide the shipment type values explicitly. On saving the schedule job with Asterisk [*] shipment type will display an error message.
- Shipments without a shipment type will not be considered by this schedule job.
- Time since last receipt (hrs): The field indicates the time elapsed since the last LPN was received for the IB Shipment. This field accepts decimal values. If no value is provided, the system will consider 72 hrs as default duration.
Note: When configuring lesser values, make sure to provide the right shipment type and time since last shipment, otherwise the system could update the status while receiving is still in process.
NOTE: Shipments with Receiving Started and Receiving Complete status are eligible for verification. Also, shipments will not be verified if they have QC pending LPNs even if the shipments match the job parameter criteria for auto-verify through the scheduler.
- Click Save