WFM RF Clock Views
WFM offers multiple RF options for users to clock into and out of various entities while operating on the warehouse floor. The user logged into RF handheld is called the clocker. The clocker could either clock oneself or clock other users.
RF CICO
Module: RF-Text: CICO (wfm)
In general, this RF screen provides options for clocking users in facility and work area and also inquire about users. Depending on the role of the user that has logged into RF handheld device, the options presented on selecting this RF screen varies as shown in pictures below:
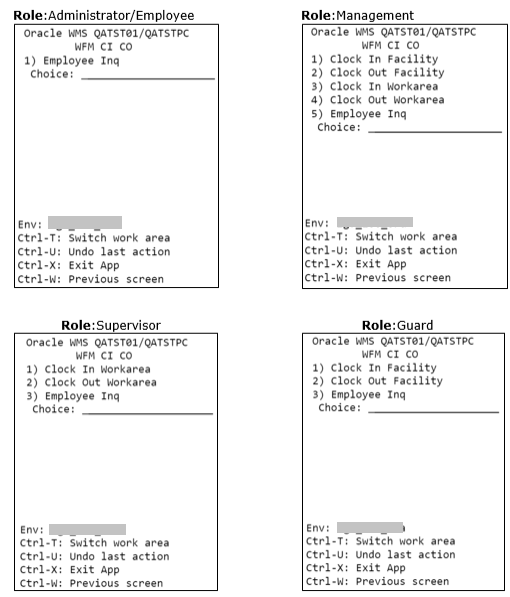
To summarize, only a user with Management role has access to all the options on this screen. A user with Guard role can only clock users at a facility level. A user with supervisor role can only clock users at a work area level. A user with Administrator or Employee role do not have the option to clock users either at the facility or the work area level. All users (regardless of role) have the option of inquiring about other users using the option Employee Inq.
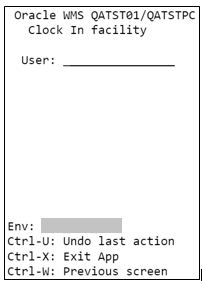
Choosing any of the Clock In/Out options, presents you with the next screen where the user id has to be keyed in. As an example, if the “Clock In Facility” option is selected, the following screen shows up. Here the login id of the user that needs to be clocked into facility is keyed in.
Unlike Clock View in the browser, RF does not provide options for Facilities or Work Area. Instead, the user is clocked into the Facility/Work Area that is marked as a default for the user.
Also, to clock a user into a Work Area, the clocker (logged in user) needs to have the same default Work Area as the user. If the clocker does not have the same default Work Area as the user being clocked in, the following error is encountered.

Ctrl-U: This control key can be used to undo the last action. For example, if a particular user was clocked into facility, hitting Ctrl-U button would mark the user as not clocked into facility.
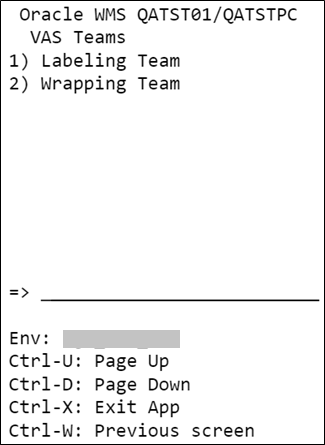
RF VAS
Module: RF-Text: VAS (wfm)
This RF screen provides options to clock users (or a Team) in a VAS activity. Regardless of the role of the logged in user, the following options are presented on selecting this RF screen:
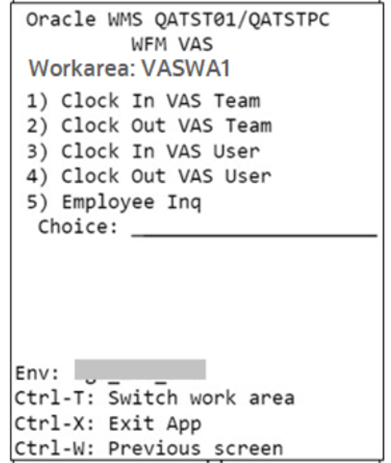
The default work area of the logged in user (clocker) is also displayed on this screen. If the clocker needs to clock a user or team into activities of a different work area, Ctrl+T can be used to switch work area and the selected work area is displayed on the screen.
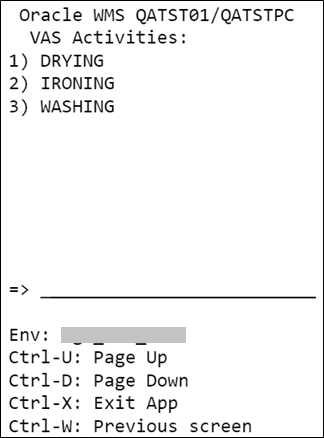
On selecting “Clock In Vas Team” or “Clock In Vas User”, all the VAS activities that have been configured in the selected Work Area are displayed in the next screen.
After selecting an activity, the logged in user is taken to the next screen, which shows all the Teams that are eligible to operate in this Work Area.
After selecting a team, the next screen varies, depending on the choice made on first screen. If “Clock In Vas Team” was selected, logged in user needs to confirm if the selected team can be clocked in. If “Clock In Vas User” was selected, the logged in user is prompted to enter the id of the user that needs to be clocked in.
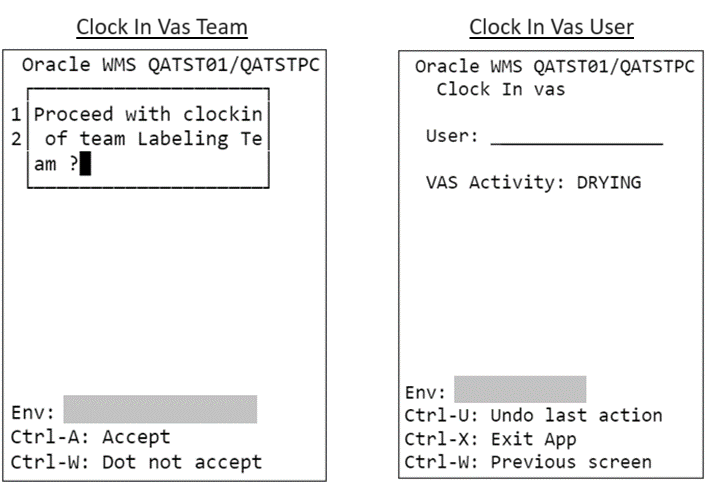
Clocking in a team, clocks all the users of that team into the VAS activity.
If the clock out options are selected on main screen, the logged in user is prompted to enter either the id of the user or the team that needs to be clocked out. Clocking out a team, clocks out all the users of the team from that VAS activity. The team or user is clocked out from the last clocked in VAS activity.
RF Manual
Module: RF-Text: MANUAL (wfm)
This RF screen provides options to clock users in a Manual activity. Regardless of the role of the logged in user, the following options are presented on selecting this RF screen:
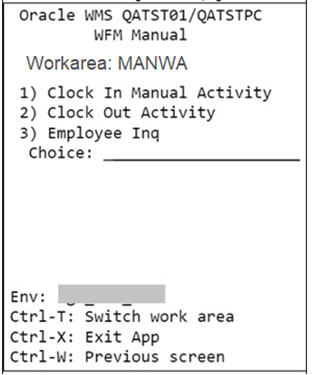
The default workarea of the logged in user (clocker) is also displayed on this screen. If the clocker needs to clock a user or team into activities of a different work area, Ctrl+T can be used to switch work area and the selected work area is displayed on the screen.
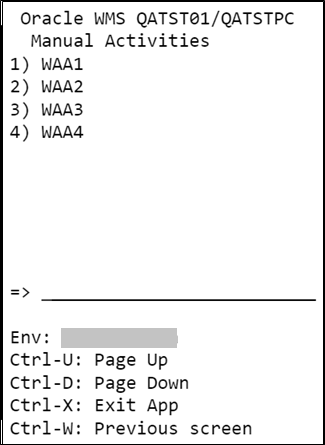
On selecting “Clock In Manual Activity”, all the manual activities that have been configured in the selected Work Area are displayed in the next screen.
After selecting an activity, on the next screen, the logged in user is prompted to enter the id of the user that needs to be clocked in.
On selecting “Clock Out Activity” on the main screen, the logged in user is prompted to enter the id of the user that needs to be clocked out. The user is clocked out from the last clocked in manual activity.
RF Break CI
Module: RF-Text: Break CI (wfm)
This RF screen can be used for clocking in users into a break. Regardless of the role of the logged in user, the following options are presented on selecting this RF screen:

After selecting a break option, on the next screen the logged in user is prompted to enter the id of the user that needs to be clocked into the selected break.
RF Break CO
Module: RF-Text: Break CO (wfm)
This RF screen can be used for clocking out users from a break. Regardless of the role of the logged in user, the logged in user is prompted to enter the id of the user that needs to be clocked out.
The user is clocked out from the last clocked in break.
RF VAS or CICO
Module: RF-Text: VAS or CICO (wfm)
This RF screen acts as a one-stop screen that provides all the options that have been described in indvidual RF screens above. Regardless of the role of the logged in user, the following options are presented on selecting this screen.
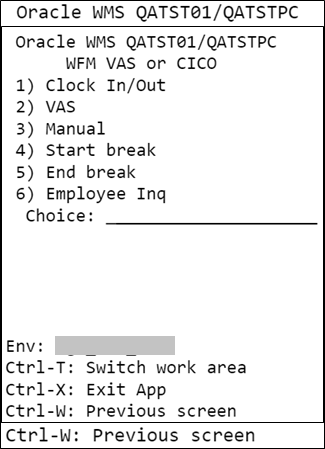
- Clock In/Out: Choosing this option takes you through the same screenflow as RF Cico.
- VAS: Choosing this option takes you through the same screenflow as RF VAS.
- Manual: Choosing this option takes you through the same screenflow as RF Manual.
- Start Break: Choosing this option takes you through the same screenflow as RF Break Cl.
- End Break: Choosing this option takes you through the same screenflow as RF Break CO.
- Employee Inq: Choosing this option takes you through the same screenflow as RF Employee Inq.
RF Employee Inq
Module: RF-Text: Employee Inq (wfm)
This RF screen does not provide any clock options but can be used to inquire about any user. The first screen prompts for a user and on keying in the id of a user, the last clock information about the user is displayed.
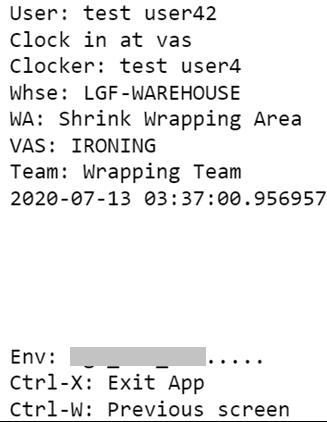
For example, in the screenshot above, the logged in user has requested information about test user42. The Employee Inq screen shows that the test user42 was last clocked into the “IRONING” VAS Activity by clocker test user 4 on July 13th at 03:37 am.
Note: Employee Inq is also available as an option in all other clock RF screens except the Break RF screens.
RF CICO User
Module: RF-Text: CiCo User - WFM (wfm)
This RF screen can be used for clocking into facilities and work areas. Unlike other RF clock screens that allow clocking other users, this RF screen supports only self-clocking. The logged in user is not prompted to enter any user id. Instead, on choosing any option on this screen, the logged in user is clocked into the chosen entity.
This screen can be used by any user regardless of their ROLE, as long it has been added to the user’s RF menu. On selecting this screen in RF, the following options are presented to the user:
- Clock in facility
- Clock out facility
- Clock in Work Area
- Clock out Work Area
The "Current Facility" and "Current Work Area" will always show the current clocked in facility and work area for the logged in user. An empty value in these fields indicates that the user is not clocked into these entities.
The following table describes the actions for each selection:
| Menu Option | Action |
|---|---|
| 1 - Clock in facility |
|
| 2 - Clock out facility |
|
| 3 - Clock in Work Area |
|
| 4 - Clock out Work Area |
|