Add a Replicat for Google Cloud Spanner
Learn about the configurations required before adding a Replicat for Google Cloud Spanner in an Oracle GoldenGate deployment and the steps to add a Replicat.
Before Adding a Replicat
You need to configure a database connection to Google Cloud, set up the Checkpoint table, and establish a database connection to Google Cloud before you begin adding a Replicat. Optionally, you can also create the heartbeat table.
Also, make sure to go through the list of supported data types, objects and operations. For details, see Google Spanner: Supported Data Types, Objects and Operations.
Learn how to configure Google Cloud for Oracle GoldenGate Replicat.
Authenticate Connection to Google Cloud Using IAM
Google Spanner is a fully managed, cloud-native distributed database. For Oracle GoldenGate Replicat for Google Spanner, passwordless authentication is implemented.
Authentication in Google Cloud Spanner is fundamentally different from traditional relational databases like MySQL, PostgreSQL, or SQL Server because it is not a standalone database server that is logged into directly.
Spanner uses Google Cloud IAM (Identity and Access Management) and authentication happens at the cloud platform level, not inside Google Spanner.
Following are the steps for authenticating a connection to Google Cloud through IAM:
-
User application is authenticated to Google Cloud using service account credentials in the JSON file.
Service account needs to have
roles/Spanner.databaseUser,roles/spanner.databaseAdminroles. -
Download the credentials file:
-
Log in to your Google account at
cloud.google.com. -
Click Console, and then to go to the Dashboard where you can select your project.
-
From the navigation menu, click APIs & Services then select Credentials.
-
From the Create Credentials menu, choose Service account key.
-
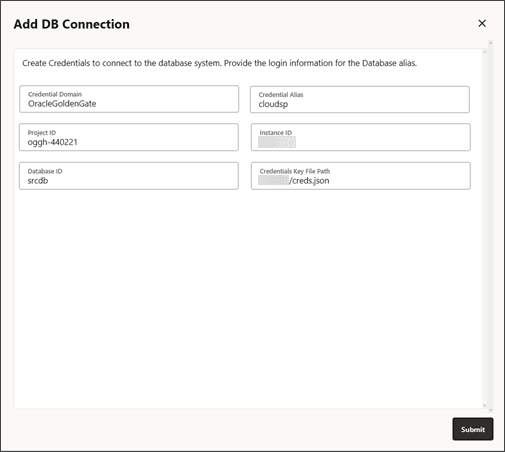
Choose the JSON key type to download the JSON credentials file for your system. This JSON credential file should be provided as input while adding the database connection in the web interface.
Spanner supports only the
https_proxyand does not support thehttp_proxy. If you connect to Spanner behind a proxy server, thenhttps_proxymust be set andhttp_servermust not be set. Thehttps_proxycan be set in the environment variable for configuration of the Service Manager. -
Add a Database Connection, Checkpoint Table, and Heartbeat Table
The process to add a Replicat for Google Cloud Spanner is the same as adding any Replicat. Set up the following configurations before you begin adding a Replicat:
- Add a database connection.
-
Connect to the database after creating the Database alias to ensure that the connection is successful. After the database connects, you can add the checkpoint table.
-
Click the plus sign next to Checkpoint to open the Add Checkpoint screen and specify the checkpoint table name in the
schema.table_nameformat.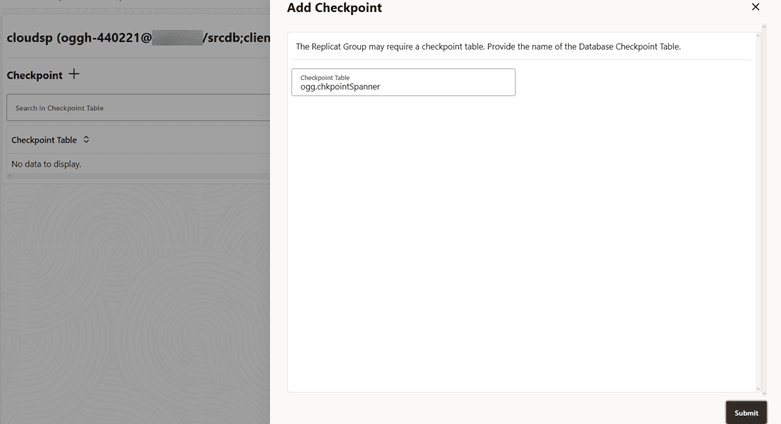
-
Click Submit. The checkpoint table is added.
-
In the left-navigation pane under the connected database, check the heartbeat table. The heartbeat table is enabled to check heartbeat lag.

Add a Replicat for Google Spanner
Before you start adding a Replicat, make sure that you have set up the database connections and created the checkpoint table. See Add a Database Connection, Checkpoint Table, and Heartbeat Table for details.
Use the following steps to create a classic or coordinated Replicat for Google Spanner:
-
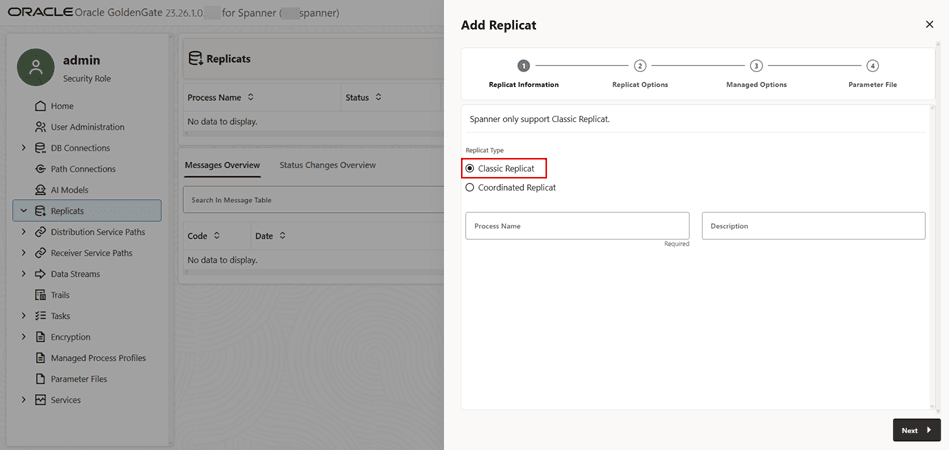
Open the Add Replicat wizard and select Classic Replicat for Spanner.
-
Specify the Replicat name and click Next.
-
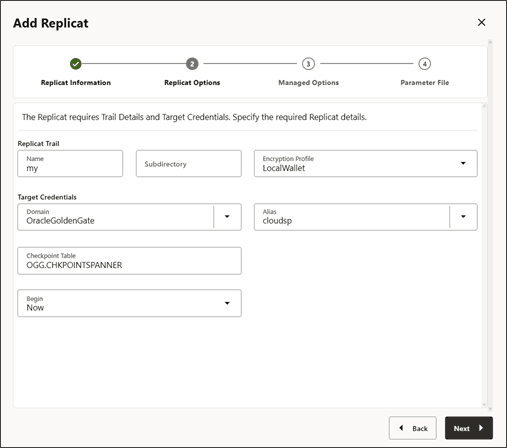
Specify the Replicat Options such as the trail name, target credentials, and checkpoint table name.
-
On the Parameter File screen, specify the
MAPandTARGETdetails and clickCreate and Run. This would create the Spanner Replicat.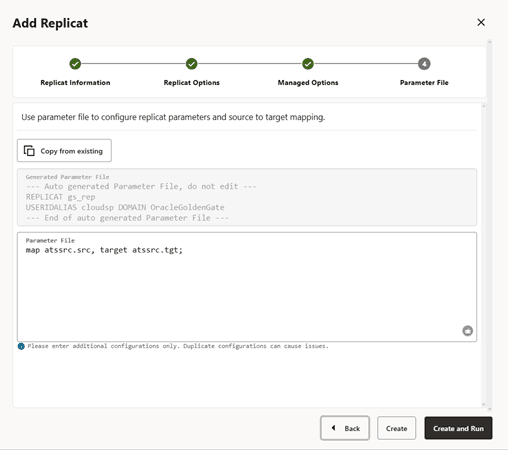
Note: If unqualified table name is used in the MAP statement of Replicat parameter, the schema name is taken from GGSCHEMA specified in the GLOBALS file. If GGSCHEMA is not defined in the GLOBALS parameter, then the default (unnamed) schema is used for the replication.
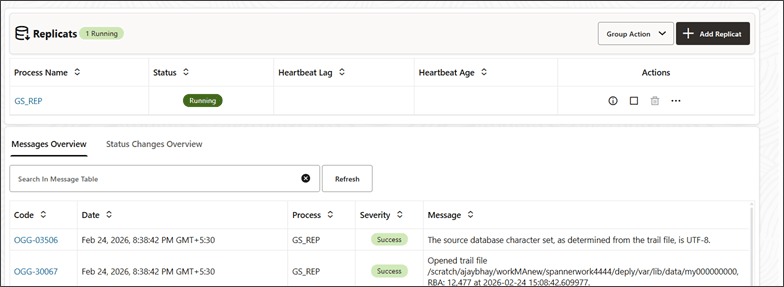
If all the specifications are correctly configured, the Replicat runs successfully.
Add a Replicat Using the Admin Client
Before you start adding a Replicat, make sure that you have set up the database connections and created the checkpointtable and heartbeattable. See Add a Database Connection, Checkpoint Table, and Heartbeat Table for details.
Use the following steps to create a classic or coordinated Replicat for Google Spanner from Admin Client:
-
Connect to the deployment from the Admin Client prompt.
-
Run the following command to create a database connection:
ALTER CREDENTIALSTORE ADD USER "oggh-440221@xxxxxx/srcdb;client_secrets=/scratch/creds.json" nopassword alias spanner -
Connect to the database credential that you created in the preceding step:
DBLOGIN USERIDALIAS spanner -
Run the commnad to add the Replicat:
ADD REPLICAT nrep, classic, EXTTRAIL ea, checkpointtable ggadmin.ckpt1The output confirms if the Replicat is added successfully.
-
You can add other parameters for the Replicat in the Replicat parameter file using the
EDIT PARAMScommand.EDIT PARAMS nrepSpecify the required parameters in the Replicat parameter file. Following is a sample Replicat parameter file:
DDL EXCLUDE ALL DDLERROR default discard REPERROR (default,discard) DDLOPTIONS REPORT SOURCECATALOG spanner MAP hr.*, TARGET hr.*; -
Start the Replicat and make sure it runs successfully.
START REPLICAT nrep### Additional References {#GUID-C737B199-8182-47BC-986C-088BC1171863}
See Handling Transient and Permanent Errors in Replicat for Google Spanner to learn about handling errors in Replicat for Google Cloud Spanner.