Task 2: Configure the Oracle GoldenGate Environment
Perform the following steps to complete this task:
-
Step 2.1 - Access the GoldenGate deployment
-
Step 2.2 - Create the Database Credentials
-
Step 2.3 - Create Autostart profiles
-
Step 2.4 - Configure Oracle GoldenGate processes
Step 2.1: Access the deployment
To access the deployment:
-
If the client subnet is public, you can access the nodes using the VIP address and SSH tunnel. You must create an SSH tunnel with the VIP DNS Name on both the primary and standby clusters using the following command on all nodes:
ssh -N -L <local_port>:<vip-dns-name>:443 -p 22 <gghub-node>The
local_portcan be any available port on the local system. Thegghub-nodeis the name of the cluster to which the tunnel is configured.Oracle recommends that you manage GoldenGate using the primary and standby VIP DNS names as follows:
-
Primary VIP DNS Name:
<cluster-prefix>1.ggoraclevcn.com -
Standby VIP DNS Name:
<cluster-prefix>2.ggoraclevcn.com
You can then access the deployment with your web browser using
https://localhost:<local_port> -
-
If the client subnet is private,
-
You must create a Bastion to the client subnet with the following values:
-
Target VCN: Select your VCN
-
Target subnet: Client subnet name
-
CIDR block allowlist: Enter or select the IP addresses or address ranges to allow connections to target resources using SSH sessions.
-
-
Create an SSH Port Forwarding session using the primary VIP address and standby VIP address with port 443. Learn more about creating Port Forwarding sessions.
-
From the session’s Actions menu (three dots), select View SSH command and select Copy.
-
Run the SSH command, ensuring that you replace
<privateKey>with the local private key path and443for<localPort>. Learn more about connecting to a Port Forwarding session -
You can then access the deployment with your web browser using
https://localhost.
-
Step 2.2: Create database credentials
Use the Oracle GoldenGate Microservices UI to create the database credentials using the above TNS alias names. As the oggadmin user, add the database credentials:
-
Log in into the Oracle GoldenGate Administration Service:
https://localhost:<localPort>/services/<deployment_name>/adminsrvr/v2/content/. -
In the left navigation menu, select DB Connections.
-
On the DB Connections page, select Add DB Connection (plus icon).
-
Add the required information for each source and target CDB and PDB:
Region Container Domain Alias User ID Region 1 CDB GoldenGate Reg1_CDB c##ggadmin@ Region 1 PDB GoldenGate Reg1_PDB ggadmin@ Region 2 CDB GoldenGate Reg2_CDB c##ggadmin@ Region 2 PDB GoldenGate Reg2_PDB ggadmin@
Step 2.3: Create Autostart profiles
Create a profile that automatically starts the Extract and Replicat processes when the Oracle GoldenGate Administration Server starts, and restarts if any Extract or Replicat processes are abandoned. In GoldenGate Microservices, profiles manage auto start and restart.
Using the Oracle GoldenGate Administration Server UI, create a profile to assign to each Oracle GoldenGate process:
-
Log in to the GoldenGate WebUI for the Source GoldenGate deployment.
-
In the navigation menu, select Managed Process Profiles.
-
Select Add Profile on the Managed Process Settings page.
-
Enter the details as follows:
-
Profile Name: Start_Default
-
Description: Default auto-start/resteart profile
-
Default Profile: Yes
-
Auto Start: Yes
-
Auto Start Options
-
Startup Delay: 1 min
-
Auto Restart: Yes
-
-
Auto Restart Options
-
Max Retries: 5
-
Retry Delay: 30 sec
-
Retries Window: 30 min
-
Restart on Failure only: Yes
-
Disable Task After Retries Exhausted: Yes
-
-
-
Select Submit
-
Repeat these steps on the Target GoldenGate deployment.
Step 2.4: Configure Oracle GoldenGate processes
When creating Extract, Distribution Paths, and Replicat processes with Oracle GoldenGate Microservices Architecture, all files that need to be shared between the GGHub nodes are already shared with the deployment files stored on a shared file system.
The following, are the essential configuration details recommended for running Oracle GoldenGate Microservices on GGhub for Extract, Distribution Paths, and Replicat processes.
Perform the following sub-steps to complete this step:
-
Step 2.5.1 - Extract configuration
-
Step 2.5.2 - Replicat configuration
-
Step 2.5.3 - Distribution Path configuration
Step 2.5.1: Extract configuration
When creating an Extract using the Oracle GoldenGate Administration Service interface, leave the Trail Subdirectory parameter blank so that the trail files are automatically created in the deployment directories stored on the shared file system. The default location for trail files is the /<deployment directory>/var/lib/data directory.
Note: To capture from a multitenant database, you must use an Extract configured at the root level using a c## account. To apply data into a multitenant database, a separate Replicat is needed for each PDB because a Replicat connects at the PDB level and doesn’t have access to objects outside of that PDB.
For GoldenGate Extract processes using Data Guard configurations that are using redo transport Maximum Performance or Maximum Availability modes, the following parameter must be added to the Extract process parameter file on the primary systemto avoid losing transactions and resulting in logical data inconsistencies:
TRANLOGOPTIONS HANDLEDLFAILOVERThis parameter prevents Extract from extracting transaction data from redo that has not yet been applied to the Data Guard standby database. This is crucial to preventing Oracle GoldenGate from replicating data to a target database that does not exist in the source standby database.
If this parameter is not specified, after a data loss failover of the source database it is possible to have data in the target database that is not present in the source database, leading to logical data inconsistencies.
By default, after 60 seconds, a warning message will be written to the Extract report file when the Extract is stalled due to not being able to query the standby database applied SCN information. For example:
WARNING OGG-02721 Extract has been waiting for the standby database for 60 seconds.The amount of time before the warning message is written to Extract report file can be adjusted using the Extract parameter “TRANLOGOPTIONS HANDLEDLFAILOVER STANDBY_WARNING”.
If the Extract is still not able to query the standby database applied SCN information after 30 minutes (default), the Extract process will abend, logging the following message in the Extract report file:
ERROR   OGG-02722  Extract abended waiting for 1,800 seconds for the
    standby database to be accessible or caught up with the primary database.
If the standby database becomes available before the default 30 timeout expires, Extract continues mining data from the source database and reports the following message to the report file:
INFO OGG-02723 Extract resumed from stalled state and started processing LCRs.The timeout value of 30 minutes can be adjusted using the Extract parameter “TRANLOGOPTIONS HANDLEDLFAILOVER STANDBY_ABEND
If the standby database will be unavailable for a prolonged duration, such as during a planned maintenance outage, and you wish Extract to continue extracting data from the primary database, remove the “TRANLOGOPTIONS HANDLEDLFAILOVER” parameter from the Extract parameter file and restart Extract (see example below in Figures 4 to 6). Remember to set the parameter after the standby becomes available.
Note: If extracting from a primary database continues while the standby is unavailable, a data loss failover could result after the standby becomes available, and not all the primary redo was applied before a failover. The GoldenGate target database will contain data that does not exist in the source database.
If the Extract process has been assigned an auto restart profile, after a Data Guard role transition, the Extract process will automatically restart. Extract will continue to mine redo data from the new primary database, ignoring the current state of the new standby database, until a default 5-minute timeout period expires. After this time, if the standby is not available Extract will abend with the following errors:
INFO    OGG-25053  Timeout waiting for 300 seconds for standby database
 reinstatement. Now enforcing HANDLEDLFAILOVER.
ERROR   OGG-06219  Unable to extract data from the Logmining server OGG$CAP_XXXXX.
ERROR   OGG-02078  Extract encountered a fatal error in a processing thread and is
 abending.
Extract will continue to automatically restart, based on the GoldenGate Microservices auto restart profile, and failing due to reaching the HANDLEDLFAILOVER timeout, until the number retries is reached or the new standby database becomes available.
During the timeout period following a database role transition, the HANDLEDLFAILOVER parameter is automatically suspended, so data will be replicated to the Oracle GoldenGate replica database without consideration of the source standby database not being kept up to date. The timeout period for the standby database to start up before Extract abends can be adjusted using the Extract parameter TRANLOGOPTIONS DLFAILOVER_TIMEOUT.
It is recommended that you leave DLFAILOVER_TIMEOUT at the default of 5 minutes, to allow the old primary to convert to a standby. If the new standby database will be unavailable for an extended period of time or completely gone, then in order for Extract to start and remain running, you must remove the HANDLEDLFAILOVER parameter from the Extract parameter file. After removing the parameter, Extract no longer waits until redo has been applied to the standby database before extracting the data.
During the time it takes for the standby database to come back online and apply all the redo from the primary database, there will be data divergence between it and the Oracle GoldenGate replica database. This will be resolved once the standby database is up to date. At which point, add the HANDLEDLFAILOVER parameter back into the integrated Extract process parameter file, and then stop and restart the Extract.
When Oracle Data Guard Fast-Start Failover is disabled, such that the broker can automatically fail over to a standby database in the event of loss of the primary database, you must specify an additional integrated Extract parameter shown below.
TRANLOGOPTIONS FAILOVERTARGETDESTID nThis parameter identifies which standby database the Oracle GoldenGate Extract process must remain behind, with regards to not extracting redo data that has not yet been applied to the standby database.
If Oracle Data Guard Fast-Start Failover is disabled, and you don’t specify the additional integrated Extract parameter FAILOVERTARGETDESTID, the extract will abend with the following errors:
ERROR OGG-06219 Unable to extract data from the Logmining server OGG$CAP_XXXXX.
ERROR OGG-02078 Extract encountered a fatal error in a processing thread and is abending.
To determine the correct value for FAILOVERTARGETDESTID, use the LOG_ARCHIVE_DEST_N parameter from the GoldenGate source database which is used for sending redo to the source standby database. For example, if LOG_ARCHIVE_DEST_2 points to the standby database, then use a value of 2.
As the oracle user on the primary database system, execute the following command:
[opc@exapri-node1 ~]$ sudo su - oracle
[oracle@exapri-node1 ~]$ source <db_name>.env
[oracle@exapri-node1 ~]$ sqlplus / as sysdba

SQL> show parameters log_archive_dest

NAME                  TYPE        VALUE
--------------------- ----------- ---------------------------------------------------
log_archive_dest_1    string      location=USE_DB_RECOVERY_FILE_DEST,
                                  valid_for=(ALL_LOGFILES, ALL_ROLES)

log_archive_dest_2    string      service="<db_name>", SYNC AFFIRM delay=0
                                  optional compression=disable max_failure=0 reopen=300
                                  db_unique_name="<db_name>" net_timeout=30,
                                  valid_for=(online_logfile,all_roles)
In this example, the Extract parameter would be set to the following:
TRANLOGOPTIONS FAILOVERTARGETDESTID 2Create the Extract:
-
Log in to the source Oracle GoldenGate.
-
In the navigation menu, select Extracts.
-
On the Extracts page, select Add Extract.
-
Complete the Add Extract form as follows:
-
For Extract Information:
-
Extract type: Integrated Extract.
-
Process Name: EXT_1
-
Description: Extract for Region 1 CDB
-
-
For Extract Options:
-
Credential Domain: GoldenGate
-
Credential Alias: Reg1_CDB
-
Register to PDBs: PDB Name
-
Intent: Unidirectional
-
Begin: Now
-
Trail Name: aa
-
-
-
Select Next
-
If using CDB Root Capture from PDB, add the
SOURCECATALOGparameter with the PDB Name -
Select Create and Run
Step 2.5.2 - Replicat configuration
Oracle generally recommends using integrated parallel Replicat which offers better apply performance for most workloads when the GGHUB is in the same region as the target Oracle GoldenGate database.
The best apply performance can be achieved when the network latency between the GGHUB and the target database is as low as possible. The following configuration is recommended for the remote Replicat running on the Oracle GGHUB.
-
APPLY_PARALLELISM– Disables automatic parallelism, instead of usingMAX_APPLY_PARALLELISMandMIN_APPLY_PARALLELISM, and allows the highest amount of concurrency to the target database. It is recommended to set this as high as possible based on available CPU of the hub and the target database server. -
MAP_PARALLELISM– Should be set with a value of 2 to 5. With a larger number of appliers, increasing the Mappers increases the ability to hand work to the appliers. -
BATCHSQL– applies DML using array processing which reduces the amount network overheads with a higher latency network. Be aware that if there are many data conflicts,BATCHSQLresults in reduced performance, as rollback of the batch operations followed by a re-read from trail file to apply in non-batch mode.
Step 2.5.2.1 - Create the Checkpoint Table
The checkpoint table is a required component for Oracle GoldenGate Replicat processes. After connecting to the database from the Credentials page of the Administration Service, you can create the checkpoint table.
Create the checkpoint table in the target deployment:
-
Log in to the Oracle GoldenGate Web UI.
-
In the navigation menu, select DB Connections, then connect to the target database.
-
After successfully connecting to the target database, select Checkpoint Table.
-
Select Add Checkpoint (plus icon). The Add Checkpoint page is displayed.
-
For Checkpoint Table, enter
ggadmin.chkp_table. -
Select Submit
Refer to Add a Checkpoint Table.
Step 2.5.2.2 - Add a Replicat
After you’ve set up your database connections and verified them, you can add a Replicat for the deployment by following these steps:
-
In the navigation menu, select Replicats.
-
On the Replicats page, select Add Replicat (plus icon). The Add Replicat page is displayed.
-
Select a Replicat type and select Next.
-
Enter the details as follows:
-
Process Name: REP_1
-
Description: Replicat for Region 2 PDB
-
Intent: Unidirectional
-
Credential Domain: GoldenGate
-
Credential Alias: Reg2_PDB
-
Source: Trail
-
Trail Name: aa
-
Begin: Position in Log
-
Checkpoint Table: “GGADMIN”.”CHKP_TABLE”
-
-
Select Next
-
From the Action Menu, select Start.
Step 2.5.3 - Distribution Path configuration
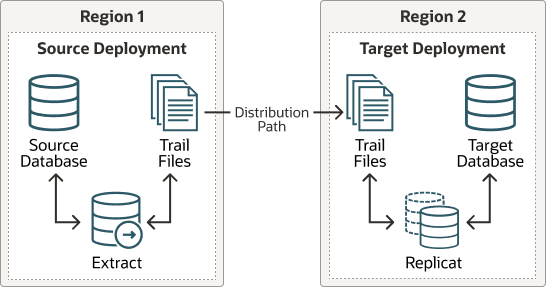
Distribution paths are only necessary when trail files need to be sent to an additional Oracle GoldenGate Hub in a different, or even the same, region as described in the following figure.
Figure 1: Oracle GoldenGate Distribution Path
When using Oracle GoldenGate Distribution paths with the NGINX Reverse Proxy, additional steps must be carried out to ensure the path client and server certificates are configured.
For more information, see Distribution Service Path. A step-by-step example is in the following video, “Connect an on-premises Oracle GoldenGate to OCI GoldenGate using NGINX,” to correctly configure the certificates.
Here are the steps performed in this sub-step:
-
Step 2.5.3.1 - Download the Target Server’s Root Certificate, and then upload it to the source Oracle GoldenGate
-
Step 2.5.3.2 - Create a user in the Target Deployment for the Source Oracle GoldenGate to use
-
Step 2.5.3.3 - Create a Credential in the Source Oracle GoldenGate
-
Step 2.5.3.4 - Create a Distribution Path on the Source Oracle GoldenGate to the Target Deployment
-
Step 2.5.3.5 - Verify the Connection in the Target Deployment Console Receiver Service
Step 2.5.3.1 - Download the Target Server’s Root Certificate, and then upload it to the source Oracle GoldenGate
Download the target deployment server’s root certificate and add the CA certificate to the source deployment Service Manager.
-
Log in to the GoldenGate Web UI for the Target GoldenGate.
-
Follow “Step 2 - Download the target server’s root certificate” in the video, Connect an on-premises Oracle GoldenGate to OCI GoldenGate using NGINX.
Step 2.5.3.2 - Create a user in the Target Deployment for the Source Oracle GoldenGate to use
-
In the target GoldenGate Web UI, select User Administration from the left navigation.
-
Select Add New User, and then complete the following:
-
Authenticated By: Select Password from the dropdown.
-
Role: Select Operator from the dropdown.
-
Username: Enter your username.
-
Password and Verify Password: Enter the password associated with this user.
-
-
Select Submit.
Step 2.5.3.3 - Create a Path Connection in the Source Oracle GoldenGate
Create a Path Connection in the source deployment connecting the target deployment with the user created in the previous step. For example, a domain of OP2C and an alias of WSSNET.
-
Log in to the source Oracle GoldenGate.
-
In the navigation menu, select Path Connections.
-
On the Path Connections page, select Add Path Connection, and then complete the following:
-
Credential Alias: Enter an alias.
-
User ID: Enter the name of the user created in step 2.5.3.2.
-
Password and Verify Password: Enter the password associated with this user from step 2.5.3.2.
-
-
Select Submit.
Step 2.5.3.4 - Create a Distribution Path on the Source Oracle GoldenGate to the Target Deployment
A path is created to send trail files from the Distribution Server to the Receiver Server. You can create a path from the Distribution Service. To add a path for the source deployment:
-
In the source Oracle GoldenGate, select Distribution Service Paths from the navigation menu.
-
Select Add Path (plus icon). The Add Path page is displayed.
-
Enter the details as follows:
-
Enter a Path Name.
-
For Source, select the Extract name from the drop-down.
-
For Generated Source URI, enter
localhostfor the server’s name. This enables the distribution path to start from on any of the Oracle RAC nodes. -
For Target Authentication Method, select UserID Alias.
-
For Target, select wss (secure web socket).
-
For Target Host, enter the target hostname/VIP to use for connecting to the target system.
-
For Port Number, enter the port number that NGINX was configured with (default is 443).
-
For Domain, select the credential domain created in Step 2.3.3.3.
-
For Alias select the credential alias wssnet, also created in Step 2.3.3.3.
-
For Auto Restart Options, set the distribution path to restart when the Distribution Server starts automatically. This is required, so that manual intervention is not required after a RAC node relocation of the Distribution Server.
-
For Retries enter 10.
-
For Delay, which is the time in minutes to pause between restart attempts, to enter 1.
-
-
Select Create Path.
-
From the Action Menu, select Start.