Configure Jira
Configure Jira access so Agent Builder workflows can read, create, update, and search Jira issues within approved limits.
Before You Begin
Sign in to Agent Factory as an administrator. Obtain a Jira Personal Access Token (PAT) with only the permissions required by your workflows.
The default shared-PAT policy is read-only. No projects or fields are available until you configure them.
Configure Jira Access
-
In the left navigation menu, select Application Settings.
-
Select the Jira config tab.
-
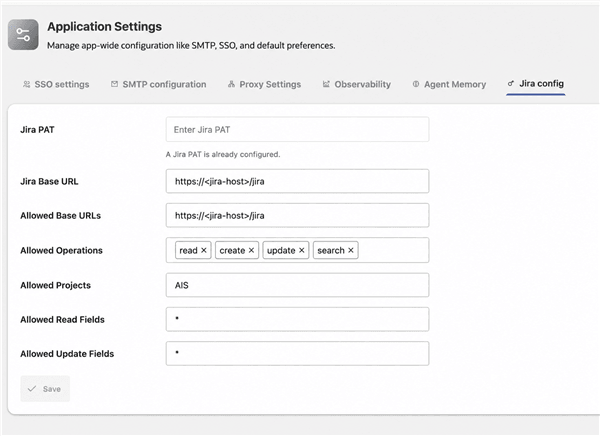
In Jira PAT, enter the PAT. If the page indicates that a Jira PAT is already configured, enter a new token only when you need to replace it.
The application stores the PAT in its wallet and does not display the token after you save it.
-
In Jira Base URL, enter the approved HTTPS URL for your Jira instance.
-
In Allowed Base URLs, enter the approved HTTPS Jira URL or URLs that workflows can use. Include the Jira Base URL.
-
In Allowed Operations, select only the operations that workflows require: read, create, update, or search.
-
In Allowed Projects, enter the Jira project keys that workflows can access.
-
In Allowed Read Fields, enter the Jira fields that workflows can read. To allow all readable fields, enter
*. -
In Allowed Update Fields, enter the Jira fields that workflows can update. To allow all updatable fields, enter
*. -
Click Save.
Note: Use a least-privilege PAT and restrict the allowed operations, projects, and fields to those required by trusted workflows. Do not include a PAT in prompts, logs, outputs, or screenshots. Agent Factory accepts only approved HTTPS Jira base URLs and rejects localhost, metadata service endpoints, and private or otherwise disallowed destinations.
Verify the Configuration
-
In Agent Builder, add a Jira node from the Tools category.
-
Connect a Chat input or Prompt node to the Agent that uses the Jira node.
-
Run a request that uses an allowed operation, project, and field.
For information about using the node in a workflow, see Jira.