Components in an Agent Builder
Components, also referred to as nodes, are the building blocks in an Agent Builder flow.
This section explains when to use each node, their inputs and outputs, and how to configure them to reliably build your flows.
Common data types across nodes include:
- Message: A string, typically human-readable
- JSON: A Python
dictorlistused for structured data - DataFrame: A
list[dict]suitable for table-like flows
Agents
Agent
An Agent node uses an LLM configured in LLM Management to carry out instructions, answer questions, and orchestrate complex multi-step tasks using hierarchical manager/worker orchestration and sub-agents.
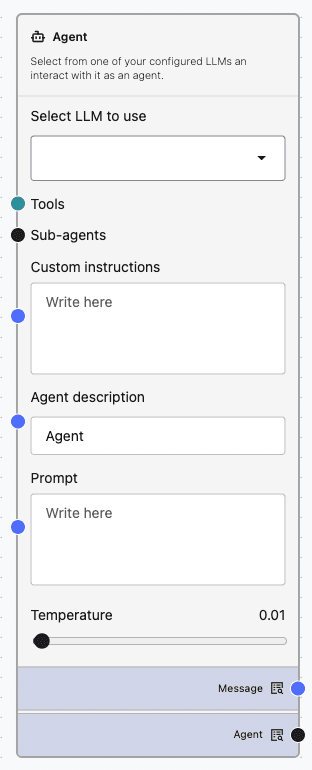
When to use?
- For multi-step tasks that require tool calls, planning, or delegation
- In manager/worker scenarios where a coordinator Agent assigns tasks to sub-agents
- When tool-enabled reasoning is needed such as search, APIs, or debugging tools
How to add and configure?
- Drag the Agent node onto the canvas.
- Select a base LLM from LLM Management.
- Optionally, attach relevant Tools.
- Optionally, connect other Agent nodes to the Sub-agents connector to set up manager/worker orchestration.
- Provide instructions through a Prompt or Message input.
- Optionally, set the temperature to a low value for more predictable and deterministic responses from the LLM, or to a high value for more varied and creative output.
- Connect the output Message as input to Agent, Output, or Processing components per the flow logic.
Inputs:
- Message (instructions)
- Optional JSON or tool configurations as needed
Outputs:
- Message: Agent result or summary
- JSON: Tool results or any structured output produced by the agent
External Agent
Use the External Agent node to delegate a task to an enabled external Agent2Agent (A2A) agent. Before you add this node, register and enable the external agent in A2A Agents. For an example, see Math Help Assistant and Basic Math Service.
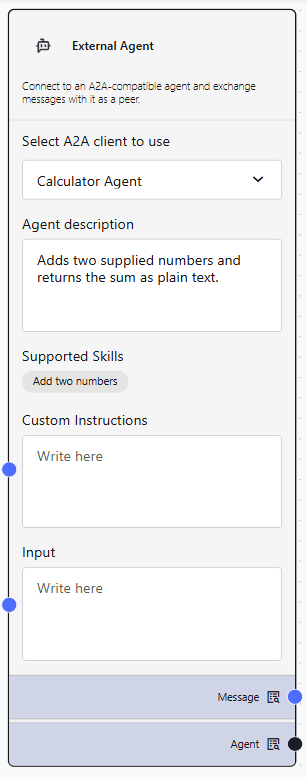
When to use?
- To include a trusted remote A2A agent as a sub-agent in a local workflow
- To delegate a specialized task to an external agent without recreating that capability locally
How to add and configure?
- In Components, expand Agents, then drag External Agent onto the canvas.
- Select an enabled external A2A agent.
- Optionally, edit the agent description used by the local workflow. The discovered supported skills are read-only.
- To use the external agent as a sub-agent, connect the Agent output of the External Agent node to the Sub-agents input of a local Agent node.
- Configure the local Agent node with instructions for when and how to delegate work to the external agent.
When connected as a sub-agent, the local Agent sends its message to the external agent. The External Agent node Input is not used for that delegated interaction.
Inputs:
- Message: A task sent directly to the external agent
Outputs:
- Message: The external agent response when the node is used directly in the flow
- Agent: The external agent for connection to a local Agent node as a sub-agent
Language Model
LLM
The LLM node executes prompts using a Large Language Model configured in LLM Management. This node serves as the primary reasoning and completion engine for many flows.
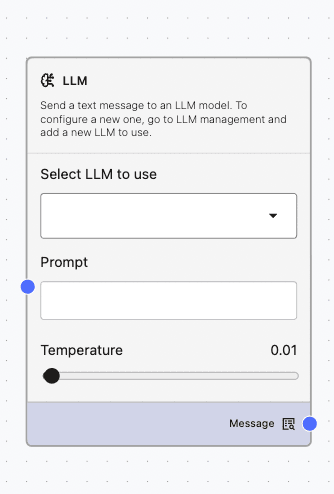
When to use?
- To generate, summarize, or transform text
- To perform reasoning on inputs based on provided instructions
- As a foundational component for Agent nodes
How to add and configure?
- Drag the LLM node onto the canvas.
- Choose a configured model from LLM Management.
- Supply prompts or instructions via an upstream Prompt or Message node.
- Set the temperature to a low value for more predictable and deterministic responses from the LLM, or to a high value for more varied and creative output.
- Connect the output Message as input to Agent, Output, or Processing components per the flow logic.
Inputs:
- Message (prompt)
- Optional JSON or context as a Message
Outputs:
- Message: The model’s response text
- JSON: If the model response is valid JSON, it can be parsed downstream by the Type Convert node
Vision Language Model (VLM)
The Vision Language Model (VLM) node sends a text prompt and image data to a configured LLM that supports image input. Use it to describe, inspect, classify, or extract visible information from an image. For an example, see Image Analysis with Vision Language Model (VLM).
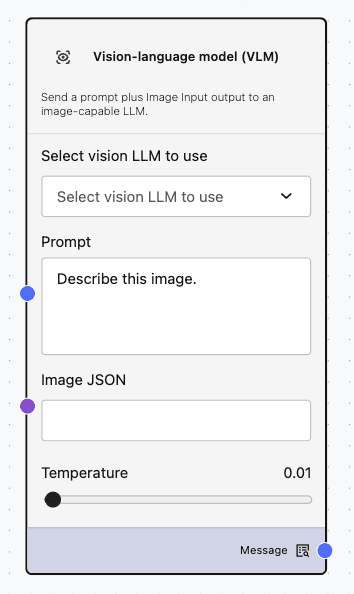
When to use?
- To describe or inspect images and screenshots
- To classify visible objects or scenes
- To extract readable text or summarize visual content
How to add and configure?
- Drag the Vision Language Model (VLM) node from the Language Model category onto the canvas.
- Select a configured LLM that supports image input.
- Enter a prompt that describes the analysis you want the model to perform.
- Connect an Image JSON output, such as the output from an Image Input node, to the Image JSON input.
- Optionally, set the temperature.
- Connect the Message output to a Chat Output node or another downstream node.
Inputs:
- Prompt: The text instruction to send with the image
- Image JSON: Image metadata and image data from an Image Input node
- Temperature: The generation temperature
Outputs:
- Message: The response from the selected vision-capable LLM
Note: The VLM node requires an LLM that supports image input. A text-only model can fail even when the flow is connected correctly.
Limitations:
- The Image JSON input must receive image data from an Image Input node or another compatible node.
- Large images can increase workflow payload size and model-response time.
Troubleshooting:
- If the VLM node indicates that Image JSON is required, connect Image Input > Image JSON to Vision Language Model (VLM) > Image JSON.
- If the VLM node fails after it receives the image, select an LLM configuration that supports image input or multimodal messages.
- If the result does not match the expected analysis, make the prompt more specific. For example, ask the model to describe visible text, objects, or a particular region of the image.
Select AI
Use these nodes to design Select AI flows with components configured in Settings > Select AI Framework. See Configure Select AI for Your Database to learn how to set up Select AI components, such as profiles with RAG or NL2SQL. Refer to Select AI Workflows for sample workflows created using Select AI nodes.
In-Database Agent
Use this node to choose an existing in-database agent or to create a new agent using a selected database and profile.
-
Choose Existing Agent
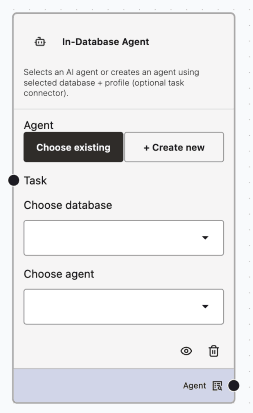
When to use?
Use this mode when you need to select an existing AI Agent that has already been defined. This is helpful when you want to reuse an Agent with pre-configured database and profile settings in your Select AI flows.How to add and configure?
- Drag the In-Database Agent node onto the canvas.
- Select the Choose Existing mode.
- Select a database from the dropdown to filter the available agents.
- Pick an already defined Agent from the Select Agent dropdown.
- Click the View or Delete icons to view the Agent configuration or remove the Agent.
Inputs: Task (Optional)
Outputs: DB name, Agent name
-
Create New Agent
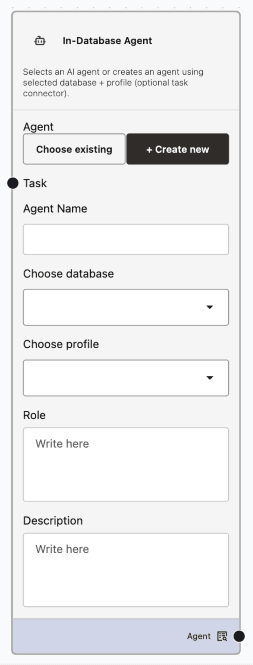
When to use?
Use this mode when you need to create a new AI Agent to represent logic powered by a specific database context, profile (e.g., LLM, SQL), and task (optional) in your Select AI flows. Create a customized Agent for your database profile with a unique name, instructions, defined role, and other agent-specific settings.How to add and configure?
- Drag the In-Database Agent node onto the canvas.
- Choose the Create New mode.
- Enter a unique name for your new Agent.
- Select a database from the dropdown to provide the context for the Agent.
- Select an AI profile (such as LLM or SQL) to define the Agent’s capabilities.
- Optionally, attach an existing Task to associate with the Agent.
- Define the Agent Role to specify metadata or role context.
- Optionally, add a description to provide additional notes about the Agent.
Inputs: Task (Optional)
Outputs: DB name, Agent name
Select AI
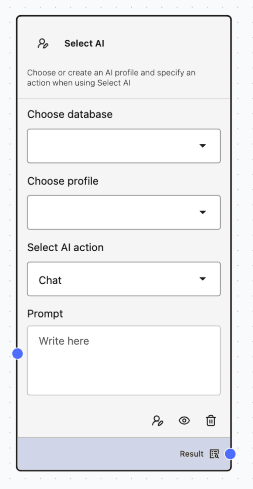
When to use?
Use the Select AI node when you need to perform an AI-driven action, such as chat, run SQL, or other supported interactions, within a specific database and profile context. This node is ideal for executing discrete AI actions and retrieving results as part of your Select AI workflow.
See Select AI Demos for sample workflows created for each action.
How to add and configure?
- Drag the Select AI node onto the canvas.
- Select the database to provide context for the action.
- Select a profile from the dropdown to link the node to the desired profile, or click the Create Profile icon at the bottom of the node to create a new profile.
- Choose the specific AI Action you want to perform (e.g., Chat, Run SQL, ShowSQL, ExplainSQL, Narrate, Show Prompt).
- Enter the prompt or message to be sent to the AI model for processing. You can supply prompts or instructions via an upstream Prompt or Message node.
- Click the View or Delete icons to view the profile or delete the profile.
- Connect Result to a downstream node for direct workflow output. To make the configured action available to an Agent node, use Use as Agent Tool.
Inputs: Message (prompt)
Outputs: Result for direct workflow output, or a prompt-based Agent tool with the configured database, profile, and action
In-Database Task
Use this node to choose or define a in-database task. You can create new tasks using one or more connected tools or select from available ones.
-
Choose Existing Task
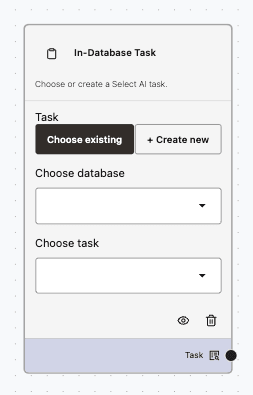
When to use?
Use this mode when you need to select an existing Task that has already been defined. This is helpful when you want to reuse a Task with pre-configured tools, database connections, and logic in your Select AI flows.How to add and configure?
- Drag the In-Database Task node onto the canvas.
- Choose the Choose Existing mode.
- Select a database from the dropdown to filter available tasks and tools.
- Pick an already defined Task from the Choose Task dropdown.
- Click the View or Delete icons to view the Task configuration or remove the Task from your flow.
Inputs: None
Outputs: DB Name, Task name
-
Create New Task
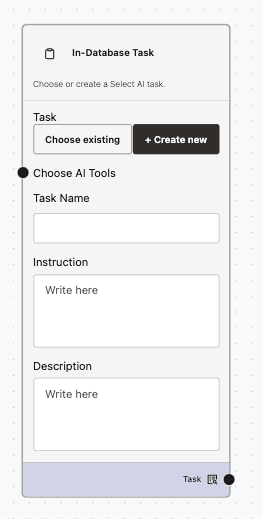
When to use?
Use this mode when you need to create a new task to define and orchestrate logic using specific tools and database connections within your Select AI flows. This option is suitable when you want a customized Task with a unique name and chosen tool set.How to add and configure?
- Drag the In-Database Task node onto the canvas.
- Choose the Create New mode.
- Connect one or more In-Database Tool outputs to the task.
- Enter a unique name for your new task.
- Provide instructions for the task.
- Optionally, add a description to provide additional information about the task.
Inputs: One or more In-Database Tool outputs. The task inherits its database context from the connected tools.
Outputs: Task
In-Database Team
Use the In-Database Team node when you need to orchestrate multiple AI agents to work together as a team within a defined database context. This is useful for workflows that require collaborative or sequential agent actions, either by selecting an existing team or creating a new one with custom settings.
-
Choose Existing Team
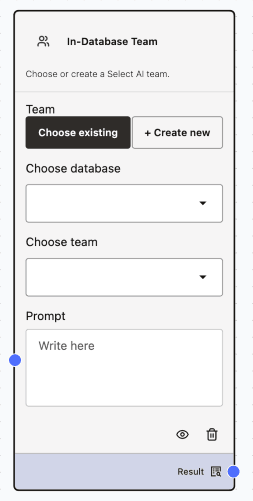
When to use?
Use the Choose Existing mode to select an existing team in your workflow.How to add and configure?
- Drag the In-Database Team node onto the canvas.
- Select the Choose Existing mode.
- Select the database to provide the context for the team’s operations.
- Pick from a list of predefined teams.
- Enter the prompt or message to be sent to the AI model for processing. You can supply prompts or instructions via an upstream Prompt or Message node.
- Click the View or Delete icons to view the team or delete the team.
Inputs: Message (prompt)
Outputs: Team LLM output result
-
Create New Team
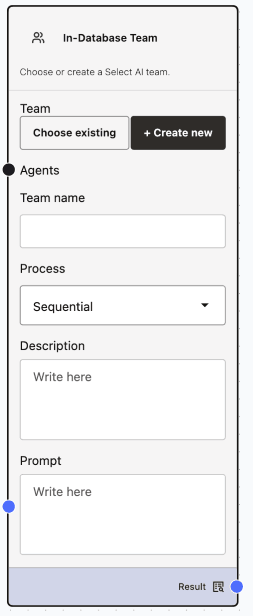
When to use?
Use the Create New mode to create a new in-database team.How to add and configure?
- Enter a unique team name.
- Use the Sequential process for agent execution.
- Attach available agents to the team.
- Configure a team-level prompt if required. You can supply prompts or instructions via an upstream Prompt or Message node.
- Optionally, add a description to provide additional notes about the Agent.
Inputs:
- Agent
- Message (prompt)
Outputs: Team LLM output result
In-Database Tool
Use this node to define or select a tool—such as RAG, SQL, or database functions—bound to a specific database, profile, or function. You can create new tools by type or select from available ones.
-
Choose Existing Tool
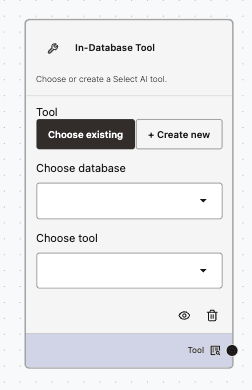
When to use?
Use this mode when you need to select an existing tool—such as RAG, SQL, or database functions—that is already bound to a specific database, profile, or function.
How to add and configure?
- Drag the In-Database Tool node onto the canvas.
- Select the Choose Existing mode.
- Select a database from the dropdown to fetch the available tools.
- Pick an already defined tool from the Choose Tool dropdown.
- Click the View or Delete icons to view or delete the selected tool.
Inputs: None
Outputs: DB name, Tool name
-
Create New RAG Tool

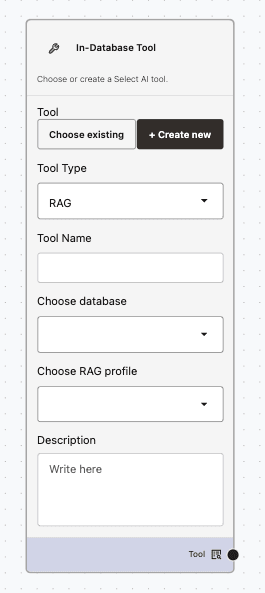
When to use?
Use this mode when you need to create a new RAG tool for your existing profile. See Create Profile to create one.How to add and configure?
- Drag the In-Database Tool node onto the canvas.
- Choose the Create New mode and select RAG as the tool type.
- Enter a unique name for your RAG tool.
- Select a database from the dropdown to connect the tool to the desired DB context.
- Choose an existing RAG profile to define how the tool retrieves and augments content.
- Optionally, add a description to provide additional information about the tool.
Inputs: None
Outputs: DB name, Tool name
-
Create New SQL Tool
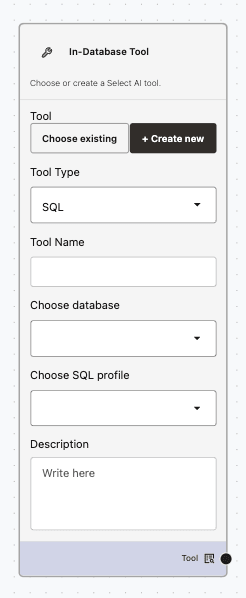
When to use?
Use this mode when you need to create a new SQL tool for your existing profile. See Create Profile to create one.How to add and configure?
- Drag the In-Database Tool node onto the canvas.
- Choose the Create New mode and select SQL as the tool type.
- Enter a unique name for your SQL tool.
- Select a database from the dropdown to connect the tool to the desired database context.
- Choose an existing SQL profile to define the tool’s execution behavior.
- Optionally, add a description to provide additional information about the tool.
Inputs: None
Outputs: DB name, Tool name
-
Create New DB Functions Tool
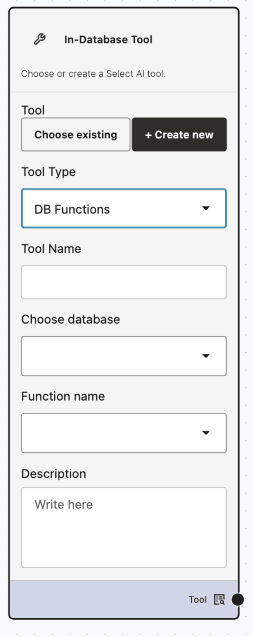
When to use?
Use this mode when you need to create a new database function (DB Function) tool.How to add and configure?
- Drag the In-Database Tool node onto the canvas.
- Choose the Create New mode and select DB Functions as the tool type.
- Enter a unique name for your DB Function tool.
- Select a database from the dropdown to connect the tool to the desired database context.
- Choose the required database function from the available list.
- Optionally, add a description to provide additional information about the tool.
Inputs: None
Outputs: DB name, Tool name
-
Create New Websearch Tool
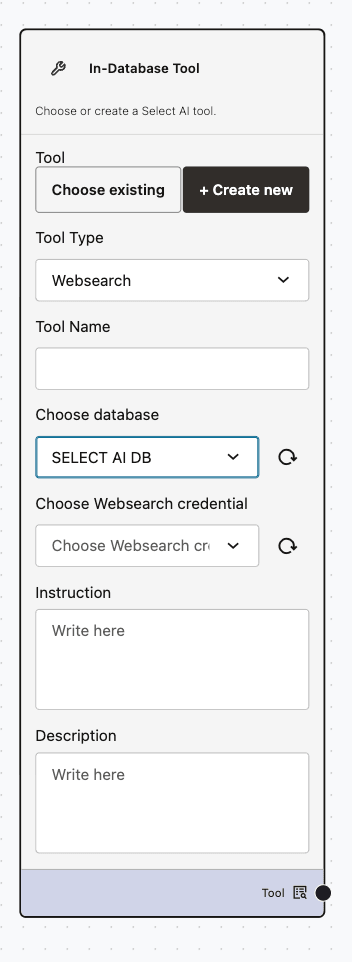
When to use?
Use this mode when an in-database agent needs to search the web.
How to add and configure?
- Drag the In-Database Tool node onto the canvas.
- Choose the Create New mode and select Websearch as the tool type.
- Enter a unique tool name and select the database.
- Select the Websearch Credential. Websearch supports an OpenAI credential.
- Enter an instruction that tells the agent when and how to use the web search tool. Optionally, add a description that explains the tool’s purpose.
- Configure the required database network ACL access before running the tool.
Inputs: None
Outputs: DB name, Tool name
-
Create New Email Tool
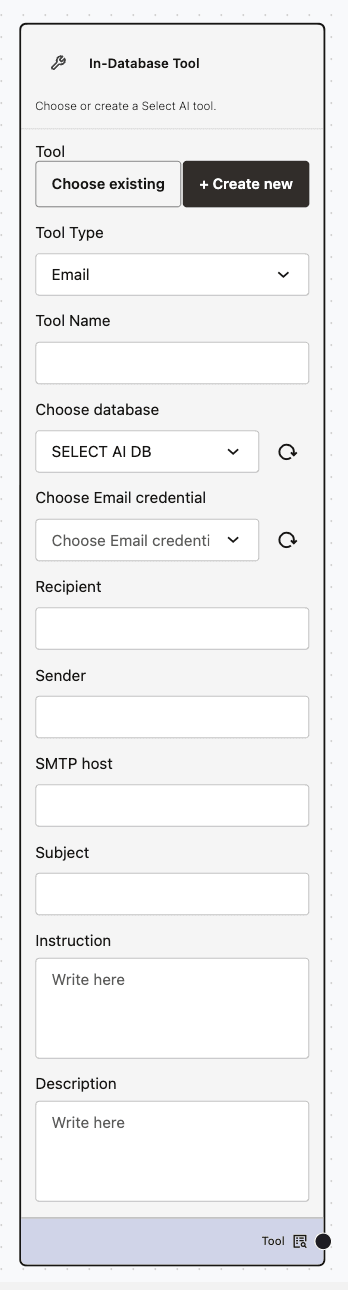
When to use?
Use this mode when an in-database agent must send email as part of its workflow.
How to add and configure?
- Drag the In-Database Tool node onto the canvas.
- Choose the Create New mode and select Email as the tool type.
- Enter a unique tool name and select the database.
- Select the Email Credential, then enter the recipient, sender, SMTP host, and subject.
- Enter an instruction that tells the agent when and how to use the email tool. Optionally, add a description that explains the tool’s purpose.
- Configure the required database network ACL access before running the tool.
Inputs: None
Outputs: DB name, Tool name
-
Create New Slack Tool
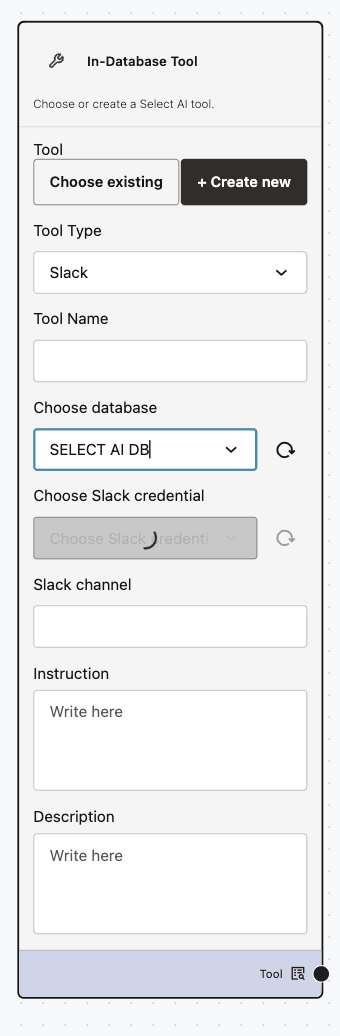
When to use?
Use this mode when an in-database agent needs to interact with a configured Slack channel.
How to add and configure?
- Drag the In-Database Tool node onto the canvas.
- Choose the Create New mode and select Slack as the tool type.
- Enter a unique tool name and select the database.
- Select the Slack Credential and enter the Slack channel.
- Enter an instruction that tells the agent when and how to use the Slack tool. Optionally, add a description that explains the tool’s purpose.
- Configure the required database network ACL access before running the tool.
Inputs: None
Outputs: DB name, Tool name
Tools
Bug Tools
The Bug Tools node is a specialized component for interacting with your organization’s bug or issue trackers.
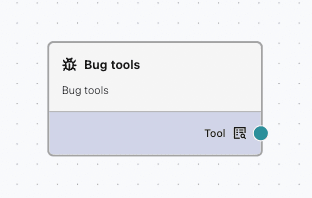
When to use?
- To query bugs, create updates or comments, or retrieve triage information
- To automate bug lifecycle processes within an Agent flow
How to add and configure?
- Drag the Agent node (or another compatible node that supports tool calls) onto the canvas.
- Attach Bug Tools in the Agent’s Tools configuration.
- Provide the required credentials or configuration for your bug tracking system.
- Use prompts or instructions within your Agent to invoke Bug Tools.
Inputs: Tool parameters supplied by Agent prompts or upstream data
Outputs: Message summaries or structured JSON results returned by the tool
- Be explicit in your prompts by specifying which bug ID(s) to query or update.
- Use the Parser or Type Convert node to format tool JSON output for display.
Jira
The Jira node lets agents create, read, update, search, and inspect Jira issues directly from Agent Builder workflows.
Note: Before you use the Jira node, an administrator must configure the approved HTTPS Jira base URL, Jira Personal Access Token (PAT), and other fields in Application Settings. See Configure Jira for more details.
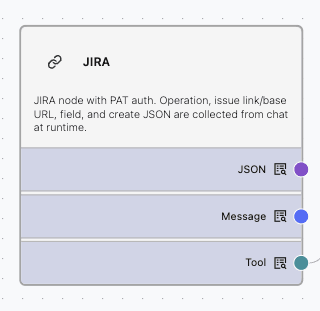
When to use?
- To create a single Jira issue from issue JSON
- To create a feature bundle, including an Epic and related child issues
- To read specific Jira issue fields
- To update issue fields or add comments
- To search Jira issues by using JQL
- To review available Jira fields before reading or updating an issue
How to add and configure?
-
Drag the Jira node from the Tools category onto the canvas.
-
Drag an Agent node onto the canvas and select the LLM that the agent must use.
Tip: It is recommended to use advanced models, such as
xai.grok-4-fast-reasoning, when using the Jira node. -
Connect the Jira node’s Tool output to the Agent node’s Tools input.
-
Add a Chat input node and connect its Message output to the Agent node’s prompt input.
-
Add a Chat output node and connect the Agent node’s Message output to the Chat output Message input.
-
In the chat prompt, ask the Agent to perform the Jira action and provide the required runtime values for the operation.
- For Create, provide the Jira base URL and create request or issue JSON. The Jira node supports direct single-issue creation and feature-bundle creation. Direct single-issue creation creates one Jira issue. Feature-bundle creation creates an Epic and related child issues. If you request create without issue JSON, the node returns a JSON template that you can complete and retry.
- For Read, provide the full Jira issue URL and one or more field selectors. Use field selectors to target the Jira fields that you want to inspect. You can provide more than one field selector when you want to read multiple fields.
- For Update, provide the full Jira issue URL, field selector, and update value. To add a Jira comment, use
commentas the field selector. To update status, provide the target status or transition value. - For Search, provide the Jira base URL, a JQL query, and optional result limit or return fields.
Tip: Use a least-privilege PAT and restrict the Jira node to trusted workflows. Use only approved HTTPS Jira base URLs. The node rejects localhost, metadata service endpoints, and private or otherwise disallowed destination addresses.
Inputs:
- Operation
- Jira base URL or Jira issue URL
- Field selector
- Update value
- Create request or issue JSON
- JQL query, result limit, or return fields for search
Outputs:
- Tool output with Jira issue details, field values, update status, search results, or validation guidance.
Calculator
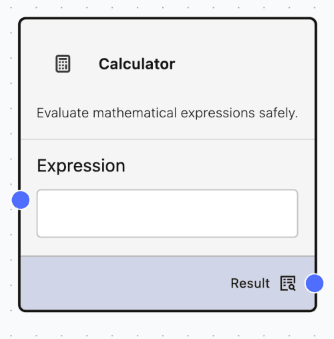
Calculator tool evaluates mathematical expressions safely and returns the computed result. The node supports arithmetic operations, parentheses, and standard numeric functions.
When to use?
- To perform calculations within workflows.
- To compute totals, percentages, or derived values.
- To transform numeric data before sending it to an LLM.
- To evaluate formulas from user input or previous nodes.
- Common uses include:
- totals and subtotals
- tax or discount calculations
- unit conversions
- averages and ratios
- dynamic formula evaluation
How to add and configure?
- Drag the Calculator node into the workflow.
- Enter a mathematical expression in the Expression field.
- You can include:
- numbers
- operators
- parentheses
- values from previous nodes
- Verify the expression syntax.
Inputs:
- Mathematical expressions
- Numeric values
- Variables from connected nodes
Outputs:
- Calculated result
- Evaluated numeric value
File System
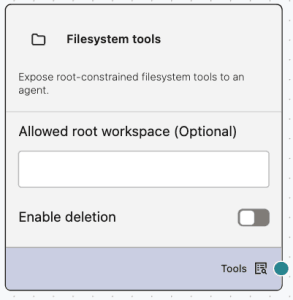
The File System node lets agents inspect, read, write, append, move, search, and optionally delete files inside a configured workspace root.
When to use?
- To let an Agent inspect project files or generated artifacts
- To read instruction files, logs, plans, or Markdown context
- To create or update files in a controlled workspace
- To search for files by name or content without exposing the whole file system
- To move files into folders or create backup folders as part of a workflow
How to add and configure?
-
Drag the File System node from the Tools category onto the canvas.
-
Configure the workspace root.
The workspace root defines the directory that the File System tools can access. If you leave it blank, Agent Factory uses the default workspace root for the current user.
-
Optionally, enable delete operations.
Delete operations are disabled by default. Enable delete only for trusted workflows that need to remove files or directories.
-
Drag an Agent node onto the canvas and select the LLM that the Agent must use.
-
Connect the File System node’s Tool output to the Agent node’s Tools input.
-
Provide instructions to the Agent through a Prompt, Message, or Chat input node.
-
Connect the Agent node’s Message output to a downstream node, such as Chat output, Parser, or Type Convert.
Inputs:
- Workspace root selected in the node
- Delete option selected in the node
- Runtime instructions from the Agent prompt or chat input
- File path, folder path, file content, search pattern, or move destination provided through chat
Outputs:
- Tool output with file or folder details, file content, search results, write status, move status, or delete status
Note: File System operations are constrained to the configured workspace root. Delete operations require the delete option to be enabled, and the node does not delete the workspace root itself.
Oracle Database
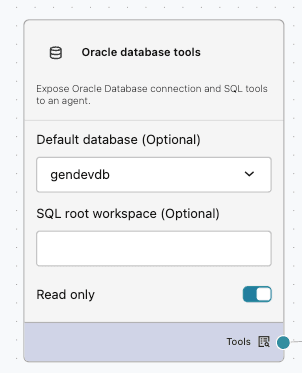
The Oracle Database node discovers saved Oracle Database connections for the current user and exposes them as tools for Agent Builder agents and agent flows.
The node can open one active connection, run SQL or PL/SQL statements or batches of statements, execute SQL files, inspect schema metadata, and close the active connection.
When to use?
- To let an Agent query a saved Oracle Database connection
- To inspect schema metadata before generating SQL or code
- To run controlled SQL or PL/SQL with bind variables
- To run related SQL statements sequentially without committing them
- To execute SQL files from the configured SQL file root
- To let a workflow provide database access without asking the user for connection details during execution
How to add and configure?
-
Configure the required database connection in Database Data Source.
-
Drag the Oracle Database node from the Tools category onto the canvas.
-
Optionally, select a saved Database source as the default database so SQL and schema tools can connect automatically.
Use this optional select field to configure the default database once at flow design time so the Agent does not need to ask for connection information during execution.
-
Optionally set SQL root workspace to a relative directory inside the user workspace.
-
Leave Read only enabled unless the flow needs controlled write access.
-
Drag an Agent node onto the canvas and select the LLM that the Agent must use.
-
Connect the Oracle Database node’s Tool output to the Agent node’s Tools input.
-
Provide instructions to the Agent through a Prompt, Message, or Chat input node.
-
Connect the Agent node’s Message output to a downstream node, such as Chat output, Parser, or Type Convert.
Inputs:
- Optional default database connection selected in the node
- Runtime instructions from the Agent prompt or chat input
- SQL statement, PL/SQL block, batch of SQL statements, SQL file path, bind values, or schema metadata request provided through chat
Outputs:
- Tool output with connection status, query results, SQL execution results, per-statement batch results, schema metadata, or error details
Note:
- The node lists only the database connections that are saved for the current user. When you set a default database, the Agent cannot switch to a different connection at runtime.
- Keep Read only enabled unless the workflow requires controlled write access. Changes are committed only when the tool call explicitly requests a commit.
- Query results are limited to 1,000 rows. The default request returns up to 200 rows and identifies truncated results.
- SQL files must remain within the configured SQL root workspace. The node rejects files larger than 100 MB, scripts with more than 1,000 statements, and unsupported SQL*Plus commands.
MCP Server
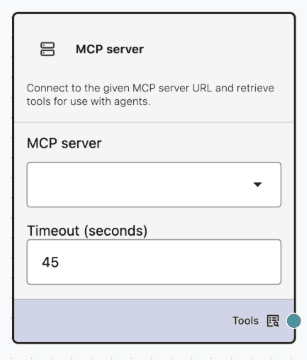
The MCP Server node integrates an MCP server to expose external capabilities as tools to Agents. It is a specialized component for interfacing with AI models using the Model Context Protocol (MCP) with Server-Sent Events (SSE) transport.
When to use?
- When you need to access custom tools or endpoints provided by your MCP server
- To extend Agent capabilities with organization-specific functions
How to add and configure?
-
Configure your MCP Server and build the server URL. See Build Your Own MCP Server.
-
Drag and drop an MCP Server node from the Tools category.
-
Select the MCP Server from the dropdown. See Add MCP Server to add and configure your MCP server.
-
Specify an optional timeout value, in seconds, after which the MCP Tool call will time out. This is applicable if the MCP Server tool call takes some time to receive a response. By default, the value is 45 seconds. Increase the timeout only when the target tool is expected to run longer. For slow tools, also check whether the MCP server logs show the request arriving and completing.
-
By default, Agent Factory discovers all tools exposed by the configured MCP server. You can restrict the allowed tools so an agent sees only the tools required for the workflow.
Use allowed tools when:
- A server exposes many tools, but the workflow needs only a subset.
- Tool names are similar, and you want to reduce selection ambiguity for the LLM.
- You need to limit the scope of a tool-using agent.
-
Connect the MCP Server node’s Tools output to downstream Agent nodes that consume the discovered MCP tools. Trigger tool usage through Agent prompts or tool-calling logic.
Inputs: Agent instructions and any necessary tool arguments
Outputs: JSON responses from MCP tools and message summaries generated by the Agent
- Validate the schemas and output structure of your tools.
- Use deterministic tool outputs to make downstream parsing easier.
See FAQs and Troubleshooting for MCP server related questions.
Deterministic MCP Server
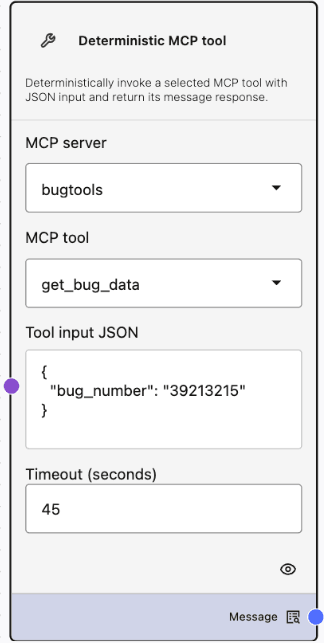
The Deterministic MCP Server node invokes one specific tool from a saved MCP server by using explicit JSON input. It returns the selected tool response as a message.
When to use?
- To run a specific MCP tool without agentic tool selection
- To use a saved MCP server with a known tool and payload
- To execute deterministic tool calls where the server, tool, and JSON input are chosen up front
How to add and configure?
- Make sure an MCP server has already been created and saved in the MCP server configuration area.
- Drag the Deterministic MCP Server node from the Tools category onto the canvas.
- Select the saved MCP server.
- Select the MCP tool exposed by the selected server.
- Provide Tool input JSON, or connect an upstream node to pass the JSON payload at runtime.
- Optionally, adjust the timeout value in seconds.
- Use View tool description to inspect the selected tool description and input schema.
Inputs:
- MCP server: The saved MCP server source to use
- MCP tool: The tool exposed by the selected MCP server
- Tool input JSON: A JSON object payload passed to the selected MCP tool
- Timeout (seconds): Timeout used while discovering tool metadata
Outputs:
- Message: The selected MCP tool’s returned text
Note: The payload must be a JSON object. If an upstream node is connected to Tool input JSON, that incoming value overrides the inline JSON.
The node loads available tools dynamically based on the selected server, shows the tool description and input schema, and generates a default JSON payload skeleton from the tool’s input schema when available. It resolves MCP authentication from the saved wallet secret for the selected server, supports MCP servers exposed over SSE or streamable HTTP, and returns the first text content item from the MCP tool response.
The node reports readable validation and execution errors for missing server, missing tool, invalid JSON, schema mismatch, invalid URL, authentication issues, and MCP transport failures.
Knowledge Agent
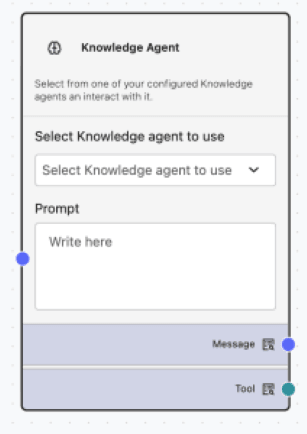
The Knowledge Agent node lets you use an existing Knowledge Agent in Agent Builder, either as a callable tool for an Agent node or as a standalone step that returns a message.
When to use?
- To use Knowledge Agent capabilities in an Agent Builder flow
- To let an Agent node call a Knowledge Agent as a tool
- To run a prompt directly against a configured Knowledge Agent and pass the response to downstream nodes
How to add and configure?
- Drag the Knowledge Agent node from the Tools category onto the canvas.
- Select the Knowledge Agent to use.
- Enter a prompt, or connect a Message output from an upstream node.
- To use the Knowledge Agent as a tool, connect the Tool output to an Agent node.
- To run the node directly, connect the Message output to a Chat Output, LLM, logging, preview, or downstream processing node.
Inputs:
- Knowledge Agent: The configured Knowledge Agent to use
- Prompt: Prompt text or an upstream Message input
Outputs:
- Message: The Knowledge Agent response text when the node runs directly
- Tool: A callable Knowledge Agent tool for Agent nodes
Note: When the Tool output is connected to an Agent node, the prompt field is hidden in the node UI. Agent Builder still passes prompt data to the Knowledge Agent at runtime.
Data Analysis Agent
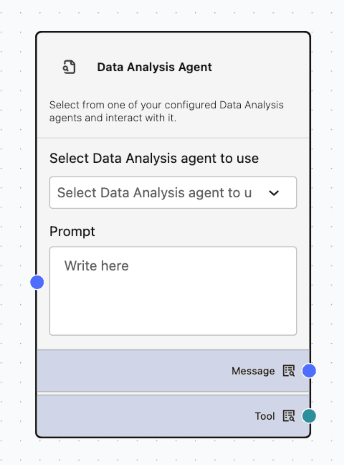
The Data Analysis Agent node lets you use an existing Data Analysis Agent in an Agent Builder flow. The node uses the configured agent to analyze structured database data and return answer text for the workflow.
When to use?
- To invoke Data Analysis Agent capabilities inside larger agent workflows without leaving Agent Builder or switching to the standalone Data Analysis Agent UI
- To combine database exploration, SQL generation, and analytical answers with other Agent Builder tools
- To delegate tabular-data questions to a purpose-built Data Analysis Agent
- To let an Agent node call a Data Analysis Agent as a tool
- To run a data analysis prompt directly and pass the answer to downstream nodes
How to add and configure?
- Create and publish a Data Analysis Agent.
- Drag the Data Analysis Agent node from the Tools category onto the canvas.
- Select the Data Analysis Agent to use.
- Enter a prompt, or connect a Message output from an upstream node.
- To use the Data Analysis Agent as a tool, connect the Tool output to an Agent node.
- To run the node directly, connect the Message output to a Chat Output, LLM, logging, preview, or downstream processing node.
Inputs:
- Data Analysis Agent: The configured Data Analysis Agent to use
- Prompt: Prompt text or an upstream Message input
Outputs:
- Message: The Data Analysis Agent response text when the node runs directly
- Tool: A callable Data Analysis Agent tool for Agent nodes
Note:
- When the Tool output is connected to an Agent node, the prompt field is hidden in the node UI. Agent Builder passes prompt data to the Data Analysis Agent at runtime.
- The tool returns answer text and does not generate visualizations.
- Complex multi-turn analytical exploration may still be better suited to the standalone Data Analysis Agent UI.
Deep Data Research Agent
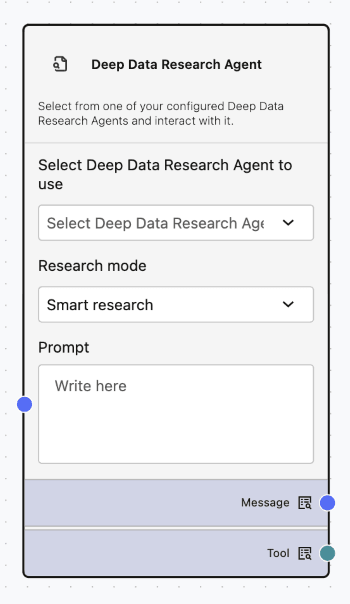
The Deep Research Agent node exposes Deep Research capabilities as a reusable tool node in Agent Builder. Use it to answer research questions from prepared knowledge bases and return cited Markdown answers as part of a larger orchestrated agent flow.
When to use?
- To reuse Deep Research capabilities inside larger Agent Builder workflows
- To compose evidence-backed research answers with other workflow steps
- To answer questions from prepared knowledge bases and preserve source citations
- To let agent builders choose smart research or fast answer behavior
- To keep standalone Deep Research chat behavior separate from tool execution
How to add and configure?
- Create and publish a Deep Data Research Agent.
- Drag the Deep Research Agent node from the Tools category onto the canvas.
- Select the Deep Research Agent or research context to use.
- Optionally, select how the tool researches the workflow question: smart research mode performs deeper research, and fast answer mode returns faster RAG-style answers.
- Enter a prompt, or connect a Message output from an upstream node.
- To use the Deep Research Agent as a tool, connect the Tool output to an Agent node.
- To run the node directly, connect the Message output to a Chat Output, LLM, or downstream processing node.
Inputs:
- Deep Research Agent or research context: The configured Deep Research Agent or prepared knowledge context to use
- Research mode: The research behavior to use, such as smart research or fast answer
- Prompt: Prompt text or an upstream Message input
Outputs:
- Message: The cited Markdown answer when the node runs directly
- Tool: A callable Deep Research Agent tool for Agent nodes
Note:
- Tool output preserves Markdown citation links returned by Deep Research.
- You must have access to the selected Deep Research Agent, knowledge base, data sources, and cited source files.
- The selected knowledge base must be prepared and available before the tool can return cited answers.
- Answers depend on the prepared knowledge base content, retrieval results, and configured models.
- If the selected agent is unavailable, the user lacks access, a provider fails, or no supporting evidence is found, the tool returns a controlled response instead of an unsupported answer.
- Long-running research can time out in an Agent Builder workflow.
Oracle PL/SQL Executor
The Oracle PL/SQL Executor node exposes selected Oracle PL/SQL procedures and functions as tools that an Agent can call. It uses Oracle catalog metadata and runtime execution logic to discover and invoke in-database business logic safely through a structured tool interface.
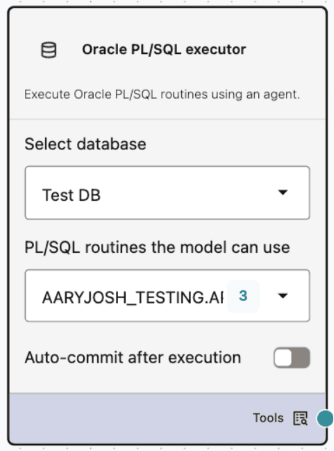
The node provides a discovery tool for listing routines and signatures, and an execution tool for invoking an approved procedure or function with bound arguments. It supports packaged procedures, standalone procedures, functions, overload selection, named and positional arguments, OUT and IN OUT values, return values, and DBMS_OUTPUT capture.
When to use?
- You want an Agent to call existing Oracle stored procedures/functions instead of rebuilding the same logic in a separate service.
- You need to expose curated in-database business operations to an LLM using tool-calling.
- You want the model to discover available PL/SQL routines first, then execute only approved routines.
How to add and configure?
- Register or reuse an Oracle database datasource in Agent Builder.
- Add the Oracle PL/SQL Executor node from the Tools category.
- Select the target database.
- Choose the specific PL/SQL routines the model is allowed to use.
- Set Auto-commit after execution only if the use case requires successful calls to be committed automatically.
- Connect the node’s Tools output to an Agent node.
- In the Agent instructions, guide the LLM to use the discovery tool first when needed, call the execution tool with the exact routine or qualified name, and report results only when the tool returns success.
Inputs:
- Oracle datasource selection
- Allowed routine selection
- Optional auto-commit at runtime
Outputs:
- Message summaries by Agent
Only routines visible in the connected schema metadata can be executed. The node does not execute arbitrary free-form PL/SQL text from the LLM. It discovers routines from Oracle metadata, resolves requested routines against the discovered set, and builds executable blocks only from validated metadata.
REST API Tools
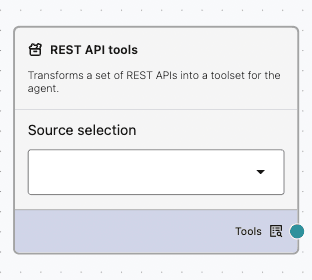
The REST API node allows you to call REST APIs directly from your flows, often through an Agent.
When to use?
- To integrate with external services or internal microservices
- To retrieve or send data as part of your workflow
How to add and configure?
- Configure REST API connection. See Add REST API Data Source.
- Drag the REST API node onto the canvas and connect it to an Agent or any other compatible tool-enabled node.
- Specify the endpoints, headers, authentication, and HTTP method (GET, POST, PUT, or DELETE).
- Use Agent prompts to determine which endpoint and parameters to use.
Inputs: URL/endpoint and parameters or body data, often passed from previous node outputs
Outputs: JSON responses from the API and message summaries created by the Agent
- Use Type Convert to ensure the JSON response is in the expected format.
- Combine JSON outputs to merge multiple API responses for downstream use.
Select AI Bridge
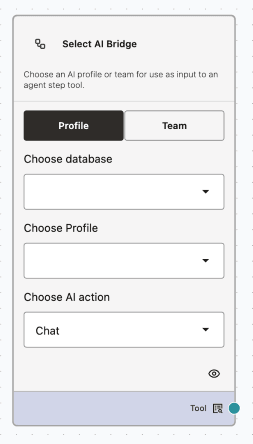
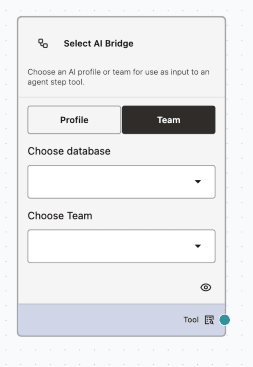
Use the Select AI Bridge node to configure Select AI in either Profile mode or Team mode. The node outputs a Server tool with prompt-only input, and the tool name and description are personalized based on the selected profile or team information.
-
Profile Mode
When to use?
Use the Select AI Bridge node in Profile Mode when you need to perform a specific AI-driven action—such as sending a prompt or running a database operation—within a defined workflow. This mode is ideal for executing discrete actions using a selected database and profile, and for obtaining an immediate result to advance your workflow.How to add and configure?
- Drag the Select AI Bridge node onto the canvas.
- Select Profile Mode.
- Choose the database to set the context for the action.
- Select a profile to specify the flow or agent context.
- Choose the desired AI Action you want the node to execute such as Run SQL, Show SQL, Explain SQL, Narrate, Chat, Show Prompt.
- Enter your prompt or query to send to the AI model.
- Click the View or Delete icon to manage the workflow node.
Inputs: None
Outputs: LLM/Action Result
-
Team Mode
When to use?
Use the Select AI Bridge node in Team Mode when you want to coordinate and run workflows involving a team of agents. This mode is ideal for scenarios where team-based collaboration or multi-agent orchestration is needed, leveraging existing teams defined by name within a specific database context.How to add and configure?
- Drag the Select AI Bridge node onto the canvas.
- Choose Team Mode.
- Select the database to provide context for team operations.
- Select a team from the dropdown list by name.
- Enter a prompt or message to send to the team of agents for processing.
- Click the View or Delete icons to manage the workflow node as needed.
Inputs: None
Outputs: Team LLM output result
Text Combiner
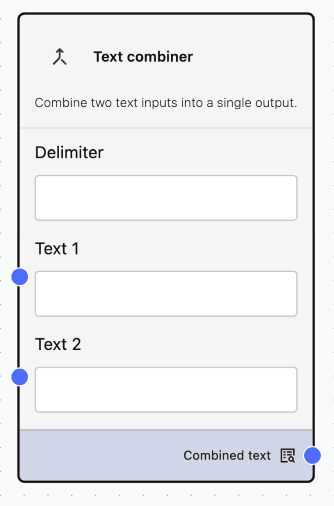
The Text Combiner node combines two text inputs into a single output, optionally separated by a delimiter and is useful for merging strings, building prompts, or formatting content by joining values, adding labels or separators, and creating structured text (e.g., full names, sentences, headings, or CSV lines).
When to use?
- Merge text from multiple nodes into one message.
- Build prompts by joining dynamic values.
- Format outputs with separators, labels, or spacing.
- Create structured text like full names from first and last name, sentences from fragments, prompt context + user input, headings + content, or CSV-style lines.
How to add and configure?
- Drag the Text Combiner node into your workflow.
- Enter a delimiter (optional) such as a space, comma, newline, dash, or pipe.
- Add text to Text 1 and Text 2, or connect outputs from previous nodes.
- Leave the delimiter blank to join text directly.
- Connect the combined output to the next node.
Inputs:
- Text strings
- Dynamic values from other nodes
- Multiline content
Outputs:
- Combined text string
- Formatted text with delimiter applied
Wikipedia Search
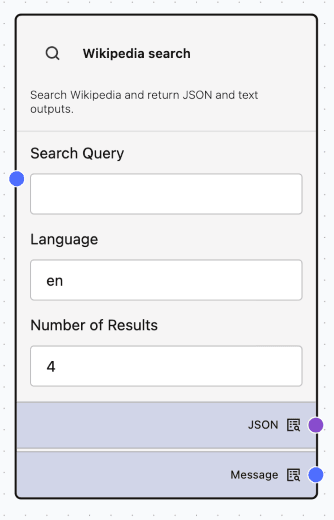
The Wikipedia search node searches Wikipedia and returns both structured JSON results and a human-readable text summary.
When to use?
- Retrieve reliable background information for prompts.
- Enrich LLM responses with factual summaries.
- Provide structured data for downstream parsing or RAG workflows.
- Search Wikipedia dynamically based on user input.
How to add and configure?
- Drag Wikipedia Search from the Tools category into your flow.
- Configure the fields:
- Search Query (required): Text to search on Wikipedia
- Language (optional, default:
en): e.g.,en,de,fr - Number of Results (optional, default: 4, range: 1–10)
- You can enter a query directly or connect a Message output from an upstream node.
- Connect outputs as needed:
- JSON → parsing, filtering, RAG, or structured processing
- Message → chat response, preview, logging, or LLM input
Inputs:
- Search Query (string, required)
- Language (string, default:
en) - Number of Results (integer, default: 4, range: 1–10)
Outputs:
-
JSON Output:
Returns a dictionary containing:{ "results": [ { "title": "...", "summary": "...", "url": "...", "snippet": "...", "language": "..." } ] }If an error occurs, JSON returns an error payload.
-
Message Output: Formatted human-readable text including:
- Title
- Summary or snippet
- Canonical URL
If an error occurs, returns:
Error: <description>
Inputs
Chat Input
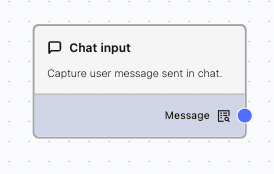
Chat Input node captures conversational user input in a chat interface.
Note: A custom flow can contain a maximum of one Chat Input component.
When to use:
- For interactive flows where the user submits messages or questions
- To supply prompts or context to an LLM or Agent
How to add and configure:
- Drag the Chat Input node onto the canvas.
- Connect its Message output to downstream nodes such as Prompt, Agent, or LLM.
Inputs: None, as the user provides input at runtime
Outputs: Message containing the user’s text
- Use with the Agent node to pass instructions from Chat Input node as a Prompt.
- Use the Condition node to enable keyword-based branching in your flow.
Text Input
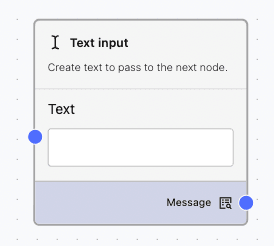
The Text Input node captures plain text input to pass to the next node.
When to use?
- For one-off values, such as IDs, categories, or thresholds
- To capture simple user parameters that influence the flow
How to add and configure?
- Drag the Text Input node onto the canvas.
- Optionally, set a label or placeholder for the input field.
- Connect its Message output to downstream nodes.
Inputs: None, as input is provided by the user
Outputs: Message containing the entered text
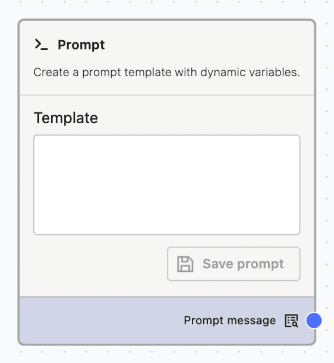
Prompt
The Prompt node creates and formats textual instructions for an LLM or Agent, often combining fixed instructions with dynamic values from upstream nodes.
When to use?
- To centralize system instructions and role-based prompts
- To create templates that incorporate values from upstream nodes
How to add and configure?
- Drag the Prompt node onto the canvas.
- Write your instructions, optionally using placeholders to reference outputs from upstream nodes.
- Connect the Prompt node to an LLM or Agent node.
Inputs: Message or JSON data for variable interpolation
Outputs: Message containing the final prompt text
Outputs
Chat Output
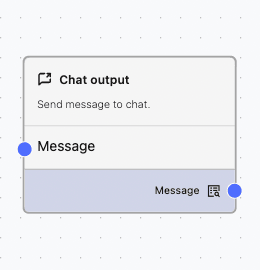
The Chat Output node renders or returns model/agent responses in a chat interface.
When to use?
- For chat interfaces intended for end users
- To display conversational responses in the user interface
How to add and configure?
- Drag the Chat Output node onto the canvas.
- Connect Message output from the LLM or Agent (or a formatted message from a Parser node) to the Chat Output node.
Inputs: Message
Outputs: None, as the response is rendered directly in the UI
Email Output
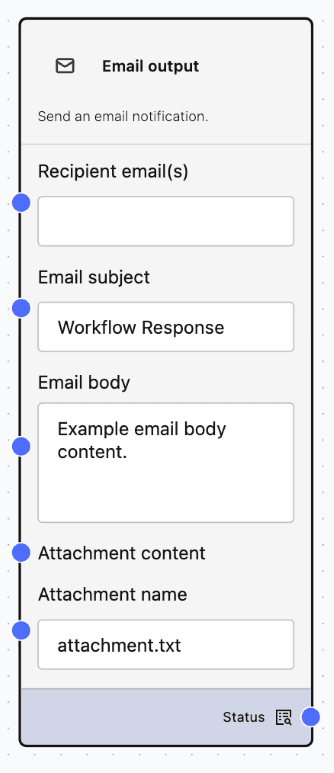
The Email Output node sends generated content via email. Accepts comma-separated email addresses and sends the generated content by email to multiple recipients.
When to use?
- To notify stakeholders by sending artifacts such as summaries, alerts, or reports
- To automate email communications within your workflows
How to add and configure?
- Make sure SMTP is configured. See SMTP Configuration
- Drag the Email Output node onto the canvas.
- Provide a subject, specify recipients as comma-separated email addresses to send to multiple people, and connect the Message output from an upstream node to serve as the email body.
- Optionally, attach any supported files using upstream file or data nodes.
Inputs:
- Recipient email(s)
- Email subject,
- Email body,
- Attachment content(optional),
- Attachment name (optional, default name:
attachment.txt)
Outputs: None (the node sends the email)
Slack Webhook
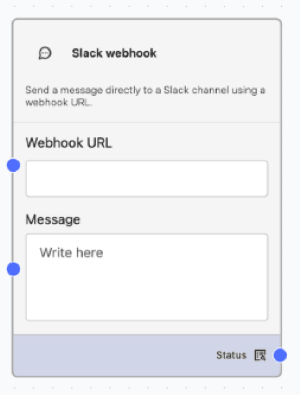
The Slack Webhook node sends messages directly to a Slack channel by using a Slack Incoming Webhook URL. Use it for output and notification workflows, such as sending results, alerts, summaries, or status updates to Slack.
When to use?
- To send workflow results or status updates to a Slack channel
- To notify teams when an agent flow completes or encounters an error
- To publish summaries, alerts, or generated content from upstream nodes
How to add and configure?
- Drag the Slack Webhook node from the Outputs category onto the canvas.
- Provide the Slack Incoming Webhook URL in the node configuration, or pass it from an upstream node at runtime.
- Provide the message text in the node configuration, or connect a Message output from an upstream node.
- Connect the Status output to a downstream node if the flow needs to inspect the Slack delivery result.
Inputs:
- Webhook URL: The Slack Incoming Webhook URL used to post the message
- Message: The text content to send to Slack
Outputs:
- Status: A string containing the execution status message
The node normalizes markdown-like formatting before sending the message to Slack. It removes markdown headings, converts **bold** to Slack-style *bold*, strips simple italic markdown formatting, converts list bullets to Slack bullet characters, and collapses excessive blank lines.
The node uses a 10-second timeout for outbound webhook requests and supports proxy-aware execution through standard environment variables such as HTTPS_PROXY, HTTP_PROXY, https_proxy, and http_proxy.
Data
Current Date
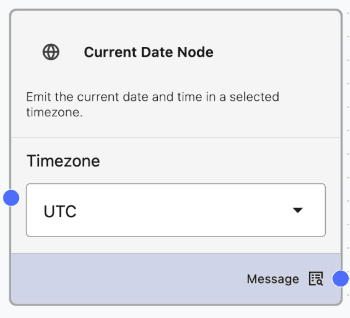
The Current Date node generates the current date and time dynamically. It lets you select a timezone so the output reflects the required regional setting.
When to use?
- To add the current date and time to a workflow
- To generate timezone-specific timestamps for prompts, summaries, or notifications
- To pass a formatted current date and time value to downstream nodes
How to add and configure?
- Drag the Current Date node from the Tools category onto the canvas.
- Select the timezone for the date and time output.
- Connect the Status output to downstream nodes that need the generated date and time.
Inputs: None
Outputs:
- Status: A string containing the current date and time in the selected timezone
The node fetches the system time, converts it to the selected timezone, and formats it into a readable string.
Example output:
{"message": "Current date and time in UTC: 2026-04-13 14:08:18 UTC"}Image Input
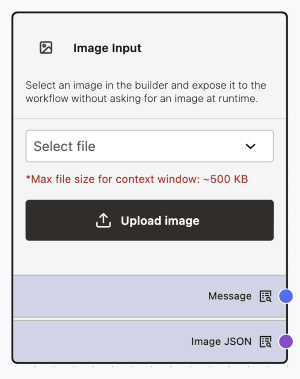
The Image Input node provides an image that you select or upload while configuring the workflow. It validates the image and produces an Image JSON payload that downstream nodes, such as the Vision Language Model (VLM) node, can use. For an example, see Image Analysis with Vision Language Model (VLM).
When to use?
- To provide an image or screenshot for analysis in a workflow
- To send an image to a Vision Language Model (VLM) node
How to add and configure?
- Drag the Image Input node from the Data category onto the canvas.
- Upload or select an image in the node configuration.
- Connect the Image JSON output to the Image JSON input of a Vision Language Model (VLM) node.
- Connect the VLM node’s Message output to a Chat Output node or another downstream node.
Inputs:
- Image: An image that you upload or select while configuring the node
Outputs:
- Message: Status information about the selected image
- Image JSON: Image metadata and image data for downstream nodes
Note: Image Input is configured by the workflow builder. It does not accept an image uploaded by a chat user at runtime. Supported image formats are PNG, JPEG, GIF, WEBP, BMP, and TIFF.
Limitations:
- Image Input does not retrieve images from remote URLs.
- The image is included in the workflow payload. Large images can increase payload size and model-response time.
Troubleshooting:
- If the node reports that no image is configured, upload or select an image in the node configuration, then save the workflow.
- If the selected image is rejected, use a supported image format and verify that the file is a valid image.
- If a downstream VLM node cannot use the image, connect the Image Input node’s Image JSON output, rather than its Message output, to the VLM node’s Image JSON input.
Read CSV File
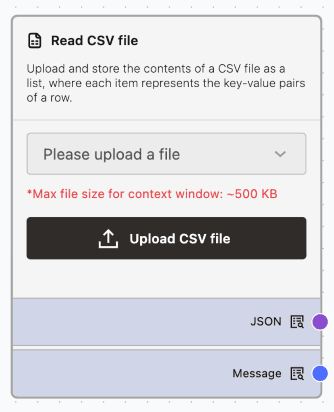
The Read CSV node imports and parses CSV files for batch or tabular data processing.
When to Use?
- To import tabular data for analysis or reporting.
- To feed a DataFrame into a Parser or LLM node for summarization.
How to Add and Configure?
- Drag the Read CSV node into your workflow.
- Select or upload a CSV file.
- Adjust delimiter and encoding settings if necessary.
- Connect the node’s outputs to subsequent steps in your workflow.
Inputs: File path or uploaded CSV file
Outputs:
- DataFrame: A list of dictionaries
list[dict], each representing a row - JSON: An array of objects, if this format is provided
File Upload
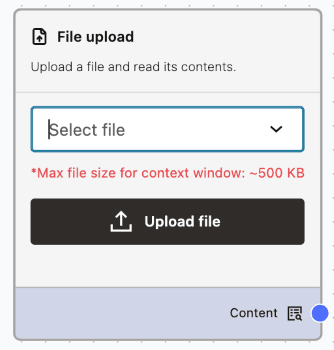
The File Upload node allows users to upload files for processing or analysis.
When to Use?
- To import external documents or data into a workflow
- To use alongside parsing or data extraction steps
How to Add and Configure?
- Drag the File Upload component into your flow
- Select the file to upload
- Connect the node to parsers, LLMs, or data converters
Inputs: None
Outputs: File handles/paths and/or Message/JSON, depending on integration
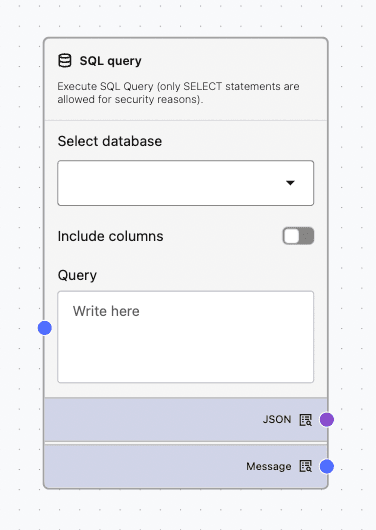
SQL Query
The SQL Query node executes SQL statements against configured databases and returns the results for use in workflows.
Note: Only SELECT-like queries are supported for security and governance.
When to use?
- To retrieve data for enriching prompts
- To enable further processing or visualization downstream
How to add and configure?
- Ensure the database connection is set up. See Database Data Source.
- Drag the SQL Query node into your workflow.
- Enter your SQL query text. This can be static or parameterized using data from upstream nodes.
- Connect the output to nodes such as Parser, Type Convert, or Combine JSON.
Inputs: Message or JSON containing the query and its parameters
Outputs:
- DataFrame: Tabular data results
- JSON: Array of row objects
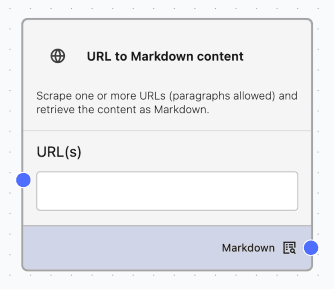
URL to Markdown Content
The URL to Markdown Content node fetches data from one or more URLs accessible within the same network, provided they do not require authentication.
When to Use?
- Retrieve data from URLs to enrich prompts
- Summarize content from URLs using an LLM
How to Add and Configure?
- Ensure the URLs are accessible on the application network.
- Confirm that the URLs do not require authentication.
- Drag the URL to Markdown Content node into your flow.
- Add the URL(s) and connect the node to a Prompt node or LLM node.
Inputs: Single URL, comma-separated URLs, or a paragraph containing URLs
Outputs: Content from the URL page in Markdown format
URL Crawler
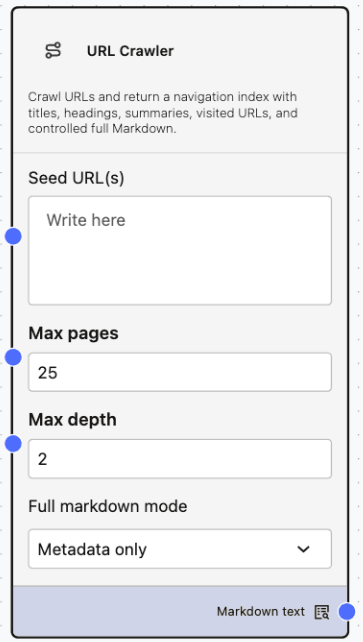
The URL Crawler node crawls one or more seed URLs, discovers pages on the same site, and returns a Markdown crawl report. The report can include page titles, headings, summaries, and visited URLs, with an option to include cleaned page text.
When to use?
- To discover the structure and content of a website before retrieving individual pages
- To provide an LLM with a site index so it can identify relevant pages
- To crawl a small site when you need page content as well as crawl metadata
How to add and configure?
- Drag the URL Crawler node from the Data category onto the canvas.
- Enter one or more seed URLs, or connect a Message output from an upstream node. You can provide full URLs, domains, paragraphs containing URLs, or comma-separated URLs.
- Set Max pages and Max depth to control the crawl size. You can also connect Message outputs that provide these values.
- Select Metadata only to return a crawl index, headings, summaries, and visited URLs. Select All pages to also include cleaned page text.
- When you select All pages, set Max chars per page and Max total chars to limit the returned content.
- Connect the Markdown text output to a downstream LLM, storage node, or Chat Output node.
Inputs:
- Seed URL(s): One or more URLs supplied as a Message
- Max pages: The maximum number of pages to crawl, supplied as a Message
- Max depth: The maximum link depth to crawl, supplied as a Message
- Full markdown mode: A node configuration that controls whether full page text is included
- Max chars per page and Max total chars: Node configurations available when Full markdown mode is set to All pages
Outputs:
- Markdown text: The crawl report, available as Message and Markdown output
Limitations:
- The node crawls only pages on the same site as the seed URL and does not send credentials.
- The node skips common static assets, such as images, PDFs, videos, archives, scripts, stylesheets, and spreadsheets.
- Pages must be reachable from the Agent Factory application network. The crawler works best with server-rendered HTML.
- The default crawl limit is 25 pages at depth 2. You can crawl up to 250 pages at depth 8.
Use URL Crawler to discover a site, then pass selected URLs to URL to Markdown Content when you need detailed content from specific pages.
Processing
Condition
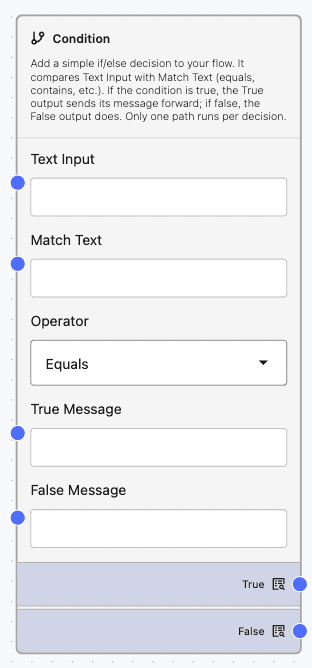
The Condition node enables simple if-else decision logic in agent flows. Use condition node to compare a Text Input against a Match Text using operators. If the condition evaluates to true, it outputs a configurable true message and follows the “true” branch. If false, it outputs a false message and follows the “false” branch. You can use it for basic branching without complex orchestration.
When to use?
- Route flows based on keywords or user roles.
- Validate input values, such as numbers or specific formats.
- Gate actions before invoking tools or services.
How to add and configure?
-
Drag the Condition node onto the canvas.
- Configure the following settings:
- Text Input: The value you want to check.
- Match Text: The value to compare against.
- Operator: Choose from equals, not equals, contains, not contains, greater than, less than, or regex match.
- True Message (optional): Message to return if the condition is met.
- False Message (optional): Message to return if the condition is not met.
- Connect the True and False outputs to their respective next steps.
- Test the Condition node using sample inputs.
- equals / not equals: Checks for an exact match (case and spacing matter).
- contains / not contains: Useful for keywords.
- greater than / less than: Only works with numeric values.
- regex match: Matches text patterns using regular expressions (best for simple patterns).
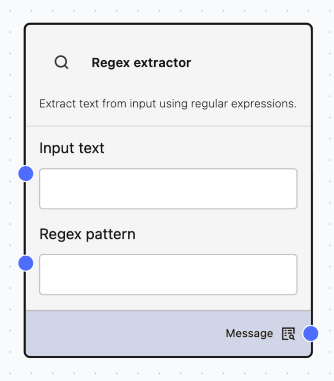
Regex Extractor
The node extracts text from input using regular expressions (regex) to identify and return specific values such as emails, IDs, dates, URLs, or structured data fragments.
When to use?
- Extract structured data from unstructured text.
- Clean and transform text before sending it to an LLM.
- Parse logs, messages, HTML snippets, or API responses.
- Identify patterns such as:
- Emails
- Phone numbers
- Dates
- Order IDs
- URLs
- Key/value pairs
How to add and configure?
- Ensure the input text contains the data you want to extract.
- Drag the Regex Extractor node into your workflow.
- Add the input text directly, or connect a node that outputs text.
- Enter the desired regex pattern.
Inputs:
- Plain text
- Multiline text
- JSON or HTML as text
- Output from previous nodes
Outputs:
- All matches found
- Capture groups (if defined)
- Structured list of extracted values
Type Convert
The Type Convert node transforms data between message to string, JSON to dictionary or list, and dataframe to list of dictionaries for use by downstream nodes that require a specific structural type. It outputs all three types simultaneously, allowing downstream nodes to use whichever type they require.
Type Convert node supports robust JSON parsing from text:
- Detects and extracts the first valid JSON object or array found within the text (such as from code blocks or mixed content).
- Recursively parses nested JSON strings (for example, JSON fields that contain JSON data) to generate a structured output.

When to use?
- When downstream nodes require a specific data type:
- Parser: Accepts JSON or DataFrame
- Combine JSON: Accepts JSON only
- LLM/Prompt/Chat: Requires Message format
- To standardize mixed input formats received from APIs, tools, or earlier steps
How to add and configure?
- Drag and drop a Type Convert node from the Processing category.
- Connect any of Message, JSON, or DataFrame from the upstream node as input.
- Test the Type Convert node by connecting the output(s) - string, dictionary, or list of dictinories to appropriate downstream node(s). Execute the flow by selecting Playground.
Conversion Examples:
-
Input: “Hello” Outputs: Message - “Hello”, JSON - {“value”:”Hello”}, DataFrame - [{“value”:”Hello”}]
-
Input: ‘{“id”:1,”text”:”Hi”}’ Outputs: Message - string, JSON - {“id”:1,”text”:”Hi”}, DataFrame - [{“id”:1,”text”:”Hi”}]
-
Input: ‘[{“id”:1},{“id”:2}] Outputs: Message - string, JSON - [{“id”:1},{“id”:2}], DataFrame - [{“id”:1},{“id”:2}]
Inputs: Message, JSON, or DataFrame
Outputs (provided simultaneously):
- String for Message. JSON string for JSON objects/arrays
dictorlist(Union[Dict,List]) suitable for Parser or Combine JSON Datalist[dict]for table‑like flows
For example flows that use the Type Convert node together with the Parser and Combine JSON Data nodes, see Example Flows Using Combine JSON Data and Example Flow Using Parser.
- Use this node before Parser or Combine JSON to ensure the data is correctly formatted as JSON.
- If you expect arrays, check that the DataFrame output is a list of dictionaries (
list[dict]). - Keep the Message output concise if it will be used as input for prompts.
Combine JSON Data
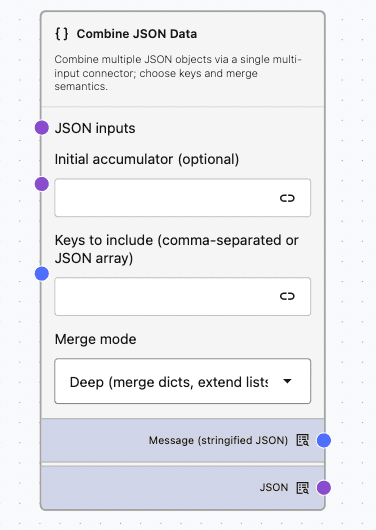
The Combine JSON Data node merges multiple JSON payloads into a single object. It allows you to filter top-level keys and define how to resolve conflicts between keys. The node outputs both a JSON object and a Message containing the stringified JSON.
When to use?
- Combine results from multiple APIs or queries.
- Create a single JSON payload for downstream processing.
How to add and configure?
-
Drag and drop a *Combine JSON Data** node from the Processing category.
-
Connect one or more upstream JSON sources to the JSON inputs inlet.
-
Optionally, connect the output of a previous Combine JSON node to the Initial accumulator field for multi-stage merging. Leave it empty for a filter-only operation.
-
Input the top-level keys to include from input sources in the Keys to include field. Supported formats are a JSON array or a comma-separated list:
["a","b"],a, b, ora b. Leave it empty to include all the top-level keys. -
Select the Merge mode from Deep or Replace. Use Deep merge to recursively extend lists, replace scalars, and combine keys from all JSONs. Use Replace mode to overwrite keys with values from the JSON of the last connected node to the JSON inputs inlet.
-
Test the Combine JSON node by connecting two or more JSON inputs to the JSON inlet and the stringified JSON or merged dictorionary JSON to a chat output node. Execute the flow by selecting Playground, typing a space in the Chat input, and pressing Enter.
Inputs: Multiple JSON or Message-with-JSON
Outputs:
- JSON: A merged object suitable for downstream nodes.
- Message: A stringified JSON for display or logging purposes.
Example Flows
Example 1: Using the Combine JSON Data Component in Deep Merge Mode:
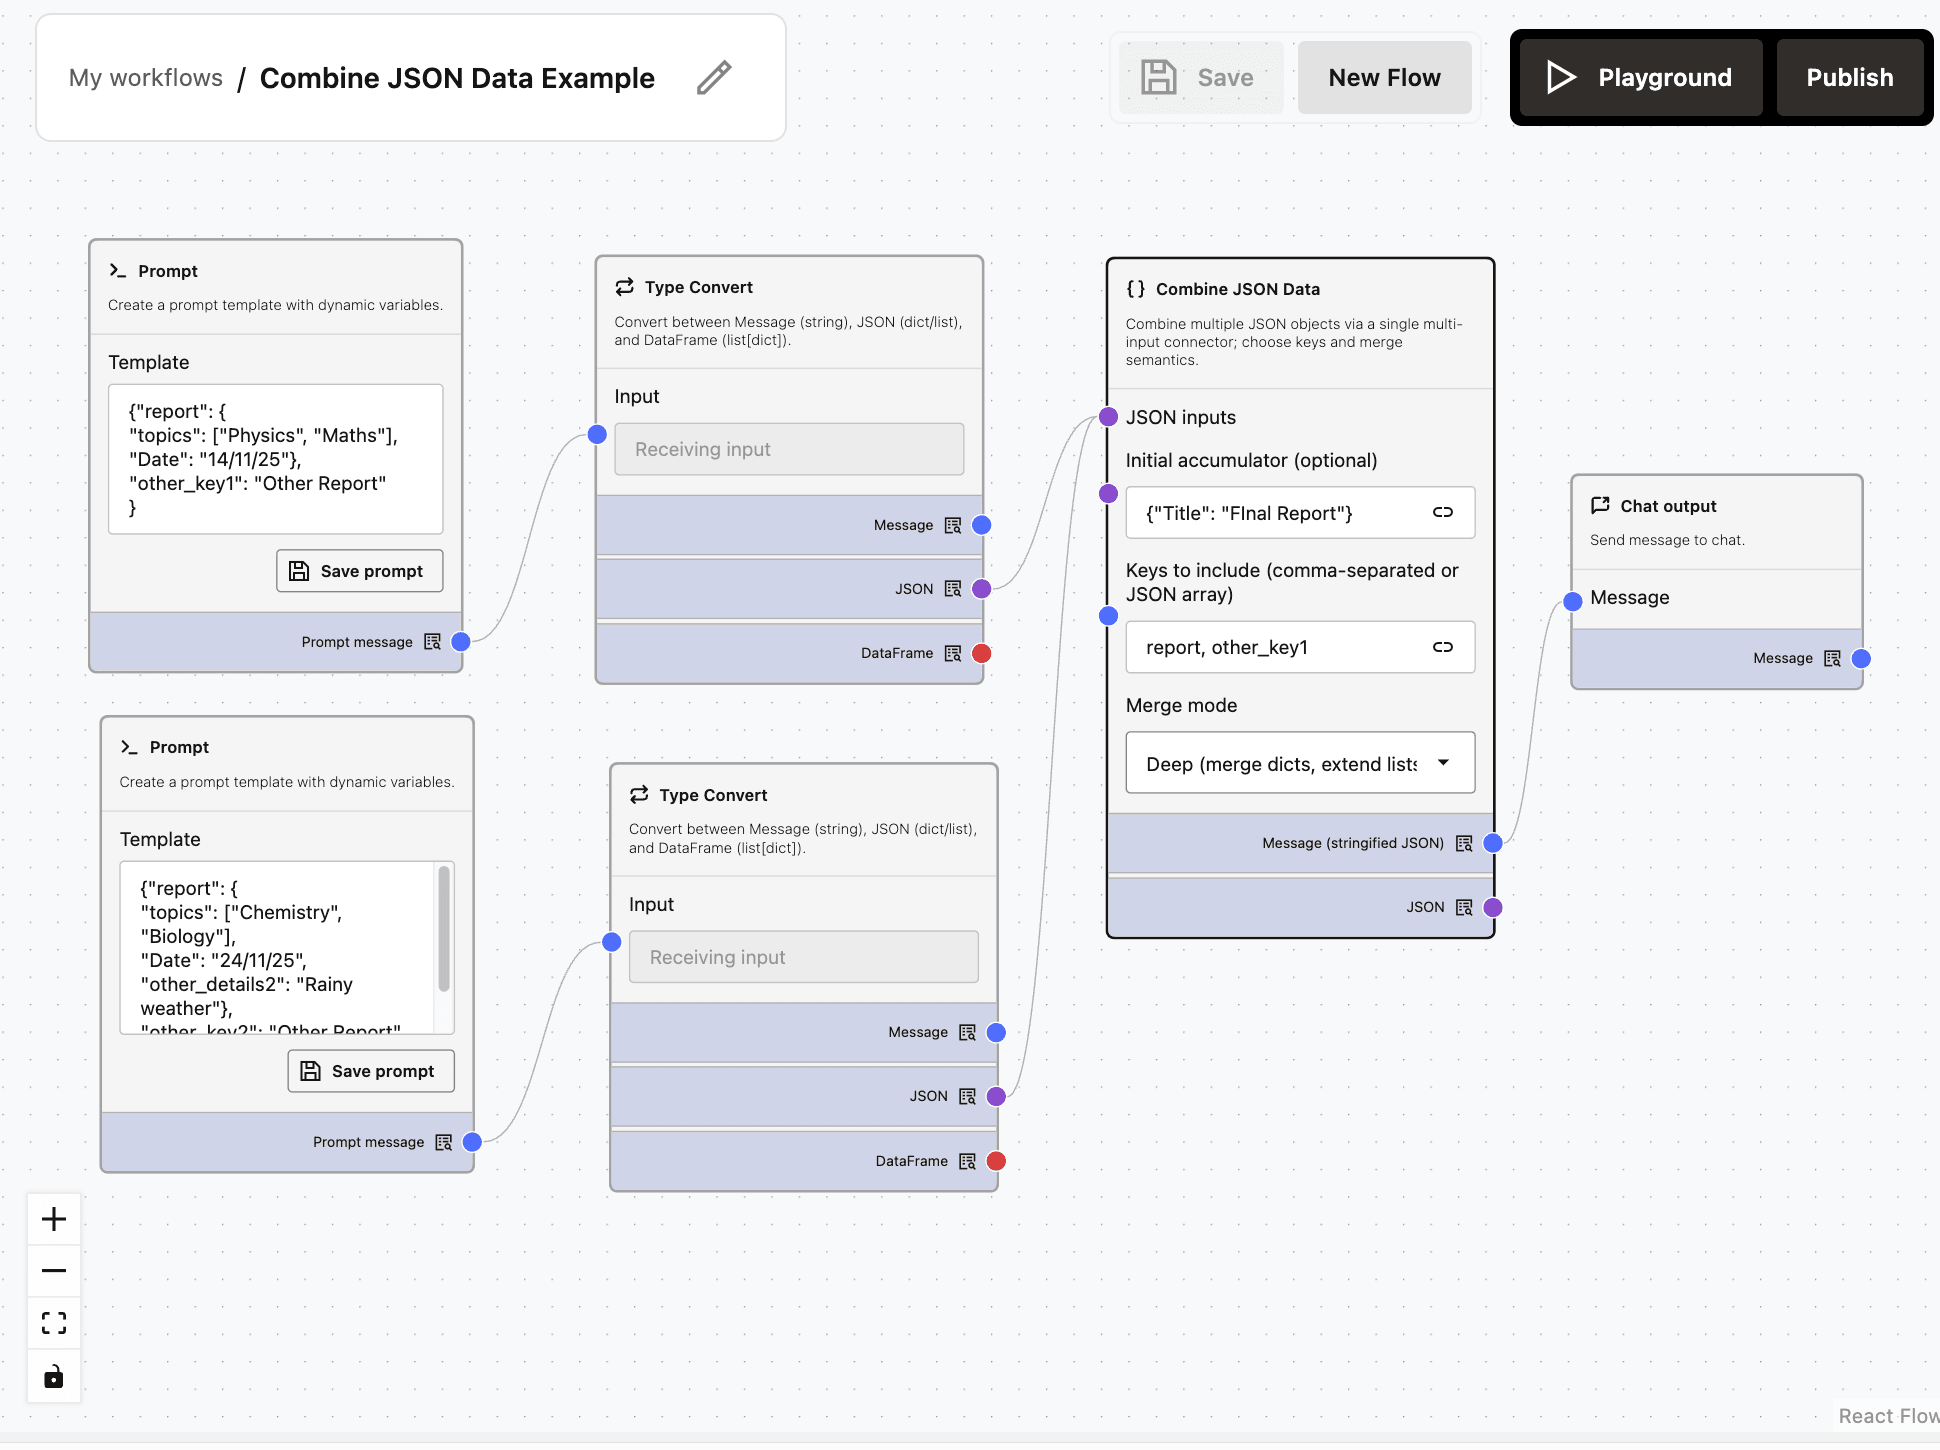
The output JSON {"Title": "Final Report", "report": {"topics": ["Physics", "Maths", "Chemistry", "Biology"], "Date": "24/11/25", "other_details2": "Rainy weather"}, "other_key1": "Other Report"} includes only the keys specified in the ‘Keys to include’ field (report and other_key1) of the Combine JSON Data node. In Deep Merge mode, list values are combined for matching keys (key=topics), whereas scalar values (key=Date) are replaced.
The Initial Accumulator can be any JSON, with or without keys that overlap with the incoming JSONs and will appear in the final JSON output. Any matching key in the Initial Accumulator will be replaced by the incoming value in the final JSON output. In this example, the Initial Accumulator is {“Title”: “Final Report”}.
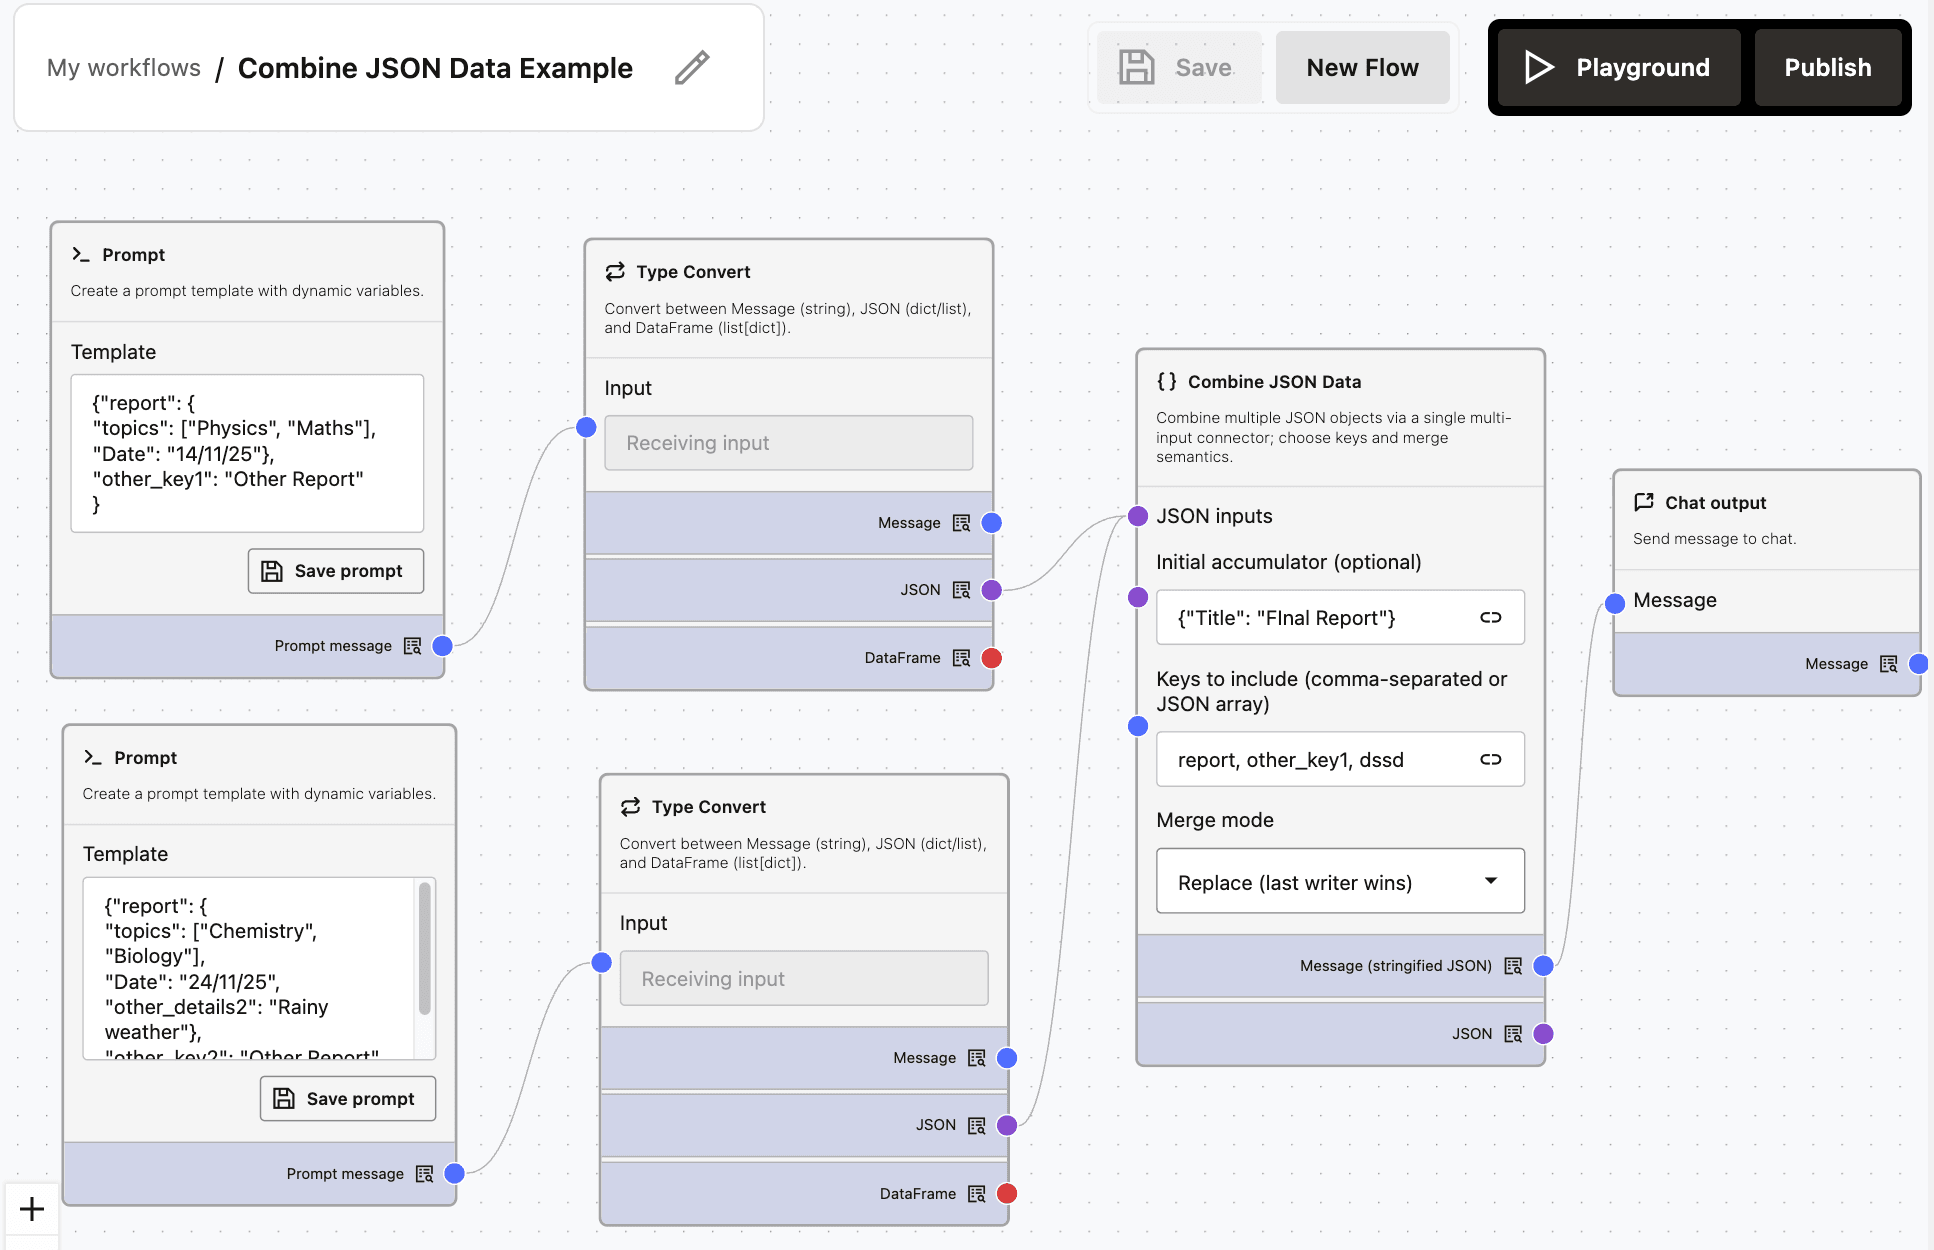
Example 2: Using the Combine JSON Data Component in Replace Merge Mode:
Description of the illustration combine-json-data-example-replace.png
The output JSON {"Title": "Final Report", "report": {"topics": ["Chemistry", "Biology"], "Date": "24/11/25", "other_details2": "Rainy weather"}, "other_key1": "Other Report"} includes the keys that were entered in the ‘Keys to include’ field (report and other_key1) of the Combine JSON Data Node. In Replace Merge mode, all the values for the same keys (key=topics) are replaced. The key value from the last input replaces the previous key values, so nodes connected later to Combine JSON Data overwrite those connected earlier.
The Initial Accumulator can be any JSON, with or without keys that overlap with the incoming JSONs and will appear in the final JSON output. Any matching key in the Initial Accumulator will be replaced by the incoming value in the final JSON output. In this example, the Initial Accumulator is {"Title": "Final Report"}.
Parser
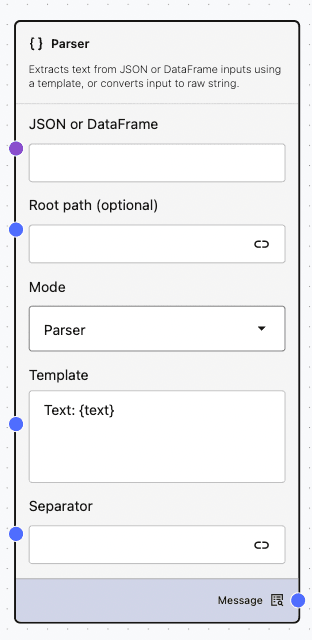
The Parser node extracts, formats, and combines text from structured inputs, such as JSON or DataFrame. It transforms these inputs into a clean, readable message output that can be displayed or passed to downstream steps.
When to use?
- Convert SQL or API results into easily readable messages.
- Create lists from arrays, such as orders, tickets, or products.
- Quickly convert JSON to a string format for logging or debugging.
How to add and configure?
-
Drag and drop a Parser node from the Processing category .
-
Connect JSON or Message outputs from upstream nodes to the JSON or DataFrame inlet. Alternatively, input a JSON in the text box.
-
Input an optional dot-path in the Root path field to navigate into the input before applying template. Examples: records, records.0, outer.inner.items.
-
Select Mode from Parser or Stringify. The parser mode applies the template to each of the selected items or objects. The stringify mode ignores template and converts the selection(s) to a raw string.
-
Input Template for parser mode as a format string with placeholders referencing keys or columns from objects, or {text} for entire string inputs.
Examples:
- Name: {name}, Age: {age}
- {PRODUCT_ID}: {PRODUCT_NAME} — stock {STOCK_QUANTITY}
- Text: {text}
-
Enter a Separator which is a string used to join multiple rendered items when the input is a list. Default is
\n. -
Test the Parser node by connecting a JSON input to its JSON inlet and routing the output message to a chat output node. Execute the flow by selecting Playground.
Inputs: JSON or DataFrame
Outputs: Message containing the final rendered text
Example Flow
Below flow demonstrates grouping the Jira issues into a ‘Primary Group’ and storing the remaining Jira issues as ‘Remaining Jiras Primary’.
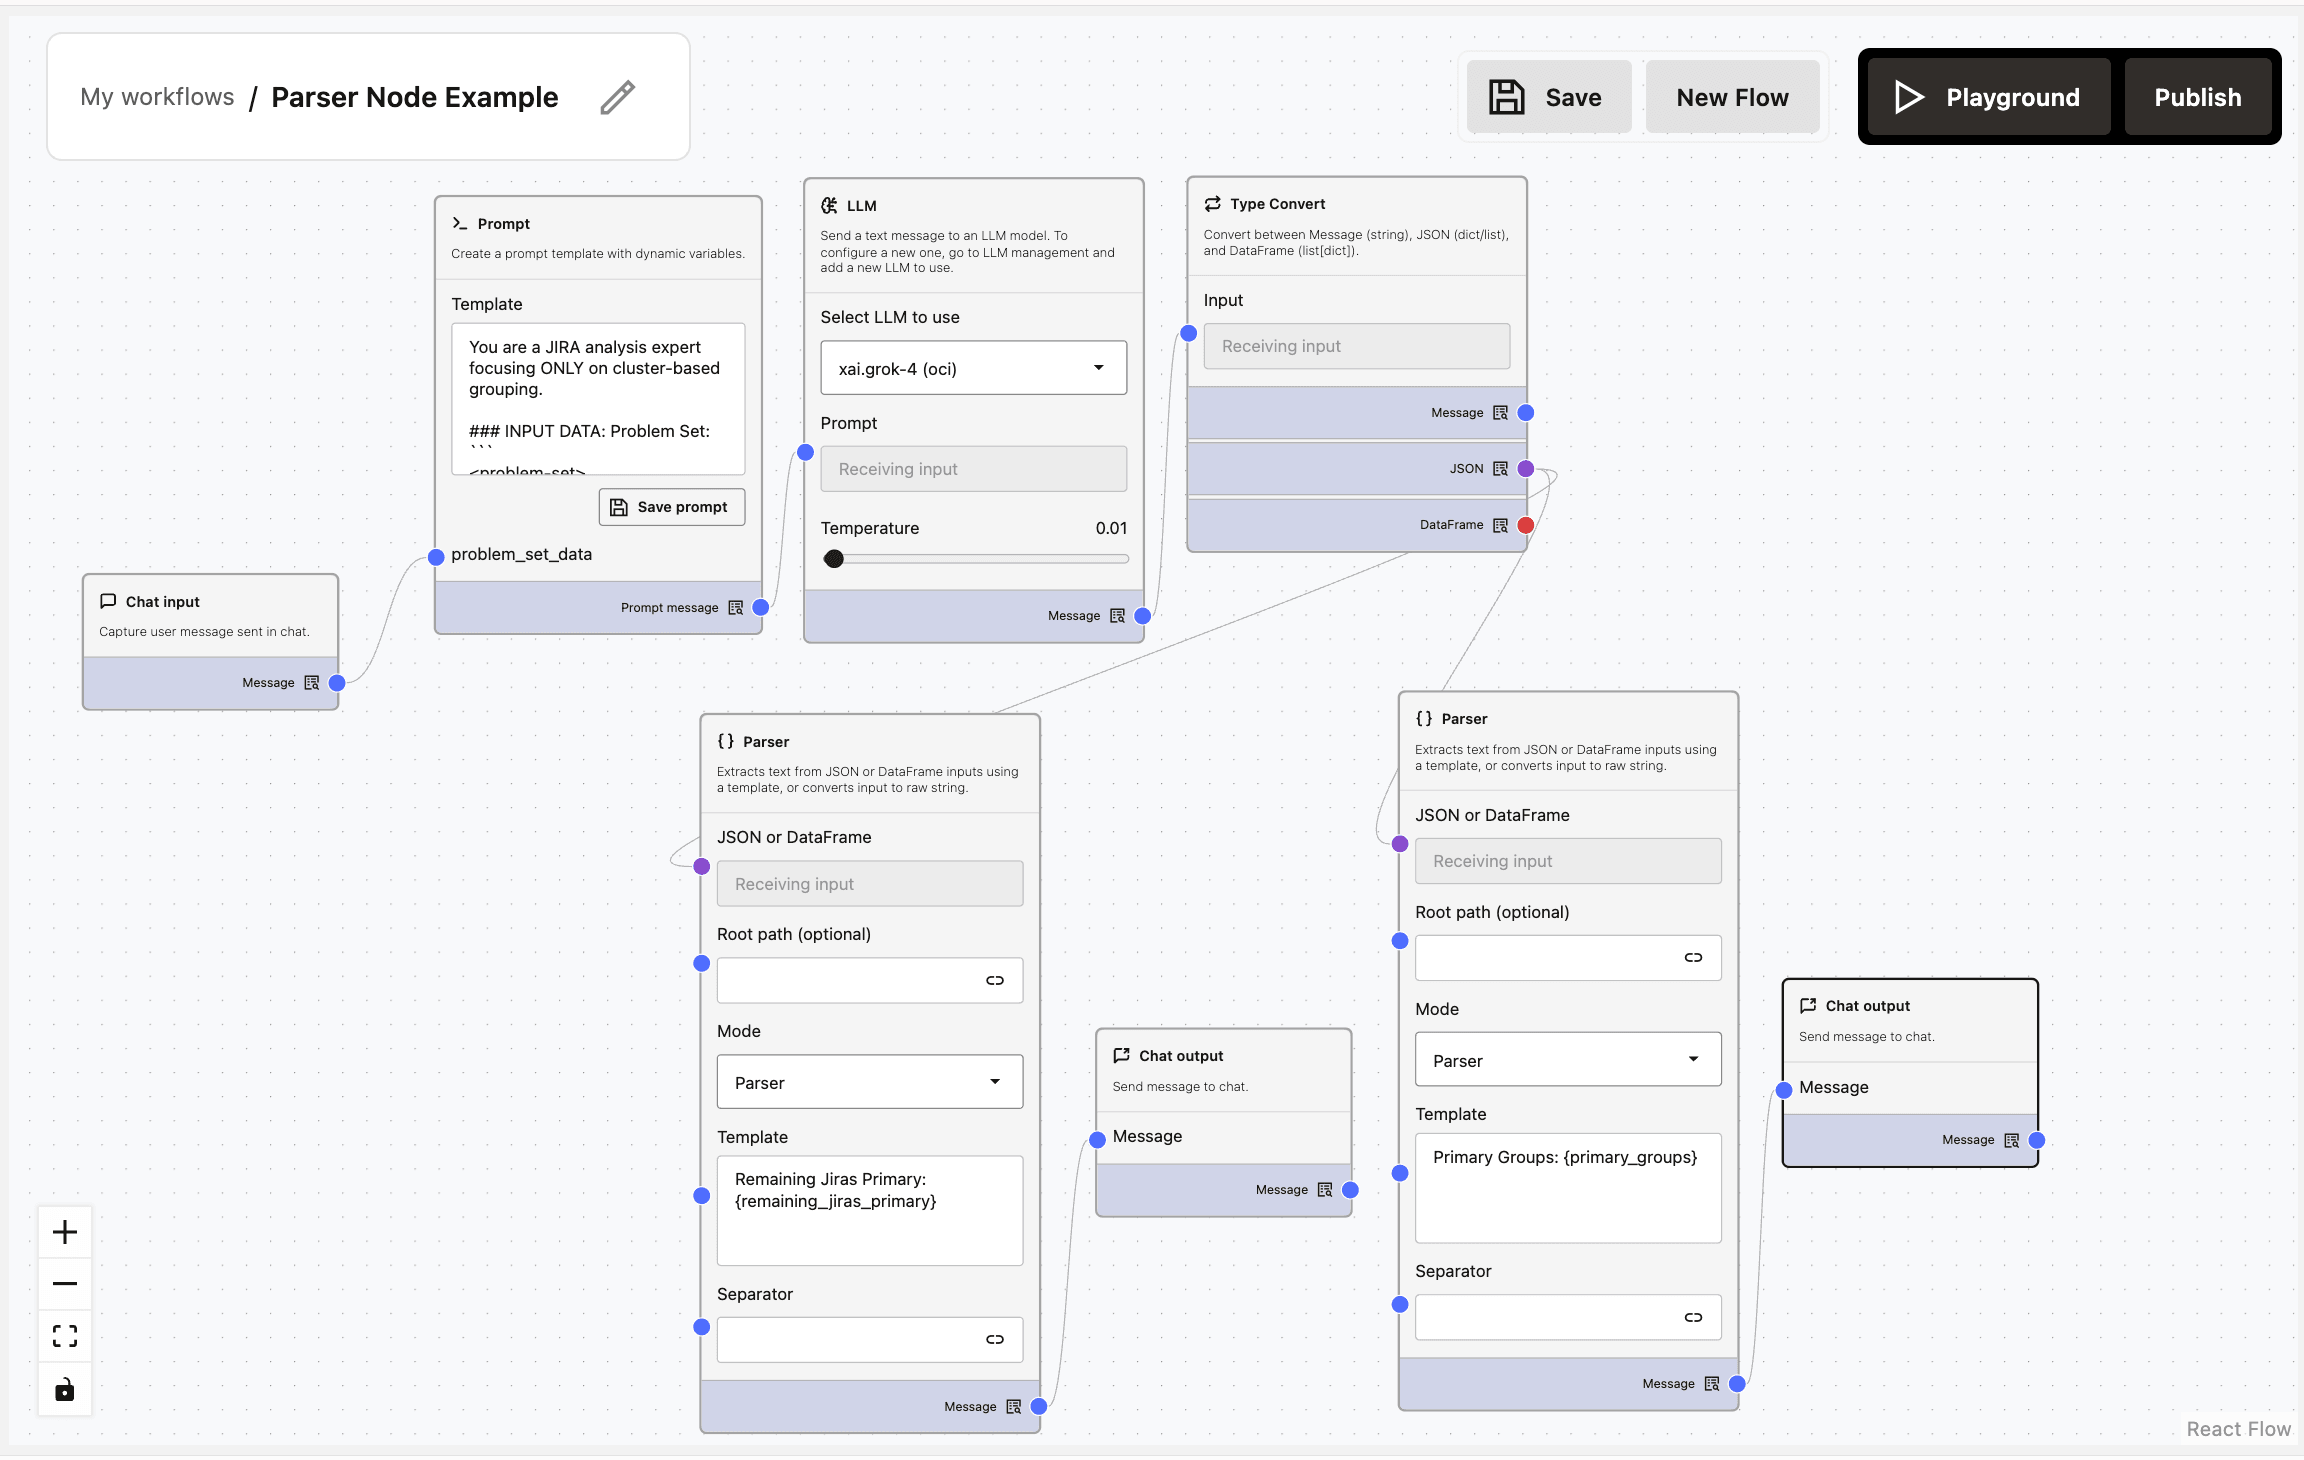
Description of the illustration parser-example.png
Using the following prompt, the LLM will generate a JSON with two keys - primary_groups and remaining_jiras_primary.
You are a JIRA analysis expert focusing ONLY on cluster-based grouping.

INPUT DATA: Problem Set:
<problem-set>
{{problem_set_data}}
</problem-set>

TASK: Group JIRAs based ONLY on cluster IDs.
STRICT RULES:
ONLY group by cluster ID matches
MANDATORY : EXACT cluster ID should match
MANDATORY : Each group MUST have minimum 2 JIRAs in the jira_list
If a group has fewer than 2 JIRAs, dissolve that group and ALL JIRAs from that group MUST be moved to remaining_jiras_primary
Order JIRAs chronologically within groups
DO NOT group by any other attributes
NO partial matches allowed
NO inferred relationships
VERIFY all groups meet the minimum 2 JIRAs requirement BEFORE outputting
DO NOT explain your reasoning or corrections
DO NOT output any intermediate results
MANDATORY: Use double quotes for ALL strings in JSON (not single quotes)
MANDATORY: Do NOT add “JIRA” prefix to any ID - use the exact ID format from the input data

OUTPUT FORMAT:
{{
    "primary_groups": [
        {{
            "title": "Cluster - <Full Cluster ID>",
            "summary": "Clear description of cluster impact",
            "jira_list": ["EXACSOPS-1", "EXACSOPS2-2"]
        }}
    ],
    "remaining_jiras_primary": ["EXACSOPS-3", "EXACSOPS-4"]
}}

CRITICAL INSTRUCTION: Return ONLY the final VALID JSON with proper double quotes for all strings. Do not include ANY explanations, reasoning, comments, corrections, or text of any kind outside the JSON structure. The response must begin with {{ and end with }} without any other characters.
Now, if you want to send the data in primary_groups directly for review and route remaining_jiras_primary through another round of analysis, you can use Parser nodes to parse the JSON generated by the LLM and extract data from two keys. This requires two Parser nodes. Select Playground to execute the flow.
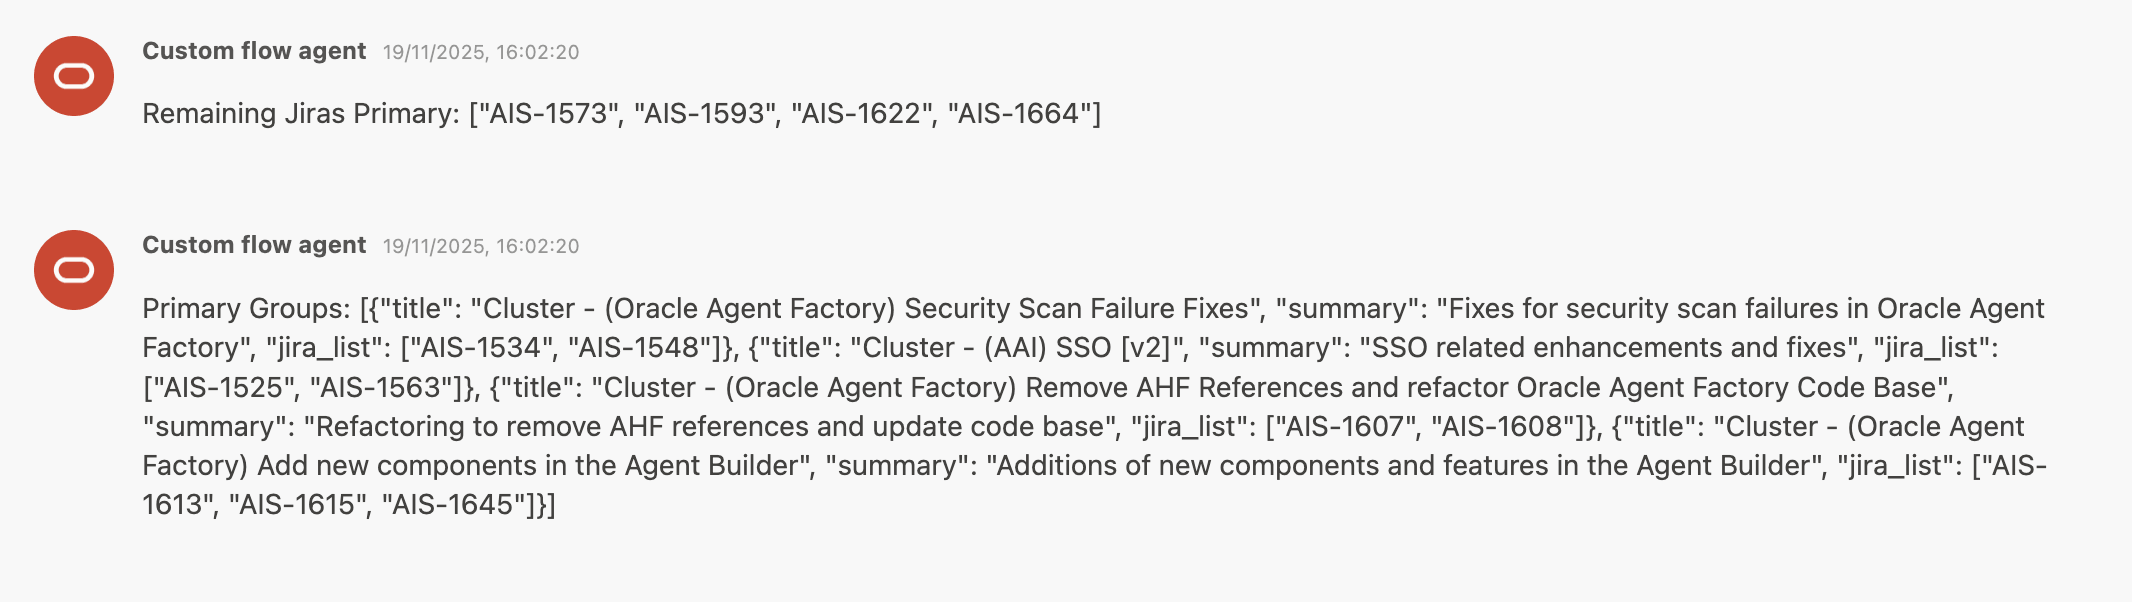
Description of the illustration parser-example-output.png
You can use the two outputs from the two Parser nodes for different purposes in a complex workflow.
Utilities
Sticky Notes
The Sticky Notes node keeps track of important information or instructions within your flow.
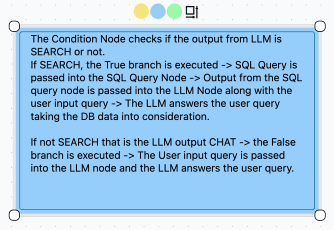
When to use?
- Explain complex logic
- Give context to collaborators
- Add annotations for future reference
How to add and configure?
- Drag the Sticky Notes node onto the canvas.
- Click the note to edit its text.
- Resize or move the note as needed.
- Choose your preferred color.
Inputs: Raw text
Outputs: Not applicable