Configure Select AI for Your Database
Before you can create and execute Select AI workflows in Agent Builder, you must first create a profile for your database. To do this, navigate to Settings > Select AI Framework and follow the instructions on this page. See Select AI Nodes for instructions on configuring Select AI nodes in Agent Builder and incorporating them into your workflows.
Prerequisites
Make sure your database is provisioned with the necessary Oracle packages and privileges before you start setting up the credentials, profiles, or vector indexes.
Prepare Database for Using Select AI Components
Package Requirements:
- For Credentials and Profile Management:
The database must have at least one of the following. If any of the packages below are present, you will be able to configure and manage Credentials and Profiles.DBMS_CLOUDDBMS_CLOUD_ADMINDBMS_CLOUD_AI
-
For Vector Index Management:
The database must have at least one of the above (for credential/profile management) andDBMS_CLOUD_PIPELINE. -
For Agent Deployments (Agent Builder):
The database must have any of the the required packages for credential/profile management andDBMS_CLOUD_PIPELINE. -
For network access from in-database AI features:
The database may require network ACL configuration withDBMS_NETWORK_ACL_ADMIN, depending on where the model provider endpoint is hosted and how your database environment controls outbound network access. - For in-database agent features:
Features that use Oracle Database AI Agent capabilities requireDBMS_CLOUD_AI_AGENTto be available and executable by the configured user.
Grant Privileges (Autonomous Database Example)
Log in as ADMIN and execute:
GRANT CREATE DATABASE LINK TO <your_user>;
GRANT EXECUTE ON DBMS_CLOUD_ADMIN TO <your_user>;
GRANT EXECUTE ON DBMS_CLOUD TO <your_user>;
GRANT EXECUTE ON DBMS_CLOUD_AI TO <your_user>;
GRANT EXECUTE ON DBMS_CLOUD_AI_AGENT TO <your_user>;
GRANT EXECUTE ON DBMS_CLOUD_PIPELINE TO <your_user>;
Replace
Note: To configure credentials and profiles, the database user needs EXECUTE on at least one core cloud package: DBMS_CLOUD, DBMS_CLOUD_ADMIN, or DBMS_CLOUD_AI. DBMS_CLOUD_AI is required to run Select AI. DBMS_CLOUD_PIPELINE extends this capability to RAG and vector indexes, and DBMS_CLOUD_AI_AGENT is required for in-database agent features. DBMS_NETWORK_ACL_ADMIN is normally granted only to the database administrator who configures outbound access.
Add Your Database as a Data Source
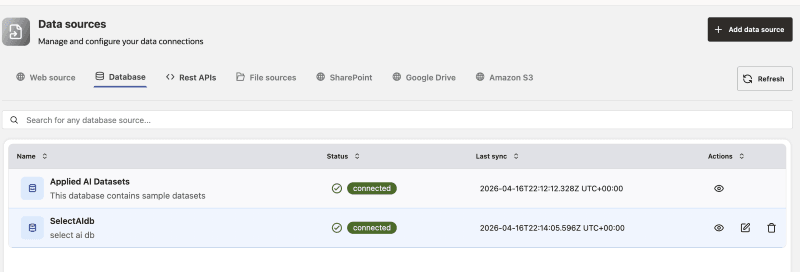
Add your database as a Database Data Source before configuring Select AI resources.
- Go to Data Sources.
- Click Add Data Source.
- Select Database.
- Enter the connection details using a database user with the required Select AI package grants.
- Save and test the connection, then verify that its status is Connected.
Readiness and Troubleshooting
Agent Factory checks which Select AI components are available for the selected database. A component can be hidden or disabled when the database package, grant, credential, profile, vector index, or network access required for that component is missing.
| Symptom | Check |
|---|---|
| Database does not appear in the Select Database list | Confirm the database source is configured and the user has required Select AI package grants. |
| Credential or profile actions are disabled | Verify DBMS_CLOUD, DBMS_CLOUD_ADMIN, or DBMS_CLOUD_AI availability and grants. |
| Vector index actions are disabled | Verify credential/profile packages and DBMS_CLOUD_PIPELINE. |
| In-database agent actions are unavailable | Verify DBMS_CLOUD_AI_AGENT availability and grants. |
| Validation succeeds but runtime calls fail | Check outbound database network ACLs, provider endpoint, credentials, and model availability. |
When troubleshooting Select AI setup, collect the exact database user, selected database source, package availability, grants, provider endpoint, and validation error message before opening a support request.
Select AI Configuration Workflow
Choose your database from the Select Database dropdown to configure Select AI resources. Only Select AI features supported by your database packages and privileges appear.
Important: Make sure your user has the required EXECUTE grants for the Select AI configuration. Otherwise, the databases will not be displayed in the Select Database drop-down list. See Grant Privileges.
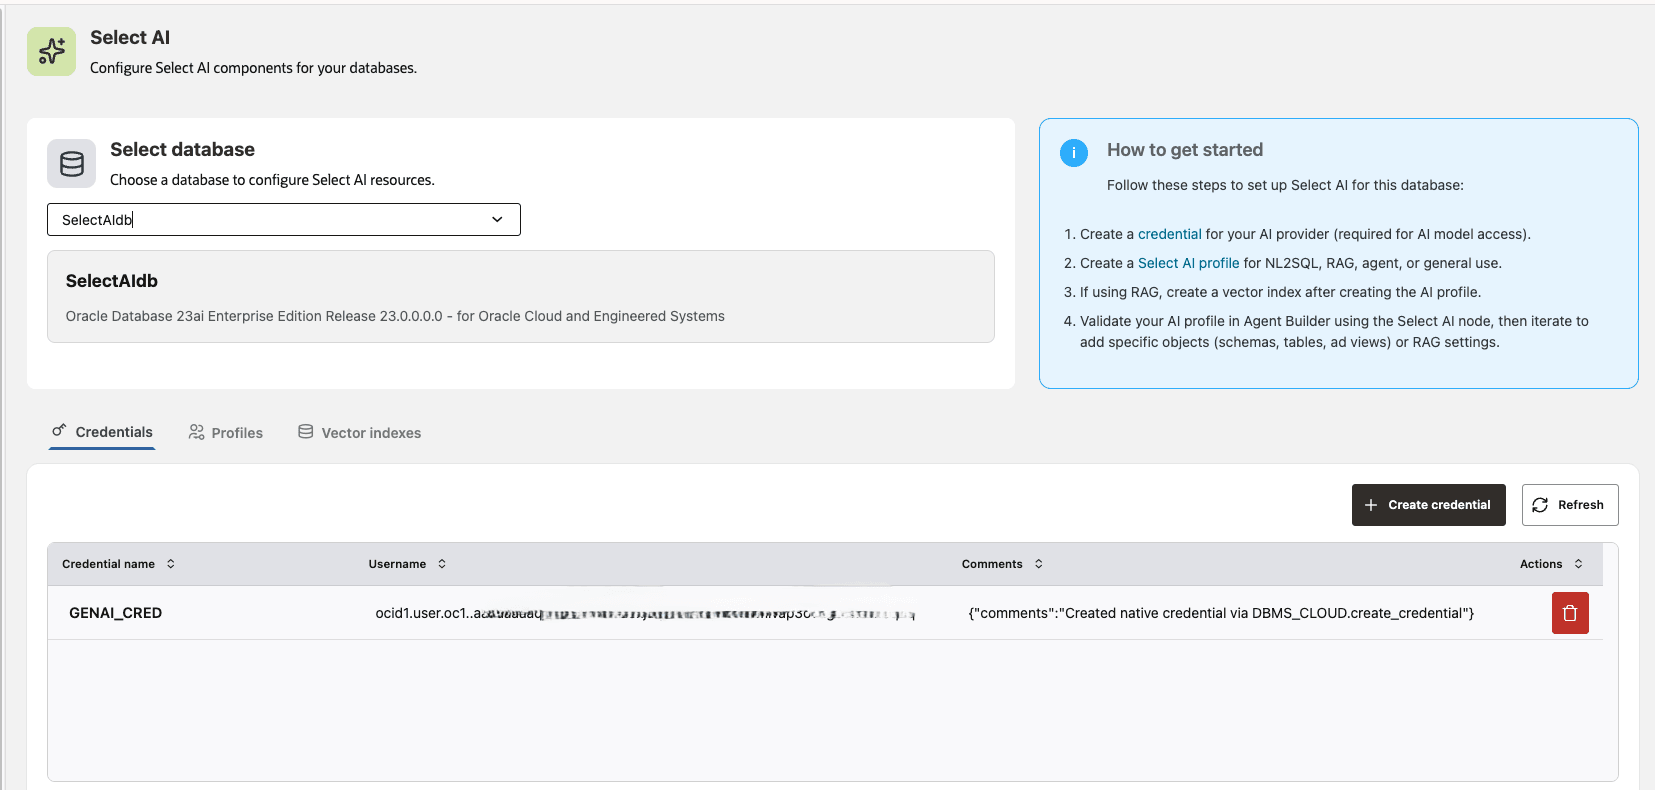
Follow the steps below to configure Select AI components for your selected database:
Configure Network ACL Access
Use Network ACL Admin to manage the database’s outbound access to AI provider and tool endpoints. Configure an ACL entry before you use a provider or tool that requires the database to connect to an external service.
- Open Network ACL Admin, then click Create ACL Entry.
- Select a Setup Type for the provider or integration, such as OpenAI, Azure OpenAI, Anthropic, Cohere, Google/Gemini, AWS Bedrock, Websearch, HTTP Request, Slack Notification, or SMTP.
-
Select the database principal and review the default Host and Port. Update them only when your provider or integration uses a different approved endpoint.
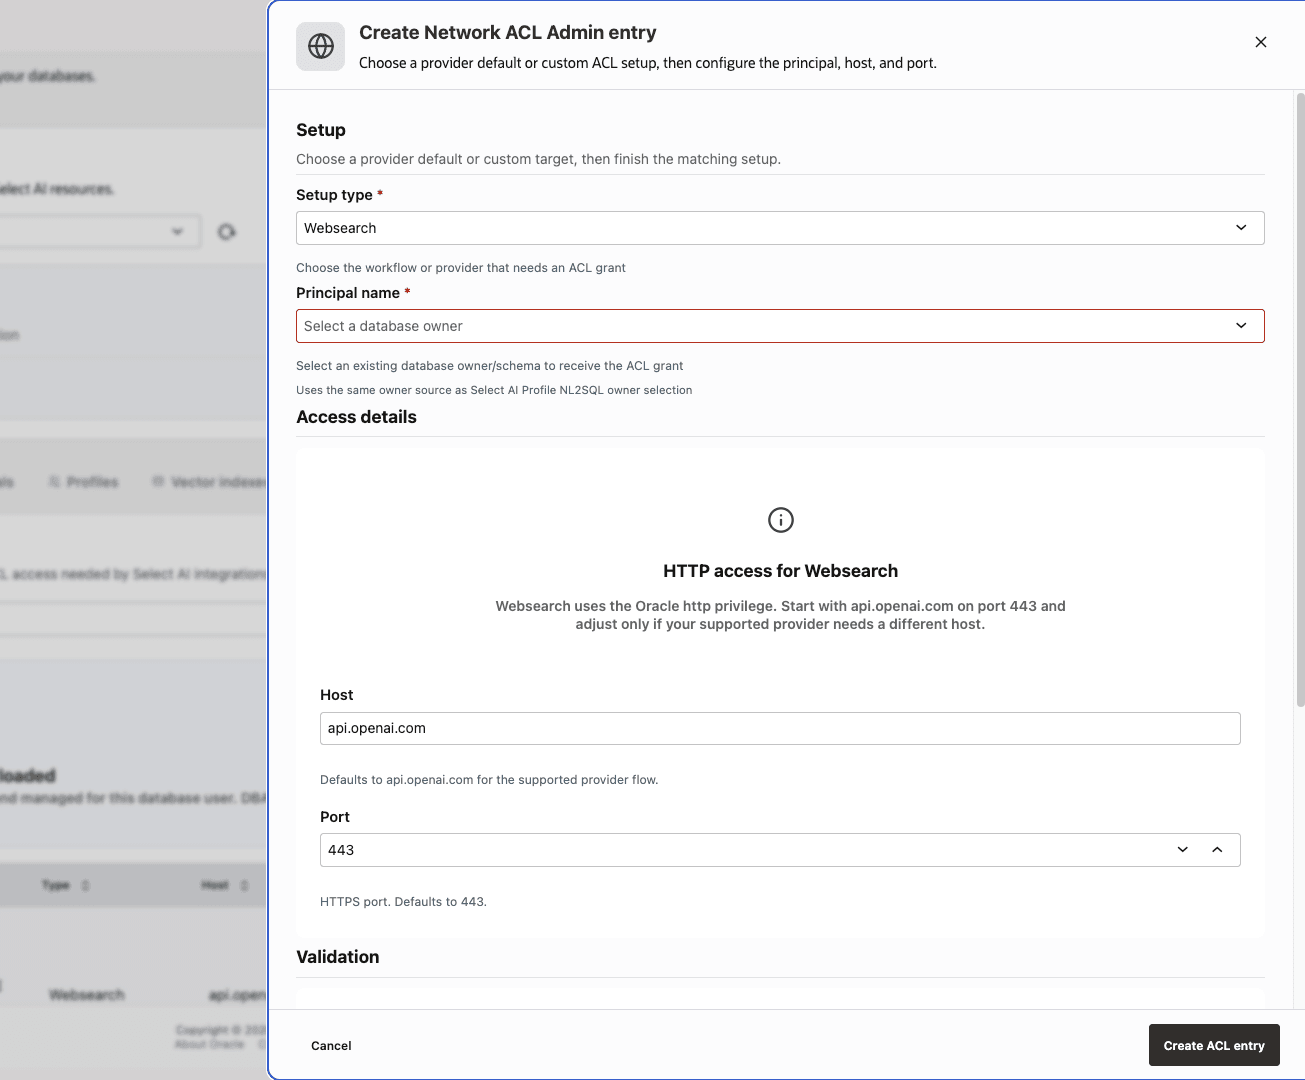
- Create the ACL entry.
- Refresh the ACL list to confirm the entry is available. You can edit or delete an entry when your database privileges allow the action.
Use the minimum host and port access needed for the provider or tool. If Network ACL Admin is unavailable, ask your database administrator to configure the required outbound access.
Note: OCI Generative AI on Autonomous Database does not require network ACL privileges.
Create Credential
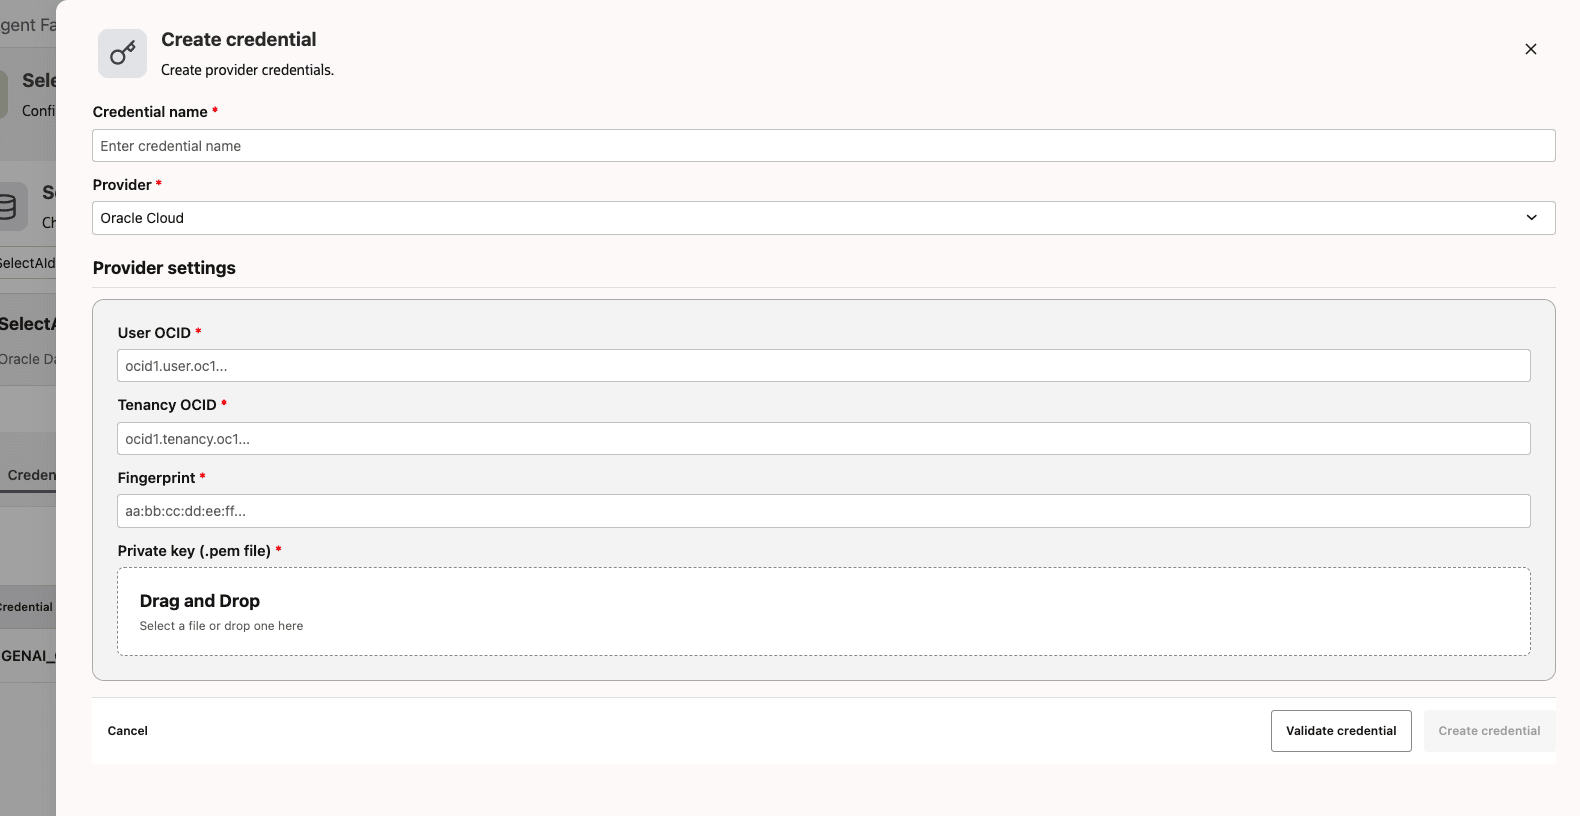
In the Credentials tab, click Create Credential to enable secure communication with providers and storage systems.
-
Enter a unique Credential name to identify your credential. This name will be stored in the database and referenced by profiles or vector indexes.
-
Choose the target provider for your credential. Available providers can include OCI, OpenAI, Anthropic, Hugging Face, Cohere, Google, Azure OpenAI, AWS Bedrock, Slack, and Email (SMTP). The selected provider determines which additional fields must be filled.
-
Configure provider settings: For OCI provider:
- Enter User OCID required for OCI signing. Input the OCID in the format
ocid1.user…for the OCI user. - Enter Tenancy OCID required for OCI signing. Input the OCID for your Oracle Cloud tenancy in the format
ocid1.tenancy…. This associates the credential with the relevant tenancy. - Enter Fingerprint. Paste the fingerprint for your OCI API key. The fingerprint must match the public key associated with your private PEM key.
- Enter Private Key (PEM). Provide the PEM-formatted private key as plain text. This key is used for secure request signing.
For API-key providers such as OpenAI, Anthropic, Hugging Face, Cohere, Google, and Azure OpenAI, enter the API key or token required by the provider. For AWS Bedrock, enter an access key ID and secret access key. For Slack, enter a bot token. For Email (SMTP), enter the SMTP user name and password.
- Enter User OCID required for OCI signing. Input the OCID in the format
-
Click the Validate Credential button to verify that your entries are correct and that the connection to the provider is successful.
-
Once all required fields are completed and validated, click the Create Credential button. This saves your credential, making it available for use with profiles and vector indexes.
Create Profile
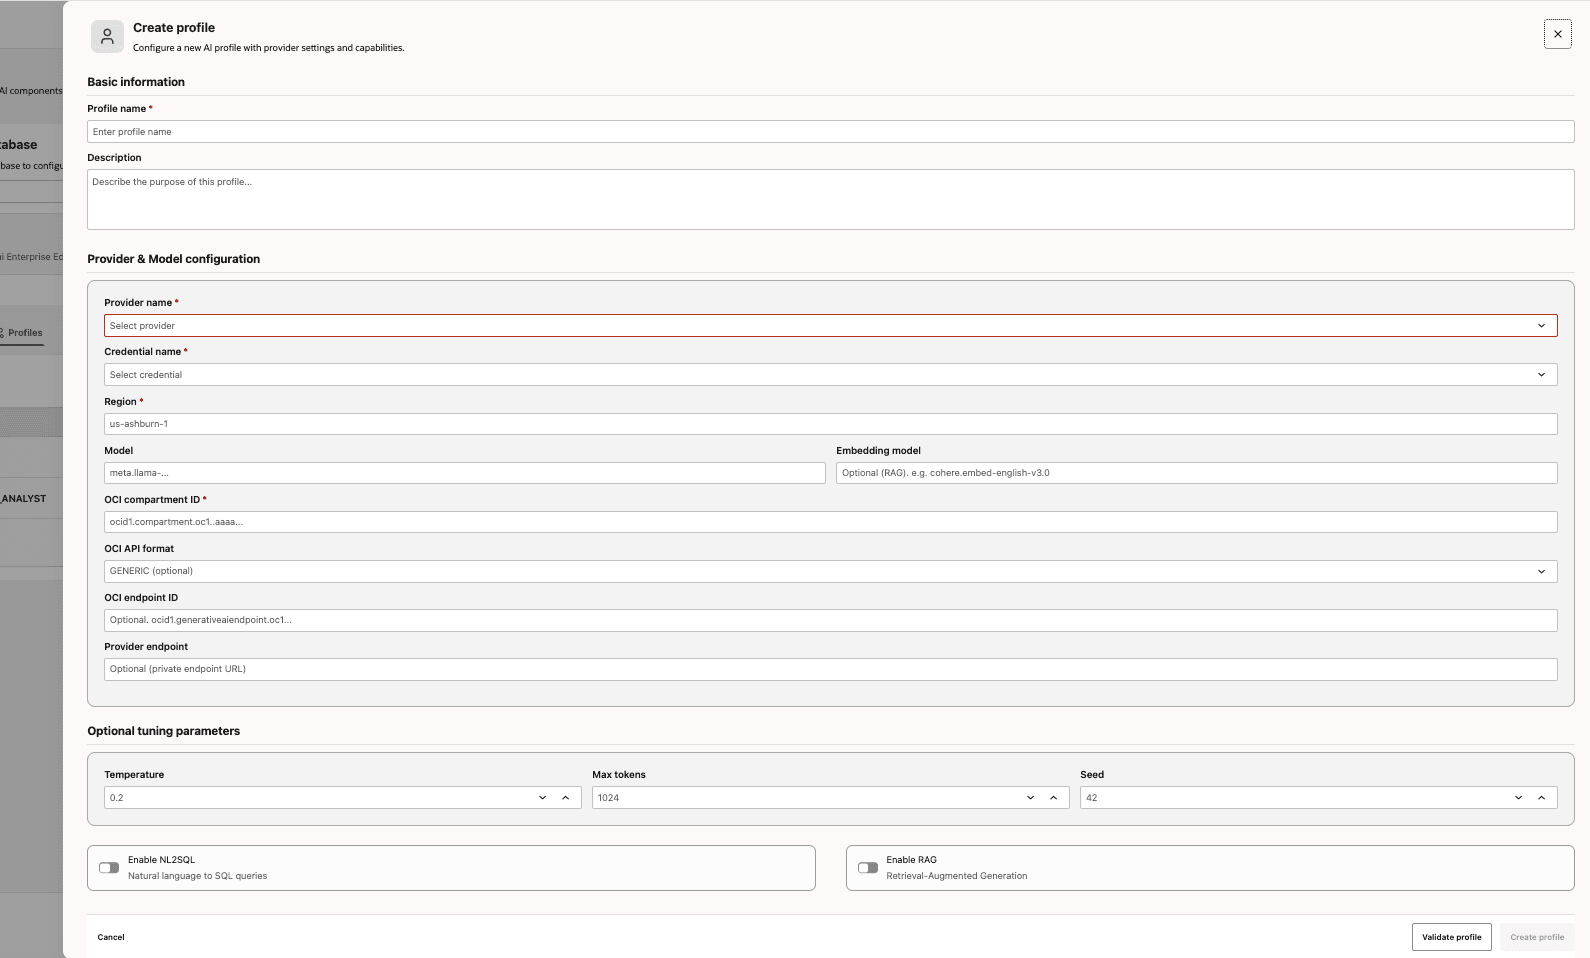
In the Profiles tab, click Create Profile to define AI behavior, provider routing, and feature configuration.
Tip: To enable Retrieval-Augmented Generation (RAG), your profile must link to an existing Vector Index. Do not enable RAG if no Vector Index exists. Similarly, NL2SQL should only be enabled if a Database Object List is defined. If you have neither, consider creating a Generic Profile, which has no dependencies and can later be used as a base for adding a Vector Index or creating a specialized profile.
-
Enter a unique Profile Name for the AI profile. This will identify your profile and is used by the Agent Builder.
-
Add a Description (optional), which is a human-friendly summary or notes about the profile. Including a description is recommended for clarity.
-
Select the provider routing key in Provider Name. The available fields depend on the selected provider.
-
Choose an existing Credential Name (created in Step 1) to be used for API calls. The credential must already be created and available for selection.
-
Specify the provider Region where resources will be provisioned or accessed. Ensure the region matches where the model is available.
-
Specify the Model for the large language model (LLM) you want to use. This value may be provider-specific.
-
Enter OCI Compartment ID OCID (for OCI Providers) for resource scoping. This value typically starts with
ocid1.compartment…. -
(Optional) Specify OCI API Format to set the provider interface style (such as GENERIC or COHERE). This controls the way API requests are formatted.
-
(Optional) Specify Provider Endpoint to override the provider’s base URL. For example, enter a URL string for private endpoints.
-
(Optional) Enter the OCI Endpoint ID OCID for advanced OCI configurations (typically begins with
ocid1…) to specify a dedicated OCI endpoint. -
(Optional) Specify Embedding Model for embedding generation (such as for Retrieval-Augmented Generation (RAG) workflows).
-
(Optional) Set Temperature value to control randomness in model responses. Use a lower value for more deterministic outputs.
-
(Optional) Set Max Tokens to define the maximum response length in tokens. If omitted, system default values will apply.
-
(Optional) Set Seed value to control reproducibility of responses. This can be a string or integer, depending on provider support.
-
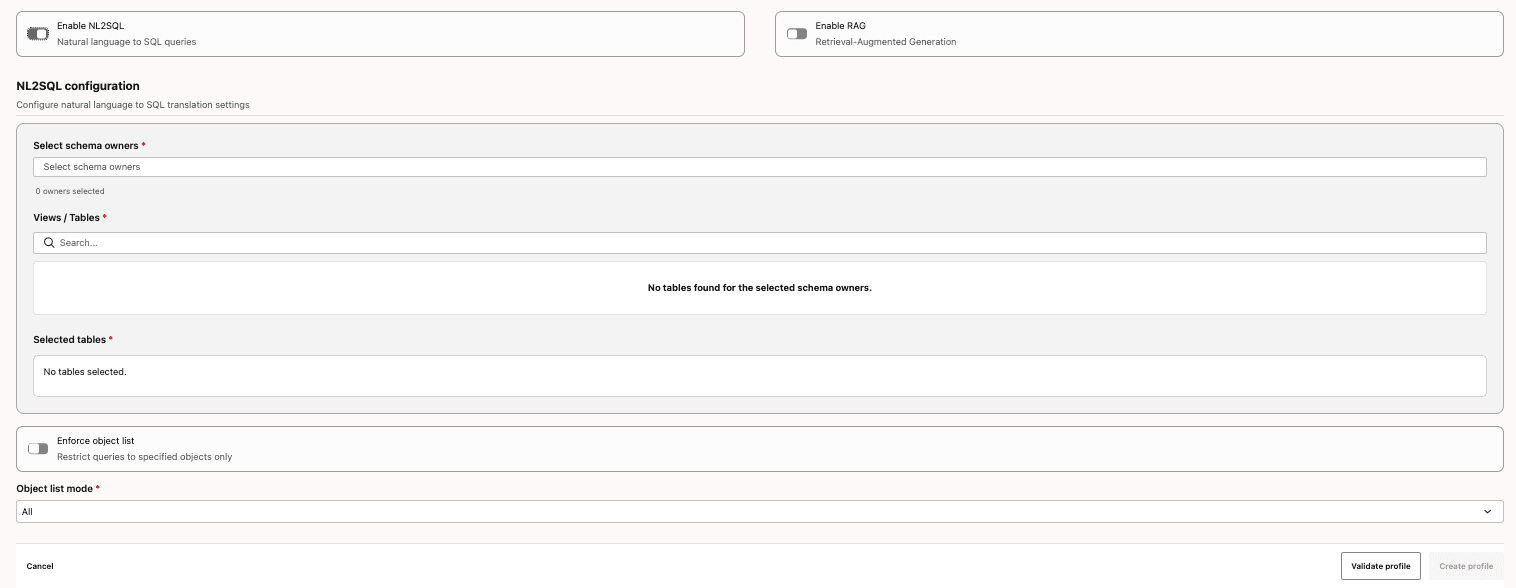
(Optional) Configure settings for natural language to SQL translation by toggling the Enable NL2SQL option. The setting controls which tables/views the model may query.
-
Choose which schema owners should be inspected when generating SQL queries in the Select Schema Owners. The list of available owners is populated dynamically.
-
Specify the tables and views that you want to allow for NL-to-SQL queries by selecting from the available
{ owner, name }objects in the Views/Tables. This defines the list of database objects that NL2SQL can query. -
Enable the Enforce Object List option (Recommended) to restrict SQL queries to only the objects specified in the Tables/Views List. This is an important guardrail for security and query scope control.
-
Set Object List Mode (Optional) for metadata selection behavior. Options include:
- All: Use all available objects from the object list.
- Automated: Automatically select and vectorize columns for RAG workflows, especially if many tables are required.
-
-
(Optional) Activate Retrieval-Augmented Generation (RAG) workflows by toggling the Enable RAG option. Enabling this will allow you to select a Vector Index as a retrieval source.
-
Choose an existing vector index from the Vector Index Name dropdown to serve as the source for retrieval. The selected vector index must already exist in your environment.
-
Optionally, enable Source Offsets to add traceability metadata to retrieval results. This feature can be useful for explainability by showing the source position of retrieved content.
-
-
Click the Validate Profile button to verify that your entries are correct.
-
Once all required fields are completed and validated, click the Create Profile button. This saves your profile for use with Agent Builder workflows.
Create Vector Index (Optional/RAG Only)
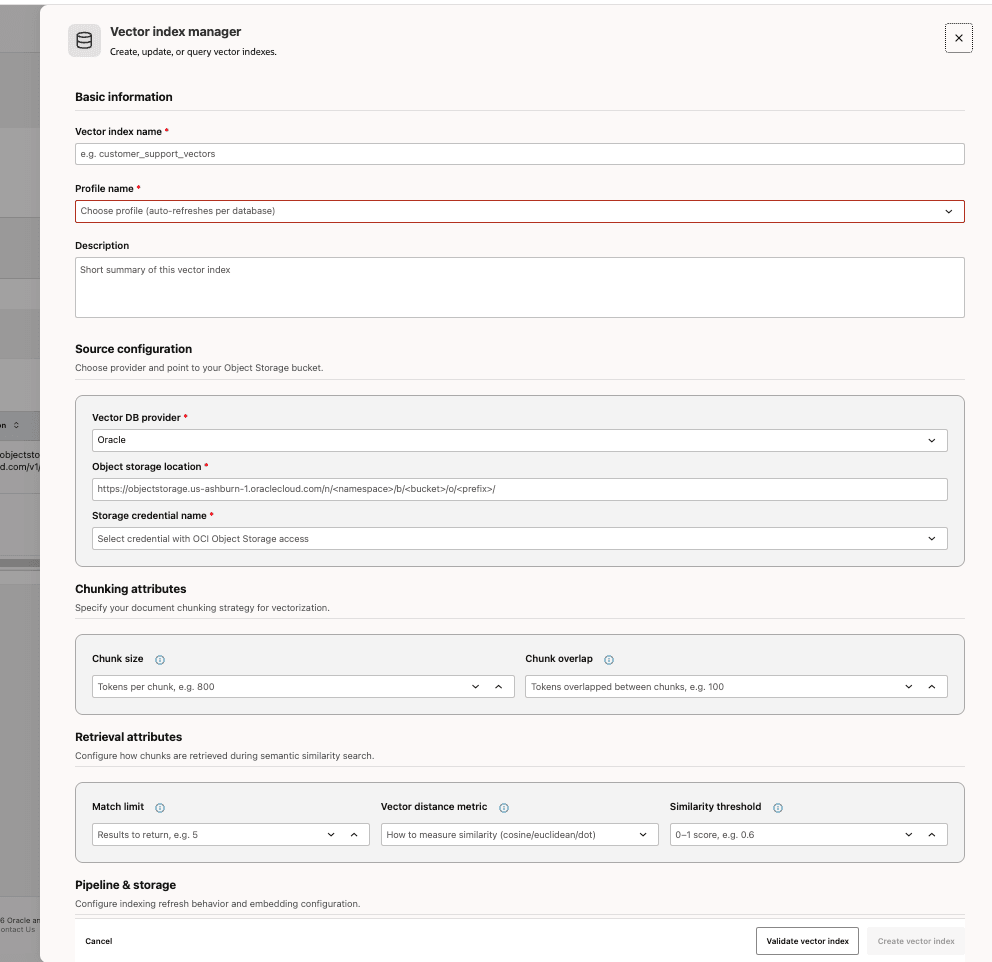
Vector Indexes enable RAG workflows. Follow the steps below to create a vector index:
-
Enter a unique Vector Index Name to identify your vector index. This name will be referenced by RAG profiles.
-
Choose an existing Profile Name to reference for embedding generation. The selected profile will be used for embeddings.
-
Optionally, add a Description to provide notes or context for the vector index. Adding a description is recommended for clarity.
-
Select Oracle as the Vector DB Provider.
-
Specify the Object Storage Location, which is a URL or prefix for the document source path—typically a bucket or folder in object storage.
-
Choose a Storage Credential Name that provides access to the object storage location. Ensure the credential has read permissions.
-
Set the Chunk Size (Optional) to define the size used to split documents into chunks. Adjust this integer value to control the granularity of indexing.
-
Enter a value for Chunk Overlap (Optional) to help preserve context between chunks and improve recall during retrieval.
-
Set the Match Limit (Optional) to specify how many results to return per retrieval operation. Adjust this integer value based on recall and cost considerations.
-
Select a Vector Distance Metric (optional) to use for similarity calculation, such as cosine similarity.
-
Set the Similarity Threshold (optional), which is a float value that defines the cutoff for relevance matches. Higher values return stricter matches.
-
Set the Refresh Rate (optional) to define the automatic index refresh frequency, if scheduling is supported.
-
Specify the Vector Table Name (optional) when required by your configuration.
-
Click the Validate Vector Index button to verify the access and configuration.
-
Click the Create Vector Index button to save the vector index.
Note: Pipeline name and status are system-managed. You can create and delete vector indexes from the current page, but editing an existing vector index is not currently available.