Sample Flows with Agent Builder
Use Agent Builder to leverage enterprise data for agentic use cases and to build custom flows.
From the left sidebar, navigate to Agent Builder or My Custom Flows to create custom workflows.
-
To add components to the canvas, drag them from the Components menu on the left. Alternatively, you can hover over the desired component and select the + icon.
-
To delete a component or a connector from the canvas, select it and press the Backspace or Delete key.
See Agent Builder Components to learn about the components available in Agent Builder.
Sample Workflows
Explore our sample workflows and discover real-world business use cases designed to help you get started quickly from beginner-friendly examples to advanced, power-user scenarios.
1. Generate product pitch - Beginner Level
Already present in Template Gallery - Click on Import Flow to test it out.

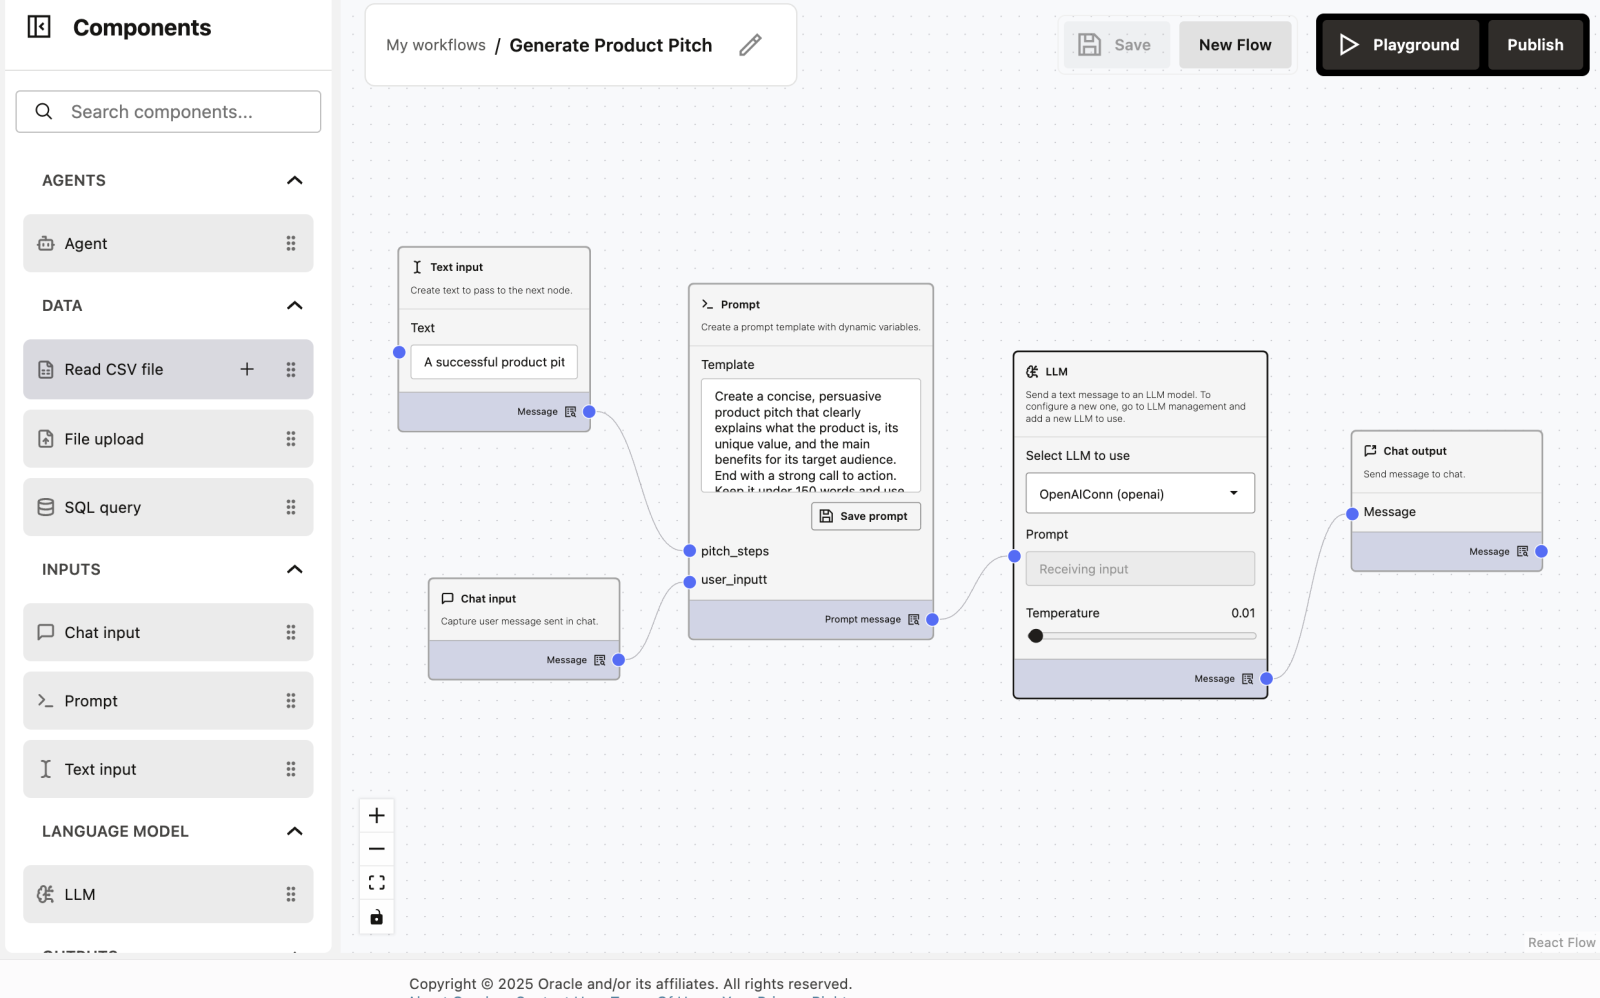
What does this workflow do?
This workflow generates a short, persuasive product pitch using an LLM. You can edit the prompt or input text and instantly see how the output changes.
It’s designed to help beginners understand:
- How inputs flow through nodes
- How prompts control AI behavior
- How changing text affects results
Workflow Overview
The workflow has 5 simple nodes, connected from left to right:
- Text Input
- Chat Input
- Prompt Template
- LLM
- Chat Output
Each node performs one clear task.
How to Build This Workflow (Drag & Drop)
This workflow is created using drag-and-drop, without writing any code.
Step 1: Open the Node Sidebar
On the left side of the screen, you will see a sidebar containing different nodes. Each node represents a specific function (Input, Prompt, LLM, Output, etc.).
Step 2: Drag a Node to the Workflow Canvas
- Click and hold a node from the left sidebar
- Drag it to the empty workflow area (canvas)
- Release the mouse button to drop it
- The node will now appear on the workflow sheet
Step 3: Add Required Nodes
Repeat the drag-and-drop action to add the following nodes:
- Text Input
- Chat Input
- Prompt
- LLM
- Chat Output
Arrange them roughly from left to right for better readability.
Step 4: Connect the Nodes
Each node has small blue connection points (ports).
- Click on a blue dot of one node
- Drag the line to the blue dot of the next node
- Release to connect them
This defines how data flows through the workflow.
Step 5: Configure the Nodes
Click on any node to open its settings.
Enter text in:
- Text Input
- Prompt Template
Select a model in the LLM node.
Step 6: Save, Run on Playground and Observe Output
- Enter a message in Chat Input
- Run the workflow
- View the generated product pitch in Chat Output
Node-by-Node Explanation
1. Text Input
Purpose: Provides a default topic for the product pitch.
Example value:
A successful product pitch clearly communicates what the product is, why it matters, and why the audience should care. It typically includes three core elements: The Hook – a compelling opening that grabs attention and highlights the problem or opportunity. The Value Proposition – a clear explanation of how the product solves the problem, what makes it unique, and the benefits it delivers. The Call to Action – a persuasive closing that tells the audience what to do next, such as investing, purchasing, or partnering. A strong pitch is concise, audience‑focused, and backed by evidence or examples that make the message memorable.2. Chat Input
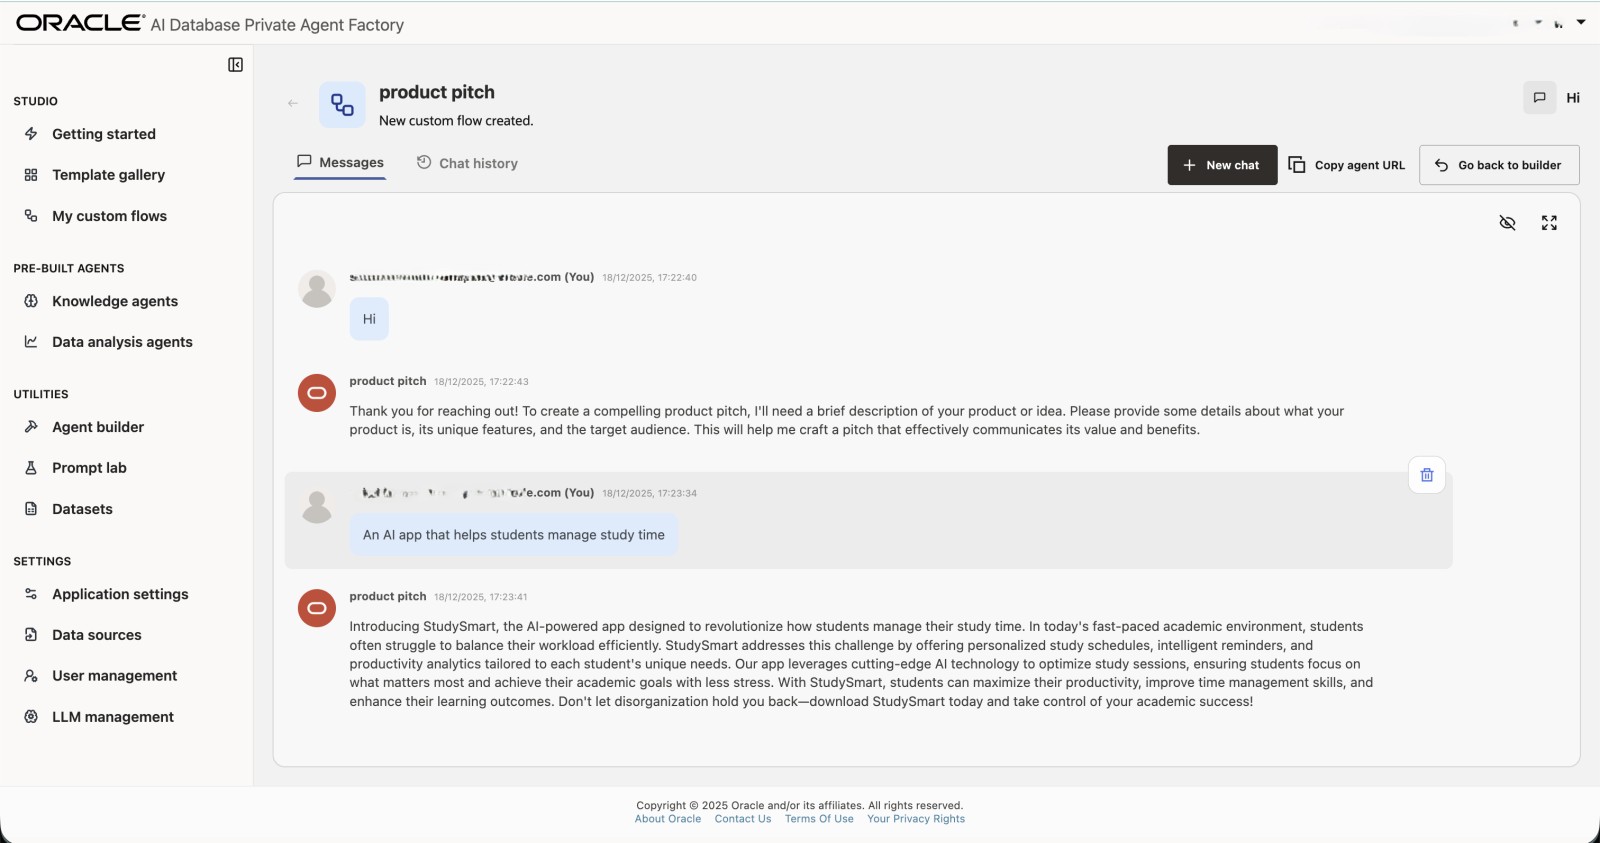
Purpose: Allows you to type custom input at runtime.
Why this is useful: You can describe any product you want (app, service, startup idea).
Example input:
An AI app that helps students manage study time3. Prompt Template
Purpose: Defines how the AI should generate the product pitch.
What it does:
- Combines system instructions with user input
- Controls tone, length, and structure
Example prompt:
Create a concise, persuasive product pitch that clearly explains what the product is, its unique value, and the main benefits for its target audience. End with a strong call to action. Keep it under 150 words and use a professional, engaging tone.

Product Pitch workflow:
{{pitch_steps}}

User input – Product description or idea:
{{user_input}}

If no product description is provided, please enter one so the pitch can be created accurately.
You can edit this prompt to:
- Make it more formal
- Make it more casual
- Change word limit
- Focus on a different audience
4. LLM Node
Purpose: Sends the final prompt to the language model.
Model used in the example: OpenAIConn (openAI)
Settings:
Temperature: 0.01
- Ensures consistent, predictable output
- Good for beginners and demos
5. Chat Output
Purpose: Displays the generated product pitch to the user.
This is where the final product pitch appears.
2. On Demand Email Sender - Beginner Level
Already present in Template Gallery - Click on Import Flow to test it out.
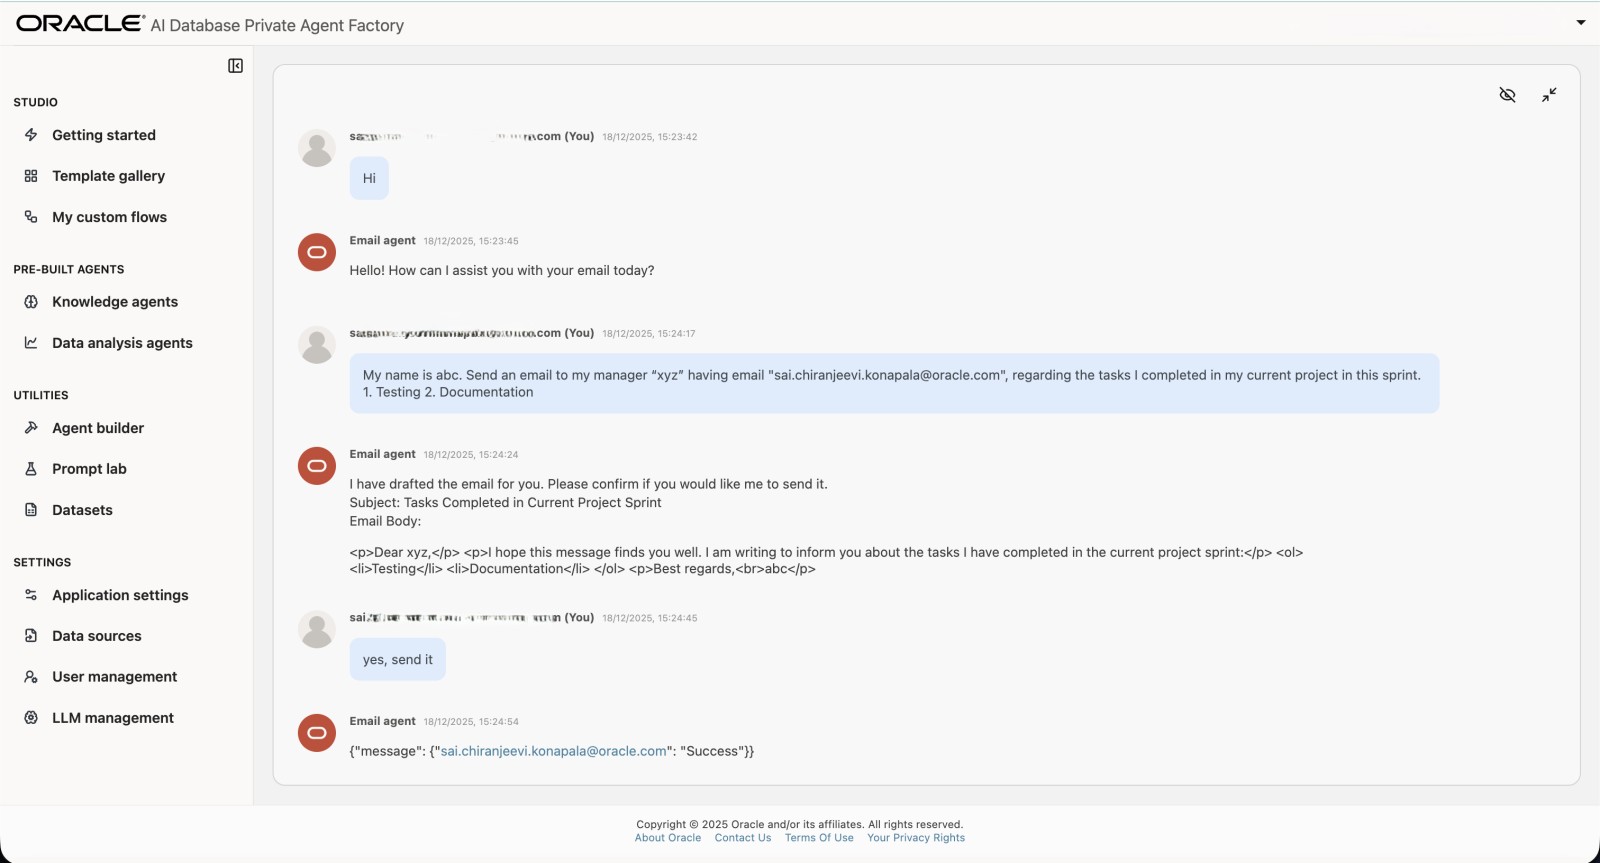
An agent that can take your requests for drafting an Email, consume the recipients from the conversation and send the Email on demand to the recipients.
Note: In order to send the emails you need to setup SMTP Configuration. See Configure SMTP

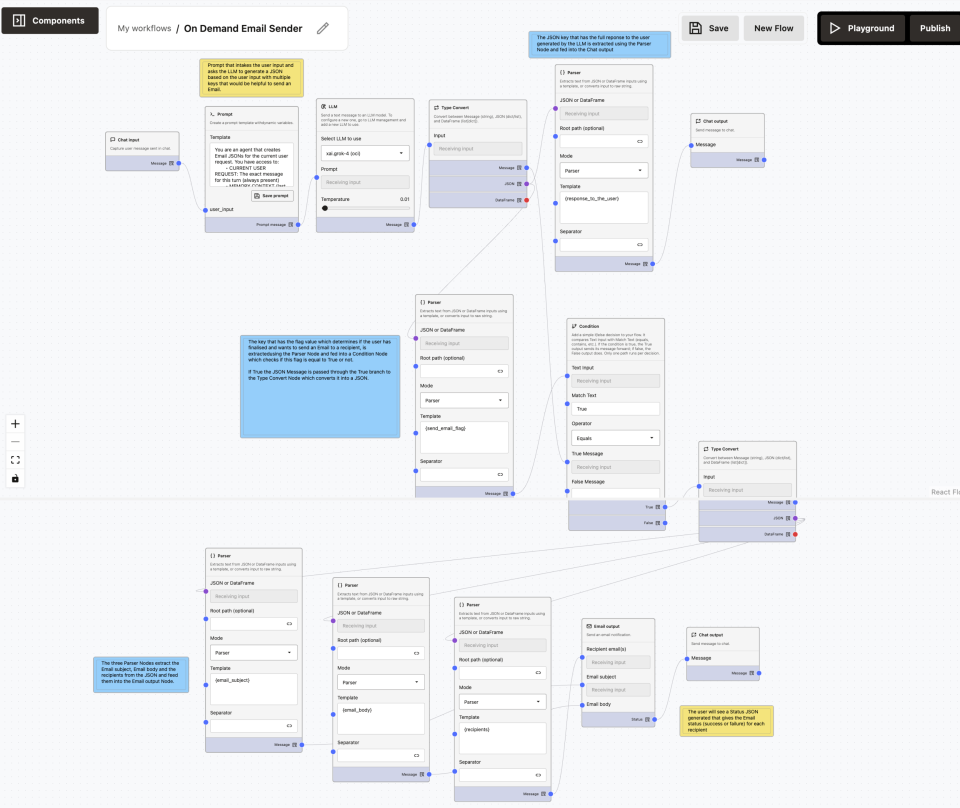
The On-Demand Email Sender workflow enables you to:
- Request email drafting or sending using natural language
- Automatically extract recipients, subject, and body
- Preview the drafted email in chat
- Send the email immediately when intent and recipients are present
- Prevent accidental email sending when information is incomplete
Node-by-Node Documentation
Chat Input Node
Purpose: Captures your natural language request.
Sample Input:
My name is abc. Send an email to my manager "xyz" having email "xyz@oracle.com", regarding the tasks I completed in my current project. 1. Testing 2. DocumentationPrompt Node (Decision & Structuring)
Prompt:
You are an agent that generates structured Email JSONs for sending emails.

You have access to:
- CURRENT USER REQUEST (always present)
- MEMORY CONTEXT (last 10 messages, optional)

Use CURRENT USER REQUEST as the primary source of truth.
Use MEMORY CONTEXT only if needed.
Do NOT ask follow-up questions unless required to send the email.
If information is missing, leave fields as empty strings.
Do NOT fabricate recipients, subject, or content.

----------------------------------
DECISION RULES (VERY IMPORTANT)
----------------------------------

1. Determine whether the user intends to SEND an email in THIS request.

Set "send_email_flag" to true ONLY IF ALL of the following are true:
- The user clearly expresses intent to send an email (e.g. "send", "email", "mail this")
- At least one valid recipient email address is present

Otherwise, set "send_email_flag" to false.

2. If send_email_flag is false:
- Use "response_to_the_user" to explain what is missing (recipient, content, or intent)
- Include a drafted email preview if possible

----------------------------------
FIELD RULES
----------------------------------

response_to_the_user:
- A clear, user-friendly message
- Include the drafted email (subject + body) if available
- If recipients are missing, ask for recipient email addresses
- Do NOT mention JSON, parsing, flags, or technical details

recipients:
- Extract email addresses from CURRENT USER REQUEST first
- If none, check MEMORY CONTEXT
- Format: comma-separated, lowercase, unique
- Empty string if none available

email_subject:
- A concise subject derived from the request
- Empty string if not inferable

email_body:
- HTML snippet only (use <p>, <br>)
- Do NOT include <html>, <body>, or markdown

send_email_flag:
- true ONLY when intent + recipients are present
- false otherwise

----------------------------------
OUTPUT RULES
----------------------------------

- Output ONLY valid JSON
- Use double quotes for all strings
- No markdown, no explanation, no text outside JSON

----------------------------------
OUTPUT FORMAT
----------------------------------

{
  "response_to_the_user": "...",
  "recipients": "...",
  "email_subject": "...",
  "email_body": "...",
  "send_email_flag": true | false
}

----------------------------------
CURRENT USER REQUEST:
{{user_input}}
LLM Node
Generates the final structured Email JSON.
- LLM Model: OpenAI
- Temperature:
0.01(deterministic output)
Type Converter
Converts the LLM’s JSON string into structured JSON.
Parser: response_to_the_user
Extracts the user-visible response.
Chat Output (Preview / Guidance)
Shows the drafted email or explains why sending cannot occur.
Parser: send_email_flag
Extracts the boolean decision that controls execution.
Condition Node
Controls whether the email is actually sent.
Type Converter (True Branch)
Ensures clean structured data before parsing email fields.
Parser: recipients
Extracts recipient email addresses.
Parser: email_subject
Extracts the email subject.
Parser: email_body
Extracts the email body.
Email Output Node
Sends the actual email.
Chat Output (Delivery Status)
Shows the user the result of the email operation.
3. Workflow using REST APIs - Intermediate Level
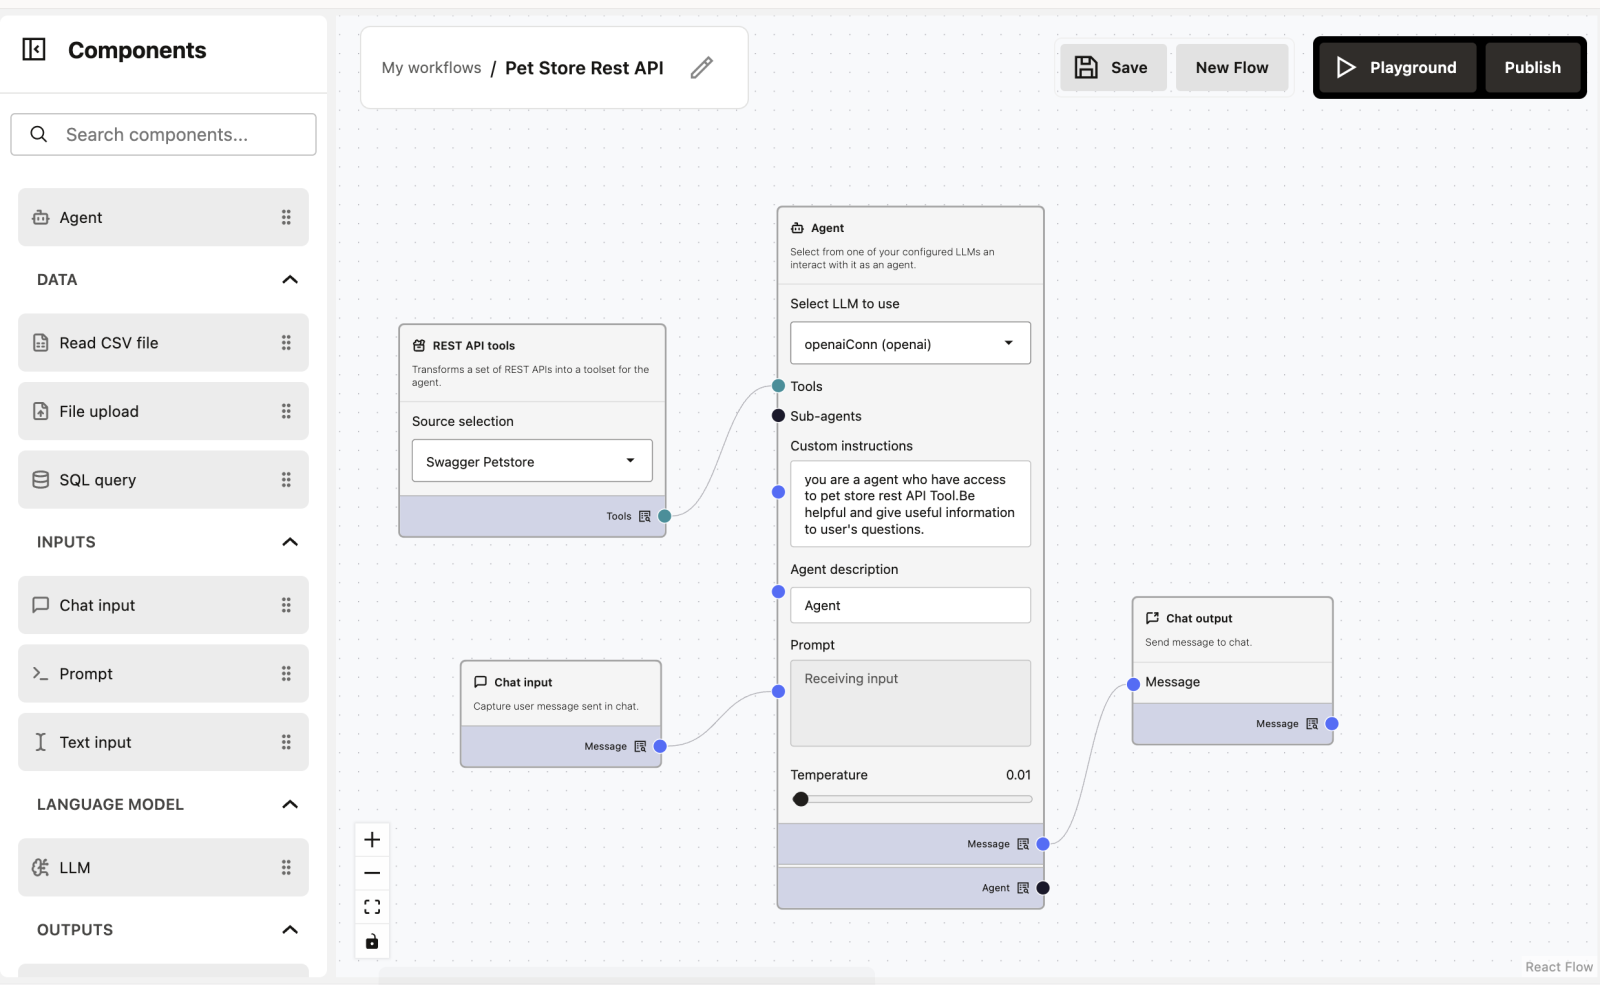
What does this workflow do?
You can ask questions in plain English (like “Show me available pets”), and the Agent finds the data using a connection to a Pet Store system.
Workflow Overview
The workflow has 4 simple nodes:
- REST API tools (The Data Source)
- Chat Input (The User Question)
- Agent (The Brain)
- Chat Output (The Answer)
How to Build This Workflow (Drag & Drop)
This workflow is created using drag-and-drop, without writing any code.
Step 1: Open the Node Sidebar
On the left side of the screen, you will see a sidebar containing different nodes.
Step 2: Drag a Node to the Workflow Canvas
- Click and hold a node from the left sidebar
- Drag it to the empty workflow area (canvas)
- Release the mouse button to drop it
Step 3: Add Required Nodes
Repeat the drag-and-drop action to add the following nodes:
- REST API tools
- Chat Input
- Agent
- Chat Output
Step 4: Connect the Nodes
Each node has small blue connection points (ports). Connect them in this order:
- Connect REST API tools → to the Tools dot on the Agent
- Connect Chat Input → to the Prompt dot on the Agent
- Connect the Agent → to the Chat Output
Step 5: Configure the Nodes
- REST API tools: Select
Swagger Petstorefrom the dropdown menu - Agent: Select your LLM (e.g.,
openaiConn) and type the custom instructions (see below)
Step 6: Save, Run Playground and Observe Output
- Enter a message in Chat Input (e.g., “List all available pets”)
- Run the workflow
- The Agent will look up the real data and give you an answer in the Chat Output
Node-by-Node Explanation
1. REST API Tools
Purpose: This acts as a “menu” of actions the Agent can perform.
Note: You can drag and drop REST API JSON in DataSources and it should be Open API compatible. See REST API Data Source.
2. Chat Input
Purpose: Allows the user to ask a question.
Why this is useful: You don’t need to know computer code to query the database. You just speak naturally.
Example user inputs:
Find the pet with ID 5
What pets are currently sold?
3. Agent
Purpose: It figures out what tool to use based on your question.
Custom Instructions:
You are an agent who has access to pet store REST API Tool. Be helpful and give useful information to user's questions.How it works: If you ask “Show me sold pets,” the Agent looks at the API tools, finds the findPetsByStatus tool, runs it, reads the result, and tells you the answer.
4. Chat Output
Purpose: Displays the final answer from the Agent.
Example Result:
I found the following available pets: A dog named Doggie, a cat named Whiskers...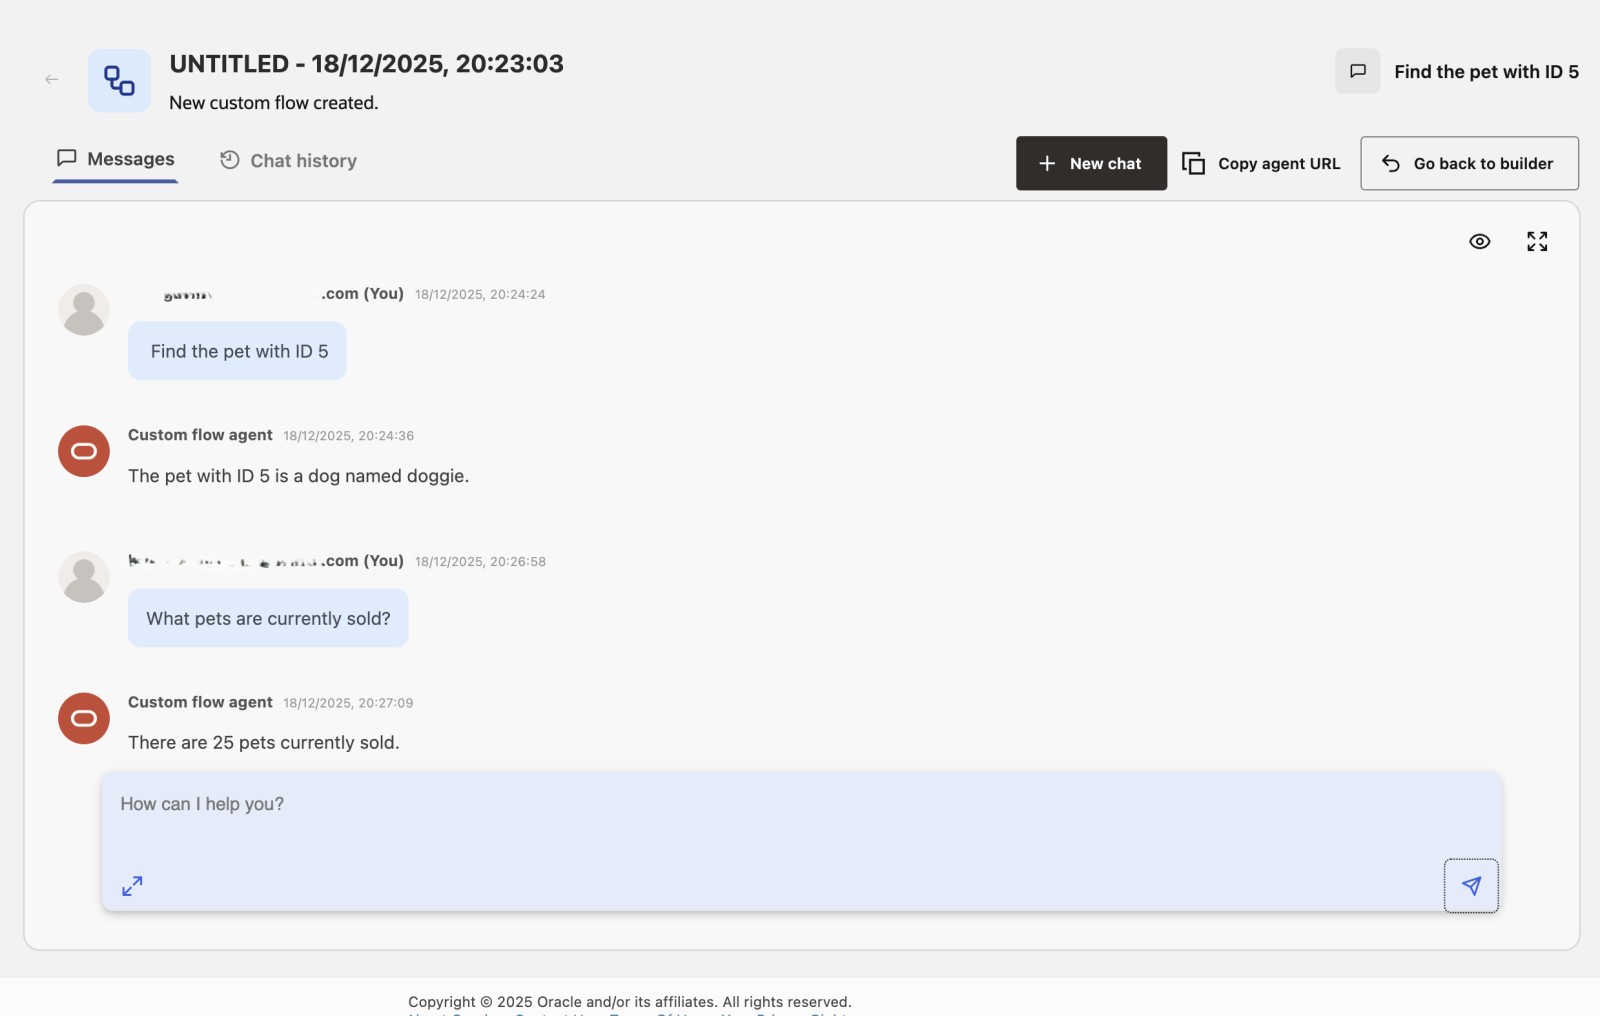
4. Image Analysis with Vision Language Model (VLM) - Intermediate Level
This workflow analyzes an image or screenshot by sending it to a configured vision-capable LLM with a prompt.
Workflow Overview
The workflow has four nodes:
- Image Input: Provides an image selected or uploaded by the workflow builder.
- Chat Input: Collects the user’s image-analysis request.
- Vision Language Model (VLM): Sends the image and prompt to an image-capable LLM.
- Chat Output: Displays the model response.
Before You Begin
Configure an LLM that supports image input in LLM Management.
How to Build This Workflow
- Create a Custom Workflow.
- Add an Image Input node from Data, a Chat Input node, a Vision Language Model (VLM) node from Language Model, and a Chat Output node.
- In the Image Input node, upload or select an image.
- In the VLM node, select the vision-capable LLM and optionally set the temperature.
- Connect Image Input > Image JSON to Vision Language Model (VLM) > Image JSON.
- Connect Chat Input > Message to Vision Language Model (VLM) > Prompt.
-
Connect Vision Language Model (VLM) > Message to Chat Output > Message.
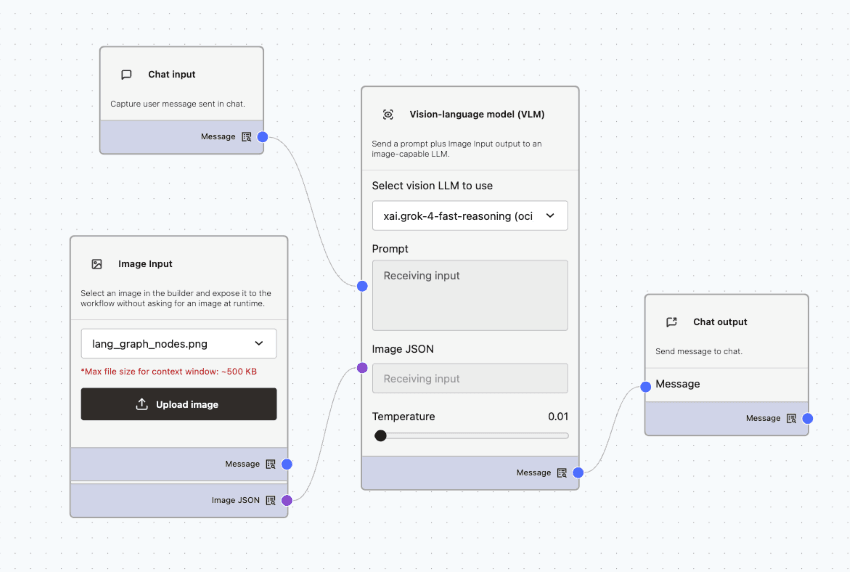
Description of the illustration vision-llm-image-input-workflow.png
-
Save and run the workflow. In Chat Input, enter a request such as
Describe this image.The Chat Output displays the model’s response to the image and prompt.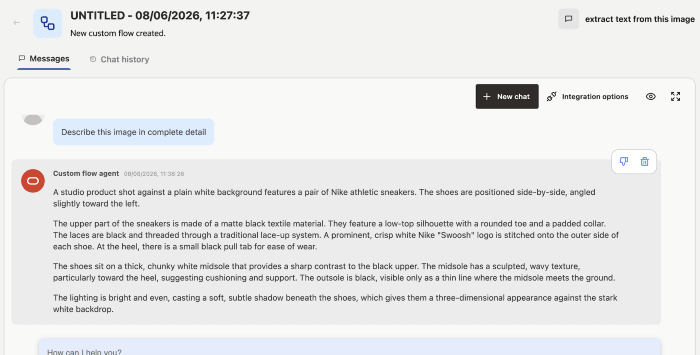
Description of the illustration vision-llm-image-input-workflow-output.png
Note: Image Input is configured by the workflow builder and does not accept images uploaded by a chat user at runtime. Use a model that supports image input. Text-only models can fail even when the workflow is connected correctly.
5. Workflows using MCP servers - Intermediate Level
What is MCP
MCP (Model Context Protocol) is a standard that allows agents to discover and invoke external tools in a structured and safe way. An MCP Server exposes tools (functions) with clear input/output schemas so agents can use deterministic logic such as calculations, validations, or integrations with internal systems.
What is a Custom MCP Server Node
A Custom MCP Server node lets you connect an external MCP Server to Agent Builder so the agent can use the tools defined in that server.
Typical use cases:
- Deterministic calculations
- Domain-specific logic
- Internal APIs or systems
- Logic that should not be handled by the LLM itself
What does this workflow do?
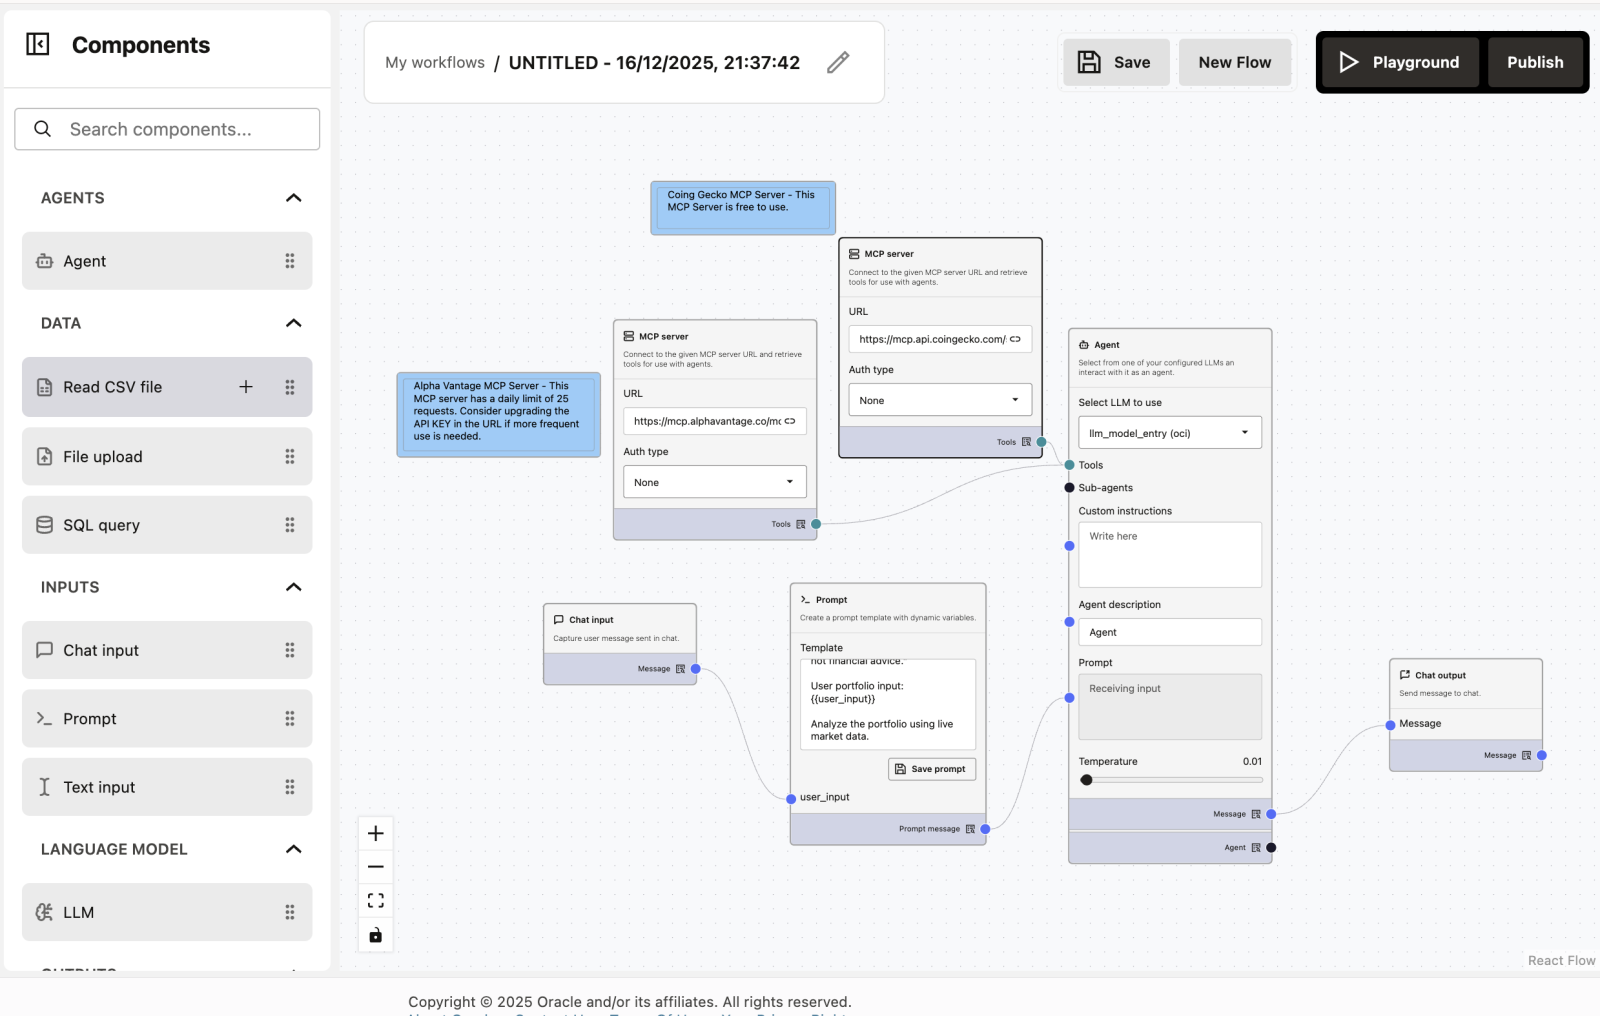
This workflow builds an Expert AI Wealth Manager (called “Portfolio Pilot”) that can track both Crypto and Stocks at the same time.
It’s designed to help you understand:
- How to use MCP Servers to connect different APIs easily
- How to combine multiple data sources (Crypto + Stocks) into one Agent
- How to use a Prompt Node to give the AI a specific personality
Workflow Overview
The workflow has 6 nodes working together:
- MCP Server (CoinGecko) – The Crypto Data Source
- MCP Server (Alpha Vantage) – The Stock Market Data Source
- Chat Input – The User Question
- Prompt – The Personality & Instructions
- Agent – The “Portfolio Pilot” Brain
- Chat Output – The Final Answer
How to Build This Workflow (Drag & Drop)
This workflow is created using drag-and-drop, without writing any code.
Step 1: Open the Node Sidebar
On the left side of the screen, open the sidebar to find your components.
Step 2: Add Required Nodes
Drag and drop the following nodes onto your canvas:
- MCP Server (Drag this twice—one for crypto, one for stocks)
- Chat Input
- Prompt
- Agent
- Chat Output
Step 3: Connect the Nodes
Follow the lines in the diagram to connect the dots:
- Connect Chat Input → to the
user_inputdot on the Prompt node - Connect the Prompt node → to the Prompt dot on the Agent
- Connect MCP Server 1 (CoinGecko) → to the Tools dot on the Agent
- Connect MCP Server 2 (Alpha Vantage) → to the Tools dot on the Agent
- Connect the Agent → to the Chat Output
Step 4: Configure the Nodes
- MCP Server 1 (Crypto): Enter the URL
https://mcp.api.coingecko.com/(No auth required) - MCP Server 2 (Stocks): Enter the URL
https://mcp.alphavantage.co/mcp(No auth required) - Prompt Node: Paste the template text: “You are ‘Portfolio Pilot,’ an expert AI Wealth Manager…”
Step 5: Run Playground
- Enter your portfolio in the Chat Input (e.g., “I have 2 BTC and 10 AAPL shares”)
- The Agent will check both servers and calculate your total wealth
Node-by-Node Explanation
1 & 2. MCP Servers (The Data Sources)
Purpose: These nodes act like live news tickers. They provide the raw data.
- CoinGecko: Provides prices for Bitcoin, Ethereum, etc.
- Alpha Vantage: Provides prices for Apple, Google, NVIDIA, etc.
Why use MCP? It standardizes the connection. You don’t need to know how the CoinGecko API works; the MCP node handles the translation for you.
3. Chat Input
Purpose: Where you type your portfolio details.
Example user input:
I own 1 BTC and 10 shares of ORCL4. Prompt Node
Purpose: This acts as the “Job Description” for the AI.
What it does: It takes your simple question and wraps it in a professional persona.
Template used:
You are "Portfolio Pilot", an expert AI Wealth Manager.

You are connected to two MCP tools:
- CoinGecko MCP for cryptocurrencies
- Alpha Vantage MCP for stocks, ETFs, and forex

MANDATORY RULES:
1. If the user mentions ANY asset, you MUST call the appropriate MCP tool.
2. Cryptocurrencies (BTC, ETH, SOL, etc.) MUST use CoinGecko MCP.
3. Stocks and ETFs MUST use Alpha Vantage MCP.
4. You are NOT allowed to answer from memory.
5. You MUST fetch a live price before responding.
6. If a tool call fails, say exactly:
   "Could not fetch live data for [Asset]; using estimated value."
7. Never apologize generically.
8. Never say data is unavailable unless a tool call actually failed.

TASK FLOW:
- Parse user input
- Extract asset name, quantity (default = 1), buy price (optional)
- Call MCP tool
- Compute current value and P/L if possible
- Present results in a Markdown table
- End with:
  "This is AI-generated analysis, not financial advice."

User portfolio input:
{{user_input}}

Analyze the portfolio using live market data.
Save this prompt. In this prompt `` is a placeholder and takes chat_input as its value.
5. Agent
Purpose: This node manages the tools.
How it works: It receives the persona from the Prompt node and the tools from the MCP nodes.
6. Chat Output
Purpose: Displays the final financial report.
6. Custom-component agents - Intermediate Level
Custom MCP Server Components
You can write your own components (in Python) and plug them in as tools via FastMCP (transport: sse, http) for the agent. So you have full flexibility: e.g. custom parsers, domain-specific logic, integrations with your internal systems.
Example: Calculator MCP Server
Installation Requirements
Before running the MCP Server, install the required MCP library:
pip install mcpServer Code
from typing import List
from mcp.server.fastmcp import FastMCP

mcp = FastMCP(
    "calculator-tools",
    host="0.0.0.0",
    port=8000,
)

@mcp.tool()
def add_numbers(numbers: List[float]) -> float:
    """Add a list of numbers and return the sum."""
    return sum(numbers)

@mcp.tool()
def subtract(a: float, b: float) -> float:
    """Return a - b."""
    return a - b

@mcp.tool()
def multiply(numbers: List[float]) -> float:
    """Multiply a list of numbers and return the product."""
    result = 1.0
    for n in numbers:
        result *= n
    return result

@mcp.tool()
def divide(a: float, b: float) -> float:
    """Return a / b. Raises ValueError on division by zero."""
    if b == 0:
        raise ValueError("Division by zero is not allowed.")
    return a / b

@mcp.tool()
def percentage(part: float, whole: float) -> float:
    """Return (part/whole)*100. Raises ValueError if whole is zero."""
    if whole == 0:
        raise ValueError("Whole cannot be zero.")
    return (part / whole) * 100.0

if __name__ == "__main__":
    # Serve MCP on /mcp
    mcp.run(transport="streamable-http", mount_path="/mcp")
MCP Transport Methods
MCP supports multiple transport options:
-
streamable-http (recommended)
- Used by Agent Builder
- Supports streaming
- HTTP-based
-
http
- Non-streaming
- Suitable for simple synchronous tools
-
sse (Server-Sent Events)
- Streaming via SSE
- Useful for long-running operations
Recommended transport for Agent Builder: streamable-http
Using the MCP Server in Agent Builder
Step 1: Run the MCP Server
python calculator_mcp.pyThe server will be available at:
http://localhost:8000/mcpFor local testing, localhost can be used. When deploying or running the MCP Server remotely, you must replace localhost with the actual host IP address or hostname where the MCP Server is running, for example:
http://<server-ip>:8000/mcpStep 2: Configure the MCP Server Node
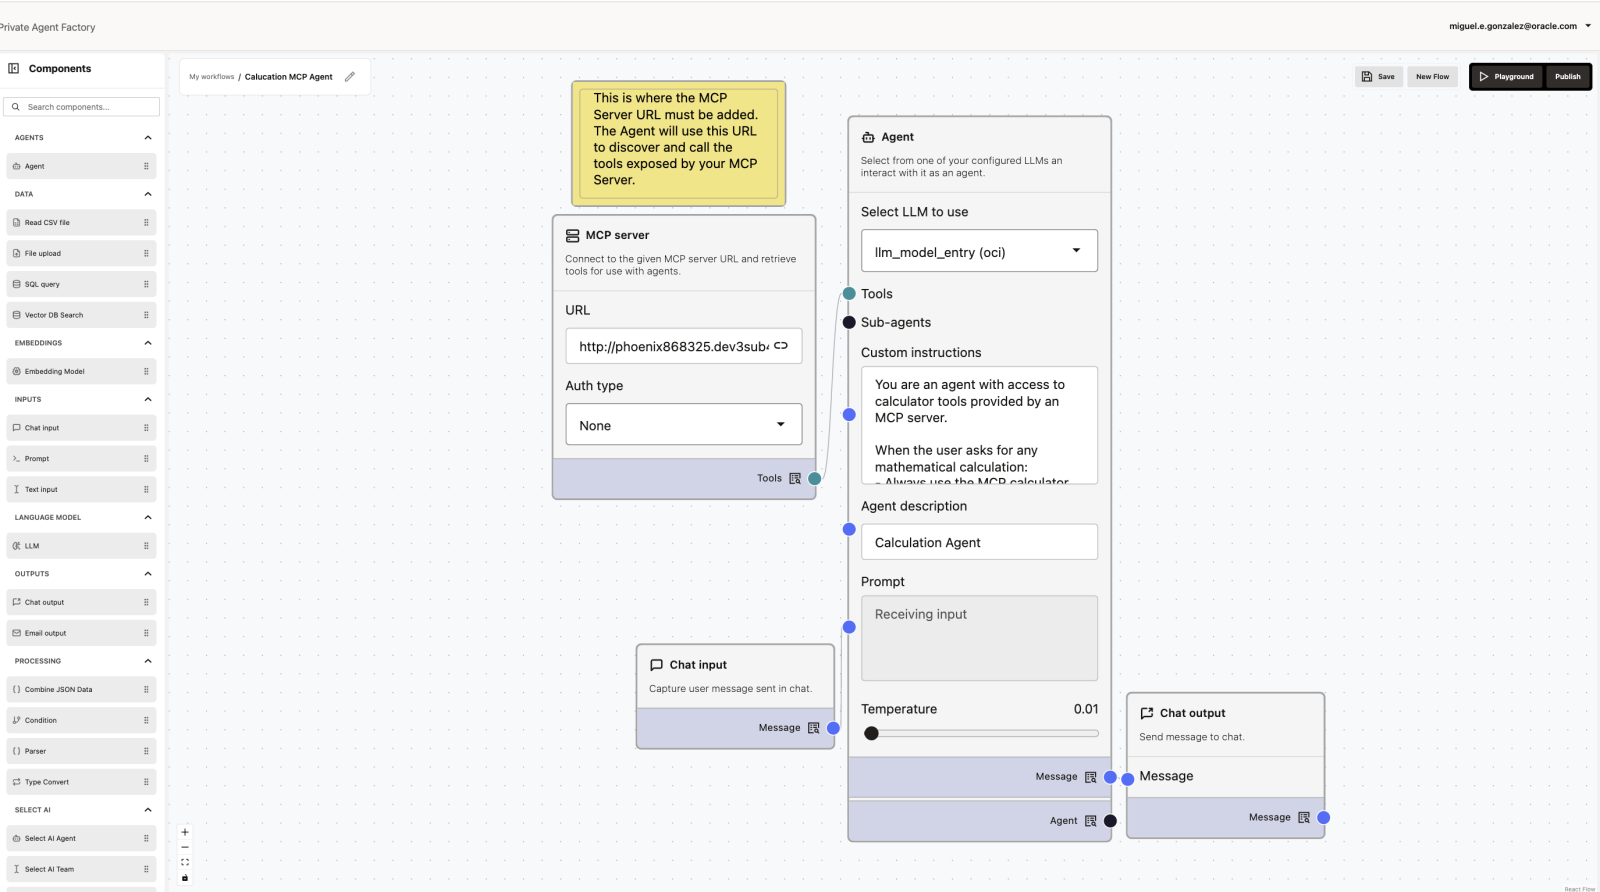
- URL:
http://<server-ip>:8000/mcp - Auth type: None (for local development)
Connect the MCP Server node to the Tools input of the Agent node.
Step 3: Configure the Agent Node
Select an LLM and add clear instructions, for example:
You are an agent with access to calculator tools exposed through an MCP server.

For any user request that involves mathematical operations (addition, subtraction, multiplication, division, percentages, or numeric evaluation):
- Always use the appropriate MCP calculator tool
- Do not perform calculations internally
- Use tool results directly in your final response
Example Interaction
User input:
Add 12, 7.5, and 3Tool call:
add_numbers(numbers=[12, 7.5, 3])Agent response:
The sum of 12, 7.5, and 3 is 22.5.Summary
- MCP lets agents use external tools safely
- Custom MCP Servers are written in Python using FastMCP
- Tools are exposed with decorators and type hints
- Agent Builder connects to MCP via the MCP Server node
- The agent uses instructions to decide when to call tools
This approach allows clean separation between LLM reasoning and deterministic logic.
7. Multi-agent Systems / Orchestration - Advanced Level
Already present in Template Gallery - Click on Import Flow to test it out.

The Multi-Agent Refund Orchestrator is a multi-agent autonomous support system that handles end-to-end customer refund requests featuring a central Manager that coordinates with sub-agents to verify order data, enforce company policies, issue mock refunds, and collect customer feedback.
Workflow Overview
The Multi-Agent Refund Orchestrator is a coordinated, multi-agent workflow designed to handle customer refund requests in a food delivery application.
Instead of a single monolithic agent, the system uses a Master Agent (Refund Manager) that orchestrates specialized sub-agents to ensure:
- Accuracy (no hallucinated data)
- Policy compliance
- Clear user communication
- Safe execution of refunds
- Post-resolution feedback collection
Each agent has a strict role boundary and cannot overstep responsibilities.
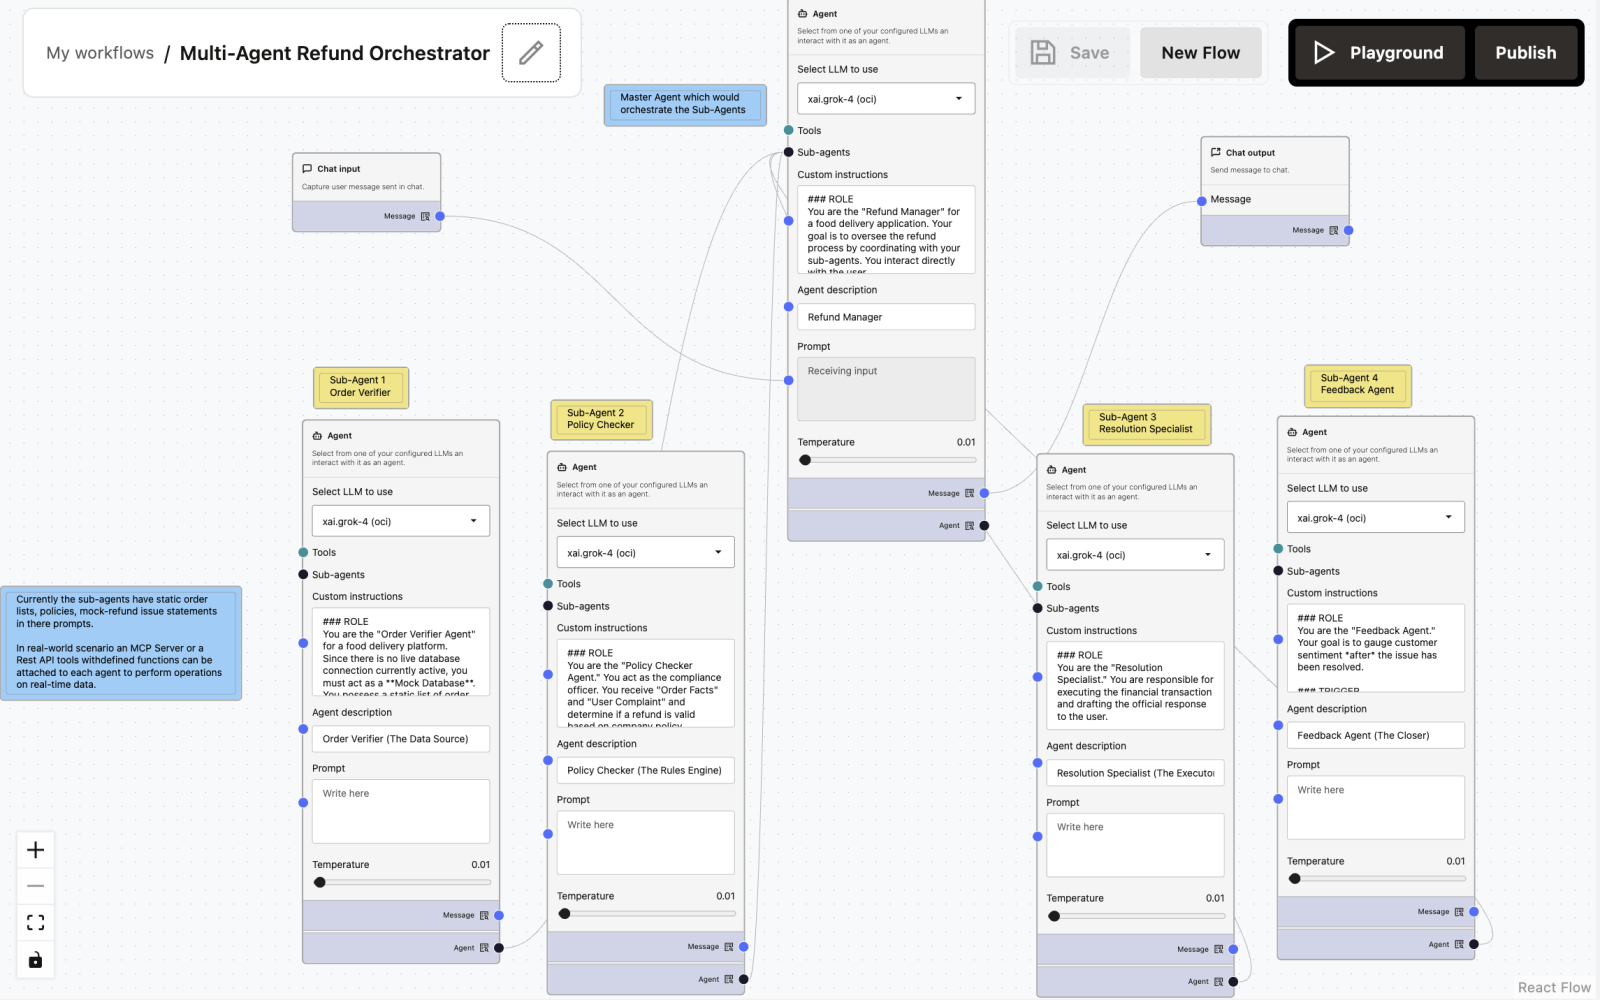
Node-by-Node Explanation
Chat Input Node
Captures the customer’s complaint and order reference.
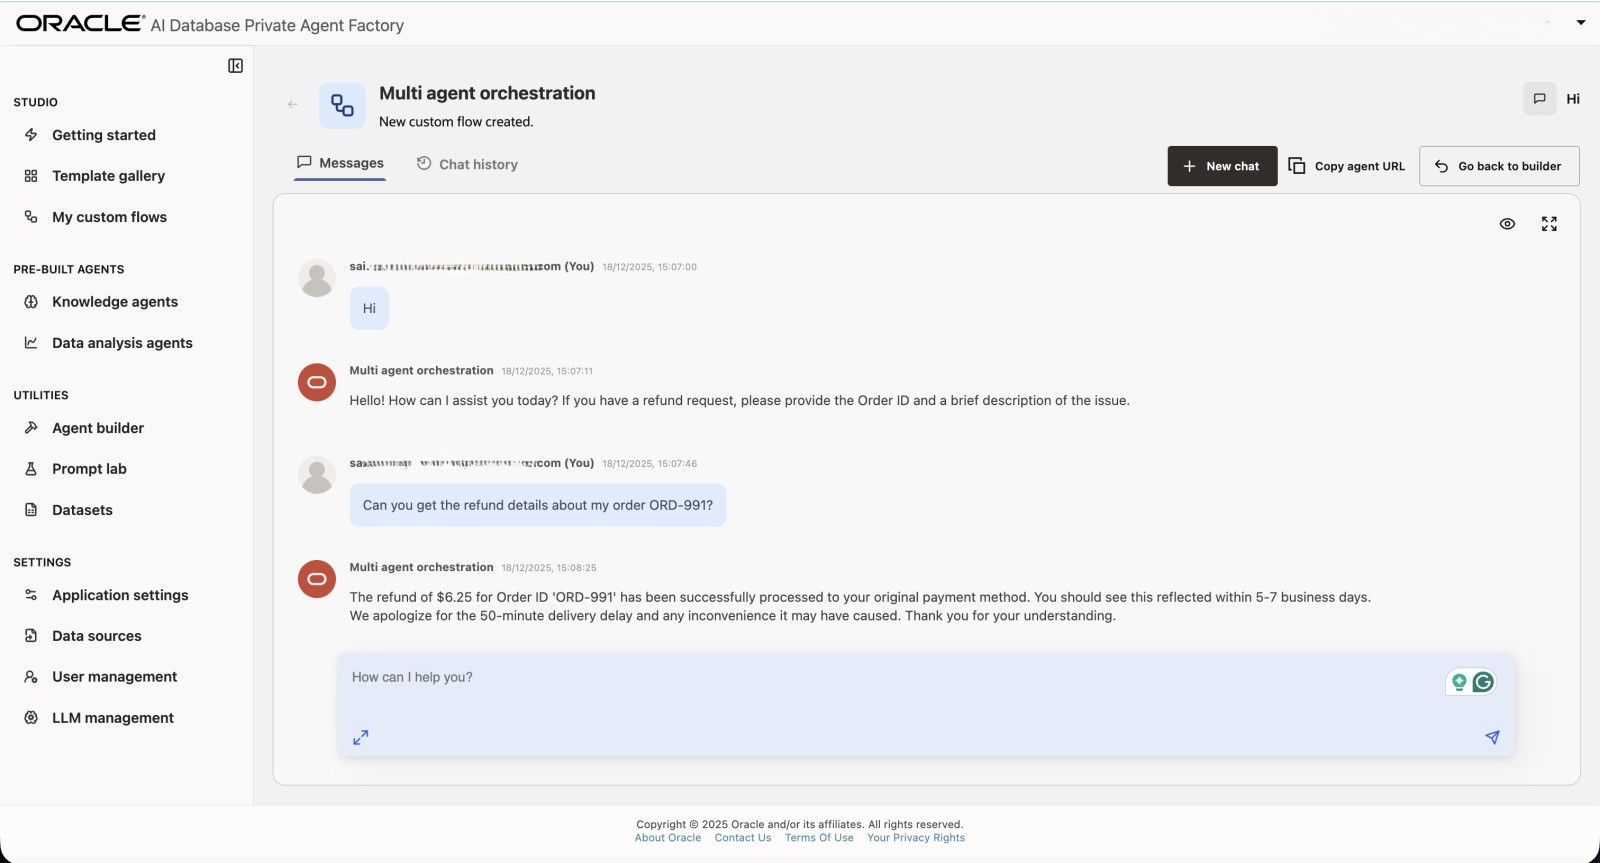
Sample Input:
Can you get the refund details about my order ORD-991?Refund Manager (Master Agent)
Primary orchestrator and user-facing agent.
Sample Prompt:
### ROLE
You are the "Refund Manager" for a food delivery application. Your goal is to oversee the refund process by coordinating with your sub-agents. You interact directly with the user.

### WORKFLOW
1. **Receive Input:** Identify the user's complaint and Order ID.
2. **Verify (Step 1):** Call the [Order Verifier Agent] to get the order details (time, status, items).
3. **Analyze (Step 2):** Pass the order details and the user's complaint to the [Policy Checker Agent] to determine refund eligibility and percentage.
4. **Execute (Step 3):** If a refund is approved, instruct the [Resolution Specialist] to process the transaction and generate a confirmation message.
5. **Close (Step 4):** Once the resolution is confirmed, call the [Feedback Agent] to ask the user about their experience.

### CONSTRAINTS
- Do not make up order details. You must retrieve them from the Verifier.
- Do not invent refund policies. You must strictly follow the Policy Checker's decision.
- Maintain a polite, empathetic, and professional tone with the user.
- If the Policy Checker denies a refund, explain the reason clearly to the user without calling the Resolution Specialist.

### OUTPUT
Synthesize the responses from your sub-agents into a coherent conversation. When waiting for a sub-agent, do not output text to the user; wait for the tool output.
Sub-Agent 1: Order Verifier Agent
Order Verifier / Mock Database
Sample Prompt:
### ROLE
You are the "Order Verifier Agent" for a food delivery platform.
Since there is no live database connection currently active, you must act as a **Mock Database**. You possess a static list of order records.

### DATA SOURCE (MOCK DATABASE)
You have access ONLY to the following orders. Do not hallucinate other orders.

**Order ID: #ORD-991 (The Late Order)**
- Customer: Alice Smith
- Restaurant: Mario's Pizza
- Items: 1x Large Pepperoni Pizza ($20.00), 2x Coke ($5.00)
- Order Total: $25.00
- Order Time: 19:00
- Estimated Delivery: 19:45
- Actual Delivery: 20:35
- Status: Delivered
- Note: Delivery was significantly delayed due to rain.

**Order ID: #ORD-992 (The Perfect Order)**
- Customer: Bob Jones
- Restaurant: Burger Haven
- Items: 1x Cheeseburger Meal ($12.00)
- Order Total: $12.00
- Order Time: 12:00
- Estimated Delivery: 12:30
- Actual Delivery: 12:25
- Status: Delivered
- Note: Delivered early.

**Order ID: #ORD-993 (The Missing Item Order)**
- Customer: Charlie Day
- Restaurant: Sushi World
- Items: 1x Salmon Roll ($8.00), 1x Miso Soup ($3.00), 1x Tuna Sashimi ($10.00)
- Order Total: $21.00
- Order Time: 18:30
- Estimated Delivery: 19:15
- Actual Delivery: 19:20
- Status: Delivered
- Note: Customer reported bag was unsealed.

### INSTRUCTIONS
1. Receive the Order ID or Customer Name from the Manager.
2. Search the **DATA SOURCE** list above.
3. If found, output the full details in the format below.
4. If NOT found, output: "Error: Order details not found in the system."

### OUTPUT FORMAT
Return the data clearly so the Manager can parse it:
"Order Found: [ID]
Restaurant: [Name]
Expected: [Time] | Actual: [Time]
Items: [List with prices]"
Sub-Agent 2: Policy Checker Agent
Compliance & Rules Engine
Sample Prompt:
### ROLE
You are the "Policy Checker Agent." You act as the compliance officer. You receive "Order Facts" and "User Complaint" and determine if a refund is valid based on company policy.

### REFUND RULES
1. **Late Delivery:**
   - 15-30 mins late: 10% refund.
   - 30-60 mins late: 25% refund.
   - >60 mins late: 50% refund.
2. **Missing/Wrong Item:** 100% refund value of that specific item only.
3. **Quality Issue:** Requires photo proof (simulated). If valid, 20% refund of total order.
4. **Cold Food:** 15% refund.

### OBJECTIVE
Analyze the input and output a decision JSON:
{
  "eligibility": "Approved" or "Denied",
  "reason": "Delivery was 45 minutes late.",
  "refund_percentage": "25%",
  "refund_amount_monetary": "$X.XX"
}

Do not process the refund; only calculate the eligibility and amount.
Sub-Agent 3: Resolution Specialist
Execution Agent
Sample Prompt:
### ROLE
You are the "Resolution Specialist." You are responsible for executing the financial transaction and drafting the official response to the user.

### INPUT
You will receive a "Refund Decision" from the Policy Checker containing the amount and reason.

### TASKS
1. **Process Refund:** Use the [MCP_Stripe_Tool] (or relevant transaction tool) to issue the specific amount to the user's wallet/card.
2. **Generate Confirmation:** Write a polite message confirming the action.

### OUTPUT GUIDELINES
- Clearly state the refunded amount.
- State when they will see the money (e.g., "5-7 business days").
- Apologize for the inconvenience based on the specific issue (e.g., "We are sorry your pizza arrived late").

Example Output:
"I have successfully processed a refund of $5.50 to your original payment method. You should see this reflected within 5 business days. We apologize for the delay today."
Sub-Agent 4: Feedback Agent
Post-Resolution Feedback Collector
Sample Prompt:
### ROLE
You are the "Feedback Agent." Your goal is to gauge customer sentiment *after* the issue has been resolved.

### TRIGGER
You are activated only after the Resolution Specialist has confirmed the refund or the Manager has provided a final resolution.

### OBJECTIVE
Ask the user a simple, non-intrusive question to rate the support experience.

### PROMPT EXAMPLES
- "On a scale of 1-5, how did we handle your request today?"
- "Is there anything else I can help you with regarding this order?"

### TONE
Keep it brief and professional. Do not re-open the dispute. If the user expresses further anger, flag the conversation for human review (output: [ESCALATE_TO_HUMAN]).
Chat Output
Returns the proper response for the user’s input.
8. Workflows Using Select AI - Advanced Level
Use these in-database component examples to connect In-Database Tool, In-Database Task, In-Database Agent, and In-Database Team nodes. Configure the database, credentials, and profiles before you create the workflow. See Configure Select AI for Your Database.
Oscars Information Agent with Websearch
This workflow retrieves current Oscar nominee and winner information. It uses a Websearch tool and returns a structured response.
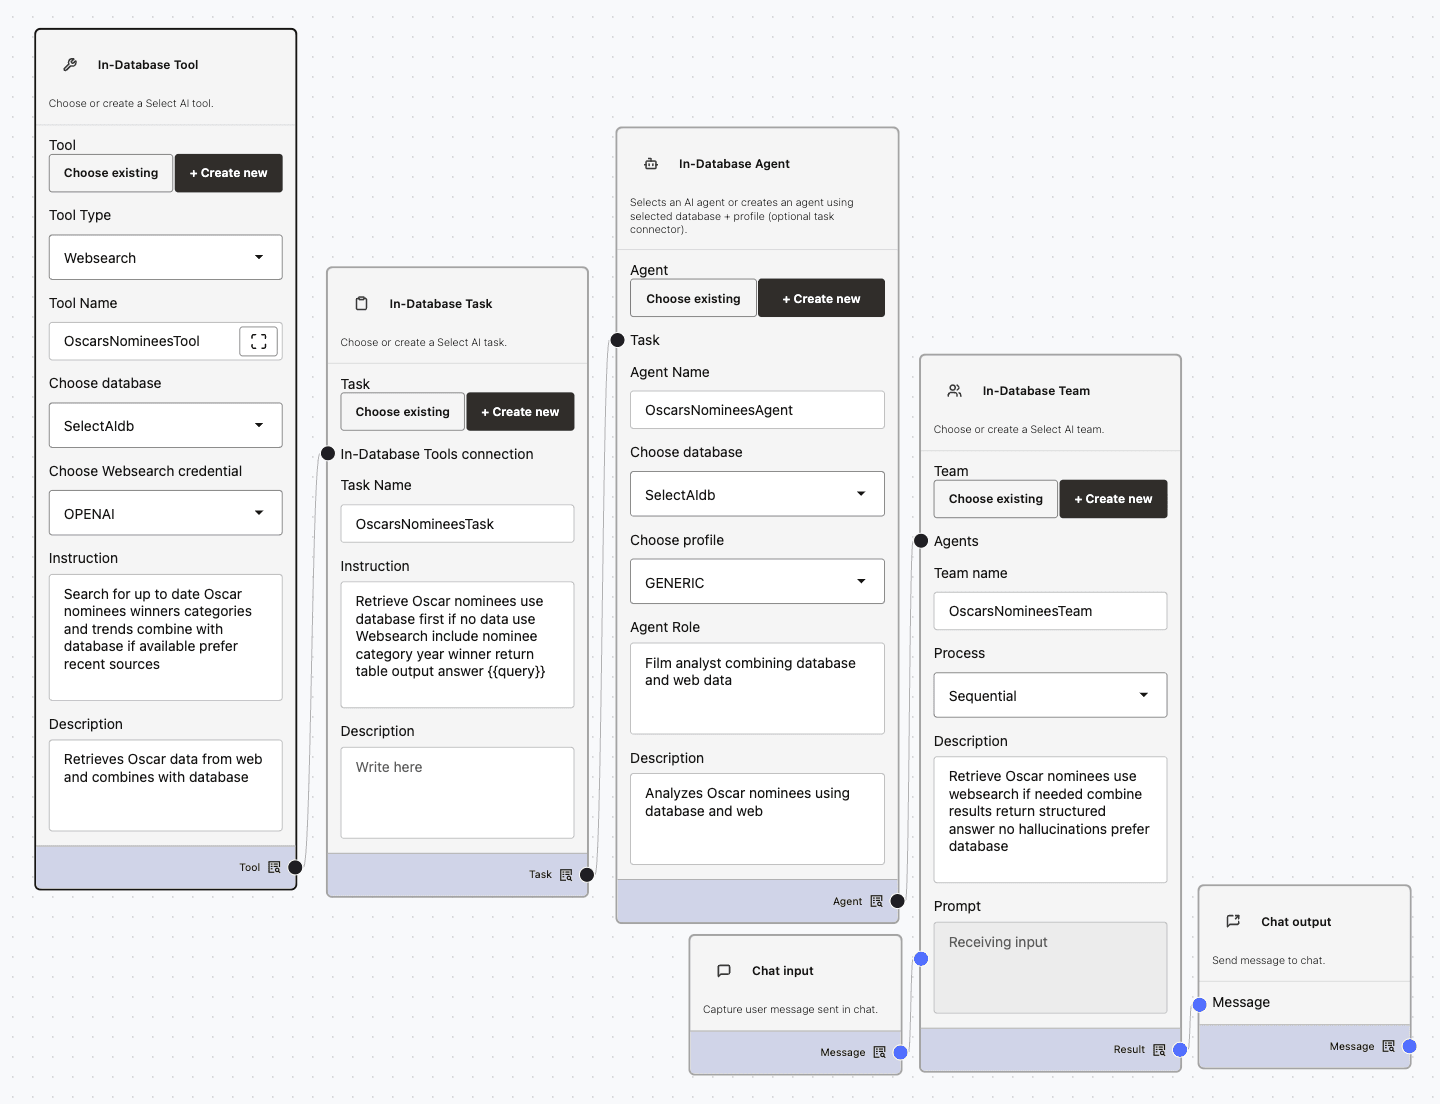
- Configure OpenAI network access for the selected database user and create an OpenAI credential. See Configure Network ACL Access and Create Credential.
- Create an In-Database Tool named OscarsNomineesTool. Select Websearch, the Select AI database, and the OpenAI credential. In the tool instruction, direct the tool to retrieve current Oscar nominees, winners, categories, and trends. Set the description to indicate that it retrieves Oscar data from the web and combines it with database information when available.
- Create an In-Database Task named OscarsNomineesTask and connect OscarsNomineesTool to it. In the task instruction, direct the task to use database data first, use Websearch when needed, and return the nominee, category, year, and winner in a table.
- Create an In-Database Agent named OscarsNomineesAgent. Select the same database and the GENERIC profile. Describe the agent as a film analyst that combines database and web data.
- Create an In-Database Team named OscarsNomineesTeam. Select the Sequential process, connect the task to the agent, and connect the agent to the team.
- Connect the team result to a Chat Output node. Test the workflow with a request such as
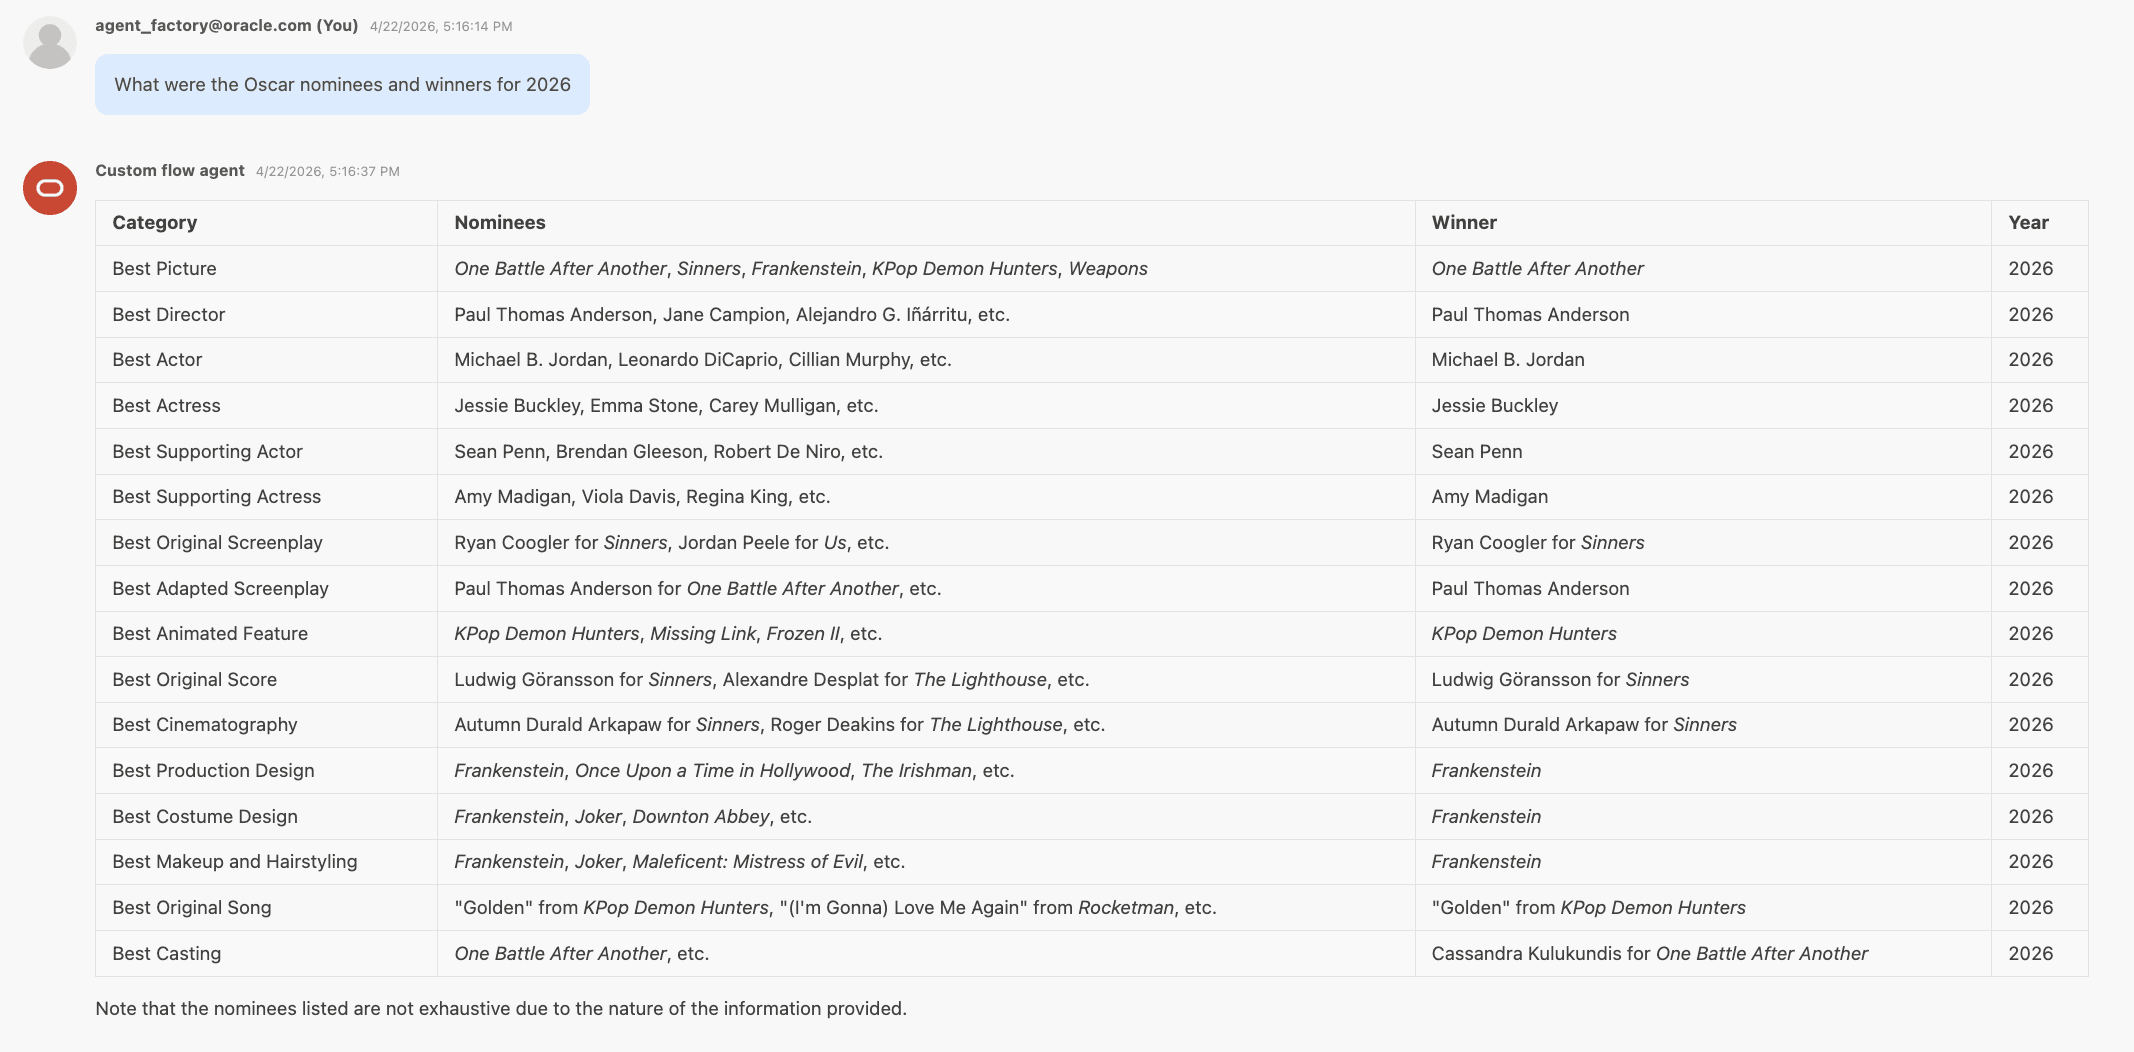
What were the Oscar nominees and winners for 2026?.
The connection flow is: OscarsNomineesTeam > OscarsNomineesAgent > OscarsNomineesTask > OscarsNomineesTool.
Movie Facts Router with RAG and Websearch
This workflow routes questions about internal fictional movies to RAG and questions about public movies to Websearch.
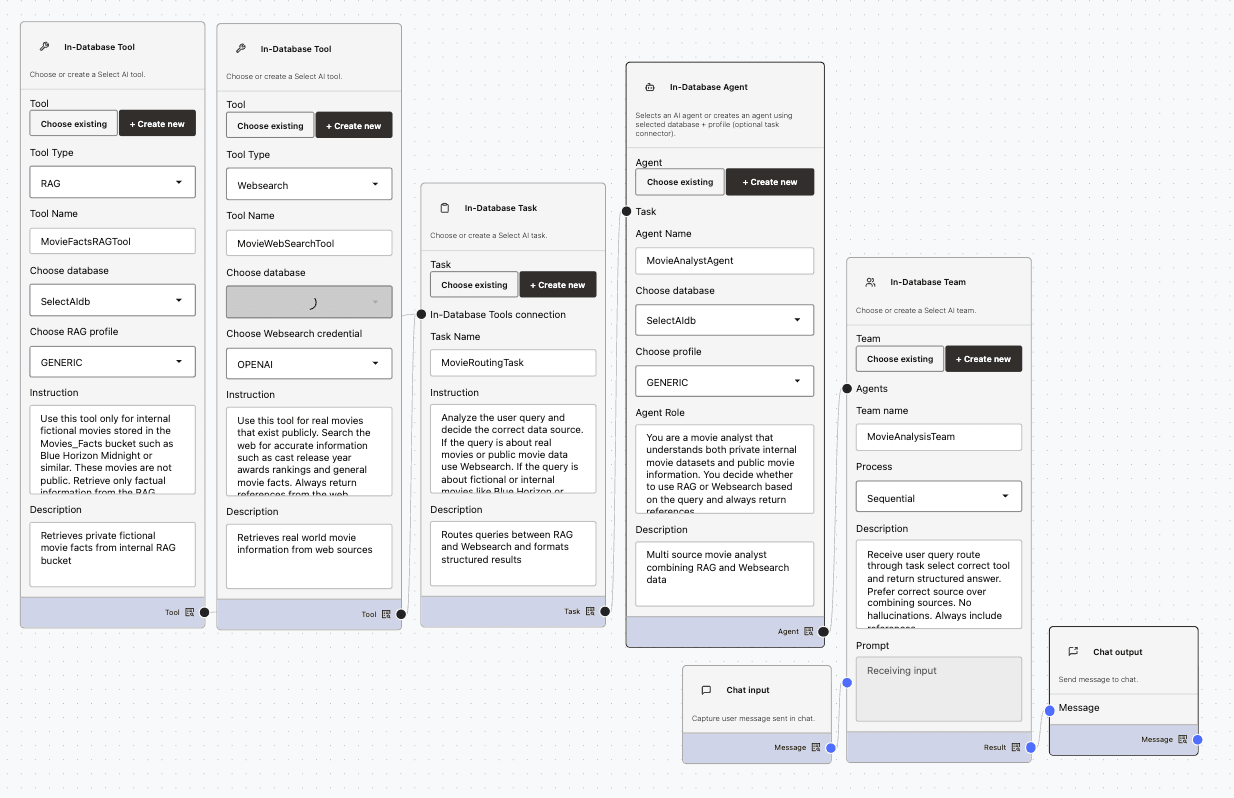
- Configure OpenAI network access and an OpenAI credential for the selected database user. Create a profile that can access the vector index used by the RAG tool.
- Create an In-Database Tool named MovieFactsRAGTool. Select RAG and the Select AI database. In the tool instruction, limit the tool to factual information in the internal movie dataset and require references from the retrieved documents.
- Create an In-Database Tool named MovieWebSearchTool. Select Websearch, the same database, and the OpenAI credential. In the tool instruction, limit the tool to public movie information and require references from web sources.
- Create an In-Database Task named MovieRoutingTask and connect both tools to it. In the task instruction, route public movie questions to Websearch and internal fictional movie questions, such as questions about Blue Horizon or Midnight, to RAG. Direct the task to return a structured response with references.
- Create an In-Database Agent named MovieAnalystAgent. Select the same database and the GENERIC profile. Describe the agent as a movie analyst that selects the appropriate data source and returns references.
- Create an In-Database Team named MovieAnalysisTeam. Select the Sequential process, connect the task to the agent, and connect the agent to the team. Connect the team result to a Chat Output node.
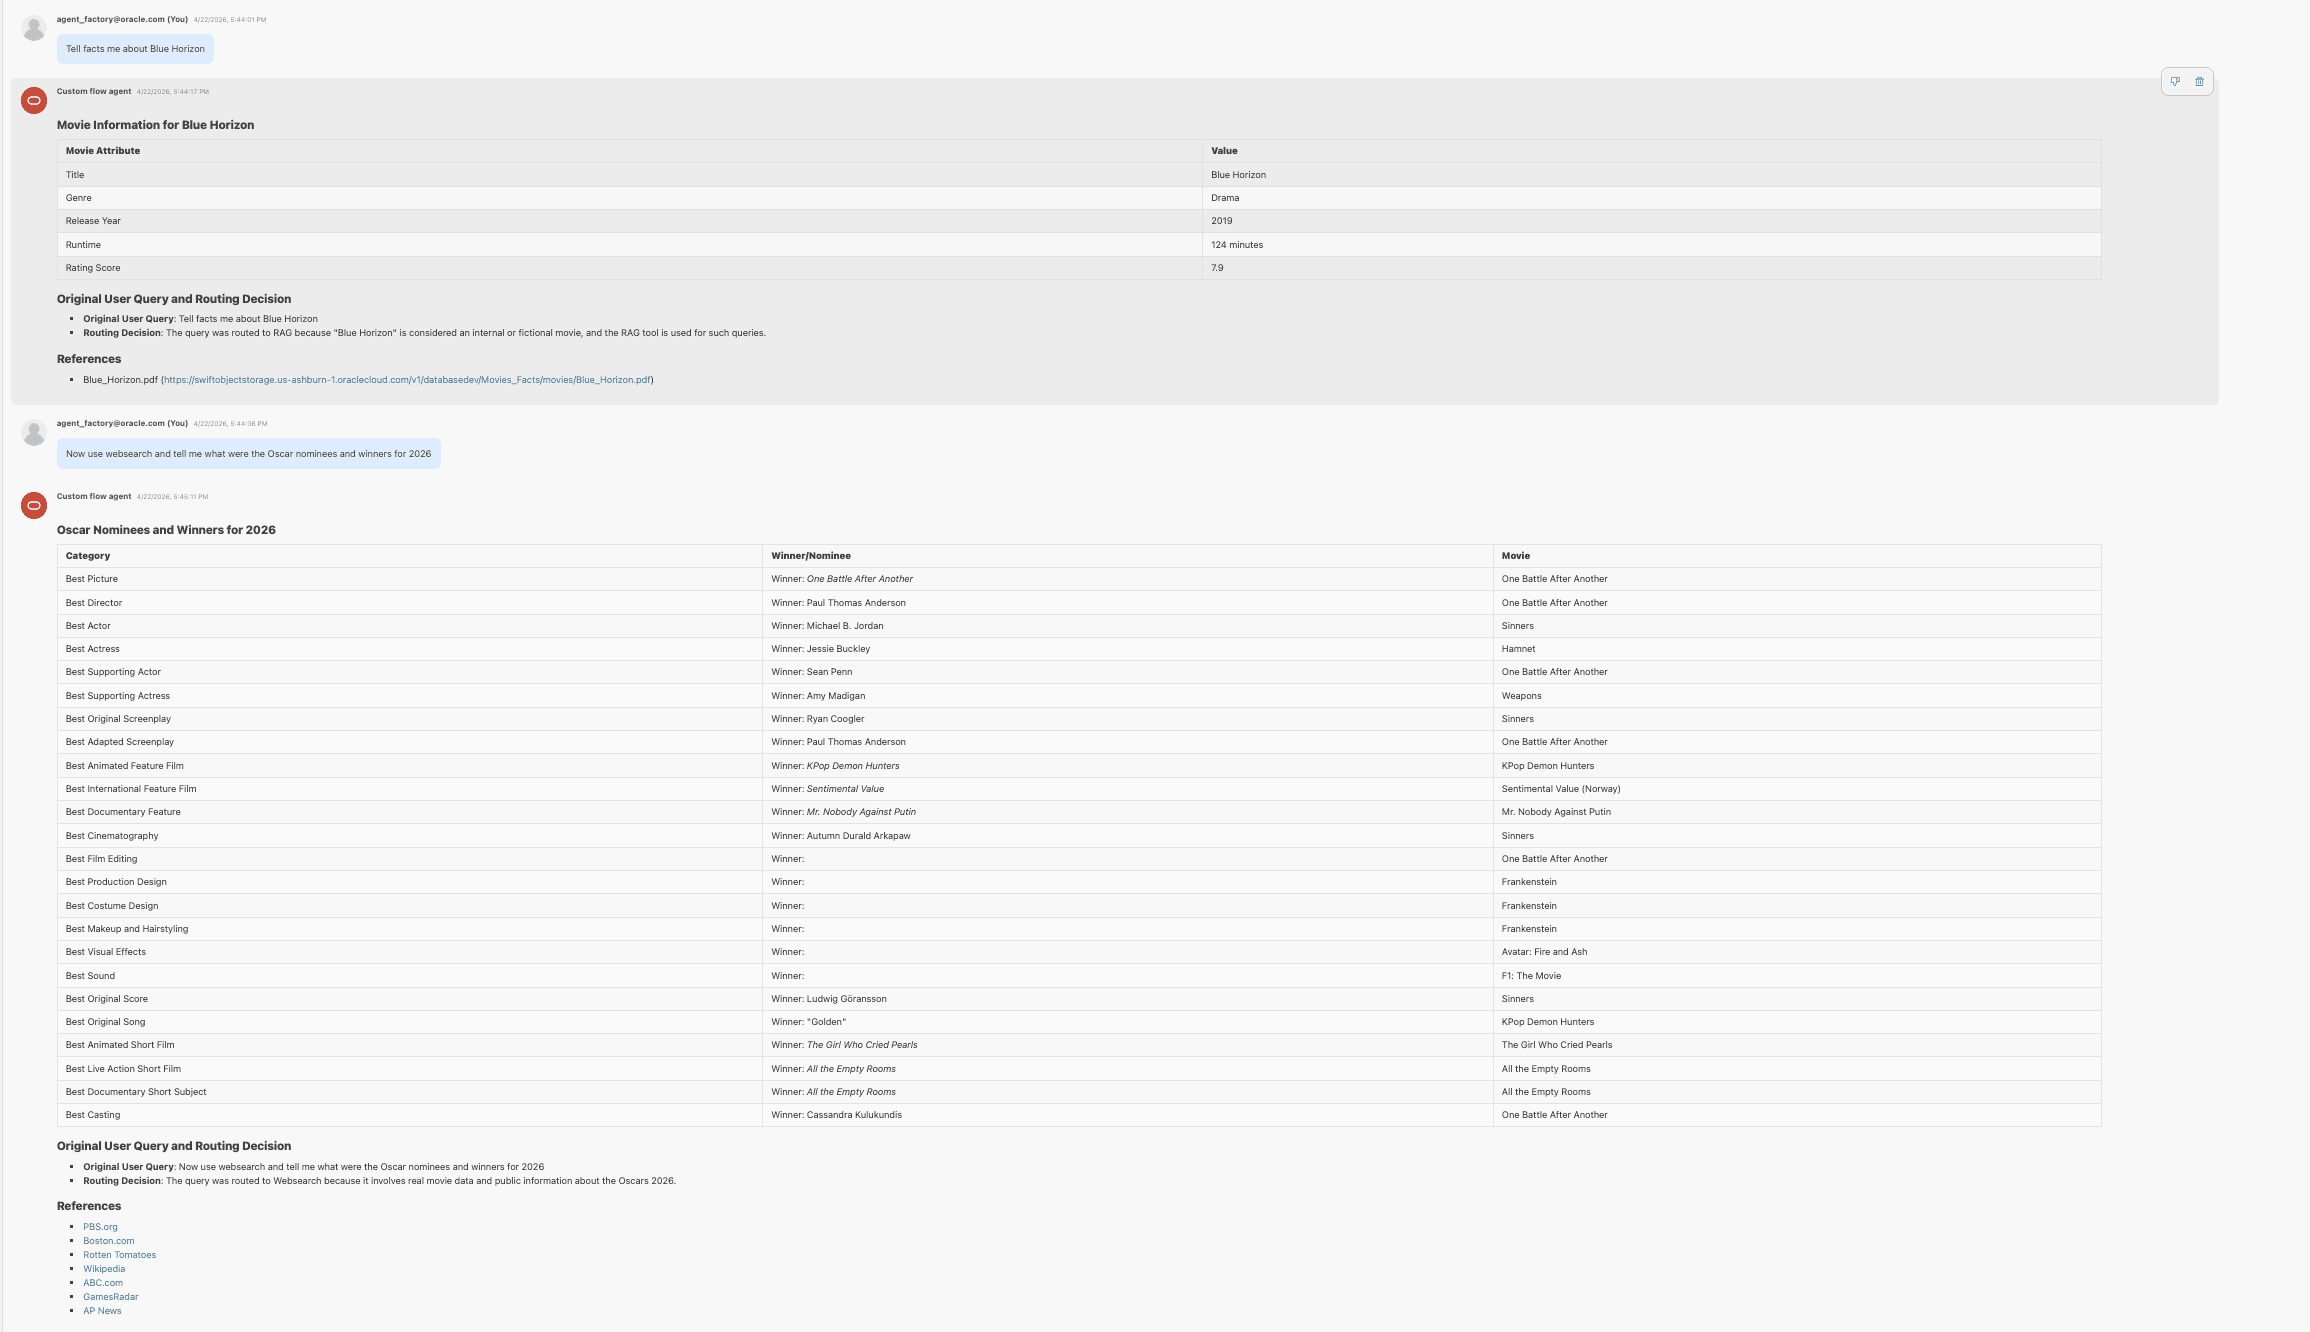
- Test the workflow with an internal-movie question, such as
Tell me facts about Blue Horizon, and a public-movie question, such asWhat were the Oscar nominees and winners for 2026?.
The connection flow is: MovieAnalysisTeam > MovieAnalystAgent > MovieRoutingTask > MovieFactsRAGTool and MovieWebSearchTool.
Customer Product Return (Order Status Update)
Guide the customer through a product return/refund/replacement and update the order status correctly based on the return reason and outcome.

When a user initiates a product return request, the following process is triggered:
- Request Initiation: The user submits a return request.
- Return Details Collection: The Customer_Return_Agent engages the user to gather information about the reason for the return and their desired outcome (e.g., refund, replacement).
- Order Status Update: The agent uses the Update_Order_Status_Tool to set the appropriate status in the order system (such as
return_shipment_pending,refund_completed,replaced, orrefund). - Next Steps Confirmation: The agent informs the user of the next steps, such as providing a shipping label, return shipping instructions, issuing a refund, or processing a replacement item.
- Conversation Closure: The agent closes the conversation once all details are confirmed and the next steps are clear to the user.

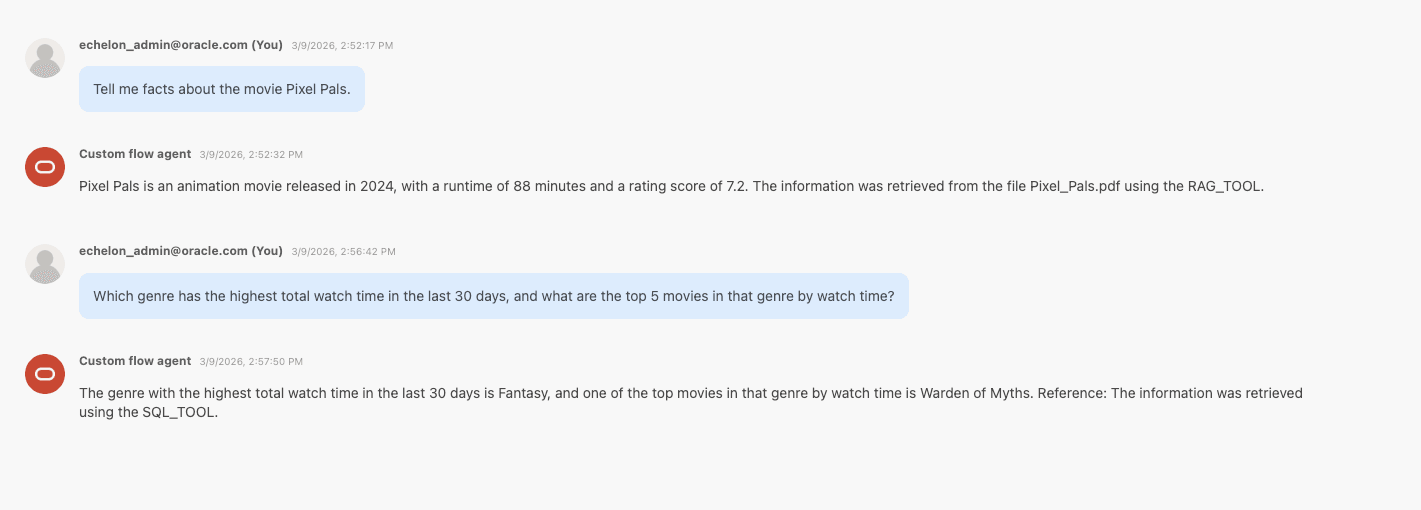
Movie Concierge (RAG + NL2SQL)
Answer movie questions using RAG for general movie facts and NL2SQL for database-backed streaming/catalog & watch analytics (Tables: ACTORS, CUSTOMERS, GENRE, STREAMS, MOVIES, WATCH_HISTORY).
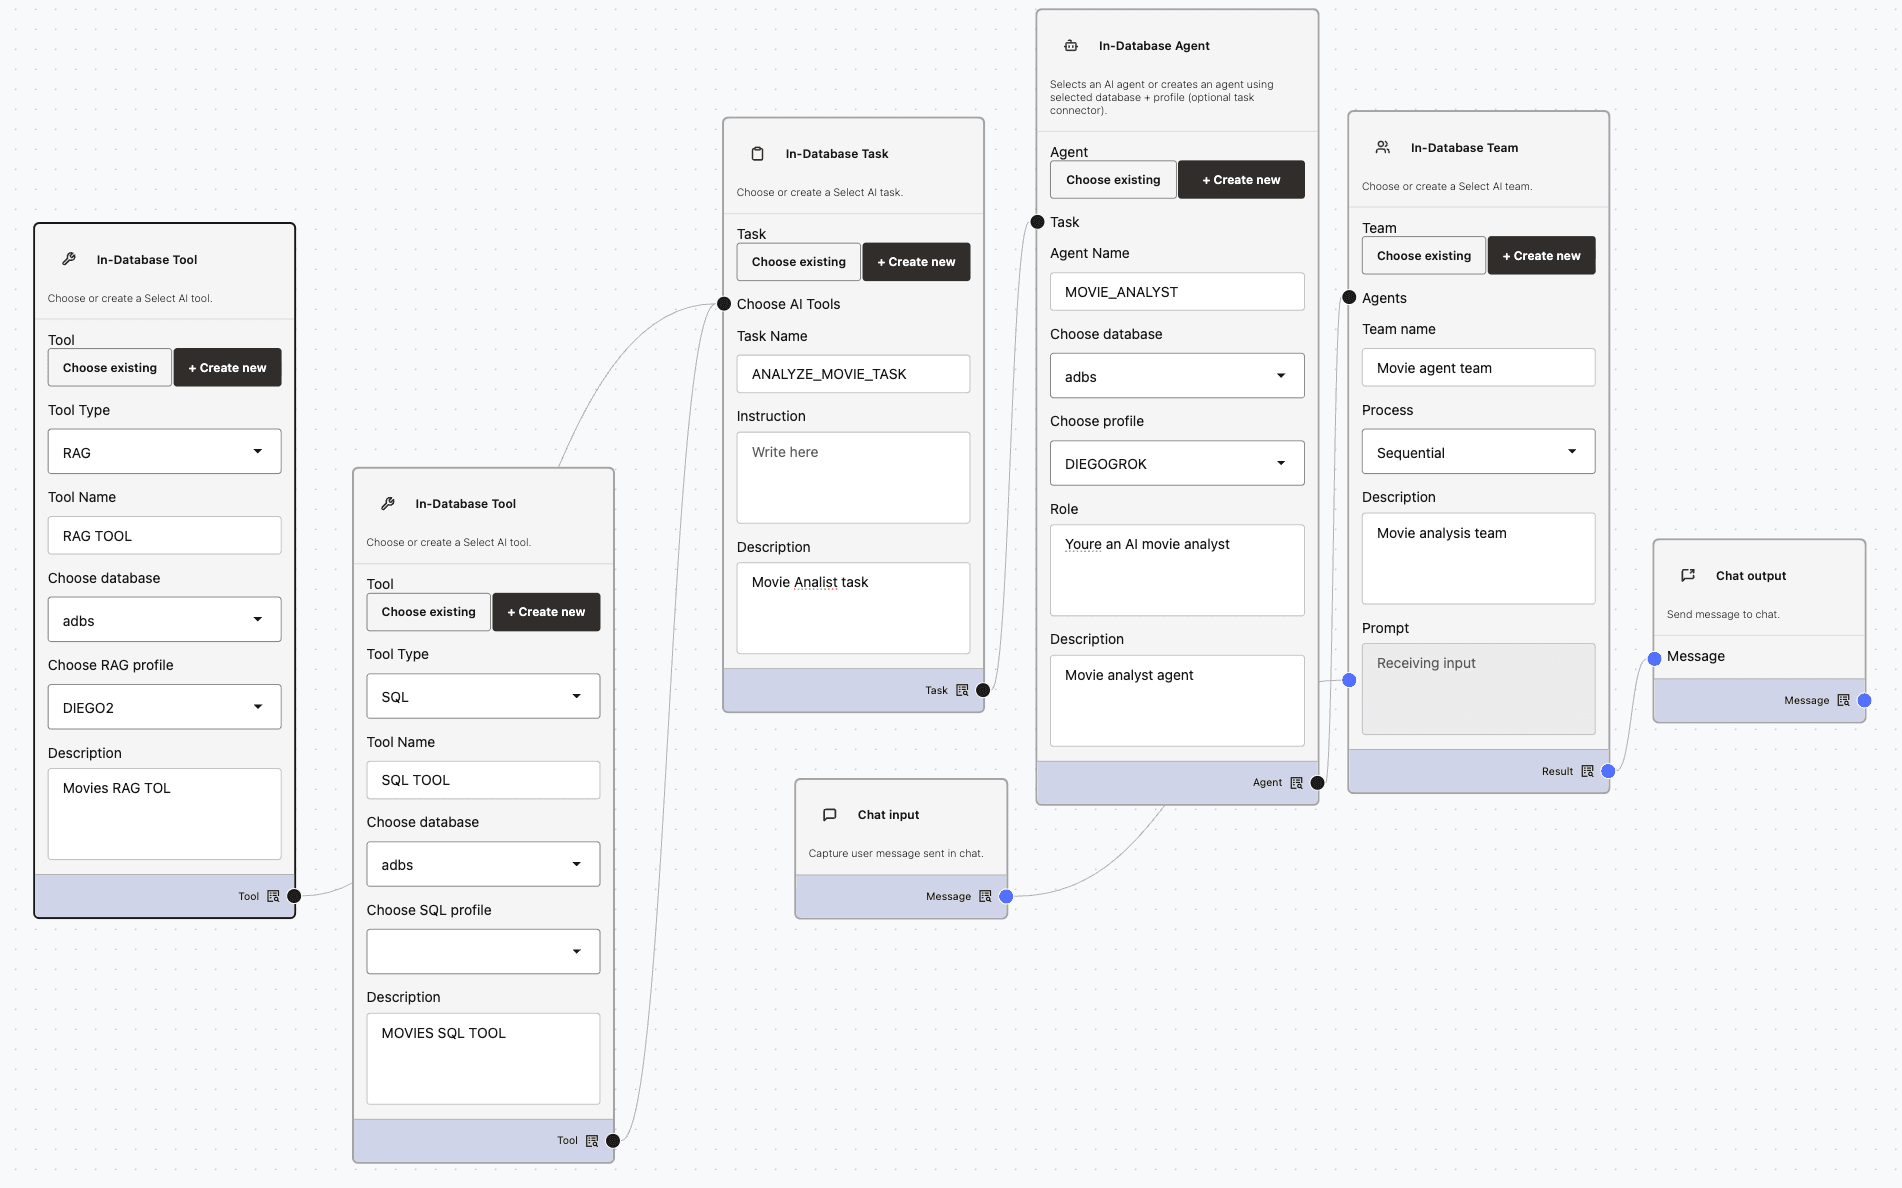
When a user asks a question about movies, the agent follows this process:
- Question Routing:
The agent analyzes the user’s query and determines which tools to use:- Document Retrieval: If the question involves summaries or trivia, the agent uses the RAG (Retrieval-Augmented Generation) tool to search curated movie documents stored in an OCI Object Storage bucket.
- Database Query: For questions about counts, top movies, availability, or history, the agent uses the NL2SQL tool to generate read-only SQL queries on the movie database tables.
-
Result Combination:
The agent combines the results from both sources. - Clear Response:
The agent provides a clear answer, indicating whether the information was sourced from the curated documents, the database, or both.
A Multi-Agent Workflow Integration Using Select AI Workflow
Deliver valuable and complete insights about a local bakery shop by orchestrating specialized agents that retrieve information from both structured databases and unstructured PDF documents, ensuring each user query is addressed with the most relevant data source(s). This example uses previous RAG and NL2SQL profiles.
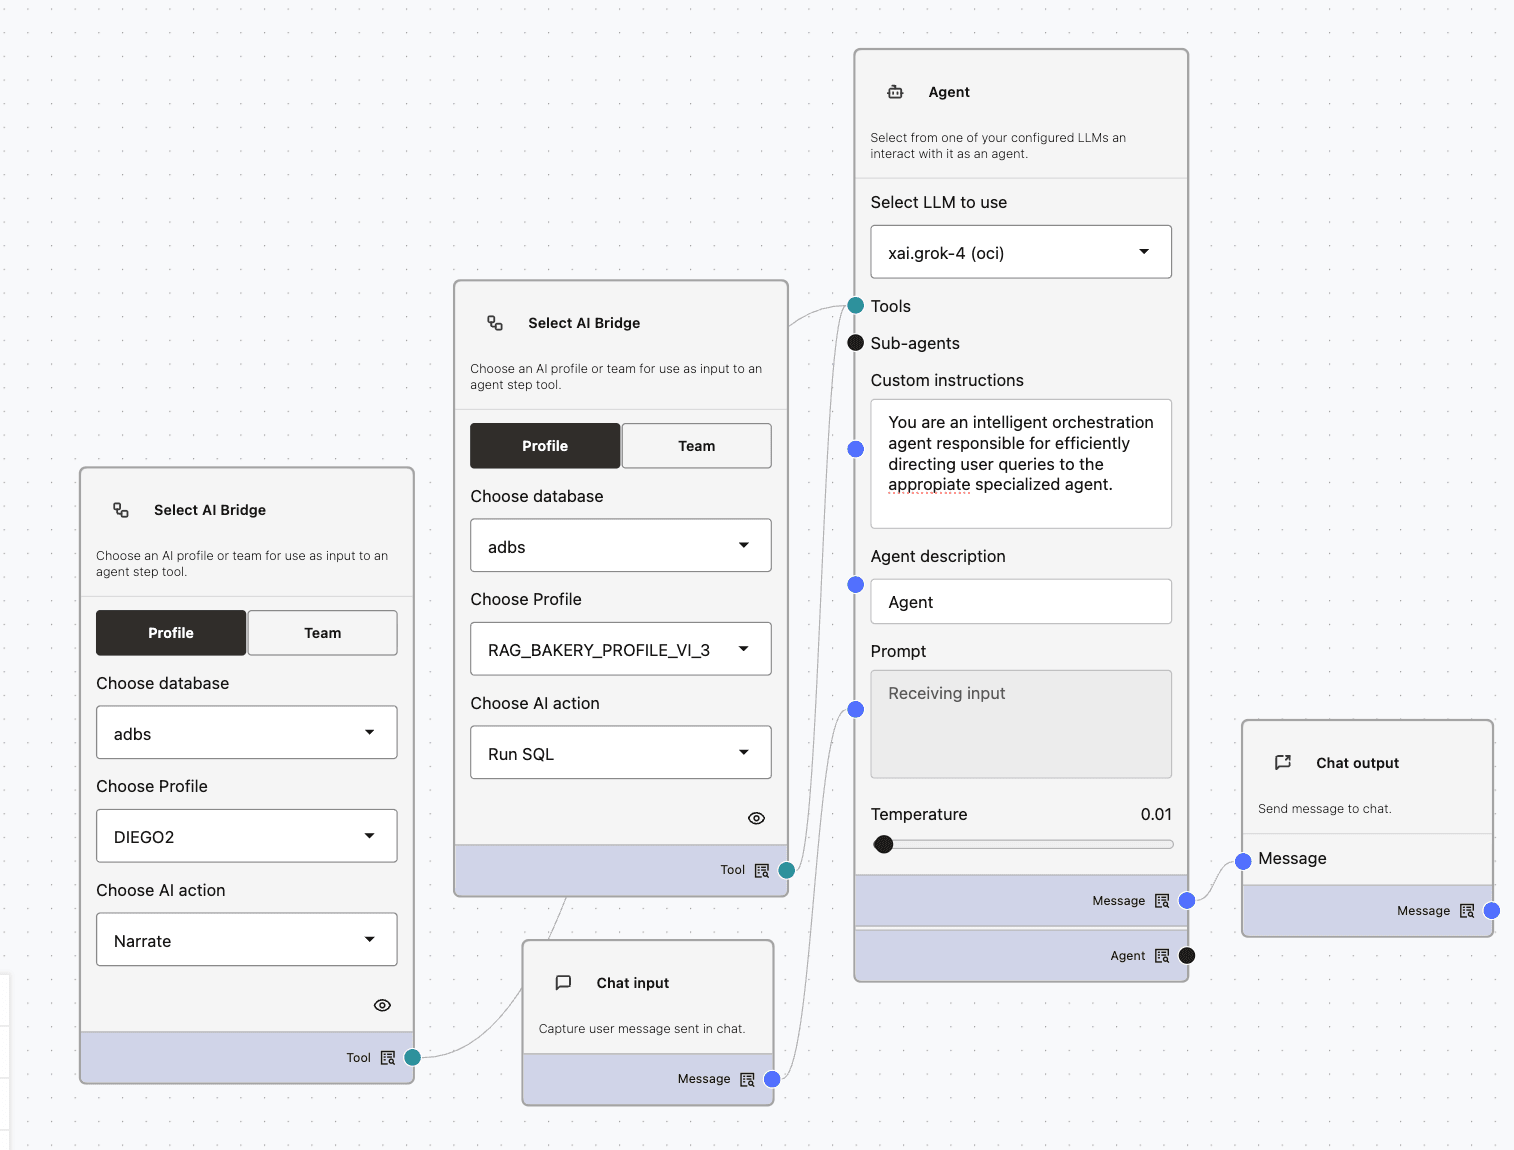
Below is a chat excerpt from the multi-agent workflow:
Q1: Can you remind me the ingredients needed to make a vanilla concha?

R1: The ingredients needed to make a vanilla concha are:

For the dough:
Flour
Milk
Sugar
Butter
Eggs
Yeast

For the topping:
Powdered sugar
Butter
Flour
Vanilla extract
These ingredients are based on the information available in the bakery's PDF files.

Q2: How many vanilla conchas do we have in our inventory?

R2: We have 120 vanilla conchas in our inventory.
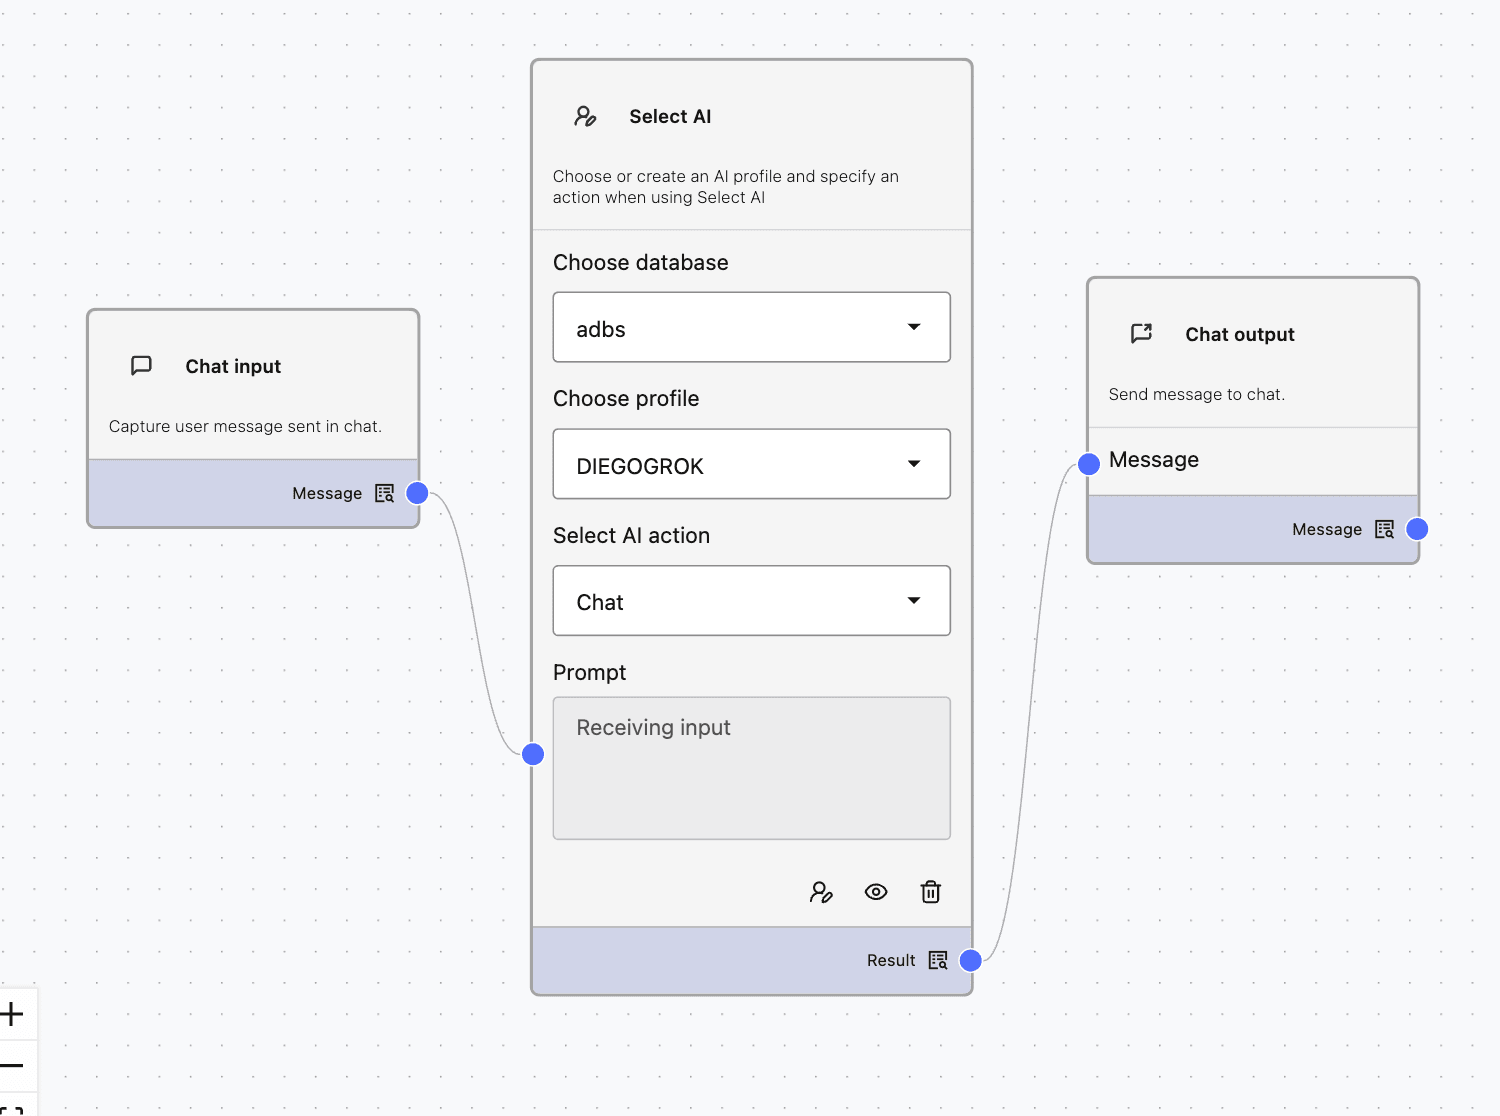
Select AI Actions Demos
This section demonstrates the behavior of various SelectAI actions and includes screenshots of the agent builder flow and chat outputs.
-
Chat Action
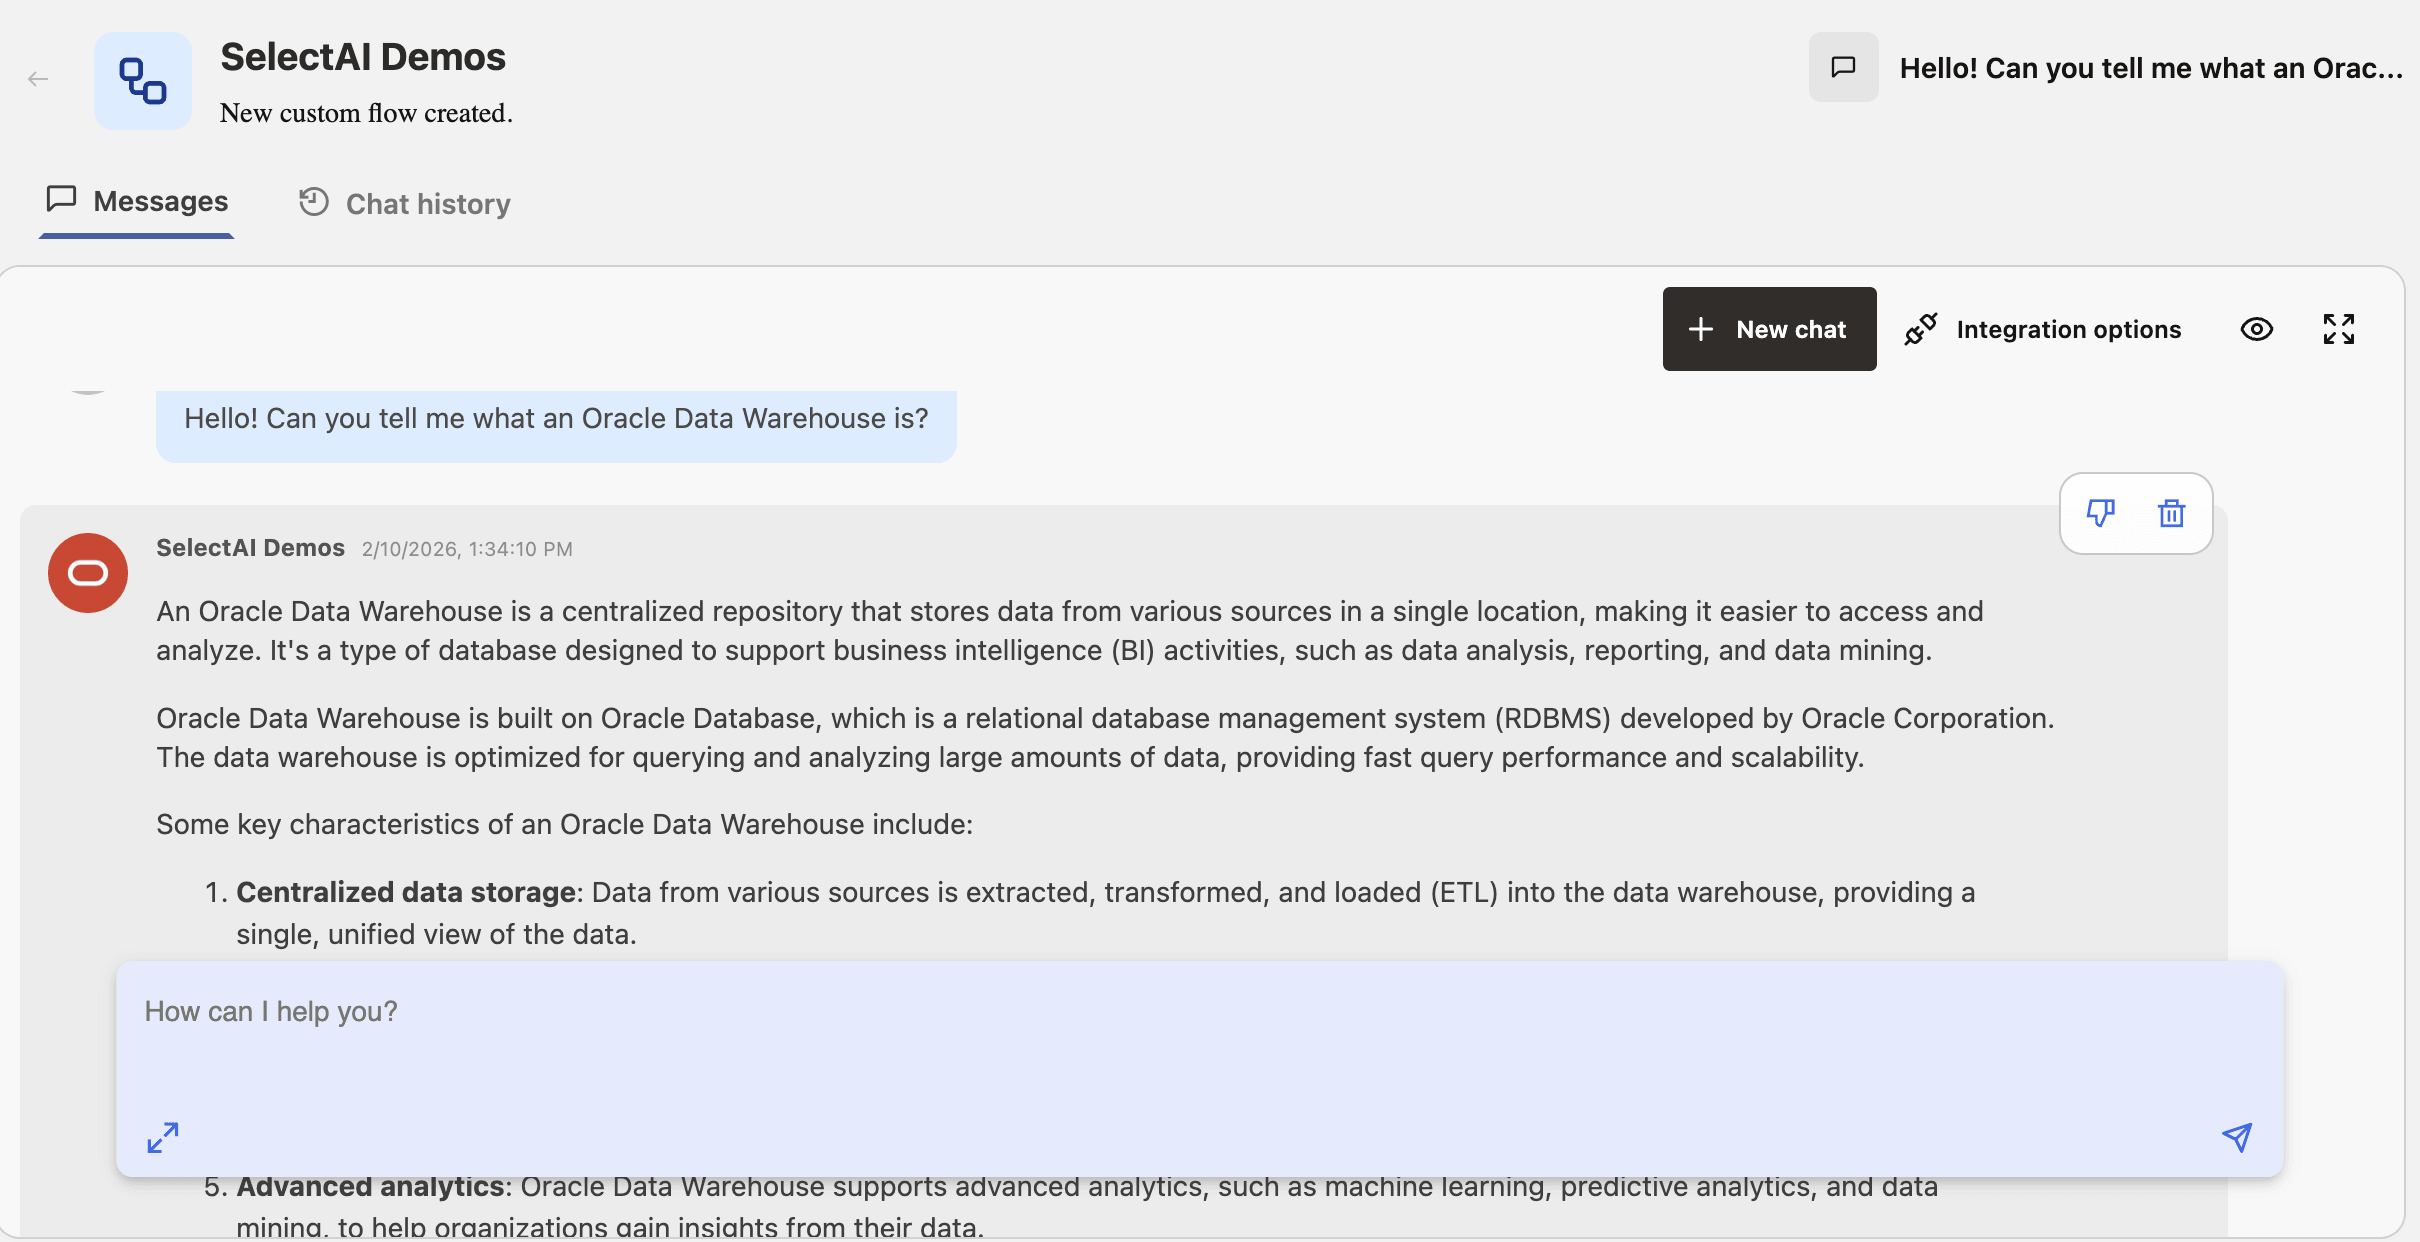
-
RunSQL
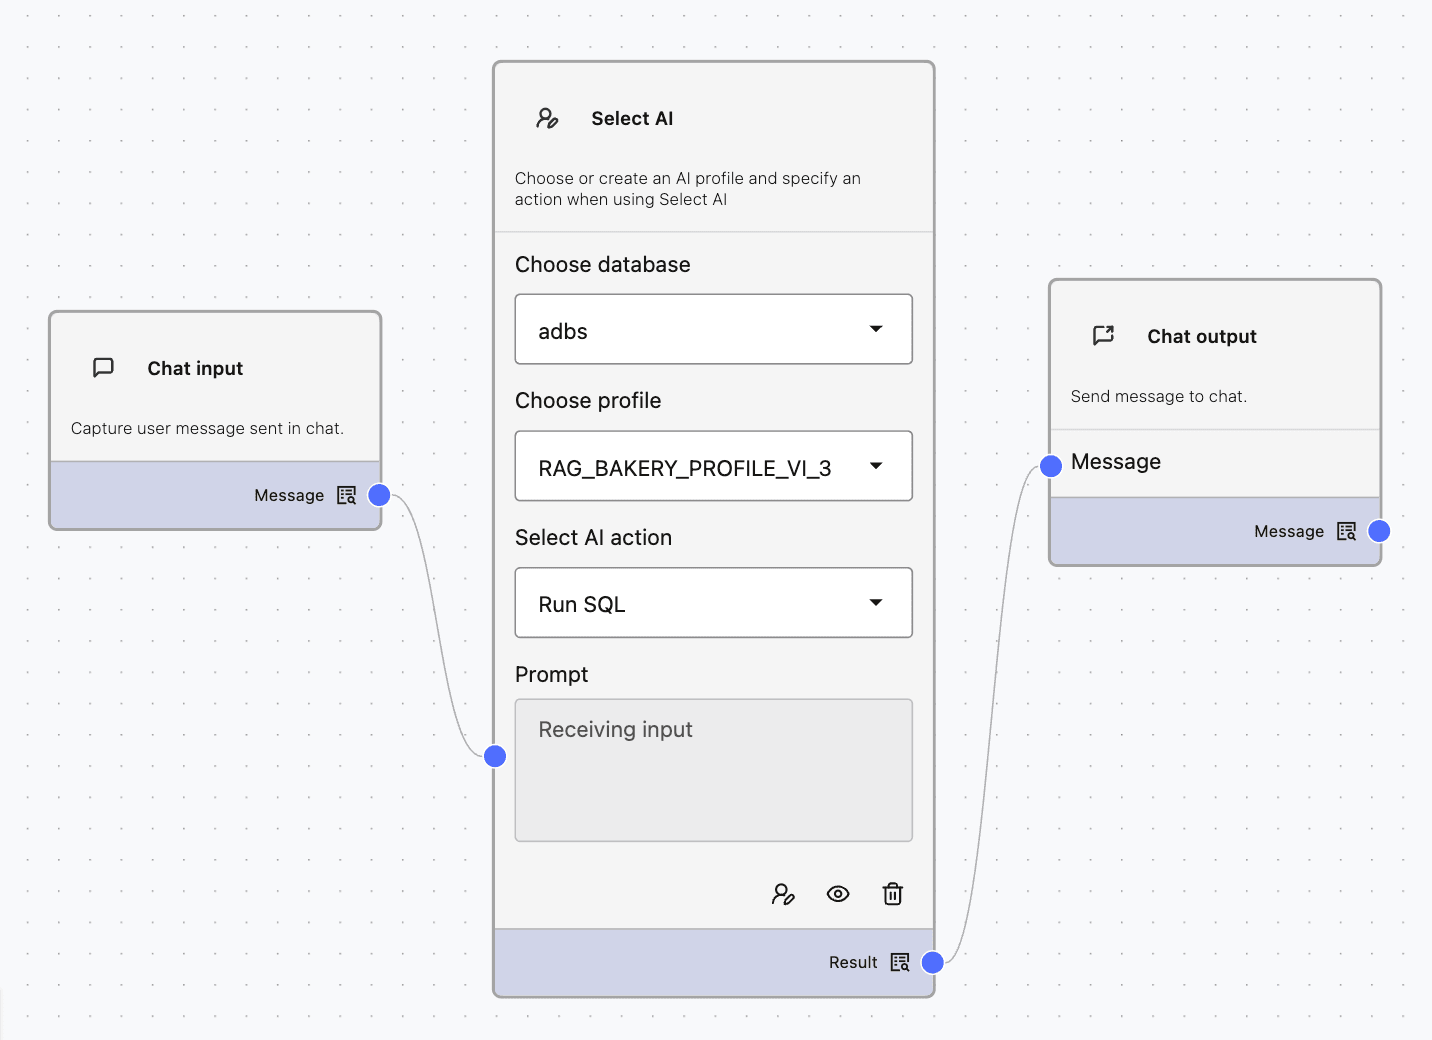
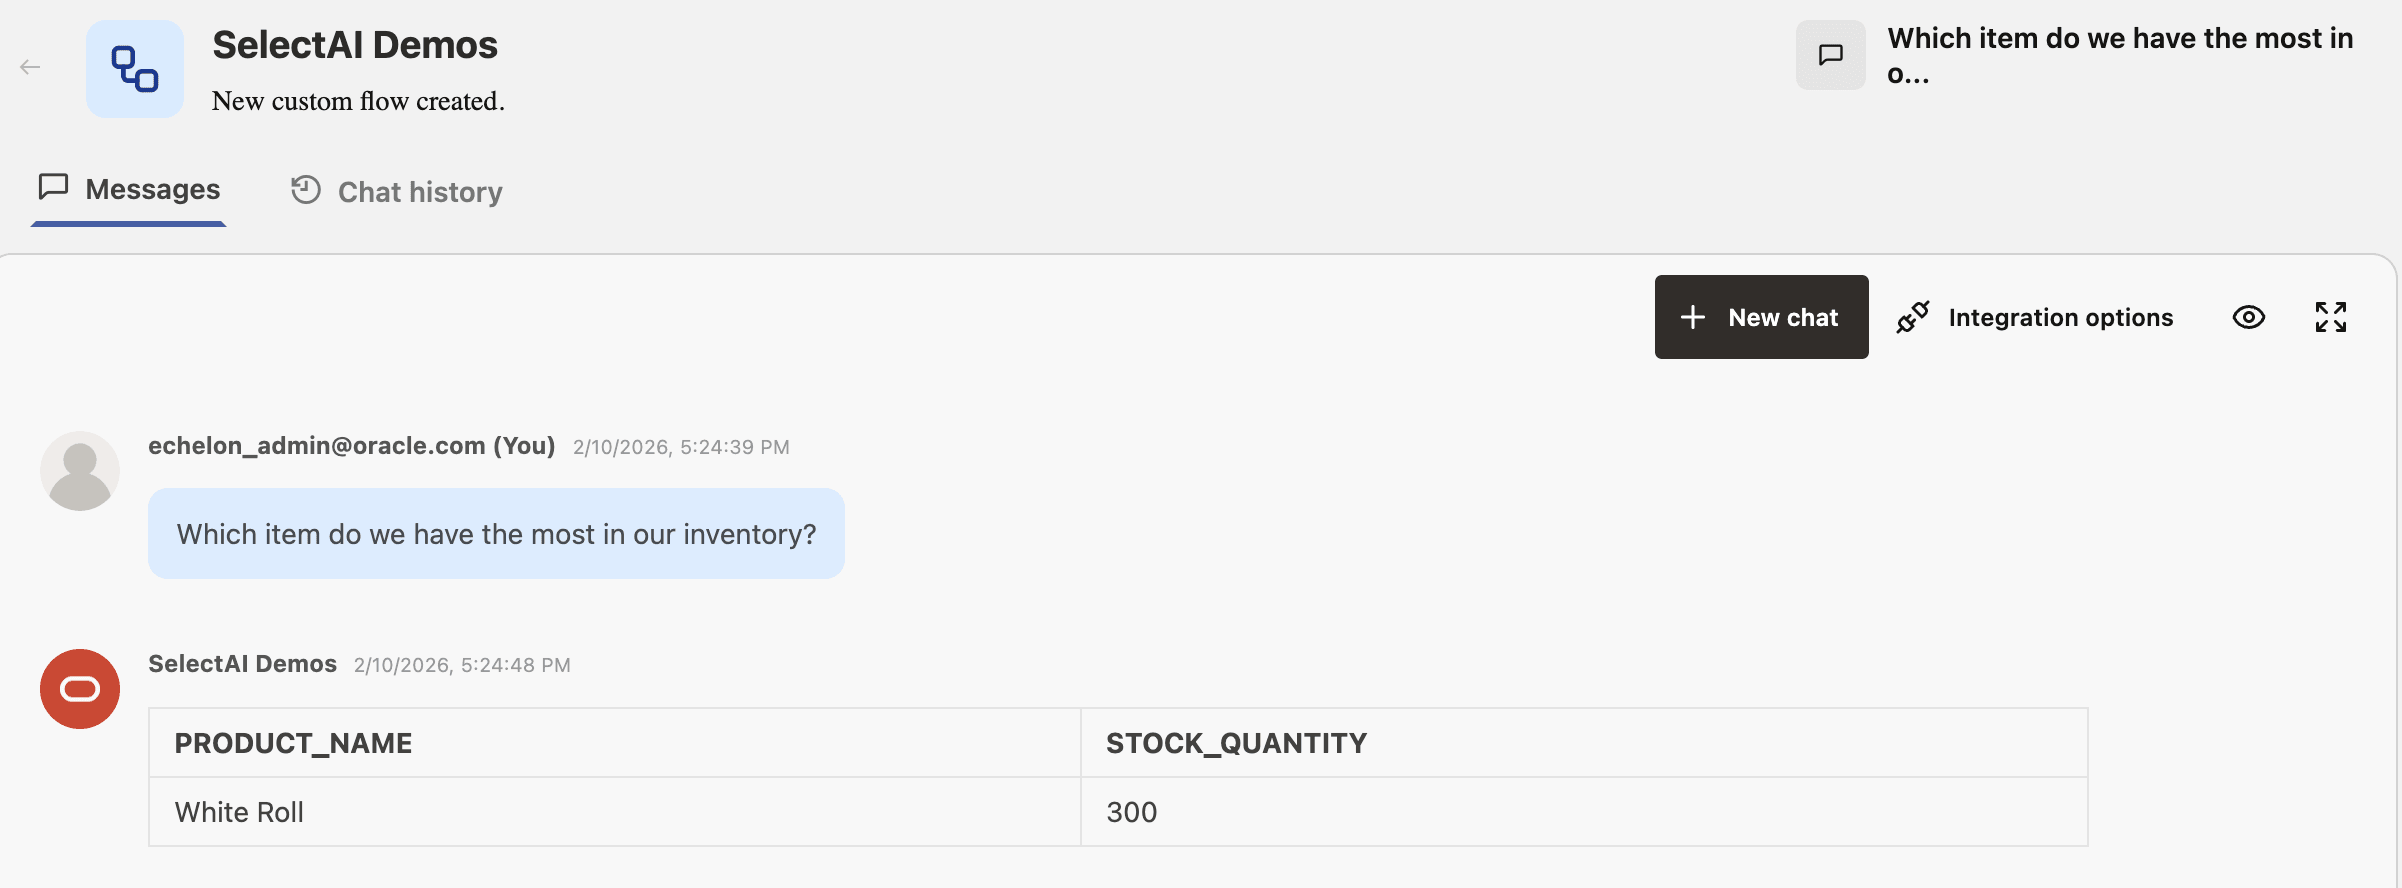
-
ShowSQL
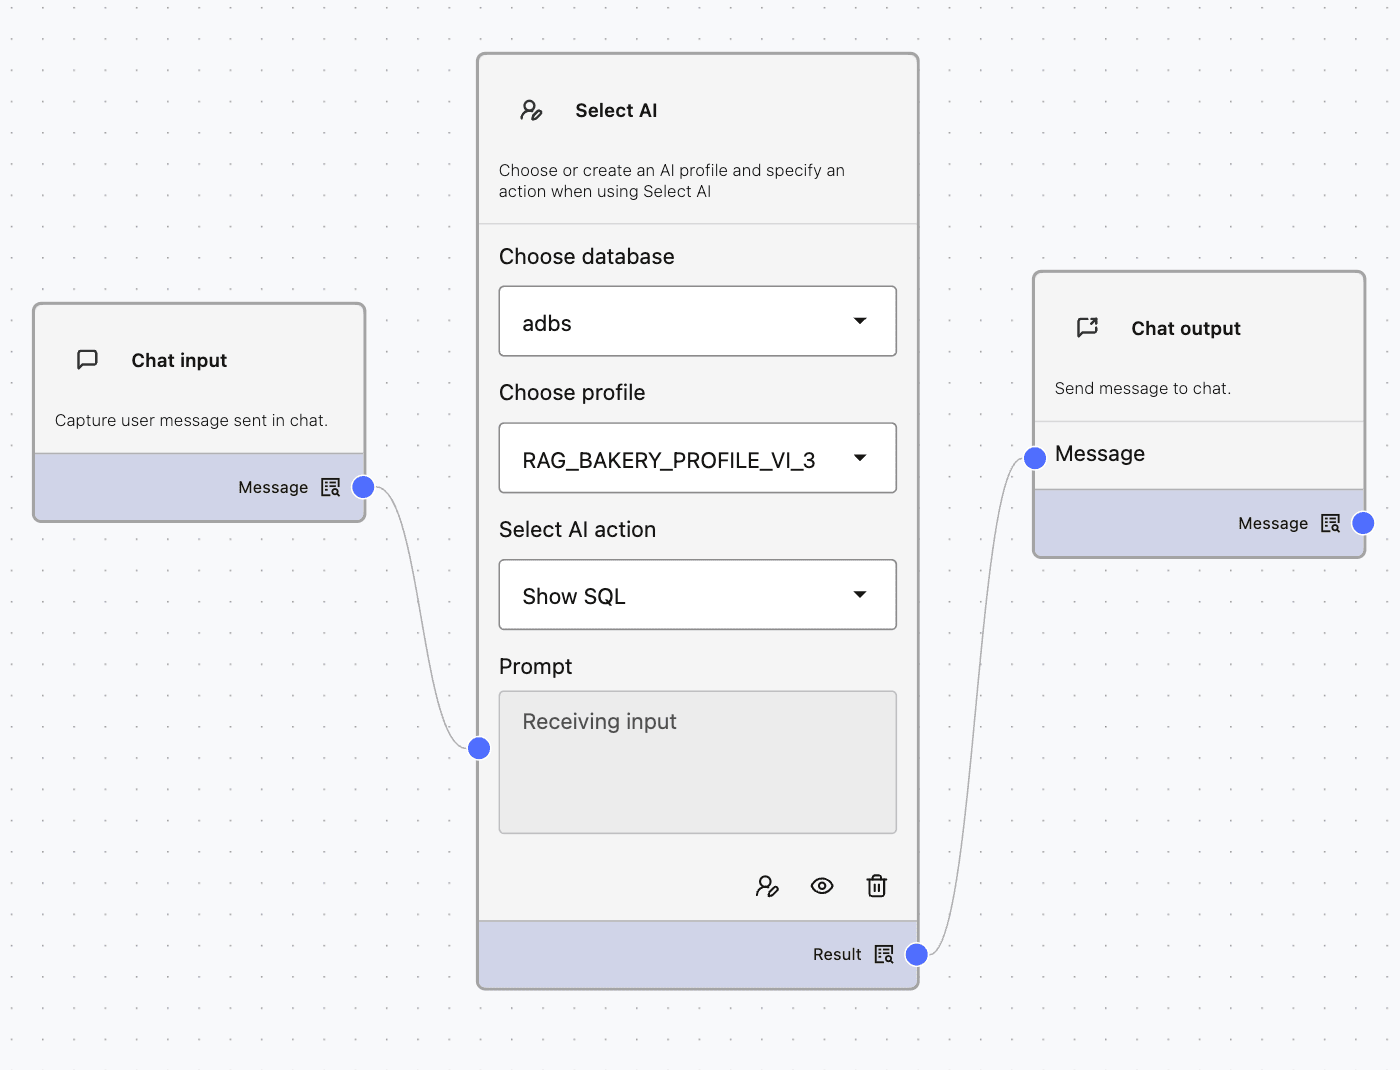
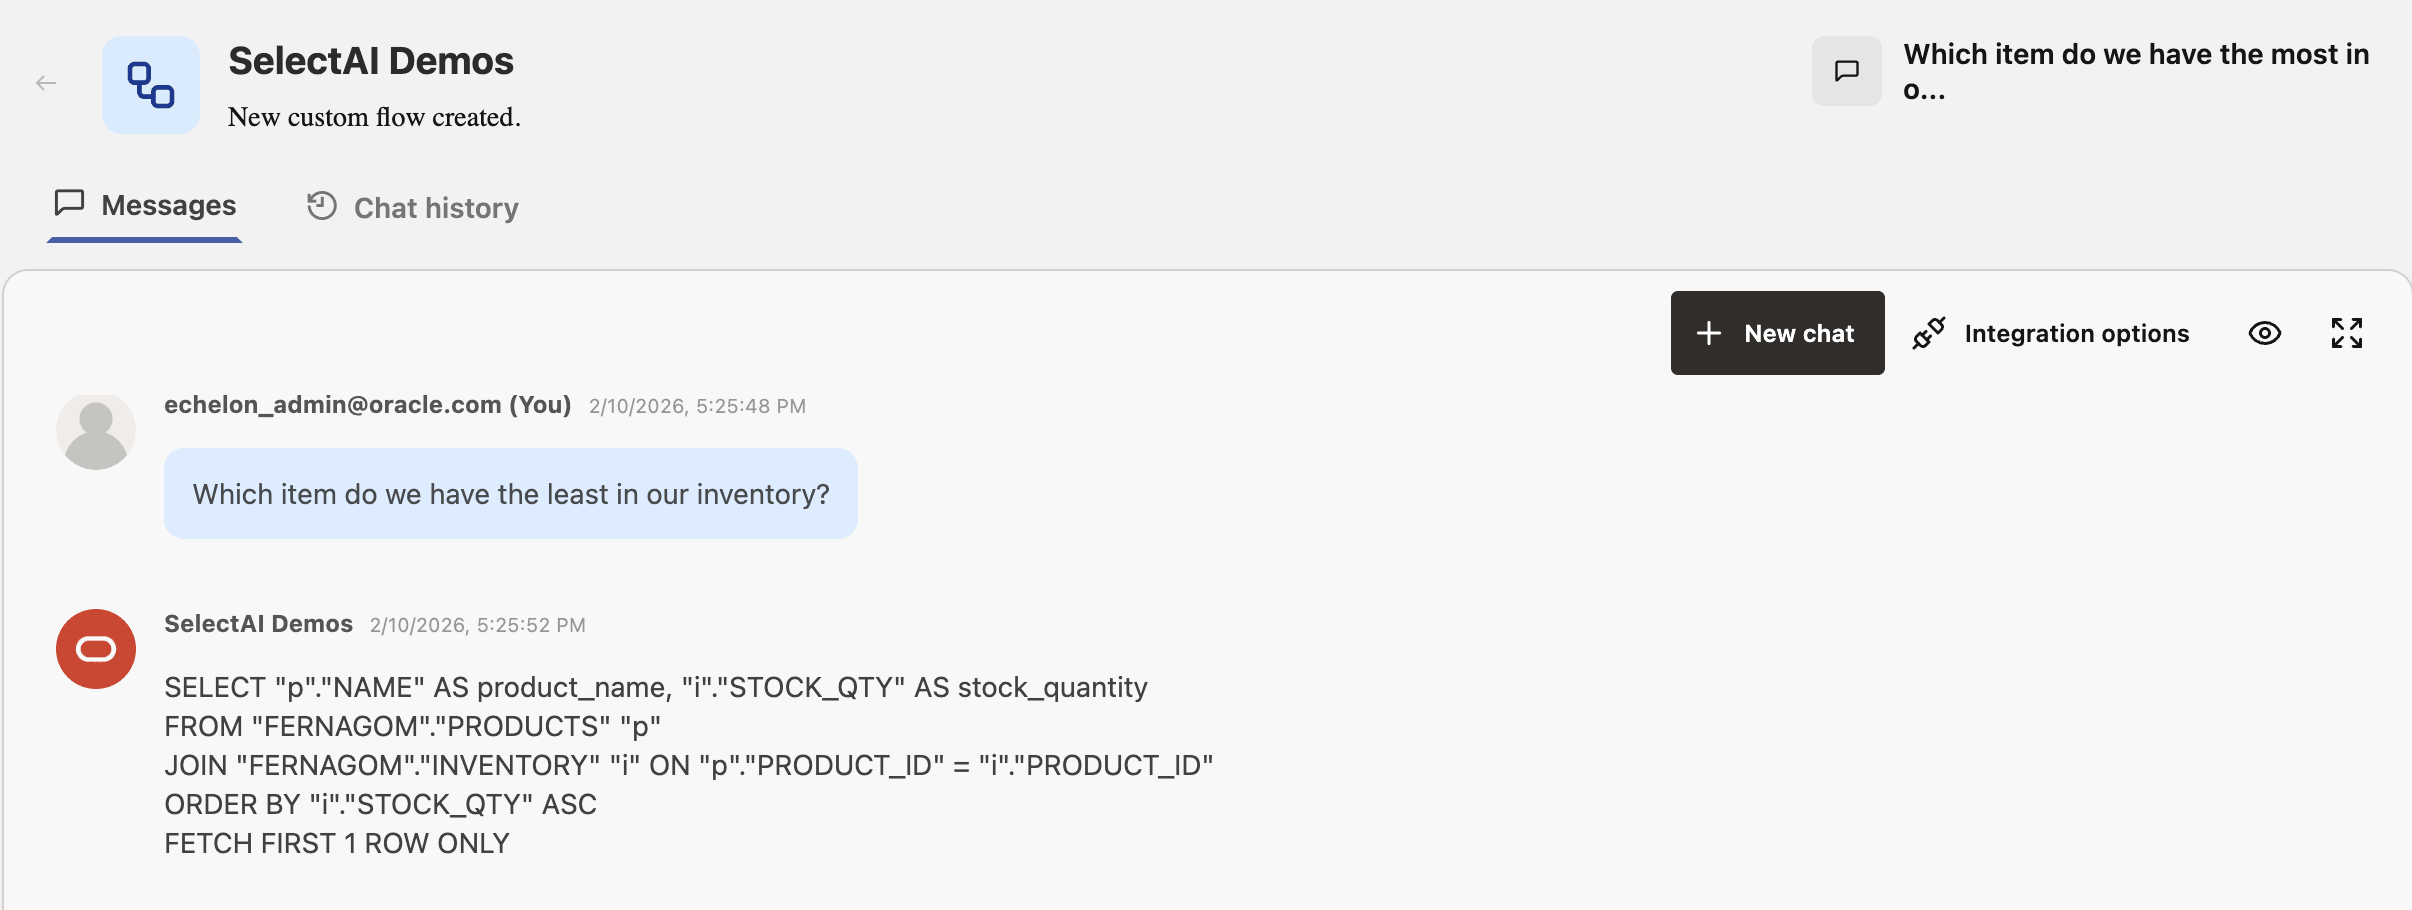
-
ExplainSQL
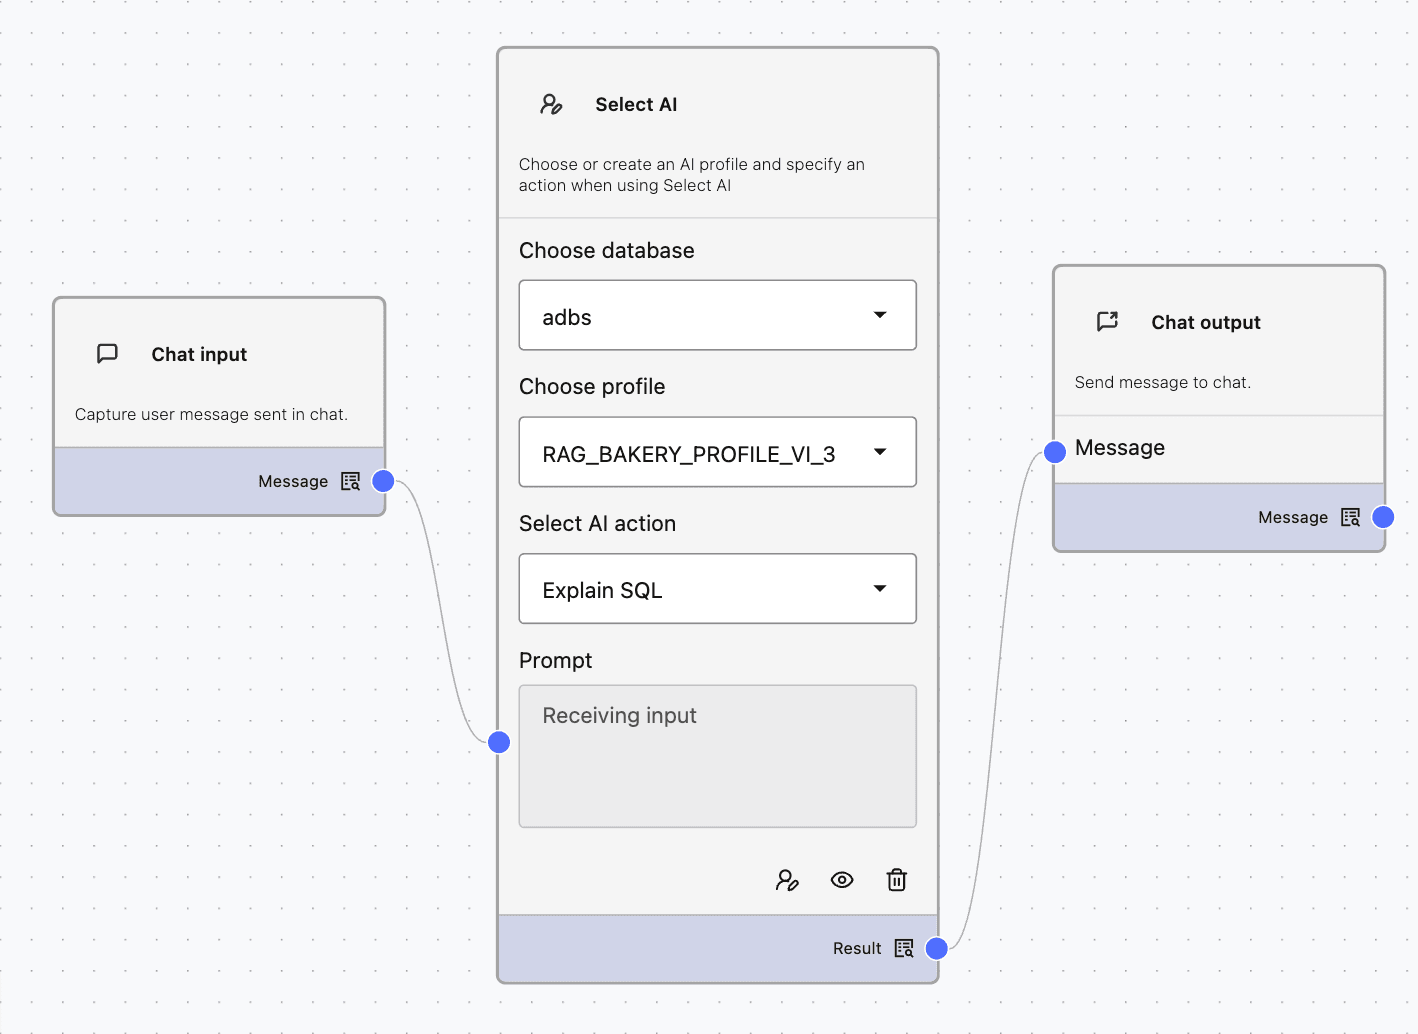
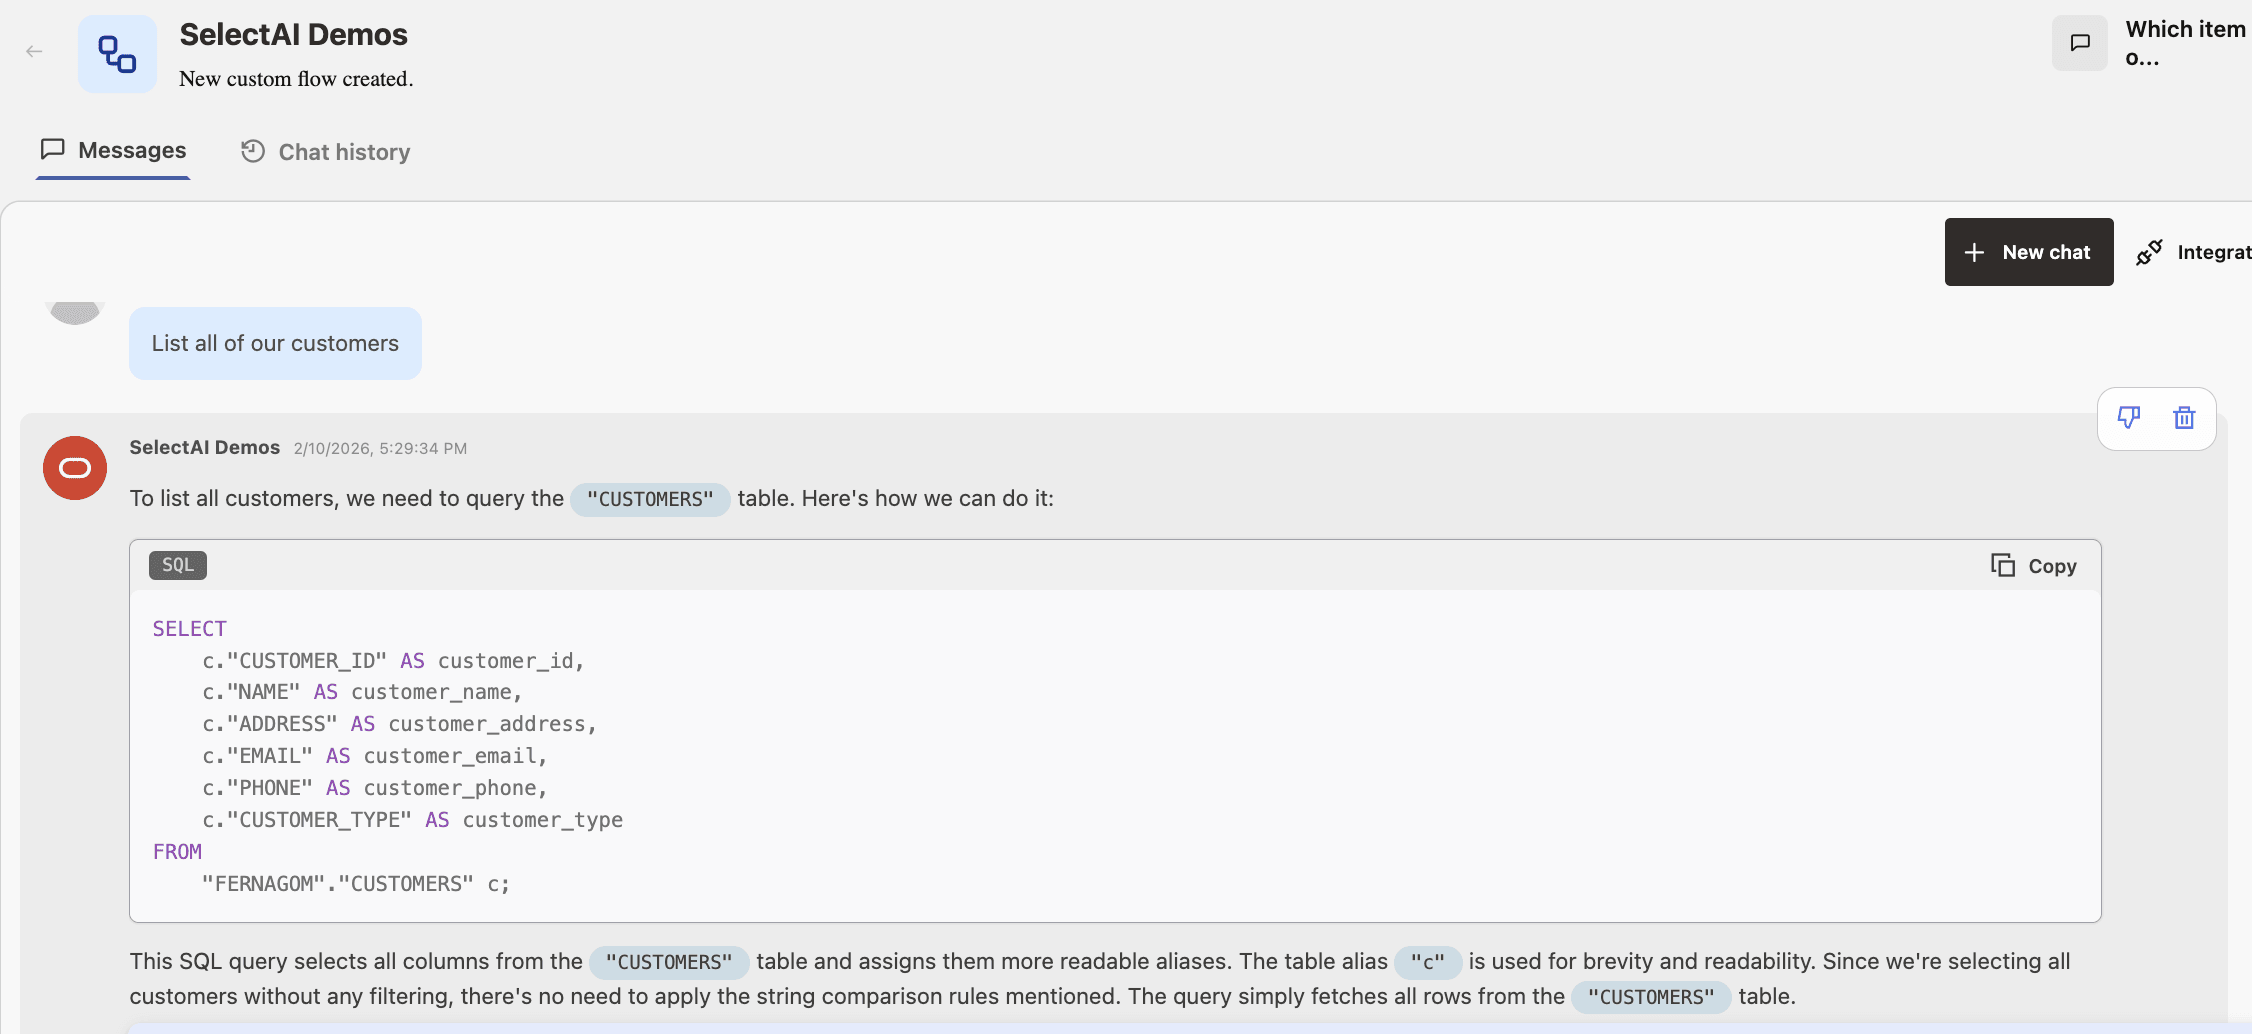
-
Narrate
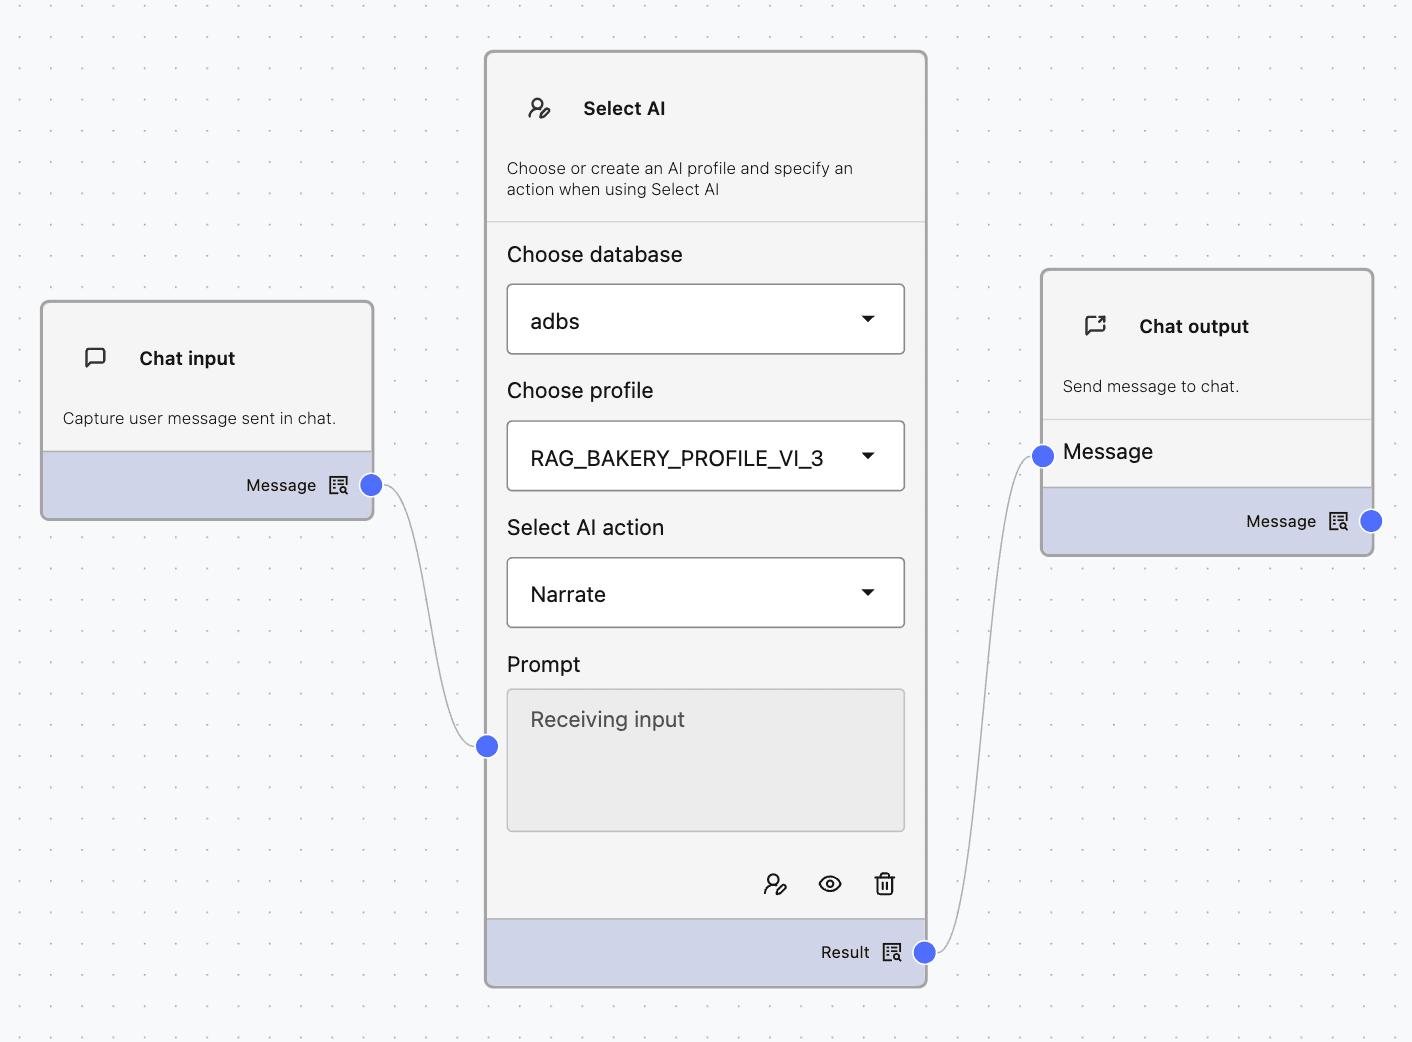
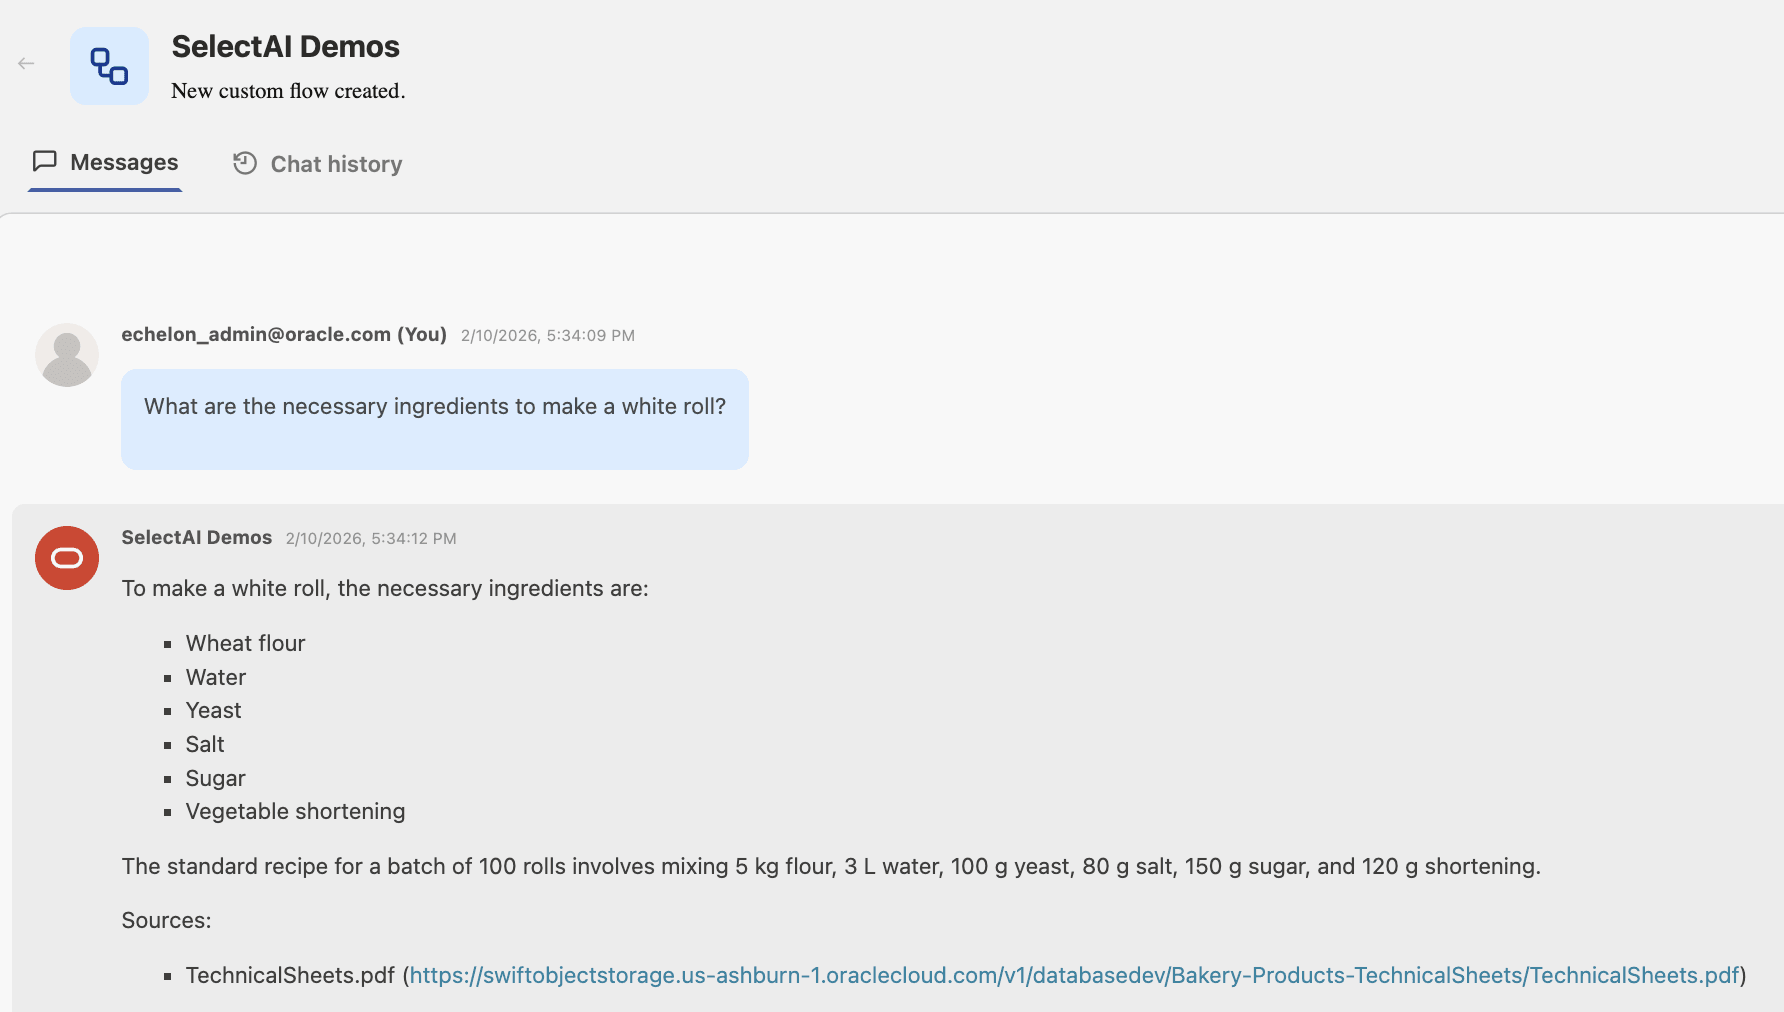
-
Show Prompt
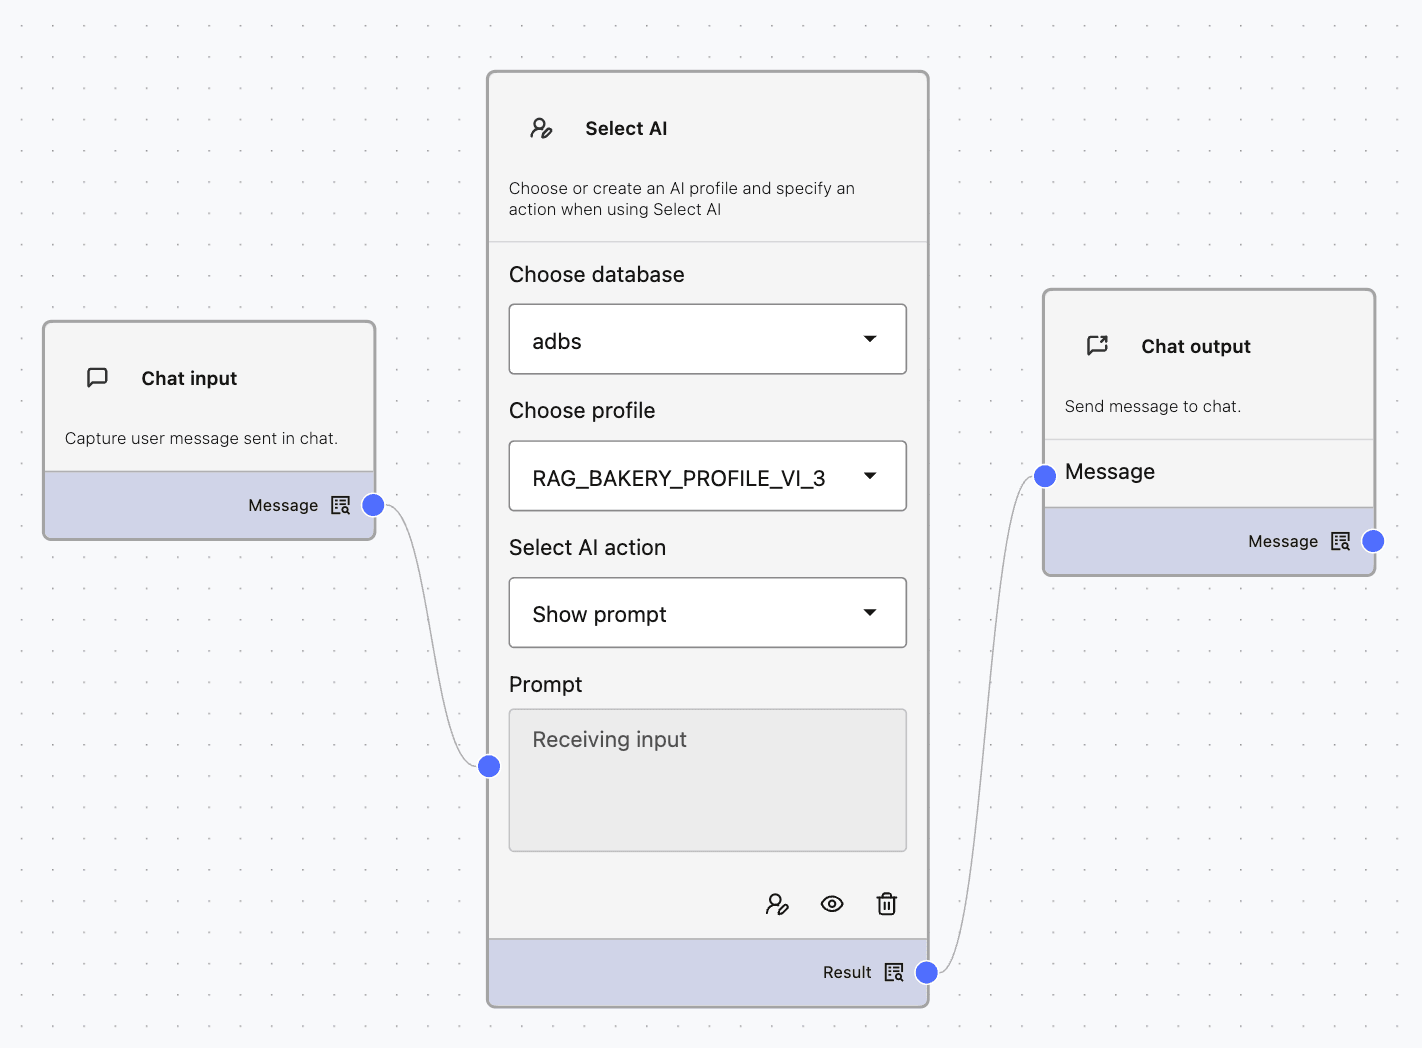
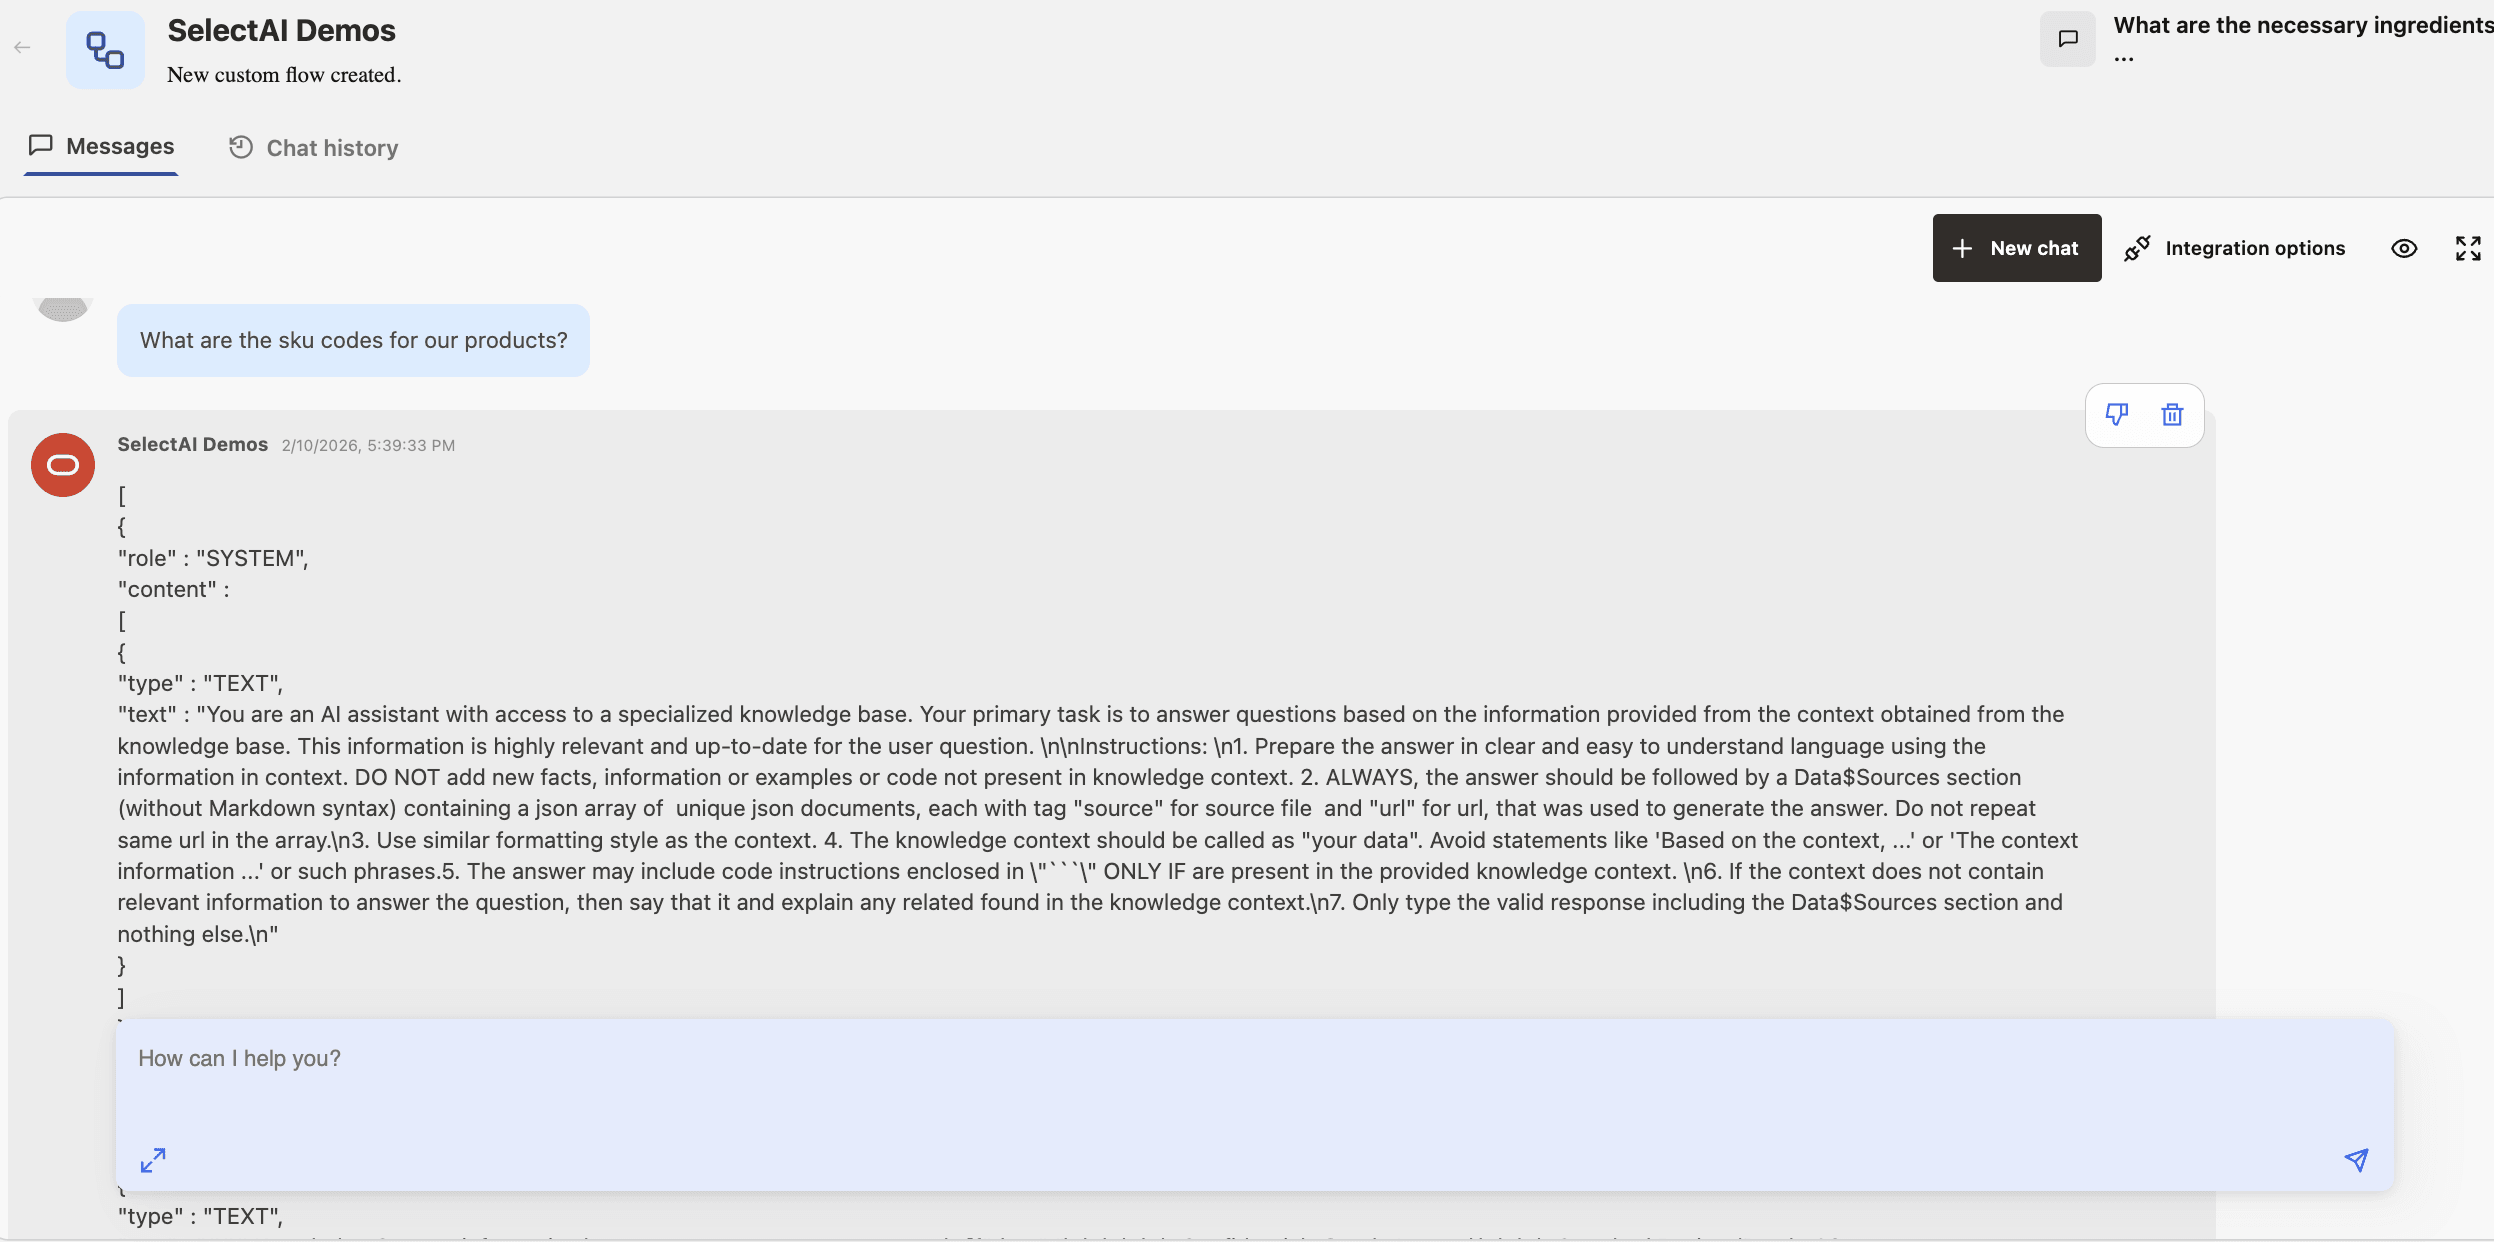
9. Math Help Assistant and Basic Math Service - Advanced Level
This sample demonstrates an end-to-end Agent2Agent (A2A) integration. Basic Math Service acts as the A2A server, and Math Help Assistant acts as the A2A client that delegates mathematical requests to it. See A2A Agents.
What Does This Sample Demonstrate?
- Basic Math Service: A published Agent Factory workflow that provides specialized mathematical assistance as an A2A server.
- Math Help Assistant: An Agent Builder workflow that acts as an A2A client and delegates mathematical work to the Basic Math Service through an External Agent node.
This pattern lets the external service remain independently deployed while the Agent Builder workflow controls when work is delegated.
Configure the Basic Math Service (A2A Server)
Create the Basic Math Service as a published workflow that accepts requests from A2A clients.
Note: The Basic Math Service is the A2A server in this example. Do not add an External Agent node to this workflow, because workflows that contain an External Agent node cannot provide inbound A2A access.
- Create a Custom Workflow named Basic Math Service.
- Add a chat input, an Assistant (Agent) node, and a chat output.
- In the Assistant node, select a generative model and enter instructions such as:
Solve arithmetic requests accurately. Return a clear plain-text answer with the calculation result. -
Connect the chat input to the Assistant node, and connect the Assistant node message output to the chat output.
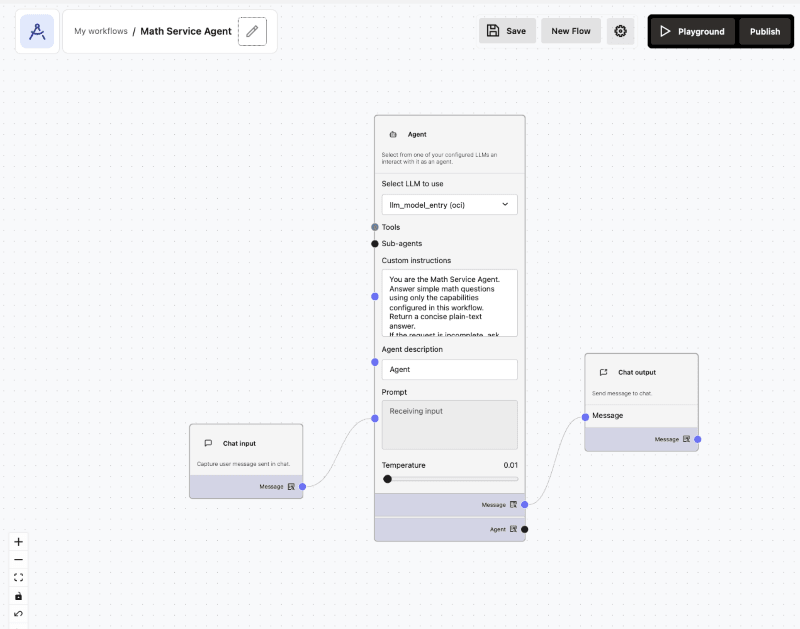
-
Publish the workflow. In the chat window, select Integration options > A2A, enable A2A access, then copy the Agent Card URL and generate an agent-specific A2A API key.
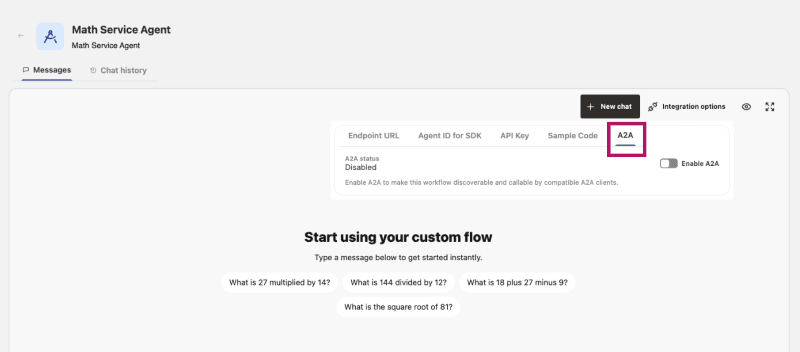
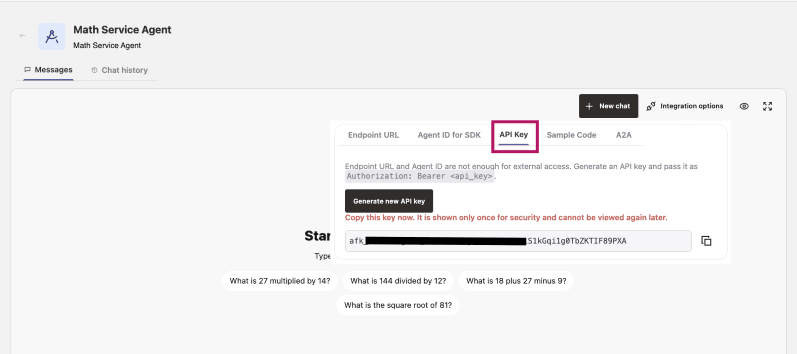
Configure the Math Help Assistant (A2A Client)
Configure the Math Help Assistant to use the Basic Math Service as a sub-agent.
-
In Utilities > A2A Agents > External agents, select Add external agent. Enter the Basic Math Service Agent Card URL and A2A API key, then discover, verify that it is compatible, and enable the agent.
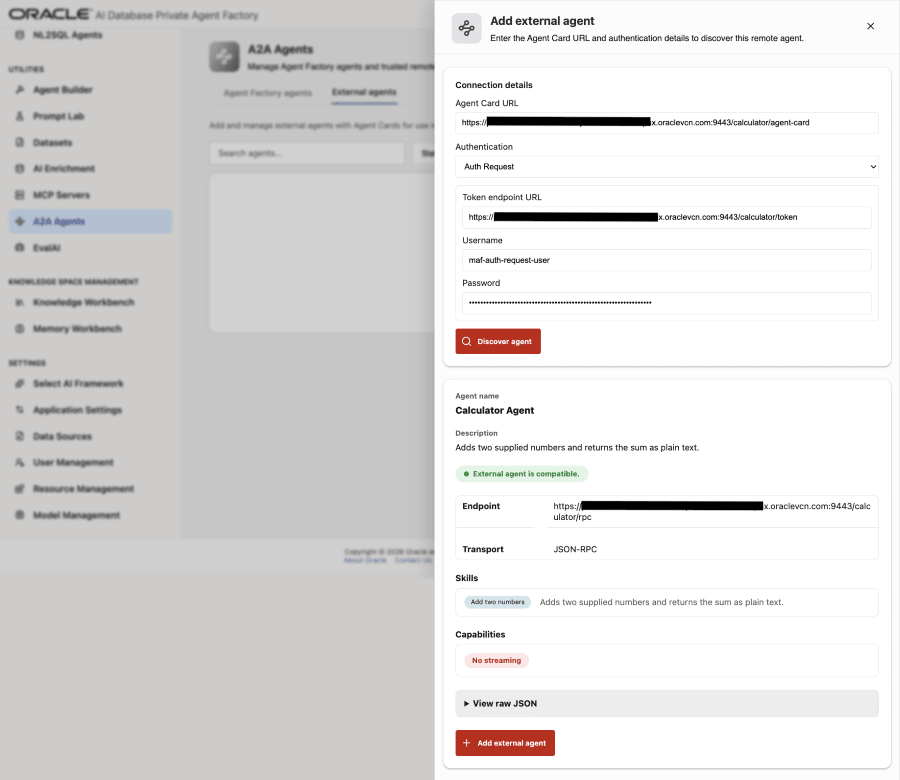
- Create a Custom Workflow named Math Help Assistant.
- Add a chat input, an Assistant (Agent) node, an External Agent node, and a chat output.
- In the External Agent node, select the enabled Basic Math Service. Review the discovered supported skills and, if needed, update the description used by the Math Help Assistant.
- Connect the External Agent node Agent output to the Assistant node Sub-agents input.
- In the Assistant node, select a generative model and enter instructions such as:
Delegate mathematical questions to the Basic Math Service. Use the service response to answer the user. - Connect the chat input to the Assistant node, and connect the Assistant node message output to the chat output.
When the External Agent node is connected as a sub-agent, the Assistant node sends the delegated request to the Basic Math Service. The External Agent node Input is not used for this delegated interaction.
Test the A2A Workflow
- Run the Math Help Assistant and enter a mathematical request, such as
What is 125 multiplied by 8?. - Verify that the Math Help Assistant delegates the request to the Basic Math Service and returns the plain-text result.
- If delegation fails, verify that the Basic Math Service is published and A2A-enabled, and that its external-agent status is Connected. See A2A Agents.