5.3 Creating an Application from a File
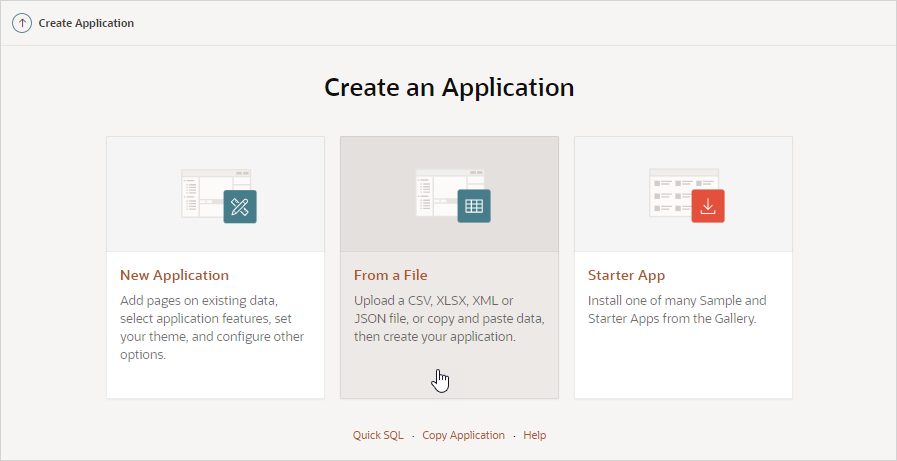
Run the Create Application Wizard and select From a File to upload a file and then create an application on the uploaded data.

5.3.1 About Creating an Application from a File
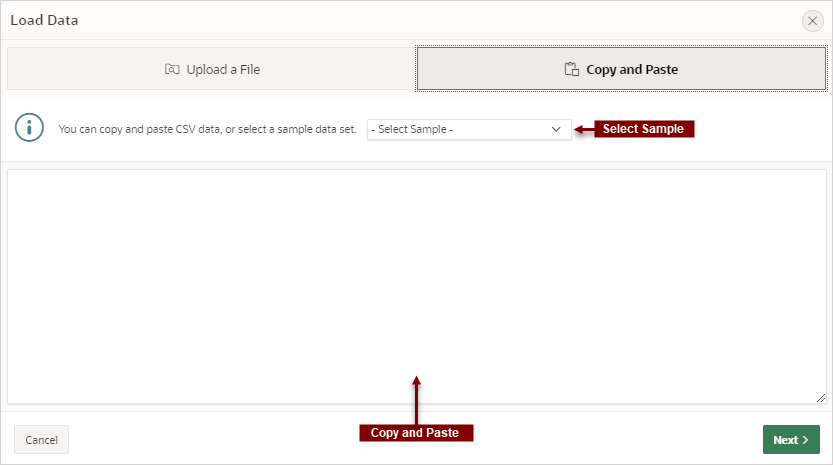
Upload a CSV, XLSX, XML, TXT, or JSON file, or copy and paste CSV data and then create your application.

When you run the Create Application Wizard and select From a File, the Load Data Wizard appears. On the Load Data Wizard, you can choose to:

  • Upload a File. Select this option to load data from a CSV, XLSX, XML, TXT, or JSON file.
  • Copy and Paste. Select this option to copy and paste column delimited data. You have the option of selecting a sample data set from the Select Sample list.

Once you load data into the database table, the wizard provides an option to Continue to the Create Application Wizard. When you continue, a report with form and dashboard pages based on the new table displays under Pages. You then finish the application creation process by naming the application.

See Also:

Loading Data in Oracle APEX SQL Workshop Guide

5.3.2 Creating an Application by Uploading File

Upload a file to the database and then create an application based on the new table.

To create an application from a file:

  1. On the Workspace home page, click the App Builder icon.
  2. Click the Create button.

    The Create Application Wizard appears.

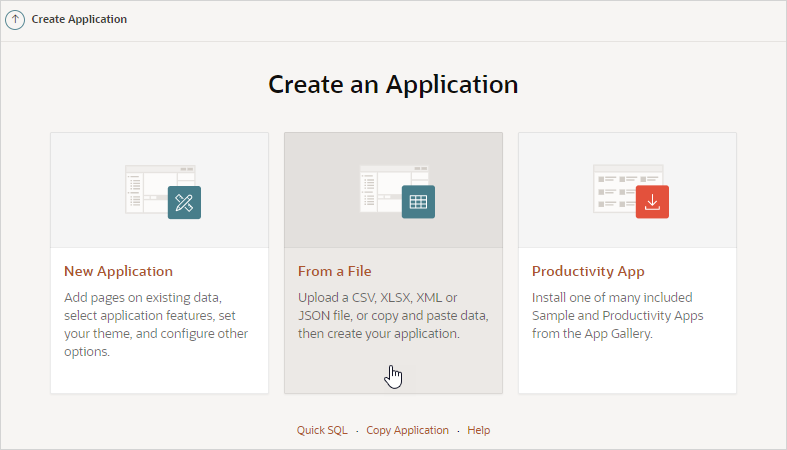
  3. Click From a File.

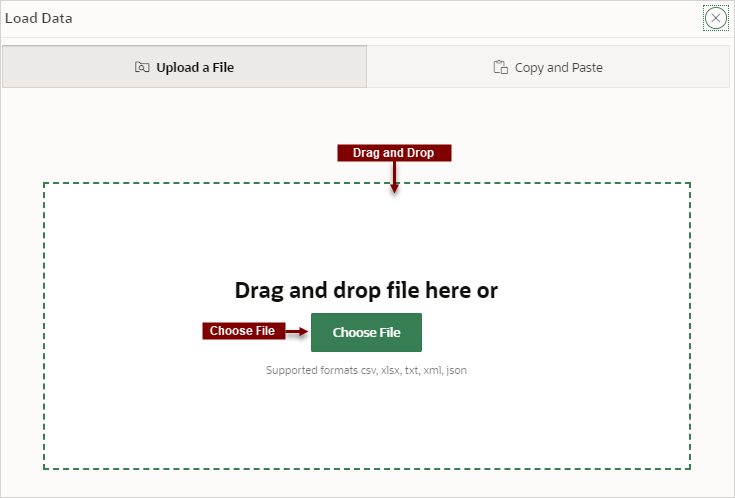
    The Load Data page appears with the Upload a File tab selected.

    Description of load_data_file.png follows
    Description of the illustration load_data_file.png
  4. In the Upload a File tab, you have two options:
    • Drag and Drop - Drag and drop the file to the region in the center of the page.
    • Choose File - Click Choose File and then navigate to and select the file.

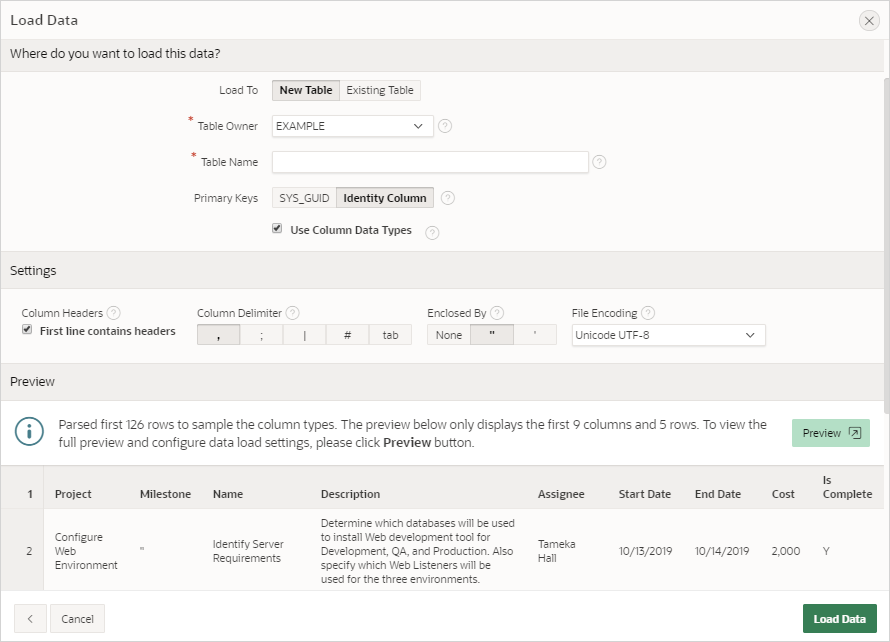
    The Load Data page appears containing the sections Where do you want to load this data?, Settings, Preview. Note that the Load Data page that appears differs slightly depending upon the selected file type.

  5. Under Where do you want to load this data?, select where to load the data.

    What appears next depends upon your selection.

  6. To load data to a new table:
    1. Load To - Select New Table.
    2. Table Owner - Select the database schema.
    3. Table Name - Identify the table name you would like to create. By default, all table names are converted to upper case.
    4. Error Table Name - Identify the error table name you would like to save errors during data load. By default, all table names are converted to upper case. If data load succeeds without any error, this error table is dropped automatically.
    5. Primary Keys - Select how to set the primary key. Options include SYS_GUID or Identity Column. To learn more, see field-level Help.
    6. Use Column Data Types - Select to use the column types parsed from the file. If un-checked, the table columns will be created as VARCHAR2(4000).
  7. To load data to an existing table:
    1. Load To - Select Existing Table.
    2. Table Owner - Select the database schema.
    3. Table Name - Select the database table to load data.
      A message appears indicating the number of columns mapped to the target table.
    4. Click Configure to configure any remaining columns. On Configure, under Column Mapping:
      • Rows to Sample - Select the maximum number of rows to be used to sample column types.
      • Treat as Null - The entered case insensitive value will be treated as NULL. For example, "tbd", "n/a", "unknown", "-".
      • Column Mapping - Configure any additional attributes.
      • Click Save Changes.
    5. Error Table Name - Identify the error table name where you would like to save errors during data load. By default, all table names are converted to upper case. If data load succeeds without any errors, this error table is dropped automatically.
    6. Update Method - Options include:
      • Append - If data already exists in the table, the wizard appends the new rows into the table. If data does not exist, the new rows are simply loaded.
      • Replace - The entire table is replaced by deleting the table first and then loading the new rows into the table.
  8. Under Settings:
    1. Column Headers - Select this option if your data contains column names in the first row.
    2. Column Delimiter - Select a column delimiter character (if CSV or TXT file).
    3. Enclosed By - Select a column enclosed by character (if CSV or TXT file). This character deliminates the starting and ending boundary of a data value. If you specify a delimiter character, the wizard ignores white space occurring before the starting and ending boundary of a data value.
    4. File Encoding (if applicable) - Choose the character set in which the file is encoded.
  9. Preview displays a sample of columns and rows. The exact number varies based on the type of file. Click one of the following tabs:
    • Preview - Displays a sample of columns and rows. The exact number varies based on the type of file.
    • Column Mapping - Enables you to configure any remaining columns:
      • Rows to Sample - Select the maximum number of rows to be used to sample column types.
      • Treat as Null - The entered case insensitive value will be treated as NULL. For example, "tbd", "n/a", "unknown", "-".
      • Column Mapping - Configure any additional attributes.
      • Click Save Changes.
  10. Click Load Data.
    A confirmation page appears indicating the table and rows have been created. You have the following options:
    • View Table - Click View Table to exit from the current wizard and opens Object Browser so you can view the newly created table.
    • Continue to the Create Application Wizard - Click Continue to the Create Application Wizard to load the Create Application Wizard.

      Note that if all rows fail to load, this button does not display.

  11. Click Continue to Create Application Wizard.

    The Create an Application page in the Create Application Wizard appears. Report with form and dashboard pages based on the new table display under Pages. From here, you can edit page name or create additional pages based on the imported data.

  12. Complete the Create Application Wizard.

5.3.3 Creating an Application by Copying and Pasting from a File

Copy and paste column delimited data from a CSV file, or selecting a sample and then create an application based on the new table.

To create an application by copying and pasting column delimited data from a CSV file, or selecting a sample:

  1. On the Workspace home page, click the App Builder icon.
  2. Click the Create button.

    The Create Application Wizard appears.

  3. Click From a File.

    The Load Data page appears

  4. Select the Copy and Paste tab.
  5. To load data, do one of the following:
    • Select a Sample - Select a sample database from the Select Sample list.
    • Copy and Paste - Copy and paste CSV data.
  6. Click Next

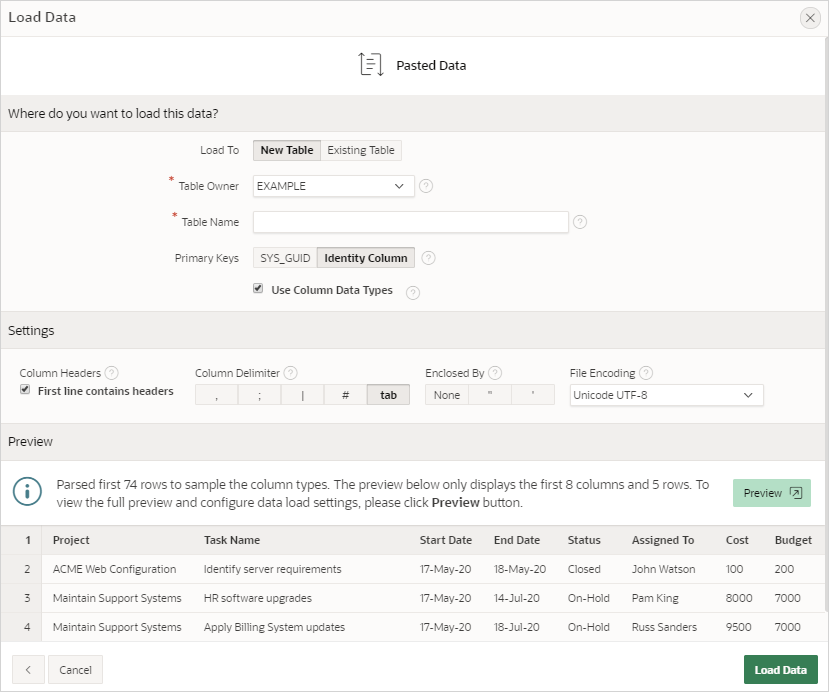
    The Load Data page appears.

  7. Under Where do you want to load this data?, select where to load the data.

    What appears next, depends upon your selection.

  8. To load data to a new table:
    1. Load To - Select New Table.
    2. Table Owner - Select the database schema.
    3. Table Name - Identify the table name you would like to create. By default, all table names are converted to upper case.
    4. Error Table Name - Identify the error table name you would like to save errors during data load. By default, all table names are converted to upper case. If data load succeeds without any error, this error table is dropped automatically.
    5. Primary Keys - Select how to set the primary key. Options include SYS_GUID or Identity Column. To learn more, see field-level Help.
    6. Use Column Data Types - Select to use the column types parsed from the file. If un-checked, the table columns will be created as VARCHAR2(4000).
  9. To load data to an existing table:
    1. Load To - Select Existing Table.
    2. Table Owner - Select the database schema.
    3. Table Name - Select the database table to load data into.
      A message appears indicating the number of columns that are mapped.
    4. Click Configure to configure any remaining columns. On Configure, under Column Mapping:
      • Rows to Sample - Select the maximum number of rows to be used to sample column types.
      • Treat as Null - The entered case insensitive value will be treated as NULL. For example, "tbd", "n/a", "unknown", "-".
      • Column Mapping - Configure any additional attributes.
      • Click Save Changes.
    5. Error Table Name - Identify the error table name you would like to save errors during data load. By default, all table names are converted to upper case. If data load succeeds without any error, this error table is dropped automatically.
    6. Update Method - Options include:
      • Append - If data already exists in the table, the wizard appends the new rows into the table. If data does not exist, the new rows are simply loaded.
      • Replace The entire table is replaced by deleting the table first and then loading the new rows into the table.
  10. Under Settings:
    1. Column Headers - Enable First Line Contains if your data contains column names in the first row.
    2. Column Delimiter - Select a column delimiter character.
    3. Enclosed By - Select a column enclosed by character . This character deliminates the starting and ending boundary of a data value. If you specify a delimiter character, the wizard ignores white space occurring before the starting and ending boundary of a data value.
    4. File Encoding - Choose the characterset in which the file is encoded.
  11. Preview displays a sample of columns and rows. The exact number varies based on the type of file. Click one o the following tabs:
    • Preview displays a sample of columns and rows. The exact number varies based on the type of file.
    • Column Mapping enables you to configure any remaining columns:
      • Rows to Sample - Select the maximum number of rows to be used to sample column types.
      • Treat as Null - The entered case insensitive value will be treated as NULL. For example, "tbd", "n/a", "unknown", "-".
      • Column Mapping - Configure any additional attributes.
      • Click Save Changes.
  12. Click Load Data.
    A confirmation page appears indicating the table and rows have been created. You have the following options:
    • View Table - Exits from the current wizard and opens Object Browser so you can view the newly created table.
    • Continue to the Create Application Wizard
  13. Click Continue to Create Application Wizard.

    The Create Application Wizard appears. The wizard pre-populates pages based on the new table and the pages display under Pages. From here you can edit the page name or create additional pages based on the imported data.

  14. Complete the Create Application Wizard.