8.11 Managing Sorting with Order By Item

Create an inline static LOV by configuring region-level Order By Item attributes.

8.11.1 Order By Item Sort Example

View an Order By Item sort example.

Configuring an Order By Item enables end users to choose region ordering from a set of predefined options. Including an Order by Item is particularly useful for region types which do not support ordering on their own, such as a Cards region. Order By Item is supported by all region types except map regions, tree regions, interactive reports, and interactive grids.

An Order By Item configuration consists of predefined order by clauses which are maintained at the region level and a page item which is available to end users at runtime. While the default page item is a Select List, other item types, such as radio groups, plug-in based types or even hidden items, are also supported.

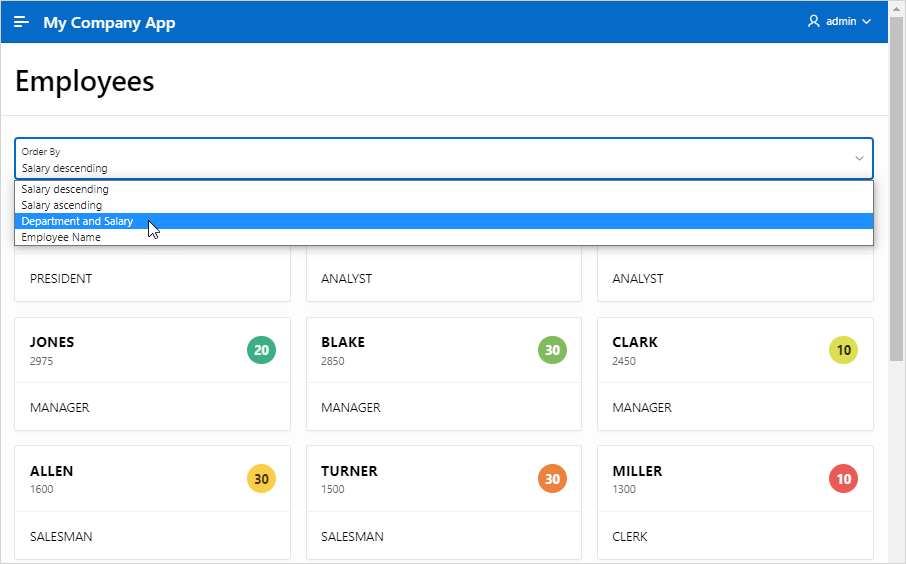
The following example shows a cards region. An Order By select list displays above the cards and contains the options: Salary descending, Salary ascending, Department and Salary, and Employee Name.
Description of sort_order_by_item_example2.png follows
Description of the illustration sort_order_by_item_example2.png

8.11.2 Configuring Sorting with Order By Item

Configure region Order By attributes to create an inline static LOV.

The following example configures an Order By Item for a Cards region built on the EMP table. The EMP table is available in the sample dataset, EMP / DEPT.

Tip:

In the following task, steps 1 to 5 creates a cards region. If you already have a cards region, skip to step 6.
To configure an order by item for a cards region:

Create a cards region:

  1. View the page in Page Designer:
    1. On the Workspace home page, click the App Builder icon.
    2. Select an application.
    3. Select a page.
    Page Designer appears.
  2. Create a new cards region:
    1. Click the Layout tab in the central pane.
    2. In the Gallery, click the Regions tab. Right-click Cards and select Add To, and select the appropriate location.

      Tip:

      You can also select the Cards region in the Gallery and drag it to the appropriate location in the Layout tab.
    3. Page Designer indicates what to do next. If there are errors, the Show Messages icon displays in the Page Developer toolbar.
      • Click the Show Messages icon on the Page Designer toolbar.

        The Messages dialog displays errors that must be addressed.

      • Select an error to highlight the associated attribute in the Property Editor.

  3. Edit the Region attributes:
    1. In the Property Editor, select the Region tab (if not already selected).
    2. Identification, Title - Enter a region title. For example, enter Employees.
    3. Under Source:
      • Location - Accept the default value, Local Database.

      • Type - Accept the default value, Table/View.

      • Table Name - Enter EMP. You can also type in the name or pick from the list.

    4. Click Save.
  4. Edit the cards region Attributes:
    1. In the Property Editor, click the Attributes tab.
    2. Edit the following cards region Attributes:
      • Title - Select the column to be used as title. Select ENAME

      • Subtitle - Select the column to be used as subtitle. Select SAL

      • Body - Select the column to be used as body. Enter Select JOB

      • Icon and Badge:

        • Icon Source - Select Initials

        • Icon Column - Select DEPTNO

        • Icon Position - Select End

  5. Preview the page.
    1. Click Save or Save and Run Page.

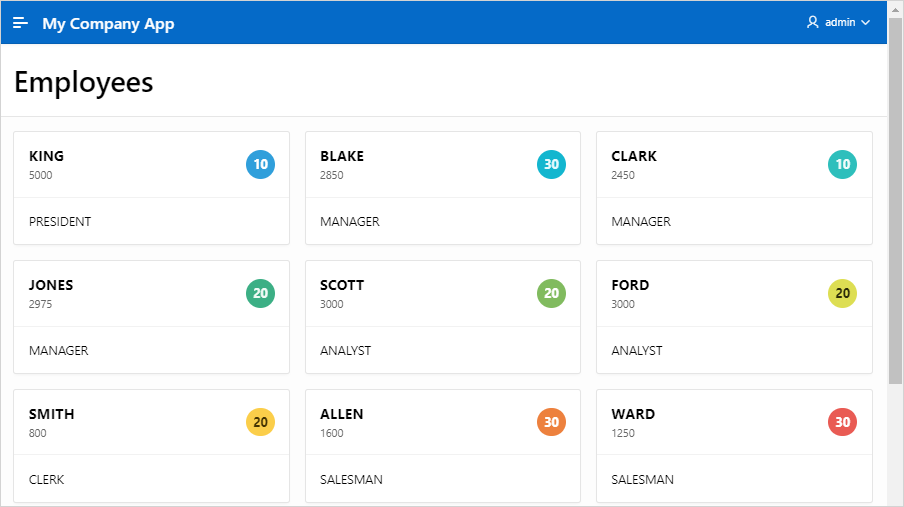
      The cards page loads, displaying a cards for each employee. Each card includes the employee name, salary, job title, and an icon with the department number.

      Description of sort_order_by_item_example1.png follows
      Description of the illustration sort_order_by_item_example1.png
    2. Return to Page Designer. Click Page XX on the Runtime Developer toolbar where XX is the page number.

Configure the Order By Item:

  1. Enable Order By Items to create an inline static LOV:
    1. In the Rendering tab, verify that cards region, Employees, is selected.
    2. In the Property Editor, click the Region tab find Order By.
    3. Order By, Type - Select Item.
    4. Order By, Iten - Click the No Order By Item button.
    The Order by Item dialog appears.
  2. In the Order By Item dialog:
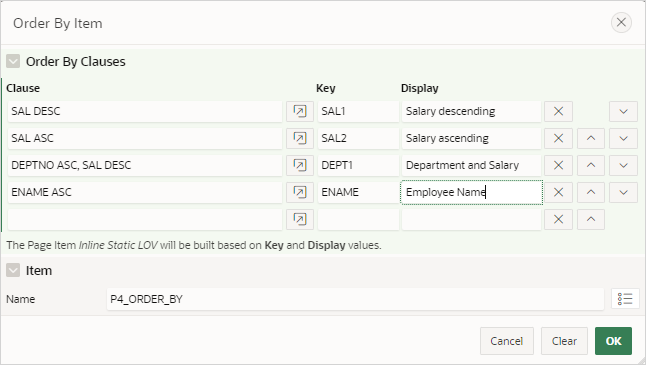
    1. Order By Clauses - Enter multiple Order By Clauses from which users can select at runtime. Each can contain one or more comma-separated column names, including directives, to define the order in which records are retrieved. See Page Designer Help for more details on directives and examples.

      The following creates a LOV named Order By which contains the options: Salary descending, Salary ascending, Department and Salary, and Employee Name.

      • Row 1

        Clause - Enter SAL DESC

        Key - Enter SAL1

        Display - Enter Salary descending

      • Row 2

        Clause - Enter SAL ASC

        Key - Enter SAL2

        Display - Enter Salary ascending

      • Row 3

        Clause - Enter DEPTNO ASC, SAL DESC

        Key - Enter DEPT1

        Display - Enter Department and Salary

      • Row 4

        Clause - Enter ENAME ASC

        Key - Enter ENAME

        Display - Enter Employee Name

    2. Item - Displays the page item to be built based on the Key and Display values defined under Order By Clauses. You can accept the Item Name or to make a new selection by clicking the List of Values: Name icon.
    3. Click OK.
  3. Click Save or Save and Run Page.

    The following example shows the revised cards region. An Order By select list now displays above the cards. Note, however, you can position the item anywhere on the page in Page Designer.

    Description of sort_order_by_item_example2.png follows
    Description of the illustration sort_order_by_item_example2.png

    Select options from the Order By select list to alter the sort order.