5.6.2 Creating a Progressive Web App (PWA)

Learn about Progressive Web App (PWA) features and requirements.

5.6.2.1 About Progressive Web App Support

Progressive Web Apps (PWAs) leverage modern web APIs giving users an experience that looks and feels like a native app.

Developers can create a PWA when creating a new application with the Create Application Wizard, or by editing attributes of an existing application.

Progressive Web App Requirements

Requirements for using this feature include:

  • The Oracle APEX application must be served over a secured HTTPS environment, or localhost. If using an unsecured environment, PWA features will not be rendered

  • The application Definition, Properties, Friendly URLs attribute must be On. See Accessing the Application Definition Page.

About Progressive Web Apps

Enabling PWA functionality:

  • Adds the ability to install the app as a Progressive Web App (PWA).
  • Adds a new navigation bar entry named Install App to your application.
  • Optimizes page loading speed on the mobile device. Improves page load rendering time with a new browser cache architecture for static files (APEX core files and app files).
  • Enables users to install the application on devices.

  • Provides a customizable offline page when users are offline and cannot request the network. See Progressive Web App (PWA) Messages Requiring Translation.
  • Supports hooks into the service worker code for a fully customizable PWA experience.

Creating a New PWA

For a new application, you can create a PWA by enabling the Install Progressive Web App feature in the Create Application Wizard and then configuring the Progressive Web App attributes.

Making an Existing App a PWA

To make an existing application a PWA, you must:

  • Verify Friendly URLs attribute is On in the Application Definition, Properties section.

  • Turn on the Enable Progressive Web App attribute and then configure the remaining Progressive Web App attributes.

5.6.2.2 Creating a Progressive Web App

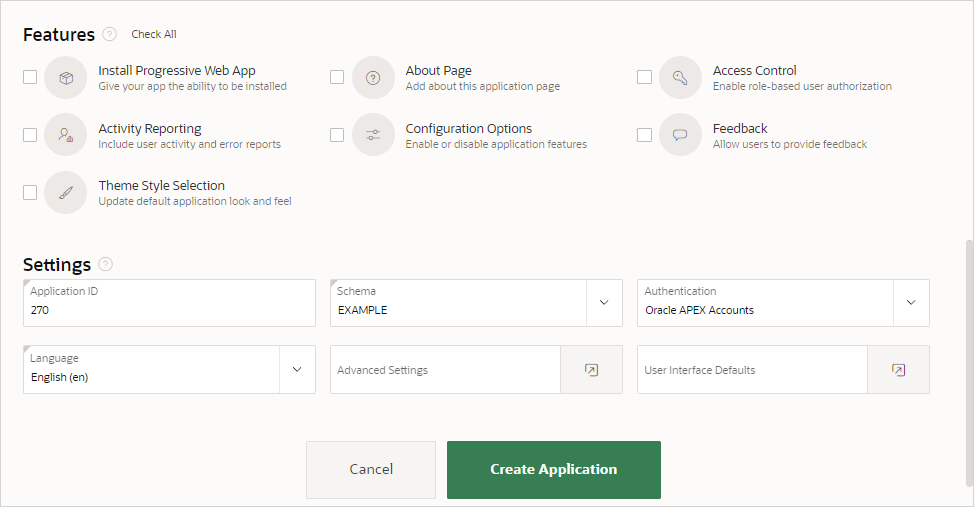
Create a Progressive Web App by running the Create Application Wizard and enabling the Install Progressive Web App feature.

Tip:

To include mobile friendly reports and forms, create your application and then add pages to it. See Mobile Friendly Forms.

To create a new application with Progressive Web App functionality enabled:

  1. On the Workspace home page, click the App Builder icon.
  2. Click the Create button.
  3. Click New Application.

    The Create an Application page appears.

    Note:

    To learn more about all the options available in the Create Application Wizard, see Running the Create Application Wizard.
  4. For Name, enter the name used to identify the application to developers.
  5. To add a page, click Add Page and select the desired page type. The user interface changes based on the selected page type.

    Tip:

    The Create Page Wizard supports the creation of a number of mobile friendly reports and forms. See Mobile Friendly Forms.

    Pages you create display under Pages.

  6. For Features, select features to include with your application. Select Install Progressive Web App.

    Features provide application-level functionality and can only be added once per application. To learn more, see Help. To select all features, click Check All.

  7. Click Create Application.
  8. Configure Progressive Web App attributes. See Configuring Progressive Web App Attributes.

5.6.2.3 Configuring Progressive Web App Attributes

Configure Progressive Web App attributes for both new and existing Progressive Web App applications.

To configure Progressive Web App attributes:

  1. On the Workspace home page, click the App Builder icon.
  2. Select an application.
  3. From the Application home page, you can access the Progressive Web App page in two ways:
    • Edit Application Definition button:
      • Click Edit Application Definition to the right of the application name.

      • Click the Progressive Web App tab.

    • From Shared Components:
      1. Click Shared Components.

      2. Under User Interface, click Progressive Web App.

  4. Under General, edit the following:
    1. Enable Progressive Web App - Confirm this option is enabled.
    2. Installable - Confirm this option is enabled.
  5. Under Appearance:
    1. Display - Select the preferred display mode for the application. This option controls how much of the browser UI the user sees. Options include:
      • Fullscreen - Opens the PWA without any browser UI. This option takes the entirety of the screen or window.

      • Standalone- Opens the PWA to look like a standalone application. The app runs in a distinct window, separate from the browser. Standard browser UI components like the URL bar and buttons are not visible.

      • Minimal UI - Similar to standalone, except with browser controlling navigation buttons like back and refresh.

      • Browser - Opens the PWA is a regular browser UI.

      Note: Some devices and browsers ignore this attribute. Oracle APEX is only relaying this information to the device which handles the Progressive Web App appropriately. For more information, see https://web.dev/add-manifest//.

    2. Screen Orientation - Select the preferred screen orientation when using this Progressive Web App. This option applies mostly for mobile devices.

      Note: Some devices and browsers ignore this attribute. Oracle APEX is only relaying this information to the device which handles the Progressive Web App appropriately.

    3. Theme Color - Defines the default theme color for the application.

      This attribute affects how the operating system displays the application (for example, for an Android's task switcher, the theme color surrounds the application).

      Note: Some devices and browsers ignore this attribute. Oracle APEX is only relaying this information to the device which handles the Progressive Web App appropriately.

    4. Background Color - Select the background color.

      The background color defines a placeholder background color for the application to display before its stylesheet is loaded. Therefore, the background color should match the theme body background color for a smooth transition between launching the web application and loading the application content.

      Note: Some devices and browsers ignore this attribute. APEX is only relaying this information to the device which handles the Progressive Web App appropriately.

    5. iOS Status Bar Style - Determines the style of the iOS status bar of your progressive web app. Apple offers three distinct choices:
      • Black Text and White Background

      • Black Text and Black Background - This option makes it appear completely black

      • Translucent - This option has white text takes the same background color as the body of your web app. The text color will remain white even if you use a light background color. If using translucent, the page content is displayed on the entire screen.

    6. App Description - Explains what the application does. Use this attribute to provide more information to users when they are prompted to install the application.
    7. Custom Manifest - Used to store additional JSON properties for the Web App Manifest file. The properties found here will be used to extend the declarative options above, by overriding existing properties or appending new properties.

      For more information on building a Custom Manifest, you can read the Web App Manifest specifications: https://www.w3.org/TR/appmanifest/.

    8. Screenshots - Include screenshots for promotional purposes when users are prompted to install the Progressive Web App.

      To add a screenshot:

      • Click Add Screenshot.
      • Description - Enter the PWA screenshot label which is used for accessibility purposes when installing the PWA.
      • Sequence - Identifies the display sequence used by this PWA screenshot.
      • Upload a Screenshot:
        • Drag and Drop - Drag and drop the file to the region.
        • Choose a File - Click the Upload a Screenshot region and then navigate to and select the file.
      • Build Option - Identifies the build option that this PWA screenshot uses.
      • Comments - Add comments associated with this PWA screenshot.
      • Click Create.
    9. Shortcuts - Include shortcuts to enable users of installed PWAs to quickly access a specific page. For touch-enabled devices, shortcuts are accessible when doing a long-press on the application icon on the home screen. For other devices, shortcuts are accessible when doing a right click on the application icon on the task bar.

      To add a shortcut:

      • Click Add Shortcut.
      • Name - Enter the name of the PWA shortcut.
      • Target URL - Specify the page of the application for the current shortcut.
      • Sequence - Identifies the display sequence used by this PWA screenshot.
      • Upload an icon:
        • Drag and Drop - Drag and drop the file to the region.
        • Choose a File - Click the Upload an Icon region and then navigate to and select the file.
      • Description - Enter a description for this PWA shortcut.
      • Build Option - Identifies the build option that this PWA shortcut uses.
      • Comments - Add comments associated with this PWA shortcut.
      • Click Create.

      Tip:

      An APEX application can only use PWA Shortcuts if Rejoin Sessions is enabled. Before configuring shortcuts, click either Enable for Public Sessions or Enable for All Sessions. To learn more, see Session Management.
  6. Under Service Worker Configuration, select a Service Worker.

    Service workers are JavaScript files that can execute code even when the app is not in use. Service workers can listen to events like fetching resources or handling notifications. You can modify a service worker through hooks, or by replacing events completely. Service Worker options include:

    • Default - The APEX engine generates it with the following strategy:

      • Install and activate the service worker

      • Serve resources from cache if cache exists

      • Otherwise serve from network, then put resource in cache

      • Serve an offline page if network fails

    • Configure Hooks - Fill in the placeholders in the service worker code to add your own. Hooks locations are provided by Oracle APEX. When using this option, you can choose to "Download Configuration" and use it as a File URL.

    • File URL - Provide a URL reference to a file that contains the service worker hooks interface. This is useful for sharing service worker hooks across multiple applications. If using the file reference, make sure to follow the interface architecture appropriately or else the service worker will fail at runtime.

      To view the interface structure, see field-level Help for this attribute.

  7. Click Apply Changes.