14.3.4 Editing Breadcrumbs

Edit breadcrumbs and breadcrunb entries in Shared Components and edit breadcrumb attributes in Page Designer.

14.3.4.1 Editing Breadcrumb and Breadcrumb Entries

Edit breadcrumbs and breadcrumb entries on the Breadcrumbs page in Shared Components.

To edit a breadcrumb:

  1. Navigate to the Breadcrumbs page:
    1. On the Workspace home page, click the App Builder icon.
    2. Select an application.
    3. On the Application home page, click Shared Components.
    4. Under Navigation and Search, select Breadcrumbs.
      The Breadcrumbs page appears.
  2. To edit the breadcrumb name:
    1. On the Breadcrumbs page, select the breadcrumb.

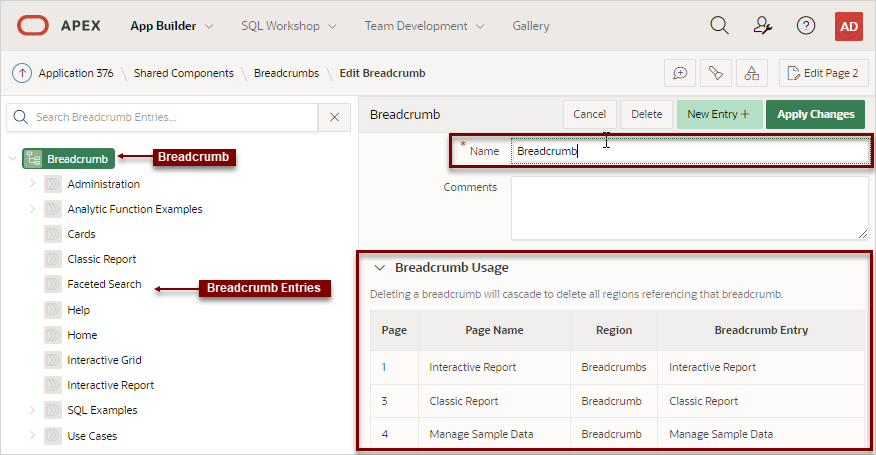
      The Edit Breadcrumb page appears. A breadcrumb tree displays in the left pane.

      Description of edit_breadcrumb.png follows
      Description of the illustration edit_breadcrumb.png
    2. Select the root node.
      The Breadcrumb attributes appear in the right pane.
    3. Edit the Name attribute and click Apply Changes.
  3. To delete a breadcrumb:
    1. On the Breadcrumbs page, select the breadcrumb.
      The Edit Breadcrumb page appears. A breadcrumb tree displays in the left pane.
    2. Select the parent node.
      The Breadcrumb attributes appear in the right pane.
    3. Expand and review the Breadcrumb Usage region. Deleting a breadcrumb delete all regions referencing that breadcrumb.
    4. Click Delete.
  4. To edit breadcrumb entries:
    1. On the Breadcrumbs page, select the breadcrumb.
      The Edit Breadcrumb page appears. A breadcrumb tree displays in the left pane.
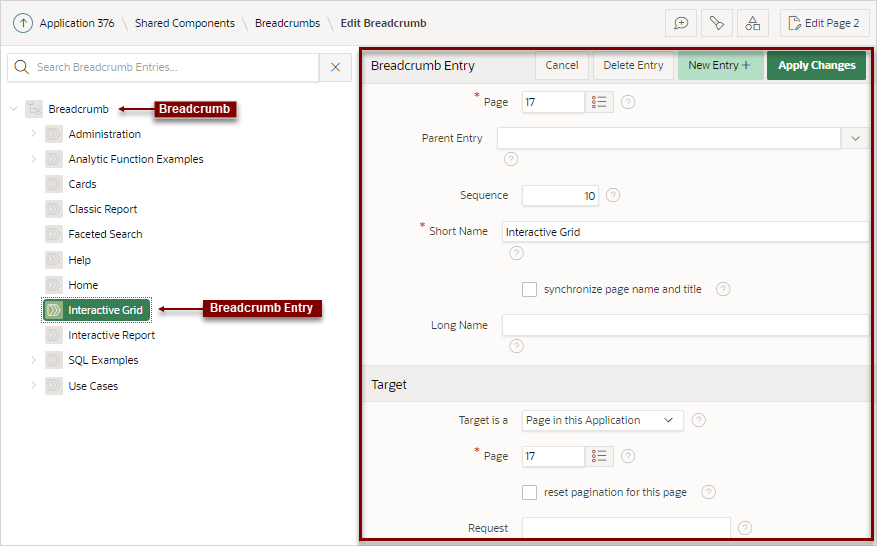
    2. In the breadcrumb tree, select a breadcrumb entry.

      The Breadcrumb Entry attributes appear in the right pane.

      Description of breadcrumb_entry.png follows
      Description of the illustration breadcrumb_entry.png
    3. Edit the appropriate Breadcrumb Entry attributes.
      To learn more about a specific attribute, see field-level Help.
    4. Click Apply Changes.

14.3.4.2 Adding Breadcrumb Entries

Add breadcrumb entries on the Breadcrumb Entry page.

To add entries to a breadcrumb:

  1. Navigate to the Breadcrumbs page:
    1. On the Workspace home page, click App Builder.
    2. Select an application.
    3. Click Shared Components.
    4. Under Navigation and Search, click Breadcrumbs.

      The Breadcrumbs page appears.

  2. In the left pane, select the breadcrumb to which to add entries.
  3. Click New Entry.
    The Edit Breadcrumb page appears.
  4. Under Breadcrumb Entry:
    1. Page - Select the page where this breadcrumb entry displays.
    2. Parent Entry - Identify the parent of this entry. Any given breadcrumb should have only one root node, identified as an item with no parent ID.
    3. Sequence - Indicate the order in which breadcrumb entries appear. The sequence determines the order of evaluation.
    4. Short Name - Identify the short name of this breadcrumb entry. Both the short and long names can be referenced from the breadcrumb template.
    5. Long Name - Identify the long name of this breadcrumb entry. Both the short and long names can be referenced from the breadcrumb template.
  5. Under Target, specify the target location. For the Target is a attribute, select either:
    • Page in this Application
    • URL
    The UI changes depending upon what you select.
  6. If the target is a page in the application:
    1. Target is a - Select Page in this Application.
    2. Page - Specify the target page number.

      To reset pagination for that page, select reset pagination for this page.

    3. Request - Enter text for which you would like to set the built-in application item called REQUEST. This is also the item that is set with the name of a button that was clicked.
    4. Clear Cache - Enter the page numbers (separated by commas) for those pages for which you would like to clear the user's session state.
    5. To set session state (that is, give a listed item a value):
      • Set these items - Enter the list of application item names (separated by commas) for which you would like to set the session state (give the listed item a value).

      • With these values - Enter a comma delimited list of values for the items specified in Set these items. You can specify static values or substitution syntax (for example, &APP_ITEM_NAME.).

      You can specify static values or substitution syntax (for example, &APP_ITEM_NAME.). Note that item values passed to f?p= in the URL cannot contain a colon. Additionally, item values cannot contain commas unless you enclose the entire value in backslashes (for example, \1234,56\).

  7. If the target is a URL:
    1. Target is a - Select URL.
    2. URL Target - Identify URL to go to when the breadcrumb entry is clicked..
  8. For Conditions:
    1. Condition Type - Select a condition type from the list. This condition must be met in order for this component to be rendered or processed.
    2. Enter expressions in the fields provided.
  9. For Authorization - Optionally select an authorization scheme. This authorization scheme must evaluate to TRUE in order for this component to be rendered or otherwise processed.
  10. For Configuration - Select a build option for this component. Build options are predefined settings that determine whether or not components within an application are enabled.
  11. Click Create Entry.

Repeat these procedures for each breadcrumb entry you create.

14.3.4.3 Reparenting Breadcrumb Entries

Select a new parent for selected breadcrumb entries on the Reparent Entries page.

To reparent breadcrumb entries:

  1. Navigate to the Breadcrumbs page:
    1. On the Workspace home page, click App Builder.
    2. Select an application.
    3. On the Application home page, click Shared Components.
    4. Under Navigation and Search, click Breadcrumbs.
      The Breadcrumbs page appears.
  2. On the Breadcrumbs page, select the breadcrumb.
    The Edit Breadcrumb page appears. A breadcrumb tree displays in the left pane.
  3. Click the Reparent Entries tab.
    The Reparent Entries page appears.
  4. You can reparent entries in two ways:
    • Drag and Drop - In the breadcrumb tree, drag and drop entries to a new location in the tree.
    • Reparent Context Menu - Right-click the entry and select Reparent. In the Select a Parent Node dialog, select a new location..

14.3.4.4 Deleting Unused Breadcrumb Entries

Delete unused breadcrumb entries.

Tip:

The Delete Unused button described in this section is conditional and only appears if the application has unused (or orphaned) breadcrumb entries.

To delete unused breadcrumb entries:

  1. Navigate to the Breadcrumbs page:
    1. On the Workspace home page, click App Builder.
    2. Select an application.
    3. On the Application home page, click Shared Components.
    4. Under Navigation and Search, select Breadcrumbs.
      The Breadcrumbs page appears.
  2. Click the Utilization tab.
    The Utilization report appears. The Orphaned Breadcrumb Entries region displays any unused breadcrumbs.
  3. To delete unused breadcrumb entries, click Delete Unused.
    Delete Unused only appears if there are orphaned breadcrumb entries.

14.3.4.5 Editing Breadcrumb Attributes in Page Designer

Edit Region attributes and breadcrumb Attributes in Page Designer.

Region attributes define the area of the page which functions as a container for the breadcrumb. Edit breadcrumb Attributes to change the Breadcrumb Template, Template Options, and CSS Classes.

To edit region attributes:

  1. View the page in Page Designer.
    1. On the Workspace home page, click the App Builder icon.
    2. Select an application.
    3. Select a page.
    Page Designer appears.
  2. To edit Region attributes:
    1. In the Rendering tab, select the region containing the breadcrumb.
    2. The Property Editor displays the region attributes in the Region tab.
    3. Edit the appropriate attributes.
      To learn more about an attribute, select the attribute in the Property Editor and click the Help tab in the center pane.
  3. To edit breadcrumb Attributes:
    1. In the Rendering tab, select the region containing the breadcrumb.

      The Property Editor displays the region attributes in the Attributes tab.

    2. Edit the appropriate attributes.
      To learn more about an attribute, select the attribute in the Property Editor and click the Help tab in the center pane.
  4. Click Save.