5.15.7 Managing Application Backups

Review backup history, perform manual backups, or restore an application from a backup.

5.15.7.1 About Application Backups

Backups provide a simple way for developers to automatically recover applications that may have been unexpectedly modified or deleted.

Oracle APEX backs up modified applications as a part of daily maintenance. Backups are automatic and do not require an administrator or developer involvement. However, applications are not backed up if they meet the following criteria:

  • If no changes have been made to the application since the last backup, then the application is not backed up again.
  • Run-time only applications are not be backed up.
  • Applications that are installed into runtime-only instances are not backed up.

About Configuring the Number of Backups

By default, APEX only retains the 25 most recent backups. Older backups are deleted to make room for new ones.

Instance administrators can configure the number of backups per application, or disable automatic backups all together. To configure the number of backups for each application, sign in to the Administration Services application and navigate to Manage Instance, Feature Configuration, Application Development, and update the Number of backups per application attribute. Valid values are between 0 and 30. A value of zero (0) disables the backup feature.

See Also:

Configuring the Number of Application Backups in Oracle APEX Administration Guide

Viewing the Backup Log

Instance administrators monitor the performance of the backup job in the Backup Log. To view the Backup Log, sign in to the Administration Services application and navigate to Monitor Activity, Backup Log. The Backup Log reports when a backup job ran, the number of applications backed up by the job, and the elapsed time required to backup the applications.

See Also:

Viewing the Backup Log in Oracle APEX Administration Guide

Managing Backups

Developers can view all backups in App Builder in Workspace Utilities, Manage Backups. To view backups for a specific application, click the application name.

5.15.7.2 Viewing All Application Backups

View a summary of all application backups on the Manage Backups page.

App Builder automatically backs up modified applications on a daily basis.

To view the Manage Backups page:

  1. Navigate to the Workspace Utilities page:
    1. Sign in to Oracle APEX.
    2. On the Workspace home page, click the App Builder icon.
    3. Click the Workspace Utilities icon.
  2. Click Manage Backups.

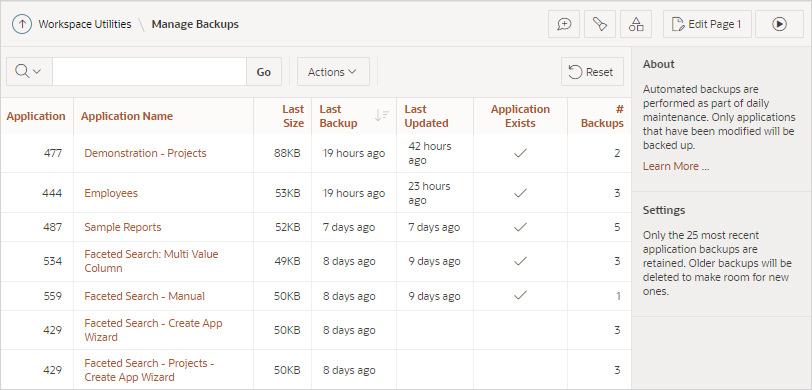
    The Manage Backups page appears displaying the following columns:

    • Application - Displays the Application ID
    • Application Name - Displays the application name when the backup occurred. If the name has changed, both names display in the report.
    • Last Size
    • Last Updated
    • Application Exists
    • # Backup - Displays the number of backups.
  3. To view backup details for a specific application, click the Application Name.
    The Manage Backups page for the application appears.

Tip:

You can also access the Manage Backups page from the App Builder home page. Select Manage Backups from the Tasks region.

5.15.7.3 Managing Backups for a Specific Application

Manage Backups for all application on the Manage Backup page.

To manage backups for a specific application:

  1. Navigate to the Manage Backups page:
    1. On the Workspace home page, click the App Builder icon.
    2. Click the Workspace Utilities icon.
    3. Click Manage Backups.
      The Manage Backups page appears.
  2. To view backups for a specific application, click the Application Name.

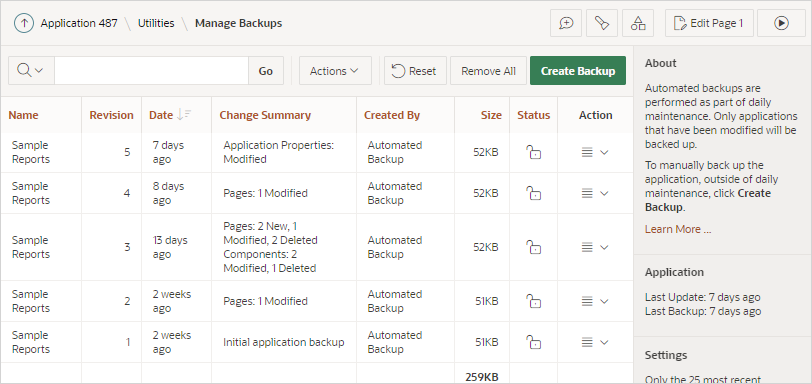
    The application, Manage Backups page appears displaying the following columns:

    • Name - Application name at the time of backup.
    • Revision - Revision number.
    • Date - Backup date.
    • Change Summary - Indicates the number of new, modified, or deleted pages and components since the last backup.
    • Created By - Indicates whether the back up was automated or manual. If manual, the user who created the backup displays.
    • Size - Backup size.
    • Status - Generally displays a Lock or Unlock status icon. Locking a backup prevents it from being removed if the backup limit is reached. If a developer restores an application, then a Restore icon appears.
    • Action - Menu options include: Restore, Download, View Details, Manage Lock, or Delete. These options are discussed in detail in the steps that follow.
  3. To restore a backup:
    1. Locate the application and click the Actions menu.
    2. From the Actions menu, select Restore.
    3. In the Restore Application dialog:
      1. Install As Application - Select one of the following:
        • Restore Application ID - The existing application ID will be used. This option overwrites the existing application without changing the ID.
        • Auto Assign New Application ID - A new application ID will be created for you.
        • Change Application ID - You specify a new application ID.
      2. Click Restore Application.
  4. To download a backup:
    1. Locate the application and click the Actions menu.
    2. From the Actions menu, select Download.
    3. Import the Export Files.
  5. To view backup details:
    1. Locate the application and click the Actions menu.
    2. From the Actions menu, select View Details.
  6. To manage backup locks:
    1. Locate the application and click the Actions menu.
    2. From the Actions menu, select Manage Lock.
      Locking a backup prevents it from being deleted during daily maintenance.
    3. In the Manage Backup Lock dialog, select Unlock Backup or Lock Backup.
  7. To delete a backup:
    1. Locate the application and click the Actions menu.
    2. From the Actions menu, select Delete.
    3. In the Delete Backup dialog, select Delete Backup.
  8. To backup an application manually:
    1. Click Create Backup.
    2. In the Create a Backup dialog, enter comments and click Backup.
  9. To remove all backups for an application:
    1. Click Remove All.
    2. In the Remove All Backups dialog, confirm your selection by clicking Remove All Backups.

Note:

You can also access the backups for a specific application from the Application home page. Navigate to the application and select Manage Backups from the Tasks list.