15.3.4 Understanding Background Page Processing
Background page processing enables developers to run a sequence of page processes that can execute in the foreground or in the background.
- About Background Page Processes
Learn about background page processes. - Creating a Background Page Page Process
Create a background page process using the Execution Chain process type, which contains child processes executing one after the other. Execution chains can run in the background or in the foreground. - Monitoring Currently Running Background Processes
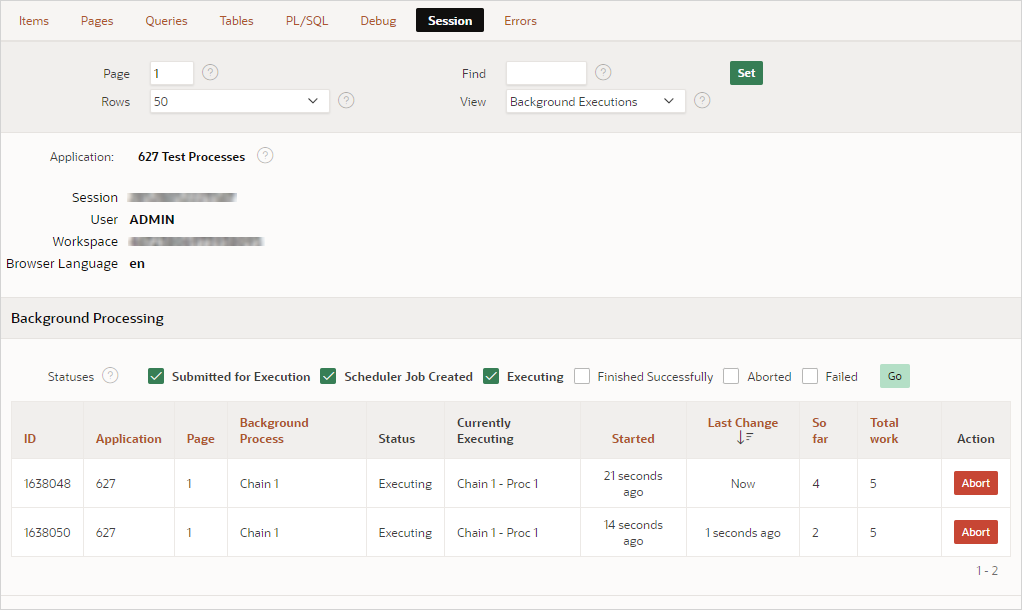
Monitor background processes by clicking Session on the Runtime Developer toolbar.
Parent topic: Understanding Page Processes
15.3.4.1 About Background Page Processes
Learn about background page processes.
The Execution Chain process type enables page processing to execute in the background so that users don't have to wait until processing finishes. Typical use cases are long running operations such as data loading or expensive data processing. An Execution Chain process type may contain one or multiple child processes, which do the actual processing, and are executed one after the other. An execution chain can run either in the background or in the foreground.
Creating a background page process involves the following general steps:
- In Page Designer, create a Execution Chain page process.
- To the Execution Chain process, add the child processes which do the actual processing (for example, Execute PL/SQL code, Data Loading, and so on).
- Edit the Execution Chain attributes and enable the Execute in Background switch.
Tip:
You can monitor background procecces programatically, using theAPEX_BACKGROUND_PROCESS API. See APEX_BACKGROUND_PROCESS in Oracle APEX API
ReferenceAbout Reimporting an Application with Background Processes
Reimporting an application with background processes has a slightly different workflow compared to a standard Application Export. During the import, the wizard prompts you on how to handle existing background processes. See Reimporting an Application Containing Background Processes.
Configuring Limits for Concurrently Running Scheduler Jobs
Background page processing is actually executed by the database
scheduler (DBMS_SCHEDULER). This means that the application's
parsing schema must have the CREATE JOB privilege granted in order
to run background page processing jobs.
You can configure limits for concurrently running background page processing jobs as follows. If a new background execution would exceed the configured limits, it will wait in a queued state until one of the running executions finishes and a slot becomes available.
-
Instance level (as a default). Configure the Background Jobs attributes in Instance Settings. The instance level setting acts as a default for all workspaces and can be overridden at the workspace level.
See Configuring Background Jobs in Oracle APEX Administration Guide
-
Workspace level. Edit the Maximum Background Page Process Jobs attribute under Workspace Isolation. The workspace limit acts as a maximum for all applications within that workspace.
See Configuring Workspace Isolation Attributes in Oracle APEX Administration Guide
-
Application level. Edit the Application Definition, Maximum Background Page Process Jobs attribute. This limit is specific to this application. Use this setting to distribute the workspace limit across applications in that workspace. If you configure a higher value than the workspace limit, this limit will be ignored and the workspace limit will be used instead.
Application level. Edit the Application Definition, Maximum Background Page Process Jobs attribute. See Properties.
Parent topic: Understanding Background Page Processing
15.3.4.2 Creating a Background Page Page Process
Create a background page process using the Execution Chain process type, which contains child processes executing one after the other. Execution chains can run in the background or in the foreground.
To create background page process using the Execution Chain process type:
- View the page in Page Designer.
Create Execution Chain page process:
- In the Processing tab, locate the node where the process will occur. Right-click and select Create Process.
In the Property Editor, configure the Execution Chain process.
- Under Identification:
- Identification, Name - Enter the name of the process for easy identification by developers.
- Identification, Type - Select Execution Chain.
- Identification, Execution Chain - This attribute enables support for nested execution chains. Use this attribute to define another execution chain as the parent for this chain. For this example, select None.
- Under Settings:
- Under Execution :
- Under Success Message:
- Success Message, Success Message - Enter the success
message for this process.
If the process runs and does not generate an error, then this process success message displays in the notification section of the resulting page displayed. If you are branching to another page using a URL redirect, you may need to check the preserve success message attribute.
To learn more, select the attribute in the Property Editor and click the Help tab in the central pane.
- Success Message, Success Message - Enter the success
message for this process.
- Under Error:
- Click Save.
Create one or more child process:
- Create a child process:
- Repeat the previous step to create additional child processes.
Parent topic: Understanding Background Page Processing
15.3.4.3 Monitoring Currently Running Background Processes
Monitor background processes by clicking Session on the Runtime Developer toolbar.
Tip:
You can also view a Background Processing report for Active Sessions in Workspace Administration. From the Administration menu, select Monitor Activity and then Active Sessions. Select an active session and then Background Processing.To monitor background processes:
Parent topic: Understanding Background Page Processing
