16.12.4 Managing Static Application Files in Remote Storage
Manage static application files in Oracle Cloud Infrastructure Object Storage service.

About OCI Object Storage Service

Oracle Cloud Infrastructure (OCI) offers high-performance compute capabilities (such as physical hardware instances) and storage capacity in a flexible overlay virtual network that is securely accessible from your on-premises network. If you have OCI account, you can store static application files in the OCI Object Storage service. OCI Object Storage stores objects in logical containers called buckets. Each bucket is associated with a single compartment that has policies that determine the actions users can perform on all objects in the bucket.

Tip:

To learn more about OCI Object Storage, see Object Storage.

16.12.4.1 Uploading Files to Remote Storage

Store static application files in Oracle Cloud Infrastructure (OCI) Object Storage service.

Prior to uploading static application files to OCI Object Storage, you must:

  1. Signup for an OCI account. If you have OCI account, you can store static application files in the OCI Object Storage service. Begin the signup process, by reviewing Oracle Cloud Infrastructure Free Tier. To start your signup, go to https://signup.oraclecloud.com/.

  2. Create OCI Credentials. See Managing Web Credentials.

To upload objects to OCI Object Storage:

  1. Access the Application Definition page:
    1. On the Workspace home page, click the App Builder icon.
    2. Select the application.

      The Application home page appears.

    3. Click the Edit Application Definition button.

      The Edit Application Definition page appears.

  2. On the Edit Application Definition page, click Add Object Storage.

    Note:

    If you have not yet created an OCI Credential, a warning appears. You must create an OCI Credentials before you can proceed. To learn more, see Managing Web Credentials

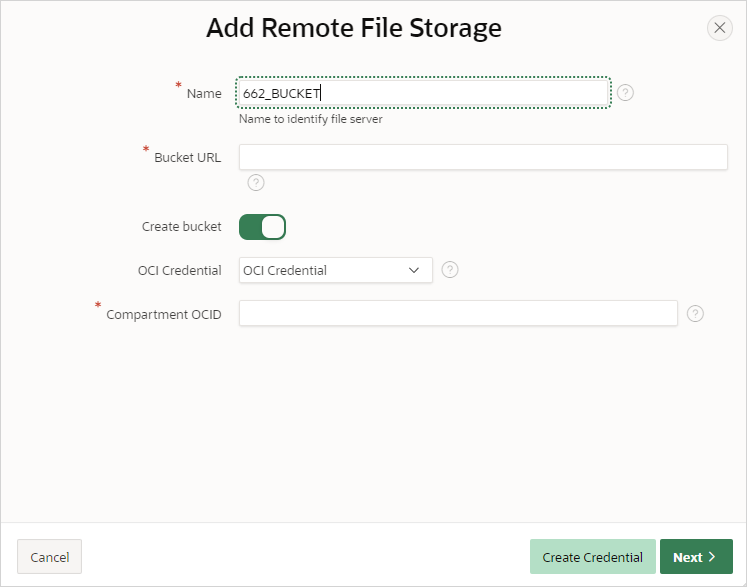
    The Add Remote File Storage Wizard appears.

  3. In the Add Remote File Storage Wizard:
    1. Name - Enter a name to identify the file server.
    2. Bucket URL - Enter the endpoint URL of the file storage bucket.

      Use the following format:

      https://objectstorage.region.oraclecloud.com/n/tenancy_namespace/b/bucket_name

    3. Create Bucket - If enabled, the wizard creates a bucket for you.
    4. OCI Credential - Select an OCI Web Credential from the list.
      If you have not yet created the appropriate OCI Credential, click Create Credential.
    5. Compartment OCID - Enter the OCID of the compartment for this bucket. The compartment OCID can be found in the Oracle Cloud Infrastructure (OCI) console under Identity, Compartments.
    6. Click Next.
    A Success message appears.
  4. On the Add Remote File Storage Success message:
    • Migrate Files to Object Storage - If enabled, existing static application files in the database are automatically migrated to OCI Object Storage.

      If Migrate Files to Object Storage is disabled, you can migrate static application files manually using the Synchronize Files option on the Shared Components, Static Application Files page. See Synchronizing Files in Remote Storage.

    • Click Finish.

    The Edit Application Definition page appears. If you enabled Migrate Files to Object Storage, the following message displays:

    Files migrated to Object Storage.

    The Edit Application Definition, Application File Storage region displays the following:

    • File Storage - Displays Oracle Cloud Object Storage.
    • Remote File Server - Displays the name of the file server you specified in the Add Remote File Storage Wizard.

16.12.4.2 Viewing or Downloading Files in Remote Storage

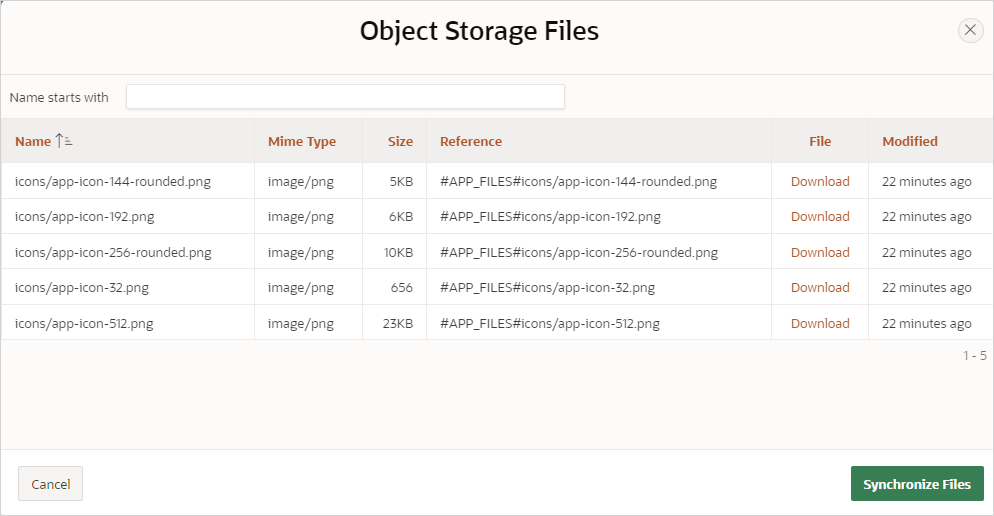
View or download static application files loaded to Object Storage on the Object Storage Files page.

To view static application files uploaded to OCI Object Storage:

  1. Navigate to the Shared Components page:
    1. On the Workspace home page, click App Builder.
    2. Select an application.
    3. On the Application home page, click Shared Components.

      The Shared Components page appears.

  2. Under Files and Reports, select Static Application Files.

    The Static Application Files page appears.

  3. Under Tasks, click View Object Storage Files.
  4. To narrow the display, enter keywords in the Name starts with field.

    To show all files again, delete any text entered in the Use Name starts field and press Enter.

    Tip:

    The first 1000 files in Object Storage are retrieved for this report. If the file or files you want to synchronize does not appear in this report, or you want to narrow the number of files considered for the synchronize operation, use Name starts with to narrow the results.
  5. To download a file, click the Download link adjacent to the appropriate file name.
  6. To synchronize the files, click Synchronize Files. See Synchronizing Files in Remote Storage.

16.12.4.3 Synchronizing Files in Remote Storage

Synchronize static application files stored in OCI Object Storage with those uploaded to the database.

To synchronize static application files uploaded to OCI Object Storage:

  1. Navigate to the Shared Components page:
    1. On the Workspace home page, click App Builder.
    2. Select an application.
    3. On the Application home page, click Shared Components.

      The Shared Components page appears.

  2. Under Files and Reports, select Static Application Files.

    The Static Application Files page appears.

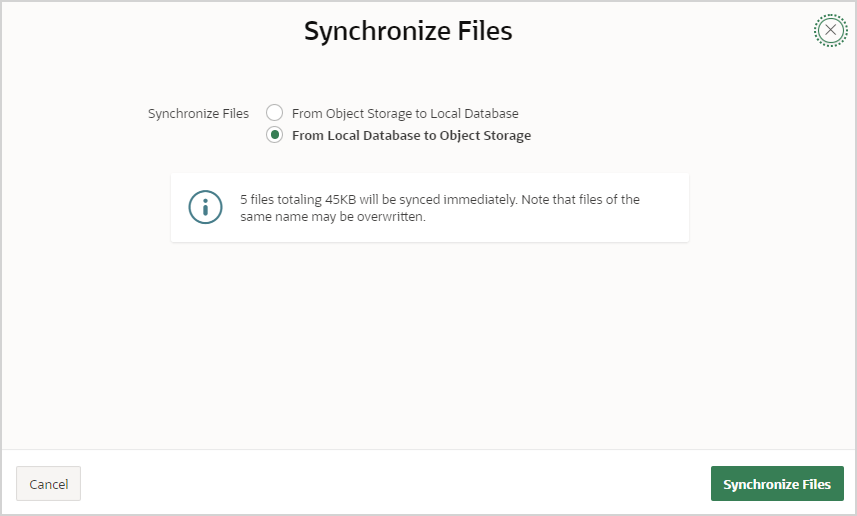
  3. Under Tasks, click Synchronize Files.

    The Synchronize Files page appears.

  4. For Synchronize Files - Select the synchronization direction. Options include:
    • From Object Storage to Local Database
    • From Local Database to Object Storage
  5. Click Synchronize Files.