Managing Messages
Administrators can create login and system messages to communicate with all system users, for example regarding privacy notices or access restrictions
- Defining a Login Message
Create messages that display on the Oracle Application Express Sign In page. - Defining a System Message
Create a system message that displays on the Workspace home page. - Creating a Site-Specific Tasks List
Create a Site-Specific Tasks list of links on the Workspace home page or Workspace login page.
Parent topic: Oracle Application Express Administration Services
Defining a Login Message
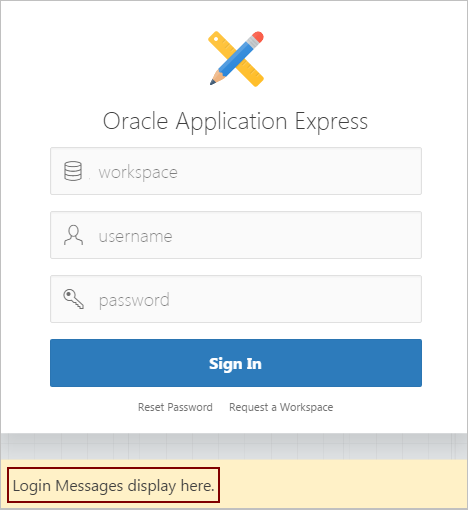
Create messages that display on the Oracle Application Express Sign In page.
- About Login Messages
Login messages display directly below the Oracle Application Express Sign In page. - Creating a Login Message
Instance administrators create login messages under Messages on the Manage Instance page. - Editing or Removing a Login Message
Instance administrators edit and remove login messages under Messages on the Manage Instance page.
Parent topic: Managing Messages
About Login Messages
Login messages display directly below the Oracle Application Express Sign In page.
Parent topic: Defining a Login Message
Creating a Login Message
Instance administrators create login messages under Messages on the Manage Instance page.
To create a login message:
- Sign in to Oracle Application Express Administration Services.
- Click Manage Instance.
- Under Messages, click Define Login Message.
- In Message, enter a message. The message can contain any text and can optionally include HTML formatting.
- Click Apply Changes.
Parent topic: Defining a Login Message
Editing or Removing a Login Message
Instance administrators edit and remove login messages under Messages on the Manage Instance page.
To edit or remove a login message:
- Sign in to Oracle Application Express Administration Services.
- Click Manage Instance.
- Under Messages, click Define Login Message.
- In Message, edit or remove the text.
- Click Apply Changes.
Parent topic: Defining a Login Message
Defining a System Message
Create a system message that displays on the Workspace home page.
- About System Messages
System message display on the Workspace home page under News and Message. - Creating and Editing a System Message
Instance administrators create and edit system message.
Parent topic: Managing Messages
About System Messages
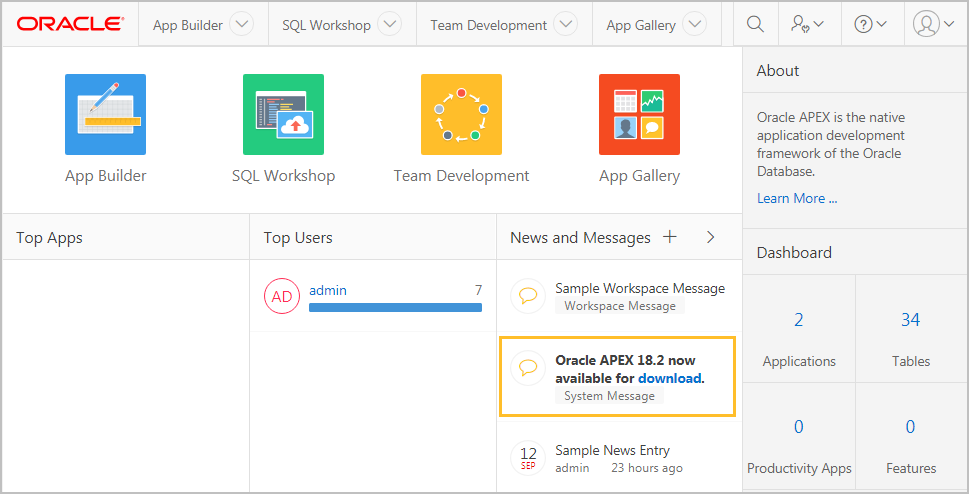
System message display on the Workspace home page under News and Message.
System messages display a gold icon to the left of message text. The textual identifier System Message also displays directly beneath the message text.
Parent topic: Defining a System Message
Creating and Editing a System Message
Instance administrators create and edit system message.
To create a system message:
- Sign in to Oracle Application Express Administration Services.
- Click Manage Instance.
- Under Messages, click Define System Message.
- In Message, enter a message. The message can contain any text and can include HTML formatting.
- Click Apply Changes.
Parent topic: Defining a System Message
Creating a Site-Specific Tasks List
Create a Site-Specific Tasks list of links on the Workspace home page or Workspace login page.
You can use the Site-Specific Tasks list to include to links to important user information such as training, discussion forums, and user feedback applications.
Tip:
The Site-Specific Tasks region only displays if links are defined.
- Adding a New Task
Instance administrators create a Site-Specific Tasks list under Manage Site-Specific Tasks on the Manage Instance page. - Editing an Existing Task
Instance administrators edit existing task on the Site-Specific Task page. - Deleting a Task
Instance administrators can delete existing task on the Site-Specific Task page.
Parent topic: Managing Messages
Adding a New Task
Instance administrators create a Site-Specific Tasks list under Manage Site-Specific Tasks on the Manage Instance page.
To add a new task to a Site-Specific Tasks list:
See Also:
"Using f?p Syntax to Link Pages" in Oracle Application Express App Builder User’s Guide
Parent topic: Creating a Site-Specific Tasks List
Editing an Existing Task
Instance administrators edit existing task on the Site-Specific Task page.
To edit an existing task:
Parent topic: Creating a Site-Specific Tasks List
Deleting a Task
Instance administrators can delete existing task on the Site-Specific Task page.
To delete an existing task:
Parent topic: Creating a Site-Specific Tasks List

